# Stable
> Explore Stable docs to integrate stablecoin payments, liquidity, and infrastructure securely into your platform.
## Stable에 오신 것을 환영합니다
 **스테이블(Stable)의 공식 문서에 오신 것을 환영합니다.**
현재 전 세계적으로 1,500억 달러 이상의 USDT가 유통되고 있으며, 3억 5천만 명 이상의 사용자가 이를 이용하고 있습니다. USDT는 중앙화 거래소, 탈중앙화 금융(DeFi), 국제 결제 등 다양한 분야에서 핵심적인 역할을 수행하고 있습니다. 그러나 기존 블록체인 인프라는 더 낮은 수수료, 더 빠른 속도, 더 높은 안정성에 대한 늘어나는 요구를 충족하는 데 한계를 보이고 있습니다.
Stable은 이러한 요구를 해결하기 위해 설계된 블록체인입니다. 실제로 USDT를 사용하는 다양한 환경에 최적화되어 있으며, 확장성, 보안성, 사용자 편의성을 모두 갖추고 있습니다. 개발 도상국의 개인 사용자부터 대량의 거래를 처리하는 금융기관까지, 누구나 USDT를 더욱 빠르고 저렴하게 전송할 수 있는 최적의 환경을 제공합니다.
Stable은 1초 이하 수준의 거래 완결을 지원하는 고성능 레이어 1 블록체인으로, USDT의 발행 및 정산 레이어 역할을 수행하며, 주요 특징은 다음과 같습니다:
* **USDT를 위한 최적화**: Stable은 USDT에 특화된 기능을 제공합니다. 여기에는 대규모 USDT 전송 최적화, 효율적인 USDT 발행 및 정산 기능이 포함됩니다.
* **일상 사용에 적합한 사용성**: 모든 거래는 1초 이내에 완결되며, 수수료도 매우 낮습니다. 사용이 간편한 지갑과 신용/직불 카드 통합 기능을 통해 누구나 쉽고 편리하게 자산을 관리하고 전송할 수 있습니다.
* **기업 맞춤형 기능**: Stable은 기관을 위한 고급 기능을 제공합니다. 보장된 블록스페이스 할당, 빠른 USDT 거래 처리, 트랜잭션 집계를 통한 대규모 거래 지원, 그리고 규제 준수를 고려한 개인 정보 보호 기능도 포함됩니다.
### 시작하기
이 가이드는 일반 사용자, 개발자, 기관 등 누구나 쉽게 이해하고 활용할 수 있도록 만들어졌습니다.
* [**Why Stable**](/ko/introduction/why-stable) — USDT를 가스 토큰으로 사용하는 고성능 스테이블체인
* [**Stable for Users**](/ko/introduction/stable-for-users) — Stable이 당신의 일상을 어떻게 개선하는지 알아보세요
* [**Technical Roadmap**](/ko/introduction/technical-roadmap) — Stable의 기술 로드맵에 대해 더 알아보세요
* [**FAQ**](/ko/introduction/faq) — 자주 묻는 질문
### Stable의 기술
Stable의 기술 및 핵심 기능에 대해 깊이 있게 살펴보세요
* [**Tech Overview**](/ko/architecture/tech-overview) — Stable의 최첨단 기술
* [**Key Features**](/ko/architecture/key-features) — Stable만의 차별화된 기능
* [**Core Optimization**](/ko/architecture/core-optimization/overview) — 고성능 스테이블체인을 위한 핵심 최적화 요소들
* [**USDT-Specific Features**](/ko/architecture/usdt-specific-features/overview) — USDT 거래에 특화되어 설계된 기능들
## Brand Kit
아래에서 Stable 브랜드 키트를 확인하실 수 있습니다. 이 키트에는 다양한 형식의 로고와 컬러 팔레트가 포함되어 있으며, 프로젝트나 커뮤니케이션에서 Stable의 브랜딩을 일관되게 유지할 수 있도록 설계되었습니다.
[Stable Brand Kit 확인하기](https://www.stable.xyz/brand-kit)
## 공식 링크
* 웹사이트: [https://stable.xyz](https://stable.xyz)
* X(트위터): [https://x.com/stable](https://x.com/stable)
* 디스코드: [https://discord.gg/stablexyz](https://discord.gg/stablexyz)
## FAQ
### 일반 정보
**Stable이란 무엇인가요?**
Stable은 USDT를 위한 전용 네트워크로 설계된 **고성능 블록체인**으로, USDT의 글로벌 전송 방식을 혁신하는 것을 목표로 합니다.
**Stable은 다른 블록체인과 무엇이 다른가요?**
Stable은 USDT에 최적화된 고성능 네트워크입니다. USDT를 기본 가스 토큰으로 사용하고, 보장된 블록스페이스, USDT0 전송 집계 기능 등을 제공하며, 모두 높은 확장성의 아키텍처를 기반으로 구축되어 있습니다.
### 기술 특징
**Stable은 확장성을 어떻게 향상시키나요?**
Stable은 트랜잭션 라이프사이클 내 모든 단계 - State DB, 실행 엔진, 합의, USDT 전용 최적화 - 를 업그레이드하는 풀스택 접근 방식을 사용합니다.
**Stable이 향후 DAG 기반 합의로 업그레이드될 수 있나요?**
네. StableBFT와 호환되지 않는 Narwhal 및 Tusk와 달리, Autobahn은 DAG 기반 PBFT 아키텍처를 제공하며, Stable의 합의 계층과 자연스럽게 통합될 수 있습니다.
**Stable은 EVM 호환되나요? 기존 dApp을 이식할 수 있나요?**
네. Stable은 완전한 EVM 호환성을 가지며, 사용자 및 개발자는 기존 Ethereum 스마트 컨트랙트, 툴, 지갑 등을 그대로 사용할 수 있습니다.
### USDT 관련 기능
**Stable에서 USDT0를 어떻게 받을 수 있나요?**
USDT0는 OFT 표준을 따르기 때문에, LayerZero 브릿지를 통해 다른 네트워크에서 쉽게 Stable로 USDT0를 옮길 수 있습니다.
**Stable의 기타 USDT 전용 기능은 무엇이 있나요?**
다음과 같은 기능들이 추가될 예정입니다.
* 보장된 블록스페이스: 기관 사용자가 네트워크 혼잡 여부와 무관하게 예측 가능한 레이턴시와 비용으로 블록 공간을 확보할 수 있도록 합니다
* USDT 전송 집계: 여러 개의 USDT0 전송을 묶어서 처리하여, 처리량을 향상하고 오버헤드를 감소시킵니다.
* 기밀 전송: 거래 금액에 대한 프라이버시를 보호하면서도 규제를 준수할 수 있습니다.
**Stable Pay이란 무엇인가요?**
Stable Pay은 초보자와 고급 사용자 모두를 위한 간단하고 직관적인 탈중앙화 지갑입니다. 소셜 로그인 등으로 쉽게 온보딩할 수 있으며, 기존 지갑도 별도 마이그레이션 없이 연결 가능합니다. 웹과 모바일 모두에서 제공되어, 언제 어디서나 안전한 자산 접근이 가능합니다.
## 사용자들을 위한 Stable
Stable은 각각의 사용자 그룹(기관, 사용자, 개발자)에 맞춘 기능을 통해 금융 효율성을 높이고 비즈니스 운영을 최적화합니다.
### 기업을 위한, 높은 신뢰성을 갖춘 맞춤형 기능
USDT를 중심으로 스테이블코인의 글로벌 도입이 빠르게 확산되며, Stable은 이 성장을 선도할 수 있는 전략적 위치에 있습니다. 2030년까지 스테이블코인 시장은 2.8조 달러 규모로 성장할 것으로 전망되며, 이는 기관 투자 확대와 시장 통합 측면에서 엄청난 기회를 의미합니다.
Stable은 기관이 효과적이고 안전하며 비용 효율적으로 USDT를 결제 및 정산할 수 있도록 다음과 같은 기능을 제공합니다:
* **보장된 블록스페이스 (예정)**: 블록체인 인프라를 사용하는 기업들은 일관적인 트랜잭션 레이턴시를 위해 보장된 블록스페이스가 필요합니다. Stable은 네트워크 혼잡 시에도 트랜잭션이 지연되지 않고 처리될 수 있도록 기업에게 사전 할당된 블록스페이스를 제공합니다.
* **USDT 전송 최적화**: Stable은 USDT의 발행, 정산 및 일상적인 트랜잭션들의 효율을 증가시켜, 고가치의 USDT 거래도 빠르고 안전하게 처리합니다.
* **높은 트랜잭션 확장성**: Stable은 수천 건 이상의 트랜잭션들을 신속히 처리하여, 기업들의 대규모 거래를 즉시 정산할 수 있습니다. 또한, USDT 전송 집계 기능을 통해 확장 가능한 대규모 트랜잭션 인프라를 구현합니다.
* **보안성과 신뢰성**: Stable은 강력한 보안 체계를 갖추고 있어 거래와 자산을 포괄적으로 보호합니다. 안정적인 아키텍처를 기반으로 고액 결제 및 주요 금융 작업을 신뢰할 수 있게 지원합니다.
* **기밀 전송 (예정)**: Stable은 엔터프라이즈급 기밀 전송 기능을 제공하여, 기관들로 하여금 거래 내역을 공개하지 않고도 규제를 준수할 수 있도록 합니다. 고급 암호화 기술을 활용해 민감한 거래 데이터는 외부에 노출되지 않지만, 권한이 있는 기관에 의해 감사가 가능한 형태로 유지됩니다. 이를 통해 기관은 AML/KYC 및 회계 감사와 같은 규제 요구사항에 따른 투명성을 유지하면서도, 핵심 정보 보호라는 필요를 균형 있게 충족할 수 있습니다. 이러한 기능은 금융 규제 속에서 신뢰성과 운영 안정성을 높이는 데 기여합니다.
#### 기관을 위한 실제 활용 사례
Stable은 기관의 운영 효율화를 위한 직관적인 기능들을 제공합니다:
* **스테이블코인 결제 솔루션**: USDT가 연동된 직불/신용카드를 통해 손쉽게 결제할 수 있는 기능을 제공합니다.
* **기업용 결제 단말기**: 중개자나 수수료 없이 기업이 직접 USDT를 받을 수 있어, 네트워크 혼잡 상황에서도 예측 가능한 방식으로 운영 비용을 절감할 수 있습니다.
### 일반 사용자를 위한, 저렴하고 직관적인 사용 경험
Stable은 일상적인 USDT 전송을 빠르고 저렴하게 만들기 위해 설계되었습니다. 이는 USDT의 빈번한 송금, 결제 및 정산을 위한 플랫폼을 찾는 사용자에게 최적화된 환경입니다. Stable이 일상적인 금융 활동을 촉진하는 방식은 다음과 같습니다:
* **빠르고 신뢰성 높은 트랜잭션**: 인프라 최적화를 통해, Stable의 모든 트랜잭션은 1초 이내에 완결됩니다.
* **직관적인 사용자 경험**: Stable Pay은 자산의 송금, 수령, 관리를 매우 간편하게 만드는, 직관적인 인터페이스를 제공합니다.
* **편리한 결제 수단**: Stable은 유명 결제 네트워크들과 연동되어, 직불 및 신용카드를 통해 스테이블코인을 쉽게 실생활에서 사용할 수 있도록 합니다.
* **크로스체인 USDT 전송**: LayerZero 기반 USDT0를 통해 체인 간 자유로운 USDT 전송이 가능합니다.
Stable은 은행 접근성이 부족한 지역의 사용자들까지 USDT를 쓸 수 있게 만들어, 전세계 누구나 금융에 참여할 수 있는 솔루션을 제공하는 것을 목표로 합니다. Stable을 사용하면 매우 작은 비용으로 국경 없는 거래와 일상적인 결제를 할 수 있고, 이는 모든 사용자에게 더 큰 금융 유연성과 편리함을 제공합니다.
Stable은 일상적인 USDT 거래를 위한 최적의 솔루션으로, 여러분의 금융 활동을 더 빠르고, 더 간단하며, 더욱 효율적으로 만들어줍니다.
### 개발자를 위한, 최적화된 EVM 기반 레이어 1
Stable은 USDT의 발행, 정산, 관리에 특화된 초고속 블록 생성 및 확정을 가진 Stablechain입니다. 높은 성능, 보안, 사용성을 요구하는 스테이블코인 기반 트랜잭션의 요구에 맞게, Stable은 USDT를 기반으로 확장 가능한 탈중앙화 앱(dApp) 및 인프라 솔루션을 쉽게 개발할 수 있는 기반을 제공합니다. 다음은 Stable의 주요 기술 사양입니다.
* **1초 이내의 블록 완결**: 트랜잭션은 실시간으로 완결되어, 즉각적인 정산이 가능합니다.
* **위임 지분 증명(dPoS)**: StableBFT라는 강력하고 안정적인 합의 메커니즘을 사용하며, 향후 더 높은 확장성을 위해 DAG 기반 합의를 도입할 예정입니다.
* **100% EVM 호환**: 이더리움 스마트 컨트랙트를 그대로 실행할 수 있는 Stable EVM을 통해, 개발자들은 Etherscan, MetaMask와 같은 익숙한 이더리움 툴들에 문제 없이 접근할 수 있습니다.
#### 개발자 도구 및 리소스
Stable은 dApp 개발과 생태계 통합을 간소화하기 위한 종합 개발 도구 세트를 제공합니다:
* **Stable EVM**: 이더리움과 호환되는 Stable의 실행 레이어로, 기존의 이더리움 도구와 지갑을 그대로 활용해 Stable 체인과 매끄럽게 상호작용할 수 있도록 지원합니다. 또한 Stable EVM과 Stable SDK 간의 연동을 위한 프리컴파일 세트를 도입하여, EVM 스마트컨트랙트에서 핵심 체인 로직을 안전하고 아토믹하게 호출할 수 있게 합니다.
* **강화된 스마트 컨트랙트 기능**: 프리컴파일 컨트랙트 인터페이스를 통해 EVM 컨트랙트와 Stable SDK 모듈 간의 통신을 간소화하여, 복잡한 모듈 간 트랜잭션을 쉽게 처리할 수 있습니다.
* **Stable Pay**: 브리지, 토큰 전송, 스테이킹, 거버넌스, DeFi 유틸리티 등 블록체인의 모든 기능을 하나의 지갑에서 제공하여, 웹 2.5 수준의 매끄러운 사용자 경험을 제공합니다.
#### 기술 로드맵 및 향후 개발 계획
Stable은 견고하고 확장 가능하며 높은 성능을 가진 인프라를 구축하기 위해, 여러 단계에 걸친 로드맵을 가지고 있습니다:
* **고성능 레이어 1**: 상태 DB, 합의, 실행 등 블록체인의 모든 구성 요소를 연구하고 최적화하여, 체인의 전반적인 처리 성능을 향상시킬 계획입니다.
* **실생활 적용 사례**: Stable의 고유한 강점을 활용해, 결제, 기업 거래, 소비자 금융 서비스 등 현실 세계에서 활용 가능한 애플리케이션을 출시할 예정입니다.
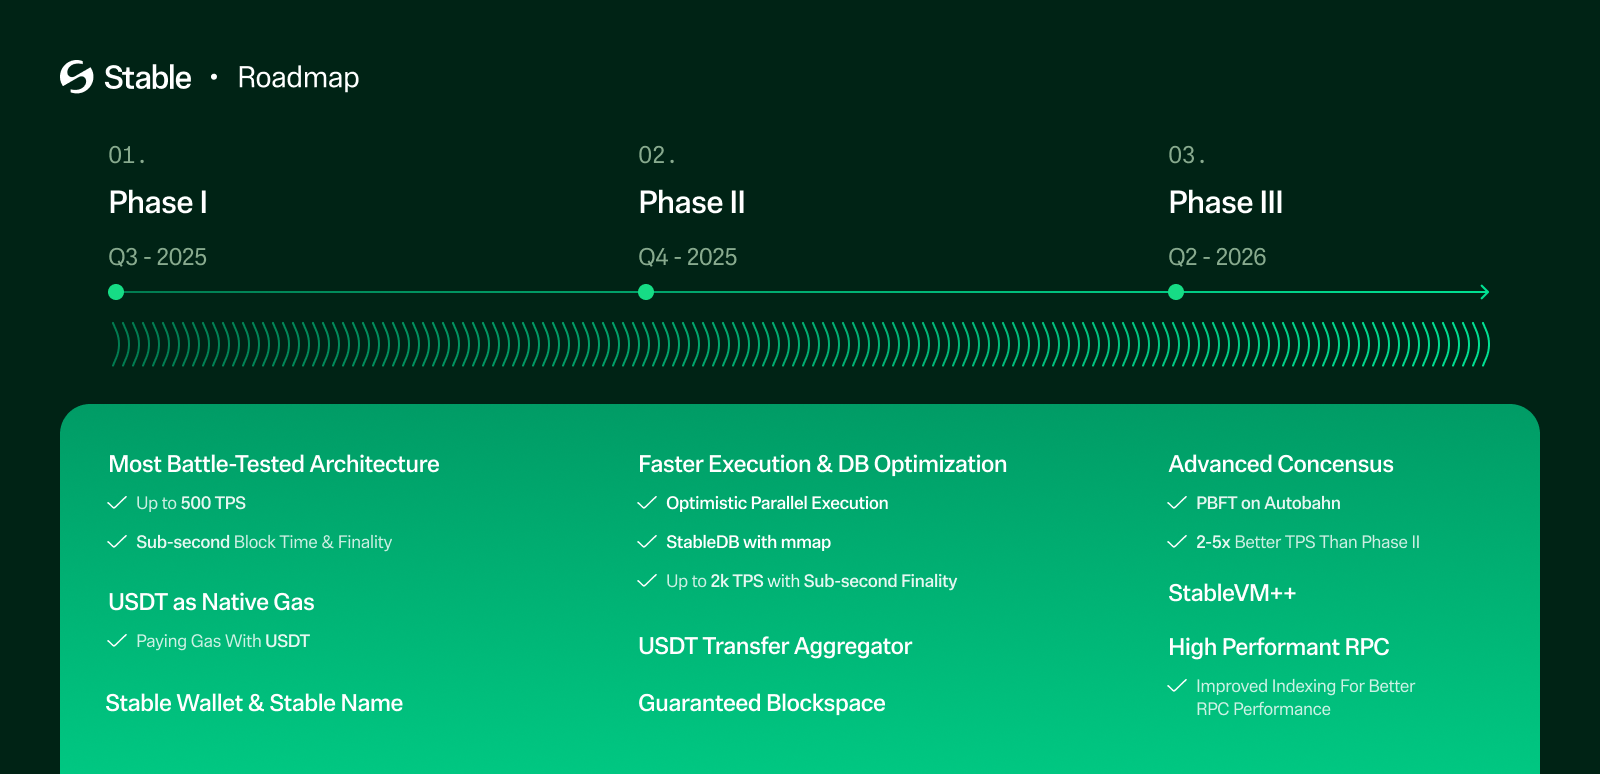
## 기술 로드맵
### 모든 레이어를 최적화하기 위한 Stable의 접근법
사용자가 트랜잭션을 제출하기부터 결과를 받기까지의 라이프사이클은 여러 단계로 구성됩니다. 우선 트랜잭션은 RPC를 통해 전파되고, 멤풀에 저장되며, 블록에 포함된 다음, 합의를 통해 검증되고 실행되어, 마침내 데이터베이스에 결과 상태가 저장됩니다. 이러한 단계를 거쳐야만 사용자는 최종 결과를 받아볼 수 있습니다.
이 중 어느 단계라도 최적화되지 않는다면, 전체 시스템의 성능이 악화됩니다. Stable은 트랜잭션 파이프라인의 각 단계를 최적화하여 성능을 극대화하고 레이턴시를 최소화하는 것을 목표로 합니다.
Stable의 핵심 기술은 여러 페이즈에 걸쳐 출시될 것이며, 각각은 트랜잭션 완결성을 희생하지 않으면서 전반적인 초당 트랜잭션 수(TPS)를 증가시키도록 설계되었습니다.
아래 섹션은 현재 블록체인 아키텍처 내 일반적인 병목과, Stable이 최적화하려고 하는 것들에 대해 설명합니다.
**스테이블(Stable)의 공식 문서에 오신 것을 환영합니다.**
현재 전 세계적으로 1,500억 달러 이상의 USDT가 유통되고 있으며, 3억 5천만 명 이상의 사용자가 이를 이용하고 있습니다. USDT는 중앙화 거래소, 탈중앙화 금융(DeFi), 국제 결제 등 다양한 분야에서 핵심적인 역할을 수행하고 있습니다. 그러나 기존 블록체인 인프라는 더 낮은 수수료, 더 빠른 속도, 더 높은 안정성에 대한 늘어나는 요구를 충족하는 데 한계를 보이고 있습니다.
Stable은 이러한 요구를 해결하기 위해 설계된 블록체인입니다. 실제로 USDT를 사용하는 다양한 환경에 최적화되어 있으며, 확장성, 보안성, 사용자 편의성을 모두 갖추고 있습니다. 개발 도상국의 개인 사용자부터 대량의 거래를 처리하는 금융기관까지, 누구나 USDT를 더욱 빠르고 저렴하게 전송할 수 있는 최적의 환경을 제공합니다.
Stable은 1초 이하 수준의 거래 완결을 지원하는 고성능 레이어 1 블록체인으로, USDT의 발행 및 정산 레이어 역할을 수행하며, 주요 특징은 다음과 같습니다:
* **USDT를 위한 최적화**: Stable은 USDT에 특화된 기능을 제공합니다. 여기에는 대규모 USDT 전송 최적화, 효율적인 USDT 발행 및 정산 기능이 포함됩니다.
* **일상 사용에 적합한 사용성**: 모든 거래는 1초 이내에 완결되며, 수수료도 매우 낮습니다. 사용이 간편한 지갑과 신용/직불 카드 통합 기능을 통해 누구나 쉽고 편리하게 자산을 관리하고 전송할 수 있습니다.
* **기업 맞춤형 기능**: Stable은 기관을 위한 고급 기능을 제공합니다. 보장된 블록스페이스 할당, 빠른 USDT 거래 처리, 트랜잭션 집계를 통한 대규모 거래 지원, 그리고 규제 준수를 고려한 개인 정보 보호 기능도 포함됩니다.
### 시작하기
이 가이드는 일반 사용자, 개발자, 기관 등 누구나 쉽게 이해하고 활용할 수 있도록 만들어졌습니다.
* [**Why Stable**](/ko/introduction/why-stable) — USDT를 가스 토큰으로 사용하는 고성능 스테이블체인
* [**Stable for Users**](/ko/introduction/stable-for-users) — Stable이 당신의 일상을 어떻게 개선하는지 알아보세요
* [**Technical Roadmap**](/ko/introduction/technical-roadmap) — Stable의 기술 로드맵에 대해 더 알아보세요
* [**FAQ**](/ko/introduction/faq) — 자주 묻는 질문
### Stable의 기술
Stable의 기술 및 핵심 기능에 대해 깊이 있게 살펴보세요
* [**Tech Overview**](/ko/architecture/tech-overview) — Stable의 최첨단 기술
* [**Key Features**](/ko/architecture/key-features) — Stable만의 차별화된 기능
* [**Core Optimization**](/ko/architecture/core-optimization/overview) — 고성능 스테이블체인을 위한 핵심 최적화 요소들
* [**USDT-Specific Features**](/ko/architecture/usdt-specific-features/overview) — USDT 거래에 특화되어 설계된 기능들
## Brand Kit
아래에서 Stable 브랜드 키트를 확인하실 수 있습니다. 이 키트에는 다양한 형식의 로고와 컬러 팔레트가 포함되어 있으며, 프로젝트나 커뮤니케이션에서 Stable의 브랜딩을 일관되게 유지할 수 있도록 설계되었습니다.
[Stable Brand Kit 확인하기](https://www.stable.xyz/brand-kit)
## 공식 링크
* 웹사이트: [https://stable.xyz](https://stable.xyz)
* X(트위터): [https://x.com/stable](https://x.com/stable)
* 디스코드: [https://discord.gg/stablexyz](https://discord.gg/stablexyz)
## FAQ
### 일반 정보
**Stable이란 무엇인가요?**
Stable은 USDT를 위한 전용 네트워크로 설계된 **고성능 블록체인**으로, USDT의 글로벌 전송 방식을 혁신하는 것을 목표로 합니다.
**Stable은 다른 블록체인과 무엇이 다른가요?**
Stable은 USDT에 최적화된 고성능 네트워크입니다. USDT를 기본 가스 토큰으로 사용하고, 보장된 블록스페이스, USDT0 전송 집계 기능 등을 제공하며, 모두 높은 확장성의 아키텍처를 기반으로 구축되어 있습니다.
### 기술 특징
**Stable은 확장성을 어떻게 향상시키나요?**
Stable은 트랜잭션 라이프사이클 내 모든 단계 - State DB, 실행 엔진, 합의, USDT 전용 최적화 - 를 업그레이드하는 풀스택 접근 방식을 사용합니다.
**Stable이 향후 DAG 기반 합의로 업그레이드될 수 있나요?**
네. StableBFT와 호환되지 않는 Narwhal 및 Tusk와 달리, Autobahn은 DAG 기반 PBFT 아키텍처를 제공하며, Stable의 합의 계층과 자연스럽게 통합될 수 있습니다.
**Stable은 EVM 호환되나요? 기존 dApp을 이식할 수 있나요?**
네. Stable은 완전한 EVM 호환성을 가지며, 사용자 및 개발자는 기존 Ethereum 스마트 컨트랙트, 툴, 지갑 등을 그대로 사용할 수 있습니다.
### USDT 관련 기능
**Stable에서 USDT0를 어떻게 받을 수 있나요?**
USDT0는 OFT 표준을 따르기 때문에, LayerZero 브릿지를 통해 다른 네트워크에서 쉽게 Stable로 USDT0를 옮길 수 있습니다.
**Stable의 기타 USDT 전용 기능은 무엇이 있나요?**
다음과 같은 기능들이 추가될 예정입니다.
* 보장된 블록스페이스: 기관 사용자가 네트워크 혼잡 여부와 무관하게 예측 가능한 레이턴시와 비용으로 블록 공간을 확보할 수 있도록 합니다
* USDT 전송 집계: 여러 개의 USDT0 전송을 묶어서 처리하여, 처리량을 향상하고 오버헤드를 감소시킵니다.
* 기밀 전송: 거래 금액에 대한 프라이버시를 보호하면서도 규제를 준수할 수 있습니다.
**Stable Pay이란 무엇인가요?**
Stable Pay은 초보자와 고급 사용자 모두를 위한 간단하고 직관적인 탈중앙화 지갑입니다. 소셜 로그인 등으로 쉽게 온보딩할 수 있으며, 기존 지갑도 별도 마이그레이션 없이 연결 가능합니다. 웹과 모바일 모두에서 제공되어, 언제 어디서나 안전한 자산 접근이 가능합니다.
## 사용자들을 위한 Stable
Stable은 각각의 사용자 그룹(기관, 사용자, 개발자)에 맞춘 기능을 통해 금융 효율성을 높이고 비즈니스 운영을 최적화합니다.
### 기업을 위한, 높은 신뢰성을 갖춘 맞춤형 기능
USDT를 중심으로 스테이블코인의 글로벌 도입이 빠르게 확산되며, Stable은 이 성장을 선도할 수 있는 전략적 위치에 있습니다. 2030년까지 스테이블코인 시장은 2.8조 달러 규모로 성장할 것으로 전망되며, 이는 기관 투자 확대와 시장 통합 측면에서 엄청난 기회를 의미합니다.
Stable은 기관이 효과적이고 안전하며 비용 효율적으로 USDT를 결제 및 정산할 수 있도록 다음과 같은 기능을 제공합니다:
* **보장된 블록스페이스 (예정)**: 블록체인 인프라를 사용하는 기업들은 일관적인 트랜잭션 레이턴시를 위해 보장된 블록스페이스가 필요합니다. Stable은 네트워크 혼잡 시에도 트랜잭션이 지연되지 않고 처리될 수 있도록 기업에게 사전 할당된 블록스페이스를 제공합니다.
* **USDT 전송 최적화**: Stable은 USDT의 발행, 정산 및 일상적인 트랜잭션들의 효율을 증가시켜, 고가치의 USDT 거래도 빠르고 안전하게 처리합니다.
* **높은 트랜잭션 확장성**: Stable은 수천 건 이상의 트랜잭션들을 신속히 처리하여, 기업들의 대규모 거래를 즉시 정산할 수 있습니다. 또한, USDT 전송 집계 기능을 통해 확장 가능한 대규모 트랜잭션 인프라를 구현합니다.
* **보안성과 신뢰성**: Stable은 강력한 보안 체계를 갖추고 있어 거래와 자산을 포괄적으로 보호합니다. 안정적인 아키텍처를 기반으로 고액 결제 및 주요 금융 작업을 신뢰할 수 있게 지원합니다.
* **기밀 전송 (예정)**: Stable은 엔터프라이즈급 기밀 전송 기능을 제공하여, 기관들로 하여금 거래 내역을 공개하지 않고도 규제를 준수할 수 있도록 합니다. 고급 암호화 기술을 활용해 민감한 거래 데이터는 외부에 노출되지 않지만, 권한이 있는 기관에 의해 감사가 가능한 형태로 유지됩니다. 이를 통해 기관은 AML/KYC 및 회계 감사와 같은 규제 요구사항에 따른 투명성을 유지하면서도, 핵심 정보 보호라는 필요를 균형 있게 충족할 수 있습니다. 이러한 기능은 금융 규제 속에서 신뢰성과 운영 안정성을 높이는 데 기여합니다.
#### 기관을 위한 실제 활용 사례
Stable은 기관의 운영 효율화를 위한 직관적인 기능들을 제공합니다:
* **스테이블코인 결제 솔루션**: USDT가 연동된 직불/신용카드를 통해 손쉽게 결제할 수 있는 기능을 제공합니다.
* **기업용 결제 단말기**: 중개자나 수수료 없이 기업이 직접 USDT를 받을 수 있어, 네트워크 혼잡 상황에서도 예측 가능한 방식으로 운영 비용을 절감할 수 있습니다.
### 일반 사용자를 위한, 저렴하고 직관적인 사용 경험
Stable은 일상적인 USDT 전송을 빠르고 저렴하게 만들기 위해 설계되었습니다. 이는 USDT의 빈번한 송금, 결제 및 정산을 위한 플랫폼을 찾는 사용자에게 최적화된 환경입니다. Stable이 일상적인 금융 활동을 촉진하는 방식은 다음과 같습니다:
* **빠르고 신뢰성 높은 트랜잭션**: 인프라 최적화를 통해, Stable의 모든 트랜잭션은 1초 이내에 완결됩니다.
* **직관적인 사용자 경험**: Stable Pay은 자산의 송금, 수령, 관리를 매우 간편하게 만드는, 직관적인 인터페이스를 제공합니다.
* **편리한 결제 수단**: Stable은 유명 결제 네트워크들과 연동되어, 직불 및 신용카드를 통해 스테이블코인을 쉽게 실생활에서 사용할 수 있도록 합니다.
* **크로스체인 USDT 전송**: LayerZero 기반 USDT0를 통해 체인 간 자유로운 USDT 전송이 가능합니다.
Stable은 은행 접근성이 부족한 지역의 사용자들까지 USDT를 쓸 수 있게 만들어, 전세계 누구나 금융에 참여할 수 있는 솔루션을 제공하는 것을 목표로 합니다. Stable을 사용하면 매우 작은 비용으로 국경 없는 거래와 일상적인 결제를 할 수 있고, 이는 모든 사용자에게 더 큰 금융 유연성과 편리함을 제공합니다.
Stable은 일상적인 USDT 거래를 위한 최적의 솔루션으로, 여러분의 금융 활동을 더 빠르고, 더 간단하며, 더욱 효율적으로 만들어줍니다.
### 개발자를 위한, 최적화된 EVM 기반 레이어 1
Stable은 USDT의 발행, 정산, 관리에 특화된 초고속 블록 생성 및 확정을 가진 Stablechain입니다. 높은 성능, 보안, 사용성을 요구하는 스테이블코인 기반 트랜잭션의 요구에 맞게, Stable은 USDT를 기반으로 확장 가능한 탈중앙화 앱(dApp) 및 인프라 솔루션을 쉽게 개발할 수 있는 기반을 제공합니다. 다음은 Stable의 주요 기술 사양입니다.
* **1초 이내의 블록 완결**: 트랜잭션은 실시간으로 완결되어, 즉각적인 정산이 가능합니다.
* **위임 지분 증명(dPoS)**: StableBFT라는 강력하고 안정적인 합의 메커니즘을 사용하며, 향후 더 높은 확장성을 위해 DAG 기반 합의를 도입할 예정입니다.
* **100% EVM 호환**: 이더리움 스마트 컨트랙트를 그대로 실행할 수 있는 Stable EVM을 통해, 개발자들은 Etherscan, MetaMask와 같은 익숙한 이더리움 툴들에 문제 없이 접근할 수 있습니다.
#### 개발자 도구 및 리소스
Stable은 dApp 개발과 생태계 통합을 간소화하기 위한 종합 개발 도구 세트를 제공합니다:
* **Stable EVM**: 이더리움과 호환되는 Stable의 실행 레이어로, 기존의 이더리움 도구와 지갑을 그대로 활용해 Stable 체인과 매끄럽게 상호작용할 수 있도록 지원합니다. 또한 Stable EVM과 Stable SDK 간의 연동을 위한 프리컴파일 세트를 도입하여, EVM 스마트컨트랙트에서 핵심 체인 로직을 안전하고 아토믹하게 호출할 수 있게 합니다.
* **강화된 스마트 컨트랙트 기능**: 프리컴파일 컨트랙트 인터페이스를 통해 EVM 컨트랙트와 Stable SDK 모듈 간의 통신을 간소화하여, 복잡한 모듈 간 트랜잭션을 쉽게 처리할 수 있습니다.
* **Stable Pay**: 브리지, 토큰 전송, 스테이킹, 거버넌스, DeFi 유틸리티 등 블록체인의 모든 기능을 하나의 지갑에서 제공하여, 웹 2.5 수준의 매끄러운 사용자 경험을 제공합니다.
#### 기술 로드맵 및 향후 개발 계획
Stable은 견고하고 확장 가능하며 높은 성능을 가진 인프라를 구축하기 위해, 여러 단계에 걸친 로드맵을 가지고 있습니다:
* **고성능 레이어 1**: 상태 DB, 합의, 실행 등 블록체인의 모든 구성 요소를 연구하고 최적화하여, 체인의 전반적인 처리 성능을 향상시킬 계획입니다.
* **실생활 적용 사례**: Stable의 고유한 강점을 활용해, 결제, 기업 거래, 소비자 금융 서비스 등 현실 세계에서 활용 가능한 애플리케이션을 출시할 예정입니다.
## 기술 로드맵
### 모든 레이어를 최적화하기 위한 Stable의 접근법
사용자가 트랜잭션을 제출하기부터 결과를 받기까지의 라이프사이클은 여러 단계로 구성됩니다. 우선 트랜잭션은 RPC를 통해 전파되고, 멤풀에 저장되며, 블록에 포함된 다음, 합의를 통해 검증되고 실행되어, 마침내 데이터베이스에 결과 상태가 저장됩니다. 이러한 단계를 거쳐야만 사용자는 최종 결과를 받아볼 수 있습니다.
이 중 어느 단계라도 최적화되지 않는다면, 전체 시스템의 성능이 악화됩니다. Stable은 트랜잭션 파이프라인의 각 단계를 최적화하여 성능을 극대화하고 레이턴시를 최소화하는 것을 목표로 합니다.
Stable의 핵심 기술은 여러 페이즈에 걸쳐 출시될 것이며, 각각은 트랜잭션 완결성을 희생하지 않으면서 전반적인 초당 트랜잭션 수(TPS)를 증가시키도록 설계되었습니다.
아래 섹션은 현재 블록체인 아키텍처 내 일반적인 병목과, Stable이 최적화하려고 하는 것들에 대해 설명합니다.
 ### 페이즈 1 – USDT를 위한 기반 레이어
#### StableBFT
초기 Stable 블록체인은 StableBFT를 활용합니다. 이는 CometBFT를 기반으로 높은 처리량, 낮은 레이턴시, 그리고 강력한 신뢰성을 제공하기 위한 맞춤형 PoS 프로토콜입니다. 이는 결정론적인 완결성과 최대 1/3의 밸리데이터 장애 허용(fault tolerance)이라는 특징을 가지고 있습니다. 향후 Stable은 DAG 기반 합의로의 업그레이드를 통해 5배 빠른 합의 속도를 달성할 예정입니다.
#### USDT를 네이티브 가스로
Stable에서는 USDT0를 네이티브 가스 토큰으로 사용합니다. USDT0는 가스 결제와 가치 전송을 위한 네이티브 자산으로 동시에 기능하며, `approve`, `transfer`, `transferFrom`, `permit`을 지원하는 ERC20 토큰으로도 동작합니다.
#### Stable Pay & Stable Name
Stable Pay은 탈중앙화 금융의 사용성을 크게 향상하기 위해 설계되었습니다. 현재 Web3 지갑들에는 가파른 학습 곡선 문제가 존재하며, Stable은 Web2.5 UX를 가진 지갑 경험을 도입하는 방식으로 이 문제를 해결합니다. 이를 통해 새로운 사용자들의 온보딩을 간소화하는 동시에, 기존 크립토 사용자들과도 호환될 수 있게 할 수 있습니다. 새로운 사용자들은 직관적인 디자인과 원활한 셋업 프로세스(소셜 로그인 등)를 통해 쉽게 온보딩할 수 있으며, 기존 크립토 유저들은 가지고 있던 지갑을 Stable에 그대로 가져와 마이그레이션 없이 사용할 수 있습니다. Stable Pay은 웹 앱과 모바일 앱 양쪽으로 제공되어, 모든 기기에서 안전하게 디지털 자산에 접근할 수 있습니다.
지갑에 더해, Stable은 복잡하고 오류가 잦은 EVM 공개 주소 포맷을 고유하고 사람이 읽을 수 있는 형태로 바꾸는 Stable Name을 도입합니다. 사용자들은 긴 16진수 문자열을 관리할 필요 없이 Stable Name으로 간편하게 토큰을 주고받을 수 있습니다. 이 방식은 거래 상 오류를 크게 줄이고 크립토 자산과 상호작용할 때의 전반적인 경험을 증진하여, Stable을 블록체인 생태계로 진입하는 강력하고 사용자 중심적인 출발점으로 만들어줍니다.
### 페이즈 2 – USDT를 위한 경험 레이어
#### 낙관적 병렬 실행
실제 운영 환경의 통계에 따르면, 전체 트랜잭션의 약 60\~80%는 서로 겹치지 않는 상태를 다루기 때문에, 병렬로 안전하게 실행될 수 있습니다. 그러나 대부분의 블록체인 시스템은 여전히 트랜잭션을 순차적으로 처리하며, 이로 인해 불필요한 지연이 발생하고 있습니다.
Stable은 이러한 한계를 극복하기 위해 낙관적 병렬 실행(Optimistic Parallel Execution) 모델을 채택합니다. 초기에는 상태 충돌이 없다는 가정 하에 트랜잭션을 병렬로 실행하고, 충돌이 감지되면 해당 트랜잭션만 롤백 후 순차적으로 재실행합니다. 이 방식은 정확성을 유지하면서도 처리량을 크게 향상시킬 수 있습니다.
#### State DB 최적화
블록체인 성능의 주요 병목 중 하나는 느린 디스크 I/O입니다. 블록 실행 후 변경된 상태는 디스크에 기록되어야 하며, 기존 시스템에서는 상태 저장이 완료될 때까지 다음 블록 실행이 지연된다는 문제가 존재합니다.
Stable은 이를 해결하기 위해 상태 커밋과 상태 저장을 분리합니다. 밸리데이터 노드는 메모리에 최신 상태를 커밋하기만 하면 다음 블록 실행을 진행할 수 있고, 과거 상태는 디스크에 비동기적으로 저장됩니다. 이로 인해 실행에 대한 레이턴시를 줄일 수 있습니다.
또한 `mmap`이라는 메모리 매핑 파일 I/O 메커니즘을 도입하여, 파일을 메모리 배열처럼 처리하는 방식으로 스토리지 성능을 높일 수 있습니다. 즉 실시간 상태 커밋은 메모리에서, 아카이브 상태는 디스크에 저장함으로써, Stable은 디스크 I/O 지연을 최소화하고 읽기/쓰기 처리량을 높입니다.
#### USDT 전송 집계
많은 양의 USDT0 전송을 한 번에 처리하기 위해, Stable은 집계 메커니즘을 구현할 예정입니다. USDT0 전송 트랜잭션들을 그룹화하여 한 번에 처리함으로써, 트랜잭션 당 오버헤드를 줄이고 전반적인 처리량을 개선할 수 있습니다.
#### 보장된 블록스페이스
블록체인 인프라를 사용하는 기업들은 예측 가능한 트랜잭션 레이턴시가 필요합니다. 하지만 네트워크 혼잡 시에는 이 예측 가능성이 무너질 수 있습니다.
Stable은 이를 해결하기 위해 다음과 같은 방식으로 고정된 블록스페이스를 기업에 보장합니다:
* 밸리데이터 단의 커스터마이징: 밸리데이터 노드가 기업을 위해 블록스페이스 일부를 할당합니다.
* 전용 RPC 노드: 보장된 트랜잭션은 별도의 멤풀과 API 엔드포인트를 통해 우선적으로 처리됩니다.
이 모델은 혼잡하거나 적대적인 네트워크 환경에서도 기업의 핵심 운영에 필요한 성능을 안정적으로 제공합니다.
### 페이즈 3 – USDT를 위한 풀스택 최적화 레이어
#### Autobahn 기반의 StableBFT를 활용한 발전된 합의 알고리즘
1세대 DAG 기반 BFT 엔진(Narwhal, Tusk)은 데이터 전파와 합의를 분리함으로써 단일 제안자가 가지던 병목을 제거합니다. 그러나 이러한 시스템을 기존의 CometBFT 환경에 직접 적용하면, 높이(height) 기반 블록 처리나 전통적인 멤풀 구조와 충돌할 수 있습니다.
Autobahn은 Stable의 합의 레이어와 더 자연스럽게 통합되는 ‘DAG 기반 PBFT’ 알고리즘을 제공합니다. Autobahn 기반의 StableBFT는 다음과 같은 장점을 가집니다.
* 단일 리더 제한 제거를 통한 프로포절 병렬 처리
* 데이터 전파와 트랜잭션 순서 합의의 분리를 통한 더 빠른 완결성
* 네트워크 장애에 강한 견고한 BFT 구조
이 발전된 합의 디자인은 내부 테스트의 통제된 환경 내에서 (합의 레이어 한정) 200,000 TPS를 달성하는 등 매우 높은 처리량을 지원합니다.
#### StableVM++
StableVM++는 기존 Go 기반 EVM을 대체하는 고성능 C++ 실행 엔진입니다. 이는 최대 6배 빠른 실행 속도를 제공하여, EVM 트랜잭션 처리 성능을 획기적으로 향상시킬 것으로 기대됩니다.
#### 고성능 RPC
고성능 탈중앙화 애플리케이션은 빠르고 정확한 RPC와 인덱싱 서비스에 의존합니다. Stable은 이를 위해 다음을 포함한 고성능 RPC 스택을 개발합니다:
* 노드 단 성능 향상: 즉각적인 RPC 응답을 위한 실시간 체인 상태 처리
* 노드 통합형 인덱서: 지연 없는 API 제공을 위한 실시간 인덱싱
* 확장 가능한 Pub/Sub 구조: 이벤트 구독 및 전달을 위한 견고한 웹소켓 아키텍처
* 하이브리드 로드 밸런서: 요청 유형별 트래픽 분산으로 리소스 최적화 및 병목 최소화
이러한 최적화를 통해 Stable은 dApp 및 기업 사용자에게 안정적이고 확장 가능한 엔드포인트를 제공합니다.
## 토크노믹스
Stable은 스테이블코인 결제, 엔터프라이즈급 결제 및 USDT 중심 인프라에 최적화된 고성능 레이어 1 블록체인입니다.
이 토큰노믹스 페이지는 STABLE 토큰의 공급, 분배 및 경제 설계를 설명합니다.
***
### 개요
| 항목 | 세부사항 |
| :-------- | :---------------------- |
| **심볼** | STABLE |
| **총 공급량** | 100,000,000,000 토큰 |
| **표준** | ERC-20 (Stable 메인넷 EVM) |
| **소수점** | 18 |
STABLE은 Stable 메인넷과 생태계의 거버넌스 토큰으로, 검증자, 개발자 및 사용자 간의 장기적인 경제적 정렬을 지원하도록 설계되었습니다.
***
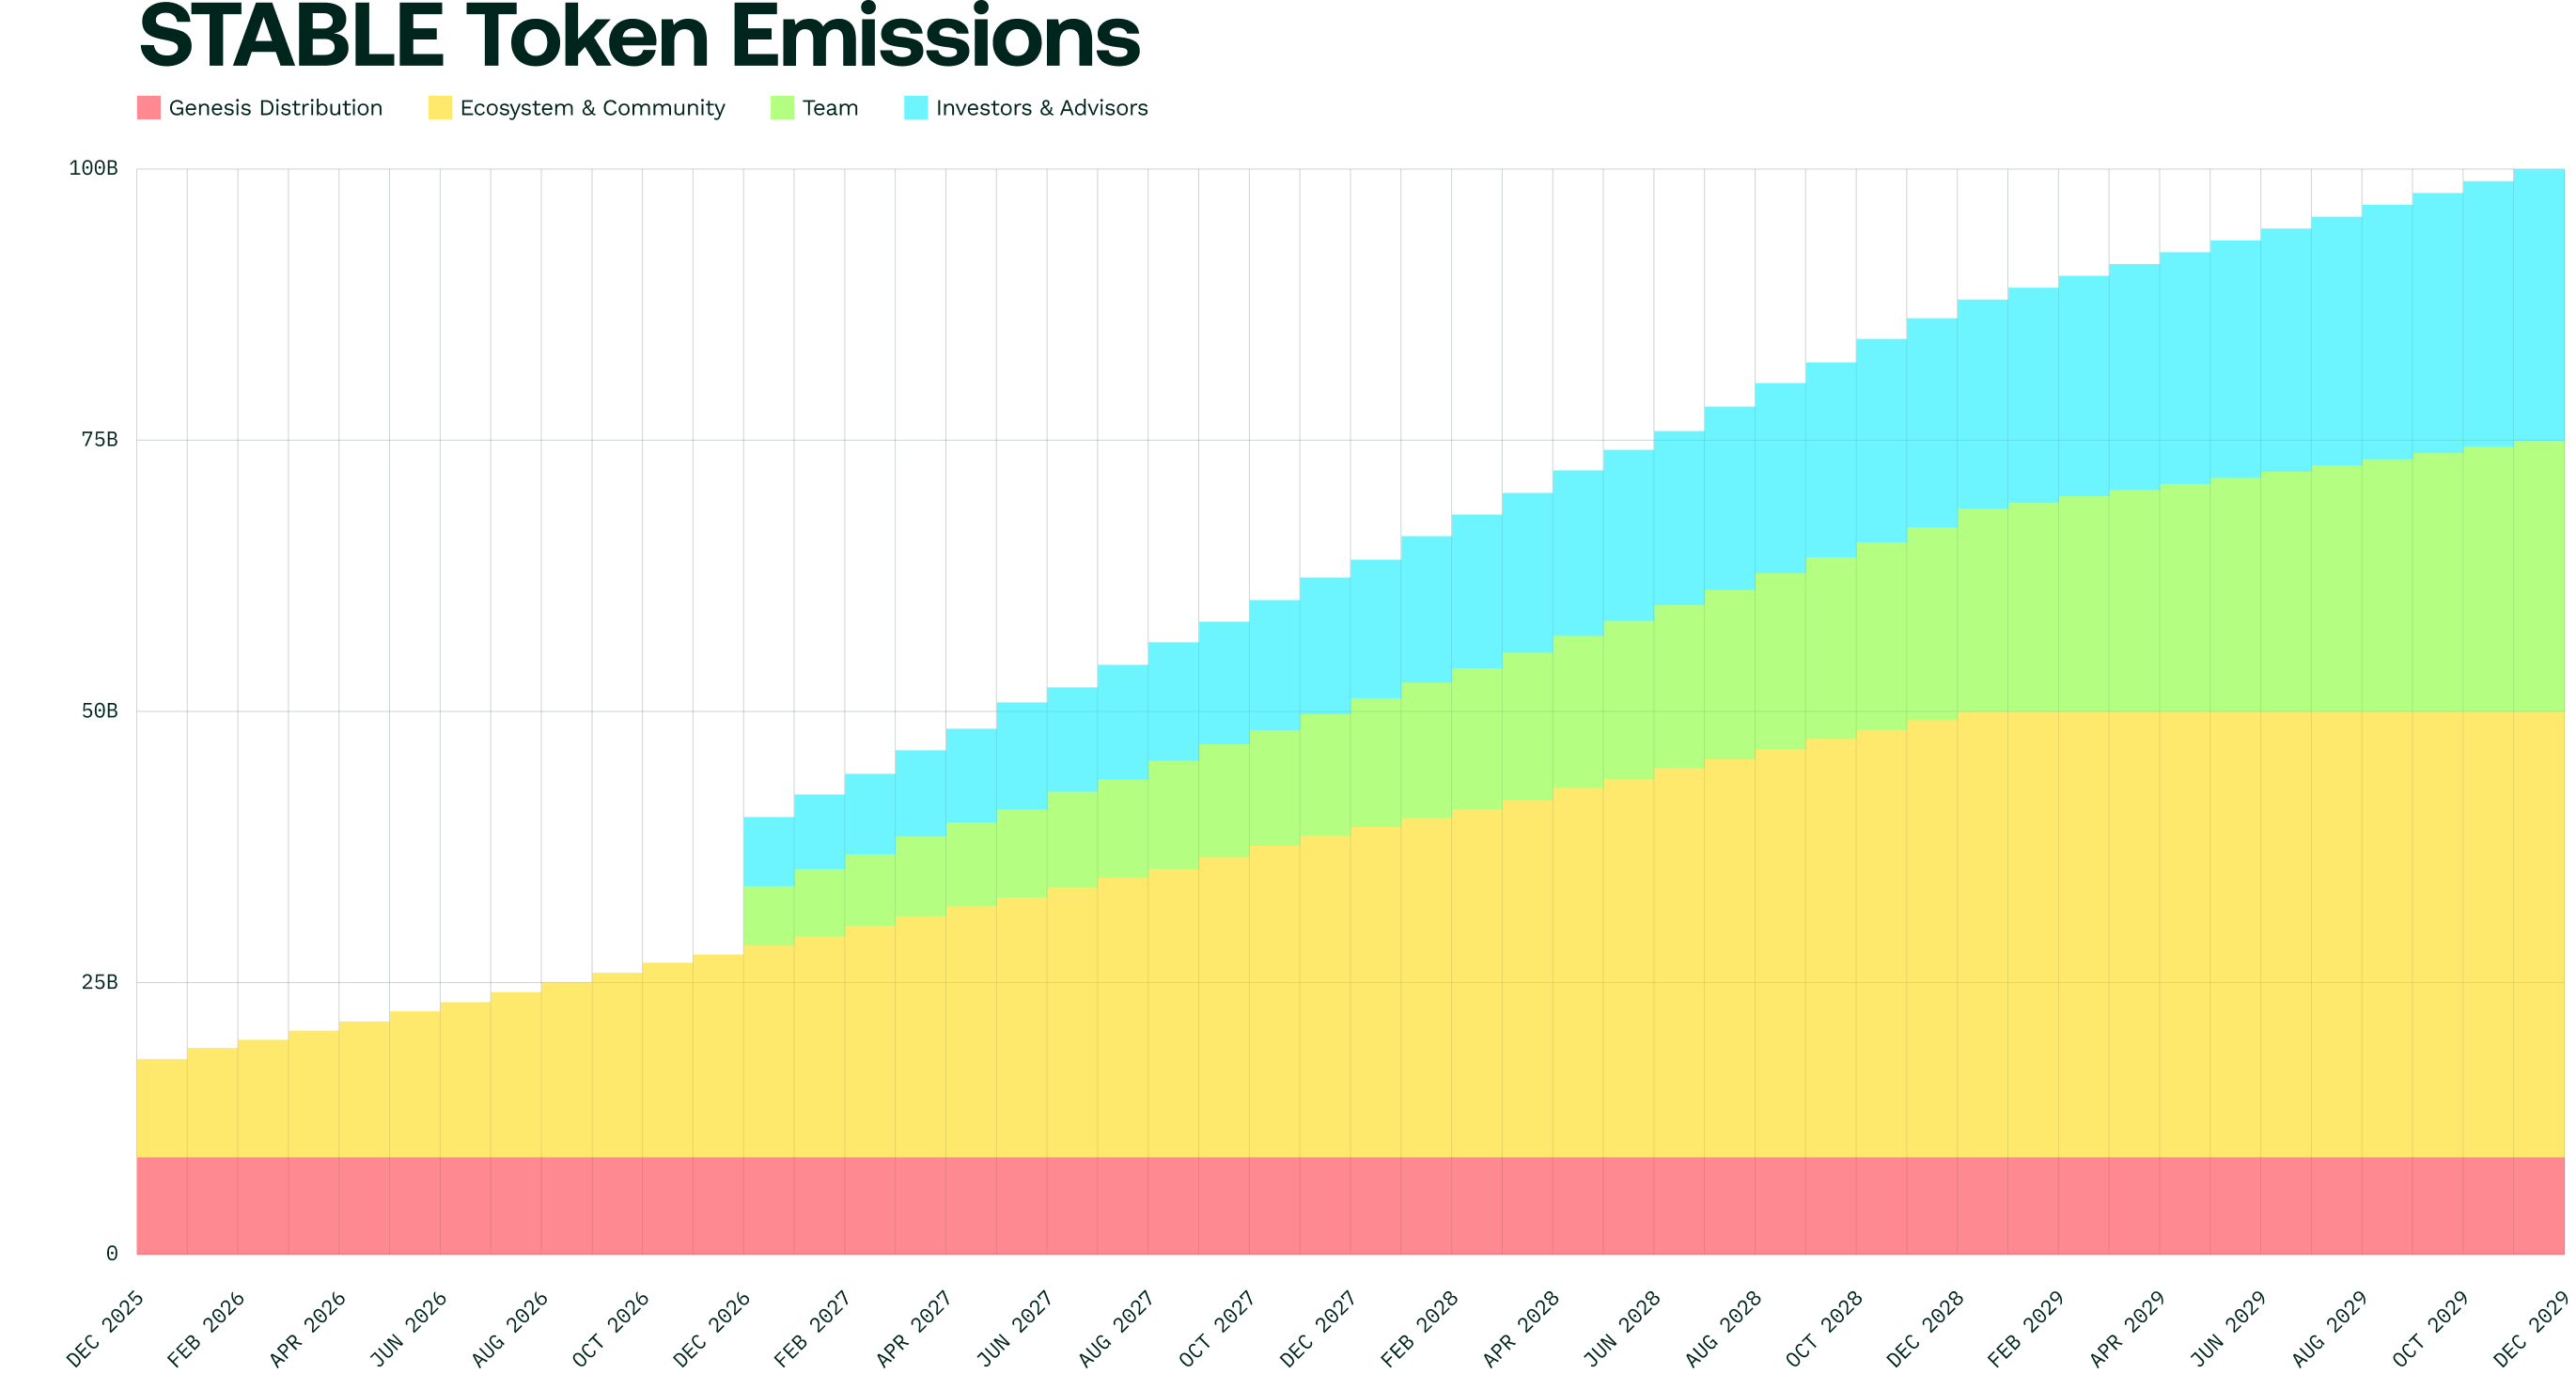
### 토큰 분배
**총 공급량:** 100,000,000,000 STABLE 토큰
| 카테고리 | 할당 | STABLE 수량 |
| :------------- | :--- | :-------------- |
| **투자자 및 자문위원** | 25% | 25,000,000,000 |
| **팀** | 25% | 25,000,000,000 |
| **생태계 및 커뮤니티** | 40% | 40,000,000,000 |
| **제네시스 분배** | 10% | 10,000,000,000 |
| **총합** | 100% | 100,000,000,000 |
***
### 발행 모델 및 공급 일정
* 총 공급량은 100,000,000,000 STABLE 토큰으로 고정되어 있습니다.
* Stable 메인넷 출시 시 공급량의 일부만 유통됩니다.
* 팀 및 투자자와 자문위원 할당은 장기적 헌신을 보장하기 위해 1년 클리프가 있는 4년 선형 베스팅 모델을 적용받습니다.
***
### 할당
#### 제네시스 분배 - 총 토큰 공급량의 10%
초기 부트스트래핑과 시장 유동성 공급, 에어드롭, 초기 지지자와 거래소 및 생태계 파트너와의 캠페인 보상을 위해 설계되었습니다.
**베스팅 일정**
* Stable 메인넷 출시 시 100% 잠금 해제
#### 생태계 및 커뮤니티 - 총 토큰 공급량의 40%
장기적인 생태계 및 커뮤니티 성장을 지원합니다:
* Stable 소프트웨어 및 생태계 개발 지원
* 개발자 보조금
* 사용자 온보딩 인센티브
* 결제 파트너 통합
* 온체인 활동 보상
* 해커톤, 앰배서더 프로그램
* 인프라 보조금
**베스팅 일정**
* **초기 잠금 해제:** 전략적 출시 파트너와의 인센티브, 유동성 수요 및 초기 생태계 성장 캠페인 구현을 위해 Stable 메인넷 출시 시 총 공급량의 8%가 잠금 해제됩니다.
* **총 베스팅 기간:** 총 공급량의 32%에 대해 이후 3년 선형 베스팅
#### 팀 - 총 토큰 공급량의 25%
* 창립 팀원, 엔지니어, 연구원 및 기여자에게 할당되었습니다
* 팀과 Stable 생태계 간의 장기적인 정렬을 보장하도록 설계되었습니다.
**베스팅 일정**
* **1년 클리프:** 첫 12개월 동안 토큰이 잠금 해제되지 않습니다
* **총 베스팅 기간:** Stable 메인넷 출시부터 48개월 선형 베스팅
#### 투자자 및 자문위원 - 총 토큰 공급량의 25%
자금 조달 라운드 및 자문 지원을 위해 할당되었습니다.
**베스팅 일정**
* **1년 클리프:** 첫 12개월 동안 토큰이 잠금 해제되지 않습니다
* **총 베스팅 기간:** Stable 메인넷 출시부터 48개월 선형 베스팅
***
### 발행 차트
### 페이즈 1 – USDT를 위한 기반 레이어
#### StableBFT
초기 Stable 블록체인은 StableBFT를 활용합니다. 이는 CometBFT를 기반으로 높은 처리량, 낮은 레이턴시, 그리고 강력한 신뢰성을 제공하기 위한 맞춤형 PoS 프로토콜입니다. 이는 결정론적인 완결성과 최대 1/3의 밸리데이터 장애 허용(fault tolerance)이라는 특징을 가지고 있습니다. 향후 Stable은 DAG 기반 합의로의 업그레이드를 통해 5배 빠른 합의 속도를 달성할 예정입니다.
#### USDT를 네이티브 가스로
Stable에서는 USDT0를 네이티브 가스 토큰으로 사용합니다. USDT0는 가스 결제와 가치 전송을 위한 네이티브 자산으로 동시에 기능하며, `approve`, `transfer`, `transferFrom`, `permit`을 지원하는 ERC20 토큰으로도 동작합니다.
#### Stable Pay & Stable Name
Stable Pay은 탈중앙화 금융의 사용성을 크게 향상하기 위해 설계되었습니다. 현재 Web3 지갑들에는 가파른 학습 곡선 문제가 존재하며, Stable은 Web2.5 UX를 가진 지갑 경험을 도입하는 방식으로 이 문제를 해결합니다. 이를 통해 새로운 사용자들의 온보딩을 간소화하는 동시에, 기존 크립토 사용자들과도 호환될 수 있게 할 수 있습니다. 새로운 사용자들은 직관적인 디자인과 원활한 셋업 프로세스(소셜 로그인 등)를 통해 쉽게 온보딩할 수 있으며, 기존 크립토 유저들은 가지고 있던 지갑을 Stable에 그대로 가져와 마이그레이션 없이 사용할 수 있습니다. Stable Pay은 웹 앱과 모바일 앱 양쪽으로 제공되어, 모든 기기에서 안전하게 디지털 자산에 접근할 수 있습니다.
지갑에 더해, Stable은 복잡하고 오류가 잦은 EVM 공개 주소 포맷을 고유하고 사람이 읽을 수 있는 형태로 바꾸는 Stable Name을 도입합니다. 사용자들은 긴 16진수 문자열을 관리할 필요 없이 Stable Name으로 간편하게 토큰을 주고받을 수 있습니다. 이 방식은 거래 상 오류를 크게 줄이고 크립토 자산과 상호작용할 때의 전반적인 경험을 증진하여, Stable을 블록체인 생태계로 진입하는 강력하고 사용자 중심적인 출발점으로 만들어줍니다.
### 페이즈 2 – USDT를 위한 경험 레이어
#### 낙관적 병렬 실행
실제 운영 환경의 통계에 따르면, 전체 트랜잭션의 약 60\~80%는 서로 겹치지 않는 상태를 다루기 때문에, 병렬로 안전하게 실행될 수 있습니다. 그러나 대부분의 블록체인 시스템은 여전히 트랜잭션을 순차적으로 처리하며, 이로 인해 불필요한 지연이 발생하고 있습니다.
Stable은 이러한 한계를 극복하기 위해 낙관적 병렬 실행(Optimistic Parallel Execution) 모델을 채택합니다. 초기에는 상태 충돌이 없다는 가정 하에 트랜잭션을 병렬로 실행하고, 충돌이 감지되면 해당 트랜잭션만 롤백 후 순차적으로 재실행합니다. 이 방식은 정확성을 유지하면서도 처리량을 크게 향상시킬 수 있습니다.
#### State DB 최적화
블록체인 성능의 주요 병목 중 하나는 느린 디스크 I/O입니다. 블록 실행 후 변경된 상태는 디스크에 기록되어야 하며, 기존 시스템에서는 상태 저장이 완료될 때까지 다음 블록 실행이 지연된다는 문제가 존재합니다.
Stable은 이를 해결하기 위해 상태 커밋과 상태 저장을 분리합니다. 밸리데이터 노드는 메모리에 최신 상태를 커밋하기만 하면 다음 블록 실행을 진행할 수 있고, 과거 상태는 디스크에 비동기적으로 저장됩니다. 이로 인해 실행에 대한 레이턴시를 줄일 수 있습니다.
또한 `mmap`이라는 메모리 매핑 파일 I/O 메커니즘을 도입하여, 파일을 메모리 배열처럼 처리하는 방식으로 스토리지 성능을 높일 수 있습니다. 즉 실시간 상태 커밋은 메모리에서, 아카이브 상태는 디스크에 저장함으로써, Stable은 디스크 I/O 지연을 최소화하고 읽기/쓰기 처리량을 높입니다.
#### USDT 전송 집계
많은 양의 USDT0 전송을 한 번에 처리하기 위해, Stable은 집계 메커니즘을 구현할 예정입니다. USDT0 전송 트랜잭션들을 그룹화하여 한 번에 처리함으로써, 트랜잭션 당 오버헤드를 줄이고 전반적인 처리량을 개선할 수 있습니다.
#### 보장된 블록스페이스
블록체인 인프라를 사용하는 기업들은 예측 가능한 트랜잭션 레이턴시가 필요합니다. 하지만 네트워크 혼잡 시에는 이 예측 가능성이 무너질 수 있습니다.
Stable은 이를 해결하기 위해 다음과 같은 방식으로 고정된 블록스페이스를 기업에 보장합니다:
* 밸리데이터 단의 커스터마이징: 밸리데이터 노드가 기업을 위해 블록스페이스 일부를 할당합니다.
* 전용 RPC 노드: 보장된 트랜잭션은 별도의 멤풀과 API 엔드포인트를 통해 우선적으로 처리됩니다.
이 모델은 혼잡하거나 적대적인 네트워크 환경에서도 기업의 핵심 운영에 필요한 성능을 안정적으로 제공합니다.
### 페이즈 3 – USDT를 위한 풀스택 최적화 레이어
#### Autobahn 기반의 StableBFT를 활용한 발전된 합의 알고리즘
1세대 DAG 기반 BFT 엔진(Narwhal, Tusk)은 데이터 전파와 합의를 분리함으로써 단일 제안자가 가지던 병목을 제거합니다. 그러나 이러한 시스템을 기존의 CometBFT 환경에 직접 적용하면, 높이(height) 기반 블록 처리나 전통적인 멤풀 구조와 충돌할 수 있습니다.
Autobahn은 Stable의 합의 레이어와 더 자연스럽게 통합되는 ‘DAG 기반 PBFT’ 알고리즘을 제공합니다. Autobahn 기반의 StableBFT는 다음과 같은 장점을 가집니다.
* 단일 리더 제한 제거를 통한 프로포절 병렬 처리
* 데이터 전파와 트랜잭션 순서 합의의 분리를 통한 더 빠른 완결성
* 네트워크 장애에 강한 견고한 BFT 구조
이 발전된 합의 디자인은 내부 테스트의 통제된 환경 내에서 (합의 레이어 한정) 200,000 TPS를 달성하는 등 매우 높은 처리량을 지원합니다.
#### StableVM++
StableVM++는 기존 Go 기반 EVM을 대체하는 고성능 C++ 실행 엔진입니다. 이는 최대 6배 빠른 실행 속도를 제공하여, EVM 트랜잭션 처리 성능을 획기적으로 향상시킬 것으로 기대됩니다.
#### 고성능 RPC
고성능 탈중앙화 애플리케이션은 빠르고 정확한 RPC와 인덱싱 서비스에 의존합니다. Stable은 이를 위해 다음을 포함한 고성능 RPC 스택을 개발합니다:
* 노드 단 성능 향상: 즉각적인 RPC 응답을 위한 실시간 체인 상태 처리
* 노드 통합형 인덱서: 지연 없는 API 제공을 위한 실시간 인덱싱
* 확장 가능한 Pub/Sub 구조: 이벤트 구독 및 전달을 위한 견고한 웹소켓 아키텍처
* 하이브리드 로드 밸런서: 요청 유형별 트래픽 분산으로 리소스 최적화 및 병목 최소화
이러한 최적화를 통해 Stable은 dApp 및 기업 사용자에게 안정적이고 확장 가능한 엔드포인트를 제공합니다.
## 토크노믹스
Stable은 스테이블코인 결제, 엔터프라이즈급 결제 및 USDT 중심 인프라에 최적화된 고성능 레이어 1 블록체인입니다.
이 토큰노믹스 페이지는 STABLE 토큰의 공급, 분배 및 경제 설계를 설명합니다.
***
### 개요
| 항목 | 세부사항 |
| :-------- | :---------------------- |
| **심볼** | STABLE |
| **총 공급량** | 100,000,000,000 토큰 |
| **표준** | ERC-20 (Stable 메인넷 EVM) |
| **소수점** | 18 |
STABLE은 Stable 메인넷과 생태계의 거버넌스 토큰으로, 검증자, 개발자 및 사용자 간의 장기적인 경제적 정렬을 지원하도록 설계되었습니다.
***
### 토큰 분배
**총 공급량:** 100,000,000,000 STABLE 토큰
| 카테고리 | 할당 | STABLE 수량 |
| :------------- | :--- | :-------------- |
| **투자자 및 자문위원** | 25% | 25,000,000,000 |
| **팀** | 25% | 25,000,000,000 |
| **생태계 및 커뮤니티** | 40% | 40,000,000,000 |
| **제네시스 분배** | 10% | 10,000,000,000 |
| **총합** | 100% | 100,000,000,000 |
***
### 발행 모델 및 공급 일정
* 총 공급량은 100,000,000,000 STABLE 토큰으로 고정되어 있습니다.
* Stable 메인넷 출시 시 공급량의 일부만 유통됩니다.
* 팀 및 투자자와 자문위원 할당은 장기적 헌신을 보장하기 위해 1년 클리프가 있는 4년 선형 베스팅 모델을 적용받습니다.
***
### 할당
#### 제네시스 분배 - 총 토큰 공급량의 10%
초기 부트스트래핑과 시장 유동성 공급, 에어드롭, 초기 지지자와 거래소 및 생태계 파트너와의 캠페인 보상을 위해 설계되었습니다.
**베스팅 일정**
* Stable 메인넷 출시 시 100% 잠금 해제
#### 생태계 및 커뮤니티 - 총 토큰 공급량의 40%
장기적인 생태계 및 커뮤니티 성장을 지원합니다:
* Stable 소프트웨어 및 생태계 개발 지원
* 개발자 보조금
* 사용자 온보딩 인센티브
* 결제 파트너 통합
* 온체인 활동 보상
* 해커톤, 앰배서더 프로그램
* 인프라 보조금
**베스팅 일정**
* **초기 잠금 해제:** 전략적 출시 파트너와의 인센티브, 유동성 수요 및 초기 생태계 성장 캠페인 구현을 위해 Stable 메인넷 출시 시 총 공급량의 8%가 잠금 해제됩니다.
* **총 베스팅 기간:** 총 공급량의 32%에 대해 이후 3년 선형 베스팅
#### 팀 - 총 토큰 공급량의 25%
* 창립 팀원, 엔지니어, 연구원 및 기여자에게 할당되었습니다
* 팀과 Stable 생태계 간의 장기적인 정렬을 보장하도록 설계되었습니다.
**베스팅 일정**
* **1년 클리프:** 첫 12개월 동안 토큰이 잠금 해제되지 않습니다
* **총 베스팅 기간:** Stable 메인넷 출시부터 48개월 선형 베스팅
#### 투자자 및 자문위원 - 총 토큰 공급량의 25%
자금 조달 라운드 및 자문 지원을 위해 할당되었습니다.
**베스팅 일정**
* **1년 클리프:** 첫 12개월 동안 토큰이 잠금 해제되지 않습니다
* **총 베스팅 기간:** Stable 메인넷 출시부터 48개월 선형 베스팅
***
### 발행 차트
 ***
### 경제 설계 원칙
Stable의 토큰 경제학은 세 가지 기본 목표를 중심으로 설계되었습니다:
#### 1. 결제에 최적화된 레이어 1 구동
STABLE 토큰은 고처리량, 저지연 인프라를 인센티브화하여 1초 미만의 블록 확인 및 기업급 결제 보장을 지원합니다.
#### 2. 지속 가능한 생태계 성장 지원
총 토큰 공급량의 40%가 주요 개발 및 성장 영역에 중점을 두고 장기적 성장에 전념합니다
* 개발자 보조금
* 파트너 통합
* 새로운 생태계 애플리케이션
#### 3. 베스팅을 통한 장기 기여자 정렬
팀 할당은 1년 클리프가 있는 4년 선형 베스팅 모델을 사용하여 네트워크 개발에 대한 장기적인 정렬과 지속적인 기여를 보장합니다.
***
### STABLE 토큰의 유틸리티
STABLE 토큰은 Stable 메인넷의 ERC-20 거버넌스 토큰입니다. 다음과 같은 용도로 사용할 수 있습니다:
* 검증자 선출
* 프로토콜 업그레이드 투표
* 거버넌스 제안 처리
* 검증자로부터 가스 수수료 분배를 받기 위한 자격 증명 역할
Stable 네트워크에서 모든 트랜잭션은 네이티브 가스 토큰으로 USDT0을 사용합니다. 이러한 USDT0 가스 수수료는 스마트 컨트랙트가 관리하는 재무에 수집됩니다. 토큰 보유자가 STABLE 토큰을 검증자에게 스테이킹하면 검증자는 재무에서 가스 수수료를 스테이커에게 비례적으로 분배할 수 있습니다.
## 왜 Stable인가?
### Stable은 무엇인가요?
Stable은 세계 최초의 Stablechain으로서 USDT를 네이티브 가스 및 정산에 사용하는 페이먼트 레이어 1 블록체인입니다.
### Stable 이전의 문제들
디지털 금융이 가속화됨에 따라 스테이블코인, 특히 USDT는 온체인 활동의 중심으로 자리잡고 있습니다. 하지만 현재의 블록체인 인프라는 스테이블코인 중심의 운영에 최적화되어 있지 않으며, 다음과 같은 주요 문제점들이 존재합니다:
* **예측 불가능하고 높은 수수료**: 트랜잭션 수수료가 일정하지 않고 갑작스럽게 치솟는 경우가 자주 있으며, 이로 인해 소액 거래를 자주 하는 것이 비효율적이고 부담스러워집니다.
* **기업 활용의 제약**: 트랜잭션 속도가 불안정하고, 기존 시스템과의 통합이 어려우며, 개인 정보 보호 기술이 부족함에 따라 기업의 도입이 어렵습니다.
* **복잡한 사용자 경험**: 사용자는 가스 토큰을 포함해 변동성이 큰 여러 개 토큰을 별도로 보유해야 하며, 이는 초보자에게 매우 혼란스럽고 진입 장벽이 됩니다.
* **금융 접근성의 한계**: 많은 금융 소외 지역에서는 달러 기반 금융 도구에 접근하기 어렵습니다. 또한 높은 송금 수수료로 인해 디지털 금융 참여가 더욱 제한됩니다.
* **개발자 환경의 미비**: 스테이블코인 특화 인프라가 부족해 dApp 개발이 복잡하고 비효율적입니다.
Stable은 이러한 문제들을 해결하기 위해 USDT에 최적화된 블록체인 인프라로 설계되었습니다.
***
### 경제 설계 원칙
Stable의 토큰 경제학은 세 가지 기본 목표를 중심으로 설계되었습니다:
#### 1. 결제에 최적화된 레이어 1 구동
STABLE 토큰은 고처리량, 저지연 인프라를 인센티브화하여 1초 미만의 블록 확인 및 기업급 결제 보장을 지원합니다.
#### 2. 지속 가능한 생태계 성장 지원
총 토큰 공급량의 40%가 주요 개발 및 성장 영역에 중점을 두고 장기적 성장에 전념합니다
* 개발자 보조금
* 파트너 통합
* 새로운 생태계 애플리케이션
#### 3. 베스팅을 통한 장기 기여자 정렬
팀 할당은 1년 클리프가 있는 4년 선형 베스팅 모델을 사용하여 네트워크 개발에 대한 장기적인 정렬과 지속적인 기여를 보장합니다.
***
### STABLE 토큰의 유틸리티
STABLE 토큰은 Stable 메인넷의 ERC-20 거버넌스 토큰입니다. 다음과 같은 용도로 사용할 수 있습니다:
* 검증자 선출
* 프로토콜 업그레이드 투표
* 거버넌스 제안 처리
* 검증자로부터 가스 수수료 분배를 받기 위한 자격 증명 역할
Stable 네트워크에서 모든 트랜잭션은 네이티브 가스 토큰으로 USDT0을 사용합니다. 이러한 USDT0 가스 수수료는 스마트 컨트랙트가 관리하는 재무에 수집됩니다. 토큰 보유자가 STABLE 토큰을 검증자에게 스테이킹하면 검증자는 재무에서 가스 수수료를 스테이커에게 비례적으로 분배할 수 있습니다.
## 왜 Stable인가?
### Stable은 무엇인가요?
Stable은 세계 최초의 Stablechain으로서 USDT를 네이티브 가스 및 정산에 사용하는 페이먼트 레이어 1 블록체인입니다.
### Stable 이전의 문제들
디지털 금융이 가속화됨에 따라 스테이블코인, 특히 USDT는 온체인 활동의 중심으로 자리잡고 있습니다. 하지만 현재의 블록체인 인프라는 스테이블코인 중심의 운영에 최적화되어 있지 않으며, 다음과 같은 주요 문제점들이 존재합니다:
* **예측 불가능하고 높은 수수료**: 트랜잭션 수수료가 일정하지 않고 갑작스럽게 치솟는 경우가 자주 있으며, 이로 인해 소액 거래를 자주 하는 것이 비효율적이고 부담스러워집니다.
* **기업 활용의 제약**: 트랜잭션 속도가 불안정하고, 기존 시스템과의 통합이 어려우며, 개인 정보 보호 기술이 부족함에 따라 기업의 도입이 어렵습니다.
* **복잡한 사용자 경험**: 사용자는 가스 토큰을 포함해 변동성이 큰 여러 개 토큰을 별도로 보유해야 하며, 이는 초보자에게 매우 혼란스럽고 진입 장벽이 됩니다.
* **금융 접근성의 한계**: 많은 금융 소외 지역에서는 달러 기반 금융 도구에 접근하기 어렵습니다. 또한 높은 송금 수수료로 인해 디지털 금융 참여가 더욱 제한됩니다.
* **개발자 환경의 미비**: 스테이블코인 특화 인프라가 부족해 dApp 개발이 복잡하고 비효율적입니다.
Stable은 이러한 문제들을 해결하기 위해 USDT에 최적화된 블록체인 인프라로 설계되었습니다.
 ### Stable이 해결하는 것
#### USDT를 위해 설계된 맞춤형 생태계
Stable은 사용자는 물론 기업과 개발자가 겪는 모든 불편함을 해소하도록 정교하게 설계된 USDT 전용 레이어 1 블록체인입니다. 주요 장점은 다음과 같습니다:
* **높은 처리량**: 초당 수천 개의 트랜잭션들을 효율적으로 처리하며, 네트워크가 혼잡한 상황에서도 안정적인 성능을 유지합니다.
* **매우 저렴한 수수료 및 즉각적인 정산**: 트랜잭션은 몇 초 이내에 완결되며, 수수료는 1센트도 되지 않는 수준으로 매우 저렴하기 때문에, 소액 결제부터 대규모 정산 두 경우 모두에 적합합니다.
* **USDT 기반 가스 사용**: 거래 수수료를 USDT로 직접 지불할 수 있어, 별도로 변동성이 큰 자산을 보유할 필요가 없습니다.
#### 기업을 위한 기능
Stable은 기업의 요구사항에 맞춘 전용 솔루션들을 제공합니다:
* **강화된 보안**: 입증된 Proof-of-Stake 합의 알고리즘과 이더리움 개발 도구 호환성을 바탕으로, 안전하면서도 친숙한 환경을 제공합니다.
* **보장된 블록스페이스**: 기업은 일정 블록스페이스를 사전에 할당받아, 네트워크 혼잡과 무관하게 안정적으로 트랜잭션을 보낼 수 있습니다.
* **기밀 전송**: 규제를 준수하면서도 개인정보를 보호할 수 있는 전송 기능을 제공해, 민감한 금융 거래에도 적합합니다.
#### 개발자 지원 생태계
Stable은 개발을 빠르고 쉽게 만들기 위한 도구들을 갖추고 있습니다:
* **EVM 호환성**: Ethereum Virtual Machine을 완벽히 지원하여, 기존 이더리움 dApp을 쉽게 포팅하고 익숙한 툴을 그대로 사용할 수 있습니다.
* **전문 SDK 제공**: 스테이블코인 기반 dApp 개발에 최적화된 SDK를 제공해, 복잡도를 줄이고 개발 비용을 크게 낮춥니다.
* **통합 도구**: 강력한 API와 통합 서비스를 통해, Stable의 인프라를 기업의 기존 시스템에 손쉽게 연결할 수 있습니다.
#### 스테이블코인을 위한 확장 생태계
Stable은 다양한 영역에서 스테이블코인의 활용도를 높이는 생태계를 조성합니다:
* **크로스체인 상호운용성**: Stable과 타 블록체인 간 자산 전송을 간편하게 하여 유동성과 사용성을 극대화합니다.
* **금융 서비스 통합**: USDT를 기반으로 하는 다양한 금융 서비스 애플리케이션을 지원합니다.
* **규제 대응 도구**: 내장된 컴플라이언스 및 리포팅 기능으로, 기관의 규제 준수를 돕습니다.
#### 실생활에서의 활용 확장
Stable은 전통적인 거래 및 DeFi 플랫폼을 넘어 USDT의 실질적인 활용 가능성을 확장합니다:
* **소비자 결제 솔루션**: USDT와 연동된 직불 및 신용카드 통합으로, 스테이블코인을 실생활에서 쉽게 사용할 수 있습니다.
* **가맹점 결제 도구**: 기업이 고비용의 결제 대행사 없이 직접 USDT를 받을 수 있어, 수수료를 크게 절감할 수 있습니다.
* **Stable Pay**: 일상적인 트랜잭션에 최적화된 사용자 친화적인 지갑으로, Stable 생태계와 자연스럽게 연결되어 직관적인 UX를 제공합니다.
Stable은 스테이블코인 중심의 금융 인프라를 처음부터 새롭게 구축해, 안정적인 운영, 사용자 친화성, 글로벌 금융 포용성을 향상시키는 기반을 마련하고 있습니다.
## 개발자 지원
### FAQ
다음과 같은 주제를 다루는 개발자 중심 질문 모음집입니다:
* Stable 네트워크에 어떻게 연결하나요?
* 일반적인 EVM 도구와 호환되는 표준 JSON-RPC 요청을 사용하여 네트워크와 상호작용할 수 있습니다.
* 트랜잭션 수수료에는 어떤 통화가 사용되나요?
* 트랜잭션 수수료는 USDT0로 지불됩니다. 표준 기본 가스 가격 외에 추가적인 수수료 매개변수는 필요하지 않습니다.
* 업데이트는 어디서 추적할 수 있나요?
* 모든 프로토콜 및 개발자 대상 변경사항은 릴리스 & 변경 로그에서 전달됩니다.
* Stable은 계정 추상화를 지원하나요?
* 네. EIP-7702는 EOA가 일시적으로 스마트 계정 동작으로 작동할 수 있게 합니다.
* 자세한 내용은 [여기](ko/architecture/usdt-specific-features/eip-7702-and-aa)에서 읽을 수 있습니다.
* 트랜잭션 결과는 어디서 볼 수 있나요?
* 블록에 포함되면 다음을 통해 결과를 볼 수 있습니다:
* 잔액 읽기
* 컨트랙트 상태 조회
* 로그 및 방출된 이벤트
* Stable용 스마트 컨트랙트는 어떻게 빌드하나요?
* 다음과 같은 표준 EVM 개발자 워크플로를 사용할 수 있습니다:
* Solidity 기반 컨트랙트
* 네트워크와 상호작용하기 위한 JSON-RPC 라이브러리
이 페이지는 공개 테스트넷 사용 중 일반적인 질문이 발생하면서 확장될 것입니다.
### 지원 채널
개발자는 기술 지원을 위해 Stable 팀과 직접 소통할 수 있습니다.
* **Discord**: [https://discord.gg/stablexyz](https://discord.gg/stablexyz) 개발자 채널에 참여하세요.
* **이슈 보고**: 공개 깃헙 레포가 열리면 지침이 제공될 예정입니다.
커뮤니티 플랫폼이 사용 가능해지면 지원 연락처가 업데이트될 예정입니다.
## Stable에 첫 번째 스마트 컨트랙트 배포하기
이 튜토리얼에서는 Stable 테스트넷에 간단한 스마트 컨트랙트를 배포하고 체인에서 상태를 읽어옵니다. 이 과정에서 Stable 네트워크 구성 방식, USDT0이 가스 토큰으로 작동하는 방식, 표준 EVM 도구를 Stable에 연결하는 방법을 배웁니다.
Solidity와 Unix 계열 터미널에 대한 기본 지식이 있다고 가정합니다. Stable 사용 경험은 필요하지 않습니다.
### 사전 요구사항
* [Foundry](https://book.getfoundry.sh/getting-started/installation) 설치 (`forge`, `cast`, `anvil`이 PATH에서 사용 가능해야 함)
* 개인 키를 소유한 지갑 (새 테스트 키도 괜찮습니다 — 실제 자금이 있는 키는 절대 테스트넷에서 사용하지 마세요)
* 테스트넷 RPC 및 수도꼭지에 접근할 수 있는 인터넷 연결
***
### 1. 새 Foundry 프로젝트 생성
다음 명령어로 새 프로젝트를 생성합니다:
```bash
forge init stable-hello && cd stable-hello
```
Foundry는 `src/` 디렉토리에 샘플 `Counter.sol` 컨트랙트와 테스트 파일을 생성합니다. 이 컨트랙트를 그대로 배포합니다 — 목표는 새 Solidity 코드를 작성하는 것이 아니라 실제로 체인에 올리는 것입니다.
### 2. 배포할 컨트랙트 확인
[src/Counter.sol](src/Counter.sol)을 열어보세요. 두 개의 함수가 있습니다:
```solidity
// SPDX-License-Identifier: UNLICENSED
pragma solidity ^0.8.13;
contract Counter {
uint256 public number;
function setNumber(uint256 newNumber) public {
number = newNumber;
}
function increment() public {
number++;
}
}
```
`number`는 체인에 저장되는 공개 상태 변수입니다. `increment()`와 `setNumber()`는 이를 변경하는 두 가지 방법입니다. `number`를 읽는 것은 가스가 들지 않습니다 — 무료 `eth_call`입니다.
### 3. Stable 테스트넷 구성
프로젝트 루트에 네트워크 자격증명을 저장할 [.env](.env) 파일을 생성합니다:
```bash
touch .env
```
다음 내용을 추가하고, 플레이스홀더를 실제 개인 키로 교체합니다:
```bash
PRIVATE_KEY=0xYOUR_PRIVATE_KEY_HERE
```
다음으로 [foundry.toml](foundry.toml)을 열고 Stable 테스트넷을 명명된 네트워크 프로필로 추가합니다. 기존 `[profile.default]` 섹션 아래에 다음 블록을 추가합니다:
```toml
[rpc_endpoints]
stable_testnet = "https://rpc.testnet.stable.xyz"
```
이렇게 하면 `stable_testnet`을 대상으로 할 때 Foundry가 트랜잭션을 어디로 보낼지 알게 됩니다. Stable은 EVM 호환이므로 다른 구성은 필요하지 않습니다.
***
**체크포인트:** RPC 엔드포인트에 접근 가능한지 확인합니다:
```bash
cast chain-id --rpc-url https://rpc.testnet.stable.xyz
```
예상 출력:
```
2201
```
체인 ID `2201`은 Stable 테스트넷입니다. 이 숫자가 보이면 네트워크에 접근할 수 있는 것입니다.
***
### 4. 지갑 주소 가져오기
개인 키에서 배포자 주소를 도출하여 어떤 계정에 자금을 충전해야 하는지 확인합니다:
```bash
source .env
cast wallet address $PRIVATE_KEY
```
출력된 주소를 복사합니다. 다음 단계에서 필요합니다.
### 5. USDT0으로 지갑에 자금 충전
Stable은 **USDT0**을 가스 토큰으로 사용합니다 — 상품과 서비스 결제에 사용하는 것과 동일한 자산이 컴퓨팅 비용 지불에 직접 사용됩니다. 별도의 네이티브 토큰은 없습니다.
테스트넷 수도꼭지를 방문하여 자금을 요청합니다:
```
https://faucet.stable.xyz
```
이전 단계의 주소를 붙여넣습니다. 수도꼭지는 지갑에 1 USDT0을 전송하며, 이는 여러 컨트랙트를 배포하고 상호작용하기에 충분합니다.
***
**체크포인트:** 잔액이 도착했는지 확인합니다:
```bash
cast balance $PRIVATE_KEY --rpc-url https://rpc.testnet.stable.xyz
```
0이 아닌 값이 보여야 합니다. 잔액이 여전히 `0`이라면 몇 초 후 다시 실행하세요 — Stable은 약 0.7초마다 새 블록을 생성하므로 자금이 빨리 정산됩니다.
***
### 6. 컨트랙트 배포
`forge create`로 배포를 실행합니다:
```bash
source .env
forge create src/Counter.sol:Counter \
--rpc-url https://rpc.testnet.stable.xyz \
--private-key $PRIVATE_KEY \
--broadcast
```
Foundry가 컨트랙트를 컴파일하고, 배포 트랜잭션을 브로드캐스트하고, 영수증을 기다립니다. 블록 시간이 \~0.7초이므로 잠깐이면 됩니다.
***
**체크포인트:** 출력이 다음과 같아야 합니다:
```
[⠒] Compiling...
No files changed, compilation skipped
Deployer: 0xYourAddress
Deployed to: 0xSomeContractAddress
Transaction hash: 0xSomeTxHash
```
`Deployed to` 주소를 복사합니다. 다음 두 단계에서 필요합니다.
***
### 7. 쓰기 함수 호출
이제 `setNumber()`를 호출하여 체인에 값을 저장합니다:
```bash
cast send 0xSomeContractAddress "setNumber(uint256)" 42 \
--rpc-url https://rpc.testnet.stable.xyz \
--private-key $PRIVATE_KEY
```
이것은 트랜잭션을 전송합니다. 상태 변경에 대해 소량의 USDT0 수수료를 지불합니다. 값 `42`가 이제 Stable 테스트넷의 `number` 변수에 저장되었습니다.
### 8. 체인에서 상태 읽기
`number()`를 호출하여 값을 읽어옵니다. 이것은 무료 읽기 — 트랜잭션 없음, 가스 없음:
```bash
cast call 0xSomeContractAddress "number()(uint256)" \
--rpc-url https://rpc.testnet.stable.xyz
```
예상 출력:
```
42
```
Stable 테스트넷에 쓰고 읽는 것을 완료했습니다. 배포, 쓰기, 읽기의 전체 사이클은 EVM 개발의 핵심 루프이며, 다른 EVM 체인과 동일하게 작동합니다.
### 9. Stablescan에서 배포 확인
Stable 테스트넷 블록 탐색기를 열고 컨트랙트 주소를 붙여넣습니다:
```
https://testnet.stablescan.xyz
```
배포 트랜잭션과 `setNumber` 호출을 볼 수 있습니다. Stablescan은 Stable에서 온체인 상태를 검사하고, 컨트랙트 소스 코드를 검증하고, 트랜잭션 히스토리를 읽는 공식 도구입니다.
***
### 배운 내용
컨트랙트를 배포하고, 상태 변경 트랜잭션을 전송하고, 온체인 상태를 읽었습니다 — 모두 Stable 테스트넷에서 완료했습니다. 이제 다음을 할 수 있습니다:
* 표준 RPC 엔드포인트를 사용하여 Stable을 대상으로 Foundry(또는 다른 EVM 도구체인) 구성하기
* USDT0 수도꼭지를 사용하여 지갑에 자금 충전하기
* USDT0을 가스 토큰으로 사용하여 트랜잭션 비용 지불하기
* Stablescan에서 작업 내용 확인하기
**다음 단계:**
* [JSON-RPC API](/ko/developers/core-mechanics/json-rpc-api) — Stable이 지원하는 `eth_` 메서드와 이더리움 메인넷과의 차이점 확인
* [가스 & 가격 책정](/ko/developers/core-mechanics/gas-pricing) — USDT0 기반 수수료 계산 방식 이해
* [테스트넷 정보](/ko/developers/testnet/testnet-information) — 전체 네트워크 파라미터, 컨트랙트 주소, 브리지 세부사항
## 생태계
이 문서에서는 브릿지(LayerZero) 및 USDT0에 대한 정보를 확인할 수 있습니다.
### Stable Testnet의 LayerZero
| 이름 | 값 |
| ----------------- | ------------------------------------------ |
| eid | 40374 |
| chainKey | stable-testnet |
| stage | testnet |
| endpointV2View | 0x6Ac7bdc07A0583A362F1497252872AE6c0A5F5B8 |
| endpointV2 | 0x3aCAAf60502791D199a5a5F0B173D78229eBFe32 |
| sendUln302 | 0x9eCf72299027e8AeFee5DC5351D6d92294F46d2b |
| receiveUln302 | 0xB0487596a0B62D1A71D0C33294bd6eB635Fc6B09 |
| blockedMessageLib | 0xa229b65cc2191bf60bc24efcda3487d7b5c0c9f0 |
| executor | 0x701f3927871EfcEa1235dB722f9E608aE120d243 |
| deadDVN | 0xC1868e054425D378095A003EcbA3823a5D0135C9 |
### Stable Testnet의 USDT0
| 이름 | 값 |
| ----------- | ------------------------------------------ |
| wrapper | 0xB8CE59FC3717ada4C02eaDF9682A9e934F625ebb |
| composer | 0xe7cd86e13AC4309349F30B3435a9d337750fC82D |
| OFT | 0x779Ded0c9e1022225f8E0630b35a9b54bE713736 |
| USDT0 impl | 0x3f9E27457ac494fC729beB50e6af04Ec34e3828E |
| USDT0 proxy | 0x78Cf24370174180738C5B8E352B6D14c83a6c9A9 |
### Sepolia OFT 컨트랙트 및 USDT0 컨트랙트 (참고용)
| 이름 | 값 |
| ------------ | ---------------------------------------------------------------------------------------------------------------------------------------------------------------------------------------------- |
| Sepolia OFT | [https://sepolia.etherscan.io/address/0xc099cd946d5efcc35a99d64e808c1430cef08126](https://sepolia.etherscan.io/address/0xc099cd946d5efcc35a99d64e808c1430cef08126) |
| Sepolia USDT | [https://sepolia.etherscan.io/address/0xc4DCC311c028e341fd8602D8eB89c5de94625927#writeContract](https://sepolia.etherscan.io/address/0xc4DCC311c028e341fd8602D8eB89c5de94625927#writeContract) |
## Stable 테스트넷 지갑에 자금을 충전하는 방법
Stable은 USDT0를 가스 토큰으로 사용하므로, 체인과 상호작용하기 위해서는 지갑에 USDT0가 필요합니다. 먼저 Faucet을 사용하여 계정에 USDT0를 충전해야 합니다.
1. [https://faucet.stable.xyz](https://faucet.stable.xyz) 를 방문합니다
2. 'Get USDT0' 버튼을 클릭하면 1 USDT0가 지갑으로 전송됩니다.
더 많은 USDT0가 필요한 경우, Ethereum Sepolia에서 Stable 테스트넷으로 Test USDT를 브리지할 수 있습니다.
1. [https://sepolia.etherscan.io/token/0xc4DCC311c028e341fd8602D8eB89c5de94625927#writeContract](https://sepolia.etherscan.io/token/0xc4DCC311c028e341fd8602D8eB89c5de94625927#writeContract) 를 방문하여, `_mint` 함수를 호출해 원하는 양의 Test Tether USD를 계정에 발행합니다.
2. Ethereum Sepolia의 LayerZero 브리지 컨트랙트로 다음 트랜잭션을 전송하여 Test USDT를 Stable 테스트넷으로 브리지합니다:
```jsx
export function addrTo32Bytes(addr: string): Buffer {
const hex20 = ethers.utils.getAddress(addr).slice(2);
const padded = hex20.padStart(64, "0"); // 32 bytes ⇒ 64 hex
return Buffer.from(padded, "hex"); // length === 32
}
async function main() {
const [owner] = await ethers.getSigners();
const SEPOLIA_USDT0 = "0xc4DCC311c028e341fd8602D8eB89c5de94625927";
const SEPOLIA_USDT0_OAPP = "0xc099cD946d5efCC35A99D64E808c1430cEf08126"
const RECEIVER_EID = 40374;
const usdt0 = await ethers.getContractAt("ERC20", SEPOLIA_USDT0);
await usdt0.approve(SEPOLIA_USDT0_OAPP, ethers.utils.parseEther("1"));
const options = Options.newOptions().addExecutorLzReceiveOption(0, 0).toBytes();
const amount = ethers.utils.parseEther("1"); // Change this to your desired amount
const OFTAdapter = await ethers.getContractAt("OFTAdapter", SEPOLIA_USDT0_OAPP);
const sendParams = {
dstEid: RECEIVER_EID,
to: addrTo32Bytes(owner.address),
amountLD: amount,
minAmountLD: amount,
extraOptions: options,
composeMsg: Buffer.from(""),
oftCmd: Buffer.from(""),
};
const fee = await OFTAdapter.quoteSend(sendParams, false);
await OFTAdapter.send(
sendParams,
fee,
owner.address,
{
value: fee.nativeFee,
}
)
}
```
## Testnet 정보
Stable testnet에 접근하기 위해 필요한 모든 정보입니다.
### 네트워크 개요
| 설정 | 값 |
| ------------ | -------------- |
| **네트워크 이름** | Stable Testnet |
| **Chain ID** | `2201` |
| **가스 토큰** | USDT0 |
| **거버넌스 토큰** | STABLE |
| **블록 타임** | \~0.7 초 |
### Block Explorer
| Explorer | URL |
| -------------- | ---------------------------------------------------------------- |
| **Stablescan** | [https://testnet.stablescan.xyz](https://testnet.stablescan.xyz) |
### RPC 엔드포인트
#### 주요 엔드포인트
| 타입 | 엔드포인트 | 목적 |
| ---------------- | ---------------------------------------------------------------- | -------- |
| **EVM JSON-RPC** | [https://rpc.testnet.stable.xyz](https://rpc.testnet.stable.xyz) | EVM 트랜잭션 |
| **WebSocket** | wss\://rpc.testnet.stable.xyz | 실시간 업데이트 |
### 체인 정보
| 파라미터 | EVM |
| ------------ | ------- |
| **Chain ID** | `2201` |
| **주소 형식** | `0x...` |
| **가스 토큰** | `USDT0` |
| **소수점** | 18 |
### Faucet 및 도구
| 도구 | URL | 설명 |
| ------------- | ------------------------------------------------------- | ----------- |
| **Faucet** | [https://faucet.stable.xyz](https://faucet.stable.xyz) | 테스트 토큰 받기 |
| **Snapshots** | [Node Operators Guide](../node-operations/snapshots) 참조 | 체인 snapshot |
## 버전 히스토리
Stable 테스트넷의 전체 버전 히스토리 및 관련 문서 정보입니다.
### 현재 버전 정보
* **현재 버전**: `v1.3.1-rc0`
* **다음 업그레이드**: `TBD`
* **업그레이드 높이**: `TBD`
* **예상 시간**: `TBD`
### 버전 히스토리
#### 현재 및 이전 버전
| 버전 | 커밋 | 업그레이드 높이 | 바이너리 | 상태 |
| -------------- | ---------- | ---------- | --------------------------------------------------------------------------------------------------------------------------------------------------------------------------------------------------------------------------------------------------- | -------------------- |
| **v1.3.1-rc0** | `75bb546` | - | [AMD64](https://stable-data-dist.s3.us-east-1.amazonaws.com/testnet/binary/stabled-1.3.1-rc0-linux-amd64-testnet.tar.gz) / [ARM64](https://stable-data-dist.s3.us-east-1.amazonaws.com/testnet/binary/stabled-1.3.1-rc0-linux-arm64-testnet.tar.gz) | 현재 버전 |
| **v1.3.0-rc1** | `25b5e47` | 53,265,500 | [AMD64](https://stable-data-dist.s3.us-east-1.amazonaws.com/testnet/binary/stabled-1.3.0-rc1-linux-amd64-testnet.tar.gz) / [ARM64](https://stable-data-dist.s3.us-east-1.amazonaws.com/testnet/binary/stabled-1.3.0-rc1-linux-arm64-testnet.tar.gz) | |
| **v1.3.0-rc0** | `864d54c` | 49,855,000 | [AMD64](https://stable-data-dist.s3.us-east-1.amazonaws.com/testnet/binary/stabled-1.3.0-rc0-linux-amd64-testnet.tar.gz) / [ARM64](https://stable-data-dist.s3.us-east-1.amazonaws.com/testnet/binary/stabled-1.3.0-rc0-linux-arm64-testnet.tar.gz) | |
| **v1.2.2-rc0** | `8bd5d5e` | - | [AMD64](https://stable-data-dist.s3.us-east-1.amazonaws.com/testnet/binary/stabled-1.2.2-rc0-linux-amd64-testnet.tar.gz) / [ARM64](https://stable-data-dist.s3.us-east-1.amazonaws.com/testnet/binary/stabled-1.2.2-rc0-linux-arm64-testnet.tar.gz) | |
| **v1.2.1-rc1** | `7ff9a8a` | - | [AMD64](https://stable-data-dist.s3.us-east-1.amazonaws.com/testnet/binary/stabled-1.2.1-rc1-linux-amd64-testnet.tar.gz) / [ARM64](https://stable-data-dist.s3.us-east-1.amazonaws.com/testnet/binary/stabled-1.2.1-rc1-linux-arm64-testnet.tar.gz) | |
| **v1.2.0-rc1** | `263c033` | 41,306,450 | [AMD64](https://stable-data-dist.s3.us-east-1.amazonaws.com/testnet/binary/stabled-1.2.0-rc1-linux-amd64-testnet.tar.gz) / [ARM64](https://stable-data-dist.s3.us-east-1.amazonaws.com/testnet/binary/stabled-1.2.0-rc1-linux-arm64-testnet.tar.gz) | |
| **v1.2.0** | `ee8ca35` | 40,392,500 | [AMD64](https://stable-data-dist.s3.us-east-1.amazonaws.com/testnet/binary/stabled-1.2.0-linux-amd64-testnet.tar.gz) / [ARM64](https://stable-data-dist.s3.us-east-1.amazonaws.com/testnet/binary/stabled-1.2.0-linux-arm64-testnet.tar.gz) | |
| **v1.1.2** | `3d83aa3` | 34,649,300 | [AMD64](https://stable-data-dist.s3.us-east-1.amazonaws.com/testnet/binary/stabled-1.1.2-linux-amd64-testnet.tar.gz) / [ARM64](https://stable-data-dist.s3.us-east-1.amazonaws.com/testnet/binary/stabled-1.1.2-linux-arm64-testnet.tar.gz) | |
| **v1.1.1** | `8becd6b` | 33,152,000 | [AMD64](https://stable-data-dist.s3.us-east-1.amazonaws.com/testnet/binary/stabled-1.1.1-linux-amd64-testnet.tar.gz) / [ARM64](https://stable-data-dist.s3.us-east-1.amazonaws.com/testnet/binary/stabled-1.1.1-linux-arm64-testnet.tar.gz) | |
| **v1.1.0** | `17ceaa7` | 32,309,700 | [AMD64](https://stable-data-dist.s3.us-east-1.amazonaws.com/testnet/binary/stabled-1.1.0-linux-amd64-testnet.tar.gz) / [ARM64](https://stable-data-dist.s3.us-east-1.amazonaws.com/testnet/binary/stabled-1.1.0-linux-arm64-testnet.tar.gz) | |
| **v0.8.1** | `1eb65d5` | 30,770,000 | [AMD64](https://stable-data-dist.s3.us-east-1.amazonaws.com/testnet/binary/stabled-0.8.1-linux-amd64-testnet.tar.gz) / [ARM64](https://stable-data-dist.s3.us-east-1.amazonaws.com/testnet/binary/stabled-0.8.1-linux-arm64-testnet.tar.gz) | |
| **v0.8.0** | `e55efb6` | 29,410,999 | [AMD64](https://stable-data-dist.s3.us-east-1.amazonaws.com/testnet/binary/stabled-0.8.0-linux-amd64-testnet.tar.gz) / [ARM64](https://stable-data-dist.s3.us-east-1.amazonaws.com/testnet/binary/stabled-0.8.0-linux-arm64-testnet.tar.gz) | Bank 프리컴파일 개선 |
| **v0.7.2** | `3c53e14` | 27,258,000 | [AMD64](https://stable-data-dist.s3.us-east-1.amazonaws.com/testnet/binary/stabled-0.7.2-linux-amd64-testnet.tar.gz) / [ARM64](https://stable-data-dist.s3.us-east-1.amazonaws.com/testnet/binary/stabled-0.7.2-linux-arm64-testnet.tar.gz) | StableBFT 통합 |
| **v0.6.0** | `5cc1ad6` | 19,587,000 | [AMD64](https://stable-data-dist.s3.us-east-1.amazonaws.com/testnet/binary/stabled-0.6.0-linux-amd64-testnet.tar.gz) | 소규모 수정 |
| **v0.5.0** | `919281d` | 18,719,000 | [AMD64](https://stable-data-dist.s3.us-east-1.amazonaws.com/testnet/binary/stabled-0.5.0-linux-amd64-testnet.tar.gz) | 소규모 수정 |
| **v0.4.0** | `c6240c0` | 18,666,150 | [AMD64](https://stable-data-dist.s3.us-east-1.amazonaws.com/testnet/binary/stabled-0.4.0-linux-amd64-testnet.tar.gz) | Stable SDK v0.53.4 |
| **v0.3.0** | `a4f5ac5` | 9,166,131 | [AMD64](https://stable-data-dist.s3.us-east-1.amazonaws.com/testnet/binary/stabled-0.3.0-linux-amd64-testnet.tar.gz) | EVM 가치 전송 허용 목록 |
| **v0.2.1** | `53e6e073` | - | [AMD64](https://stable-data-dist.s3.us-east-1.amazonaws.com/testnet/binary/stabled-0.2.1-linux-amd64-testnet.tar.gz) | 논브레이킹 업데이트 |
| **v0.2.0** | `8bdd771` | 8,956,584 | [AMD64](https://stable-data-dist.s3.us-east-1.amazonaws.com/testnet/binary/stabled-0.2.0-linux-amd64-testnet.tar.gz) | 기능 업데이트 |
| **v0.1.0** | `10dfg542` | Genesis | [AMD64](https://stable-data-dist.s3.us-east-1.amazonaws.com/testnet/binary/stabled-0.1.0-linux-amd64-testnet.tar.gz) | Genesis (2025-04-07) |
### 관련 문서
* [업그레이드 가이드](/ko/developers/node-operations/upgrades) - 단계별 업그레이드 절차
* [테스트넷 정보](/ko/developers/testnet/testnet-information) - 현재 네트워크 세부 정보
This guide covers all configuration options for Stable nodes, including optimization for different use cases.
### Configuration Files Overview
Stable nodes use two main configuration files:
* **`config.toml`**: Core StableBFT configuration
* **`app.toml`**: Application-specific configuration
Both files are located in `~/.stabled/config/`
### Core Configuration (config.toml)
#### Basic Settings
:::code-group
```toml [Mainnet]
# The ID of the chain to join
chain_id = "stable_988-1"
# A custom human-readable name for this node
moniker = "your-node-name"
# Database backend: goleveldb | cleveldb | boltdb | rocksdb | badgerdb
db_backend = "goleveldb"
```
```toml [Testnet]
# The ID of the chain to join
chain_id = "stabletestnet_2201-1"
# A custom human-readable name for this node
moniker = "your-node-name"
# Database backend: goleveldb | cleveldb | boltdb | rocksdb | badgerdb
db_backend = "goleveldb"
```
:::
#### P2P Configuration
:::code-group
```toml [Mainnet]
[p2p]
# Address to listen for incoming connections
laddr = "tcp://0.0.0.0:26656"
# Address to advertise to peers for them to dial
external_address = "YOUR_PUBLIC_IP:26656"
# Comma separated list of seed nodes
seeds = "17a539fda42863a99755547e1c9b3ec4c38a4439@seed1.stable.xyz:26656"
# Comma separated list of persistent peers
persistent_peers = "b896f6f8ca5a4d1cc40de09407df0c96e76df950@peer1.stable.xyz:26656"
```
```toml [Testnet]
[p2p]
# Address to listen for incoming connections
laddr = "tcp://0.0.0.0:26656"
# Address to advertise to peers for them to dial
external_address = "YOUR_PUBLIC_IP:26656"
# Comma separated list of seed nodes
seeds = "39e061b167162f6621ddadcf1be21d6fa585a468@seed1.testnet.stable.xyz:26656"
# Comma separated list of persistent peers
persistent_peers = "5ed0f977a26ccf290e184e364fb04e268ef16430@peer1.testnet.stable.xyz:26656"
```
:::
Additional P2P settings (same for both networks):
```toml
# Maximum number of inbound peers
max_num_inbound_peers = 50
# Maximum number of outbound peers
max_num_outbound_peers = 30
# Toggle to disable guard against peers connecting from the same ip
allow_duplicate_ip = false
# Peer connection configuration
handshake_timeout = "20s"
dial_timeout = "3s"
# Time to wait before flushing messages out on the connection
flush_throttle_timeout = "100ms"
# Maximum size of a message packet payload
max_packet_msg_payload_size = 1024
# Rate limiting
send_rate = 5120000 # 5 MB/s
recv_rate = 5120000 # 5 MB/s
# Seed mode (for seed nodes only)
seed_mode = false
# Enable peer exchange reactor
pex = true
```
#### RPC Server Configuration
```toml
[rpc]
# TCP or UNIX socket address for the RPC server
laddr = "tcp://127.0.0.1:26657"
# A list of origins a cross-domain request can be executed from
cors_allowed_origins = ["*"]
# A list of methods the client is allowed to use with cross-domain requests
cors_allowed_methods = ["HEAD", "GET", "POST"]
# A list of non simple headers the client is allowed to use with cross-domain requests
cors_allowed_headers = ["Origin", "Accept", "Content-Type", "X-Requested-With", "X-Server-Time"]
# TCP or UNIX socket address for the gRPC server
grpc_laddr = "tcp://127.0.0.1:9090"
# Maximum number of simultaneous connections
grpc_max_open_connections = 900
# Activate unsafe RPC commands like /dial_seeds and /unsafe_flush_mempool
unsafe = false
# Maximum number of simultaneous connections (including WebSocket)
max_open_connections = 900
# Maximum number of unique clientIDs that can connect
max_subscription_clients = 100
# Maximum number of unique queries a given client can subscribe to
max_subscriptions_per_client = 5
# How long to wait for a tx to be committed
timeout_broadcast_tx_commit = "10s"
# Maximum size of request body
max_body_bytes = 1000000
# Maximum size of request header
max_header_bytes = 1048576
```
#### Mempool Configuration
```toml
[mempool]
# Mempool version to use
version = "v1"
# Recheck enabled
recheck = true
# Broadcast enabled
broadcast = true
# Maximum number of transactions in the mempool
size = 3000
# Limit the total size of all txs in the mempool
max_txs_bytes = 1073741824 # 1GB
# Size of the cache
cache_size = 10000
# Do not remove invalid transactions from the cache
keep-invalid-txs-in-cache = false
# Maximum size of a single transaction
max_tx_bytes = 1048576 # 1MB
# Maximum size of a batch of transactions to send to a peer
max_batch_bytes = 0
```
#### Consensus Configuration
```toml
[consensus]
# How long we wait for a proposal block before prevoting nil
timeout_propose = "5s"
# How much timeout_propose increases with each round
timeout_propose_delta = "10ms"
# How long we wait after receiving +2/3 prevotes
timeout_prevote = "150ms"
# How much the timeout_prevote increases with each round
timeout_prevote_delta = "10ms"
# How long we wait after receiving +2/3 precommits
timeout_precommit = "150s"
# How much the timeout_precommit increases with each round
timeout_precommit_delta = "10ms"
# Make progress as soon as we have all the precommits
skip_timeout_commit = false
# Enable/disable double sign check
double_sign_check_height = 2
# EmptyBlocks mode
create_empty_blocks = true
create_empty_blocks_interval = "0s"
# Reactor sleep duration
peer_gossip_sleep_duration = "100ms"
peer_query_maj23_sleep_duration = "2s"
```
### Application Configuration (app.toml)
#### Basic Application Settings
```toml
# Pruning strategy
pruning = "default"
# HaltHeight contains a non-zero block height at which a node will halt
halt-height = 0
# HaltTime contains a non-zero time at which a node will halt
halt-time = 0
# MinRetainBlocks defines the number of blocks for which a node will retain
min-retain-blocks = 0
# InterBlockCache enables inter-block caching
inter-block-cache = true
# IndexEvents defines the set of events in the form {eventType}.{attributeKey}
index-events = []
# IavlCacheSize set the size of the iavl tree cache
iavl-cache-size = 781250
```
#### API Configuration
```toml
[api]
# Enable defines if the API server should be enabled
enable = true
# Swagger defines if swagger documentation should automatically be registered
swagger = true
# Address defines the API server to listen on
address = "tcp://0.0.0.0:1317"
# MaxOpenConnections defines the number of maximum open connections
max-open-connections = 1000
# EnabledUnsafeCORS defines if CORS should be enabled
enabled-unsafe-cors = true
```
#### gRPC Configuration
```toml
[grpc]
# Enable defines if the gRPC server should be enabled
enable = true
# Address defines the gRPC server address to bind to
address = "0.0.0.0:9090"
```
#### EVM JSON-RPC Configuration
```toml
[json-rpc]
# Enable the JSON-RPC server
enable = true
# Address to bind the JSON-RPC server
address = "0.0.0.0:8545"
# Address to bind the WebSocket server
ws-address = "0.0.0.0:8546"
# APIs to enable
api = "eth,net,web3,txpool,personal,debug"
# Gas cap for eth_call/estimateGas
gas-cap = 25000000
# EVM timeout for eth_call/estimateGas
evm-timeout = "5s"
# Tx fee cap for transactions
txfee-cap = 1
# Filter cap for eth_getLogs
filter-cap = 200
# FeeHistory cap
feehistory-cap = 100
# Block range cap for eth_getLogs
logs-cap = 10000
# Block range cap
block-range-cap = 10000
# HTTP timeout
http-timeout = "30s"
# HTTP idle timeout
http-idle-timeout = "120s"
# Allow unprotected transactions
allow-unprotected-txs = true
# Maximum number of transactions in the pool
max-tx-in-pool = 3000
# Enable indexer
enable-indexer = false
# Enable metrics
metrics = true
```
### Configuration Profiles
#### Full Node (Default)
Balanced configuration for full nodes:
```bash
# config.toml adjustments
sed -i 's/^indexer = ".*"/indexer = "kv"/' ~/.stabled/config/config.toml
sed -i 's/^max_num_inbound_peers = .*/max_num_inbound_peers = 50/' ~/.stabled/config/config.toml
sed -i 's/^max_num_outbound_peers = .*/max_num_outbound_peers = 30/' ~/.stabled/config/config.toml
# app.toml adjustments
sed -i 's/^pruning = ".*"/pruning = "default"/' ~/.stabled/config/app.toml
sed -i 's/^snapshot-interval = .*/snapshot-interval = 1000/' ~/.stabled/config/app.toml
```
#### Archive Node
No pruning, full history:
```bash
# config.toml adjustments
sed -i 's/^indexer = ".*"/indexer = "kv"/' ~/.stabled/config/config.toml
# app.toml adjustments
sed -i 's/^pruning = ".*"/pruning = "nothing"/' ~/.stabled/config/app.toml
```
#### RPC Node
Public RPC endpoint configuration:
```bash
# config.toml adjustments
sed -i 's/^max_num_inbound_peers = .*/max_num_inbound_peers = 30/' ~/.stabled/config/config.toml
sed -i 's/^max_open_connections = .*/max_open_connections = 30/' ~/.stabled/config/config.toml
sed -i 's/^cors_allowed_origins = .*/cors_allowed_origins = ["*"]/' ~/.stabled/config/config.toml
# app.toml adjustments
sed -i 's/^enable = .*/enable = true/' ~/.stabled/config/app.toml
sed -i 's/^swagger = .*/swagger = true/' ~/.stabled/config/app.toml
sed -i 's/^enabled-unsafe-cors = .*/enabled-unsafe-cors = true/' ~/.stabled/config/app.toml
```
### Monitoring Configuration
#### Prometheus Metrics
```toml
# config.toml
[instrumentation]
# Enable Prometheus metrics
prometheus = true
# Metrics listen address
prometheus_listen_addr = ":26660"
# Namespace for metrics
namespace = "stablebft"
```
#### Logging
```toml
# config.toml
[log]
# Log level (trace|debug|info|warn|error|fatal|panic)
level = "info"
# Log format (plain|json)
format = "plain"
```
### Applying Configuration Changes
After making configuration changes:
```bash
# Restart the node
sudo systemctl restart ${SERVICE_NAME}
# Check logs for errors
sudo journalctl -u ${SERVICE_NAME} -f
# Verify configuration loaded
curl localhost:26657/status | jq '.result.node_info'
```
### Next Steps
* [Set up Monitoring](./monitoring) for your node
* Review [Troubleshooting Guide](./troubleshooting) for common issues
This guide provides detailed instructions for installing and setting up a Stable node on various platforms.
### Prerequisites
Before starting the installation, ensure you have:
* Met all [System Requirements](./system-requirements)
* Root or sudo access to your server
* Basic knowledge of Linux command line
### Installation Method
Use the pre-compiled binaries for your platform. Building from source is not currently supported.
#### Mainnet
##### Linux AMD64
```bash
# Download the latest binary for AMD64 architecture
wget https://stable-data-dist.s3.us-east-1.amazonaws.com/mainnet/binary/stabled-latest-linux-amd64-mainnet.tar.gz
# Extract the archive
tar -xvzf stabled-latest-linux-amd64-mainnet.tar.gz
# Move binary to system path
sudo mv stabled /usr/bin/
# Verify installation
stabled version
```
##### Linux ARM64
```bash
# Download the binary for ARM64 architecture
wget https://stable-data-dist.s3.us-east-1.amazonaws.com/mainnet/binary/stabled-latest-linux-arm64-mainnet.tar.gz
# Extract and install
tar -xvzf stabled-latest-linux-arm64-mainnet.tar.gz
sudo mv stabled /usr/bin/
# Verify installation
stabled version
```
#### Testnet
##### Linux AMD64
```bash
# Download the latest binary for AMD64 architecture
wget https://stable-data-dist.s3.us-east-1.amazonaws.com/testnet/binary/stabled-latest-linux-amd64-testnet.tar.gz
# Extract the archive
tar -xvzf stabled-latest-linux-amd64-testnet.tar.gz
# Move binary to system path
sudo mv stabled /usr/bin/
# Verify installation
stabled version
```
##### Linux ARM64
```bash
# Download the binary for ARM64 architecture
wget https://stable-data-dist.s3.us-east-1.amazonaws.com/testnet/binary/stabled-latest-linux-arm64-testnet.tar.gz
# Extract and install
tar -xvzf stabled-latest-linux-arm64-testnet.tar.gz
sudo mv stabled /usr/bin/
# Verify installation
stabled version
```
### Node Initialization
After installing the binary, initialize your node:
#### Step 1: Set Node Name
```bash
# Set your node's moniker (choose a unique name)
export MONIKER="your-node-name"
```
#### Step 2: Initialize the Node
#### Mainnet
```bash
# Initialize with the mainnet chain ID
stabled init $MONIKER --chain-id stable_988-1
# This creates the configuration directory at ~/.stabled/
```
> **Note**: For current network parameters including chain ID, see [Mainnet Information](#TODO)
#### Testnet
```bash
# Initialize with the testnet chain ID
stabled init $MONIKER --chain-id stabletestnet_2201-1
# This creates the configuration directory at ~/.stabled/
```
> **Note**: For current network parameters including chain ID, see [Testnet Information](#TODO)
#### Step 3: Download Genesis File
:::code-group
```bash [Mainnet]
# Create backup of default genesis
mv ~/.stabled/config/genesis.json ~/.stabled/config/genesis.json.backup
# Download mainnet genesis
wget https://stable-data-dist.s3.us-east-1.amazonaws.com/mainnet/configuration/genesis.zip
unzip genesis.zip
# Move genesis to config directory
cp genesis.json ~/.stabled/config/genesis.json
# Verify genesis checksum
sha256sum ~/.stabled/config/genesis.json
# Expected: e1ceda79a3cc48a1028ca8646a2e9e2d156f610637cfb8b428ca8354277921f1
```
```bash [Testnet]
# Create backup of default genesis
mv ~/.stabled/config/genesis.json ~/.stabled/config/genesis.json.backup
# Download testnet genesis
wget https://stable-data-dist.s3.us-east-1.amazonaws.com/testnet/configuration/genesis.zip
unzip genesis.zip
# Move genesis to config directory
cp genesis.json ~/.stabled/config/genesis.json
# Verify genesis checksum
sha256sum ~/.stabled/config/genesis.json
# Expected: 66afbb6e57e6faf019b3021de299125cddab61d433f28894db751252f5b8eaf2
```
:::
#### Step 4: Configure Node
##### Download Configuration Files
:::code-group
```bash [Mainnet]
# Download optimized configuration (choose one based on your node type)
# For RPC/Full nodes:
wget https://stable-data-dist.s3.us-east-1.amazonaws.com/mainnet/configuration/rpc_node_config.zip
unzip rpc_node_config.zip
# For Archive nodes:
# wget https://stable-data-dist.s3.us-east-1.amazonaws.com/mainnet/configuration/archive_node_config.zip
# unzip archive_node_config.zip
# Backup original config
cp ~/.stabled/config/config.toml ~/.stabled/config/config.toml.backup
# Apply new configuration
cp config.toml ~/.stabled/config/config.toml
# Update moniker in config
sed -i "s/^moniker = \".*\"/moniker = \"$MONIKER\"/" ~/.stabled/config/config.toml
```
```bash [Testnet]
# Download optimized configuration
wget https://stable-data-dist.s3.us-east-1.amazonaws.com/testnet/configuration/rpc_node_config.zip
unzip rpc_node_config.zip
# Backup original config
cp ~/.stabled/config/config.toml ~/.stabled/config/config.toml.backup
# Apply new configuration
cp config.toml ~/.stabled/config/config.toml
# Update moniker in config
sed -i "s/^moniker = \".*\"/moniker = \"$MONIKER\"/" ~/.stabled/config/config.toml
```
:::
##### Essential Configuration Updates
Edit `~/.stabled/config/app.toml`:
```toml
# Enable JSON-RPC for EVM compatibility
[json-rpc]
enable = true
address = "0.0.0.0:8545"
ws-address = "0.0.0.0:8546"
allow-unprotected-txs = true
```
Edit `~/.stabled/config/config.toml`:
:::code-group
```toml [Mainnet]
# P2P Configuration
[p2p]
# Maximum number of peers
max_num_inbound_peers = 50
max_num_outbound_peers = 30
# Seed nodes
seeds = "9aa181b20248e948567cb47a15eae35d58cd549d@seed1.stable.xyz:46656"
# Persistent peers (mainnet seed nodes)
persistent_peers = "b896f6f8ca5a4d1cc40de09407df0c96e76df950@peer1.stable.xyz:26656"
# Enable peer exchange
pex = true
# RPC Configuration
[rpc]
# Listen address
laddr = "tcp://0.0.0.0:26657"
# Maximum number of simultaneous connections
max_open_connections = 900
# CORS settings (adjust for production)
cors_allowed_origins = ["*"]
```
```toml [Testnet]
# P2P Configuration
[p2p]
# Maximum number of peers
max_num_inbound_peers = 50
max_num_outbound_peers = 30
# Seed nodes
seeds = "6f3195823f7e5ee6f911a0a0ceb9ea689e0dc5bd@seed1.testnet.stable.xyz:56656"
# Persistent peers (testnet seed nodes)
persistent_peers = "128accd3e8ee379bfdf54560c21345451c7048c7@peer1.testnet.stable.xyz:26656"
# Enable peer exchange
pex = true
# RPC Configuration
[rpc]
# Listen address
laddr = "tcp://0.0.0.0:26657"
# Maximum number of simultaneous connections
max_open_connections = 900
# CORS settings (adjust for production)
cors_allowed_origins = ["*"]
```
:::
### Systemd Service Setup
Create a systemd service for automatic management:
#### Step 1: Create Service File
:::code-group
```bash [Mainnet]
sudo tee /etc/systemd/system/stabled.service > /dev/null < /dev/null <> ~/.bashrc
echo "export DAEMON_NAME=stabled" >> ~/.bashrc
echo "export DAEMON_HOME=$HOME/.stabled" >> ~/.bashrc
echo "export DAEMON_ALLOW_DOWNLOAD_BINARIES=true" >> ~/.bashrc
echo "export DAEMON_RESTART_AFTER_UPGRADE=true" >> ~/.bashrc
echo "export DAEMON_LOG_BUFFER_SIZE=512" >> ~/.bashrc
echo "export UNSAFE_SKIP_BACKUP=true" >> ~/.bashrc
# Load variables
source ~/.bashrc
```
#### Step 3: Setup Cosmovisor Directory Structure
```bash
# Create cosmovisor directory structure
mkdir -p ~/.stabled/cosmovisor/genesis/bin
mkdir -p ~/.stabled/cosmovisor/upgrades
# Copy current binary to genesis
cp /usr/bin/stabled ~/.stabled/cosmovisor/genesis/bin/
# Create current symlink
ln -s ~/.stabled/cosmovisor/genesis ~/.stabled/cosmovisor/current
# Verify setup
ls -la ~/.stabled/cosmovisor/
cosmovisor run version
```
#### Step 4: Set Environment Variable
```bash
# Set service name (default: stable)
export SERVICE_NAME=stable
```
#### Step 5: Create Service File
:::code-group
```bash [Mainnet]
sudo tee /etc/systemd/system/${SERVICE_NAME}.service > /dev/null < /dev/null < /dev/null < /dev/null < /dev/null < /dev/null < 3 |
| `stablebft_p2p_peers` | 연결된 피어 | \< 3 |
| `stablebft_mempool_size` | 멤풀 크기 | > 1500 |
| `stablebft_mempool_failed_txs` | 실패한 트랜잭션 총계 | > 100/분 |
#### 시스템 메트릭
| 메트릭 | 설명 | 알림 임계값 |
| ---------------------------------- | ---------- | --------------- |
| `node_cpu_seconds_total` | CPU 사용량 | 5분간 > 80% |
| `node_memory_MemAvailable_bytes` | 사용 가능한 메모리 | \< 10% |
| `node_filesystem_avail_bytes` | 사용 가능한 디스크 | \< 10% |
| `node_network_receive_bytes_total` | 네트워크 RX | > 100MB/초 |
| `node_disk_io_time_seconds_total` | 디스크 I/O | > 80% |
| `node_load15` | 시스템 부하 | > CPU 코어 수 \* 2 |
### Grafana 대시보드 설정
#### Stable 대시보드 가져오기
```json
{
"dashboard": {
"title": "Stable Node Monitoring",
"panels": [
{
"title": "Block Height",
"targets": [
{
"expr": "stablebft_consensus_height{chain_id=\"stabletestnet_2201-1\"}"
}
]
},
{
"title": "Peers",
"targets": [
{
"expr": "stablebft_p2p_peers"
}
]
},
{
"title": "Block Time",
"targets": [
{
"expr": "rate(stablebft_consensus_height[1m]) * 60"
}
]
},
{
"title": "Mempool Size",
"targets": [
{
"expr": "stablebft_mempool_size"
}
]
}
]
}
}
```
#### 커스텀 대시보드 가져오기
Grafana UI를 통해 대시보드 가져오기:
```bash
# Navigate to Dashboards > Import > Upload JSON file
# Or use Dashboard ID in Grafana's dashboard library
```
### AlertManager 구성
#### AlertManager 설치
```bash
# Download AlertManager
wget https://github.com/prometheus/alertmanager/releases/download/v0.26.0/alertmanager-0.26.0.linux-amd64.tar.gz
tar xvf alertmanager-0.26.0.linux-amd64.tar.gz
sudo mv alertmanager-0.26.0.linux-amd64 /opt/alertmanager
# Configure
sudo tee /opt/alertmanager/alertmanager.yml > /dev/null < 1500
for: 10m
labels:
severity: warning
annotations:
summary: "High mempool size: {{ $value }}"
- alert: DiskSpaceLow
expr: node_filesystem_avail_bytes{mountpoint="/"} / node_filesystem_size_bytes{mountpoint="/"} < 0.1
for: 5m
labels:
severity: critical
annotations:
summary: "Low disk space: {{ $value | humanizePercentage }}"
- alert: HighCPUUsage
expr: 100 - (avg by(instance) (irate(node_cpu_seconds_total{mode="idle"}[5m])) * 100) > 80
for: 10m
labels:
severity: warning
annotations:
summary: "High CPU usage: {{ $value }}%"
```
### 로그 모니터링
#### Systemd 로그
```bash
# View recent logs
sudo journalctl -u ${SERVICE_NAME} -n 100
# Follow logs
sudo journalctl -u ${SERVICE_NAME} -f
# Filter by time
sudo journalctl -u ${SERVICE_NAME} --since "1 hour ago"
# Export logs
sudo journalctl -u ${SERVICE_NAME} --since today > stable-logs-$(date +%Y%m%d).log
```
#### 로그 분석 스크립트
```bash
#!/bin/bash
# analyze-logs.sh
# Count errors in last hour
echo "Errors in last hour:"
sudo journalctl -u ${SERVICE_NAME} --since "1 hour ago" | grep -c ERROR
# Show peer connections
echo "Peer connections:"
sudo journalctl -u ${SERVICE_NAME} --since "10 minutes ago" | grep "Peer connection" | tail -10
# Check for consensus issues
echo "Consensus rounds:"
sudo journalctl -u ${SERVICE_NAME} --since "30 minutes ago" | grep -E "enterNewRound|Timeout" | tail -20
# Memory usage patterns
echo "Memory warnings:"
sudo journalctl -u ${SERVICE_NAME} --since "1 day ago" | grep -i memory
```
#### Loki 설정 (선택사항)
```bash
# Install Loki
wget https://github.com/grafana/loki/releases/download/v2.9.0/loki-linux-amd64.zip
unzip loki-linux-amd64.zip
sudo mv loki-linux-amd64 /usr/local/bin/loki
# Install Promtail
wget https://github.com/grafana/loki/releases/download/v2.9.0/promtail-linux-amd64.zip
unzip promtail-linux-amd64.zip
sudo mv promtail-linux-amd64 /usr/local/bin/promtail
# Configure Promtail
sudo tee /etc/promtail-config.yml > /dev/null <> ~/metrics/resources.csv
sleep 60
done
```
#### 쿼리 성능
```bash
# Monitor RPC response times
while true; do
START=$(date +%s%N)
curl -s http://localhost:26657/status > /dev/null
END=$(date +%s%N)
DIFF=$((($END - $START) / 1000000))
echo "RPC response time: ${DIFF}ms"
sleep 5
done
```
### 모니터링 모범 사례
1. **중복 모니터링 설정**
* 외부 모니터링 서비스 사용
* 노드 간 교차 모니터링 구현
* Dead man's switch 알림 설정
2. **알림 피로도 방지**
* 기준선을 바탕으로 알림 임계값 조정
* 알림 그룹화 및 억제 사용
* 에스컬레이션 정책 구현
3. **데이터 보존**
* 최소 30일간 메트릭 보관
* 중요 로그 아카이빙
* 모니터링 설정 정기 백업
### 다음 단계
* 문제 해결을 위한 [트러블슈팅 가이드](./troubleshooting) 검토
* 모니터링과 함께 [업그레이드 구성](./upgrades)
* 요구사항에 따른 커스텀 알림 설정
## Overview
This comprehensive guide covers everything you need to know about running and maintaining Stable nodes.
### Quick Links
* **[System Requirements](./system-requirements)** - Hardware and software requirements for different node types
* **[Installation Guide](./installation)** - Step-by-step installation instructions for various platforms
* **[Configuration](./configuration)** - Detailed configuration options and best practices
* **[Snapshots & Sync](./snapshots)** - Fast sync options using snapshots
* **[Upgrade Guide](./upgrades)** - Node upgrade procedures and version history
* **[Monitoring](./monitoring)** - Tools and metrics for node monitoring
* **[Troubleshooting](./troubleshooting)** - Common issues and solutions
### Node Types
#### Full Node
A full node maintains a complete copy of the blockchain and validates all transactions and blocks. Full nodes:
* Verify all transactions and blocks
* Maintain the entire blockchain history
* Can serve data to other nodes
* Support the network's decentralization
#### Archive Node
An archive node stores the complete history of all states and can serve historical queries. Archive nodes:
* Store all historical states
* Support historical queries at any block height
* Require significantly more storage
* Essential for block explorers and analytics
### Network Information
For complete network details including RPC endpoints, block explorers, and chain parameters, see:
* **[Mainnet](#TODO)** - Mainnet details
* **[Testnet](#TODO)** - Testnet details
### Support and Community
* **Discord**: [Join our Discord](https://discord.gg/stablexyz)
### Quick Start
For experienced operators who want to get started quickly:
1. Check [System Requirements](./system-requirements)
2. Follow the [Installation Guide](./installation)
3. Configure your node using [Configuration Guide](./configuration)
4. Speed up sync with [Snapshots](./snapshots)
5. Monitor your node with [Monitoring Guide](./monitoring)
For network parameters and RPC endpoints, see [Mainnet Information](#TODO) or [Testnet Information](#TODO).
This guide covers various methods to synchronize your Stable node quickly using snapshots and state sync.
### Sync Methods Overview
| Method | Sync Time | Storage Required | Use Case |
| -------------------- | --------- | ---------------- | ------------------------------ |
| **Pruned Snapshot** | \~10 min | \< 5 GiB | Regular full nodes |
| **Archive Snapshot** | \~1 hours | \~500 GB | Archive nodes, block explorers |
### Official Snapshots
Stable provides official snapshots updated daily (00:00 UTC).
#### Snapshot Information
#### Mainnet
| Type | Compression | Size | URL | Update Frequency |
| ----------- | ----------- | -------- | -------------------------------------------------------------------------------------------------------- | ---------------- |
| **Pruned** | LZ4 | \< 5 GiB | [Download](https://stable-data-dist.s3.us-east-1.amazonaws.com/mainnet/snapshots/snapshot.tar.lz4) | Daily |
| **Archive** | ZSTD | \~300 GB | [Download](https://stable-data-dist.s3.us-east-1.amazonaws.com/mainnet/snapshots/stable_archive.tar.zst) | Weekly |
#### Testnet
| Type | Compression | Size | URL | Update Frequency |
| ----------- | ----------- | -------- | -------------------------------------------------------------------------------------------------------- | ---------------- |
| **Pruned** | LZ4 | \< 5 GiB | [Download](https://stable-data-dist.s3.us-east-1.amazonaws.com/testnet/snapshots/snapshot.tar.lz4) | Daily |
| **Archive** | ZSTD | \~800 GB | [Download](https://stable-data-dist.s3.us-east-1.amazonaws.com/testnet/snapshots/stable_archive.tar.zst) | Weekly |
### Using Pruned Snapshots
Pruned snapshots contain recent blockchain state (last 100-1000 blocks).
#### Step 1: Set Environment Variable
```bash
# Set service name (default: stable)
export SERVICE_NAME=stable
```
#### Step 2: Stop Node Service
```bash
# Stop the running node
sudo systemctl stop ${SERVICE_NAME}
# Verify it's stopped
sudo systemctl status ${SERVICE_NAME}
```
#### Step 2: Backup Current Data (Optional)
```bash
# Create backup directory
mkdir -p ~/stable-backup
# Backup current state (optional, requires significant space)
cp -r ~/.stabled/data ~/stable-backup/
```
#### Step 3: Download and Extract Pruned Snapshot
:::code-group
```bash [Mainnet]
# Install dependencies
sudo apt install -y wget zstd pv
# Create snapshot directory
mkdir -p ~/snapshot
cd ~/snapshot
# Download pruned snapshot with progress
wget -c https://stable-data-dist.s3.us-east-1.amazonaws.com/mainnet/snapshots/snapshot.tar.lz4
# Remove old data
rm -rf ~/.stabled/data/*
# Extract snapshot with progress indicator
pv stable_pruned.tar.zst | zstd -d -c | tar -xf - -C ~/.stabled/
# Alternative extraction without pv
zstd -d stable_pruned.tar.zst -c | tar -xvf - -C ~/.stabled/
# Clean up
rm stable_pruned.tar.zst
```
```bash [Testnet]
# Install dependencies
sudo apt install -y wget lz4 pv
# Create snapshot directory
mkdir -p ~/snapshot
cd ~/snapshot
# Download pruned snapshot with progress
wget -c https://stable-data-dist.s3.us-east-1.amazonaws.com/testnet/snapshots/snapshot.tar.lz4
# Alternative: Download with resume support
curl -C - -o snapshot.tar.lz4 https://stable-data-dist.s3.us-east-1.amazonaws.com/testnet/snapshots/snapshot.tar.lz4
# Remove old data
rm -rf ~/.stabled/data/*
# Extract snapshot with progress indicator
pv snapshot.tar.lz4 | tar -I lz4 -xf - -C ~/.stabled/
# Alternative extraction without pv
tar -I lz4 -xvf snapshot.tar.lz4 -C ~/.stabled/
# Clean up
rm snapshot.tar.lz4
```
:::
#### Step 4: Restart Node
```bash
# Start the node
sudo systemctl start ${SERVICE_NAME}
# Check status
sudo systemctl status ${SERVICE_NAME}
# Monitor logs
sudo journalctl -u stabled -f
```
### Using Archive Snapshots
Archive snapshots contain complete blockchain history.
#### Step 1: Prepare System
```bash
# Stop node
sudo systemctl stop ${SERVICE_NAME}
# Install dependencies
sudo apt install -y wget zstd pv
# Check available disk space (need 2x snapshot size)
df -h ~/.stabled
```
#### Step 2: Download and Extract Archive Snapshot
:::code-group
```bash [Mainnet]
# Create working directory
mkdir -p ~/snapshot
cd ~/snapshot
# Download archive snapshot
wget -c https://stable-data-dist.s3.us-east-1.amazonaws.com/mainnet/snapshots/stable_archive.tar.zst
# Clear old data
rm -rf ~/.stabled/data/*
# Extract with high memory for better performance
pv stable_archive.tar.zst | zstd -d --long=31 --memory=2048MB -c - | tar -xf - -C ~/.stabled/
# Alternative: Standard extraction
zstd -d --long=31 stable_archive.tar.zst -c | tar -xvf - -C ~/.stabled/
# Clean up
rm stable_archive.tar.zst
```
```bash [Testnet]
# Create working directory
mkdir -p ~/snapshot
cd ~/snapshot
# Download archive snapshot
wget -c https://stable-data-dist.s3.us-east-1.amazonaws.com/testnet/snapshots/stable_archive.tar.zst
# Clear old data
rm -rf ~/.stabled/data/*
# Extract with high memory for better performance
pv archive.tar.zst | zstd -d --long=31 --memory=2048MB -c - | tar -xf - -C ~/.stabled/
# Alternative: Standard extraction
zstd -d --long=31 archive.tar.zst -c | tar -xvf - -C ~/.stabled/
# Clean up
rm archive.tar.zst
```
:::
#### Step 3: Start Node
```bash
# Start service
sudo systemctl start ${SERVICE_NAME}
# Verify sync status
curl -s localhost:26657/status | jq '.result.sync_info'
```
### Creating Your Own Snapshots
#### Manual Snapshot Creation
```bash
# Stop node
sudo systemctl stop ${SERVICE_NAME}
# Create snapshot archive
cd ~/.stabled
tar -cf - data/ | lz4 -9 > ~/stable-snapshot-$(date +%Y%m%d).tar.lz4
# Create checksum
sha256sum ~/stable-snapshot-*.tar.lz4 > checksums.txt
# Restart node
sudo systemctl start ${SERVICE_NAME}
```
#### Automated Snapshot Script
```bash
#!/bin/bash
# snapshot.sh - Automated snapshot creation
# Configuration
SNAPSHOT_DIR="/var/snapshots"
STABLED_HOME="$HOME/.stabled"
KEEP_DAYS=7
# Create snapshot directory
mkdir -p $SNAPSHOT_DIR
# Stop node
sudo systemctl stop ${SERVICE_NAME}
# Create snapshot
SNAPSHOT_NAME="stable-snapshot-$(date +%Y%m%d-%H%M%S).tar.lz4"
tar -cf - -C $STABLED_HOME data/ | lz4 -9 > $SNAPSHOT_DIR/$SNAPSHOT_NAME
# Generate metadata
cat > $SNAPSHOT_DIR/latest.json </dev/null || echo "RPC not responding"
# 3. Peer Connections
echo -e "\n3. PEER COUNT:"
curl -s localhost:26657/net_info | jq '.result.n_peers' 2>/dev/null || echo "Cannot get peer info"
# 4. Recent Errors
echo -e "\n4. RECENT ERRORS (last 20):"
sudo journalctl -u ${SERVICE_NAME} --since "1 hour ago" | grep -i error | tail -20
# 5. System Resources
echo -e "\n5. SYSTEM RESOURCES:"
df -h / | grep -v Filesystem
free -h | grep Mem
top -bn1 | grep "load average"
# 6. Port Status
echo -e "\n6. PORT STATUS:"
ss -tulpn | grep ${SERVICE_NAME} || echo "No ${SERVICE_NAME} ports found"
echo -e "\n=== Diagnostics Complete ==="
```
### 일반적인 문제 및 해결 방법
#### 노드가 시작되지 않음
##### 문제: 바이너리를 찾을 수 없음
**오류 메시지:**
```
stabled: command not found
```
**해결 방법:**
```bash
# Check if binary exists
ls -la /usr/bin/stabled
# If missing, reinstall (use arm64 if needed)
wget https://stable-data-dist.s3.us-east-1.amazonaws.com/testnet/binary/stabled-0.7.2-linux-amd64-testnet.tar.gz
tar -xvzf stabled-0.7.2-linux-amd64-testnet.tar.gz
sudo mv stabled /usr/bin/
sudo chmod +x /usr/bin/stabled
```
##### 문제: 권한 거부됨
**오류 메시지:**
```
Error: open /home/user/.stabled/config/config.toml: permission denied
```
**해결 방법:**
```bash
# Fix ownership
sudo chown -R $USER:$USER ~/.stabled/
# Fix permissions
chmod 700 ~/.stabled/
chmod 600 ~/.stabled/config/*.json
chmod 644 ~/.stabled/config/*.toml
```
##### 문제: 주소가 이미 사용 중
**오류 메시지:**
```
Error: listen tcp 0.0.0.0:26657: bind: address already in use
```
**해결 방법:**
```bash
# Find process using port
sudo lsof -i :26657
# Kill the process
sudo kill -9
# Or change port in config
sed -i 's/laddr = "tcp:\/\/0.0.0.0:26657"/laddr = "tcp:\/\/0.0.0.0:26658"/' ~/.stabled/config/config.toml
```
#### 동기화 문제
##### 문제: 노드가 특정 높이에서 멈춤
**증상:**
* 블록 높이가 증가하지 않음
* 1분 이상 새 블록이 없음
**해결 방법:**
```bash
# 1. Check peers
curl localhost:26657/net_info | jq '.result.n_peers'
# If no peers, add persistent peers
echo "persistent_peers = \"5ed0f977a26ccf290e184e364fb04e268ef16430@37.187.147.27:26656,128accd3e8ee379bfdf54560c21345451c7048c7@37.187.147.22:26656\"" >> ~/.stabled/config/config.toml
# 2. Reset and resync
sudo systemctl stop ${SERVICE_NAME}
stabled comet unsafe-reset-all --keep-addr-book
sudo systemctl start ${SERVICE_NAME}
# 3. Use snapshot (see Snapshots guide)
```
##### 문제: "wrong Block.Header.AppHash" 오류
**오류 메시지:**
```
panic: Wrong Block.Header.AppHash. Expected XXXX, got YYYY
```
**해결 방법:**
```bash
# This indicates state corruption - rollback to previous block
sudo systemctl stop ${SERVICE_NAME}
# Rollback one block
stabled rollback
# Restart node
sudo systemctl start ${SERVICE_NAME}
# If rollback doesn't work, restore from snapshot
# Backup important files
cp ~/.stabled/config/priv_validator_key.json ~/backup/
cp ~/.stabled/config/node_key.json ~/backup/
# Reset state
stabled comet unsafe-reset-all
# Restore from snapshot
wget https://stable-data-dist.s3.us-east-1.amazonaws.com/testnet/snapshots/snapshot.tar.lz4
tar -I lz4 -xf snapshot.tar.lz4 -C ~/.stabled/
sudo systemctl start ${SERVICE_NAME}
```
##### 문제: 느린 동기화 속도
**증상:**
* 분당 100블록 미만
* 높은 CPU/디스크 사용량
**해결 방법:**
```bash
# 1. Check disk I/O
iostat -x 1 5
# 2. Optimize configuration
cat >> ~/.stabled/config/config.toml <> ~/.stabled/config/config.toml < db_dump.txt
# 4. If repair fails, resync
rm -rf ~/.stabled/data
# Restore from snapshot
# 5. Start node
sudo systemctl start ${SERVICE_NAME}
```
##### 문제: "Too many open files"
**오류 메시지:**
```
accept: too many open files
```
**해결 방법:**
```bash
# 1. Check current limits
ulimit -n
# 2. Increase limits
echo "* soft nofile 65535" | sudo tee -a /etc/security/limits.conf
echo "* hard nofile 65535" | sudo tee -a /etc/security/limits.conf
# 3. Update systemd service
sudo sed -i '/\[Service\]/a LimitNOFILE=65535' /etc/systemd/system/stabled.service
# 4. Reload and restart
sudo systemctl daemon-reload
sudo systemctl restart ${SERVICE_NAME}
```
#### 메모리 문제
##### 문제: 메모리 부족(OOM)으로 종료됨
**증상:**
```
stabled.service: Main process exited, code=killed, status=9/KILL
```
**해결 방법:**
```bash
# 1. Check memory usage
free -h
dmesg | grep -i "killed process"
# 2. Add swap space
sudo fallocate -l 8G /swapfile
sudo chmod 600 /swapfile
sudo mkswap /swapfile
sudo swapon /swapfile
echo '/swapfile none swap sw 0 0' | sudo tee -a /etc/fstab
# 3. Optimize memory usage
cat >> ~/.stabled/config/app.toml < $OUTPUT_DIR/system.txt
df -h >> $OUTPUT_DIR/system.txt
free -h >> $OUTPUT_DIR/system.txt
# Service status
systemctl status ${SERVICE_NAME} --no-pager > $OUTPUT_DIR/service-status.txt
# Recent logs
sudo journalctl -u ${SERVICE_NAME} --since "1 hour ago" > $OUTPUT_DIR/recent-logs.txt
# Config files (remove sensitive data)
grep -v "priv" ~/.stabled/config/config.toml > $OUTPUT_DIR/config.toml
grep -v "priv" ~/.stabled/config/app.toml > $OUTPUT_DIR/app.toml
# Node status
curl -s localhost:26657/status > $OUTPUT_DIR/node-status.json 2>/dev/null
# Create archive
tar -czf $OUTPUT_DIR.tar.gz $OUTPUT_DIR/
echo "Debug info collected: $OUTPUT_DIR.tar.gz"
echo "Share this file when requesting support"
```
### 다음 단계
* 문제를 예방하기 위해 [모니터링 설정](./monitoring)을 검토하세요
* 버전별 문제는 [업그레이드 가이드](./upgrades)를 확인하세요
이 가이드는 upgrade 절차 및 rollback을 포함한 Stable 노드의 upgrade 과정을 다룹니다.
> 전체 버전 히스토리 및 upgrade 세부 정보는 [Version History](#TODO)를 참조하세요.
### Upgrade 방법
#### Soft Upgrades (Non-Breaking)
* 언제든지 수행 가능
* 이전 버전과 호환 가능
#### Hard Upgrades (Breaking)
* 특정 높이에서 upgrade 필요
* 이전 버전과 호환 불가능
#### Emergency Upgrades
* 중요한 보안 수정
* 즉각적인 조치 필요
* 체인 중단이 필요할 수 있음
### 표준 Upgrade 절차
#### 1단계: 준비
```bash
# Check current version
stabled version --long
# Backup critical data
cp -r ~/.stabled/config ~/stable-backup-$(date +%Y%m%d)/
# For validators only: Backup validator state
cp ~/.stabled/data/priv_validator_state.json ~/stable-backup-$(date +%Y%m%d)/
# Check disk space (need 2x current data size)
df -h ~/.stabled
```
#### 2단계: 새 바이너리 다운로드
```bash
# For v1.2.0-rc1 upgrade (January 22, 2026)
# Choose your architecture:
# Linux AMD64
BINARY_URL="https://stable-data-dist.s3.us-east-1.amazonaws.com/testnet/binary/stabled-1.2.0-rc1-linux-amd64-testnet.tar.gz"
# OR Linux ARM64
BINARY_URL="https://stable-data-dist.s3.us-east-1.amazonaws.com/testnet/binary/stabled-1.2.0-rc1-linux-arm64-testnet.tar.gz"
# Download new binary
wget $BINARY_URL
# Extract to temporary location
tar -xvzf stabled-1.2.0-rc1-linux-*.tar.gz -C /tmp/
# Verify new version
/tmp/stabled version --long
```
#### 3단계: Upgrade 수행
##### Soft Upgrades의 경우
```bash
# Stop node
sudo systemctl stop ${SERVICE_NAME}
# Backup current binary
sudo mv /usr/bin/stabled /usr/bin/stabled.backup
# Install new binary
sudo mv /tmp/stabled /usr/bin/stabled
sudo chmod +x /usr/bin/stabled
# Verify installation
stabled version --long
# Start node
sudo systemctl start ${SERVICE_NAME}
# Monitor logs
sudo journalctl -u ${SERVICE_NAME} -f
```
##### Hard Upgrades
```bash
# Monitor for upgrade height
while true; do
HEIGHT=$(curl -s localhost:26657/status | jq -r '.result.sync_info.latest_block_height')
echo "Current height: $HEIGHT"
if [ $HEIGHT -ge $UPGRADE_HEIGHT ]; then
break
fi
sleep 10
done
# Node will halt automatically at upgrade height
# Wait for halt message in logs
sudo journalctl -u ${SERVICE_NAME} -f | grep "UPGRADE"
# Once halted, perform upgrade
sudo systemctl stop ${SERVICE_NAME}
sudo mv /usr/bin/stabled /usr/bin/stabled.backup
sudo mv /tmp/stabled /usr/bin/stabled
# Start with new binary
sudo systemctl start ${SERVICE_NAME}
```
#### 4단계: Upgrade 후 검증
```bash
# Check node status
curl -s localhost:26657/status | jq '.result'
# Verify version
curl -s localhost:26657/status | jq '.result.node_info.version'
# Check peers
curl -s localhost:26657/net_info | jq '.result.n_peers'
# Monitor sync status
watch -n 2 'curl -s localhost:26657/status | jq ".result.sync_info"'
# Check for errors
sudo journalctl -u ${SERVICE_NAME} --since "10 minutes ago" | grep -i error
```
### Cosmovisor 설정 (자동 Upgrades)
Cosmovisor는 조율된 upgrade의 upgrade 프로세스를 자동화합니다.
#### 설치
```bash
# Install cosmovisor
go install cosmossdk.io/tools/cosmovisor/cmd/cosmovisor@latest
# Or download binary
wget https://github.com/cosmos/cosmos-sdk/releases/download/cosmovisor%2Fv1.7.0/cosmovisor-v1.7.0-linux-amd64.tar.gz
tar -xzf cosmovisor-v1.7.0-linux-amd64.tar.gz
sudo mv cosmovisor /usr/bin/
```
#### 구성
```bash
# Set environment variables
cat >> ~/.bashrc < /dev/null < > export.json
# 3. Wait for coordinated restart instructions
```
### 다음 단계
* [Version History](#TODO) - 전체 upgrade 히스토리 및 릴리스 노트
* upgrade 후 [노드 모니터링](./monitoring)
* 일반적인 문제는 [Troubleshooting](./troubleshooting) 확인
## Mainnet 정보
Stable mainnet에 접근하기 위해 필요한 모든 정보입니다.
### 네트워크 개요
| 설정 | 값 |
| ------------ | -------------- |
| **네트워크 이름** | Stable Mainnet |
| **Chain ID** | `988` |
| **가스 토큰** | USDT0 |
| **거버넌스 토큰** | STABLE |
| **블록 타임** | \~0.7 초 |
### Block Explorer
| Explorer | URL |
| -------------- | ------------------------------------------------ |
| **Stablescan** | [https://stablescan.xyz](https://stablescan.xyz) |
### RPC 엔드포인트
#### 주요 엔드포인트
| 타입 | 엔드포인트 | 목적 |
| ---------------- | ------------------------------------------------ | -------- |
| **EVM JSON-RPC** | [https://rpc.stable.xyz](https://rpc.stable.xyz) | EVM 트랜잭션 |
| **WebSocket** | wss\://rpc.stable.xyz | 실시간 업데이트 |
### 체인 정보
| 파라미터 | EVM |
| ------------ | ------- |
| **Chain ID** | `988` |
| **가스 토큰** | `USDT0` |
| **소수점** | 18 |
### 도구
| 도구 | URL | 설명 |
| ------------- | ------------------------------------------------------- | ----------- |
| **Snapshots** | [Node Operators Guide](../node-operations/snapshots) 참조 | 체인 snapshot |
## 버전 히스토리
Stable 메인넷의 전체 버전 히스토리 및 관련 문서 정보입니다.
### 현재 버전 정보
* **현재 버전**: `v1.3.1`
* **다음 업그레이드**: `TBD`
* **업그레이드 높이**: `TBD`
* **예상 시간**: `TBD`
### 버전 히스토리
#### 현재 및 이전 버전
| 버전 | 커밋 | 업그레이드 높이 | 바이너리 | 상태 |
| ---------- | --------- | ---------- | ------------------------------------------------------------------------------------------------------------------------------------------------------------------------------------------------------------------------------------------- | ------- |
| **v1.3.1** | `f85d155` | - | [AMD64](https://stable-data-dist.s3.us-east-1.amazonaws.com/mainnet/binary/stabled-1.3.1-linux-amd64-mainnet.tar.gz) / [ARM64](https://stable-data-dist.s3.us-east-1.amazonaws.com/mainnet/binary/stabled-1.3.1-linux-arm64-mainnet.tar.gz) | 현재 버전 |
| **v1.3.0** | `dd103ec` | 24,077,500 | [AMD64](https://stable-data-dist.s3.us-east-1.amazonaws.com/mainnet/binary/stabled-1.3.0-linux-amd64-mainnet.tar.gz) / [ARM64](https://stable-data-dist.s3.us-east-1.amazonaws.com/mainnet/binary/stabled-1.3.0-linux-arm64-mainnet.tar.gz) | |
| **v1.2.2** | `76da1da` | - | [AMD64](https://stable-data-dist.s3.us-east-1.amazonaws.com/mainnet/binary/stabled-1.2.2-linux-amd64-mainnet.tar.gz) / [ARM64](https://stable-data-dist.s3.us-east-1.amazonaws.com/mainnet/binary/stabled-1.2.2-linux-arm64-mainnet.tar.gz) | |
| **v1.2.1** | `7955bb7` | - | [AMD64](https://stable-data-dist.s3.us-east-1.amazonaws.com/mainnet/binary/stabled-1.2.1-linux-amd64-mainnet.tar.gz) / [ARM64](https://stable-data-dist.s3.us-east-1.amazonaws.com/mainnet/binary/stabled-1.2.1-linux-arm64-mainnet.tar.gz) | |
| **v1.2.0** | `47e355b` | 12004000 | [AMD64](https://stable-data-dist.s3.us-east-1.amazonaws.com/mainnet/binary/stabled-1.2.0-linux-amd64-mainnet.tar.gz) / [ARM64](https://stable-data-dist.s3.us-east-1.amazonaws.com/mainnet/binary/stabled-1.2.0-linux-arm64-mainnet.tar.gz) | |
| **v1.1.4** | `c795773` | - | [AMD64](https://stable-data-dist.s3.us-east-1.amazonaws.com/mainnet/binary/stabled-1.1.4-linux-amd64-mainnet.tar.gz) / [ARM64](https://stable-data-dist.s3.us-east-1.amazonaws.com/mainnet/binary/stabled-1.1.4-linux-arm64-mainnet.tar.gz) | |
| **v1.1.2** | `3d83aa3` | 3263600 | [AMD64](https://stable-data-dist.s3.us-east-1.amazonaws.com/mainnet/binary/stabled-1.1.2-linux-amd64-mainnet.tar.gz) / [ARM64](https://stable-data-dist.s3.us-east-1.amazonaws.com/mainnet/binary/stabled-1.1.2-linux-arm64-mainnet.tar.gz) | |
| **v1.1.0** | `17ceaa7` | 1694000 | [AMD64](https://stable-data-dist.s3.us-east-1.amazonaws.com/mainnet/binary/stabled-1.1.0-linux-amd64-mainnet.tar.gz) / [ARM64](https://stable-data-dist.s3.us-east-1.amazonaws.com/mainnet/binary/stabled-1.1.0-linux-arm64-mainnet.tar.gz) | |
| **v1.0.0** | `d996084` | Genesis | [AMD64](https://stable-data-dist.s3.us-east-1.amazonaws.com/mainnet/binary/stabled-1.0.0-linux-amd64-mainnet.tar.gz) / [ARM64](https://stable-data-dist.s3.us-east-1.amazonaws.com/mainnet/binary/stabled-1.0.0-linux-arm64-mainnet.tar.gz) | Genesis |
### 관련 문서
* [업그레이드 가이드](/ko/developers/node-operations/upgrades) - 단계별 업그레이드 절차
* [메인넷 정보](/ko/developers/mainnet/mainnet-information) - 현재 네트워크 세부 정보
## EIP-7702
Stable은 **EIP-7702**를 지원하여 EOA(외부 소유 계정)가 임시로 스마트 계정처럼 작동할 수 있는 통합 계정 모델을 도입합니다.
**주요 동작:**
* 사용자는 기존 키로 트랜잭션에 서명합니다
* 영구적인 계정 업그레이드 없이 컨트랙트와 같은 로직을 실행에 통합할 수 있습니다
* 결제 및 수탁을 위한 안전한 승인 흐름을 가능하게 합니다
* USDT를 사용하는 지갑과 가맹점의 UX를 개선합니다
개발자에게 미치는 영향:
* 사용자는 새로운 컨트랙트를 배포하지 않고도 컨트랙트급 기능을 획득하여 온보딩 마찰을 줄이고 수탁을 단순화합니다.
## Ethereum 생태계와의 호환성
Stable은 Ethereum Virtual Machine (EVM)과 완벽하게 호환되어, 개발자들이 익숙한 도구, 라이브러리 및 컨트랙트 패턴을 수정 없이 사용할 수 있습니다.
이를 통해 기존 애플리케이션의 원활한 마이그레이션과 이미 Ethereum 생태계에서 개발 중인 팀의 간편한 온보딩을 보장합니다.
**주요 호환성 기능**
* **언어**: 스마트 컨트랙트 개발을 위해 Solidity와 Vyper를 지원합니다.
* **도구**: Hardhat 및 Foundry와 같은 표준 프레임워크와 즉시 사용 가능합니다.
* **라이브러리**: ethers.js, web3.js 및 기타 일반적인 JSON-RPC 클라이언트와 완벽하게 호환됩니다.
* **컨트랙트 패턴**: ERC-20 승인, 이벤트 발생 및 액세스 제어 메커니즘을 포함한 표준 EVM 규약을 준수합니다.
* **RPC 인터페이스**: Ethereum 네트워크에서 사용되는 동일한 JSON-RPC 메서드를 제공하여 기존 통합 및 인덱서가 코드 변경 없이 작동할 수 있도록 합니다.
## Finality 규칙 및 호환성 보장
Stable은 EVM 기반 실행 환경에서 트랜잭션을 처리합니다. 트랜잭션이 블록에 포함되면 그 효과가 상태에 적용되고 애플리케이션, 컨트랙트 및 인덱서에 즉시 표시됩니다.
#### 실행 확인
트랜잭션은 다음 조건을 충족하면 **확인됨**으로 간주됩니다:
* 생성된 블록에 성공적으로 포함됨
* 상태 변경(잔액, 스토리지, 이벤트)을 RPC를 통해 확인할 수 있음
퍼블릭 테스트넷 단계 동안:
* 확인된 상태는 애플리케이션 로직에 유효한 것으로 취급되어야 합니다
* 블록 연속성을 추적하기 위해 모니터링 시스템을 사용해야 합니다
#### Settlement 고려사항
Stable은 싱글 슬롯 finality를 제공하므로, 트랜잭션은 유효한 블록에 포함되는 즉시 확정됩니다.
**개발자에게 이것은 다음을 보장합니다:**
* 트랜잭션이 확인된 블록에 나타나면 상태 변경은 최종적이며 되돌릴 수 없습니다.
* 애플리케이션은 블록 포함을 settlement 확인으로 안전하게 신뢰할 수 있습니다.
**결정론적 finality가 있더라도, 재정적으로 민감한 플로우를 처리하는 애플리케이션은 다음을 수행해야 합니다:**
* 종속 작업(예: 잠금 해제, 상환)을 진행하기 전에 RPC 또는 발행된 이벤트를 통해 트랜잭션 성공을 확인합니다.
* 일시적인 제출 또는 RPC 오류를 처리하기 위해 자동화 및 일괄 작업에 대한 재시도 및 조정 로직을 구현합니다.
#### Compatibility Commitments
Stable은 테스트넷 성장 단계 전반에 걸쳐 개발자를 위한 일관된 실행 환경을 유지할 것을 목표로 합니다.
**Current Commitments:**
* 게시된 시스템 모듈 인터페이스와 실행 동작은 명시적으로 언급되지 않는 한 안정적으로 유지됩니다
* 잠재적으로 파괴적인 변경 사항은 다음과 같이 처리됩니다:
* 사전 공지
* 릴리스 및 변경 로그에 문서화
* 필요한 경우 마이그레이션 지침 제공
향후 업데이트에는 다음이 포함될 예정입니다:
* 공식 호환성 정책
* 개발자 대상 기능에 대한 변경 수준 분류
* 버전 전환에 대한 명확한 처리 지침
## Gas 가격 책정
Stable은 단일 구성 요소 gas 수수료 모델을 사용합니다:
* **우선순위 팁 없음 (maxPriorityFeePerGas는 무시됨)**
* 수수료는 순수하게 기본 실행 비용에 기반합니다
* 수수료는 **USDT0**로 지불됩니다
근거:
* Stable은 예측 가능한 결제를 위해 수수료 변동성을 제거합니다
* "팁"과 채굴자 인센티브에 대한 사용자 혼란을 제거합니다
개발자에 미치는 영향:
* 개발자는 트랜잭션 가속화를 위해 **우선순위 수수료**에 의존해서는 안 됩니다
* 지갑은 팁 입력 필드를 숨기거나 비활성화해야 합니다
* Gas 추정 도구는 Stable RPC 가격 책정 로직을 참조해야 합니다
## Gas Waiver
### 요약
Gas Waiver는 소수의 거버넌스 승인 주소("면제자")가 `gasPrice = 0`인 트랜잭션을 제출할 수 있도록 허용하여 Stable에서 가스리스 최종 사용자 트랜잭션을 가능하게 합니다. Stable은 현재 파트너가 프로토콜별 래퍼 로직을 구현하지 않고도 가스리스 UX를 제공하기 위해 통합할 수 있는 면제자 서비스("면제자 서버")를 운영하고 있습니다.
본 문서는 Gas Waiver 메커니즘, 트랜잭션 형식, 거버넌스 제어 및 파트너를 위한 면제자 서버 API를 명시합니다.
### 범위
본 명세는 다음을 다룹니다:
* 가스 면제 트랜잭션에 대한 프로토콜 수준 규칙
* 래퍼 트랜잭션 메커니즘 및 마커 주소
* 거버넌스 제어 권한 부여 및 허용된 대상
* 서명된 사용자 트랜잭션 제출을 위한 면제자 서버 인터페이스
### 정의
* **Waiver(면제자)**: 검증자 거버넌스를 통해 온체인에 등록된 이더리움 주소로, 가스 면제 트랜잭션을 제출할 권한이 있습니다.
* **InnerTx(내부 트랜잭션)**: `gasPrice = 0`인 최종 사용자의 서명된 트랜잭션입니다.
* **WrapperTx(래퍼 트랜잭션)**: 면제자가 서명한 트랜잭션으로, 사용자의 `InnerTx`를 체인으로 전송하고 실행을 승인합니다.
* **Marker address(마커 주소)**: 면제자 래퍼 트랜잭션을 식별하는 데 사용되는 센티널 주소: `0x000000000000000000000000000000000000f333`.
* **AllowedTarget(허용된 대상)**: 면제자를 특정 컨트랙트 주소 및 메서드 선택자로 제한하는 정책입니다.
### 개요
Gas Waiver는 래퍼 트랜잭션 패턴을 사용합니다:
1. 사용자가 `gasPrice = 0`인 `InnerTx`에 서명합니다.
2. 면제자가 `InnerTx`를 `WrapperTx`로 래핑하여 브로드캐스트합니다.
3. 검증자는 마커 트랜잭션을 감지하고, 면제자 권한 및 정책 제약 조건을 확인한 후 임베디드된 `InnerTx`를 실행합니다.
Stable은 온체인에 승인된 면제자로 등록된 면제자 서비스(면제자 서버)를 운영합니다. 파트너는 면제자 서버 API와 통합하여 서명된 `InnerTx` 페이로드를 제출합니다.
### 프로토콜 명세
#### 마커 주소 라우팅
다음 조건을 만족하는 경우에만 트랜잭션이 면제자 래퍼 트랜잭션으로 처리됩니다:
* `to == 0x000000000000000000000000000000000000f333`.
프로토콜은 트랜잭션 `data` 필드를 인코딩된 내부 트랜잭션 페이로드로 해석하고 아래의 면제자 검증 규칙을 사용하여 처리합니다.
#### 권한 부여 및 정책 검사
각 후보 래퍼 트랜잭션에 대해 검증자는 다음을 시행해야 합니다:
1. **면제자 권한 부여**
* `WrapperTx.from`은 거버넌스를 통해 온체인에 등록된 면제자 주소여야 합니다.
2. **가스 면제**
* `WrapperTx.gasPrice`는 `0`이어야 합니다.
* `InnerTx.gasPrice`는 `0`이어야 합니다.
3. **대상 허용 목록**
* `InnerTx.to` 및 `InnerTx.data`에서 추출된 메서드 선택자는 면제자의 `AllowedTarget` 정책에 의해 허용되어야 합니다.
4. **Value 제한**
* `WrapperTx.value`는 `0`이어야 합니다.
검사가 실패하면 래퍼 트랜잭션은 거부되어야 하며 내부 트랜잭션은 실행되지 않아야 합니다.
#### 실행 의미론
모든 검사가 통과되면:
1. 프로토콜은 사용자의 `from`, `nonce` 및 호출 의미론을 보존하면서 사용자로서 `InnerTx`를 실행합니다.
2. 가스 회계는 면제자 메커니즘에 의해 처리됩니다: 사용자는 가스를 지불하지 않으며, 면제자 트랜잭션은 기능의 정의에 따라 `gasPrice = 0`을 사용합니다.
3. 래퍼 트랜잭션은 `InnerTx`의 실행을 커버할 충분한 `gasLimit`를 제공해야 합니다(언래핑 및 검증 오버헤드 포함).
### 트랜잭션 형식
#### WrapperTx
래퍼 트랜잭션은 면제자가 서명하고 마커 주소로 전송됩니다.
```javascript
WrapperTx {
from: waiver_address,
to: 0x000000000000000000000000000000000000f333,
value: 0, // 0이어야 함
data: RLP(InnerTx), // RLP 인코딩된 내부 트랜잭션
gasPrice: 0, // 0이어야 함
gasLimit: sufficient_for_inner, // 내부 실행 + 오버헤드를 커버해야 함
nonce: waiver_nonce
}
```
#### InnerTx
내부 트랜잭션은 최종 사용자가 서명합니다.
```javascript
InnerTx {
from: user_address,
to: target_contract,
value: value,
data: call_data,
gasPrice: 0, // 0이어야 함
gasLimit: execution_gas,
nonce: user_nonce
}
```
### 거버넌스 제어 액세스
면제자 권한 부여는 검증자 거버넌스에 의해 온체인에서 관리됩니다.
거버넌스 제어는 다음을 제공합니다:
* 면제자 주소의 검토 가능한 권한 부여
* 면제자 등록 및 업데이트의 온체인 투명성
* 철회 기능
* `AllowedTarget`을 통한 면제자별 범위 지정
### 보안 모델
#### 최종 사용자 서명 무결성
사용자는 `InnerTx`에 서명합니다. 면제자는 서명을 무효화하지 않고는 내부 트랜잭션 페이로드를 수정할 수 없습니다. 파트너는 여전히 사용자가 의도된 트랜잭션 페이로드에만 서명하도록 보장해야 합니다.
#### 신뢰 경계
파트너가 면제자 서버를 통해 제출을 라우팅하는 경우 Gas Waiver는 서비스 종속성을 도입합니다:
* 서비스의 가용성은 가스리스 트랜잭션을 제출할 수 있는 능력에 영향을 미칩니다.
* 권한 부여는 온체인에 유지됩니다. 등록된 면제자 주소만 유효한 래퍼 제출을 생성할 수 있습니다.
### 파트너 통합
파트너는 다음과 같이 통합합니다:
1. 사용자로부터 서명된 `InnerTx`를 수집합니다(`gasPrice = 0`).
2. 서명된 내부 트랜잭션을 면제자 서버 API에 제출합니다.
3. 스트리밍된 결과를 처리하고 최종 사용자에게 트랜잭션 해시를 표시합니다.
### 면제자 서버
#### 개요
면제자 서버는 서명된 사용자 `InnerTx` 페이로드를 면제자 승인 래퍼 트랜잭션으로 래핑하고 브로드캐스트합니다. 파트너는 래퍼 트랜잭션을 구성하거나 면제자 주소를 운영할 필요가 없습니다.
#### 엔드포인트 및 기본 URL
기본 URL:
* 메인넷: 미정
* 테스트넷: `https://waiver.testnet.stable.xyz`
#### 인증
상태 확인을 제외한 모든 엔드포인트는 Bearer 토큰 인증이 필요합니다:
```
Authorization: Bearer
```
#### API
##### GET `/v1/health`
상태 확인 엔드포인트입니다.
인증: 없음.
##### POST `/v1/submit`
서명된 내부 트랜잭션 배치를 제출합니다.
인증: 필수(`Bearer`).
요청 본문:
```json
{
"transactions": ["0x", "0x"]
}
```
응답은 NDJSON(줄 바꿈 구분 JSON)으로 스트리밍됩니다. 각 줄은 제출된 트랜잭션 인덱스에 해당합니다.
예시:
```json
{"index":0,"id":"abc123","success":true,"txHash":"0x..."}
{"index":1,"id":"def456","success":false,"error":{"code":"VALIDATION_FAILED","message":"invalid signature"}}
```
##### GET `/v1/submit`
스트리밍 제출을 위한 WebSocket 인터페이스입니다.
인증: 필수(`Bearer`).
#### 통합 예시
```javascript
const WAIVER_SERVER = "https://waiver.testnet.stable.xyz";
async function submitGaslessTransaction(signedInnerTxHex, apiKey) {
const response = await fetch(`${WAIVER_SERVER}/v1/submit`, {
method: "POST",
headers: {
"Content-Type": "application/json",
"Authorization": `Bearer ${apiKey}`,
},
body: JSON.stringify({
transactions: [signedInnerTxHex],
}),
});
const reader = response.body.getReader();
const decoder = new TextDecoder();
while (true) {
const { done, value } = await reader.read();
if (done) break;
const lines = decoder.decode(value).trim().split("\n");
for (const line of lines) {
const result = JSON.parse(line);
console.log(result);
}
}
}
```
#### 사용자 InnerTx 생성
파트너는 `gasPrice = 0`인 `InnerTx`를 구성한 후 사용자 서명을 수집할 책임이 있습니다.
예시:
```javascript
import { ethers } from "ethers";
async function createInnerTx(userWallet, contractAddress, callData, nonce) {
const innerTx = {
to: contractAddress,
data: callData,
value: value,
gasPrice: 0, // 면제를 위해 0이어야 함
gasLimit: 100000,
nonce: nonce,
chainId: 2201, // 메인넷: 988, 테스트넷: 2201
};
return await userWallet.signTransaction(innerTx);
}
```
#### 오류 코드
* `PARSE_ERROR`: 트랜잭션 파싱 실패
* `INVALID_REQUEST`: 요청 본문 형식 오류
* `BATCH_SIZE_EXCEEDED`: 배치 크기가 허용된 최대값 초과
* `VALIDATION_FAILED`: 트랜잭션 검증 실패
* `BROADCAST_FAILED`: 체인으로 브로드캐스트 실패
* `RATE_LIMITED`: 속도 제한 초과
* `QUEUE_FULL`: 서버 대기열이 용량에 도달
* `TIMEOUT`: 요청 시간 초과
## JSON-RPC API
### eth\_namespace
| API | support |
| ------------------------------------------- | ------- |
| eth\_syncing | ✅ |
| eth\_gasPrice | ✅ |
| eth\_maxPriorityFeePerGas | ✅ |
| eth\_feeHistory | ✅ |
| eth\_blobBaseFee | ❌ |
| eth\_chainId | ✅ |
| eth\_blockNumber | ✅ |
| eth\_getBalance | ✅ |
| eth\_getProof | ✅ |
| eth\_getHeaderByNumber | ❌ |
| eth\_getHeaderByHash | ❌ |
| eth\_getBlockByNumber | ✅ |
| eth\_getBlockByHash | ✅ |
| eth\_getUncleByBlockNumberAndIndex | ❌ |
| eth\_getUncleByBlockHashAndIndex | ❌ |
| eth\_getUncleCountByBlockNumber | ❌ |
| eth\_getUncleCountByBlockHash | ❌ |
| eth\_getCode | ✅ |
| eth\_getStorageAt | ✅ |
| eth\_getBlockReceipts | ❌ |
| eth\_call | ✅ |
| eth\_simulateV1 | ❌ |
| eth\_estimateGas | ✅ |
| eth\_createAccessList | ❌ |
| eth\_getBlockTransactionCountByNumber | ✅ |
| eth\_getBlockTransactionCountByHash | ✅ |
| eth\_getTransactionByBlockNumberAndIndex | ✅ |
| eth\_getTransactionByBlockHashAndIndex | ✅ |
| eth\_getRawTransactionByBlockNumberAndIndex | ❌ |
| eth\_getRawTransactionByBlockHashAndIndex | ❌ |
| eth\_getTransactionCount | ✅ |
| eth\_getTransactionByHash | ✅ |
| eth\_getRawTransactionByHash | ❌ |
| eth\_getTransactionReceipt | ✅ |
| eth\_sendTransaction | ✅ |
| eth\_fillTransaction | ❌ |
| eth\_sendRawTransaction | ✅ |
| eth\_sign | ✅ |
| eth\_signTransaction | ❌ |
| eth\_pendingTransactions | ✅ |
| eth\_resend | ✅ |
| eth\_accounts | ✅ |
| eth\_subscribe | ✅ |
| eth\_unsubscribe | ✅ |
| eth\_getTransactionLogs | ✅ |
| eth\_signTypedData | ✅ |
| eth\_newPendingTransactionFilter | ✅ |
| eth\_newBlockFilter | ✅ |
| eth\_newFilter | ✅ |
| eth\_getFilterChanges | ✅ |
| eth\_getFilterLogs | ✅ |
| eth\_uninstallFilter | ✅ |
| eth\_getLogs | ✅ |
### debug\_namespace
| API | support |
| ---------------------------------- | ------- |
| debug\_accountRange | ❌ |
| debug\_backtraceAt | ❌ |
| debug\_blockProfile | ✅ |
| debug\_chaindbCompact | ❌ |
| debug\_chaindbProperty | ❌ |
| debug\_cpuProfile | ✅ |
| debug\_dbAncient | ❌ |
| debug\_dbAncients | ❌ |
| debug\_dbGet | ❌ |
| debug\_dumpBlock | ❌ |
| debug\_freeOSMemory | ✅ |
| debug\_freezeClient | ❌ |
| debug\_gcStats | ✅ |
| debug\_getAccessibleState | ❌ |
| debug\_getBadBlocks | ❌ |
| debug\_getRawBlock | ❌ |
| debug\_getRawHeader | ❌ |
| debug\_getRawTransaction | ❌ |
| debug\_getModifiedAccountsByHash | ❌ |
| debug\_getModifiedAccountsByNumber | ❌ |
| debug\_getRawReceipts | ❌ |
| debug\_goTrace | ✅ |
| debug\_intermediateRoots | ✅ |
| debug\_memStats | ✅ |
| debug\_mutexProfile | ✅ |
| debug\_preimage | ❌ |
| debug\_printBlock | ✅ |
| debug\_setBlockProfileRate | ✅ |
| debug\_setGCPercent | ✅ |
| debug\_setHead | ❌ |
| debug\_setMutexProfileFraction | ✅ |
| debug\_setTrieFlushInterval | ❌ |
| debug\_stacks | ✅ |
| debug\_standardTraceBlockToFile | ❌ |
| debug\_standardTraceBadBlockToFile | ❌ |
| debug\_startCPUProfile | ✅ |
| debug\_startGoTrace | ✅ |
| debug\_stopCPUProfile | ✅ |
| debug\_stopGoTrace | ✅ |
| debug\_storageRangeAt | ❌ |
| debug\_traceBadBlock | ❌ |
| debug\_traceBlock | ❌ |
| debug\_traceBlockByNumber | ✅ |
| debug\_traceBlockByHash | ✅ |
| debug\_traceBlockFromFile | ❌ |
| debug\_traceCall | ❌ |
| debug\_traceChain | ❌ |
| debug\_traceTransaction | ✅ |
| debug\_verbosity | ❌ |
| debug\_vmodule | ❌ |
| debug\_writeBlockProfile | ✅ |
| debug\_writeMemProfile | ✅ |
| debug\_writeMutexProfile | ✅ |
## 개요
Stable이 트랜잭션, 수수료 및 프로토콜 수준의 USDT 동작을 처리하는 방법에 대해 자세히 알아보세요.
### 핵심 메커니즘 소개
Stable은 이더리움 가상 머신(EVM)과 완벽하게 호환되는 고성능 블록체인으로, 개발자들이 친숙한 도구와 라이브러리를 사용하여 애플리케이션을 구축할 수 있도록 설계되었습니다. Stable의 핵심 메커니즘은 다음과 같은 주요 영역으로 구성됩니다.
#### 시스템 아키텍처
Stable은 다음과 같은 핵심 구성 요소로 이루어져 있습니다:
* **실행 레이어**: EVM 호환 스마트 컨트랙트 실행 환경
* **합의 레이어**: 빠르고 안전한 트랜잭션 확정을 위한 합의 메커니즘
* **상태 관리**: 효율적인 블록체인 상태 저장 및 관리
* **네트워크 레이어**: P2P 통신 및 데이터 전파
#### 수수료 모델
Stable은 예측 가능한 수수료 구조를 제공합니다:
* **단일 구성 요소 가스 모델**: 우선순위 팁 없이 기본 실행 비용만 적용
* **USDT0로 수수료 지불**: 안정적이고 예측 가능한 거래 비용
* **수수료 변동성 제거**: 사용자 경험 향상을 위한 일관된 가격 구조
#### 성능 및 확장성
* **고처리량**: 초당 수천 건의 트랜잭션 처리 가능
* **낮은 지연시간**: 빠른 트랜잭션 확정 시간
* **효율적인 자원 사용**: 최적화된 실행 환경
### 개발자를 위한 핵심 기능
#### 개발 도구 호환성
Stable은 기존 이더리움 개발 생태계와 완벽하게 호환됩니다:
**지원되는 프로그래밍 언어:**
* Solidity
**개발 프레임워크:**
* Hardhat
* Foundry
* Truffle
**클라이언트 라이브러리:**
* ethers.js
* web3.js
* 기타 JSON-RPC 호환 라이브러리
#### JSON-RPC API
표준 이더리움 JSON-RPC 메서드를 지원하여 기존 도구와 인프라를 그대로 사용할 수 있습니다:
* `eth_*` 메서드 완전 지원
* 기존 인덱서 및 모니터링 도구 호환
* 표준 트랜잭션 형식 지원
#### 스마트 컨트랙트 패턴
* ERC-20, ERC-721, ERC-1155 등 표준 토큰 규격 지원
* 프록시 패턴 및 업그레이드 가능한 컨트랙트
* 멀티시그 및 접근 제어 메커니즘
* 이벤트 로깅 및 상태 관리
### USDT 통합
#### 네이티브 USDT 지원
Stable의 독특한 특징 중 하나는 USDT의 네이티브 통합입니다:
* **가스 토큰으로서의 USDT**: 트랜잭션 수수료를 USDT0 로 직접 지불
* **크로스체인 호환성**: 다른 체인과의 원활한 USDT 이동
#### USDT 특화 기능
* **보장된 블록 공간**: USDT 트랜잭션을 위한 우선 처리
* **전송 집계기**: 효율적인 배치 전송 처리
* **기밀 전송**: 향상된 프라이버시 보호
### 시스템 모듈
Stable은 다음과 같은 핵심 시스템 모듈로 구성됩니다:
#### 은행(Bank) 모듈
* 계정 잔액 관리
* 토큰 전송 및 보관
* 다중 자산 지원
#### 스테이킹(Staking) 모듈
* 검증자 관리
* 위임 및 보상 분배
* 슬래싱 메커니즘
#### 분배(Distribution) 모듈
* 블록 보상 분배
* 수수료 재분배
* 인센티브 관리
### 보안 및 최종성
#### 즉시 최종성
* 트랜잭션이 포함된 블록은 즉시 최종 확정
* 재구성(reorg) 위험 제거
* 높은 수준의 거래 확실성
#### 보안 모델
* 검증된 암호학적 프리미티브 사용
* 다중 레이어 보안 아키텍처
* 정기적인 보안 감사
### 다음 단계
Stable의 핵심 메커니즘을 더 자세히 이해하려면 다음 문서들을 참조하세요:
* [이더리움 호환성](/ko/developers/core-mechanics/ethereum-compatibility): EVM 호환성에 대한 상세 정보
* [가스 가격 책정](/ko/developers/core-mechanics/gas-pricing): 수수료 모델 설명
* [JSON-RPC API](/ko/developers/core-mechanics/json-rpc-api): API 참조 문서
* [최종성](/ko/developers/core-mechanics/finality): 트랜잭션 확정 메커니즘
* [EIP-7702](/ko/developers/core-mechanics/eip-7702): 계정 추상화 지원
개발을 시작하려면 [빠른 시작 가이드](/ko/developers/quick-start)를 확인하세요.
## Bank
### 개요
Stable SDK의 `x/bank` 모듈은 기본적인 토큰 관리 기능만 제공합니다.
모든 토큰은 제한 없이 다른 계정으로 전송될 수 있으며, 사용자는 다른 계정에 토큰 전송 권한을 위임할 수 없습니다.
이러한 이유로, `bank` precompile 컨트랙트는 Stable SDK의 기존 `x/bank` 모듈 위에 추가적인 권한 부여 및 위임 기능을 제공합니다.
### 목차
1. **[개념](#concepts)**
2. **[설정](#configuration)**
3. **[메서드](#methods)**
4. **[이벤트](#events)**
### 개념
이 precompile 컨트랙트는 ERC20 표준 메서드를 제공합니다 - 전송을 위한 `transfer`와 `balanceOf`, 위임을 위한 `transferFrom`, `approve`, `allowance` 등이 있습니다. 이러한 메서드는 컨트랙트 주소 등록 없이 직접 호출할 수 있습니다.
그러나 `mint`와 `burn` 메서드는 `x/precompile` 모듈에 의해 등록된 컨트랙트 주소가 화이트리스트에 포함되어야 합니다.
```go
func (p *Precompile) mint(
ctx sdk.Context,
contract *vm.Contract,
denom string,
method *abi.Method,
stateDB vm.StateDB,
args []interface{},
) ([]byte, error) {
// ...
// mint method is only allowed for the registered caller contract
if _, err := precompilecommon.CheckPermissions(ctx, p.precompileKeeper, contract.CallerAddress, CallerPermissions); err != nil {
return nil, err
}
```
추가적인 검증 프로세스는 이 precompile 컨트랙트를 호출하는 토큰 컨트랙트가 승인되었음을 보장할 수 있습니다.
토큰 컨트랙트 주소와 해당 denom을 `x/precompile` 모듈의 화이트리스트에 등록하려면 거버넌스 제안이 필요합니다.
### 설정
컨트랙트 주소와 가스 비용은 사전 정의되어 있습니다.
#### 컨트랙트 주소
* `0x0000000000000000000000000000000000001003` - STABLE (거버넌스 토큰)
### 메서드
#### `mint`
요청된 수량의 새로운 토큰을 발행하고 계정으로 전송합니다.
발행할 토큰의 수량은 0보다 커야 합니다.
토큰이 성공적으로 발행되고 계정으로 전송되면 `PrecompiledBankMint`가 발생합니다.
주의사항:
* 거버넌스 토큰 발행은 금지되어 있습니다.
* mint 메서드를 호출하는 컨트랙트는 x/precompile 모듈에 등록되어 있어야 합니다.
##### 입력
| 이름 | 타입 | 설명 |
| ------ | ------- | ------------- |
| to | address | 발행된 토큰을 받을 주소 |
| amount | uint256 | 발행할 토큰의 수량 |
##### 출력
| 이름 | 타입 | 설명 |
| ------- | ---- | ----------------------------- |
| success | bool | 토큰이 성공적으로 발행되고 계정으로 전송되면 true |
#### `burn`
계정에서 요청된 수량의 토큰을 소각합니다.
소각할 토큰의 수량은 0보다 커야 합니다.
토큰이 성공적으로 소각되면 `PrecompiledBankBurn`이 발생합니다.
주의사항:
* 거버넌스 토큰 소각은 금지되어 있습니다.
* mint 메서드를 호출하는 컨트랙트는 x/precompile 모듈에 등록되어 있어야 합니다.
##### 입력
| 이름 | 타입 | 설명 |
| ------ | ------- | ---------- |
| from | address | 토큰을 소각할 주소 |
| amount | uint256 | 소각할 토큰의 수량 |
##### 출력
| 이름 | 타입 | 설명 |
| ------- | ---- | ------------------- |
| success | bool | 토큰이 성공적으로 소각되면 true |
#### `transfer`
발신자로부터 수신자에게 요청된 수량의 토큰을 전송합니다.
토큰은 전송 가능하도록 설정되어 있어야 합니다. 전송할 토큰의 수량은 0보다 커야 합니다.
토큰이 성공적으로 전송되면 `PrecompiledBankTransfer`가 발생합니다.
##### 입력
| 이름 | 타입 | 설명 |
| ------ | ------- | ---------- |
| to | address | 토큰을 받을 주소 |
| amount | uint256 | 전송할 토큰의 수량 |
##### 출력
| 이름 | 타입 | 설명 |
| ------- | ---- | ------------------- |
| success | bool | 토큰이 성공적으로 전송되면 true |
#### `transferFrom`
승인된 spender가 allowance 한도 내에서 소유자로부터 수신자에게 요청된 수량의 토큰을 전송합니다.
토큰은 전송 가능하도록 설정되어 있어야 합니다.
전송할 토큰의 수량은 0보다 크고 현재 allowance보다 작거나 같아야 합니다.
토큰이 성공적으로 전송되면 `PrecompiledBankTransfer`가 발생합니다.
##### 입력
| 이름 | 타입 | 설명 |
| ------ | ------- | ---------- |
| from | address | 토큰을 전송할 주소 |
| to | address | 토큰을 받을 주소 |
| amount | uint256 | 전송할 토큰의 수량 |
##### 출력
| 이름 | 타입 | 설명 |
| ------- | ---- | ------------------- |
| success | bool | 토큰이 성공적으로 전송되면 true |
#### `multiTransfer`
단일 계정에서 여러 계정으로 토큰을 전송합니다.
토큰은 전송 가능하도록 설정되어 있어야 합니다.
각 수신자에게 전송할 토큰의 수량은 0보다 커야 합니다.
토큰이 성공적으로 전송되면 각 수신자마다 `PrecompiledBankTransfer`가 발생합니다.
##### 입력
| 이름 | 타입 | 설명 |
| ------ | ---------- | ------------------ |
| to | address\[] | 전송된 토큰을 받을 주소들 |
| amount | uint256\[] | 각 수신자에게 전송할 토큰의 수량 |
##### 출력
| 이름 | 타입 | 설명 |
| ------- | ---- | ---------------------------- |
| success | bool | 모든 수신자에게 토큰이 성공적으로 전송되면 true |
#### `approve`
spender가 소유자의 계정에서 토큰을 전송할 수 있도록 승인합니다.
승인할 토큰의 수량은 0보다 커야 합니다.
승인이 성공적으로 설정되면 `PrecompiledBankApproval`이 발생합니다.
##### 입력
| 이름 | 타입 | 설명 |
| ------- | ------- | ---------- |
| spender | address | 승인할 주소 |
| value | uint256 | 승인할 토큰의 수량 |
##### 출력
| 이름 | 타입 | 설명 |
| ------- | ---- | ------------------- |
| success | bool | 승인이 성공적으로 설정되면 true |
#### `revoke`
소유자로부터 토큰을 전송할 수 있는 spender의 승인을 취소합니다.
승인이 성공적으로 취소되면 `PrecompiledBankRevoke`가 발생합니다.
##### 입력
| 이름 | 타입 | 설명 |
| ------- | ------- | ------ |
| spender | address | 취소할 주소 |
##### 출력
| 이름 | 타입 | 설명 |
| ------- | ---- | ------------------- |
| success | bool | 승인이 성공적으로 취소되면 true |
#### `balanceOf`
계정의 토큰 잔액을 반환합니다.
##### 입력
| 이름 | 타입 | 설명 |
| ------- | ------- | ------------- |
| account | address | 토큰 잔액을 조회할 주소 |
##### 출력
| 이름 | 타입 | 설명 |
| ------- | ------- | --------- |
| balance | uint256 | 계정의 토큰 수량 |
#### `totalSupply`
토큰의 총 공급량을 반환합니다.
##### 입력
없음
##### 출력
| 이름 | 타입 | 설명 |
| ----------- | ------- | -------- |
| totalSupply | uint256 | 토큰의 총 수량 |
#### `allowance`
spender가 owner로부터 여전히 인출할 수 있는 수량을 반환합니다.
##### 입력
| 이름 | 타입 | 설명 |
| ------- | ------- | ----------- |
| owner | address | 소유자의 주소 |
| spender | address | spender의 주소 |
##### 출력
| 이름 | 타입 | 설명 |
| ------ | ------- | ---------- |
| amount | uint256 | 승인된 토큰의 수량 |
### 이벤트
이 precompile 컨트랙트에서 발생하는 모든 이벤트는 `PrecompiledBank` 접두사가 붙습니다.
모호함을 피하기 위해, 이 precompile 컨트랙트를 호출하는 토큰 컨트랙트는 동일한 접두사를 가진 이벤트 이름 사용을 피해야 합니다.
#### PrecompiledBankMint
| 이름 | 타입 | 인덱싱 | 설명 |
| ------ | ------- | --- | ------------- |
| from | address | Y | 토큰을 발행한 주소 |
| to | address | Y | 발행된 토큰을 받을 주소 |
| amount | uint256 | N | 발행된 토큰의 수량 |
#### PrecompiledBankBurn
| 이름 | 타입 | 인덱싱 | 설명 |
| ------ | ------- | --- | ---------------- |
| from | address | Y | 토큰을 소각한 주소 |
| to | address | Y | 이 메서드에서는 사용되지 않음 |
| amount | uint256 | N | 소각된 토큰의 수량 |
#### PrecompiledBankTransfer
| 이름 | 타입 | 인덱싱 | 설명 |
| ------ | ------- | --- | ------------- |
| from | address | Y | 토큰을 전송한 주소 |
| to | address | Y | 전송된 토큰을 받을 주소 |
| amount | uint256 | N | 전송된 토큰의 수량 |
#### PrecompiledBankApproval
| 이름 | 타입 | 인덱싱 | 설명 |
| ------- | ------- | --- | ---------- |
| owner | address | Y | 토큰을 승인한 주소 |
| spender | address | Y | 승인할 주소 |
| value | uint256 | N | 승인된 토큰의 수량 |
#### PrecompiledBankRevoke
| 이름 | 타입 | 인덱싱 | 설명 |
| ------- | ------- | --- | ---------- |
| owner | address | Y | 토큰을 취소한 주소 |
| spender | address | Y | 취소할 주소 |
| value | uint256 | N | 승인된 토큰의 수량 |
## Distribution
### 개요
`distribution` precompile 컨트랙트는 Stable SDK의 `x/distribution` 모듈 기능을 EVM 환경에서 사용할 수 있도록 브리지 역할을 합니다.
### 목차
1. **[개념](#개념)**
2. **[구성](#구성)**
3. **[메서드](#메서드)**
4. **[이벤트](#이벤트)**
### 개념
`distribution` precompile 컨트랙트에서는 위임자 또는 예치자가 호출자인지 확인하는 추가 검사가 수행됩니다.
### 구성
컨트랙트 주소와 가스 비용은 사전 정의되어 있습니다.
#### 컨트랙트 주소
* `0x0000000000000000000000000000000000000801`
### 메서드
#### `setWithdrawAddress`
위임자가 검증자에게 위임한 토큰에 대한 rewards를 받을 주소를 설정합니다.
때로는 위임자가 자기 위임(self-delegated)일 때 검증자 주소가 위임자로 사용됩니다.
`SetWithdrawAddress`는 출금 주소가 성공적으로 설정되었을 때 발생합니다.
##### 입력
| 이름 | 타입 | 설명 |
| ----------------- | ------- | --------------------- |
| delegatorAddress | address | 위임자의 주소 |
| withdrawerAddress | address | 위임에 대한 rewards를 받을 주소 |
##### 출력
| 이름 | 타입 | 설명 |
| ------- | ---- | ---------------------- |
| success | bool | 출금 주소가 성공적으로 설정되면 true |
#### `withdrawDelegatorRewards`
검증자로부터 위임자가 받을 rewards를 출금합니다.
검증자가 위임자에게 지급하는 모든 유형의 토큰이 단일 트랜잭션으로 출금됩니다.
`WithdrawDelegatorRewards`는 rewards가 성공적으로 출금되었을 때 발생합니다.
##### 입력
| 이름 | 타입 | 설명 |
| ---------------- | ------- | ------- |
| delegatorAddress | address | 위임자의 주소 |
| validatorAddress | address | 검증자의 주소 |
##### 출력
| 이름 | 타입 | 설명 |
| ------ | ------- | ----------------------- |
| amount | Coin\[] | 위임자가 받을 다양한 토큰의 rewards |
`Coin`은 다음 필드를 가진 구조체입니다:
| 이름 | 타입 | 설명 |
| ------ | ------- | ------------- |
| denom | string | reward의 denom |
| amount | uint256 | reward의 수량 |
#### `withdrawValidatorCommission`
검증자의 수수료를 출금합니다.
검증자가 수수료로 받는 모든 유형의 토큰이 단일 트랜잭션으로 출금됩니다.
`WithdrawValidatorCommission`은 수수료가 성공적으로 출금되었을 때 발생합니다.
##### 입력
| 이름 | 타입 | 설명 |
| ---------------- | ------- | ------- |
| validatorAddress | address | 검증자의 주소 |
##### 출력
| 이름 | 타입 | 설명 |
| ------ | ------- | ------------------- |
| amount | Coin\[] | 검증자가 받을 다양한 토큰의 수수료 |
#### `validatorDistributionInfo`
검증자가 받을 reward를 나타내는 분배 정보를 반환합니다. 검증자는 자신의 주소로 토큰을 위임하여 자기 결합(self-bonded)이라고 하는 위임자 역할을 할 수 있습니다.
##### 입력
| 이름 | 타입 | 설명 |
| ---------------- | ------- | ------- |
| validatorAddress | address | 검증자의 주소 |
##### 출력
| 이름 | 타입 | 설명 |
| ---------------- | ------------------------- | ---------- |
| distributionInfo | ValidatorDistributionInfo | 검증자의 분배 정보 |
`ValidatorDistributionInfo`는 다음 필드를 가진 구조체입니다:
| 이름 | 타입 | 설명 |
| --------------- | ---------- | ------------- |
| operatorAddress | address | 검증자의 운영자 주소 |
| selfBondRewards | DecCoin\[] | 검증자의 자기 결합 수량 |
| commission | DecCoin\[] | 검증자의 수수료 |
`DecCoin`은 다음 필드를 가진 구조체입니다:
| 이름 | 타입 | 설명 |
| --------- | ------- | ------------- |
| denom | string | reward의 denom |
| amount | uint256 | reward의 수량 |
| precision | uint8 | reward의 정밀도 |
#### `validatorOutstandingRewards`
검증자의 미지급 rewards를 반환합니다. 미지급 rewards는 검증자의 수수료와 자기 결합 rewards, 그리고 위임자들의 총 rewards로 구성된 총 reward 금액을 나타냅니다. 검증자 A가 있고 위임자 B, C, D가 A에게 위임하는 경우, 검증자의 미지급 rewards는 A의 수수료와 자기 결합 rewards + B, C, D의 rewards의 합계입니다.
##### 입력
| 이름 | 타입 | 설명 |
| ---------------- | ------- | ------- |
| validatorAddress | address | 검증자의 주소 |
##### 출력
| 이름 | 타입 | 설명 |
| ------- | ---------- | ---------------- |
| rewards | DecCoin\[] | 검증자의 미지급 rewards |
#### `validatorCommission`
검증자의 수수료를 반환합니다. 이 메서드는 `withdrawValidatorCommission` 메서드를 호출하기 전에 검증자의 수수료를 조회하는 데 사용됩니다.
##### 입력
| 이름 | 타입 | 설명 |
| ---------------- | ------- | ------- |
| validatorAddress | address | 검증자의 주소 |
##### 출력
| 이름 | 타입 | 설명 |
| ---------- | ---------- | -------- |
| commission | DecCoin\[] | 검증자의 수수료 |
#### `validatorSlashes`
시작 높이와 종료 높이 사이에 검증자의 슬래시 이력을 반환합니다. 슬래싱은 검증자가 악의적으로 행동하거나 이중 서명, 잘못된 행동, 체인 규칙을 따르지 않는 등의 네트워크 규칙을 위반했을 때 부과되는 벌금입니다.
##### 입력
| 이름 | 타입 | 설명 |
| ---------------- | ------- | --------- |
| validatorAddress | address | 검증자의 주소 |
| startingHeight | uint64 | 시작 높이 |
| endingHeight | uint64 | 종료 높이 |
| pageRequest | PageReq | 페이지네이션 요청 |
`PageReq`는 다음 필드를 가진 구조체입니다:
| 이름 | 타입 | 설명 |
| ---------- | ------ | ------------------ |
| key | bytes | 페이지네이션의 키 |
| offset | uint64 | 페이지네이션의 오프셋 |
| limit | uint64 | 페이지네이션의 제한 |
| countTotal | bool | 총 페이지 수를 계산할지 여부 |
| reverse | bool | 페이지네이션을 역순으로 할지 여부 |
##### 출력
| 이름 | 타입 | 설명 |
| ---------- | ---------------------- | --------- |
| slashes | ValidatorSlashEvent\[] | 검증자의 슬래시 |
| pagination | PageResp | 페이지네이션 응답 |
`ValidatorSlashEvent`는 다음 필드를 가진 구조체입니다:
| 이름 | 타입 | 설명 |
| --------------- | ------ | ------- |
| validatorPeriod | uint64 | 검증자의 기간 |
| fraction | Dec | 슬래시의 비율 |
`Dec`은 다음 필드를 가진 구조체입니다:
| 이름 | 타입 | 설명 |
| --------- | ------ | -------- |
| value | uint64 | Dec의 값 |
| precision | uint8 | Dec의 정밀도 |
`PageResp`는 다음 필드를 가진 구조체입니다:
| 이름 | 타입 | 설명 |
| ------- | ------ | ------------ |
| nextKey | bytes | 페이지네이션의 다음 키 |
| total | uint64 | 총 페이지 수 |
#### `delegationRewards`
위임자가 검증자로부터 받는 rewards를 반환합니다.
##### 입력
| 이름 | 타입 | 설명 |
| ---------------- | ------- | ----------- |
| delegatorAddress | address | 위임자의 hex 주소 |
| validatorAddress | address | 검증자의 주소 |
##### 출력
| 이름 | 타입 | 설명 |
| ------- | ---------- | ---------------------- |
| rewards | DecCoin\[] | 위임자가 검증자로부터 받는 rewards |
#### `delegationTotalRewards`
위임자가 모든 검증자로부터 받는 총 rewards를 반환합니다.
##### 입력
| 이름 | 타입 | 설명 |
| ---------------- | ------- | ----------- |
| delegatorAddress | address | 위임자의 hex 주소 |
##### 출력
| 이름 | 타입 | 설명 |
| ------- | ---------------------------- | --------------------------- |
| rewards | DelegationDelegatorReward\[] | 위임자가 모든 검증자로부터 받는 총 rewards |
| total | DecCoin\[] | rewards의 총 수량 |
`DelegationDelegatorReward`는 다음 필드를 가진 구조체입니다:
| 이름 | 타입 | 설명 |
| ---------------- | ---------- | ---------------------- |
| validatorAddress | address | 검증자의 주소 |
| reward | DecCoin\[] | 위임자가 검증자로부터 받는 rewards |
#### `delegatorValidators`
위임자가 결합된 검증자들을 반환합니다.
##### 입력
| 이름 | 타입 | 설명 |
| ---------------- | ------- | ----------- |
| delegatorAddress | address | 위임자의 hex 주소 |
##### 출력
| 이름 | 타입 | 설명 |
| ---------- | --------- | ------------- |
| validators | string\[] | 위임자가 결합된 검증자들 |
#### `delegatorWithdrawAddress`
`setWithdrawAddress` 메서드로 설정한 위임 rewards를 받을 주소를 반환합니다.
##### 입력
| 이름 | 타입 | 설명 |
| ---------------- | ------- | ----------- |
| delegatorAddress | address | 위임자의 hex 주소 |
##### 출력
| 이름 | 타입 | 설명 |
| --------------- | ------- | ----------------- |
| withdrawAddress | address | 위임 rewards를 받을 주소 |
### 이벤트
#### SetWithdrawAddress
| 이름 | 타입 | 인덱스 | 설명 |
| --------------- | ------- | --- | ----------------- |
| caller | address | Y | 호출자(위임자)의 주소 |
| withdrawAddress | address | N | 위임 rewards를 받을 주소 |
#### WithdrawDelegatorRewards
| 이름 | 타입 | 인덱스 | 설명 |
| ---------------- | ------- | --- | ---------- |
| delegatorAddress | address | Y | 위임자의 주소 |
| validatorAddress | address | Y | 검증자의 주소 |
| amount | uint256 | N | reward의 수량 |
#### WithdrawValidatorCommission
| 이름 | 타입 | 인덱스 | 설명 |
| ---------------- | ------- | --- | --------- |
| validatorAddress | address | Y | 검증자의 주소 |
| commission | uint256 | N | 수수료의 총 수량 |
## 개요
Stable은 가스 효율성과 예측 가능한 제어를 위해 **precompiled contracts**로 구현된 **시스템 모듈**을 통해 핵심 settlement 동작을 제공합니다.
**주요 모듈:**
* [Bank 모듈](./bank)
* USDT 전송, 잔액 관리 및 예치/인출을 처리합니다
* [Distribution 모듈](./distribution)
* 네트워크 참여자를 위한 수수료 분배 및 보상 로직
* [Staking 모듈](./staking)
* 검증자 참여 및 스테이킹을 제어합니다 (메인넷과 함께 제공 예정)
**DApp은 토큰이나 settlement 로직을 재구현하는 대신 내장 모듈을 활용할 수 있습니다.**
## Staking
### 개요
`staking` precompile 컨트랙트는 Stable SDK의 `x/staking` 모듈 기능을 EVM 환경에서 사용할 수 있도록 브리지 역할을 합니다.
### 목차
1. **[개념](#concepts)**
2. **[구성](#configuration)**
3. **[메서드](#methods)**
4. **[이벤트](#events)**
### 개념
Stable SDK의 `x/staking` 모듈에서는 스테이킹을 위해 체인 초기화 시 bond denom이 등록되어야 합니다.
Validator와 delegator는 bond denom 스테이킹 토큰만 사용할 수 있습니다.
`staking` precompile 컨트랙트에서는 validator 또는 delegator가 호출자인지 확인하는 추가 검증이 수행됩니다.
### 구성
컨트랙트 주소와 가스 비용은 사전에 정의되어 있습니다.
#### 컨트랙트 주소
* `0x0000000000000000000000000000000000000800`
### 메서드
#### `createValidator`
Validator가 생성됩니다.
Validator는 운영자의 초기 delegation과 함께 생성되어야 합니다.
잠재적인 delegator를 위해 validator는 자신의 정보와 수수료율 계획을 제공해야 합니다.
Delegator는 시장 메커니즘의 자연스러운 규제를 통해 공개된 정보를 바탕으로 자신의 토큰을 위임할 validator를 선택할 수 있습니다.
Validator가 성공적으로 등록되면 `CreateValidator` 이벤트가 발생합니다.
##### Inputs
| Name | Type | Description |
| ----------------- | --------------- | --------------------------------- |
| description | Description | validator의 정보 |
| commissionRates | CommissionRates | validator가 보상받는 스테이킹 토큰의 수수료율 |
| minSelfDelegation | uint256 | validator의 최소 자체 위임 금액 |
| validatorAddress | address | validator의 주소 |
| pubkey | string | validator의 공개 키 |
| value | uint256 | validator에게 초기 자체 위임되는 스테이킹 토큰의 양 |
`Description`은 다음 필드를 가진 구조체입니다:
| Name | Type | Description |
| --------------- | ------ | ------------------- |
| moniker | string | validator의 이름 |
| identity | string | validator의 신원 |
| website | string | validator 웹사이트의 URL |
| securityContact | string | 보안 연락처 정보 |
| details | string | validator의 추가 설명 |
`CommissionRates`는 다음 필드를 가진 구조체입니다:
| Name | Type | Description |
| ------------- | ------- | ------------------------------- |
| rate | uint256 | validator가 받는 현재 수수료율 |
| maxRate | uint256 | 최대 수수료율 (이보다 높게 설정할 수 없음) |
| maxChangeRate | uint256 | validator가 하루에 변경할 수 있는 최대 수수료율 |
`rate`는 시장에서 수용 가능한 적절한 값으로 설정해야 합니다.
* Validator의 수수료율이 높으면 delegator의 수익이 낮아집니다.
* Validator의 수수료율이 낮으면 validator의 수익이 낮아지고 운영이 어려워집니다.
높은 `maxRate`는 validator의 예상치 못한 높은 수수료율에 대한 delegator의 우려를 야기할 수 있으므로 `maxRate`는 신중하게 설정해야 합니다. `maxChangeRate`는 초기화 후 변경할 수 없습니다.
##### Outputs
| Name | Type | Description |
| ------- | ---- | -------------------------- |
| success | bool | validator가 성공적으로 등록되면 true |
#### `editValidator`
Validator가 정보를 업데이트합니다.
Validator는 `CommissionRates` 구조체의 `maxRate` 및 `maxChangeRate`와 같이 변경 불가능한 필드를 제외한 정보만 업데이트할 수 있습니다.
Validator가 성공적으로 업데이트되면 `EditValidator` 이벤트가 발생합니다.
##### Inputs
| Name | Type | Description |
| ----------------- | ----------- | ----------------------------- |
| description | Description | validator의 정보 |
| validatorAddress | address | validator의 주소 |
| commissionRate | int256 | validator가 보상받는 스테이킹 토큰의 수수료율 |
| minSelfDelegation | int256 | validator의 최소 자체 위임 금액 |
##### Outputs
| Name | Type | Description |
| ------- | ---- | ---------------------------- |
| success | bool | validator가 성공적으로 업데이트되면 true |
#### `delegate`
Delegator가 validator에게 위임할 토큰의 양을 설정합니다.
Delegation이 성공적으로 완료되면 `Delegate` 이벤트가 발생합니다.
##### Inputs
| Name | Type | Description |
| ---------------- | ------- | --------------------------- |
| delegatorAddress | address | delegator의 주소 |
| validatorAddress | address | validator의 주소 |
| amount | uint256 | validator에게 위임되는 스테이킹 토큰의 양 |
##### Outputs
| Name | Type | Description |
| ------- | ---- | --------------------------- |
| success | bool | delegation이 성공적으로 완료되면 true |
##### Events
`newShares`는 delegator의 소유 비율을 나타냅니다.
동일한 양의 토큰이 위임되더라도 시간에 따라 계산되는 shares는 달라질 수 있습니다.
#### `undelegate`
Delegator가 validator에게 위임한 토큰의 양을 인출합니다.
언델리게이션이 성공적으로 완료되면 `Unbond` 이벤트가 발생합니다.
##### Inputs
| Name | Type | Description |
| ---------------- | ------- | --------------------------------- |
| delegatorAddress | address | delegator의 주소 |
| validatorAddress | address | validator의 주소 |
| amount | uint256 | validator로부터 언델리게이트하려는 스테이킹 토큰의 양 |
##### Outputs
| Name | Type | Description |
| ------- | ---- | ----------------------- |
| success | bool | 언델리게이션이 성공적으로 완료되면 true |
#### `redelegate`
Delegator가 validator에게 위임한 토큰의 양을 다른 validator에게 재위임합니다.
재위임이 성공적으로 완료되면 `Redelegate` 이벤트가 발생합니다.
##### Inputs
| Name | Type | Description |
| ---------------- | ------- | ----------------- |
| delegatorAddress | address | delegator의 주소 |
| validatorSrc | string | 출발지 validator의 주소 |
| validatorDst | string | 목적지 validator의 주소 |
| amount | uint256 | 재위임할 스테이킹 토큰의 양 |
##### Outputs
| Name | Type | Description |
| ------- | ---- | -------------------- |
| success | bool | 재위임이 성공적으로 완료되면 true |
#### `delegation`
Delegator와 validator 간의 delegation 정보를 반환합니다.
Delegation을 찾을 수 없으면 `shares`와 `balance`는 `0`이 됩니다.
##### Inputs
| Name | Type | Description |
| ---------------- | ------- | ------------- |
| delegatorAddress | address | delegator의 주소 |
| validatorAddress | address | validator의 주소 |
##### Outputs
| Name | Type | Description |
| ------- | ------- | ---------------- |
| shares | uint256 | 위임된 shares |
| balance | Coin | 위임된 토큰의 양과 denom |
`Coin`은 다음 필드를 가진 구조체입니다:
| Name | Type | Description |
| ------ | ------- | ----------- |
| denom | string | 보상의 denom |
| amount | uint256 | 보상의 양 |
#### `unbondingDelegation`
Delegator와 validator 간의 언본딩 delegation 정보를 반환합니다.
언본딩 delegation을 찾을 수 없으면 빈 `UnbondingDelegationOutput`이 반환됩니다.
##### Inputs
| Name | Type | Description |
| ---------------- | ------- | ------------- |
| delegatorAddress | address | delegator의 주소 |
| validatorAddress | address | validator의 주소 |
##### Outputs
| Name | Type | Description |
| ------------------- | ------------------------- | ------------------ |
| unbondingDelegation | UnbondingDelegationOutput | 언본딩 delegation의 정보 |
`UnbondingDelegationOutput`은 다음 필드를 가진 구조체입니다:
| Name | Type | Description |
| ---------------- | --------------------------- | ------------------- |
| validatorAddress | address | validator의 주소 |
| delegatorAddress | address | delegator의 주소 |
| entries | UnbondingDelegationEntry\[] | 언본딩 delegation의 항목들 |
`UnbondingDelegationEntry`는 다음 필드를 가진 구조체입니다:
| Name | Type | Description |
| -------------- | ------ | ----------- |
| creationHeight | uint64 | 항목의 생성 높이 |
| completionTime | uint64 | 항목의 완료 시간 |
| initialBalance | Coin | 항목의 초기 잔액 |
| balance | Coin | 항목의 잔액 |
#### `validator`
Validator 정보를 반환합니다.
Validator를 찾을 수 없으면 빈 `ValidatorOutput`이 반환됩니다.
##### Inputs
| Name | Type | Description |
| ---------------- | ------- | ------------- |
| validatorAddress | address | validator의 주소 |
##### Outputs
| Name | Type | Description |
| --------- | --------- | ------------- |
| validator | Validator | validator의 정보 |
`Validator`는 다음 필드를 가진 구조체입니다:
| Name | Type | Description |
| ----------------- | ------- | ----------------------------- |
| operatorAddress | address | validator의 주소 |
| consensusPubkey | string | validator의 공개 키 |
| jailed | bool | validator가 jailed 상태인지 여부 |
| status | int32 | validator의 상태 |
| tokens | uint256 | validator에게 위임된 스테이킹 토큰의 양 |
| delegatorShares | uint256 | delegation shares의 양 |
| description | string | validator의 설명 |
| unbondingHeight | int64 | validator가 언본딩 중인 높이 |
| unbondingTime | int64 | validator가 언본딩 중인 시간 |
| commission | uint256 | validator가 보상받는 스테이킹 토큰의 수수료율 |
| minSelfDelegation | uint256 | validator의 최소 자체 위임 금액 |
#### `validators`
상태와 일치하는 모든 validator를 반환합니다.
Validator를 찾을 수 없으면 빈 `ValidatorsOutput`이 반환됩니다.
`x/staking` 모듈에서 선언된 상태는 다음 중 하나일 수 있습니다:
* 0 : "BOND\_STATUS\_UNSPECIFIED", 지정되지 않은 상태
* 1 : "BOND\_STATUS\_UNBONDING", validator가 언본딩 중
* 2 : "BOND\_STATUS\_UNBONDED", validator가 언본딩됨
* 3 : "BOND\_STATUS\_BONDED", validator가 본딩됨
##### Inputs
| Name | Type | Description |
| ----------- | ------- | ------------- |
| status | string | validator의 상태 |
| pageRequest | PageReq | 페이지네이션 요청 |
`PageReq`는 다음 필드를 가진 구조체입니다:
| Name | Type | Description |
| ---------- | ----- | -------------------- |
| key | bytes | 페이지의 키 |
| offset | int64 | 페이지의 오프셋 |
| limit | int64 | 페이지의 제한 |
| countTotal | bool | 결과의 총 개수를 세어야 하는지 여부 |
| reverse | bool | 결과를 역순으로 정렬할지 여부 |
##### Outputs
| Name | Type | Description |
| ------------ | ------------ | -------------- |
| validators | Validator\[] | validator들의 배열 |
| pageResponse | PageResp | 페이지네이션 응답 |
`PageResp`는 다음 필드를 가진 구조체입니다:
| Name | Type | Description |
| ------- | ------ | ----------- |
| nextKey | bytes | 다음 페이지의 키 |
| total | uint64 | 결과의 총 개수 |
#### `redelegation`
Delegator, 출발지 validator, 목적지 validator의 재위임 정보를 반환합니다.
재위임을 찾을 수 없으면 빈 `RedelegationOutput`이 반환됩니다.
##### Inputs
| Name | Type | Description |
| ------------------- | ------- | ----------------- |
| delegatorAddress | address | delegator의 주소 |
| srcValidatorAddress | address | 출발지 validator의 주소 |
| dstValidatorAddress | address | 목적지 validator의 주소 |
##### Outputs
| Name | Type | Description |
| ------------ | ------------------ | ----------- |
| redelegation | RedelegationOutput | 재위임의 정보 |
`RedelegationOutput`은 다음 필드를 가진 구조체입니다:
| Name | Type | Description |
| ------------------- | -------------------- | ----------------- |
| delegatorAddress | address | delegator의 주소 |
| validatorSrcAddress | address | 출발지 validator의 주소 |
| validatorDstAddress | address | 목적지 validator의 주소 |
| entries | RedelegationEntry\[] | 재위임의 항목들 |
`RedelegationEntry`는 다음 필드를 가진 구조체입니다:
| Name | Type | Description |
| -------------- | ------ | ----------- |
| creationHeight | uint64 | 항목의 생성 높이 |
| completionTime | uint64 | 항목의 완료 시간 |
| initialBalance | Coin | 항목의 초기 잔액 |
| balance | Coin | 항목의 잔액 |
#### `redelegations`
Delegator, 출발지 validator, 목적지 validator의 모든 재위임을 반환합니다.
재위임을 찾을 수 없으면 빈 `RedelegationResponse`와 `PageResp`가 반환됩니다.
##### Inputs
| Name | Type | Description |
| ------------------- | ------- | ----------------- |
| delegatorAddress | address | delegator의 주소 |
| srcValidatorAddress | address | 출발지 validator의 주소 |
| dstValidatorAddress | address | 목적지 validator의 주소 |
| pageRequest | PageReq | 페이지네이션 요청 |
##### Outputs
| Name | Type | Description |
| ------------ | ----------------------- | ----------- |
| response | RedelegationResponse\[] | 재위임들의 정보 |
| pageResponse | PageResp | 페이지네이션 응답 |
### 이벤트
#### CreateValidator
| Name | Type | Indexed | Description |
| -------- | ------- | ------- | --------------------------------- |
| valiAddr | address | Y | validator의 주소 |
| value | uint256 | N | validator에게 초기 자체 위임되는 스테이킹 토큰의 양 |
#### EditValidator
| Name | Type | Indexed | Description |
| ----------------- | ------- | ------- | ----------------------------------- |
| valiAddr | address | Y | validator의 주소 |
| commissionRate | int256 | N | validator가 보상받는 스테이킹 토큰의 업데이트된 수수료율 |
| minSelfDelegation | int256 | N | validator의 업데이트된 최소 자체 위임 금액 |
#### Delegate
| Name | Type | Indexed | Description |
| ------------- | ------- | ------- | ----------------------------------- |
| delegatorAddr | address | Y | delegator의 주소 |
| validatorAddr | string | Y | validator의 주소 |
| amount | uint256 | N | validator에게 위임되는 스테이킹 토큰의 양 |
| newShares | uint256 | N | delegation 이후의 delegation shares의 양 |
#### Unbond
| Name | Type | Indexed | Description |
| -------------- | ------- | ------- | ------------------------------- |
| delegatorAddr | address | Y | delegator의 주소 |
| validatorAddr | string | Y | validator의 주소 |
| amount | uint256 | N | validator로부터 언델리게이트된 스테이킹 토큰의 양 |
| completionTime | uint256 | N | 언델리게이션의 완료 시간 |
#### Redelegate
| Name | Type | Indexed | Description |
| ------------------- | ------- | ------- | ----------------- |
| delegatorAddr | address | Y | delegator의 주소 |
| validatorSrcAddress | address | Y | 출발지 validator의 주소 |
| validatorDstAddress | address | Y | 목적지 validator의 주소 |
| amount | uint256 | N | 재위임할 스테이킹 토큰의 양 |
| completionTime | uint256 | N | 재위임의 완료 시간 |
## System Transactions
### 요약
시스템 트랜잭션은 Stable 프로토콜이 Stable SDK 작업에 대한 EVM 이벤트를 발생시킬 수 있는 방법을 제공합니다. 언본딩 완료와 같은 스테이킹 이벤트가 SDK 계층에서 발생하면 프로토콜은 해당 이벤트를 발생시키는 EVM 트랜잭션을 자동으로 생성하여 이러한 작업이 EVM 도구 및 애플리케이션에 완전히 표시되도록 합니다.
### 동기
Stable의 EVM 사용자와 애플리케이션은 `eth_getLogs`와 같은 표준 EVM 인터페이스를 통해 블록체인 이벤트를 모니터링할 것으로 기대합니다. 그러나 중요한 작업은 EVM 이벤트를 자연스럽게 발생시키지 않는 Stable SDK 모듈에서 발생합니다. 이는 가시성 격차를 만듭니다: EVM dapp은 사용자의 토큰이 언제 언본딩을 완료하는지 쉽게 추적할 수 없습니다.
시스템 트랜잭션은 이 격차를 해소합니다. 스테이킹 모듈이 언본딩 작업을 완료하면 Stable의 x/stable 모듈이 이벤트를 감지하고 StableSystem 프리컴파일 (`0x0000000000000000000000000000000000009999`)을 호출하는 시스템 트랜잭션을 생성합니다. 그런 다음 프리컴파일은 모든 dapp이 구독할 수 있는 적절한 EVM 이벤트를 발생시킵니다. 시스템 트랜잭션은 프로토콜만 사용할 수 있는 특수 발신자 주소(`0x8888888888888888888888888888888888888888`)로 실행됩니다. 이는 누구도 프로토콜 이벤트를 위조할 수 없도록 방지하면서 이벤트 발생을 무신뢰적이고 온체인에서 검증 가능하게 유지합니다.
### 명세
시스템 트랜잭션은 세 가지 주요 구성 요소를 통해 작동합니다: x/stable 모듈의 EndBlocker, PrepareProposal 핸들러 및 StableSystem 프리컴파일입니다.
#### 아키텍처 개요
### Stable이 해결하는 것
#### USDT를 위해 설계된 맞춤형 생태계
Stable은 사용자는 물론 기업과 개발자가 겪는 모든 불편함을 해소하도록 정교하게 설계된 USDT 전용 레이어 1 블록체인입니다. 주요 장점은 다음과 같습니다:
* **높은 처리량**: 초당 수천 개의 트랜잭션들을 효율적으로 처리하며, 네트워크가 혼잡한 상황에서도 안정적인 성능을 유지합니다.
* **매우 저렴한 수수료 및 즉각적인 정산**: 트랜잭션은 몇 초 이내에 완결되며, 수수료는 1센트도 되지 않는 수준으로 매우 저렴하기 때문에, 소액 결제부터 대규모 정산 두 경우 모두에 적합합니다.
* **USDT 기반 가스 사용**: 거래 수수료를 USDT로 직접 지불할 수 있어, 별도로 변동성이 큰 자산을 보유할 필요가 없습니다.
#### 기업을 위한 기능
Stable은 기업의 요구사항에 맞춘 전용 솔루션들을 제공합니다:
* **강화된 보안**: 입증된 Proof-of-Stake 합의 알고리즘과 이더리움 개발 도구 호환성을 바탕으로, 안전하면서도 친숙한 환경을 제공합니다.
* **보장된 블록스페이스**: 기업은 일정 블록스페이스를 사전에 할당받아, 네트워크 혼잡과 무관하게 안정적으로 트랜잭션을 보낼 수 있습니다.
* **기밀 전송**: 규제를 준수하면서도 개인정보를 보호할 수 있는 전송 기능을 제공해, 민감한 금융 거래에도 적합합니다.
#### 개발자 지원 생태계
Stable은 개발을 빠르고 쉽게 만들기 위한 도구들을 갖추고 있습니다:
* **EVM 호환성**: Ethereum Virtual Machine을 완벽히 지원하여, 기존 이더리움 dApp을 쉽게 포팅하고 익숙한 툴을 그대로 사용할 수 있습니다.
* **전문 SDK 제공**: 스테이블코인 기반 dApp 개발에 최적화된 SDK를 제공해, 복잡도를 줄이고 개발 비용을 크게 낮춥니다.
* **통합 도구**: 강력한 API와 통합 서비스를 통해, Stable의 인프라를 기업의 기존 시스템에 손쉽게 연결할 수 있습니다.
#### 스테이블코인을 위한 확장 생태계
Stable은 다양한 영역에서 스테이블코인의 활용도를 높이는 생태계를 조성합니다:
* **크로스체인 상호운용성**: Stable과 타 블록체인 간 자산 전송을 간편하게 하여 유동성과 사용성을 극대화합니다.
* **금융 서비스 통합**: USDT를 기반으로 하는 다양한 금융 서비스 애플리케이션을 지원합니다.
* **규제 대응 도구**: 내장된 컴플라이언스 및 리포팅 기능으로, 기관의 규제 준수를 돕습니다.
#### 실생활에서의 활용 확장
Stable은 전통적인 거래 및 DeFi 플랫폼을 넘어 USDT의 실질적인 활용 가능성을 확장합니다:
* **소비자 결제 솔루션**: USDT와 연동된 직불 및 신용카드 통합으로, 스테이블코인을 실생활에서 쉽게 사용할 수 있습니다.
* **가맹점 결제 도구**: 기업이 고비용의 결제 대행사 없이 직접 USDT를 받을 수 있어, 수수료를 크게 절감할 수 있습니다.
* **Stable Pay**: 일상적인 트랜잭션에 최적화된 사용자 친화적인 지갑으로, Stable 생태계와 자연스럽게 연결되어 직관적인 UX를 제공합니다.
Stable은 스테이블코인 중심의 금융 인프라를 처음부터 새롭게 구축해, 안정적인 운영, 사용자 친화성, 글로벌 금융 포용성을 향상시키는 기반을 마련하고 있습니다.
## 개발자 지원
### FAQ
다음과 같은 주제를 다루는 개발자 중심 질문 모음집입니다:
* Stable 네트워크에 어떻게 연결하나요?
* 일반적인 EVM 도구와 호환되는 표준 JSON-RPC 요청을 사용하여 네트워크와 상호작용할 수 있습니다.
* 트랜잭션 수수료에는 어떤 통화가 사용되나요?
* 트랜잭션 수수료는 USDT0로 지불됩니다. 표준 기본 가스 가격 외에 추가적인 수수료 매개변수는 필요하지 않습니다.
* 업데이트는 어디서 추적할 수 있나요?
* 모든 프로토콜 및 개발자 대상 변경사항은 릴리스 & 변경 로그에서 전달됩니다.
* Stable은 계정 추상화를 지원하나요?
* 네. EIP-7702는 EOA가 일시적으로 스마트 계정 동작으로 작동할 수 있게 합니다.
* 자세한 내용은 [여기](ko/architecture/usdt-specific-features/eip-7702-and-aa)에서 읽을 수 있습니다.
* 트랜잭션 결과는 어디서 볼 수 있나요?
* 블록에 포함되면 다음을 통해 결과를 볼 수 있습니다:
* 잔액 읽기
* 컨트랙트 상태 조회
* 로그 및 방출된 이벤트
* Stable용 스마트 컨트랙트는 어떻게 빌드하나요?
* 다음과 같은 표준 EVM 개발자 워크플로를 사용할 수 있습니다:
* Solidity 기반 컨트랙트
* 네트워크와 상호작용하기 위한 JSON-RPC 라이브러리
이 페이지는 공개 테스트넷 사용 중 일반적인 질문이 발생하면서 확장될 것입니다.
### 지원 채널
개발자는 기술 지원을 위해 Stable 팀과 직접 소통할 수 있습니다.
* **Discord**: [https://discord.gg/stablexyz](https://discord.gg/stablexyz) 개발자 채널에 참여하세요.
* **이슈 보고**: 공개 깃헙 레포가 열리면 지침이 제공될 예정입니다.
커뮤니티 플랫폼이 사용 가능해지면 지원 연락처가 업데이트될 예정입니다.
## Stable에 첫 번째 스마트 컨트랙트 배포하기
이 튜토리얼에서는 Stable 테스트넷에 간단한 스마트 컨트랙트를 배포하고 체인에서 상태를 읽어옵니다. 이 과정에서 Stable 네트워크 구성 방식, USDT0이 가스 토큰으로 작동하는 방식, 표준 EVM 도구를 Stable에 연결하는 방법을 배웁니다.
Solidity와 Unix 계열 터미널에 대한 기본 지식이 있다고 가정합니다. Stable 사용 경험은 필요하지 않습니다.
### 사전 요구사항
* [Foundry](https://book.getfoundry.sh/getting-started/installation) 설치 (`forge`, `cast`, `anvil`이 PATH에서 사용 가능해야 함)
* 개인 키를 소유한 지갑 (새 테스트 키도 괜찮습니다 — 실제 자금이 있는 키는 절대 테스트넷에서 사용하지 마세요)
* 테스트넷 RPC 및 수도꼭지에 접근할 수 있는 인터넷 연결
***
### 1. 새 Foundry 프로젝트 생성
다음 명령어로 새 프로젝트를 생성합니다:
```bash
forge init stable-hello && cd stable-hello
```
Foundry는 `src/` 디렉토리에 샘플 `Counter.sol` 컨트랙트와 테스트 파일을 생성합니다. 이 컨트랙트를 그대로 배포합니다 — 목표는 새 Solidity 코드를 작성하는 것이 아니라 실제로 체인에 올리는 것입니다.
### 2. 배포할 컨트랙트 확인
[src/Counter.sol](src/Counter.sol)을 열어보세요. 두 개의 함수가 있습니다:
```solidity
// SPDX-License-Identifier: UNLICENSED
pragma solidity ^0.8.13;
contract Counter {
uint256 public number;
function setNumber(uint256 newNumber) public {
number = newNumber;
}
function increment() public {
number++;
}
}
```
`number`는 체인에 저장되는 공개 상태 변수입니다. `increment()`와 `setNumber()`는 이를 변경하는 두 가지 방법입니다. `number`를 읽는 것은 가스가 들지 않습니다 — 무료 `eth_call`입니다.
### 3. Stable 테스트넷 구성
프로젝트 루트에 네트워크 자격증명을 저장할 [.env](.env) 파일을 생성합니다:
```bash
touch .env
```
다음 내용을 추가하고, 플레이스홀더를 실제 개인 키로 교체합니다:
```bash
PRIVATE_KEY=0xYOUR_PRIVATE_KEY_HERE
```
다음으로 [foundry.toml](foundry.toml)을 열고 Stable 테스트넷을 명명된 네트워크 프로필로 추가합니다. 기존 `[profile.default]` 섹션 아래에 다음 블록을 추가합니다:
```toml
[rpc_endpoints]
stable_testnet = "https://rpc.testnet.stable.xyz"
```
이렇게 하면 `stable_testnet`을 대상으로 할 때 Foundry가 트랜잭션을 어디로 보낼지 알게 됩니다. Stable은 EVM 호환이므로 다른 구성은 필요하지 않습니다.
***
**체크포인트:** RPC 엔드포인트에 접근 가능한지 확인합니다:
```bash
cast chain-id --rpc-url https://rpc.testnet.stable.xyz
```
예상 출력:
```
2201
```
체인 ID `2201`은 Stable 테스트넷입니다. 이 숫자가 보이면 네트워크에 접근할 수 있는 것입니다.
***
### 4. 지갑 주소 가져오기
개인 키에서 배포자 주소를 도출하여 어떤 계정에 자금을 충전해야 하는지 확인합니다:
```bash
source .env
cast wallet address $PRIVATE_KEY
```
출력된 주소를 복사합니다. 다음 단계에서 필요합니다.
### 5. USDT0으로 지갑에 자금 충전
Stable은 **USDT0**을 가스 토큰으로 사용합니다 — 상품과 서비스 결제에 사용하는 것과 동일한 자산이 컴퓨팅 비용 지불에 직접 사용됩니다. 별도의 네이티브 토큰은 없습니다.
테스트넷 수도꼭지를 방문하여 자금을 요청합니다:
```
https://faucet.stable.xyz
```
이전 단계의 주소를 붙여넣습니다. 수도꼭지는 지갑에 1 USDT0을 전송하며, 이는 여러 컨트랙트를 배포하고 상호작용하기에 충분합니다.
***
**체크포인트:** 잔액이 도착했는지 확인합니다:
```bash
cast balance $PRIVATE_KEY --rpc-url https://rpc.testnet.stable.xyz
```
0이 아닌 값이 보여야 합니다. 잔액이 여전히 `0`이라면 몇 초 후 다시 실행하세요 — Stable은 약 0.7초마다 새 블록을 생성하므로 자금이 빨리 정산됩니다.
***
### 6. 컨트랙트 배포
`forge create`로 배포를 실행합니다:
```bash
source .env
forge create src/Counter.sol:Counter \
--rpc-url https://rpc.testnet.stable.xyz \
--private-key $PRIVATE_KEY \
--broadcast
```
Foundry가 컨트랙트를 컴파일하고, 배포 트랜잭션을 브로드캐스트하고, 영수증을 기다립니다. 블록 시간이 \~0.7초이므로 잠깐이면 됩니다.
***
**체크포인트:** 출력이 다음과 같아야 합니다:
```
[⠒] Compiling...
No files changed, compilation skipped
Deployer: 0xYourAddress
Deployed to: 0xSomeContractAddress
Transaction hash: 0xSomeTxHash
```
`Deployed to` 주소를 복사합니다. 다음 두 단계에서 필요합니다.
***
### 7. 쓰기 함수 호출
이제 `setNumber()`를 호출하여 체인에 값을 저장합니다:
```bash
cast send 0xSomeContractAddress "setNumber(uint256)" 42 \
--rpc-url https://rpc.testnet.stable.xyz \
--private-key $PRIVATE_KEY
```
이것은 트랜잭션을 전송합니다. 상태 변경에 대해 소량의 USDT0 수수료를 지불합니다. 값 `42`가 이제 Stable 테스트넷의 `number` 변수에 저장되었습니다.
### 8. 체인에서 상태 읽기
`number()`를 호출하여 값을 읽어옵니다. 이것은 무료 읽기 — 트랜잭션 없음, 가스 없음:
```bash
cast call 0xSomeContractAddress "number()(uint256)" \
--rpc-url https://rpc.testnet.stable.xyz
```
예상 출력:
```
42
```
Stable 테스트넷에 쓰고 읽는 것을 완료했습니다. 배포, 쓰기, 읽기의 전체 사이클은 EVM 개발의 핵심 루프이며, 다른 EVM 체인과 동일하게 작동합니다.
### 9. Stablescan에서 배포 확인
Stable 테스트넷 블록 탐색기를 열고 컨트랙트 주소를 붙여넣습니다:
```
https://testnet.stablescan.xyz
```
배포 트랜잭션과 `setNumber` 호출을 볼 수 있습니다. Stablescan은 Stable에서 온체인 상태를 검사하고, 컨트랙트 소스 코드를 검증하고, 트랜잭션 히스토리를 읽는 공식 도구입니다.
***
### 배운 내용
컨트랙트를 배포하고, 상태 변경 트랜잭션을 전송하고, 온체인 상태를 읽었습니다 — 모두 Stable 테스트넷에서 완료했습니다. 이제 다음을 할 수 있습니다:
* 표준 RPC 엔드포인트를 사용하여 Stable을 대상으로 Foundry(또는 다른 EVM 도구체인) 구성하기
* USDT0 수도꼭지를 사용하여 지갑에 자금 충전하기
* USDT0을 가스 토큰으로 사용하여 트랜잭션 비용 지불하기
* Stablescan에서 작업 내용 확인하기
**다음 단계:**
* [JSON-RPC API](/ko/developers/core-mechanics/json-rpc-api) — Stable이 지원하는 `eth_` 메서드와 이더리움 메인넷과의 차이점 확인
* [가스 & 가격 책정](/ko/developers/core-mechanics/gas-pricing) — USDT0 기반 수수료 계산 방식 이해
* [테스트넷 정보](/ko/developers/testnet/testnet-information) — 전체 네트워크 파라미터, 컨트랙트 주소, 브리지 세부사항
## 생태계
이 문서에서는 브릿지(LayerZero) 및 USDT0에 대한 정보를 확인할 수 있습니다.
### Stable Testnet의 LayerZero
| 이름 | 값 |
| ----------------- | ------------------------------------------ |
| eid | 40374 |
| chainKey | stable-testnet |
| stage | testnet |
| endpointV2View | 0x6Ac7bdc07A0583A362F1497252872AE6c0A5F5B8 |
| endpointV2 | 0x3aCAAf60502791D199a5a5F0B173D78229eBFe32 |
| sendUln302 | 0x9eCf72299027e8AeFee5DC5351D6d92294F46d2b |
| receiveUln302 | 0xB0487596a0B62D1A71D0C33294bd6eB635Fc6B09 |
| blockedMessageLib | 0xa229b65cc2191bf60bc24efcda3487d7b5c0c9f0 |
| executor | 0x701f3927871EfcEa1235dB722f9E608aE120d243 |
| deadDVN | 0xC1868e054425D378095A003EcbA3823a5D0135C9 |
### Stable Testnet의 USDT0
| 이름 | 값 |
| ----------- | ------------------------------------------ |
| wrapper | 0xB8CE59FC3717ada4C02eaDF9682A9e934F625ebb |
| composer | 0xe7cd86e13AC4309349F30B3435a9d337750fC82D |
| OFT | 0x779Ded0c9e1022225f8E0630b35a9b54bE713736 |
| USDT0 impl | 0x3f9E27457ac494fC729beB50e6af04Ec34e3828E |
| USDT0 proxy | 0x78Cf24370174180738C5B8E352B6D14c83a6c9A9 |
### Sepolia OFT 컨트랙트 및 USDT0 컨트랙트 (참고용)
| 이름 | 값 |
| ------------ | ---------------------------------------------------------------------------------------------------------------------------------------------------------------------------------------------- |
| Sepolia OFT | [https://sepolia.etherscan.io/address/0xc099cd946d5efcc35a99d64e808c1430cef08126](https://sepolia.etherscan.io/address/0xc099cd946d5efcc35a99d64e808c1430cef08126) |
| Sepolia USDT | [https://sepolia.etherscan.io/address/0xc4DCC311c028e341fd8602D8eB89c5de94625927#writeContract](https://sepolia.etherscan.io/address/0xc4DCC311c028e341fd8602D8eB89c5de94625927#writeContract) |
## Stable 테스트넷 지갑에 자금을 충전하는 방법
Stable은 USDT0를 가스 토큰으로 사용하므로, 체인과 상호작용하기 위해서는 지갑에 USDT0가 필요합니다. 먼저 Faucet을 사용하여 계정에 USDT0를 충전해야 합니다.
1. [https://faucet.stable.xyz](https://faucet.stable.xyz) 를 방문합니다
2. 'Get USDT0' 버튼을 클릭하면 1 USDT0가 지갑으로 전송됩니다.
더 많은 USDT0가 필요한 경우, Ethereum Sepolia에서 Stable 테스트넷으로 Test USDT를 브리지할 수 있습니다.
1. [https://sepolia.etherscan.io/token/0xc4DCC311c028e341fd8602D8eB89c5de94625927#writeContract](https://sepolia.etherscan.io/token/0xc4DCC311c028e341fd8602D8eB89c5de94625927#writeContract) 를 방문하여, `_mint` 함수를 호출해 원하는 양의 Test Tether USD를 계정에 발행합니다.
2. Ethereum Sepolia의 LayerZero 브리지 컨트랙트로 다음 트랜잭션을 전송하여 Test USDT를 Stable 테스트넷으로 브리지합니다:
```jsx
export function addrTo32Bytes(addr: string): Buffer {
const hex20 = ethers.utils.getAddress(addr).slice(2);
const padded = hex20.padStart(64, "0"); // 32 bytes ⇒ 64 hex
return Buffer.from(padded, "hex"); // length === 32
}
async function main() {
const [owner] = await ethers.getSigners();
const SEPOLIA_USDT0 = "0xc4DCC311c028e341fd8602D8eB89c5de94625927";
const SEPOLIA_USDT0_OAPP = "0xc099cD946d5efCC35A99D64E808c1430cEf08126"
const RECEIVER_EID = 40374;
const usdt0 = await ethers.getContractAt("ERC20", SEPOLIA_USDT0);
await usdt0.approve(SEPOLIA_USDT0_OAPP, ethers.utils.parseEther("1"));
const options = Options.newOptions().addExecutorLzReceiveOption(0, 0).toBytes();
const amount = ethers.utils.parseEther("1"); // Change this to your desired amount
const OFTAdapter = await ethers.getContractAt("OFTAdapter", SEPOLIA_USDT0_OAPP);
const sendParams = {
dstEid: RECEIVER_EID,
to: addrTo32Bytes(owner.address),
amountLD: amount,
minAmountLD: amount,
extraOptions: options,
composeMsg: Buffer.from(""),
oftCmd: Buffer.from(""),
};
const fee = await OFTAdapter.quoteSend(sendParams, false);
await OFTAdapter.send(
sendParams,
fee,
owner.address,
{
value: fee.nativeFee,
}
)
}
```
## Testnet 정보
Stable testnet에 접근하기 위해 필요한 모든 정보입니다.
### 네트워크 개요
| 설정 | 값 |
| ------------ | -------------- |
| **네트워크 이름** | Stable Testnet |
| **Chain ID** | `2201` |
| **가스 토큰** | USDT0 |
| **거버넌스 토큰** | STABLE |
| **블록 타임** | \~0.7 초 |
### Block Explorer
| Explorer | URL |
| -------------- | ---------------------------------------------------------------- |
| **Stablescan** | [https://testnet.stablescan.xyz](https://testnet.stablescan.xyz) |
### RPC 엔드포인트
#### 주요 엔드포인트
| 타입 | 엔드포인트 | 목적 |
| ---------------- | ---------------------------------------------------------------- | -------- |
| **EVM JSON-RPC** | [https://rpc.testnet.stable.xyz](https://rpc.testnet.stable.xyz) | EVM 트랜잭션 |
| **WebSocket** | wss\://rpc.testnet.stable.xyz | 실시간 업데이트 |
### 체인 정보
| 파라미터 | EVM |
| ------------ | ------- |
| **Chain ID** | `2201` |
| **주소 형식** | `0x...` |
| **가스 토큰** | `USDT0` |
| **소수점** | 18 |
### Faucet 및 도구
| 도구 | URL | 설명 |
| ------------- | ------------------------------------------------------- | ----------- |
| **Faucet** | [https://faucet.stable.xyz](https://faucet.stable.xyz) | 테스트 토큰 받기 |
| **Snapshots** | [Node Operators Guide](../node-operations/snapshots) 참조 | 체인 snapshot |
## 버전 히스토리
Stable 테스트넷의 전체 버전 히스토리 및 관련 문서 정보입니다.
### 현재 버전 정보
* **현재 버전**: `v1.3.1-rc0`
* **다음 업그레이드**: `TBD`
* **업그레이드 높이**: `TBD`
* **예상 시간**: `TBD`
### 버전 히스토리
#### 현재 및 이전 버전
| 버전 | 커밋 | 업그레이드 높이 | 바이너리 | 상태 |
| -------------- | ---------- | ---------- | --------------------------------------------------------------------------------------------------------------------------------------------------------------------------------------------------------------------------------------------------- | -------------------- |
| **v1.3.1-rc0** | `75bb546` | - | [AMD64](https://stable-data-dist.s3.us-east-1.amazonaws.com/testnet/binary/stabled-1.3.1-rc0-linux-amd64-testnet.tar.gz) / [ARM64](https://stable-data-dist.s3.us-east-1.amazonaws.com/testnet/binary/stabled-1.3.1-rc0-linux-arm64-testnet.tar.gz) | 현재 버전 |
| **v1.3.0-rc1** | `25b5e47` | 53,265,500 | [AMD64](https://stable-data-dist.s3.us-east-1.amazonaws.com/testnet/binary/stabled-1.3.0-rc1-linux-amd64-testnet.tar.gz) / [ARM64](https://stable-data-dist.s3.us-east-1.amazonaws.com/testnet/binary/stabled-1.3.0-rc1-linux-arm64-testnet.tar.gz) | |
| **v1.3.0-rc0** | `864d54c` | 49,855,000 | [AMD64](https://stable-data-dist.s3.us-east-1.amazonaws.com/testnet/binary/stabled-1.3.0-rc0-linux-amd64-testnet.tar.gz) / [ARM64](https://stable-data-dist.s3.us-east-1.amazonaws.com/testnet/binary/stabled-1.3.0-rc0-linux-arm64-testnet.tar.gz) | |
| **v1.2.2-rc0** | `8bd5d5e` | - | [AMD64](https://stable-data-dist.s3.us-east-1.amazonaws.com/testnet/binary/stabled-1.2.2-rc0-linux-amd64-testnet.tar.gz) / [ARM64](https://stable-data-dist.s3.us-east-1.amazonaws.com/testnet/binary/stabled-1.2.2-rc0-linux-arm64-testnet.tar.gz) | |
| **v1.2.1-rc1** | `7ff9a8a` | - | [AMD64](https://stable-data-dist.s3.us-east-1.amazonaws.com/testnet/binary/stabled-1.2.1-rc1-linux-amd64-testnet.tar.gz) / [ARM64](https://stable-data-dist.s3.us-east-1.amazonaws.com/testnet/binary/stabled-1.2.1-rc1-linux-arm64-testnet.tar.gz) | |
| **v1.2.0-rc1** | `263c033` | 41,306,450 | [AMD64](https://stable-data-dist.s3.us-east-1.amazonaws.com/testnet/binary/stabled-1.2.0-rc1-linux-amd64-testnet.tar.gz) / [ARM64](https://stable-data-dist.s3.us-east-1.amazonaws.com/testnet/binary/stabled-1.2.0-rc1-linux-arm64-testnet.tar.gz) | |
| **v1.2.0** | `ee8ca35` | 40,392,500 | [AMD64](https://stable-data-dist.s3.us-east-1.amazonaws.com/testnet/binary/stabled-1.2.0-linux-amd64-testnet.tar.gz) / [ARM64](https://stable-data-dist.s3.us-east-1.amazonaws.com/testnet/binary/stabled-1.2.0-linux-arm64-testnet.tar.gz) | |
| **v1.1.2** | `3d83aa3` | 34,649,300 | [AMD64](https://stable-data-dist.s3.us-east-1.amazonaws.com/testnet/binary/stabled-1.1.2-linux-amd64-testnet.tar.gz) / [ARM64](https://stable-data-dist.s3.us-east-1.amazonaws.com/testnet/binary/stabled-1.1.2-linux-arm64-testnet.tar.gz) | |
| **v1.1.1** | `8becd6b` | 33,152,000 | [AMD64](https://stable-data-dist.s3.us-east-1.amazonaws.com/testnet/binary/stabled-1.1.1-linux-amd64-testnet.tar.gz) / [ARM64](https://stable-data-dist.s3.us-east-1.amazonaws.com/testnet/binary/stabled-1.1.1-linux-arm64-testnet.tar.gz) | |
| **v1.1.0** | `17ceaa7` | 32,309,700 | [AMD64](https://stable-data-dist.s3.us-east-1.amazonaws.com/testnet/binary/stabled-1.1.0-linux-amd64-testnet.tar.gz) / [ARM64](https://stable-data-dist.s3.us-east-1.amazonaws.com/testnet/binary/stabled-1.1.0-linux-arm64-testnet.tar.gz) | |
| **v0.8.1** | `1eb65d5` | 30,770,000 | [AMD64](https://stable-data-dist.s3.us-east-1.amazonaws.com/testnet/binary/stabled-0.8.1-linux-amd64-testnet.tar.gz) / [ARM64](https://stable-data-dist.s3.us-east-1.amazonaws.com/testnet/binary/stabled-0.8.1-linux-arm64-testnet.tar.gz) | |
| **v0.8.0** | `e55efb6` | 29,410,999 | [AMD64](https://stable-data-dist.s3.us-east-1.amazonaws.com/testnet/binary/stabled-0.8.0-linux-amd64-testnet.tar.gz) / [ARM64](https://stable-data-dist.s3.us-east-1.amazonaws.com/testnet/binary/stabled-0.8.0-linux-arm64-testnet.tar.gz) | Bank 프리컴파일 개선 |
| **v0.7.2** | `3c53e14` | 27,258,000 | [AMD64](https://stable-data-dist.s3.us-east-1.amazonaws.com/testnet/binary/stabled-0.7.2-linux-amd64-testnet.tar.gz) / [ARM64](https://stable-data-dist.s3.us-east-1.amazonaws.com/testnet/binary/stabled-0.7.2-linux-arm64-testnet.tar.gz) | StableBFT 통합 |
| **v0.6.0** | `5cc1ad6` | 19,587,000 | [AMD64](https://stable-data-dist.s3.us-east-1.amazonaws.com/testnet/binary/stabled-0.6.0-linux-amd64-testnet.tar.gz) | 소규모 수정 |
| **v0.5.0** | `919281d` | 18,719,000 | [AMD64](https://stable-data-dist.s3.us-east-1.amazonaws.com/testnet/binary/stabled-0.5.0-linux-amd64-testnet.tar.gz) | 소규모 수정 |
| **v0.4.0** | `c6240c0` | 18,666,150 | [AMD64](https://stable-data-dist.s3.us-east-1.amazonaws.com/testnet/binary/stabled-0.4.0-linux-amd64-testnet.tar.gz) | Stable SDK v0.53.4 |
| **v0.3.0** | `a4f5ac5` | 9,166,131 | [AMD64](https://stable-data-dist.s3.us-east-1.amazonaws.com/testnet/binary/stabled-0.3.0-linux-amd64-testnet.tar.gz) | EVM 가치 전송 허용 목록 |
| **v0.2.1** | `53e6e073` | - | [AMD64](https://stable-data-dist.s3.us-east-1.amazonaws.com/testnet/binary/stabled-0.2.1-linux-amd64-testnet.tar.gz) | 논브레이킹 업데이트 |
| **v0.2.0** | `8bdd771` | 8,956,584 | [AMD64](https://stable-data-dist.s3.us-east-1.amazonaws.com/testnet/binary/stabled-0.2.0-linux-amd64-testnet.tar.gz) | 기능 업데이트 |
| **v0.1.0** | `10dfg542` | Genesis | [AMD64](https://stable-data-dist.s3.us-east-1.amazonaws.com/testnet/binary/stabled-0.1.0-linux-amd64-testnet.tar.gz) | Genesis (2025-04-07) |
### 관련 문서
* [업그레이드 가이드](/ko/developers/node-operations/upgrades) - 단계별 업그레이드 절차
* [테스트넷 정보](/ko/developers/testnet/testnet-information) - 현재 네트워크 세부 정보
This guide covers all configuration options for Stable nodes, including optimization for different use cases.
### Configuration Files Overview
Stable nodes use two main configuration files:
* **`config.toml`**: Core StableBFT configuration
* **`app.toml`**: Application-specific configuration
Both files are located in `~/.stabled/config/`
### Core Configuration (config.toml)
#### Basic Settings
:::code-group
```toml [Mainnet]
# The ID of the chain to join
chain_id = "stable_988-1"
# A custom human-readable name for this node
moniker = "your-node-name"
# Database backend: goleveldb | cleveldb | boltdb | rocksdb | badgerdb
db_backend = "goleveldb"
```
```toml [Testnet]
# The ID of the chain to join
chain_id = "stabletestnet_2201-1"
# A custom human-readable name for this node
moniker = "your-node-name"
# Database backend: goleveldb | cleveldb | boltdb | rocksdb | badgerdb
db_backend = "goleveldb"
```
:::
#### P2P Configuration
:::code-group
```toml [Mainnet]
[p2p]
# Address to listen for incoming connections
laddr = "tcp://0.0.0.0:26656"
# Address to advertise to peers for them to dial
external_address = "YOUR_PUBLIC_IP:26656"
# Comma separated list of seed nodes
seeds = "17a539fda42863a99755547e1c9b3ec4c38a4439@seed1.stable.xyz:26656"
# Comma separated list of persistent peers
persistent_peers = "b896f6f8ca5a4d1cc40de09407df0c96e76df950@peer1.stable.xyz:26656"
```
```toml [Testnet]
[p2p]
# Address to listen for incoming connections
laddr = "tcp://0.0.0.0:26656"
# Address to advertise to peers for them to dial
external_address = "YOUR_PUBLIC_IP:26656"
# Comma separated list of seed nodes
seeds = "39e061b167162f6621ddadcf1be21d6fa585a468@seed1.testnet.stable.xyz:26656"
# Comma separated list of persistent peers
persistent_peers = "5ed0f977a26ccf290e184e364fb04e268ef16430@peer1.testnet.stable.xyz:26656"
```
:::
Additional P2P settings (same for both networks):
```toml
# Maximum number of inbound peers
max_num_inbound_peers = 50
# Maximum number of outbound peers
max_num_outbound_peers = 30
# Toggle to disable guard against peers connecting from the same ip
allow_duplicate_ip = false
# Peer connection configuration
handshake_timeout = "20s"
dial_timeout = "3s"
# Time to wait before flushing messages out on the connection
flush_throttle_timeout = "100ms"
# Maximum size of a message packet payload
max_packet_msg_payload_size = 1024
# Rate limiting
send_rate = 5120000 # 5 MB/s
recv_rate = 5120000 # 5 MB/s
# Seed mode (for seed nodes only)
seed_mode = false
# Enable peer exchange reactor
pex = true
```
#### RPC Server Configuration
```toml
[rpc]
# TCP or UNIX socket address for the RPC server
laddr = "tcp://127.0.0.1:26657"
# A list of origins a cross-domain request can be executed from
cors_allowed_origins = ["*"]
# A list of methods the client is allowed to use with cross-domain requests
cors_allowed_methods = ["HEAD", "GET", "POST"]
# A list of non simple headers the client is allowed to use with cross-domain requests
cors_allowed_headers = ["Origin", "Accept", "Content-Type", "X-Requested-With", "X-Server-Time"]
# TCP or UNIX socket address for the gRPC server
grpc_laddr = "tcp://127.0.0.1:9090"
# Maximum number of simultaneous connections
grpc_max_open_connections = 900
# Activate unsafe RPC commands like /dial_seeds and /unsafe_flush_mempool
unsafe = false
# Maximum number of simultaneous connections (including WebSocket)
max_open_connections = 900
# Maximum number of unique clientIDs that can connect
max_subscription_clients = 100
# Maximum number of unique queries a given client can subscribe to
max_subscriptions_per_client = 5
# How long to wait for a tx to be committed
timeout_broadcast_tx_commit = "10s"
# Maximum size of request body
max_body_bytes = 1000000
# Maximum size of request header
max_header_bytes = 1048576
```
#### Mempool Configuration
```toml
[mempool]
# Mempool version to use
version = "v1"
# Recheck enabled
recheck = true
# Broadcast enabled
broadcast = true
# Maximum number of transactions in the mempool
size = 3000
# Limit the total size of all txs in the mempool
max_txs_bytes = 1073741824 # 1GB
# Size of the cache
cache_size = 10000
# Do not remove invalid transactions from the cache
keep-invalid-txs-in-cache = false
# Maximum size of a single transaction
max_tx_bytes = 1048576 # 1MB
# Maximum size of a batch of transactions to send to a peer
max_batch_bytes = 0
```
#### Consensus Configuration
```toml
[consensus]
# How long we wait for a proposal block before prevoting nil
timeout_propose = "5s"
# How much timeout_propose increases with each round
timeout_propose_delta = "10ms"
# How long we wait after receiving +2/3 prevotes
timeout_prevote = "150ms"
# How much the timeout_prevote increases with each round
timeout_prevote_delta = "10ms"
# How long we wait after receiving +2/3 precommits
timeout_precommit = "150s"
# How much the timeout_precommit increases with each round
timeout_precommit_delta = "10ms"
# Make progress as soon as we have all the precommits
skip_timeout_commit = false
# Enable/disable double sign check
double_sign_check_height = 2
# EmptyBlocks mode
create_empty_blocks = true
create_empty_blocks_interval = "0s"
# Reactor sleep duration
peer_gossip_sleep_duration = "100ms"
peer_query_maj23_sleep_duration = "2s"
```
### Application Configuration (app.toml)
#### Basic Application Settings
```toml
# Pruning strategy
pruning = "default"
# HaltHeight contains a non-zero block height at which a node will halt
halt-height = 0
# HaltTime contains a non-zero time at which a node will halt
halt-time = 0
# MinRetainBlocks defines the number of blocks for which a node will retain
min-retain-blocks = 0
# InterBlockCache enables inter-block caching
inter-block-cache = true
# IndexEvents defines the set of events in the form {eventType}.{attributeKey}
index-events = []
# IavlCacheSize set the size of the iavl tree cache
iavl-cache-size = 781250
```
#### API Configuration
```toml
[api]
# Enable defines if the API server should be enabled
enable = true
# Swagger defines if swagger documentation should automatically be registered
swagger = true
# Address defines the API server to listen on
address = "tcp://0.0.0.0:1317"
# MaxOpenConnections defines the number of maximum open connections
max-open-connections = 1000
# EnabledUnsafeCORS defines if CORS should be enabled
enabled-unsafe-cors = true
```
#### gRPC Configuration
```toml
[grpc]
# Enable defines if the gRPC server should be enabled
enable = true
# Address defines the gRPC server address to bind to
address = "0.0.0.0:9090"
```
#### EVM JSON-RPC Configuration
```toml
[json-rpc]
# Enable the JSON-RPC server
enable = true
# Address to bind the JSON-RPC server
address = "0.0.0.0:8545"
# Address to bind the WebSocket server
ws-address = "0.0.0.0:8546"
# APIs to enable
api = "eth,net,web3,txpool,personal,debug"
# Gas cap for eth_call/estimateGas
gas-cap = 25000000
# EVM timeout for eth_call/estimateGas
evm-timeout = "5s"
# Tx fee cap for transactions
txfee-cap = 1
# Filter cap for eth_getLogs
filter-cap = 200
# FeeHistory cap
feehistory-cap = 100
# Block range cap for eth_getLogs
logs-cap = 10000
# Block range cap
block-range-cap = 10000
# HTTP timeout
http-timeout = "30s"
# HTTP idle timeout
http-idle-timeout = "120s"
# Allow unprotected transactions
allow-unprotected-txs = true
# Maximum number of transactions in the pool
max-tx-in-pool = 3000
# Enable indexer
enable-indexer = false
# Enable metrics
metrics = true
```
### Configuration Profiles
#### Full Node (Default)
Balanced configuration for full nodes:
```bash
# config.toml adjustments
sed -i 's/^indexer = ".*"/indexer = "kv"/' ~/.stabled/config/config.toml
sed -i 's/^max_num_inbound_peers = .*/max_num_inbound_peers = 50/' ~/.stabled/config/config.toml
sed -i 's/^max_num_outbound_peers = .*/max_num_outbound_peers = 30/' ~/.stabled/config/config.toml
# app.toml adjustments
sed -i 's/^pruning = ".*"/pruning = "default"/' ~/.stabled/config/app.toml
sed -i 's/^snapshot-interval = .*/snapshot-interval = 1000/' ~/.stabled/config/app.toml
```
#### Archive Node
No pruning, full history:
```bash
# config.toml adjustments
sed -i 's/^indexer = ".*"/indexer = "kv"/' ~/.stabled/config/config.toml
# app.toml adjustments
sed -i 's/^pruning = ".*"/pruning = "nothing"/' ~/.stabled/config/app.toml
```
#### RPC Node
Public RPC endpoint configuration:
```bash
# config.toml adjustments
sed -i 's/^max_num_inbound_peers = .*/max_num_inbound_peers = 30/' ~/.stabled/config/config.toml
sed -i 's/^max_open_connections = .*/max_open_connections = 30/' ~/.stabled/config/config.toml
sed -i 's/^cors_allowed_origins = .*/cors_allowed_origins = ["*"]/' ~/.stabled/config/config.toml
# app.toml adjustments
sed -i 's/^enable = .*/enable = true/' ~/.stabled/config/app.toml
sed -i 's/^swagger = .*/swagger = true/' ~/.stabled/config/app.toml
sed -i 's/^enabled-unsafe-cors = .*/enabled-unsafe-cors = true/' ~/.stabled/config/app.toml
```
### Monitoring Configuration
#### Prometheus Metrics
```toml
# config.toml
[instrumentation]
# Enable Prometheus metrics
prometheus = true
# Metrics listen address
prometheus_listen_addr = ":26660"
# Namespace for metrics
namespace = "stablebft"
```
#### Logging
```toml
# config.toml
[log]
# Log level (trace|debug|info|warn|error|fatal|panic)
level = "info"
# Log format (plain|json)
format = "plain"
```
### Applying Configuration Changes
After making configuration changes:
```bash
# Restart the node
sudo systemctl restart ${SERVICE_NAME}
# Check logs for errors
sudo journalctl -u ${SERVICE_NAME} -f
# Verify configuration loaded
curl localhost:26657/status | jq '.result.node_info'
```
### Next Steps
* [Set up Monitoring](./monitoring) for your node
* Review [Troubleshooting Guide](./troubleshooting) for common issues
This guide provides detailed instructions for installing and setting up a Stable node on various platforms.
### Prerequisites
Before starting the installation, ensure you have:
* Met all [System Requirements](./system-requirements)
* Root or sudo access to your server
* Basic knowledge of Linux command line
### Installation Method
Use the pre-compiled binaries for your platform. Building from source is not currently supported.
#### Mainnet
##### Linux AMD64
```bash
# Download the latest binary for AMD64 architecture
wget https://stable-data-dist.s3.us-east-1.amazonaws.com/mainnet/binary/stabled-latest-linux-amd64-mainnet.tar.gz
# Extract the archive
tar -xvzf stabled-latest-linux-amd64-mainnet.tar.gz
# Move binary to system path
sudo mv stabled /usr/bin/
# Verify installation
stabled version
```
##### Linux ARM64
```bash
# Download the binary for ARM64 architecture
wget https://stable-data-dist.s3.us-east-1.amazonaws.com/mainnet/binary/stabled-latest-linux-arm64-mainnet.tar.gz
# Extract and install
tar -xvzf stabled-latest-linux-arm64-mainnet.tar.gz
sudo mv stabled /usr/bin/
# Verify installation
stabled version
```
#### Testnet
##### Linux AMD64
```bash
# Download the latest binary for AMD64 architecture
wget https://stable-data-dist.s3.us-east-1.amazonaws.com/testnet/binary/stabled-latest-linux-amd64-testnet.tar.gz
# Extract the archive
tar -xvzf stabled-latest-linux-amd64-testnet.tar.gz
# Move binary to system path
sudo mv stabled /usr/bin/
# Verify installation
stabled version
```
##### Linux ARM64
```bash
# Download the binary for ARM64 architecture
wget https://stable-data-dist.s3.us-east-1.amazonaws.com/testnet/binary/stabled-latest-linux-arm64-testnet.tar.gz
# Extract and install
tar -xvzf stabled-latest-linux-arm64-testnet.tar.gz
sudo mv stabled /usr/bin/
# Verify installation
stabled version
```
### Node Initialization
After installing the binary, initialize your node:
#### Step 1: Set Node Name
```bash
# Set your node's moniker (choose a unique name)
export MONIKER="your-node-name"
```
#### Step 2: Initialize the Node
#### Mainnet
```bash
# Initialize with the mainnet chain ID
stabled init $MONIKER --chain-id stable_988-1
# This creates the configuration directory at ~/.stabled/
```
> **Note**: For current network parameters including chain ID, see [Mainnet Information](#TODO)
#### Testnet
```bash
# Initialize with the testnet chain ID
stabled init $MONIKER --chain-id stabletestnet_2201-1
# This creates the configuration directory at ~/.stabled/
```
> **Note**: For current network parameters including chain ID, see [Testnet Information](#TODO)
#### Step 3: Download Genesis File
:::code-group
```bash [Mainnet]
# Create backup of default genesis
mv ~/.stabled/config/genesis.json ~/.stabled/config/genesis.json.backup
# Download mainnet genesis
wget https://stable-data-dist.s3.us-east-1.amazonaws.com/mainnet/configuration/genesis.zip
unzip genesis.zip
# Move genesis to config directory
cp genesis.json ~/.stabled/config/genesis.json
# Verify genesis checksum
sha256sum ~/.stabled/config/genesis.json
# Expected: e1ceda79a3cc48a1028ca8646a2e9e2d156f610637cfb8b428ca8354277921f1
```
```bash [Testnet]
# Create backup of default genesis
mv ~/.stabled/config/genesis.json ~/.stabled/config/genesis.json.backup
# Download testnet genesis
wget https://stable-data-dist.s3.us-east-1.amazonaws.com/testnet/configuration/genesis.zip
unzip genesis.zip
# Move genesis to config directory
cp genesis.json ~/.stabled/config/genesis.json
# Verify genesis checksum
sha256sum ~/.stabled/config/genesis.json
# Expected: 66afbb6e57e6faf019b3021de299125cddab61d433f28894db751252f5b8eaf2
```
:::
#### Step 4: Configure Node
##### Download Configuration Files
:::code-group
```bash [Mainnet]
# Download optimized configuration (choose one based on your node type)
# For RPC/Full nodes:
wget https://stable-data-dist.s3.us-east-1.amazonaws.com/mainnet/configuration/rpc_node_config.zip
unzip rpc_node_config.zip
# For Archive nodes:
# wget https://stable-data-dist.s3.us-east-1.amazonaws.com/mainnet/configuration/archive_node_config.zip
# unzip archive_node_config.zip
# Backup original config
cp ~/.stabled/config/config.toml ~/.stabled/config/config.toml.backup
# Apply new configuration
cp config.toml ~/.stabled/config/config.toml
# Update moniker in config
sed -i "s/^moniker = \".*\"/moniker = \"$MONIKER\"/" ~/.stabled/config/config.toml
```
```bash [Testnet]
# Download optimized configuration
wget https://stable-data-dist.s3.us-east-1.amazonaws.com/testnet/configuration/rpc_node_config.zip
unzip rpc_node_config.zip
# Backup original config
cp ~/.stabled/config/config.toml ~/.stabled/config/config.toml.backup
# Apply new configuration
cp config.toml ~/.stabled/config/config.toml
# Update moniker in config
sed -i "s/^moniker = \".*\"/moniker = \"$MONIKER\"/" ~/.stabled/config/config.toml
```
:::
##### Essential Configuration Updates
Edit `~/.stabled/config/app.toml`:
```toml
# Enable JSON-RPC for EVM compatibility
[json-rpc]
enable = true
address = "0.0.0.0:8545"
ws-address = "0.0.0.0:8546"
allow-unprotected-txs = true
```
Edit `~/.stabled/config/config.toml`:
:::code-group
```toml [Mainnet]
# P2P Configuration
[p2p]
# Maximum number of peers
max_num_inbound_peers = 50
max_num_outbound_peers = 30
# Seed nodes
seeds = "9aa181b20248e948567cb47a15eae35d58cd549d@seed1.stable.xyz:46656"
# Persistent peers (mainnet seed nodes)
persistent_peers = "b896f6f8ca5a4d1cc40de09407df0c96e76df950@peer1.stable.xyz:26656"
# Enable peer exchange
pex = true
# RPC Configuration
[rpc]
# Listen address
laddr = "tcp://0.0.0.0:26657"
# Maximum number of simultaneous connections
max_open_connections = 900
# CORS settings (adjust for production)
cors_allowed_origins = ["*"]
```
```toml [Testnet]
# P2P Configuration
[p2p]
# Maximum number of peers
max_num_inbound_peers = 50
max_num_outbound_peers = 30
# Seed nodes
seeds = "6f3195823f7e5ee6f911a0a0ceb9ea689e0dc5bd@seed1.testnet.stable.xyz:56656"
# Persistent peers (testnet seed nodes)
persistent_peers = "128accd3e8ee379bfdf54560c21345451c7048c7@peer1.testnet.stable.xyz:26656"
# Enable peer exchange
pex = true
# RPC Configuration
[rpc]
# Listen address
laddr = "tcp://0.0.0.0:26657"
# Maximum number of simultaneous connections
max_open_connections = 900
# CORS settings (adjust for production)
cors_allowed_origins = ["*"]
```
:::
### Systemd Service Setup
Create a systemd service for automatic management:
#### Step 1: Create Service File
:::code-group
```bash [Mainnet]
sudo tee /etc/systemd/system/stabled.service > /dev/null < /dev/null <> ~/.bashrc
echo "export DAEMON_NAME=stabled" >> ~/.bashrc
echo "export DAEMON_HOME=$HOME/.stabled" >> ~/.bashrc
echo "export DAEMON_ALLOW_DOWNLOAD_BINARIES=true" >> ~/.bashrc
echo "export DAEMON_RESTART_AFTER_UPGRADE=true" >> ~/.bashrc
echo "export DAEMON_LOG_BUFFER_SIZE=512" >> ~/.bashrc
echo "export UNSAFE_SKIP_BACKUP=true" >> ~/.bashrc
# Load variables
source ~/.bashrc
```
#### Step 3: Setup Cosmovisor Directory Structure
```bash
# Create cosmovisor directory structure
mkdir -p ~/.stabled/cosmovisor/genesis/bin
mkdir -p ~/.stabled/cosmovisor/upgrades
# Copy current binary to genesis
cp /usr/bin/stabled ~/.stabled/cosmovisor/genesis/bin/
# Create current symlink
ln -s ~/.stabled/cosmovisor/genesis ~/.stabled/cosmovisor/current
# Verify setup
ls -la ~/.stabled/cosmovisor/
cosmovisor run version
```
#### Step 4: Set Environment Variable
```bash
# Set service name (default: stable)
export SERVICE_NAME=stable
```
#### Step 5: Create Service File
:::code-group
```bash [Mainnet]
sudo tee /etc/systemd/system/${SERVICE_NAME}.service > /dev/null < /dev/null < /dev/null < /dev/null < /dev/null < /dev/null < 3 |
| `stablebft_p2p_peers` | 연결된 피어 | \< 3 |
| `stablebft_mempool_size` | 멤풀 크기 | > 1500 |
| `stablebft_mempool_failed_txs` | 실패한 트랜잭션 총계 | > 100/분 |
#### 시스템 메트릭
| 메트릭 | 설명 | 알림 임계값 |
| ---------------------------------- | ---------- | --------------- |
| `node_cpu_seconds_total` | CPU 사용량 | 5분간 > 80% |
| `node_memory_MemAvailable_bytes` | 사용 가능한 메모리 | \< 10% |
| `node_filesystem_avail_bytes` | 사용 가능한 디스크 | \< 10% |
| `node_network_receive_bytes_total` | 네트워크 RX | > 100MB/초 |
| `node_disk_io_time_seconds_total` | 디스크 I/O | > 80% |
| `node_load15` | 시스템 부하 | > CPU 코어 수 \* 2 |
### Grafana 대시보드 설정
#### Stable 대시보드 가져오기
```json
{
"dashboard": {
"title": "Stable Node Monitoring",
"panels": [
{
"title": "Block Height",
"targets": [
{
"expr": "stablebft_consensus_height{chain_id=\"stabletestnet_2201-1\"}"
}
]
},
{
"title": "Peers",
"targets": [
{
"expr": "stablebft_p2p_peers"
}
]
},
{
"title": "Block Time",
"targets": [
{
"expr": "rate(stablebft_consensus_height[1m]) * 60"
}
]
},
{
"title": "Mempool Size",
"targets": [
{
"expr": "stablebft_mempool_size"
}
]
}
]
}
}
```
#### 커스텀 대시보드 가져오기
Grafana UI를 통해 대시보드 가져오기:
```bash
# Navigate to Dashboards > Import > Upload JSON file
# Or use Dashboard ID in Grafana's dashboard library
```
### AlertManager 구성
#### AlertManager 설치
```bash
# Download AlertManager
wget https://github.com/prometheus/alertmanager/releases/download/v0.26.0/alertmanager-0.26.0.linux-amd64.tar.gz
tar xvf alertmanager-0.26.0.linux-amd64.tar.gz
sudo mv alertmanager-0.26.0.linux-amd64 /opt/alertmanager
# Configure
sudo tee /opt/alertmanager/alertmanager.yml > /dev/null < 1500
for: 10m
labels:
severity: warning
annotations:
summary: "High mempool size: {{ $value }}"
- alert: DiskSpaceLow
expr: node_filesystem_avail_bytes{mountpoint="/"} / node_filesystem_size_bytes{mountpoint="/"} < 0.1
for: 5m
labels:
severity: critical
annotations:
summary: "Low disk space: {{ $value | humanizePercentage }}"
- alert: HighCPUUsage
expr: 100 - (avg by(instance) (irate(node_cpu_seconds_total{mode="idle"}[5m])) * 100) > 80
for: 10m
labels:
severity: warning
annotations:
summary: "High CPU usage: {{ $value }}%"
```
### 로그 모니터링
#### Systemd 로그
```bash
# View recent logs
sudo journalctl -u ${SERVICE_NAME} -n 100
# Follow logs
sudo journalctl -u ${SERVICE_NAME} -f
# Filter by time
sudo journalctl -u ${SERVICE_NAME} --since "1 hour ago"
# Export logs
sudo journalctl -u ${SERVICE_NAME} --since today > stable-logs-$(date +%Y%m%d).log
```
#### 로그 분석 스크립트
```bash
#!/bin/bash
# analyze-logs.sh
# Count errors in last hour
echo "Errors in last hour:"
sudo journalctl -u ${SERVICE_NAME} --since "1 hour ago" | grep -c ERROR
# Show peer connections
echo "Peer connections:"
sudo journalctl -u ${SERVICE_NAME} --since "10 minutes ago" | grep "Peer connection" | tail -10
# Check for consensus issues
echo "Consensus rounds:"
sudo journalctl -u ${SERVICE_NAME} --since "30 minutes ago" | grep -E "enterNewRound|Timeout" | tail -20
# Memory usage patterns
echo "Memory warnings:"
sudo journalctl -u ${SERVICE_NAME} --since "1 day ago" | grep -i memory
```
#### Loki 설정 (선택사항)
```bash
# Install Loki
wget https://github.com/grafana/loki/releases/download/v2.9.0/loki-linux-amd64.zip
unzip loki-linux-amd64.zip
sudo mv loki-linux-amd64 /usr/local/bin/loki
# Install Promtail
wget https://github.com/grafana/loki/releases/download/v2.9.0/promtail-linux-amd64.zip
unzip promtail-linux-amd64.zip
sudo mv promtail-linux-amd64 /usr/local/bin/promtail
# Configure Promtail
sudo tee /etc/promtail-config.yml > /dev/null <> ~/metrics/resources.csv
sleep 60
done
```
#### 쿼리 성능
```bash
# Monitor RPC response times
while true; do
START=$(date +%s%N)
curl -s http://localhost:26657/status > /dev/null
END=$(date +%s%N)
DIFF=$((($END - $START) / 1000000))
echo "RPC response time: ${DIFF}ms"
sleep 5
done
```
### 모니터링 모범 사례
1. **중복 모니터링 설정**
* 외부 모니터링 서비스 사용
* 노드 간 교차 모니터링 구현
* Dead man's switch 알림 설정
2. **알림 피로도 방지**
* 기준선을 바탕으로 알림 임계값 조정
* 알림 그룹화 및 억제 사용
* 에스컬레이션 정책 구현
3. **데이터 보존**
* 최소 30일간 메트릭 보관
* 중요 로그 아카이빙
* 모니터링 설정 정기 백업
### 다음 단계
* 문제 해결을 위한 [트러블슈팅 가이드](./troubleshooting) 검토
* 모니터링과 함께 [업그레이드 구성](./upgrades)
* 요구사항에 따른 커스텀 알림 설정
## Overview
This comprehensive guide covers everything you need to know about running and maintaining Stable nodes.
### Quick Links
* **[System Requirements](./system-requirements)** - Hardware and software requirements for different node types
* **[Installation Guide](./installation)** - Step-by-step installation instructions for various platforms
* **[Configuration](./configuration)** - Detailed configuration options and best practices
* **[Snapshots & Sync](./snapshots)** - Fast sync options using snapshots
* **[Upgrade Guide](./upgrades)** - Node upgrade procedures and version history
* **[Monitoring](./monitoring)** - Tools and metrics for node monitoring
* **[Troubleshooting](./troubleshooting)** - Common issues and solutions
### Node Types
#### Full Node
A full node maintains a complete copy of the blockchain and validates all transactions and blocks. Full nodes:
* Verify all transactions and blocks
* Maintain the entire blockchain history
* Can serve data to other nodes
* Support the network's decentralization
#### Archive Node
An archive node stores the complete history of all states and can serve historical queries. Archive nodes:
* Store all historical states
* Support historical queries at any block height
* Require significantly more storage
* Essential for block explorers and analytics
### Network Information
For complete network details including RPC endpoints, block explorers, and chain parameters, see:
* **[Mainnet](#TODO)** - Mainnet details
* **[Testnet](#TODO)** - Testnet details
### Support and Community
* **Discord**: [Join our Discord](https://discord.gg/stablexyz)
### Quick Start
For experienced operators who want to get started quickly:
1. Check [System Requirements](./system-requirements)
2. Follow the [Installation Guide](./installation)
3. Configure your node using [Configuration Guide](./configuration)
4. Speed up sync with [Snapshots](./snapshots)
5. Monitor your node with [Monitoring Guide](./monitoring)
For network parameters and RPC endpoints, see [Mainnet Information](#TODO) or [Testnet Information](#TODO).
This guide covers various methods to synchronize your Stable node quickly using snapshots and state sync.
### Sync Methods Overview
| Method | Sync Time | Storage Required | Use Case |
| -------------------- | --------- | ---------------- | ------------------------------ |
| **Pruned Snapshot** | \~10 min | \< 5 GiB | Regular full nodes |
| **Archive Snapshot** | \~1 hours | \~500 GB | Archive nodes, block explorers |
### Official Snapshots
Stable provides official snapshots updated daily (00:00 UTC).
#### Snapshot Information
#### Mainnet
| Type | Compression | Size | URL | Update Frequency |
| ----------- | ----------- | -------- | -------------------------------------------------------------------------------------------------------- | ---------------- |
| **Pruned** | LZ4 | \< 5 GiB | [Download](https://stable-data-dist.s3.us-east-1.amazonaws.com/mainnet/snapshots/snapshot.tar.lz4) | Daily |
| **Archive** | ZSTD | \~300 GB | [Download](https://stable-data-dist.s3.us-east-1.amazonaws.com/mainnet/snapshots/stable_archive.tar.zst) | Weekly |
#### Testnet
| Type | Compression | Size | URL | Update Frequency |
| ----------- | ----------- | -------- | -------------------------------------------------------------------------------------------------------- | ---------------- |
| **Pruned** | LZ4 | \< 5 GiB | [Download](https://stable-data-dist.s3.us-east-1.amazonaws.com/testnet/snapshots/snapshot.tar.lz4) | Daily |
| **Archive** | ZSTD | \~800 GB | [Download](https://stable-data-dist.s3.us-east-1.amazonaws.com/testnet/snapshots/stable_archive.tar.zst) | Weekly |
### Using Pruned Snapshots
Pruned snapshots contain recent blockchain state (last 100-1000 blocks).
#### Step 1: Set Environment Variable
```bash
# Set service name (default: stable)
export SERVICE_NAME=stable
```
#### Step 2: Stop Node Service
```bash
# Stop the running node
sudo systemctl stop ${SERVICE_NAME}
# Verify it's stopped
sudo systemctl status ${SERVICE_NAME}
```
#### Step 2: Backup Current Data (Optional)
```bash
# Create backup directory
mkdir -p ~/stable-backup
# Backup current state (optional, requires significant space)
cp -r ~/.stabled/data ~/stable-backup/
```
#### Step 3: Download and Extract Pruned Snapshot
:::code-group
```bash [Mainnet]
# Install dependencies
sudo apt install -y wget zstd pv
# Create snapshot directory
mkdir -p ~/snapshot
cd ~/snapshot
# Download pruned snapshot with progress
wget -c https://stable-data-dist.s3.us-east-1.amazonaws.com/mainnet/snapshots/snapshot.tar.lz4
# Remove old data
rm -rf ~/.stabled/data/*
# Extract snapshot with progress indicator
pv stable_pruned.tar.zst | zstd -d -c | tar -xf - -C ~/.stabled/
# Alternative extraction without pv
zstd -d stable_pruned.tar.zst -c | tar -xvf - -C ~/.stabled/
# Clean up
rm stable_pruned.tar.zst
```
```bash [Testnet]
# Install dependencies
sudo apt install -y wget lz4 pv
# Create snapshot directory
mkdir -p ~/snapshot
cd ~/snapshot
# Download pruned snapshot with progress
wget -c https://stable-data-dist.s3.us-east-1.amazonaws.com/testnet/snapshots/snapshot.tar.lz4
# Alternative: Download with resume support
curl -C - -o snapshot.tar.lz4 https://stable-data-dist.s3.us-east-1.amazonaws.com/testnet/snapshots/snapshot.tar.lz4
# Remove old data
rm -rf ~/.stabled/data/*
# Extract snapshot with progress indicator
pv snapshot.tar.lz4 | tar -I lz4 -xf - -C ~/.stabled/
# Alternative extraction without pv
tar -I lz4 -xvf snapshot.tar.lz4 -C ~/.stabled/
# Clean up
rm snapshot.tar.lz4
```
:::
#### Step 4: Restart Node
```bash
# Start the node
sudo systemctl start ${SERVICE_NAME}
# Check status
sudo systemctl status ${SERVICE_NAME}
# Monitor logs
sudo journalctl -u stabled -f
```
### Using Archive Snapshots
Archive snapshots contain complete blockchain history.
#### Step 1: Prepare System
```bash
# Stop node
sudo systemctl stop ${SERVICE_NAME}
# Install dependencies
sudo apt install -y wget zstd pv
# Check available disk space (need 2x snapshot size)
df -h ~/.stabled
```
#### Step 2: Download and Extract Archive Snapshot
:::code-group
```bash [Mainnet]
# Create working directory
mkdir -p ~/snapshot
cd ~/snapshot
# Download archive snapshot
wget -c https://stable-data-dist.s3.us-east-1.amazonaws.com/mainnet/snapshots/stable_archive.tar.zst
# Clear old data
rm -rf ~/.stabled/data/*
# Extract with high memory for better performance
pv stable_archive.tar.zst | zstd -d --long=31 --memory=2048MB -c - | tar -xf - -C ~/.stabled/
# Alternative: Standard extraction
zstd -d --long=31 stable_archive.tar.zst -c | tar -xvf - -C ~/.stabled/
# Clean up
rm stable_archive.tar.zst
```
```bash [Testnet]
# Create working directory
mkdir -p ~/snapshot
cd ~/snapshot
# Download archive snapshot
wget -c https://stable-data-dist.s3.us-east-1.amazonaws.com/testnet/snapshots/stable_archive.tar.zst
# Clear old data
rm -rf ~/.stabled/data/*
# Extract with high memory for better performance
pv archive.tar.zst | zstd -d --long=31 --memory=2048MB -c - | tar -xf - -C ~/.stabled/
# Alternative: Standard extraction
zstd -d --long=31 archive.tar.zst -c | tar -xvf - -C ~/.stabled/
# Clean up
rm archive.tar.zst
```
:::
#### Step 3: Start Node
```bash
# Start service
sudo systemctl start ${SERVICE_NAME}
# Verify sync status
curl -s localhost:26657/status | jq '.result.sync_info'
```
### Creating Your Own Snapshots
#### Manual Snapshot Creation
```bash
# Stop node
sudo systemctl stop ${SERVICE_NAME}
# Create snapshot archive
cd ~/.stabled
tar -cf - data/ | lz4 -9 > ~/stable-snapshot-$(date +%Y%m%d).tar.lz4
# Create checksum
sha256sum ~/stable-snapshot-*.tar.lz4 > checksums.txt
# Restart node
sudo systemctl start ${SERVICE_NAME}
```
#### Automated Snapshot Script
```bash
#!/bin/bash
# snapshot.sh - Automated snapshot creation
# Configuration
SNAPSHOT_DIR="/var/snapshots"
STABLED_HOME="$HOME/.stabled"
KEEP_DAYS=7
# Create snapshot directory
mkdir -p $SNAPSHOT_DIR
# Stop node
sudo systemctl stop ${SERVICE_NAME}
# Create snapshot
SNAPSHOT_NAME="stable-snapshot-$(date +%Y%m%d-%H%M%S).tar.lz4"
tar -cf - -C $STABLED_HOME data/ | lz4 -9 > $SNAPSHOT_DIR/$SNAPSHOT_NAME
# Generate metadata
cat > $SNAPSHOT_DIR/latest.json </dev/null || echo "RPC not responding"
# 3. Peer Connections
echo -e "\n3. PEER COUNT:"
curl -s localhost:26657/net_info | jq '.result.n_peers' 2>/dev/null || echo "Cannot get peer info"
# 4. Recent Errors
echo -e "\n4. RECENT ERRORS (last 20):"
sudo journalctl -u ${SERVICE_NAME} --since "1 hour ago" | grep -i error | tail -20
# 5. System Resources
echo -e "\n5. SYSTEM RESOURCES:"
df -h / | grep -v Filesystem
free -h | grep Mem
top -bn1 | grep "load average"
# 6. Port Status
echo -e "\n6. PORT STATUS:"
ss -tulpn | grep ${SERVICE_NAME} || echo "No ${SERVICE_NAME} ports found"
echo -e "\n=== Diagnostics Complete ==="
```
### 일반적인 문제 및 해결 방법
#### 노드가 시작되지 않음
##### 문제: 바이너리를 찾을 수 없음
**오류 메시지:**
```
stabled: command not found
```
**해결 방법:**
```bash
# Check if binary exists
ls -la /usr/bin/stabled
# If missing, reinstall (use arm64 if needed)
wget https://stable-data-dist.s3.us-east-1.amazonaws.com/testnet/binary/stabled-0.7.2-linux-amd64-testnet.tar.gz
tar -xvzf stabled-0.7.2-linux-amd64-testnet.tar.gz
sudo mv stabled /usr/bin/
sudo chmod +x /usr/bin/stabled
```
##### 문제: 권한 거부됨
**오류 메시지:**
```
Error: open /home/user/.stabled/config/config.toml: permission denied
```
**해결 방법:**
```bash
# Fix ownership
sudo chown -R $USER:$USER ~/.stabled/
# Fix permissions
chmod 700 ~/.stabled/
chmod 600 ~/.stabled/config/*.json
chmod 644 ~/.stabled/config/*.toml
```
##### 문제: 주소가 이미 사용 중
**오류 메시지:**
```
Error: listen tcp 0.0.0.0:26657: bind: address already in use
```
**해결 방법:**
```bash
# Find process using port
sudo lsof -i :26657
# Kill the process
sudo kill -9
# Or change port in config
sed -i 's/laddr = "tcp:\/\/0.0.0.0:26657"/laddr = "tcp:\/\/0.0.0.0:26658"/' ~/.stabled/config/config.toml
```
#### 동기화 문제
##### 문제: 노드가 특정 높이에서 멈춤
**증상:**
* 블록 높이가 증가하지 않음
* 1분 이상 새 블록이 없음
**해결 방법:**
```bash
# 1. Check peers
curl localhost:26657/net_info | jq '.result.n_peers'
# If no peers, add persistent peers
echo "persistent_peers = \"5ed0f977a26ccf290e184e364fb04e268ef16430@37.187.147.27:26656,128accd3e8ee379bfdf54560c21345451c7048c7@37.187.147.22:26656\"" >> ~/.stabled/config/config.toml
# 2. Reset and resync
sudo systemctl stop ${SERVICE_NAME}
stabled comet unsafe-reset-all --keep-addr-book
sudo systemctl start ${SERVICE_NAME}
# 3. Use snapshot (see Snapshots guide)
```
##### 문제: "wrong Block.Header.AppHash" 오류
**오류 메시지:**
```
panic: Wrong Block.Header.AppHash. Expected XXXX, got YYYY
```
**해결 방법:**
```bash
# This indicates state corruption - rollback to previous block
sudo systemctl stop ${SERVICE_NAME}
# Rollback one block
stabled rollback
# Restart node
sudo systemctl start ${SERVICE_NAME}
# If rollback doesn't work, restore from snapshot
# Backup important files
cp ~/.stabled/config/priv_validator_key.json ~/backup/
cp ~/.stabled/config/node_key.json ~/backup/
# Reset state
stabled comet unsafe-reset-all
# Restore from snapshot
wget https://stable-data-dist.s3.us-east-1.amazonaws.com/testnet/snapshots/snapshot.tar.lz4
tar -I lz4 -xf snapshot.tar.lz4 -C ~/.stabled/
sudo systemctl start ${SERVICE_NAME}
```
##### 문제: 느린 동기화 속도
**증상:**
* 분당 100블록 미만
* 높은 CPU/디스크 사용량
**해결 방법:**
```bash
# 1. Check disk I/O
iostat -x 1 5
# 2. Optimize configuration
cat >> ~/.stabled/config/config.toml <> ~/.stabled/config/config.toml < db_dump.txt
# 4. If repair fails, resync
rm -rf ~/.stabled/data
# Restore from snapshot
# 5. Start node
sudo systemctl start ${SERVICE_NAME}
```
##### 문제: "Too many open files"
**오류 메시지:**
```
accept: too many open files
```
**해결 방법:**
```bash
# 1. Check current limits
ulimit -n
# 2. Increase limits
echo "* soft nofile 65535" | sudo tee -a /etc/security/limits.conf
echo "* hard nofile 65535" | sudo tee -a /etc/security/limits.conf
# 3. Update systemd service
sudo sed -i '/\[Service\]/a LimitNOFILE=65535' /etc/systemd/system/stabled.service
# 4. Reload and restart
sudo systemctl daemon-reload
sudo systemctl restart ${SERVICE_NAME}
```
#### 메모리 문제
##### 문제: 메모리 부족(OOM)으로 종료됨
**증상:**
```
stabled.service: Main process exited, code=killed, status=9/KILL
```
**해결 방법:**
```bash
# 1. Check memory usage
free -h
dmesg | grep -i "killed process"
# 2. Add swap space
sudo fallocate -l 8G /swapfile
sudo chmod 600 /swapfile
sudo mkswap /swapfile
sudo swapon /swapfile
echo '/swapfile none swap sw 0 0' | sudo tee -a /etc/fstab
# 3. Optimize memory usage
cat >> ~/.stabled/config/app.toml < $OUTPUT_DIR/system.txt
df -h >> $OUTPUT_DIR/system.txt
free -h >> $OUTPUT_DIR/system.txt
# Service status
systemctl status ${SERVICE_NAME} --no-pager > $OUTPUT_DIR/service-status.txt
# Recent logs
sudo journalctl -u ${SERVICE_NAME} --since "1 hour ago" > $OUTPUT_DIR/recent-logs.txt
# Config files (remove sensitive data)
grep -v "priv" ~/.stabled/config/config.toml > $OUTPUT_DIR/config.toml
grep -v "priv" ~/.stabled/config/app.toml > $OUTPUT_DIR/app.toml
# Node status
curl -s localhost:26657/status > $OUTPUT_DIR/node-status.json 2>/dev/null
# Create archive
tar -czf $OUTPUT_DIR.tar.gz $OUTPUT_DIR/
echo "Debug info collected: $OUTPUT_DIR.tar.gz"
echo "Share this file when requesting support"
```
### 다음 단계
* 문제를 예방하기 위해 [모니터링 설정](./monitoring)을 검토하세요
* 버전별 문제는 [업그레이드 가이드](./upgrades)를 확인하세요
이 가이드는 upgrade 절차 및 rollback을 포함한 Stable 노드의 upgrade 과정을 다룹니다.
> 전체 버전 히스토리 및 upgrade 세부 정보는 [Version History](#TODO)를 참조하세요.
### Upgrade 방법
#### Soft Upgrades (Non-Breaking)
* 언제든지 수행 가능
* 이전 버전과 호환 가능
#### Hard Upgrades (Breaking)
* 특정 높이에서 upgrade 필요
* 이전 버전과 호환 불가능
#### Emergency Upgrades
* 중요한 보안 수정
* 즉각적인 조치 필요
* 체인 중단이 필요할 수 있음
### 표준 Upgrade 절차
#### 1단계: 준비
```bash
# Check current version
stabled version --long
# Backup critical data
cp -r ~/.stabled/config ~/stable-backup-$(date +%Y%m%d)/
# For validators only: Backup validator state
cp ~/.stabled/data/priv_validator_state.json ~/stable-backup-$(date +%Y%m%d)/
# Check disk space (need 2x current data size)
df -h ~/.stabled
```
#### 2단계: 새 바이너리 다운로드
```bash
# For v1.2.0-rc1 upgrade (January 22, 2026)
# Choose your architecture:
# Linux AMD64
BINARY_URL="https://stable-data-dist.s3.us-east-1.amazonaws.com/testnet/binary/stabled-1.2.0-rc1-linux-amd64-testnet.tar.gz"
# OR Linux ARM64
BINARY_URL="https://stable-data-dist.s3.us-east-1.amazonaws.com/testnet/binary/stabled-1.2.0-rc1-linux-arm64-testnet.tar.gz"
# Download new binary
wget $BINARY_URL
# Extract to temporary location
tar -xvzf stabled-1.2.0-rc1-linux-*.tar.gz -C /tmp/
# Verify new version
/tmp/stabled version --long
```
#### 3단계: Upgrade 수행
##### Soft Upgrades의 경우
```bash
# Stop node
sudo systemctl stop ${SERVICE_NAME}
# Backup current binary
sudo mv /usr/bin/stabled /usr/bin/stabled.backup
# Install new binary
sudo mv /tmp/stabled /usr/bin/stabled
sudo chmod +x /usr/bin/stabled
# Verify installation
stabled version --long
# Start node
sudo systemctl start ${SERVICE_NAME}
# Monitor logs
sudo journalctl -u ${SERVICE_NAME} -f
```
##### Hard Upgrades
```bash
# Monitor for upgrade height
while true; do
HEIGHT=$(curl -s localhost:26657/status | jq -r '.result.sync_info.latest_block_height')
echo "Current height: $HEIGHT"
if [ $HEIGHT -ge $UPGRADE_HEIGHT ]; then
break
fi
sleep 10
done
# Node will halt automatically at upgrade height
# Wait for halt message in logs
sudo journalctl -u ${SERVICE_NAME} -f | grep "UPGRADE"
# Once halted, perform upgrade
sudo systemctl stop ${SERVICE_NAME}
sudo mv /usr/bin/stabled /usr/bin/stabled.backup
sudo mv /tmp/stabled /usr/bin/stabled
# Start with new binary
sudo systemctl start ${SERVICE_NAME}
```
#### 4단계: Upgrade 후 검증
```bash
# Check node status
curl -s localhost:26657/status | jq '.result'
# Verify version
curl -s localhost:26657/status | jq '.result.node_info.version'
# Check peers
curl -s localhost:26657/net_info | jq '.result.n_peers'
# Monitor sync status
watch -n 2 'curl -s localhost:26657/status | jq ".result.sync_info"'
# Check for errors
sudo journalctl -u ${SERVICE_NAME} --since "10 minutes ago" | grep -i error
```
### Cosmovisor 설정 (자동 Upgrades)
Cosmovisor는 조율된 upgrade의 upgrade 프로세스를 자동화합니다.
#### 설치
```bash
# Install cosmovisor
go install cosmossdk.io/tools/cosmovisor/cmd/cosmovisor@latest
# Or download binary
wget https://github.com/cosmos/cosmos-sdk/releases/download/cosmovisor%2Fv1.7.0/cosmovisor-v1.7.0-linux-amd64.tar.gz
tar -xzf cosmovisor-v1.7.0-linux-amd64.tar.gz
sudo mv cosmovisor /usr/bin/
```
#### 구성
```bash
# Set environment variables
cat >> ~/.bashrc < /dev/null < > export.json
# 3. Wait for coordinated restart instructions
```
### 다음 단계
* [Version History](#TODO) - 전체 upgrade 히스토리 및 릴리스 노트
* upgrade 후 [노드 모니터링](./monitoring)
* 일반적인 문제는 [Troubleshooting](./troubleshooting) 확인
## Mainnet 정보
Stable mainnet에 접근하기 위해 필요한 모든 정보입니다.
### 네트워크 개요
| 설정 | 값 |
| ------------ | -------------- |
| **네트워크 이름** | Stable Mainnet |
| **Chain ID** | `988` |
| **가스 토큰** | USDT0 |
| **거버넌스 토큰** | STABLE |
| **블록 타임** | \~0.7 초 |
### Block Explorer
| Explorer | URL |
| -------------- | ------------------------------------------------ |
| **Stablescan** | [https://stablescan.xyz](https://stablescan.xyz) |
### RPC 엔드포인트
#### 주요 엔드포인트
| 타입 | 엔드포인트 | 목적 |
| ---------------- | ------------------------------------------------ | -------- |
| **EVM JSON-RPC** | [https://rpc.stable.xyz](https://rpc.stable.xyz) | EVM 트랜잭션 |
| **WebSocket** | wss\://rpc.stable.xyz | 실시간 업데이트 |
### 체인 정보
| 파라미터 | EVM |
| ------------ | ------- |
| **Chain ID** | `988` |
| **가스 토큰** | `USDT0` |
| **소수점** | 18 |
### 도구
| 도구 | URL | 설명 |
| ------------- | ------------------------------------------------------- | ----------- |
| **Snapshots** | [Node Operators Guide](../node-operations/snapshots) 참조 | 체인 snapshot |
## 버전 히스토리
Stable 메인넷의 전체 버전 히스토리 및 관련 문서 정보입니다.
### 현재 버전 정보
* **현재 버전**: `v1.3.1`
* **다음 업그레이드**: `TBD`
* **업그레이드 높이**: `TBD`
* **예상 시간**: `TBD`
### 버전 히스토리
#### 현재 및 이전 버전
| 버전 | 커밋 | 업그레이드 높이 | 바이너리 | 상태 |
| ---------- | --------- | ---------- | ------------------------------------------------------------------------------------------------------------------------------------------------------------------------------------------------------------------------------------------- | ------- |
| **v1.3.1** | `f85d155` | - | [AMD64](https://stable-data-dist.s3.us-east-1.amazonaws.com/mainnet/binary/stabled-1.3.1-linux-amd64-mainnet.tar.gz) / [ARM64](https://stable-data-dist.s3.us-east-1.amazonaws.com/mainnet/binary/stabled-1.3.1-linux-arm64-mainnet.tar.gz) | 현재 버전 |
| **v1.3.0** | `dd103ec` | 24,077,500 | [AMD64](https://stable-data-dist.s3.us-east-1.amazonaws.com/mainnet/binary/stabled-1.3.0-linux-amd64-mainnet.tar.gz) / [ARM64](https://stable-data-dist.s3.us-east-1.amazonaws.com/mainnet/binary/stabled-1.3.0-linux-arm64-mainnet.tar.gz) | |
| **v1.2.2** | `76da1da` | - | [AMD64](https://stable-data-dist.s3.us-east-1.amazonaws.com/mainnet/binary/stabled-1.2.2-linux-amd64-mainnet.tar.gz) / [ARM64](https://stable-data-dist.s3.us-east-1.amazonaws.com/mainnet/binary/stabled-1.2.2-linux-arm64-mainnet.tar.gz) | |
| **v1.2.1** | `7955bb7` | - | [AMD64](https://stable-data-dist.s3.us-east-1.amazonaws.com/mainnet/binary/stabled-1.2.1-linux-amd64-mainnet.tar.gz) / [ARM64](https://stable-data-dist.s3.us-east-1.amazonaws.com/mainnet/binary/stabled-1.2.1-linux-arm64-mainnet.tar.gz) | |
| **v1.2.0** | `47e355b` | 12004000 | [AMD64](https://stable-data-dist.s3.us-east-1.amazonaws.com/mainnet/binary/stabled-1.2.0-linux-amd64-mainnet.tar.gz) / [ARM64](https://stable-data-dist.s3.us-east-1.amazonaws.com/mainnet/binary/stabled-1.2.0-linux-arm64-mainnet.tar.gz) | |
| **v1.1.4** | `c795773` | - | [AMD64](https://stable-data-dist.s3.us-east-1.amazonaws.com/mainnet/binary/stabled-1.1.4-linux-amd64-mainnet.tar.gz) / [ARM64](https://stable-data-dist.s3.us-east-1.amazonaws.com/mainnet/binary/stabled-1.1.4-linux-arm64-mainnet.tar.gz) | |
| **v1.1.2** | `3d83aa3` | 3263600 | [AMD64](https://stable-data-dist.s3.us-east-1.amazonaws.com/mainnet/binary/stabled-1.1.2-linux-amd64-mainnet.tar.gz) / [ARM64](https://stable-data-dist.s3.us-east-1.amazonaws.com/mainnet/binary/stabled-1.1.2-linux-arm64-mainnet.tar.gz) | |
| **v1.1.0** | `17ceaa7` | 1694000 | [AMD64](https://stable-data-dist.s3.us-east-1.amazonaws.com/mainnet/binary/stabled-1.1.0-linux-amd64-mainnet.tar.gz) / [ARM64](https://stable-data-dist.s3.us-east-1.amazonaws.com/mainnet/binary/stabled-1.1.0-linux-arm64-mainnet.tar.gz) | |
| **v1.0.0** | `d996084` | Genesis | [AMD64](https://stable-data-dist.s3.us-east-1.amazonaws.com/mainnet/binary/stabled-1.0.0-linux-amd64-mainnet.tar.gz) / [ARM64](https://stable-data-dist.s3.us-east-1.amazonaws.com/mainnet/binary/stabled-1.0.0-linux-arm64-mainnet.tar.gz) | Genesis |
### 관련 문서
* [업그레이드 가이드](/ko/developers/node-operations/upgrades) - 단계별 업그레이드 절차
* [메인넷 정보](/ko/developers/mainnet/mainnet-information) - 현재 네트워크 세부 정보
## EIP-7702
Stable은 **EIP-7702**를 지원하여 EOA(외부 소유 계정)가 임시로 스마트 계정처럼 작동할 수 있는 통합 계정 모델을 도입합니다.
**주요 동작:**
* 사용자는 기존 키로 트랜잭션에 서명합니다
* 영구적인 계정 업그레이드 없이 컨트랙트와 같은 로직을 실행에 통합할 수 있습니다
* 결제 및 수탁을 위한 안전한 승인 흐름을 가능하게 합니다
* USDT를 사용하는 지갑과 가맹점의 UX를 개선합니다
개발자에게 미치는 영향:
* 사용자는 새로운 컨트랙트를 배포하지 않고도 컨트랙트급 기능을 획득하여 온보딩 마찰을 줄이고 수탁을 단순화합니다.
## Ethereum 생태계와의 호환성
Stable은 Ethereum Virtual Machine (EVM)과 완벽하게 호환되어, 개발자들이 익숙한 도구, 라이브러리 및 컨트랙트 패턴을 수정 없이 사용할 수 있습니다.
이를 통해 기존 애플리케이션의 원활한 마이그레이션과 이미 Ethereum 생태계에서 개발 중인 팀의 간편한 온보딩을 보장합니다.
**주요 호환성 기능**
* **언어**: 스마트 컨트랙트 개발을 위해 Solidity와 Vyper를 지원합니다.
* **도구**: Hardhat 및 Foundry와 같은 표준 프레임워크와 즉시 사용 가능합니다.
* **라이브러리**: ethers.js, web3.js 및 기타 일반적인 JSON-RPC 클라이언트와 완벽하게 호환됩니다.
* **컨트랙트 패턴**: ERC-20 승인, 이벤트 발생 및 액세스 제어 메커니즘을 포함한 표준 EVM 규약을 준수합니다.
* **RPC 인터페이스**: Ethereum 네트워크에서 사용되는 동일한 JSON-RPC 메서드를 제공하여 기존 통합 및 인덱서가 코드 변경 없이 작동할 수 있도록 합니다.
## Finality 규칙 및 호환성 보장
Stable은 EVM 기반 실행 환경에서 트랜잭션을 처리합니다. 트랜잭션이 블록에 포함되면 그 효과가 상태에 적용되고 애플리케이션, 컨트랙트 및 인덱서에 즉시 표시됩니다.
#### 실행 확인
트랜잭션은 다음 조건을 충족하면 **확인됨**으로 간주됩니다:
* 생성된 블록에 성공적으로 포함됨
* 상태 변경(잔액, 스토리지, 이벤트)을 RPC를 통해 확인할 수 있음
퍼블릭 테스트넷 단계 동안:
* 확인된 상태는 애플리케이션 로직에 유효한 것으로 취급되어야 합니다
* 블록 연속성을 추적하기 위해 모니터링 시스템을 사용해야 합니다
#### Settlement 고려사항
Stable은 싱글 슬롯 finality를 제공하므로, 트랜잭션은 유효한 블록에 포함되는 즉시 확정됩니다.
**개발자에게 이것은 다음을 보장합니다:**
* 트랜잭션이 확인된 블록에 나타나면 상태 변경은 최종적이며 되돌릴 수 없습니다.
* 애플리케이션은 블록 포함을 settlement 확인으로 안전하게 신뢰할 수 있습니다.
**결정론적 finality가 있더라도, 재정적으로 민감한 플로우를 처리하는 애플리케이션은 다음을 수행해야 합니다:**
* 종속 작업(예: 잠금 해제, 상환)을 진행하기 전에 RPC 또는 발행된 이벤트를 통해 트랜잭션 성공을 확인합니다.
* 일시적인 제출 또는 RPC 오류를 처리하기 위해 자동화 및 일괄 작업에 대한 재시도 및 조정 로직을 구현합니다.
#### Compatibility Commitments
Stable은 테스트넷 성장 단계 전반에 걸쳐 개발자를 위한 일관된 실행 환경을 유지할 것을 목표로 합니다.
**Current Commitments:**
* 게시된 시스템 모듈 인터페이스와 실행 동작은 명시적으로 언급되지 않는 한 안정적으로 유지됩니다
* 잠재적으로 파괴적인 변경 사항은 다음과 같이 처리됩니다:
* 사전 공지
* 릴리스 및 변경 로그에 문서화
* 필요한 경우 마이그레이션 지침 제공
향후 업데이트에는 다음이 포함될 예정입니다:
* 공식 호환성 정책
* 개발자 대상 기능에 대한 변경 수준 분류
* 버전 전환에 대한 명확한 처리 지침
## Gas 가격 책정
Stable은 단일 구성 요소 gas 수수료 모델을 사용합니다:
* **우선순위 팁 없음 (maxPriorityFeePerGas는 무시됨)**
* 수수료는 순수하게 기본 실행 비용에 기반합니다
* 수수료는 **USDT0**로 지불됩니다
근거:
* Stable은 예측 가능한 결제를 위해 수수료 변동성을 제거합니다
* "팁"과 채굴자 인센티브에 대한 사용자 혼란을 제거합니다
개발자에 미치는 영향:
* 개발자는 트랜잭션 가속화를 위해 **우선순위 수수료**에 의존해서는 안 됩니다
* 지갑은 팁 입력 필드를 숨기거나 비활성화해야 합니다
* Gas 추정 도구는 Stable RPC 가격 책정 로직을 참조해야 합니다
## Gas Waiver
### 요약
Gas Waiver는 소수의 거버넌스 승인 주소("면제자")가 `gasPrice = 0`인 트랜잭션을 제출할 수 있도록 허용하여 Stable에서 가스리스 최종 사용자 트랜잭션을 가능하게 합니다. Stable은 현재 파트너가 프로토콜별 래퍼 로직을 구현하지 않고도 가스리스 UX를 제공하기 위해 통합할 수 있는 면제자 서비스("면제자 서버")를 운영하고 있습니다.
본 문서는 Gas Waiver 메커니즘, 트랜잭션 형식, 거버넌스 제어 및 파트너를 위한 면제자 서버 API를 명시합니다.
### 범위
본 명세는 다음을 다룹니다:
* 가스 면제 트랜잭션에 대한 프로토콜 수준 규칙
* 래퍼 트랜잭션 메커니즘 및 마커 주소
* 거버넌스 제어 권한 부여 및 허용된 대상
* 서명된 사용자 트랜잭션 제출을 위한 면제자 서버 인터페이스
### 정의
* **Waiver(면제자)**: 검증자 거버넌스를 통해 온체인에 등록된 이더리움 주소로, 가스 면제 트랜잭션을 제출할 권한이 있습니다.
* **InnerTx(내부 트랜잭션)**: `gasPrice = 0`인 최종 사용자의 서명된 트랜잭션입니다.
* **WrapperTx(래퍼 트랜잭션)**: 면제자가 서명한 트랜잭션으로, 사용자의 `InnerTx`를 체인으로 전송하고 실행을 승인합니다.
* **Marker address(마커 주소)**: 면제자 래퍼 트랜잭션을 식별하는 데 사용되는 센티널 주소: `0x000000000000000000000000000000000000f333`.
* **AllowedTarget(허용된 대상)**: 면제자를 특정 컨트랙트 주소 및 메서드 선택자로 제한하는 정책입니다.
### 개요
Gas Waiver는 래퍼 트랜잭션 패턴을 사용합니다:
1. 사용자가 `gasPrice = 0`인 `InnerTx`에 서명합니다.
2. 면제자가 `InnerTx`를 `WrapperTx`로 래핑하여 브로드캐스트합니다.
3. 검증자는 마커 트랜잭션을 감지하고, 면제자 권한 및 정책 제약 조건을 확인한 후 임베디드된 `InnerTx`를 실행합니다.
Stable은 온체인에 승인된 면제자로 등록된 면제자 서비스(면제자 서버)를 운영합니다. 파트너는 면제자 서버 API와 통합하여 서명된 `InnerTx` 페이로드를 제출합니다.
### 프로토콜 명세
#### 마커 주소 라우팅
다음 조건을 만족하는 경우에만 트랜잭션이 면제자 래퍼 트랜잭션으로 처리됩니다:
* `to == 0x000000000000000000000000000000000000f333`.
프로토콜은 트랜잭션 `data` 필드를 인코딩된 내부 트랜잭션 페이로드로 해석하고 아래의 면제자 검증 규칙을 사용하여 처리합니다.
#### 권한 부여 및 정책 검사
각 후보 래퍼 트랜잭션에 대해 검증자는 다음을 시행해야 합니다:
1. **면제자 권한 부여**
* `WrapperTx.from`은 거버넌스를 통해 온체인에 등록된 면제자 주소여야 합니다.
2. **가스 면제**
* `WrapperTx.gasPrice`는 `0`이어야 합니다.
* `InnerTx.gasPrice`는 `0`이어야 합니다.
3. **대상 허용 목록**
* `InnerTx.to` 및 `InnerTx.data`에서 추출된 메서드 선택자는 면제자의 `AllowedTarget` 정책에 의해 허용되어야 합니다.
4. **Value 제한**
* `WrapperTx.value`는 `0`이어야 합니다.
검사가 실패하면 래퍼 트랜잭션은 거부되어야 하며 내부 트랜잭션은 실행되지 않아야 합니다.
#### 실행 의미론
모든 검사가 통과되면:
1. 프로토콜은 사용자의 `from`, `nonce` 및 호출 의미론을 보존하면서 사용자로서 `InnerTx`를 실행합니다.
2. 가스 회계는 면제자 메커니즘에 의해 처리됩니다: 사용자는 가스를 지불하지 않으며, 면제자 트랜잭션은 기능의 정의에 따라 `gasPrice = 0`을 사용합니다.
3. 래퍼 트랜잭션은 `InnerTx`의 실행을 커버할 충분한 `gasLimit`를 제공해야 합니다(언래핑 및 검증 오버헤드 포함).
### 트랜잭션 형식
#### WrapperTx
래퍼 트랜잭션은 면제자가 서명하고 마커 주소로 전송됩니다.
```javascript
WrapperTx {
from: waiver_address,
to: 0x000000000000000000000000000000000000f333,
value: 0, // 0이어야 함
data: RLP(InnerTx), // RLP 인코딩된 내부 트랜잭션
gasPrice: 0, // 0이어야 함
gasLimit: sufficient_for_inner, // 내부 실행 + 오버헤드를 커버해야 함
nonce: waiver_nonce
}
```
#### InnerTx
내부 트랜잭션은 최종 사용자가 서명합니다.
```javascript
InnerTx {
from: user_address,
to: target_contract,
value: value,
data: call_data,
gasPrice: 0, // 0이어야 함
gasLimit: execution_gas,
nonce: user_nonce
}
```
### 거버넌스 제어 액세스
면제자 권한 부여는 검증자 거버넌스에 의해 온체인에서 관리됩니다.
거버넌스 제어는 다음을 제공합니다:
* 면제자 주소의 검토 가능한 권한 부여
* 면제자 등록 및 업데이트의 온체인 투명성
* 철회 기능
* `AllowedTarget`을 통한 면제자별 범위 지정
### 보안 모델
#### 최종 사용자 서명 무결성
사용자는 `InnerTx`에 서명합니다. 면제자는 서명을 무효화하지 않고는 내부 트랜잭션 페이로드를 수정할 수 없습니다. 파트너는 여전히 사용자가 의도된 트랜잭션 페이로드에만 서명하도록 보장해야 합니다.
#### 신뢰 경계
파트너가 면제자 서버를 통해 제출을 라우팅하는 경우 Gas Waiver는 서비스 종속성을 도입합니다:
* 서비스의 가용성은 가스리스 트랜잭션을 제출할 수 있는 능력에 영향을 미칩니다.
* 권한 부여는 온체인에 유지됩니다. 등록된 면제자 주소만 유효한 래퍼 제출을 생성할 수 있습니다.
### 파트너 통합
파트너는 다음과 같이 통합합니다:
1. 사용자로부터 서명된 `InnerTx`를 수집합니다(`gasPrice = 0`).
2. 서명된 내부 트랜잭션을 면제자 서버 API에 제출합니다.
3. 스트리밍된 결과를 처리하고 최종 사용자에게 트랜잭션 해시를 표시합니다.
### 면제자 서버
#### 개요
면제자 서버는 서명된 사용자 `InnerTx` 페이로드를 면제자 승인 래퍼 트랜잭션으로 래핑하고 브로드캐스트합니다. 파트너는 래퍼 트랜잭션을 구성하거나 면제자 주소를 운영할 필요가 없습니다.
#### 엔드포인트 및 기본 URL
기본 URL:
* 메인넷: 미정
* 테스트넷: `https://waiver.testnet.stable.xyz`
#### 인증
상태 확인을 제외한 모든 엔드포인트는 Bearer 토큰 인증이 필요합니다:
```
Authorization: Bearer
```
#### API
##### GET `/v1/health`
상태 확인 엔드포인트입니다.
인증: 없음.
##### POST `/v1/submit`
서명된 내부 트랜잭션 배치를 제출합니다.
인증: 필수(`Bearer`).
요청 본문:
```json
{
"transactions": ["0x", "0x"]
}
```
응답은 NDJSON(줄 바꿈 구분 JSON)으로 스트리밍됩니다. 각 줄은 제출된 트랜잭션 인덱스에 해당합니다.
예시:
```json
{"index":0,"id":"abc123","success":true,"txHash":"0x..."}
{"index":1,"id":"def456","success":false,"error":{"code":"VALIDATION_FAILED","message":"invalid signature"}}
```
##### GET `/v1/submit`
스트리밍 제출을 위한 WebSocket 인터페이스입니다.
인증: 필수(`Bearer`).
#### 통합 예시
```javascript
const WAIVER_SERVER = "https://waiver.testnet.stable.xyz";
async function submitGaslessTransaction(signedInnerTxHex, apiKey) {
const response = await fetch(`${WAIVER_SERVER}/v1/submit`, {
method: "POST",
headers: {
"Content-Type": "application/json",
"Authorization": `Bearer ${apiKey}`,
},
body: JSON.stringify({
transactions: [signedInnerTxHex],
}),
});
const reader = response.body.getReader();
const decoder = new TextDecoder();
while (true) {
const { done, value } = await reader.read();
if (done) break;
const lines = decoder.decode(value).trim().split("\n");
for (const line of lines) {
const result = JSON.parse(line);
console.log(result);
}
}
}
```
#### 사용자 InnerTx 생성
파트너는 `gasPrice = 0`인 `InnerTx`를 구성한 후 사용자 서명을 수집할 책임이 있습니다.
예시:
```javascript
import { ethers } from "ethers";
async function createInnerTx(userWallet, contractAddress, callData, nonce) {
const innerTx = {
to: contractAddress,
data: callData,
value: value,
gasPrice: 0, // 면제를 위해 0이어야 함
gasLimit: 100000,
nonce: nonce,
chainId: 2201, // 메인넷: 988, 테스트넷: 2201
};
return await userWallet.signTransaction(innerTx);
}
```
#### 오류 코드
* `PARSE_ERROR`: 트랜잭션 파싱 실패
* `INVALID_REQUEST`: 요청 본문 형식 오류
* `BATCH_SIZE_EXCEEDED`: 배치 크기가 허용된 최대값 초과
* `VALIDATION_FAILED`: 트랜잭션 검증 실패
* `BROADCAST_FAILED`: 체인으로 브로드캐스트 실패
* `RATE_LIMITED`: 속도 제한 초과
* `QUEUE_FULL`: 서버 대기열이 용량에 도달
* `TIMEOUT`: 요청 시간 초과
## JSON-RPC API
### eth\_namespace
| API | support |
| ------------------------------------------- | ------- |
| eth\_syncing | ✅ |
| eth\_gasPrice | ✅ |
| eth\_maxPriorityFeePerGas | ✅ |
| eth\_feeHistory | ✅ |
| eth\_blobBaseFee | ❌ |
| eth\_chainId | ✅ |
| eth\_blockNumber | ✅ |
| eth\_getBalance | ✅ |
| eth\_getProof | ✅ |
| eth\_getHeaderByNumber | ❌ |
| eth\_getHeaderByHash | ❌ |
| eth\_getBlockByNumber | ✅ |
| eth\_getBlockByHash | ✅ |
| eth\_getUncleByBlockNumberAndIndex | ❌ |
| eth\_getUncleByBlockHashAndIndex | ❌ |
| eth\_getUncleCountByBlockNumber | ❌ |
| eth\_getUncleCountByBlockHash | ❌ |
| eth\_getCode | ✅ |
| eth\_getStorageAt | ✅ |
| eth\_getBlockReceipts | ❌ |
| eth\_call | ✅ |
| eth\_simulateV1 | ❌ |
| eth\_estimateGas | ✅ |
| eth\_createAccessList | ❌ |
| eth\_getBlockTransactionCountByNumber | ✅ |
| eth\_getBlockTransactionCountByHash | ✅ |
| eth\_getTransactionByBlockNumberAndIndex | ✅ |
| eth\_getTransactionByBlockHashAndIndex | ✅ |
| eth\_getRawTransactionByBlockNumberAndIndex | ❌ |
| eth\_getRawTransactionByBlockHashAndIndex | ❌ |
| eth\_getTransactionCount | ✅ |
| eth\_getTransactionByHash | ✅ |
| eth\_getRawTransactionByHash | ❌ |
| eth\_getTransactionReceipt | ✅ |
| eth\_sendTransaction | ✅ |
| eth\_fillTransaction | ❌ |
| eth\_sendRawTransaction | ✅ |
| eth\_sign | ✅ |
| eth\_signTransaction | ❌ |
| eth\_pendingTransactions | ✅ |
| eth\_resend | ✅ |
| eth\_accounts | ✅ |
| eth\_subscribe | ✅ |
| eth\_unsubscribe | ✅ |
| eth\_getTransactionLogs | ✅ |
| eth\_signTypedData | ✅ |
| eth\_newPendingTransactionFilter | ✅ |
| eth\_newBlockFilter | ✅ |
| eth\_newFilter | ✅ |
| eth\_getFilterChanges | ✅ |
| eth\_getFilterLogs | ✅ |
| eth\_uninstallFilter | ✅ |
| eth\_getLogs | ✅ |
### debug\_namespace
| API | support |
| ---------------------------------- | ------- |
| debug\_accountRange | ❌ |
| debug\_backtraceAt | ❌ |
| debug\_blockProfile | ✅ |
| debug\_chaindbCompact | ❌ |
| debug\_chaindbProperty | ❌ |
| debug\_cpuProfile | ✅ |
| debug\_dbAncient | ❌ |
| debug\_dbAncients | ❌ |
| debug\_dbGet | ❌ |
| debug\_dumpBlock | ❌ |
| debug\_freeOSMemory | ✅ |
| debug\_freezeClient | ❌ |
| debug\_gcStats | ✅ |
| debug\_getAccessibleState | ❌ |
| debug\_getBadBlocks | ❌ |
| debug\_getRawBlock | ❌ |
| debug\_getRawHeader | ❌ |
| debug\_getRawTransaction | ❌ |
| debug\_getModifiedAccountsByHash | ❌ |
| debug\_getModifiedAccountsByNumber | ❌ |
| debug\_getRawReceipts | ❌ |
| debug\_goTrace | ✅ |
| debug\_intermediateRoots | ✅ |
| debug\_memStats | ✅ |
| debug\_mutexProfile | ✅ |
| debug\_preimage | ❌ |
| debug\_printBlock | ✅ |
| debug\_setBlockProfileRate | ✅ |
| debug\_setGCPercent | ✅ |
| debug\_setHead | ❌ |
| debug\_setMutexProfileFraction | ✅ |
| debug\_setTrieFlushInterval | ❌ |
| debug\_stacks | ✅ |
| debug\_standardTraceBlockToFile | ❌ |
| debug\_standardTraceBadBlockToFile | ❌ |
| debug\_startCPUProfile | ✅ |
| debug\_startGoTrace | ✅ |
| debug\_stopCPUProfile | ✅ |
| debug\_stopGoTrace | ✅ |
| debug\_storageRangeAt | ❌ |
| debug\_traceBadBlock | ❌ |
| debug\_traceBlock | ❌ |
| debug\_traceBlockByNumber | ✅ |
| debug\_traceBlockByHash | ✅ |
| debug\_traceBlockFromFile | ❌ |
| debug\_traceCall | ❌ |
| debug\_traceChain | ❌ |
| debug\_traceTransaction | ✅ |
| debug\_verbosity | ❌ |
| debug\_vmodule | ❌ |
| debug\_writeBlockProfile | ✅ |
| debug\_writeMemProfile | ✅ |
| debug\_writeMutexProfile | ✅ |
## 개요
Stable이 트랜잭션, 수수료 및 프로토콜 수준의 USDT 동작을 처리하는 방법에 대해 자세히 알아보세요.
### 핵심 메커니즘 소개
Stable은 이더리움 가상 머신(EVM)과 완벽하게 호환되는 고성능 블록체인으로, 개발자들이 친숙한 도구와 라이브러리를 사용하여 애플리케이션을 구축할 수 있도록 설계되었습니다. Stable의 핵심 메커니즘은 다음과 같은 주요 영역으로 구성됩니다.
#### 시스템 아키텍처
Stable은 다음과 같은 핵심 구성 요소로 이루어져 있습니다:
* **실행 레이어**: EVM 호환 스마트 컨트랙트 실행 환경
* **합의 레이어**: 빠르고 안전한 트랜잭션 확정을 위한 합의 메커니즘
* **상태 관리**: 효율적인 블록체인 상태 저장 및 관리
* **네트워크 레이어**: P2P 통신 및 데이터 전파
#### 수수료 모델
Stable은 예측 가능한 수수료 구조를 제공합니다:
* **단일 구성 요소 가스 모델**: 우선순위 팁 없이 기본 실행 비용만 적용
* **USDT0로 수수료 지불**: 안정적이고 예측 가능한 거래 비용
* **수수료 변동성 제거**: 사용자 경험 향상을 위한 일관된 가격 구조
#### 성능 및 확장성
* **고처리량**: 초당 수천 건의 트랜잭션 처리 가능
* **낮은 지연시간**: 빠른 트랜잭션 확정 시간
* **효율적인 자원 사용**: 최적화된 실행 환경
### 개발자를 위한 핵심 기능
#### 개발 도구 호환성
Stable은 기존 이더리움 개발 생태계와 완벽하게 호환됩니다:
**지원되는 프로그래밍 언어:**
* Solidity
**개발 프레임워크:**
* Hardhat
* Foundry
* Truffle
**클라이언트 라이브러리:**
* ethers.js
* web3.js
* 기타 JSON-RPC 호환 라이브러리
#### JSON-RPC API
표준 이더리움 JSON-RPC 메서드를 지원하여 기존 도구와 인프라를 그대로 사용할 수 있습니다:
* `eth_*` 메서드 완전 지원
* 기존 인덱서 및 모니터링 도구 호환
* 표준 트랜잭션 형식 지원
#### 스마트 컨트랙트 패턴
* ERC-20, ERC-721, ERC-1155 등 표준 토큰 규격 지원
* 프록시 패턴 및 업그레이드 가능한 컨트랙트
* 멀티시그 및 접근 제어 메커니즘
* 이벤트 로깅 및 상태 관리
### USDT 통합
#### 네이티브 USDT 지원
Stable의 독특한 특징 중 하나는 USDT의 네이티브 통합입니다:
* **가스 토큰으로서의 USDT**: 트랜잭션 수수료를 USDT0 로 직접 지불
* **크로스체인 호환성**: 다른 체인과의 원활한 USDT 이동
#### USDT 특화 기능
* **보장된 블록 공간**: USDT 트랜잭션을 위한 우선 처리
* **전송 집계기**: 효율적인 배치 전송 처리
* **기밀 전송**: 향상된 프라이버시 보호
### 시스템 모듈
Stable은 다음과 같은 핵심 시스템 모듈로 구성됩니다:
#### 은행(Bank) 모듈
* 계정 잔액 관리
* 토큰 전송 및 보관
* 다중 자산 지원
#### 스테이킹(Staking) 모듈
* 검증자 관리
* 위임 및 보상 분배
* 슬래싱 메커니즘
#### 분배(Distribution) 모듈
* 블록 보상 분배
* 수수료 재분배
* 인센티브 관리
### 보안 및 최종성
#### 즉시 최종성
* 트랜잭션이 포함된 블록은 즉시 최종 확정
* 재구성(reorg) 위험 제거
* 높은 수준의 거래 확실성
#### 보안 모델
* 검증된 암호학적 프리미티브 사용
* 다중 레이어 보안 아키텍처
* 정기적인 보안 감사
### 다음 단계
Stable의 핵심 메커니즘을 더 자세히 이해하려면 다음 문서들을 참조하세요:
* [이더리움 호환성](/ko/developers/core-mechanics/ethereum-compatibility): EVM 호환성에 대한 상세 정보
* [가스 가격 책정](/ko/developers/core-mechanics/gas-pricing): 수수료 모델 설명
* [JSON-RPC API](/ko/developers/core-mechanics/json-rpc-api): API 참조 문서
* [최종성](/ko/developers/core-mechanics/finality): 트랜잭션 확정 메커니즘
* [EIP-7702](/ko/developers/core-mechanics/eip-7702): 계정 추상화 지원
개발을 시작하려면 [빠른 시작 가이드](/ko/developers/quick-start)를 확인하세요.
## Bank
### 개요
Stable SDK의 `x/bank` 모듈은 기본적인 토큰 관리 기능만 제공합니다.
모든 토큰은 제한 없이 다른 계정으로 전송될 수 있으며, 사용자는 다른 계정에 토큰 전송 권한을 위임할 수 없습니다.
이러한 이유로, `bank` precompile 컨트랙트는 Stable SDK의 기존 `x/bank` 모듈 위에 추가적인 권한 부여 및 위임 기능을 제공합니다.
### 목차
1. **[개념](#concepts)**
2. **[설정](#configuration)**
3. **[메서드](#methods)**
4. **[이벤트](#events)**
### 개념
이 precompile 컨트랙트는 ERC20 표준 메서드를 제공합니다 - 전송을 위한 `transfer`와 `balanceOf`, 위임을 위한 `transferFrom`, `approve`, `allowance` 등이 있습니다. 이러한 메서드는 컨트랙트 주소 등록 없이 직접 호출할 수 있습니다.
그러나 `mint`와 `burn` 메서드는 `x/precompile` 모듈에 의해 등록된 컨트랙트 주소가 화이트리스트에 포함되어야 합니다.
```go
func (p *Precompile) mint(
ctx sdk.Context,
contract *vm.Contract,
denom string,
method *abi.Method,
stateDB vm.StateDB,
args []interface{},
) ([]byte, error) {
// ...
// mint method is only allowed for the registered caller contract
if _, err := precompilecommon.CheckPermissions(ctx, p.precompileKeeper, contract.CallerAddress, CallerPermissions); err != nil {
return nil, err
}
```
추가적인 검증 프로세스는 이 precompile 컨트랙트를 호출하는 토큰 컨트랙트가 승인되었음을 보장할 수 있습니다.
토큰 컨트랙트 주소와 해당 denom을 `x/precompile` 모듈의 화이트리스트에 등록하려면 거버넌스 제안이 필요합니다.
### 설정
컨트랙트 주소와 가스 비용은 사전 정의되어 있습니다.
#### 컨트랙트 주소
* `0x0000000000000000000000000000000000001003` - STABLE (거버넌스 토큰)
### 메서드
#### `mint`
요청된 수량의 새로운 토큰을 발행하고 계정으로 전송합니다.
발행할 토큰의 수량은 0보다 커야 합니다.
토큰이 성공적으로 발행되고 계정으로 전송되면 `PrecompiledBankMint`가 발생합니다.
주의사항:
* 거버넌스 토큰 발행은 금지되어 있습니다.
* mint 메서드를 호출하는 컨트랙트는 x/precompile 모듈에 등록되어 있어야 합니다.
##### 입력
| 이름 | 타입 | 설명 |
| ------ | ------- | ------------- |
| to | address | 발행된 토큰을 받을 주소 |
| amount | uint256 | 발행할 토큰의 수량 |
##### 출력
| 이름 | 타입 | 설명 |
| ------- | ---- | ----------------------------- |
| success | bool | 토큰이 성공적으로 발행되고 계정으로 전송되면 true |
#### `burn`
계정에서 요청된 수량의 토큰을 소각합니다.
소각할 토큰의 수량은 0보다 커야 합니다.
토큰이 성공적으로 소각되면 `PrecompiledBankBurn`이 발생합니다.
주의사항:
* 거버넌스 토큰 소각은 금지되어 있습니다.
* mint 메서드를 호출하는 컨트랙트는 x/precompile 모듈에 등록되어 있어야 합니다.
##### 입력
| 이름 | 타입 | 설명 |
| ------ | ------- | ---------- |
| from | address | 토큰을 소각할 주소 |
| amount | uint256 | 소각할 토큰의 수량 |
##### 출력
| 이름 | 타입 | 설명 |
| ------- | ---- | ------------------- |
| success | bool | 토큰이 성공적으로 소각되면 true |
#### `transfer`
발신자로부터 수신자에게 요청된 수량의 토큰을 전송합니다.
토큰은 전송 가능하도록 설정되어 있어야 합니다. 전송할 토큰의 수량은 0보다 커야 합니다.
토큰이 성공적으로 전송되면 `PrecompiledBankTransfer`가 발생합니다.
##### 입력
| 이름 | 타입 | 설명 |
| ------ | ------- | ---------- |
| to | address | 토큰을 받을 주소 |
| amount | uint256 | 전송할 토큰의 수량 |
##### 출력
| 이름 | 타입 | 설명 |
| ------- | ---- | ------------------- |
| success | bool | 토큰이 성공적으로 전송되면 true |
#### `transferFrom`
승인된 spender가 allowance 한도 내에서 소유자로부터 수신자에게 요청된 수량의 토큰을 전송합니다.
토큰은 전송 가능하도록 설정되어 있어야 합니다.
전송할 토큰의 수량은 0보다 크고 현재 allowance보다 작거나 같아야 합니다.
토큰이 성공적으로 전송되면 `PrecompiledBankTransfer`가 발생합니다.
##### 입력
| 이름 | 타입 | 설명 |
| ------ | ------- | ---------- |
| from | address | 토큰을 전송할 주소 |
| to | address | 토큰을 받을 주소 |
| amount | uint256 | 전송할 토큰의 수량 |
##### 출력
| 이름 | 타입 | 설명 |
| ------- | ---- | ------------------- |
| success | bool | 토큰이 성공적으로 전송되면 true |
#### `multiTransfer`
단일 계정에서 여러 계정으로 토큰을 전송합니다.
토큰은 전송 가능하도록 설정되어 있어야 합니다.
각 수신자에게 전송할 토큰의 수량은 0보다 커야 합니다.
토큰이 성공적으로 전송되면 각 수신자마다 `PrecompiledBankTransfer`가 발생합니다.
##### 입력
| 이름 | 타입 | 설명 |
| ------ | ---------- | ------------------ |
| to | address\[] | 전송된 토큰을 받을 주소들 |
| amount | uint256\[] | 각 수신자에게 전송할 토큰의 수량 |
##### 출력
| 이름 | 타입 | 설명 |
| ------- | ---- | ---------------------------- |
| success | bool | 모든 수신자에게 토큰이 성공적으로 전송되면 true |
#### `approve`
spender가 소유자의 계정에서 토큰을 전송할 수 있도록 승인합니다.
승인할 토큰의 수량은 0보다 커야 합니다.
승인이 성공적으로 설정되면 `PrecompiledBankApproval`이 발생합니다.
##### 입력
| 이름 | 타입 | 설명 |
| ------- | ------- | ---------- |
| spender | address | 승인할 주소 |
| value | uint256 | 승인할 토큰의 수량 |
##### 출력
| 이름 | 타입 | 설명 |
| ------- | ---- | ------------------- |
| success | bool | 승인이 성공적으로 설정되면 true |
#### `revoke`
소유자로부터 토큰을 전송할 수 있는 spender의 승인을 취소합니다.
승인이 성공적으로 취소되면 `PrecompiledBankRevoke`가 발생합니다.
##### 입력
| 이름 | 타입 | 설명 |
| ------- | ------- | ------ |
| spender | address | 취소할 주소 |
##### 출력
| 이름 | 타입 | 설명 |
| ------- | ---- | ------------------- |
| success | bool | 승인이 성공적으로 취소되면 true |
#### `balanceOf`
계정의 토큰 잔액을 반환합니다.
##### 입력
| 이름 | 타입 | 설명 |
| ------- | ------- | ------------- |
| account | address | 토큰 잔액을 조회할 주소 |
##### 출력
| 이름 | 타입 | 설명 |
| ------- | ------- | --------- |
| balance | uint256 | 계정의 토큰 수량 |
#### `totalSupply`
토큰의 총 공급량을 반환합니다.
##### 입력
없음
##### 출력
| 이름 | 타입 | 설명 |
| ----------- | ------- | -------- |
| totalSupply | uint256 | 토큰의 총 수량 |
#### `allowance`
spender가 owner로부터 여전히 인출할 수 있는 수량을 반환합니다.
##### 입력
| 이름 | 타입 | 설명 |
| ------- | ------- | ----------- |
| owner | address | 소유자의 주소 |
| spender | address | spender의 주소 |
##### 출력
| 이름 | 타입 | 설명 |
| ------ | ------- | ---------- |
| amount | uint256 | 승인된 토큰의 수량 |
### 이벤트
이 precompile 컨트랙트에서 발생하는 모든 이벤트는 `PrecompiledBank` 접두사가 붙습니다.
모호함을 피하기 위해, 이 precompile 컨트랙트를 호출하는 토큰 컨트랙트는 동일한 접두사를 가진 이벤트 이름 사용을 피해야 합니다.
#### PrecompiledBankMint
| 이름 | 타입 | 인덱싱 | 설명 |
| ------ | ------- | --- | ------------- |
| from | address | Y | 토큰을 발행한 주소 |
| to | address | Y | 발행된 토큰을 받을 주소 |
| amount | uint256 | N | 발행된 토큰의 수량 |
#### PrecompiledBankBurn
| 이름 | 타입 | 인덱싱 | 설명 |
| ------ | ------- | --- | ---------------- |
| from | address | Y | 토큰을 소각한 주소 |
| to | address | Y | 이 메서드에서는 사용되지 않음 |
| amount | uint256 | N | 소각된 토큰의 수량 |
#### PrecompiledBankTransfer
| 이름 | 타입 | 인덱싱 | 설명 |
| ------ | ------- | --- | ------------- |
| from | address | Y | 토큰을 전송한 주소 |
| to | address | Y | 전송된 토큰을 받을 주소 |
| amount | uint256 | N | 전송된 토큰의 수량 |
#### PrecompiledBankApproval
| 이름 | 타입 | 인덱싱 | 설명 |
| ------- | ------- | --- | ---------- |
| owner | address | Y | 토큰을 승인한 주소 |
| spender | address | Y | 승인할 주소 |
| value | uint256 | N | 승인된 토큰의 수량 |
#### PrecompiledBankRevoke
| 이름 | 타입 | 인덱싱 | 설명 |
| ------- | ------- | --- | ---------- |
| owner | address | Y | 토큰을 취소한 주소 |
| spender | address | Y | 취소할 주소 |
| value | uint256 | N | 승인된 토큰의 수량 |
## Distribution
### 개요
`distribution` precompile 컨트랙트는 Stable SDK의 `x/distribution` 모듈 기능을 EVM 환경에서 사용할 수 있도록 브리지 역할을 합니다.
### 목차
1. **[개념](#개념)**
2. **[구성](#구성)**
3. **[메서드](#메서드)**
4. **[이벤트](#이벤트)**
### 개념
`distribution` precompile 컨트랙트에서는 위임자 또는 예치자가 호출자인지 확인하는 추가 검사가 수행됩니다.
### 구성
컨트랙트 주소와 가스 비용은 사전 정의되어 있습니다.
#### 컨트랙트 주소
* `0x0000000000000000000000000000000000000801`
### 메서드
#### `setWithdrawAddress`
위임자가 검증자에게 위임한 토큰에 대한 rewards를 받을 주소를 설정합니다.
때로는 위임자가 자기 위임(self-delegated)일 때 검증자 주소가 위임자로 사용됩니다.
`SetWithdrawAddress`는 출금 주소가 성공적으로 설정되었을 때 발생합니다.
##### 입력
| 이름 | 타입 | 설명 |
| ----------------- | ------- | --------------------- |
| delegatorAddress | address | 위임자의 주소 |
| withdrawerAddress | address | 위임에 대한 rewards를 받을 주소 |
##### 출력
| 이름 | 타입 | 설명 |
| ------- | ---- | ---------------------- |
| success | bool | 출금 주소가 성공적으로 설정되면 true |
#### `withdrawDelegatorRewards`
검증자로부터 위임자가 받을 rewards를 출금합니다.
검증자가 위임자에게 지급하는 모든 유형의 토큰이 단일 트랜잭션으로 출금됩니다.
`WithdrawDelegatorRewards`는 rewards가 성공적으로 출금되었을 때 발생합니다.
##### 입력
| 이름 | 타입 | 설명 |
| ---------------- | ------- | ------- |
| delegatorAddress | address | 위임자의 주소 |
| validatorAddress | address | 검증자의 주소 |
##### 출력
| 이름 | 타입 | 설명 |
| ------ | ------- | ----------------------- |
| amount | Coin\[] | 위임자가 받을 다양한 토큰의 rewards |
`Coin`은 다음 필드를 가진 구조체입니다:
| 이름 | 타입 | 설명 |
| ------ | ------- | ------------- |
| denom | string | reward의 denom |
| amount | uint256 | reward의 수량 |
#### `withdrawValidatorCommission`
검증자의 수수료를 출금합니다.
검증자가 수수료로 받는 모든 유형의 토큰이 단일 트랜잭션으로 출금됩니다.
`WithdrawValidatorCommission`은 수수료가 성공적으로 출금되었을 때 발생합니다.
##### 입력
| 이름 | 타입 | 설명 |
| ---------------- | ------- | ------- |
| validatorAddress | address | 검증자의 주소 |
##### 출력
| 이름 | 타입 | 설명 |
| ------ | ------- | ------------------- |
| amount | Coin\[] | 검증자가 받을 다양한 토큰의 수수료 |
#### `validatorDistributionInfo`
검증자가 받을 reward를 나타내는 분배 정보를 반환합니다. 검증자는 자신의 주소로 토큰을 위임하여 자기 결합(self-bonded)이라고 하는 위임자 역할을 할 수 있습니다.
##### 입력
| 이름 | 타입 | 설명 |
| ---------------- | ------- | ------- |
| validatorAddress | address | 검증자의 주소 |
##### 출력
| 이름 | 타입 | 설명 |
| ---------------- | ------------------------- | ---------- |
| distributionInfo | ValidatorDistributionInfo | 검증자의 분배 정보 |
`ValidatorDistributionInfo`는 다음 필드를 가진 구조체입니다:
| 이름 | 타입 | 설명 |
| --------------- | ---------- | ------------- |
| operatorAddress | address | 검증자의 운영자 주소 |
| selfBondRewards | DecCoin\[] | 검증자의 자기 결합 수량 |
| commission | DecCoin\[] | 검증자의 수수료 |
`DecCoin`은 다음 필드를 가진 구조체입니다:
| 이름 | 타입 | 설명 |
| --------- | ------- | ------------- |
| denom | string | reward의 denom |
| amount | uint256 | reward의 수량 |
| precision | uint8 | reward의 정밀도 |
#### `validatorOutstandingRewards`
검증자의 미지급 rewards를 반환합니다. 미지급 rewards는 검증자의 수수료와 자기 결합 rewards, 그리고 위임자들의 총 rewards로 구성된 총 reward 금액을 나타냅니다. 검증자 A가 있고 위임자 B, C, D가 A에게 위임하는 경우, 검증자의 미지급 rewards는 A의 수수료와 자기 결합 rewards + B, C, D의 rewards의 합계입니다.
##### 입력
| 이름 | 타입 | 설명 |
| ---------------- | ------- | ------- |
| validatorAddress | address | 검증자의 주소 |
##### 출력
| 이름 | 타입 | 설명 |
| ------- | ---------- | ---------------- |
| rewards | DecCoin\[] | 검증자의 미지급 rewards |
#### `validatorCommission`
검증자의 수수료를 반환합니다. 이 메서드는 `withdrawValidatorCommission` 메서드를 호출하기 전에 검증자의 수수료를 조회하는 데 사용됩니다.
##### 입력
| 이름 | 타입 | 설명 |
| ---------------- | ------- | ------- |
| validatorAddress | address | 검증자의 주소 |
##### 출력
| 이름 | 타입 | 설명 |
| ---------- | ---------- | -------- |
| commission | DecCoin\[] | 검증자의 수수료 |
#### `validatorSlashes`
시작 높이와 종료 높이 사이에 검증자의 슬래시 이력을 반환합니다. 슬래싱은 검증자가 악의적으로 행동하거나 이중 서명, 잘못된 행동, 체인 규칙을 따르지 않는 등의 네트워크 규칙을 위반했을 때 부과되는 벌금입니다.
##### 입력
| 이름 | 타입 | 설명 |
| ---------------- | ------- | --------- |
| validatorAddress | address | 검증자의 주소 |
| startingHeight | uint64 | 시작 높이 |
| endingHeight | uint64 | 종료 높이 |
| pageRequest | PageReq | 페이지네이션 요청 |
`PageReq`는 다음 필드를 가진 구조체입니다:
| 이름 | 타입 | 설명 |
| ---------- | ------ | ------------------ |
| key | bytes | 페이지네이션의 키 |
| offset | uint64 | 페이지네이션의 오프셋 |
| limit | uint64 | 페이지네이션의 제한 |
| countTotal | bool | 총 페이지 수를 계산할지 여부 |
| reverse | bool | 페이지네이션을 역순으로 할지 여부 |
##### 출력
| 이름 | 타입 | 설명 |
| ---------- | ---------------------- | --------- |
| slashes | ValidatorSlashEvent\[] | 검증자의 슬래시 |
| pagination | PageResp | 페이지네이션 응답 |
`ValidatorSlashEvent`는 다음 필드를 가진 구조체입니다:
| 이름 | 타입 | 설명 |
| --------------- | ------ | ------- |
| validatorPeriod | uint64 | 검증자의 기간 |
| fraction | Dec | 슬래시의 비율 |
`Dec`은 다음 필드를 가진 구조체입니다:
| 이름 | 타입 | 설명 |
| --------- | ------ | -------- |
| value | uint64 | Dec의 값 |
| precision | uint8 | Dec의 정밀도 |
`PageResp`는 다음 필드를 가진 구조체입니다:
| 이름 | 타입 | 설명 |
| ------- | ------ | ------------ |
| nextKey | bytes | 페이지네이션의 다음 키 |
| total | uint64 | 총 페이지 수 |
#### `delegationRewards`
위임자가 검증자로부터 받는 rewards를 반환합니다.
##### 입력
| 이름 | 타입 | 설명 |
| ---------------- | ------- | ----------- |
| delegatorAddress | address | 위임자의 hex 주소 |
| validatorAddress | address | 검증자의 주소 |
##### 출력
| 이름 | 타입 | 설명 |
| ------- | ---------- | ---------------------- |
| rewards | DecCoin\[] | 위임자가 검증자로부터 받는 rewards |
#### `delegationTotalRewards`
위임자가 모든 검증자로부터 받는 총 rewards를 반환합니다.
##### 입력
| 이름 | 타입 | 설명 |
| ---------------- | ------- | ----------- |
| delegatorAddress | address | 위임자의 hex 주소 |
##### 출력
| 이름 | 타입 | 설명 |
| ------- | ---------------------------- | --------------------------- |
| rewards | DelegationDelegatorReward\[] | 위임자가 모든 검증자로부터 받는 총 rewards |
| total | DecCoin\[] | rewards의 총 수량 |
`DelegationDelegatorReward`는 다음 필드를 가진 구조체입니다:
| 이름 | 타입 | 설명 |
| ---------------- | ---------- | ---------------------- |
| validatorAddress | address | 검증자의 주소 |
| reward | DecCoin\[] | 위임자가 검증자로부터 받는 rewards |
#### `delegatorValidators`
위임자가 결합된 검증자들을 반환합니다.
##### 입력
| 이름 | 타입 | 설명 |
| ---------------- | ------- | ----------- |
| delegatorAddress | address | 위임자의 hex 주소 |
##### 출력
| 이름 | 타입 | 설명 |
| ---------- | --------- | ------------- |
| validators | string\[] | 위임자가 결합된 검증자들 |
#### `delegatorWithdrawAddress`
`setWithdrawAddress` 메서드로 설정한 위임 rewards를 받을 주소를 반환합니다.
##### 입력
| 이름 | 타입 | 설명 |
| ---------------- | ------- | ----------- |
| delegatorAddress | address | 위임자의 hex 주소 |
##### 출력
| 이름 | 타입 | 설명 |
| --------------- | ------- | ----------------- |
| withdrawAddress | address | 위임 rewards를 받을 주소 |
### 이벤트
#### SetWithdrawAddress
| 이름 | 타입 | 인덱스 | 설명 |
| --------------- | ------- | --- | ----------------- |
| caller | address | Y | 호출자(위임자)의 주소 |
| withdrawAddress | address | N | 위임 rewards를 받을 주소 |
#### WithdrawDelegatorRewards
| 이름 | 타입 | 인덱스 | 설명 |
| ---------------- | ------- | --- | ---------- |
| delegatorAddress | address | Y | 위임자의 주소 |
| validatorAddress | address | Y | 검증자의 주소 |
| amount | uint256 | N | reward의 수량 |
#### WithdrawValidatorCommission
| 이름 | 타입 | 인덱스 | 설명 |
| ---------------- | ------- | --- | --------- |
| validatorAddress | address | Y | 검증자의 주소 |
| commission | uint256 | N | 수수료의 총 수량 |
## 개요
Stable은 가스 효율성과 예측 가능한 제어를 위해 **precompiled contracts**로 구현된 **시스템 모듈**을 통해 핵심 settlement 동작을 제공합니다.
**주요 모듈:**
* [Bank 모듈](./bank)
* USDT 전송, 잔액 관리 및 예치/인출을 처리합니다
* [Distribution 모듈](./distribution)
* 네트워크 참여자를 위한 수수료 분배 및 보상 로직
* [Staking 모듈](./staking)
* 검증자 참여 및 스테이킹을 제어합니다 (메인넷과 함께 제공 예정)
**DApp은 토큰이나 settlement 로직을 재구현하는 대신 내장 모듈을 활용할 수 있습니다.**
## Staking
### 개요
`staking` precompile 컨트랙트는 Stable SDK의 `x/staking` 모듈 기능을 EVM 환경에서 사용할 수 있도록 브리지 역할을 합니다.
### 목차
1. **[개념](#concepts)**
2. **[구성](#configuration)**
3. **[메서드](#methods)**
4. **[이벤트](#events)**
### 개념
Stable SDK의 `x/staking` 모듈에서는 스테이킹을 위해 체인 초기화 시 bond denom이 등록되어야 합니다.
Validator와 delegator는 bond denom 스테이킹 토큰만 사용할 수 있습니다.
`staking` precompile 컨트랙트에서는 validator 또는 delegator가 호출자인지 확인하는 추가 검증이 수행됩니다.
### 구성
컨트랙트 주소와 가스 비용은 사전에 정의되어 있습니다.
#### 컨트랙트 주소
* `0x0000000000000000000000000000000000000800`
### 메서드
#### `createValidator`
Validator가 생성됩니다.
Validator는 운영자의 초기 delegation과 함께 생성되어야 합니다.
잠재적인 delegator를 위해 validator는 자신의 정보와 수수료율 계획을 제공해야 합니다.
Delegator는 시장 메커니즘의 자연스러운 규제를 통해 공개된 정보를 바탕으로 자신의 토큰을 위임할 validator를 선택할 수 있습니다.
Validator가 성공적으로 등록되면 `CreateValidator` 이벤트가 발생합니다.
##### Inputs
| Name | Type | Description |
| ----------------- | --------------- | --------------------------------- |
| description | Description | validator의 정보 |
| commissionRates | CommissionRates | validator가 보상받는 스테이킹 토큰의 수수료율 |
| minSelfDelegation | uint256 | validator의 최소 자체 위임 금액 |
| validatorAddress | address | validator의 주소 |
| pubkey | string | validator의 공개 키 |
| value | uint256 | validator에게 초기 자체 위임되는 스테이킹 토큰의 양 |
`Description`은 다음 필드를 가진 구조체입니다:
| Name | Type | Description |
| --------------- | ------ | ------------------- |
| moniker | string | validator의 이름 |
| identity | string | validator의 신원 |
| website | string | validator 웹사이트의 URL |
| securityContact | string | 보안 연락처 정보 |
| details | string | validator의 추가 설명 |
`CommissionRates`는 다음 필드를 가진 구조체입니다:
| Name | Type | Description |
| ------------- | ------- | ------------------------------- |
| rate | uint256 | validator가 받는 현재 수수료율 |
| maxRate | uint256 | 최대 수수료율 (이보다 높게 설정할 수 없음) |
| maxChangeRate | uint256 | validator가 하루에 변경할 수 있는 최대 수수료율 |
`rate`는 시장에서 수용 가능한 적절한 값으로 설정해야 합니다.
* Validator의 수수료율이 높으면 delegator의 수익이 낮아집니다.
* Validator의 수수료율이 낮으면 validator의 수익이 낮아지고 운영이 어려워집니다.
높은 `maxRate`는 validator의 예상치 못한 높은 수수료율에 대한 delegator의 우려를 야기할 수 있으므로 `maxRate`는 신중하게 설정해야 합니다. `maxChangeRate`는 초기화 후 변경할 수 없습니다.
##### Outputs
| Name | Type | Description |
| ------- | ---- | -------------------------- |
| success | bool | validator가 성공적으로 등록되면 true |
#### `editValidator`
Validator가 정보를 업데이트합니다.
Validator는 `CommissionRates` 구조체의 `maxRate` 및 `maxChangeRate`와 같이 변경 불가능한 필드를 제외한 정보만 업데이트할 수 있습니다.
Validator가 성공적으로 업데이트되면 `EditValidator` 이벤트가 발생합니다.
##### Inputs
| Name | Type | Description |
| ----------------- | ----------- | ----------------------------- |
| description | Description | validator의 정보 |
| validatorAddress | address | validator의 주소 |
| commissionRate | int256 | validator가 보상받는 스테이킹 토큰의 수수료율 |
| minSelfDelegation | int256 | validator의 최소 자체 위임 금액 |
##### Outputs
| Name | Type | Description |
| ------- | ---- | ---------------------------- |
| success | bool | validator가 성공적으로 업데이트되면 true |
#### `delegate`
Delegator가 validator에게 위임할 토큰의 양을 설정합니다.
Delegation이 성공적으로 완료되면 `Delegate` 이벤트가 발생합니다.
##### Inputs
| Name | Type | Description |
| ---------------- | ------- | --------------------------- |
| delegatorAddress | address | delegator의 주소 |
| validatorAddress | address | validator의 주소 |
| amount | uint256 | validator에게 위임되는 스테이킹 토큰의 양 |
##### Outputs
| Name | Type | Description |
| ------- | ---- | --------------------------- |
| success | bool | delegation이 성공적으로 완료되면 true |
##### Events
`newShares`는 delegator의 소유 비율을 나타냅니다.
동일한 양의 토큰이 위임되더라도 시간에 따라 계산되는 shares는 달라질 수 있습니다.
#### `undelegate`
Delegator가 validator에게 위임한 토큰의 양을 인출합니다.
언델리게이션이 성공적으로 완료되면 `Unbond` 이벤트가 발생합니다.
##### Inputs
| Name | Type | Description |
| ---------------- | ------- | --------------------------------- |
| delegatorAddress | address | delegator의 주소 |
| validatorAddress | address | validator의 주소 |
| amount | uint256 | validator로부터 언델리게이트하려는 스테이킹 토큰의 양 |
##### Outputs
| Name | Type | Description |
| ------- | ---- | ----------------------- |
| success | bool | 언델리게이션이 성공적으로 완료되면 true |
#### `redelegate`
Delegator가 validator에게 위임한 토큰의 양을 다른 validator에게 재위임합니다.
재위임이 성공적으로 완료되면 `Redelegate` 이벤트가 발생합니다.
##### Inputs
| Name | Type | Description |
| ---------------- | ------- | ----------------- |
| delegatorAddress | address | delegator의 주소 |
| validatorSrc | string | 출발지 validator의 주소 |
| validatorDst | string | 목적지 validator의 주소 |
| amount | uint256 | 재위임할 스테이킹 토큰의 양 |
##### Outputs
| Name | Type | Description |
| ------- | ---- | -------------------- |
| success | bool | 재위임이 성공적으로 완료되면 true |
#### `delegation`
Delegator와 validator 간의 delegation 정보를 반환합니다.
Delegation을 찾을 수 없으면 `shares`와 `balance`는 `0`이 됩니다.
##### Inputs
| Name | Type | Description |
| ---------------- | ------- | ------------- |
| delegatorAddress | address | delegator의 주소 |
| validatorAddress | address | validator의 주소 |
##### Outputs
| Name | Type | Description |
| ------- | ------- | ---------------- |
| shares | uint256 | 위임된 shares |
| balance | Coin | 위임된 토큰의 양과 denom |
`Coin`은 다음 필드를 가진 구조체입니다:
| Name | Type | Description |
| ------ | ------- | ----------- |
| denom | string | 보상의 denom |
| amount | uint256 | 보상의 양 |
#### `unbondingDelegation`
Delegator와 validator 간의 언본딩 delegation 정보를 반환합니다.
언본딩 delegation을 찾을 수 없으면 빈 `UnbondingDelegationOutput`이 반환됩니다.
##### Inputs
| Name | Type | Description |
| ---------------- | ------- | ------------- |
| delegatorAddress | address | delegator의 주소 |
| validatorAddress | address | validator의 주소 |
##### Outputs
| Name | Type | Description |
| ------------------- | ------------------------- | ------------------ |
| unbondingDelegation | UnbondingDelegationOutput | 언본딩 delegation의 정보 |
`UnbondingDelegationOutput`은 다음 필드를 가진 구조체입니다:
| Name | Type | Description |
| ---------------- | --------------------------- | ------------------- |
| validatorAddress | address | validator의 주소 |
| delegatorAddress | address | delegator의 주소 |
| entries | UnbondingDelegationEntry\[] | 언본딩 delegation의 항목들 |
`UnbondingDelegationEntry`는 다음 필드를 가진 구조체입니다:
| Name | Type | Description |
| -------------- | ------ | ----------- |
| creationHeight | uint64 | 항목의 생성 높이 |
| completionTime | uint64 | 항목의 완료 시간 |
| initialBalance | Coin | 항목의 초기 잔액 |
| balance | Coin | 항목의 잔액 |
#### `validator`
Validator 정보를 반환합니다.
Validator를 찾을 수 없으면 빈 `ValidatorOutput`이 반환됩니다.
##### Inputs
| Name | Type | Description |
| ---------------- | ------- | ------------- |
| validatorAddress | address | validator의 주소 |
##### Outputs
| Name | Type | Description |
| --------- | --------- | ------------- |
| validator | Validator | validator의 정보 |
`Validator`는 다음 필드를 가진 구조체입니다:
| Name | Type | Description |
| ----------------- | ------- | ----------------------------- |
| operatorAddress | address | validator의 주소 |
| consensusPubkey | string | validator의 공개 키 |
| jailed | bool | validator가 jailed 상태인지 여부 |
| status | int32 | validator의 상태 |
| tokens | uint256 | validator에게 위임된 스테이킹 토큰의 양 |
| delegatorShares | uint256 | delegation shares의 양 |
| description | string | validator의 설명 |
| unbondingHeight | int64 | validator가 언본딩 중인 높이 |
| unbondingTime | int64 | validator가 언본딩 중인 시간 |
| commission | uint256 | validator가 보상받는 스테이킹 토큰의 수수료율 |
| minSelfDelegation | uint256 | validator의 최소 자체 위임 금액 |
#### `validators`
상태와 일치하는 모든 validator를 반환합니다.
Validator를 찾을 수 없으면 빈 `ValidatorsOutput`이 반환됩니다.
`x/staking` 모듈에서 선언된 상태는 다음 중 하나일 수 있습니다:
* 0 : "BOND\_STATUS\_UNSPECIFIED", 지정되지 않은 상태
* 1 : "BOND\_STATUS\_UNBONDING", validator가 언본딩 중
* 2 : "BOND\_STATUS\_UNBONDED", validator가 언본딩됨
* 3 : "BOND\_STATUS\_BONDED", validator가 본딩됨
##### Inputs
| Name | Type | Description |
| ----------- | ------- | ------------- |
| status | string | validator의 상태 |
| pageRequest | PageReq | 페이지네이션 요청 |
`PageReq`는 다음 필드를 가진 구조체입니다:
| Name | Type | Description |
| ---------- | ----- | -------------------- |
| key | bytes | 페이지의 키 |
| offset | int64 | 페이지의 오프셋 |
| limit | int64 | 페이지의 제한 |
| countTotal | bool | 결과의 총 개수를 세어야 하는지 여부 |
| reverse | bool | 결과를 역순으로 정렬할지 여부 |
##### Outputs
| Name | Type | Description |
| ------------ | ------------ | -------------- |
| validators | Validator\[] | validator들의 배열 |
| pageResponse | PageResp | 페이지네이션 응답 |
`PageResp`는 다음 필드를 가진 구조체입니다:
| Name | Type | Description |
| ------- | ------ | ----------- |
| nextKey | bytes | 다음 페이지의 키 |
| total | uint64 | 결과의 총 개수 |
#### `redelegation`
Delegator, 출발지 validator, 목적지 validator의 재위임 정보를 반환합니다.
재위임을 찾을 수 없으면 빈 `RedelegationOutput`이 반환됩니다.
##### Inputs
| Name | Type | Description |
| ------------------- | ------- | ----------------- |
| delegatorAddress | address | delegator의 주소 |
| srcValidatorAddress | address | 출발지 validator의 주소 |
| dstValidatorAddress | address | 목적지 validator의 주소 |
##### Outputs
| Name | Type | Description |
| ------------ | ------------------ | ----------- |
| redelegation | RedelegationOutput | 재위임의 정보 |
`RedelegationOutput`은 다음 필드를 가진 구조체입니다:
| Name | Type | Description |
| ------------------- | -------------------- | ----------------- |
| delegatorAddress | address | delegator의 주소 |
| validatorSrcAddress | address | 출발지 validator의 주소 |
| validatorDstAddress | address | 목적지 validator의 주소 |
| entries | RedelegationEntry\[] | 재위임의 항목들 |
`RedelegationEntry`는 다음 필드를 가진 구조체입니다:
| Name | Type | Description |
| -------------- | ------ | ----------- |
| creationHeight | uint64 | 항목의 생성 높이 |
| completionTime | uint64 | 항목의 완료 시간 |
| initialBalance | Coin | 항목의 초기 잔액 |
| balance | Coin | 항목의 잔액 |
#### `redelegations`
Delegator, 출발지 validator, 목적지 validator의 모든 재위임을 반환합니다.
재위임을 찾을 수 없으면 빈 `RedelegationResponse`와 `PageResp`가 반환됩니다.
##### Inputs
| Name | Type | Description |
| ------------------- | ------- | ----------------- |
| delegatorAddress | address | delegator의 주소 |
| srcValidatorAddress | address | 출발지 validator의 주소 |
| dstValidatorAddress | address | 목적지 validator의 주소 |
| pageRequest | PageReq | 페이지네이션 요청 |
##### Outputs
| Name | Type | Description |
| ------------ | ----------------------- | ----------- |
| response | RedelegationResponse\[] | 재위임들의 정보 |
| pageResponse | PageResp | 페이지네이션 응답 |
### 이벤트
#### CreateValidator
| Name | Type | Indexed | Description |
| -------- | ------- | ------- | --------------------------------- |
| valiAddr | address | Y | validator의 주소 |
| value | uint256 | N | validator에게 초기 자체 위임되는 스테이킹 토큰의 양 |
#### EditValidator
| Name | Type | Indexed | Description |
| ----------------- | ------- | ------- | ----------------------------------- |
| valiAddr | address | Y | validator의 주소 |
| commissionRate | int256 | N | validator가 보상받는 스테이킹 토큰의 업데이트된 수수료율 |
| minSelfDelegation | int256 | N | validator의 업데이트된 최소 자체 위임 금액 |
#### Delegate
| Name | Type | Indexed | Description |
| ------------- | ------- | ------- | ----------------------------------- |
| delegatorAddr | address | Y | delegator의 주소 |
| validatorAddr | string | Y | validator의 주소 |
| amount | uint256 | N | validator에게 위임되는 스테이킹 토큰의 양 |
| newShares | uint256 | N | delegation 이후의 delegation shares의 양 |
#### Unbond
| Name | Type | Indexed | Description |
| -------------- | ------- | ------- | ------------------------------- |
| delegatorAddr | address | Y | delegator의 주소 |
| validatorAddr | string | Y | validator의 주소 |
| amount | uint256 | N | validator로부터 언델리게이트된 스테이킹 토큰의 양 |
| completionTime | uint256 | N | 언델리게이션의 완료 시간 |
#### Redelegate
| Name | Type | Indexed | Description |
| ------------------- | ------- | ------- | ----------------- |
| delegatorAddr | address | Y | delegator의 주소 |
| validatorSrcAddress | address | Y | 출발지 validator의 주소 |
| validatorDstAddress | address | Y | 목적지 validator의 주소 |
| amount | uint256 | N | 재위임할 스테이킹 토큰의 양 |
| completionTime | uint256 | N | 재위임의 완료 시간 |
## System Transactions
### 요약
시스템 트랜잭션은 Stable 프로토콜이 Stable SDK 작업에 대한 EVM 이벤트를 발생시킬 수 있는 방법을 제공합니다. 언본딩 완료와 같은 스테이킹 이벤트가 SDK 계층에서 발생하면 프로토콜은 해당 이벤트를 발생시키는 EVM 트랜잭션을 자동으로 생성하여 이러한 작업이 EVM 도구 및 애플리케이션에 완전히 표시되도록 합니다.
### 동기
Stable의 EVM 사용자와 애플리케이션은 `eth_getLogs`와 같은 표준 EVM 인터페이스를 통해 블록체인 이벤트를 모니터링할 것으로 기대합니다. 그러나 중요한 작업은 EVM 이벤트를 자연스럽게 발생시키지 않는 Stable SDK 모듈에서 발생합니다. 이는 가시성 격차를 만듭니다: EVM dapp은 사용자의 토큰이 언제 언본딩을 완료하는지 쉽게 추적할 수 없습니다.
시스템 트랜잭션은 이 격차를 해소합니다. 스테이킹 모듈이 언본딩 작업을 완료하면 Stable의 x/stable 모듈이 이벤트를 감지하고 StableSystem 프리컴파일 (`0x0000000000000000000000000000000000009999`)을 호출하는 시스템 트랜잭션을 생성합니다. 그런 다음 프리컴파일은 모든 dapp이 구독할 수 있는 적절한 EVM 이벤트를 발생시킵니다. 시스템 트랜잭션은 프로토콜만 사용할 수 있는 특수 발신자 주소(`0x8888888888888888888888888888888888888888`)로 실행됩니다. 이는 누구도 프로토콜 이벤트를 위조할 수 없도록 방지하면서 이벤트 발생을 무신뢰적이고 온체인에서 검증 가능하게 유지합니다.
### 명세
시스템 트랜잭션은 세 가지 주요 구성 요소를 통해 작동합니다: x/stable 모듈의 EndBlocker, PrepareProposal 핸들러 및 StableSystem 프리컴파일입니다.
#### 아키텍처 개요
 #### StableSystem 프리컴파일
StableSystem 프리컴파일은 `0x0000000000000000000000000000000000009999`에 있으며 EVM 이벤트를 발생시켜야 하는 프로토콜 수준 작업을 처리합니다. 현재 언본딩 완료 알림을 지원합니다.
```solidity
interface IStableSystem {
/// @notice 대기 중인 언본딩 완료를 처리하고 EVM 이벤트를 발생시킵니다
/// @param blockHeight 완료를 처리할 블록 높이
/// @dev 시스템 트랜잭션에서만 호출 가능 (from = 0x8888888888888888888888888888888888888888)
/// @dev 호출당 최대 100개의 완료를 처리
/// @dev 처리된 완료를 큐에서 자동으로 삭제
function notifyUnbondingCompletions(int64 blockHeight) external;
/// @notice 언본딩 작업이 완료될 때 발생
/// @param delegator 토큰을 위임한 주소
/// @param validator 토큰이 위임된 검증자 주소
/// @param amount 언본딩을 완료한 토큰 양 (uusdc 단위)
event UnbondingCompleted(
address indexed delegator,
address indexed validator,
uint256 amount
);
/// @notice 호출자가 권한이 없음 (시스템 트랜잭션 발신자가 아님)
error Unauthorized();
}
```
#### 시스템 트랜잭션 발신자
시스템 트랜잭션은 `0x8888888888888888888888888888888888888888`을 발신자 주소로 사용합니다. 이 주소는:
* 서명 검증이 필요 없음
* PrepareProposal에서 생성된 트랜잭션만 사용 가능
* 사용자나 컨트랙트가 위조할 수 없음
* SystemTxDecorator ante 핸들러를 통해 수수료 공제를 건너뜀
EVM은 `msg.sender == 0x8888888888888888888888888888888888888888`을 확인하여 시스템 트랜잭션을 인식합니다. 프리컴파일은 이를 사용하여 프로토콜 전용 작업을 제한할 수 있습니다.
#### 이벤트 기반 흐름
사용자의 언본딩 기간이 완료되면 다음과 같은 일이 발생합니다:
1. **Stable SDK 계층:** 스테이킹 모듈의 EndBlocker가 언본딩을 완료하고 위임자 주소, 검증자 주소 및 금액과 함께 EventTypeCompleteUnbonding을 발생시킵니다.
2. **감지:** x/stable 모듈의 EndBlocker는 스테이킹 이후에 실행되며 블록의 이벤트 로그에서 언본딩 이벤트를 스캔합니다. 각 완료에 대해 위임자 주소, 검증자 주소, 금액 및 블록 높이를 포함하는 항목을 상태에 큐에 넣습니다.
3. **시스템 트랜잭션 생성**: 다음 블록의 PrepareProposal에서 앱은 대기 중인 모든 완료를 쿼리합니다. 있는 경우 현재 블록 높이로 StableSystem.notifyUnbondingCompletions(blockHeight)를 호출하는 시스템 트랜잭션을 생성합니다. 이 트랜잭션은 사용자 트랜잭션보다 먼저 블록 앞에 배치됩니다.
4. **실행:** 블록 실행 중에 시스템 트랜잭션이 먼저 실행됩니다. 프리컴파일은 해당 블록 높이에서 대기 중인 완료에 대한 상태를 쿼리하고, 각 완료에 대해 UnbondingCompleted 이벤트를 발생시키며(최대 100개), 큐에서 삭제합니다.
5. **EVM 가시성:** 이벤트는 트랜잭션 영수증과 로그에 나타나며, eth\_getLogs 쿼리, 블록 탐색기 및 StableSystem 프리컴파일을 모니터링하는 모든 애플리케이션에 표시됩니다.
#### 배치 처리
블록이 너무 커지는 것을 방지하기 위해 시스템은 블록당 최대 100개의 언본딩 완료를 처리합니다. 150개의 완료가 큐에 들어가면:
* 블록 N: 완료 0-99를 처리하는 시스템 트랜잭션 생성
* 블록 N+1: 완료 100-149를 처리하는 시스템 트랜잭션 생성
프리컴파일은 calldata에서 완료 데이터를 받는 대신 상태를 직접 쿼리합니다. 이렇게 하면 트랜잭션 크기를 예측 가능하게 유지하고 데이터를 비싼 calldata에서 더 저렴한 상태 읽기로 이동합니다.
### 사용 예시
가장 일반적인 사용 사례는 언본딩 기간이 완료될 때 사용자에게 알려야 하는 스테이킹 대시보드입니다. 다음은 언본딩 완료 리스너를 설정하는 방법입니다.
```javascript
import { ethers } from 'ethers';
// StableSystem 프리컴파일 주소
const STABLE_SYSTEM_ADDRESS = '0x0000000000000000000000000000000000009999';
// UnbondingCompleted 이벤트의 ABI
const STABLE_SYSTEM_ABI = [
'event UnbondingCompleted(address indexed delegator, address indexed validator, uint256 amount)'
];
// Stable 네트워크에 연결
const provider = new ethers.JsonRpcProvider('https://rpc.testnet.stable.xyz');
const stableSystem = new ethers.Contract(
STABLE_SYSTEM_ADDRESS,
STABLE_SYSTEM_ABI,
provider
);
// 모든 언본딩 완료 구독
stableSystem.on('UnbondingCompleted', (delegator, validator, amount, event) => {
console.log('언본딩 완료!');
console.log('위임자:', delegator);
console.log('검증자:', validator);
console.log('금액:', ethers.formatEther(amount), '토큰');
console.log('블록:', event.log.blockNumber);
console.log('트랜잭션 해시:', event.log.transactionHash);
});
```
이 리스너는 사용자의 언본딩이 완료될 때마다 실행됩니다. 프로덕션 dApp의 경우 일반적으로 특정 사용자에 대한 이벤트를 필터링합니다.
#### 특정 사용자에 대한 이벤트 필터링
특정 위임자 주소에 대한 이벤트만 받으려면 인덱싱된 이벤트 매개변수를 사용하여 필터를 만듭니다:
```javascript
// 특정 사용자의 언본딩만 감시
const userAddress = '0xabcd...';
const filter = stableSystem.filters.UnbondingCompleted(userAddress);
stableSystem.on(filter, (delegator, validator, amount, event) => {
// 지정된 사용자의 언본딩에 대해서만 실행됨
showNotification(`${ethers.formatEther(amount)} 토큰의 언본딩이 완료되었습니다!`);
refreshUserBalance(userAddress);
});
```
검증자별 대시보드를 구축하는 경우 검증자별로 필터링할 수도 있습니다:
```javascript
// 특정 검증자의 모든 언본딩 감시
const validatorAddress = '0x1234...';
const validatorFilter = stableSystem.filters.UnbondingCompleted(null, validatorAddress);
stableSystem.on(validatorFilter, (delegator, validator, amount) => {
updateValidatorStats(validator, amount);
});
```
#### 과거 이벤트 쿼리
dApp에서 과거 언본딩 완료 기록을 표시해야 하는 경우 블록 범위가 있는 이벤트 필터를 사용하여 과거 이벤트를 쿼리할 수 있습니다:
```javascript
// 최근 1000개 블록에서 사용자의 모든 언본딩 가져오기
const currentBlock = await provider.getBlockNumber();
const filter = stableSystem.filters.UnbondingCompleted(userAddress);
const events = await stableSystem.queryFilter(
filter,
currentBlock - 1000,
currentBlock
);
const unbondingHistory = events.map(event => ({
delegator: event.args.delegator,
validator: event.args.validator,
amount: ethers.formatEther(event.args.amount),
blockNumber: event.blockNumber,
txHash: event.transactionHash
}));
console.log('최근 언본딩:', unbondingHistory);
```
### 통합 가이드
#### 단계 1: Stable System 컨트랙트 인터페이스 추가
먼저 StableSystem 프리컴파일 인터페이스를 프로젝트에 추가합니다. Foundry 또는 Hardhat을 사용하는 경우 새 인터페이스 파일을 생성합니다:
```solidity
interface IStableSystem {
event UnbondingCompleted(
address indexed delegator,
address indexed validator,
uint256 amount
);
}
```
Solidity 컨트랙트 없이 순수 프론트엔드 dApp을 구축하는 경우 이벤트에 대한 ABI 조각만 필요합니다:
```javascript
const STABLE_SYSTEM_ABI = [
'event UnbondingCompleted(address indexed delegator, address indexed validator, uint256 amount)'
];
```
#### 단계 2: 이벤트 리스너 설정
ethers.js provider를 초기화하고 StableSystem 프리컴파일 주소를 가리키는 컨트랙트 인스턴스를 생성합니다. 프리컴파일은 Stable 테스트넷과 메인넷 모두에서 항상 `0x00000000000....0000009999`에 배포됩니다.
*참고: 프리컴파일은 아직 Stable 메인넷에 배포되지 않았으며 v1.2.0 업그레이드 후에 제공됩니다.*
```javascript
const provider = new ethers.JsonRpcProvider(RPC_URL);
const stableSystem = new ethers.Contract(
'0x0000000000000000000000000000000000009999',
STABLE_SYSTEM_ABI,
provider
);
```
#### 단계 3: 애플리케이션 로직에서 이벤트 처리
이벤트를 구독하고 애플리케이션 상태를 그에 따라 업데이트합니다. 일반적인 패턴은 다음과 같습니다:
* **잔액 업데이트**: 언본딩이 완료되면 사용자의 토큰 잔액을 새로 고침
* **알림 시스템**: 사용자의 언본딩이 완료될 때 토스트 알림 표시
* **대시보드 통계**: 실시간으로 스테이킹 지표 및 차트 업데이트
* **트랜잭션 기록**: 완료된 언본딩을 사용자의 활동 피드에 추가
#### 단계 4: 연결 문제 처리
이벤트 구독은 지속적인 websocket 연결에 의존하므로 프로덕션 dApp을 위한 재연결 로직을 구현합니다:
```javascript
let reconnectAttempts = 0;
const MAX_RECONNECT_ATTEMPTS = 5;
function setupEventListener() {
const provider = new ethers.WebSocketProvider('wss://rpc.testnet.stable.xyz');
provider.on('error', (error) => {
console.error('Provider 오류:', error);
if (reconnectAttempts < MAX_RECONNECT_ATTEMPTS) {
reconnectAttempts++;
setTimeout(() => setupEventListener(), 5000);
}
});
const stableSystem = new ethers.Contract(
'0x0000000000000000000000000000000000009999',
STABLE_SYSTEM_ABI,
provider
);
stableSystem.on('UnbondingCompleted', handleUnbonding);
}
```
### 왜 이 방법인가?
#### 커스텀 인덱서와 비교
이전에는 Stable SDK가 dApp 개발자에게 SDK 이벤트를 감시하고 데이터베이스에 저장하는 커스텀 인덱서를 실행하도록 요구했습니다. 이는 운영 오버헤드를 추가하고 잠재적인 실패 지점을 도입합니다.
시스템 트랜잭션을 사용하면 별도의 인덱서 인프라가 필요하지 않습니다. 이벤트는 모든 RPC 노드가 이미 인덱싱하고 제공하는 EVM의 로그 시스템을 통해 기본적으로 사용할 수 있습니다. 모든 표준 web3 라이브러리는 추가 도구 없이 이러한 이벤트를 구독할 수 있습니다.
#### SDK 엔드포인트 폴링과 비교
시스템 트랜잭션이 없으면 EVM dApp은 언본딩 기간이 완료되었는지 확인하기 위해 주기적으로 Stable SDK REST 엔드포인트를 호출해야 합니다. 이는 여러 문제를 야기합니다:
* **지연 시간 증가**: 5-10초의 폴링 간격은 사용자가 업데이트를 보기 전에 그만큼 기다려야 함을 의미합니다
* **더 높은 부하**: 모든 dApp 인스턴스의 엔드포인트 폴링은 RPC 인프라의 부하를 증가시킵니다
* **복잡성**: dApp은 web3 프로바이더(EVM 상호 작용용)와 Stable SDK REST 클라이언트(SDK 쿼리용)를 모두 처리해야 합니다
* **실시간 업데이트 없음**: 폴링은 본질적으로 즉각적인 알림을 제공할 수 없습니다
시스템 트랜잭션은 dApp이 이미 EVM 상호 작용에 사용하는 동일한 websocket 연결을 통해 실시간 이벤트 알림을 제공합니다. 이는 개발자 경험을 단순화하고 인프라 비용을 줄입니다.
### 보안 보증
#### 무신뢰 이벤트 발생
시스템 트랜잭션은 검증자만 실행할 수 있는 `PrepareProposal` ABCI 단계에서 생성됩니다. 사용자가 제출한 트랜잭션은 EVM의 상태 전환 로직이 StableSystem 프리컴파일 주소로의 트랜잭션만 서명 검증을 건너뛸 수 있도록 강제하기 때문에 시스템 발신자 주소(`0x8888888888888888888888888888888888888888`)를 위조할 수 없습니다.
이것은 다음을 의미합니다:
* 사용자는 언본딩 완료 이벤트를 위조할 수 없습니다
* 사용자는 자신의 트랜잭션에서 `notifyUnbondingCompletions`을 호출할 수 없습니다
* `UnbondingCompleted` 이벤트를 발생시키는 유일한 방법은 Stable SDK 스테이킹 모듈에서 실제로 언본딩을 완료하는 것입니다
#### 추가 신뢰 가정 없음
시스템 트랜잭션은 블록체인 합의에 이미 필요한 것 이상의 새로운 보안 가정을 도입하지 않습니다. 검증자가 블록을 올바르게 실행하고 있다고 신뢰한다면 시스템 트랜잭션 이벤트가 Stable SDK 상태 변경을 정확하게 반영한다고 신뢰할 수 있습니다.
이벤트 발생 프로세스는 결정론적입니다: `EndBlock`에서 동일한 SDK 이벤트가 주어지면 모든 정직한 검증자는 `PrepareProposal` 중에 동일한 시스템 트랜잭션을 생성합니다. 합의 메커니즘은 검증자가 포함할 시스템 트랜잭션에 대해 합의하도록 보장합니다.
#### 블록 최종성
Stable 블록체인은 StableBFT의 합의 메커니즘을 통해 빠른 최종성을 사용합니다. 블록이 커밋되면 즉시 최종화되며 재구성될 수 없습니다. 이는 `UnbondingCompleted` 이벤트를 받으면 영구적이라고 신뢰할 수 있음을 의미합니다.
확률적 최종성 체인에서처럼 여러 확인을 기다릴 필요가 없습니다. dApp은 이벤트를 받은 즉시 사용자 잔액을 업데이트하고 알림을 표시할 수 있습니다.
### 성능 및 제한 사항
#### 배치 크기 제약
각 블록은 시스템 트랜잭션을 통해 최대 100개의 언본딩 완료를 처리합니다. 이 제한은 높은 언본딩 활동 기간 동안 무제한 블록 크기를 방지하기 위해 존재합니다.
실제로 블록당 100개의 완료는 평균 블록 시간이 0.7초라고 가정할 때 분당 약 9000개의 완료 처리량을 제공합니다. 일반적인 스테이킹 활동은 이 제한에 거의 도달하지 않습니다. 예외적인 상황에서는 완료가 완전히 처리되기 전에 여러 블록 동안 큐에 대기할 수 있습니다.
#### Gas 소비
시스템 트랜잭션은 실행 중에 gas를 소비하며, 이는 블록의 gas 제한에서 고려됩니다. gas 비용은 처리되는 완료 수에 따라 선형적으로 증가합니다:
* 기본 함수 호출: 약 21,000 gas
* 이벤트 발생당: 약 3,000 gas
* 상태 읽기: 완료당 약 2,000 gas
100개의 완료로 구성된 전체 배치는 약 521,000 gas를 소비합니다. Stable의 블록 gas 제한이 100,000,000이므로 이는 사용 가능한 블록 공간의 0.6% 미만을 나타냅니다.
#### 알림 지연
블록 N 동안 언본딩 기간이 완료되면:
1. Stable 모듈의 `EndBlock`이 블록 N의 상태에서 완료를 큐에 넣습니다
2. 블록 N+1의 `PrepareProposal`이 시스템 트랜잭션을 생성합니다
3. 시스템 트랜잭션이 블록 N+1 동안 실행되어 이벤트를 발생시킵니다
이는 언본딩 완료와 EVM 이벤트 발생 사이에 1블록 지연(약 0.7초)이 있음을 의미합니다. 언본딩 기간 자체가 7일이기 때문에 이 지연은 허용 가능한 수준입니다.
#### 고부하 시나리오
언본딩 완료가 블록당 100개보다 빠르게 도착하면 큐에 누적됩니다. 큐는 FIFO 순서로 처리되므로 가장 오래된 완료가 항상 먼저 알림을 받습니다.
지속적인 고부하 동안 큐가 일시적으로 증가할 수 있습니다. 그러나 급증이 가라앉으면 완료가 적은 후속 블록이 점차 큐를 배출합니다. 시스템은 이벤트를 삭제하지 않고 급증을 처리하도록 설계되었습니다.
### 향후 확장
시스템 트랜잭션 메커니즘은 모든 Stable SDK 작업을 EVM 이벤트로 전달하는 일반적인 패턴을 제공합니다. 현재 언본딩 완료에만 사용되지만 아키텍처는 추가 사용 사례를 포괄하도록 확장될 수 있습니다.
#### 스테이킹 작업
언본딩 외에도 다른 스테이킹 이벤트가 EVM 알림을 발생시킬 수 있습니다:
* 검증자의 수수료율 변경
* 검증자 Jail 및 Unjail
#### 거버넌스 실행
거버넌스 제안이 통과되고 실행될 때 시스템 트랜잭션은 제안 ID 및 실행 결과와 함께 이벤트를 발생시킬 수 있습니다. 이를 통해 dApp은 거버넌스 모듈을 폴링하지 않고도 매개변수 변경 또는 업그레이드에 반응할 수 있습니다.
#### 일반 이벤트 브리지
이 패턴은 각 모듈이 어떤 SDK 이벤트를 EVM에 미러링해야 하는지 등록하는 구성 가능한 이벤트 브리지로 일반화될 수 있습니다. 이는 모듈별 커스텀 로직 없이 모든 Stable SDK 작업에 대한 포괄적인 가시성을 제공합니다. 핵심 아키텍처 원칙은 시스템 트랜잭션이 블록 제안 중에 검증자에 의해서만 생성되는 프로토콜 수준 기능으로 유지된다는 것입니다.
## 주요 기능
Stable은 USDT 기반 활동을 원활하게 지원하기 위해 설계된 고성능 블록체인입니다. **위임 지분증명 (dPoS)** 메커니즘 위에 구축된 Stable은 **완전한 EVM 호환성**을 제공하며, **1초 미만의 블록 생성 시간**을 통해 빠르고 신뢰성 높은 트랜잭션 완결성을 달성합니다. **USDT에 특화**된 네트워크인 Stable은 사용자 경험을 최적화하는 다양한 USDT 전용 기능을 제공합니다.
#### 주요 기능
* **1초 미만의 블록 완결성**: 단일 슬롯 완결성와 함께 1초 미만의 블록 타임을 달성합니다.
* **100% EVM 호환성**: Ethereum의 스마트 컨트랙트 및 툴링을 완벽히 지원합니다.
* **USDT를 가스 토큰으로 사용**: USDT0를 네이티브 가스 토큰으로 사용합니다. USDT0는 가스 결제와 가치 전송을 위한 네이티브 자산으로 동시에 기능하며, `approve`, `transfer`, `transferFrom`, `permit`을 지원하는 ERC20 토큰으로도 동작합니다.
* **USDT0 크로스체인 브릿지**: Ethereum, Arbitrum, HyperEVM 같은 EVM 체인뿐 아니라 Tron 등 다른 체인에서도 USDT0를 Stable로 브릿지할 수 있습니다.
* **Stable Pay을 통한 Web2.5 수준의 사용자 경험**: Stable Pay을 통해 직관적이고 원활한 사용자 경험을 제공합니다.
향후 Stable은 USDT의 활용성과 네트워크 효율을 더욱 높이기 위한 기능을 추가로 도입할 예정입니다. **USDT 전송 집계** 기능은 여러 개의 USDT 관련 트랜잭션을 하나의 번들로 묶어 처리량을 향상할 것이며, **보장된 블록스페이스**는 기관이 예측 가능하고 안정적인 환경에서 USDT를 사용할 수 있도록 지원할 것입니다. 이러한 업그레이드를 통해 Stable은 USDT의 중심지로 자리매김할 것입니다.
## 기술 개요
상태 데이터베이스, 실행, 합의부터 USDT 전용 최적화에 이르기까지, Stable은 성능, 확장성, 신뢰성을 중점으로 설계되었습니다. Stable 스택의 각 구성 요소는 높은 처리량을 요구하는 워크로드 및 네트워크 전반에서 USDT 중심의 원활한 운영을 위해 최적화되어 있습니다.
#### StableSystem 프리컴파일
StableSystem 프리컴파일은 `0x0000000000000000000000000000000000009999`에 있으며 EVM 이벤트를 발생시켜야 하는 프로토콜 수준 작업을 처리합니다. 현재 언본딩 완료 알림을 지원합니다.
```solidity
interface IStableSystem {
/// @notice 대기 중인 언본딩 완료를 처리하고 EVM 이벤트를 발생시킵니다
/// @param blockHeight 완료를 처리할 블록 높이
/// @dev 시스템 트랜잭션에서만 호출 가능 (from = 0x8888888888888888888888888888888888888888)
/// @dev 호출당 최대 100개의 완료를 처리
/// @dev 처리된 완료를 큐에서 자동으로 삭제
function notifyUnbondingCompletions(int64 blockHeight) external;
/// @notice 언본딩 작업이 완료될 때 발생
/// @param delegator 토큰을 위임한 주소
/// @param validator 토큰이 위임된 검증자 주소
/// @param amount 언본딩을 완료한 토큰 양 (uusdc 단위)
event UnbondingCompleted(
address indexed delegator,
address indexed validator,
uint256 amount
);
/// @notice 호출자가 권한이 없음 (시스템 트랜잭션 발신자가 아님)
error Unauthorized();
}
```
#### 시스템 트랜잭션 발신자
시스템 트랜잭션은 `0x8888888888888888888888888888888888888888`을 발신자 주소로 사용합니다. 이 주소는:
* 서명 검증이 필요 없음
* PrepareProposal에서 생성된 트랜잭션만 사용 가능
* 사용자나 컨트랙트가 위조할 수 없음
* SystemTxDecorator ante 핸들러를 통해 수수료 공제를 건너뜀
EVM은 `msg.sender == 0x8888888888888888888888888888888888888888`을 확인하여 시스템 트랜잭션을 인식합니다. 프리컴파일은 이를 사용하여 프로토콜 전용 작업을 제한할 수 있습니다.
#### 이벤트 기반 흐름
사용자의 언본딩 기간이 완료되면 다음과 같은 일이 발생합니다:
1. **Stable SDK 계층:** 스테이킹 모듈의 EndBlocker가 언본딩을 완료하고 위임자 주소, 검증자 주소 및 금액과 함께 EventTypeCompleteUnbonding을 발생시킵니다.
2. **감지:** x/stable 모듈의 EndBlocker는 스테이킹 이후에 실행되며 블록의 이벤트 로그에서 언본딩 이벤트를 스캔합니다. 각 완료에 대해 위임자 주소, 검증자 주소, 금액 및 블록 높이를 포함하는 항목을 상태에 큐에 넣습니다.
3. **시스템 트랜잭션 생성**: 다음 블록의 PrepareProposal에서 앱은 대기 중인 모든 완료를 쿼리합니다. 있는 경우 현재 블록 높이로 StableSystem.notifyUnbondingCompletions(blockHeight)를 호출하는 시스템 트랜잭션을 생성합니다. 이 트랜잭션은 사용자 트랜잭션보다 먼저 블록 앞에 배치됩니다.
4. **실행:** 블록 실행 중에 시스템 트랜잭션이 먼저 실행됩니다. 프리컴파일은 해당 블록 높이에서 대기 중인 완료에 대한 상태를 쿼리하고, 각 완료에 대해 UnbondingCompleted 이벤트를 발생시키며(최대 100개), 큐에서 삭제합니다.
5. **EVM 가시성:** 이벤트는 트랜잭션 영수증과 로그에 나타나며, eth\_getLogs 쿼리, 블록 탐색기 및 StableSystem 프리컴파일을 모니터링하는 모든 애플리케이션에 표시됩니다.
#### 배치 처리
블록이 너무 커지는 것을 방지하기 위해 시스템은 블록당 최대 100개의 언본딩 완료를 처리합니다. 150개의 완료가 큐에 들어가면:
* 블록 N: 완료 0-99를 처리하는 시스템 트랜잭션 생성
* 블록 N+1: 완료 100-149를 처리하는 시스템 트랜잭션 생성
프리컴파일은 calldata에서 완료 데이터를 받는 대신 상태를 직접 쿼리합니다. 이렇게 하면 트랜잭션 크기를 예측 가능하게 유지하고 데이터를 비싼 calldata에서 더 저렴한 상태 읽기로 이동합니다.
### 사용 예시
가장 일반적인 사용 사례는 언본딩 기간이 완료될 때 사용자에게 알려야 하는 스테이킹 대시보드입니다. 다음은 언본딩 완료 리스너를 설정하는 방법입니다.
```javascript
import { ethers } from 'ethers';
// StableSystem 프리컴파일 주소
const STABLE_SYSTEM_ADDRESS = '0x0000000000000000000000000000000000009999';
// UnbondingCompleted 이벤트의 ABI
const STABLE_SYSTEM_ABI = [
'event UnbondingCompleted(address indexed delegator, address indexed validator, uint256 amount)'
];
// Stable 네트워크에 연결
const provider = new ethers.JsonRpcProvider('https://rpc.testnet.stable.xyz');
const stableSystem = new ethers.Contract(
STABLE_SYSTEM_ADDRESS,
STABLE_SYSTEM_ABI,
provider
);
// 모든 언본딩 완료 구독
stableSystem.on('UnbondingCompleted', (delegator, validator, amount, event) => {
console.log('언본딩 완료!');
console.log('위임자:', delegator);
console.log('검증자:', validator);
console.log('금액:', ethers.formatEther(amount), '토큰');
console.log('블록:', event.log.blockNumber);
console.log('트랜잭션 해시:', event.log.transactionHash);
});
```
이 리스너는 사용자의 언본딩이 완료될 때마다 실행됩니다. 프로덕션 dApp의 경우 일반적으로 특정 사용자에 대한 이벤트를 필터링합니다.
#### 특정 사용자에 대한 이벤트 필터링
특정 위임자 주소에 대한 이벤트만 받으려면 인덱싱된 이벤트 매개변수를 사용하여 필터를 만듭니다:
```javascript
// 특정 사용자의 언본딩만 감시
const userAddress = '0xabcd...';
const filter = stableSystem.filters.UnbondingCompleted(userAddress);
stableSystem.on(filter, (delegator, validator, amount, event) => {
// 지정된 사용자의 언본딩에 대해서만 실행됨
showNotification(`${ethers.formatEther(amount)} 토큰의 언본딩이 완료되었습니다!`);
refreshUserBalance(userAddress);
});
```
검증자별 대시보드를 구축하는 경우 검증자별로 필터링할 수도 있습니다:
```javascript
// 특정 검증자의 모든 언본딩 감시
const validatorAddress = '0x1234...';
const validatorFilter = stableSystem.filters.UnbondingCompleted(null, validatorAddress);
stableSystem.on(validatorFilter, (delegator, validator, amount) => {
updateValidatorStats(validator, amount);
});
```
#### 과거 이벤트 쿼리
dApp에서 과거 언본딩 완료 기록을 표시해야 하는 경우 블록 범위가 있는 이벤트 필터를 사용하여 과거 이벤트를 쿼리할 수 있습니다:
```javascript
// 최근 1000개 블록에서 사용자의 모든 언본딩 가져오기
const currentBlock = await provider.getBlockNumber();
const filter = stableSystem.filters.UnbondingCompleted(userAddress);
const events = await stableSystem.queryFilter(
filter,
currentBlock - 1000,
currentBlock
);
const unbondingHistory = events.map(event => ({
delegator: event.args.delegator,
validator: event.args.validator,
amount: ethers.formatEther(event.args.amount),
blockNumber: event.blockNumber,
txHash: event.transactionHash
}));
console.log('최근 언본딩:', unbondingHistory);
```
### 통합 가이드
#### 단계 1: Stable System 컨트랙트 인터페이스 추가
먼저 StableSystem 프리컴파일 인터페이스를 프로젝트에 추가합니다. Foundry 또는 Hardhat을 사용하는 경우 새 인터페이스 파일을 생성합니다:
```solidity
interface IStableSystem {
event UnbondingCompleted(
address indexed delegator,
address indexed validator,
uint256 amount
);
}
```
Solidity 컨트랙트 없이 순수 프론트엔드 dApp을 구축하는 경우 이벤트에 대한 ABI 조각만 필요합니다:
```javascript
const STABLE_SYSTEM_ABI = [
'event UnbondingCompleted(address indexed delegator, address indexed validator, uint256 amount)'
];
```
#### 단계 2: 이벤트 리스너 설정
ethers.js provider를 초기화하고 StableSystem 프리컴파일 주소를 가리키는 컨트랙트 인스턴스를 생성합니다. 프리컴파일은 Stable 테스트넷과 메인넷 모두에서 항상 `0x00000000000....0000009999`에 배포됩니다.
*참고: 프리컴파일은 아직 Stable 메인넷에 배포되지 않았으며 v1.2.0 업그레이드 후에 제공됩니다.*
```javascript
const provider = new ethers.JsonRpcProvider(RPC_URL);
const stableSystem = new ethers.Contract(
'0x0000000000000000000000000000000000009999',
STABLE_SYSTEM_ABI,
provider
);
```
#### 단계 3: 애플리케이션 로직에서 이벤트 처리
이벤트를 구독하고 애플리케이션 상태를 그에 따라 업데이트합니다. 일반적인 패턴은 다음과 같습니다:
* **잔액 업데이트**: 언본딩이 완료되면 사용자의 토큰 잔액을 새로 고침
* **알림 시스템**: 사용자의 언본딩이 완료될 때 토스트 알림 표시
* **대시보드 통계**: 실시간으로 스테이킹 지표 및 차트 업데이트
* **트랜잭션 기록**: 완료된 언본딩을 사용자의 활동 피드에 추가
#### 단계 4: 연결 문제 처리
이벤트 구독은 지속적인 websocket 연결에 의존하므로 프로덕션 dApp을 위한 재연결 로직을 구현합니다:
```javascript
let reconnectAttempts = 0;
const MAX_RECONNECT_ATTEMPTS = 5;
function setupEventListener() {
const provider = new ethers.WebSocketProvider('wss://rpc.testnet.stable.xyz');
provider.on('error', (error) => {
console.error('Provider 오류:', error);
if (reconnectAttempts < MAX_RECONNECT_ATTEMPTS) {
reconnectAttempts++;
setTimeout(() => setupEventListener(), 5000);
}
});
const stableSystem = new ethers.Contract(
'0x0000000000000000000000000000000000009999',
STABLE_SYSTEM_ABI,
provider
);
stableSystem.on('UnbondingCompleted', handleUnbonding);
}
```
### 왜 이 방법인가?
#### 커스텀 인덱서와 비교
이전에는 Stable SDK가 dApp 개발자에게 SDK 이벤트를 감시하고 데이터베이스에 저장하는 커스텀 인덱서를 실행하도록 요구했습니다. 이는 운영 오버헤드를 추가하고 잠재적인 실패 지점을 도입합니다.
시스템 트랜잭션을 사용하면 별도의 인덱서 인프라가 필요하지 않습니다. 이벤트는 모든 RPC 노드가 이미 인덱싱하고 제공하는 EVM의 로그 시스템을 통해 기본적으로 사용할 수 있습니다. 모든 표준 web3 라이브러리는 추가 도구 없이 이러한 이벤트를 구독할 수 있습니다.
#### SDK 엔드포인트 폴링과 비교
시스템 트랜잭션이 없으면 EVM dApp은 언본딩 기간이 완료되었는지 확인하기 위해 주기적으로 Stable SDK REST 엔드포인트를 호출해야 합니다. 이는 여러 문제를 야기합니다:
* **지연 시간 증가**: 5-10초의 폴링 간격은 사용자가 업데이트를 보기 전에 그만큼 기다려야 함을 의미합니다
* **더 높은 부하**: 모든 dApp 인스턴스의 엔드포인트 폴링은 RPC 인프라의 부하를 증가시킵니다
* **복잡성**: dApp은 web3 프로바이더(EVM 상호 작용용)와 Stable SDK REST 클라이언트(SDK 쿼리용)를 모두 처리해야 합니다
* **실시간 업데이트 없음**: 폴링은 본질적으로 즉각적인 알림을 제공할 수 없습니다
시스템 트랜잭션은 dApp이 이미 EVM 상호 작용에 사용하는 동일한 websocket 연결을 통해 실시간 이벤트 알림을 제공합니다. 이는 개발자 경험을 단순화하고 인프라 비용을 줄입니다.
### 보안 보증
#### 무신뢰 이벤트 발생
시스템 트랜잭션은 검증자만 실행할 수 있는 `PrepareProposal` ABCI 단계에서 생성됩니다. 사용자가 제출한 트랜잭션은 EVM의 상태 전환 로직이 StableSystem 프리컴파일 주소로의 트랜잭션만 서명 검증을 건너뛸 수 있도록 강제하기 때문에 시스템 발신자 주소(`0x8888888888888888888888888888888888888888`)를 위조할 수 없습니다.
이것은 다음을 의미합니다:
* 사용자는 언본딩 완료 이벤트를 위조할 수 없습니다
* 사용자는 자신의 트랜잭션에서 `notifyUnbondingCompletions`을 호출할 수 없습니다
* `UnbondingCompleted` 이벤트를 발생시키는 유일한 방법은 Stable SDK 스테이킹 모듈에서 실제로 언본딩을 완료하는 것입니다
#### 추가 신뢰 가정 없음
시스템 트랜잭션은 블록체인 합의에 이미 필요한 것 이상의 새로운 보안 가정을 도입하지 않습니다. 검증자가 블록을 올바르게 실행하고 있다고 신뢰한다면 시스템 트랜잭션 이벤트가 Stable SDK 상태 변경을 정확하게 반영한다고 신뢰할 수 있습니다.
이벤트 발생 프로세스는 결정론적입니다: `EndBlock`에서 동일한 SDK 이벤트가 주어지면 모든 정직한 검증자는 `PrepareProposal` 중에 동일한 시스템 트랜잭션을 생성합니다. 합의 메커니즘은 검증자가 포함할 시스템 트랜잭션에 대해 합의하도록 보장합니다.
#### 블록 최종성
Stable 블록체인은 StableBFT의 합의 메커니즘을 통해 빠른 최종성을 사용합니다. 블록이 커밋되면 즉시 최종화되며 재구성될 수 없습니다. 이는 `UnbondingCompleted` 이벤트를 받으면 영구적이라고 신뢰할 수 있음을 의미합니다.
확률적 최종성 체인에서처럼 여러 확인을 기다릴 필요가 없습니다. dApp은 이벤트를 받은 즉시 사용자 잔액을 업데이트하고 알림을 표시할 수 있습니다.
### 성능 및 제한 사항
#### 배치 크기 제약
각 블록은 시스템 트랜잭션을 통해 최대 100개의 언본딩 완료를 처리합니다. 이 제한은 높은 언본딩 활동 기간 동안 무제한 블록 크기를 방지하기 위해 존재합니다.
실제로 블록당 100개의 완료는 평균 블록 시간이 0.7초라고 가정할 때 분당 약 9000개의 완료 처리량을 제공합니다. 일반적인 스테이킹 활동은 이 제한에 거의 도달하지 않습니다. 예외적인 상황에서는 완료가 완전히 처리되기 전에 여러 블록 동안 큐에 대기할 수 있습니다.
#### Gas 소비
시스템 트랜잭션은 실행 중에 gas를 소비하며, 이는 블록의 gas 제한에서 고려됩니다. gas 비용은 처리되는 완료 수에 따라 선형적으로 증가합니다:
* 기본 함수 호출: 약 21,000 gas
* 이벤트 발생당: 약 3,000 gas
* 상태 읽기: 완료당 약 2,000 gas
100개의 완료로 구성된 전체 배치는 약 521,000 gas를 소비합니다. Stable의 블록 gas 제한이 100,000,000이므로 이는 사용 가능한 블록 공간의 0.6% 미만을 나타냅니다.
#### 알림 지연
블록 N 동안 언본딩 기간이 완료되면:
1. Stable 모듈의 `EndBlock`이 블록 N의 상태에서 완료를 큐에 넣습니다
2. 블록 N+1의 `PrepareProposal`이 시스템 트랜잭션을 생성합니다
3. 시스템 트랜잭션이 블록 N+1 동안 실행되어 이벤트를 발생시킵니다
이는 언본딩 완료와 EVM 이벤트 발생 사이에 1블록 지연(약 0.7초)이 있음을 의미합니다. 언본딩 기간 자체가 7일이기 때문에 이 지연은 허용 가능한 수준입니다.
#### 고부하 시나리오
언본딩 완료가 블록당 100개보다 빠르게 도착하면 큐에 누적됩니다. 큐는 FIFO 순서로 처리되므로 가장 오래된 완료가 항상 먼저 알림을 받습니다.
지속적인 고부하 동안 큐가 일시적으로 증가할 수 있습니다. 그러나 급증이 가라앉으면 완료가 적은 후속 블록이 점차 큐를 배출합니다. 시스템은 이벤트를 삭제하지 않고 급증을 처리하도록 설계되었습니다.
### 향후 확장
시스템 트랜잭션 메커니즘은 모든 Stable SDK 작업을 EVM 이벤트로 전달하는 일반적인 패턴을 제공합니다. 현재 언본딩 완료에만 사용되지만 아키텍처는 추가 사용 사례를 포괄하도록 확장될 수 있습니다.
#### 스테이킹 작업
언본딩 외에도 다른 스테이킹 이벤트가 EVM 알림을 발생시킬 수 있습니다:
* 검증자의 수수료율 변경
* 검증자 Jail 및 Unjail
#### 거버넌스 실행
거버넌스 제안이 통과되고 실행될 때 시스템 트랜잭션은 제안 ID 및 실행 결과와 함께 이벤트를 발생시킬 수 있습니다. 이를 통해 dApp은 거버넌스 모듈을 폴링하지 않고도 매개변수 변경 또는 업그레이드에 반응할 수 있습니다.
#### 일반 이벤트 브리지
이 패턴은 각 모듈이 어떤 SDK 이벤트를 EVM에 미러링해야 하는지 등록하는 구성 가능한 이벤트 브리지로 일반화될 수 있습니다. 이는 모듈별 커스텀 로직 없이 모든 Stable SDK 작업에 대한 포괄적인 가시성을 제공합니다. 핵심 아키텍처 원칙은 시스템 트랜잭션이 블록 제안 중에 검증자에 의해서만 생성되는 프로토콜 수준 기능으로 유지된다는 것입니다.
## 주요 기능
Stable은 USDT 기반 활동을 원활하게 지원하기 위해 설계된 고성능 블록체인입니다. **위임 지분증명 (dPoS)** 메커니즘 위에 구축된 Stable은 **완전한 EVM 호환성**을 제공하며, **1초 미만의 블록 생성 시간**을 통해 빠르고 신뢰성 높은 트랜잭션 완결성을 달성합니다. **USDT에 특화**된 네트워크인 Stable은 사용자 경험을 최적화하는 다양한 USDT 전용 기능을 제공합니다.
#### 주요 기능
* **1초 미만의 블록 완결성**: 단일 슬롯 완결성와 함께 1초 미만의 블록 타임을 달성합니다.
* **100% EVM 호환성**: Ethereum의 스마트 컨트랙트 및 툴링을 완벽히 지원합니다.
* **USDT를 가스 토큰으로 사용**: USDT0를 네이티브 가스 토큰으로 사용합니다. USDT0는 가스 결제와 가치 전송을 위한 네이티브 자산으로 동시에 기능하며, `approve`, `transfer`, `transferFrom`, `permit`을 지원하는 ERC20 토큰으로도 동작합니다.
* **USDT0 크로스체인 브릿지**: Ethereum, Arbitrum, HyperEVM 같은 EVM 체인뿐 아니라 Tron 등 다른 체인에서도 USDT0를 Stable로 브릿지할 수 있습니다.
* **Stable Pay을 통한 Web2.5 수준의 사용자 경험**: Stable Pay을 통해 직관적이고 원활한 사용자 경험을 제공합니다.
향후 Stable은 USDT의 활용성과 네트워크 효율을 더욱 높이기 위한 기능을 추가로 도입할 예정입니다. **USDT 전송 집계** 기능은 여러 개의 USDT 관련 트랜잭션을 하나의 번들로 묶어 처리량을 향상할 것이며, **보장된 블록스페이스**는 기관이 예측 가능하고 안정적인 환경에서 USDT를 사용할 수 있도록 지원할 것입니다. 이러한 업그레이드를 통해 Stable은 USDT의 중심지로 자리매김할 것입니다.
## 기술 개요
상태 데이터베이스, 실행, 합의부터 USDT 전용 최적화에 이르기까지, Stable은 성능, 확장성, 신뢰성을 중점으로 설계되었습니다. Stable 스택의 각 구성 요소는 높은 처리량을 요구하는 워크로드 및 네트워크 전반에서 USDT 중심의 원활한 운영을 위해 최적화되어 있습니다.
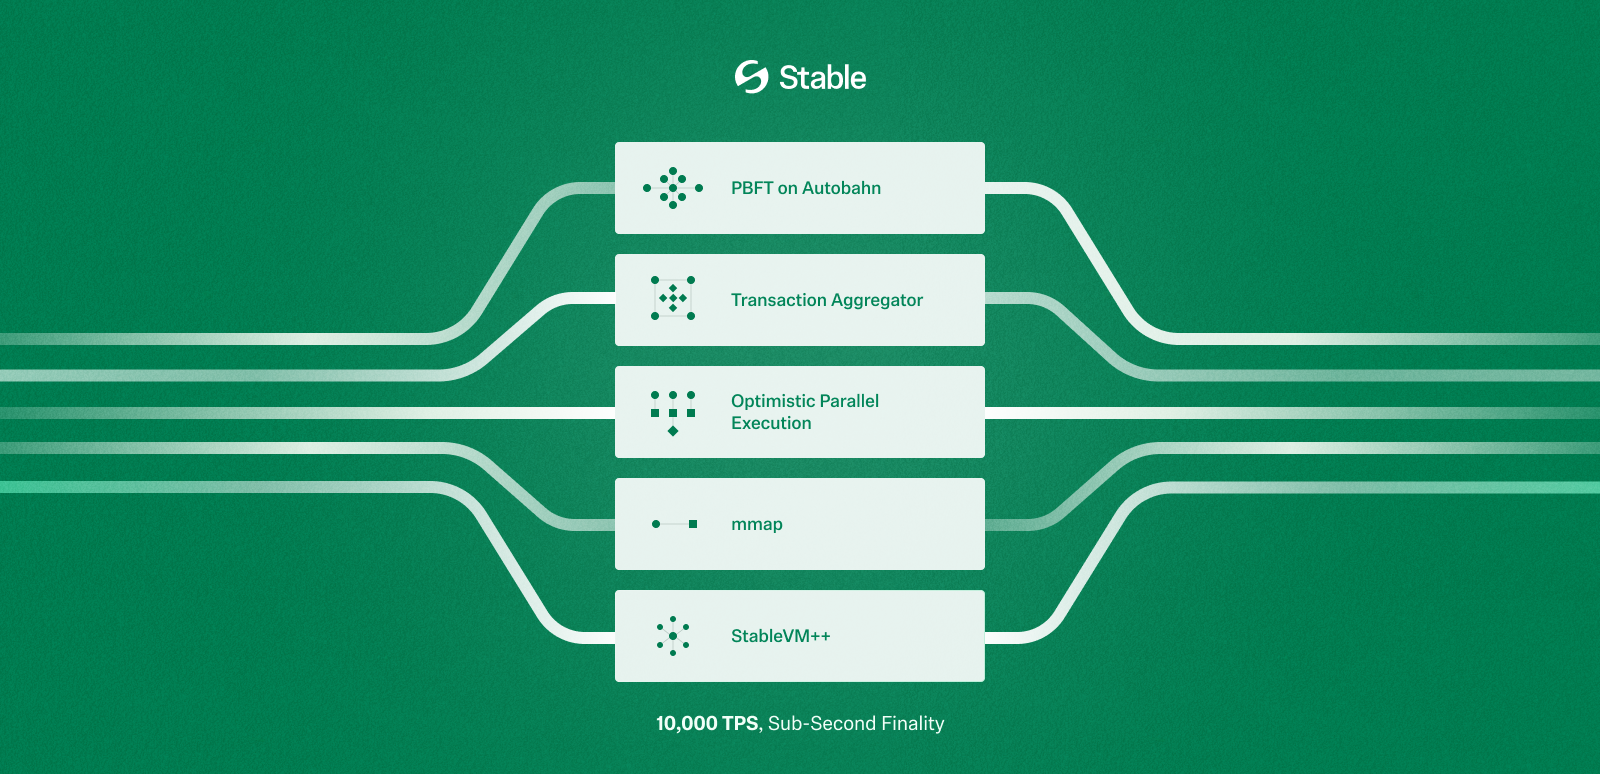 ### StableBFT
초기 Stable 블록체인은 CometBFT 기반의 맞춤형 PoS 합의 프로토콜인 **StableBFT**를 활용하여, 네트워크 전반에 걸친 높은 처리량, 낮은 지연 시간, 강력한 신뢰성을 보장합니다. 합의 성능을 더욱 최적화하기 위해, Stable은 데이터 전파와 합의 과정을 분리하고, 트랜잭션을 블록 프로포저에게 직접 브로드캐스트하는 방식을 도입할 계획입니다.
합의를 획기적으로 가속화하기 위해 Stable은 DAG 기반 **Autobahn**으로의 프로토콜 업그레이드를 계획하고 있습니다. Autobahn을 기반으로 구축된 StableBFT는 다음을 가능케 합니다:
* 단일 리더 제한 제거를 통한 프로포절 병렬 처리
* 데이터 전파와 트랜잭션 순서 정렬을 분리하여 더 빠른 완결성 달성
* 강력한 BFT 메커니즘을 통한 네트워크 장애에 대한 높은 복원력
### Stable EVM
**Stable EVM**은 Stable의 이더리움 호환 실행 계층으로, 기존 이더리움 툴 및 지갑을 사용해 체인과 원활히 상호작용할 수 있도록 합니다. Stable EVM은 StableSDK와의 연결을 위해 일련의 프리컴파일을 도입하여, EVM 스마트 컨트랙트가 핵심 체인 로직에 안전하고 아토믹하게 접근할 수 있도록 지원합니다.
Stable은 EVM 실행 성능을 극대화하기 위해 StableVM++를 도입할 예정이며, 이는 EVMONE과 같은 대체 EVM 구현체와 Block-STM 기반의 낙관적 병렬 실행 엔진을 통합합니다.
### StableDB
**상태: v1.4.0 업그레이드에서 출시**
Stable은 각 블록 생성 후 디스크 저장이 느리다는 주요 병목 현상을 해결함으로써 블록체인 속도를 개선합니다. Stable은 상태 커밋과 상태 저장을 분리하여, 블록 처리를 지연 없이 진행할 수 있도록 합니다. `mmap` 기반의 `MemDB` 및 `VersionDB`를 통해 최근 데이터는 메모리에서 처리하고, 이전 데이터는 디스크에 효율적으로 저장하여 전체 처리량을 높일 수 있습니다.
### 고성능 RPC
아무리 블록체인이 빠르더라도, RPC 레이어가 느리다면 사용자 경험이 망가질 수 있습니다. Stable은 기존 모놀리틱 RPC 구조가 리소스 충돌 및 확장성 부족 문제를 일으킬 수 있다는 점을 인식하고, 이를 재설계했습니다. Stable은 기능별로 작업 경로를 분리한 split-path 아키텍처를 도입하며, 가벼우면서도 특화된 RPC 노드를 통해 응답 시간을 크게 단축합니다.
향후 EVM 내 view 호출에 최적화된 RPC 노드 및 네이티브 인덱서를 통합하여, dApp의 온체인 데이터 접근 속도를 더욱 향상시킬 예정입니다.
## 기밀 전송
기업들 사이에서 블록체인 채택이 특히 스테이블코인 분야에서 가속화됨에 따라, 트랜잭션 프라이버시에 대한 수요도 점점 증가하고 있습니다. 기업들은 종종 결제 금액과 같은 민감한 데이터를 보호하기 위해 금융 운영에서 기밀성을 요구합니다. 이러한 요구를 해결하기 위해 Stable은 프라이버시 요구와 규제 준수라는 두 가지 필수 요소의 균형을 맞춘 기밀 전송 메커니즘을 개발 중입니다.
Stable은 영지식(ZK) 암호 기술을 활용하여 트랜잭션 금액을 온체인에 공개하지 않고도 토큰을 전송할 수 있도록 하는 기밀 전송 레이어를 구축하고 있습니다. 전송 금액은 비공개로 유지되는 반면, 송신자와 수신자의 주소는 공개된 상태로 유지되어 금융 규제 및 감사 가능성을 확보합니다.
보호된 트랜잭션 금액은 해당 거래 당사자 및 인가된 규제 감사인만 접근할 수 있어, 프라이버시 확보가 법적 투명성을 희생하지 않도록 보장합니다.
## 보장된 블록스페이스
### 비즈니스를 위한 스테이블코인 결제 필요성
스테이블코인이 지속적으로 진화함에 따라, 점점 더 많은 기업들이 이를 결제, 재무 흐름, 국경 간 정산 등 금융 운영에 통합하고 있습니다. 이러한 변화는 특히 안정적인 명목 화폐 접근이 제한된 지역에서 두드러집니다. 아프리카 및 라틴 아메리카와 같은 시장에서는 인플레이션과 환율 통제가 일반적이기 때문에, 스테이블코인은 운영 안정성을 위한 핵심 도구가 되고 있습니다.
오늘날 스테이블코인 트랜잭션은 주로 Ethereum, Solana, Tron과 같은 범용 블록체인에서 발생합니다. 이러한 네트워크는 넓은 composability와 스마트 컨트랙트 지원을 제공하지만, 수수료 예측 가능성이나 실행 보장을 염두에 두고 설계되지 않았습니다.
* **Ethereum**: 2022년 5월 1일, Yuga Labs의 “Otherside” NFT 민팅은 Ethereum에서 2억 달러 이상의 가스 수수료가 소각되도록 만들었습니다. 최고 가스는 8,000 gwei를 초과했고, 네트워크 전반에 걸쳐 불안정하고 비결정적인 트랜잭션 비용이 발생했습니다.
* **기타 네트워크**: Solana, Base와 같은 저수수료 네트워크에서는 MEV와 차익 거래 기회가 존재함에 따라 대량의 트랜잭션 스팸이 유입됩니다. 이러한 네트워크는 온체인 가치를 포착하려는 봇들로 인해 과부하 상태를 자주 경험하고, 합법적인 사용자에게 네트워크 혼잡 및 성능 저하를 초래합니다.
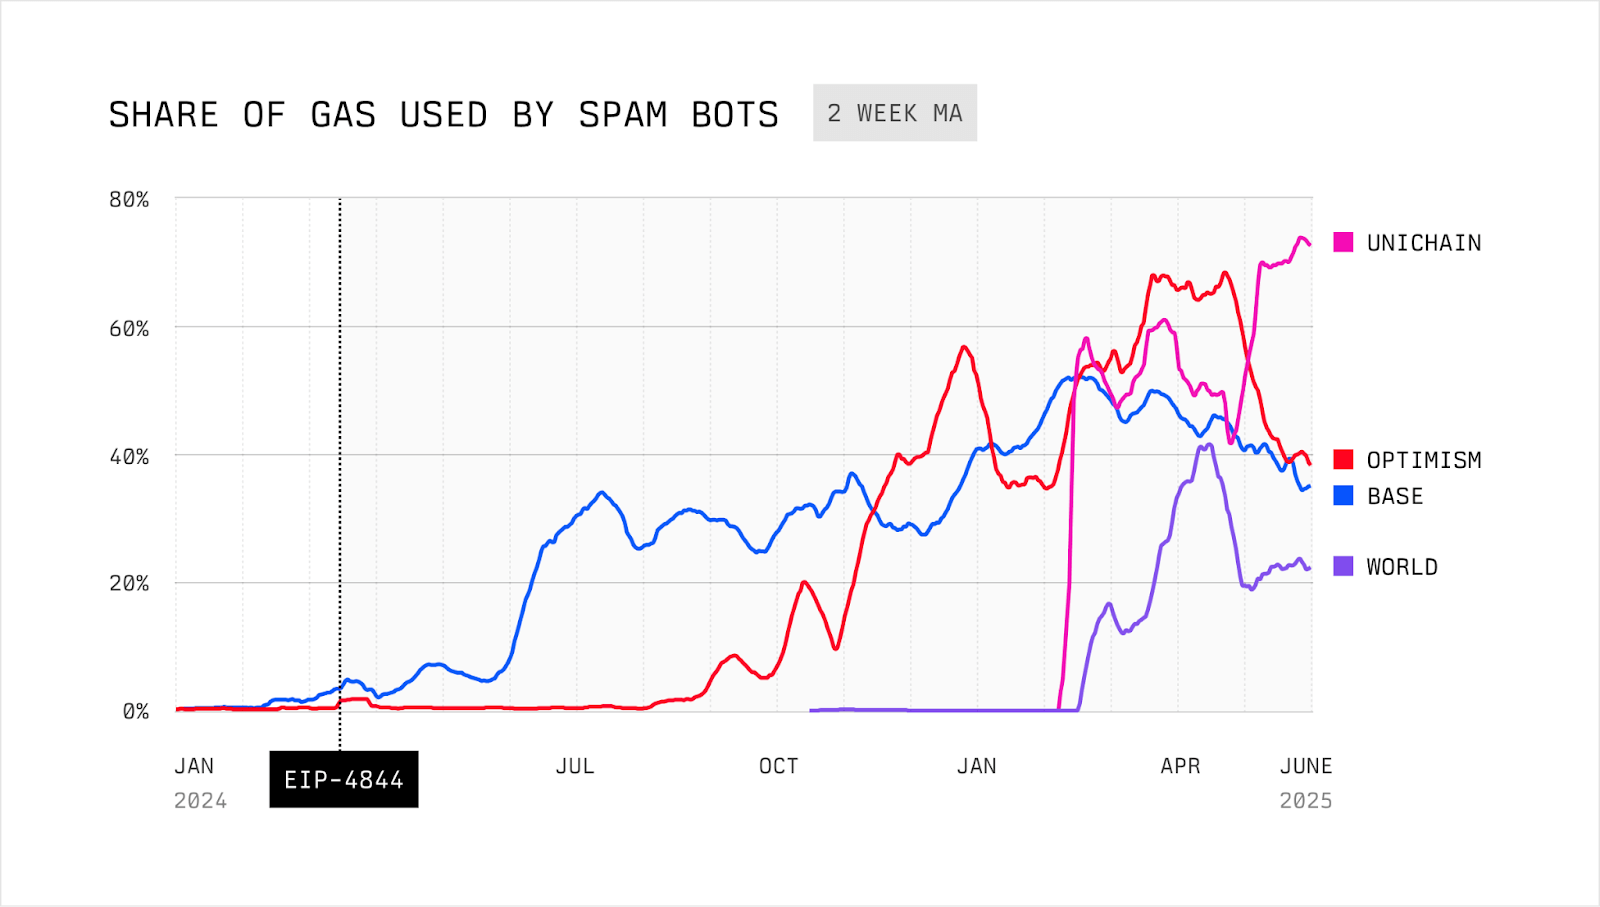
*Source: MEV and the Limits of Scaling by Flashbots and Rober Miller*
기업이 대규모로 스테이블코인 결제를 채택하려면, 그 기반 인프라는 결제 신뢰성을 위해 최적화되어야 합니다. 이를 위해서는 모든 조건에서 예측 가능한 트랜잭션 지연 시간과 수수료 안정성이 필요합니다. 이러한 보장이 없다면, 범용 체인에서의 스테이블코인 결제는 여전히 신뢰할 수 없는 상태로 남게 됩니다.
### 보장된 블록스페이스
기업의 안정적이고 신뢰 가능한 결제 운영을 보장하기 위해, Stable은 보장된 블록스페이스에 대한 지원을 도입할 예정입니다.
보장된 블록스페이스는 기업에 고정된 블록 용량을 보장하는 전용 블록 공간 할당 모델로, 네트워크 전반의 상태와 무관하게 적용됩니다. 이를 통해 급여 지급, 정산, 공급업체 결제 등 미션 크리티컬한 트랜잭션이 예측 가능한 지연 시간과 비용으로 실행될 수 있습니다.
이 보장은 다음과 같은 인프라를 통해 강제됩니다:
* **보장된 멤풀**: 밸리데이터는 퍼블릭 트래픽과 분리된 전용 멤풀을 운영하며, 여기서 가져온 보장된 트랜잭션들을 우선적으로 처리합니다.
* **밸리데이터 단의 커스터마이제이션**: 밸리데이터는 사전에 정의된 만큼의 블록 공간을 예약하여, 결정론적인 포함을 보장합니다.
* **전용 RPC 노드**: 보장된 블록스페이스 API는 격리된 RPC 엔드포인트를 통해 트랜잭션을 라우팅하여, 충돌을 줄이고 일관된 처리량을 제공합니다.
보장된 블록스페이스는 사용자에게 다음과 같은 이점을 제공합니다:
* 전용 업로드 경로를 통한 독점적 트랜잭션 라우팅으로 블록 공간에 우선 접근
* 네트워크 혼잡 여부와 관계없이 모든 블록에 예약된 용량을 확보하여 보장된 실행
* 밸리데이터의 개방성이나 네트워크 참여에 대한 타협 없이 탈중앙화를 유지
* 높은 네트워크 부하 상황에서도 비즈니스에서 중요한 작업들에 대한 안정적인 온체인 성능
## 개요
### USDT 특화 기능
Stable은 USDT를 위해 제작된 레이어 1 블록체인입니다. 프로토콜의 모든 구성 요소는 USDT 전송에서의 마찰을 최소화하고, 세계에서 가장 많이 사용되는 스테이블코인에 특화된 고성능 환경을 제공하기 위해 설계되었습니다.
핵심 인프라와 더불어, Stable은 전반적인 사용자 경험을 향상하기 위해 USDT에 특화된 여러 가지 기능들을 제공합니다:
* **USDT를 가스 토큰으로 사용**: USDT0를 네이티브 가스 토큰으로 사용합니다. USDT0는 가스 결제와 가치 전송을 위한 네이티브 자산으로 동시에 기능하며, `approve`, `transfer`, `transferFrom`, `permit`을 지원하는 ERC20 토큰으로도 동작합니다.
* **보장된 블록스페이스:** 보장된 블록스페이스는 기관들에게 블록 용량의 일부를 고정적으로 보장해주기 위한 전용 블록스페이스 할당 모델입니다. 이를 통해 기관들은 트랜잭션의 레이턴시와 비용을 쉽게 예상할 수 있습니다.
* **USDT 전송 집계**: USDT0 전송을 분리 및 집계하여, 공정성을 훼손하거나 다른 트랜잭션에 영향을 주지 않으면서 처리량을 극대화하는 특수 메커니즘입니다.
* **기밀 전송**: Stable은 ZK 암호화 기술을 활용하여, 송신자 및 수신자의 주소는 온체인에서 그대로 보이되 금액은 숨겨지는 프라이빗 USDT 전송 기능을 도입할 계획입니다. 이로써 규제 준수 및 감사 가능성을 유지하면서 프라이버시를 확보할 수 있습니다.
## USDT as Gas
Stable은 USDT 스테이블코인을 중심으로 구축되었습니다. USDT의 옴니체인 표현인 USDT0은 Stable 생태계를 지원하는 핵심 자산입니다.
### 요약
Stable은 USDT0을 네이티브 가스 토큰으로 사용하는 EVM 호환 블록체인입니다. USDT0은 가스 지불 및 가치 전송을 위한 네이티브 자산이면서 동시에 `approve`, `transfer`, `transferFrom` 및 `permit`를 지원하는 ERC20 토큰으로 기능합니다.
이 설계는 예측 가능한 달러 표시 트랜잭션 비용을 가능하게 하고 사용자 경험을 단순화합니다. 그러나 이는 잔액 의미론, 허용 안전성 및 특정 opcode 가정에 영향을 미치는 이더리움과의 행동 차이를 도입합니다.
본 문서는 Stable의 USDT0 가스 메커니즘을 명시하고, 결과적인 행동 차이를 설명하며, Stable에 배포된 스마트 컨트랙트에 필요하고 권장되는 개발 패턴을 정의합니다.
### 버전 참고사항
Stable v1.2.0에서 USDT0이 gUSDT를 대체하여 Stable의 네이티브 가스 토큰이 됩니다. 이 전환의 일부로:
* gUSDT가 폐지됩니다.
* 기존 gUSDT 잔액이 자동으로 USDT0으로 전환됩니다.
* 사용자와 애플리케이션은 더 이상 수수료를 지불하거나 가치를 이동하기 위해 래핑 및 언래핑 플로우가 필요하지 않습니다.
v1.2.0 이후 USDT0은 다음 두 가지 역할을 합니다:
* 네트워크 수수료 자산(가스), 그리고
* `approve`, `permit`, `transfer` 및 `transferFrom`을 갖춘 표준 ERC20 토큰.
### 네트워크 주소
USDT0 토큰 컨트랙트 주소:
* 테스트넷: [0x78cf24370174180738c5b8e352b6d14c83a6c9a9](https://testnet.stablescan.xyz/token/0x78cf24370174180738c5b8e352b6d14c83a6c9a9)
* 메인넷: [0x779ded0c9e1022225f8e0630b35a9b54be713736](https://stablescan.xyz/token/0x779ded0c9e1022225f8e0630b35a9b54be713736)
### 용어
* **Stable**: USDT0이 네이티브 가스 토큰인 EVM 호환 블록체인.
* **USDT0**: USDT의 옴니체인 버전으로 다음 두 가지로 기능합니다:
* 가스 및 가치 전송에 사용되는 네이티브 자산, 그리고
* approve 및 permit 기능을 가진 ERC20 토큰.
* **네이티브 잔액**: `address(x).balance`로 반환되는 USDT0으로 표시된 잔액.
* **가스 수수료**: EIP-1559 스타일 수수료 시장에서 계산된 USDT0으로 지불하는 트랜잭션 수수료.
### USDT0이란 무엇인가?
USDT0은 LayerZero의 옴니체인 대체 가능 토큰 (OFT) 표준을 사용하는 USDT의 옴니체인 표현입니다. USDT0은 USDT와 1:1로 페깅되어 있으며 전통적인 브리지 워크플로우나 래핑된 표현 없이 여러 블록체인을 이동하도록 설계되었습니다.
체인 간에 USDT0을 전송할 때, 토큰은 일부 소스 체인에서 잠기거나(체인의 네이티브 USDT 지원에 따라) 소각된 후 LayerZero의 크로스체인 메시징을 통해 목적지 체인에서 발행됩니다. 이는 1:1 페그를 유지하면서 유동성을 분산된 체인 로컬 풀이 아닌 단일 상호 운용 가능한 자산으로 통합합니다.
사용자에게 이는 더 빠른 온보딩, 운영 복잡성 감소 및 향상된 유동성 이동성을 가능하게 합니다.
### USDT0과 Stable
USDT0은 Stable의 온체인 경제와 일상적인 사용을 지원하는 핵심 자산입니다. 동일한 자산이 수수료 지불과 가치 전송 모두에 사용되기 때문에 Stable은 다음에 대한 마찰을 줄입니다:
* **일반 사용자**: 더 간단한 온보딩과 더 적은 토큰 개념
* **개발자**: 더 간단한 수수료 및 가치 흐름
* **기업**: 단순화된 회계 및 재무 운영
Stable은 또한 사용자가 LayerZero를 통해 다른 네트워크에서 USDT0을 온보딩할 수 있도록 하여 첫날부터 깊은 USDT 유동성에 액세스할 수 있습니다.
### 가정 및 전제 조건
아래 내용의 경우 독자는 다음을 이해해야 합니다:
* Solidity 실행 의미론 및 네이티브 가치 전송
* ERC20 허용 메커니즘 및 허가 플로우
* Checks-Effects-Interactions를 포함한 표준 스마트 컨트랙트 보안 패턴
### 1. 가스 및 수수료 모델
#### 1.1 개요
Stable은 모든 트랜잭션 수수료를 USDT0으로 표시합니다. 가스 가격 책정은 동적으로 조정되는 기본 수수료가 있는 EIP-1559 스타일 모델을 따릅니다.
트랜잭션 수수료는 다음과 같이 정의됩니다:
```
fee = gasUsed × baseFee
```
트랜잭션은 표준 EIP-1559 매개변수를 사용하여 `maxFeePerGas`를 지정할 수 있습니다.
*참고: Stable은 우선순위 팁을 지원하지 않습니다. `maxPriorityFeePerGas`를 설정하지 마세요. 그렇지 않으면 팁 금액이 손실됩니다.*
#### 1.2 트랜잭션 제출
클라이언트는 가장 최근 블록에서 최신 기본 수수료를 가져오고 `maxFeePerGas`를 계산할 때 안전 마진을 포함해야 합니다.
예시(설명용):
```javascript
const block = await provider.getBlock("latest");
const baseFee = block.baseFeePerGas;
const maxPriorityFeePerGas = 1n;
const maxFeePerGas = baseFee * 2n + maxPriorityFeePerGas;
```
#### 1.3 USDT0 획득
계정은 다음을 통해 USDT0을 얻습니다:
* 다른 지원되는 체인에서 USDT0 브리징
* Stable의 다른 계정으로부터 전송 받기
### 2. Stable이 USDT0을 가스 토큰으로 활성화하는 방법
Stable은 사전 청구 및 환불 결산 모델을 사용하여 USDT0으로 가스를 청구합니다.
#### 예시 트랜잭션
Alice가 Bob에게 100 USDT0을 보냅니다.
#### 2.1 Ante-handler 단계
`MonoEVMAnteHandler`에서 트랜잭션 검증 중:
1. Alice의 USDT0 잔액을 읽습니다.
2. 프로토콜은 Alice가 다음을 커버할 수 있는지 확인합니다:
* 트랜잭션 가치(100 USDT0), 그리고
* 최대 가능 가스 수수료(`gasWanted × fee`).
3. 최대 가스 수수료가 사전에 이체됩니다:
* `alice → fee_collector`로 USDT0.
#### 2.2 실행 단계
`ApplyTransaction` 동안:
1. EVM이 트랜잭션을 실행합니다.
2. 실제 가스 소비가 기록됩니다.
3. 가치 전송이 적용됩니다:
* `alice → bob`이 100 USDT0을 전송합니다.
#### 2.3 결산 단계
실행 후:
1. 프로토콜은 사전 청구된 수수료의 사용되지 않은 부분을 계산합니다:
```
refund = (gasWanted − gasUsed) × baseFee
```
2. 사용되지 않은 수수료가 환불됩니다:
* `fee_collector → alice`로 USDT0.
### 3. 잔액 의미론 및 행동 차이
#### 3.1 네이티브 잔액 가변성
이더리움에서는 컨트랙트의 네이티브 잔액이 일반적으로 컨트랙트 실행의 결과로만 변경됩니다.
Stable에서는 컨트랙트의 네이티브 USDT0 잔액이 `transferFrom` 및 `permit`를 포함한 ERC20 허용 기반 작업으로 인해 변경될 수도 있습니다. 이러한 작업은 컨트랙트 코드를 호출하지 않고도 컨트랙트의 네이티브 잔액을 줄일 수 있습니다.
결과적으로 다음 가정은 Stable에서 유효하지 않습니다:
* 컨트랙트의 네이티브 잔액은 컨트랙트가 호출된 경우에만 감소할 수 있습니다.
### 4. 컨트랙트 설계 요구 사항
#### 4.1 금지된 패턴: 미러 잔액 회계
컨트랙트는 네이티브 잔액을 미러링하기 위해 내부 변수에 의존해서는 안 됩니다.
안전하지 않은 패턴의 예:
```solidity
uint256 public deposited;
function deposit() external payable {
deposited += msg.value;
}
```
허용 기반 전송을 통해 USDT0이 고갈되면 이러한 변수는 실제 네이티브 잔액과 달라질 수 있습니다.
#### 4.2 필수 패턴: 실제 잔액 지불 능력 확인
모든 네이티브 가치 전송은 전송 직전에 `address(this).balance`를 사용하여 지불 능력을 확인해야 합니다.
예시:
```solidity
require(address(this).balance >= amount, "insufficient balance");
```
출금은 Checks-Effects-Interactions 순서를 따라야 합니다:
```solidity
uint256 amount = credit[msg.sender];
credit[msg.sender] = 0;
require(address(this).balance >= amount);
payable(msg.sender).call{value: amount}("");
```
#### 4.3 상태 진행은 잔액과 독립적이어야 함
진행, 마일스톤 또는 완료 조건에 의존하는 프로토콜 로직은 카운터나 에포크와 같은 비잔액 상태 변수를 사용하여 명시적으로 추적해야 합니다.
네이티브 잔액은 지불 시점의 지불 능력 확인에만 사용되어야 합니다.
#### 4.4 허용 노출
사용자 자금을 보관하는 컨트랙트는 외부 주소에 USDT0 허용을 부여해서는 안 됩니다.
허용이 불가피한 경우 컨트랙트는:
* 정확한 금액만 승인
* 사용 후 즉시 허용 재설정
* 잔여 고갈 위험을 알려진 제한 사항으로 처리
### 5. 주소 상태 가정
#### 5.1 EXTCODEHASH
컨트랙트는 `EXTCODEHASH(addr) == 0x0`에 의존하여 주소가 한 번도 사용되지 않았다고 추론해서는 안 됩니다.
주소 사용에 대한 모든 개념은 컨트랙트 상태 내에서 명시적으로 추적되어야 합니다.
예시:
```solidity
mapping(address => bool) public used;
```
### 6. 제로 주소 처리
Stable에서:
* `address(0)`으로의 native value 전송은 실패합니다.
* `address(0)`으로의 ERC20 USDT0 전송도 실패합니다.
제로 주소로 전송하여 USDT0을 소각하는 지원되는 메커니즘은 없습니다.
컨트랙트는 다음을 해야 합니다:
* `address(0)`을 수신자로 명시적으로 거부
* 제로 주소 소각을 가정하는 모든 로직을 재설계
* 되돌릴 수 없는 손실 의미론이 필요한 경우 명시적 싱크 컨트랙트 사용
### 7. 테스트 요구 사항
Stable 배포를 위한 테스트 스위트에는 다음이 포함되어야 합니다:
* 허용 기반 고갈 시나리오 (`approve` + `transferFrom`)
* 실제 네이티브 잔액을 사용한 지불 능력 시행
* `EXTCODEHASH`에 의존하지 않는 주소 사용 로직
* 제로 주소 전송에 대한 명시적 실패 케이스
### 8. 마이그레이션 체크리스트
이더리움에서 Stable로 컨트랙트를 마이그레이션 할 때:
* 컨트랙트 내부에서 변수로 네이티브 잔액을 미러링하는 로직 제거
* 모든 지불 능력 확인을 `address(this).balance`로 교체
* `address(0)`으로의 모든 네이티브 또는 ERC20 전송 제거
* 모든 USDT0 `approve`에 대한 검사
* `approve` 및 `permit` 기반 플로우를 다루는 테스트 추가
### 9. 요약
Stable의 USDT0을 가스 토큰으로 사용하면 예측 가능한 수수료와 통합 가치 회계를 제공하는 동시에 네이티브 잔액 동작에 대한 핵심 가정을 변경합니다.
Stable에서의 올바른 컨트랙트 설계는 다음을 필요로 합니다:
* USDT0을 이중 역할 자산으로 처리
* 실제 잔액에 대한 지불 능력 시행
* `approve` 기반 잔고 고갈 경로 회피
* Ethereum invariant에 의거한 잔고에 대한 의존성 제거
### FAQ
**현재 USDT0을 래핑된 네이티브 토큰으로 사용하고 있습니다. 업그레이드 후에는 어떤 토큰을 래핑된 네이티브로 처리해야 하나요?**
업그레이드 후 USDT0은 네이티브 토큰이자 ERC-20 토큰이 됩니다. USDT0을 직접 사용해야 하며, 래핑이나 언래핑은 더 이상 필요하지 않습니다.
**원래 USDT0 컨트랙트 주소(`0x779Ded0c9e1022225f8E0630b35a9b54bE713736`)는 어떻게 되나요?**
아무것도 변경되지 않습니다. 동일한 주소가 유효하며 계속해서 USDT0을 나타냅니다.
**업그레이드 후, 네이티브 토큰 주소는 `0x779Ded0c9e1022225f8E0630b35a9b54bE713736`인가요 (`0x0000000000000000000000000000000000001000` 대신)?**
예. 업그레이드 후 네이티브 토큰 식별자/주소는 `0x779Ded0c9e1022225f8E0630b35a9b54bE713736` 입니다.
**`0x0000000000000000000000000000000000001000`은 어떻게 되나요? 여전히 gUSDT의 토큰 주소로 사용되며, 우리 측에서 유지해야 하나요?**
아니요. 제거할 수 있습니다. 업그레이드 후에는 사용되지 않습니다.
**DEX calldata의 경우, 프로토콜이 "네이티브 토큰" 식별자로 `0x0000000000000000000000000000000000001000` 사용을 중단하고 대신 `0x779Ded0c9e1022225f8E0630b35a9b54bE713736`를 사용하게 되나요?**
맞습니다. 업그레이드 후 DEX는 `0x779Ded0c9e1022225f8E0630b35a9b54bE713736`를 네이티브 토큰 식별자로 사용해야 합니다.
## USDT 전송 집계
USDT 트랜잭션에 최적화된 블록체인으로써, Stable은 전반적인 시스템 반응성을 유지하면서도 매우 높은 수준의 토큰 전송량을 처리할 수 있도록 설계되었습니다. USDT 중심 성능과 일반 트랜잭션 다양성 간의 균형을 맞추기 위해, Stable은 USDT 전송 집계 메커니즘을 도입합니다. 이는 USDT0 전송을 고도로 병렬화되고 장애 허용적인 방식으로 번들링 및 처리하는 효율적이고 확장 가능한 솔루션입니다.
### 왜 USDT 전송 집계가 필요하나요?
대규모 USDT 사용을 지원하는 데 있어 핵심 과제는 처리량과 공정성을 동시에 최적화하는 것입니다:
* 기존 ERC20 토큰 전송은 순차적으로 처리되므로, 높은 트랜잭션 부하 시 병목 현상이 발생합니다.
* 단순히 USDT0의 처리량을 우선시하면, 다른 트랜잭션이 밀려나 체인 전반의 성능이 저하될 수 있습니다.
USDT 전송 집계 설계는 USDT0 전송을 타 트랜잭션과 분리하고 최적화함으로써, 나머지 실행 파이프라인에 영향을 주지 않고 이 문제를 해결합니다.
### 병렬 집계 및 검증
> *여기서 설명하는 내용은 현재 전략을 바탕으로 한 미래 지향적인 계획입니다. 모든 로드맵 항목과 마찬가지로, 더 많은 인사이트를 확보하고 새로운 우선순위에 따라 업데이트될 수 있습니다.*
전송 집계 시스템의 핵심은 `MapReduce` 컴퓨팅 모델에서 영감을 받은 병렬 가능한 집계 및 검증 파이프라인입니다. 각 전송을 순차적으로 처리하는 대신, 시스템은 번들 단위로 연산을 수행하며, 계정 간 입출금을 집계한 후 잔액 업데이트를 실행합니다.
#### 주요 단계
1. **계정 diff 집계**
* 각 전송은 송신자와 수신자에 매핑됩니다.
* 각 계정에 대해 토큰 이동의 순 변화(net movement)를 나타내는 diff 저널이 생성됩니다:
* 총 차감액(보냄): 음수 값
* 총 수신액(받음): 양수 값
2. **잔고 검증**
* 시스템은 전체 입력과 출력이 일치하는, 글로벌 잔액 불변성을 보장합니다.
* 각 계정의 순 변화는 병렬로 독립적으로 검증되어 잔액이 충분한지 확인됩니다.
* 잔액이 부족한 계정이 있어도 번들 실행을 멈추지 않고, 해당 계정을 별도로 표시합니다.
3. **병렬을 위한 MapReduce 모델**
* **Map 단계**: 모든 입출금 전송을 기반으로 각 계정의 순 델타(net delta)를 계산합니다.
* **Reduce 단계**: 이 델타들을 집계하여 최종 상태 업데이트를 결정합니다.
### 기술적 하이라이트
#### 병렬 계산 모델
* 프리컴파일 컨트랙트 내 병렬성을 활용하여 잔액 확인 및 diff 연산을 동시에 수행합니다.
* 기존의 순차적 ERC20 처리 대비 실행 시간을 대폭 단축할 수 있습니다.
#### 의존성 분석
* 중복 전송(예: 동일 계정에서 다수 전송)을 식별합니다.
* 실패 가능성이 높은 전송(예: 잔액 부족 예상됨)을 사전 표시하여 연쇄적인 실패를 방지합니다.
#### 모듈식 실패 핸들링
* 전송은 계정 단위로 격리되므로, 문제가 있는 계정만 영향을 받습니다.
* 충돌 없는 전송은 정상적으로 실행 및 완료됩니다.
#### 선택적 실패 처리
* 기존의 블록 내 전송 처리 방식은 성공 또는 실패 중 하나의 전체 처리 방식이었으나, Stable의 집계 모델은 계정별 실패 격리를 도입합니다:
* 특정 계정이 `현재 잔액 + 순 변화 < 0` 인 경우, 해당 계정의 전송만 실패로 처리합니다.
* 다른 계정이 포함된 전송은 정상적으로 진행됩니다.
* 이 선택적 롤백 메커니즘은, 잘못된 전송이나 악의적 전송이 전체 번들의 무결성을 해치지 않도록 보장합니다.
### 프로포저 혹은 평판 기반 정렬
실행 최적화 및 상태 충돌 방지를 위해, Stable은 집계된 전송에 대해 사전 처리 순서 지정 메커니즘을 도입합니다:
* **평판 기반 정렬**: 신뢰도 높은 이력 또는 검증된 신원을 가진 송신자는 우선 처리되어 실패 및 재정렬 위험이 줄어듭니다.
* **프로포저 기반 정렬**: 신뢰할 수 있는 프로포저 노드가 트랜잭션을 정렬하여 충돌을 최소화하고 처리량을 극대화합니다.
* **전송 번들 우선 처리**: 집계된 USDT 전송은 일반 트랜잭션보다 우선 순위로 처리되어 의존성 충돌을 줄이고 깔끔한 실행 윈도우를 확보됩니다.
Stable의 USDT 전송 집계 메커니즘은 USDT0 전송의 처리량을 극대화하면서도 일반 트랜잭션 처리 성능을 저해하지 않는 타겟형 최적화입니다. 병렬 실행, 모듈식 오류 처리, 스마트 정렬 전략을 결합함으로써, Stable은 빠르고 빈번하며 마찰 없는 토큰 전송이 일상화된 스테이블코인 기반 경제를 위한 확장 가능한 기반을 제공합니다.
## 합의
### StableBFT를 활용한 PoS 합의 알고리즘
초기 Stable 블록체인은 CometBFT 기반의 맞춤형 PoS 합의 프로토콜인 **StableBFT**를 활용하여, 높은 처리량, 낮은 지연 시간, 강력한 신뢰성을 보장합니다. StableBFT의 주요 강점은 결정론적 완결성(포크 없이 즉각적인 블록 완결 보장)과 강력한 장애 허용성(밸리데이터 중 1/3이 실패하거나 악의적인 행동을 하더라도 네트워크는 안전)입니다.
향후 Stable은 다음과 같은 두 레이어에서의 개선 사항을 구현하여 합의 성능을 보다 더 최적화할 예정입니다.
* **트랜잭션과 합의 전파 분리**: 트랜잭션과 합의 각각의 전파 과정을 분리함으로써, 트랜잭션 네트워크의 혼잡이 합의 통신에 영향을 주지 않도록 할 수 있습니다.
* **트랜잭션을 블록 프로포저에게 직접 브로드캐스트**: 기존에는 트랜잭션이 노드 간 P2P 가십(gossip)을 통해 발생하였고, 이는 네트워크 내 트랜잭션 가십 트래픽의 증가라는 단점을 낳았습니다. Stable은 트랜잭션이 블록 프로포저에게 직접적으로 브로드캐스트되는 구조를 통해, 트랜잭션 전파 효율을 개선하고자 합니다.
### 향후 로드맵: DAG 기반 합의
합의 속도를 획기적으로 증가시키기 위해, Stable은 프로토콜을 DAG 기반 설계로 업그레이드할 계획이며, 이는 최대 5배의 속도 향상을 제공할 수 있습니다.
PBFT 및 HotStuff와 같은 전통적인 view 기반 BFT 프로토콜은 안정적인 네트워크 조건 하에서 낮은 레이턴시를 유지하는 데에 최적화되어 있습니다. 그러나 일시적인 장애가 발생하면 네트워크의 성능이 크게 저하되며, 회복까지 오랜 지연이 발생하는 경우가 많습니다.
Narwhal & Tusk와 같은 1세대 DAG 기반 엔진은 데이터 전파를 트랜잭션 순서 합의와 분리함으로써 단일 프로포저에 있던 병목을 제거하고, 네트워크 불안정 상황에서의 견고함 또한 향상시킬 수 있음을 보여줍니다. 그러나 이 아키텍처들은 기존의 높이 기반 블록 구조를 따르지 않으며 멤풀 설계에 차이가 있기 때문에, CometBFT와 같은 시스템과 호환되지 않습니다.
[Autobahn](/ko/architecture/core-optimization/appendix/autobahn)은 Stable의 합의 계층과 보다 자연스럽게 통합되는 DAG 기반 PBFT 아키텍처를 제공합니다. 이 아키텍처는 정상적인 조건에서 낮은 레이턴시를 가지면서도, 네트워크 장애 발생 시에도 빠르게 회복한다는 장점을 가집니다. Stable 팀은 Autobahn 논문의 저자들과 긴밀한 관계를 유지하고 있으며, StableBFT의 성능을 극대화하기 위해 Autobahn의 아키텍처를 활용할 예정입니다.
Autobahn 위에 구축된 StableBFT는 다음 장점을 가집니다:
* 단일 리더 제한을 제거함으로써 프로포절 병렬 처리
* 데이터 전파와 트랜잭션 순서 정렬을 분리함으로써 더 빠른 완결성
* 견고한 BFT 메커니즘을 통해 네트워크 장애에 대한 향상된 복원력
이러한 고급 합의 설계는 내부 테스트 내 제어된 환경에서 200,000 TPS(합의 레이어만)를 달성한 바 있습니다.
## 실행
### Stable EVM
### StableBFT
초기 Stable 블록체인은 CometBFT 기반의 맞춤형 PoS 합의 프로토콜인 **StableBFT**를 활용하여, 네트워크 전반에 걸친 높은 처리량, 낮은 지연 시간, 강력한 신뢰성을 보장합니다. 합의 성능을 더욱 최적화하기 위해, Stable은 데이터 전파와 합의 과정을 분리하고, 트랜잭션을 블록 프로포저에게 직접 브로드캐스트하는 방식을 도입할 계획입니다.
합의를 획기적으로 가속화하기 위해 Stable은 DAG 기반 **Autobahn**으로의 프로토콜 업그레이드를 계획하고 있습니다. Autobahn을 기반으로 구축된 StableBFT는 다음을 가능케 합니다:
* 단일 리더 제한 제거를 통한 프로포절 병렬 처리
* 데이터 전파와 트랜잭션 순서 정렬을 분리하여 더 빠른 완결성 달성
* 강력한 BFT 메커니즘을 통한 네트워크 장애에 대한 높은 복원력
### Stable EVM
**Stable EVM**은 Stable의 이더리움 호환 실행 계층으로, 기존 이더리움 툴 및 지갑을 사용해 체인과 원활히 상호작용할 수 있도록 합니다. Stable EVM은 StableSDK와의 연결을 위해 일련의 프리컴파일을 도입하여, EVM 스마트 컨트랙트가 핵심 체인 로직에 안전하고 아토믹하게 접근할 수 있도록 지원합니다.
Stable은 EVM 실행 성능을 극대화하기 위해 StableVM++를 도입할 예정이며, 이는 EVMONE과 같은 대체 EVM 구현체와 Block-STM 기반의 낙관적 병렬 실행 엔진을 통합합니다.
### StableDB
**상태: v1.4.0 업그레이드에서 출시**
Stable은 각 블록 생성 후 디스크 저장이 느리다는 주요 병목 현상을 해결함으로써 블록체인 속도를 개선합니다. Stable은 상태 커밋과 상태 저장을 분리하여, 블록 처리를 지연 없이 진행할 수 있도록 합니다. `mmap` 기반의 `MemDB` 및 `VersionDB`를 통해 최근 데이터는 메모리에서 처리하고, 이전 데이터는 디스크에 효율적으로 저장하여 전체 처리량을 높일 수 있습니다.
### 고성능 RPC
아무리 블록체인이 빠르더라도, RPC 레이어가 느리다면 사용자 경험이 망가질 수 있습니다. Stable은 기존 모놀리틱 RPC 구조가 리소스 충돌 및 확장성 부족 문제를 일으킬 수 있다는 점을 인식하고, 이를 재설계했습니다. Stable은 기능별로 작업 경로를 분리한 split-path 아키텍처를 도입하며, 가벼우면서도 특화된 RPC 노드를 통해 응답 시간을 크게 단축합니다.
향후 EVM 내 view 호출에 최적화된 RPC 노드 및 네이티브 인덱서를 통합하여, dApp의 온체인 데이터 접근 속도를 더욱 향상시킬 예정입니다.
## 기밀 전송
기업들 사이에서 블록체인 채택이 특히 스테이블코인 분야에서 가속화됨에 따라, 트랜잭션 프라이버시에 대한 수요도 점점 증가하고 있습니다. 기업들은 종종 결제 금액과 같은 민감한 데이터를 보호하기 위해 금융 운영에서 기밀성을 요구합니다. 이러한 요구를 해결하기 위해 Stable은 프라이버시 요구와 규제 준수라는 두 가지 필수 요소의 균형을 맞춘 기밀 전송 메커니즘을 개발 중입니다.
Stable은 영지식(ZK) 암호 기술을 활용하여 트랜잭션 금액을 온체인에 공개하지 않고도 토큰을 전송할 수 있도록 하는 기밀 전송 레이어를 구축하고 있습니다. 전송 금액은 비공개로 유지되는 반면, 송신자와 수신자의 주소는 공개된 상태로 유지되어 금융 규제 및 감사 가능성을 확보합니다.
보호된 트랜잭션 금액은 해당 거래 당사자 및 인가된 규제 감사인만 접근할 수 있어, 프라이버시 확보가 법적 투명성을 희생하지 않도록 보장합니다.
## 보장된 블록스페이스
### 비즈니스를 위한 스테이블코인 결제 필요성
스테이블코인이 지속적으로 진화함에 따라, 점점 더 많은 기업들이 이를 결제, 재무 흐름, 국경 간 정산 등 금융 운영에 통합하고 있습니다. 이러한 변화는 특히 안정적인 명목 화폐 접근이 제한된 지역에서 두드러집니다. 아프리카 및 라틴 아메리카와 같은 시장에서는 인플레이션과 환율 통제가 일반적이기 때문에, 스테이블코인은 운영 안정성을 위한 핵심 도구가 되고 있습니다.
오늘날 스테이블코인 트랜잭션은 주로 Ethereum, Solana, Tron과 같은 범용 블록체인에서 발생합니다. 이러한 네트워크는 넓은 composability와 스마트 컨트랙트 지원을 제공하지만, 수수료 예측 가능성이나 실행 보장을 염두에 두고 설계되지 않았습니다.
* **Ethereum**: 2022년 5월 1일, Yuga Labs의 “Otherside” NFT 민팅은 Ethereum에서 2억 달러 이상의 가스 수수료가 소각되도록 만들었습니다. 최고 가스는 8,000 gwei를 초과했고, 네트워크 전반에 걸쳐 불안정하고 비결정적인 트랜잭션 비용이 발생했습니다.
* **기타 네트워크**: Solana, Base와 같은 저수수료 네트워크에서는 MEV와 차익 거래 기회가 존재함에 따라 대량의 트랜잭션 스팸이 유입됩니다. 이러한 네트워크는 온체인 가치를 포착하려는 봇들로 인해 과부하 상태를 자주 경험하고, 합법적인 사용자에게 네트워크 혼잡 및 성능 저하를 초래합니다.

*Source: MEV and the Limits of Scaling by Flashbots and Rober Miller*
기업이 대규모로 스테이블코인 결제를 채택하려면, 그 기반 인프라는 결제 신뢰성을 위해 최적화되어야 합니다. 이를 위해서는 모든 조건에서 예측 가능한 트랜잭션 지연 시간과 수수료 안정성이 필요합니다. 이러한 보장이 없다면, 범용 체인에서의 스테이블코인 결제는 여전히 신뢰할 수 없는 상태로 남게 됩니다.
### 보장된 블록스페이스
기업의 안정적이고 신뢰 가능한 결제 운영을 보장하기 위해, Stable은 보장된 블록스페이스에 대한 지원을 도입할 예정입니다.
보장된 블록스페이스는 기업에 고정된 블록 용량을 보장하는 전용 블록 공간 할당 모델로, 네트워크 전반의 상태와 무관하게 적용됩니다. 이를 통해 급여 지급, 정산, 공급업체 결제 등 미션 크리티컬한 트랜잭션이 예측 가능한 지연 시간과 비용으로 실행될 수 있습니다.
이 보장은 다음과 같은 인프라를 통해 강제됩니다:
* **보장된 멤풀**: 밸리데이터는 퍼블릭 트래픽과 분리된 전용 멤풀을 운영하며, 여기서 가져온 보장된 트랜잭션들을 우선적으로 처리합니다.
* **밸리데이터 단의 커스터마이제이션**: 밸리데이터는 사전에 정의된 만큼의 블록 공간을 예약하여, 결정론적인 포함을 보장합니다.
* **전용 RPC 노드**: 보장된 블록스페이스 API는 격리된 RPC 엔드포인트를 통해 트랜잭션을 라우팅하여, 충돌을 줄이고 일관된 처리량을 제공합니다.
보장된 블록스페이스는 사용자에게 다음과 같은 이점을 제공합니다:
* 전용 업로드 경로를 통한 독점적 트랜잭션 라우팅으로 블록 공간에 우선 접근
* 네트워크 혼잡 여부와 관계없이 모든 블록에 예약된 용량을 확보하여 보장된 실행
* 밸리데이터의 개방성이나 네트워크 참여에 대한 타협 없이 탈중앙화를 유지
* 높은 네트워크 부하 상황에서도 비즈니스에서 중요한 작업들에 대한 안정적인 온체인 성능
## 개요
### USDT 특화 기능
Stable은 USDT를 위해 제작된 레이어 1 블록체인입니다. 프로토콜의 모든 구성 요소는 USDT 전송에서의 마찰을 최소화하고, 세계에서 가장 많이 사용되는 스테이블코인에 특화된 고성능 환경을 제공하기 위해 설계되었습니다.
핵심 인프라와 더불어, Stable은 전반적인 사용자 경험을 향상하기 위해 USDT에 특화된 여러 가지 기능들을 제공합니다:
* **USDT를 가스 토큰으로 사용**: USDT0를 네이티브 가스 토큰으로 사용합니다. USDT0는 가스 결제와 가치 전송을 위한 네이티브 자산으로 동시에 기능하며, `approve`, `transfer`, `transferFrom`, `permit`을 지원하는 ERC20 토큰으로도 동작합니다.
* **보장된 블록스페이스:** 보장된 블록스페이스는 기관들에게 블록 용량의 일부를 고정적으로 보장해주기 위한 전용 블록스페이스 할당 모델입니다. 이를 통해 기관들은 트랜잭션의 레이턴시와 비용을 쉽게 예상할 수 있습니다.
* **USDT 전송 집계**: USDT0 전송을 분리 및 집계하여, 공정성을 훼손하거나 다른 트랜잭션에 영향을 주지 않으면서 처리량을 극대화하는 특수 메커니즘입니다.
* **기밀 전송**: Stable은 ZK 암호화 기술을 활용하여, 송신자 및 수신자의 주소는 온체인에서 그대로 보이되 금액은 숨겨지는 프라이빗 USDT 전송 기능을 도입할 계획입니다. 이로써 규제 준수 및 감사 가능성을 유지하면서 프라이버시를 확보할 수 있습니다.
## USDT as Gas
Stable은 USDT 스테이블코인을 중심으로 구축되었습니다. USDT의 옴니체인 표현인 USDT0은 Stable 생태계를 지원하는 핵심 자산입니다.
### 요약
Stable은 USDT0을 네이티브 가스 토큰으로 사용하는 EVM 호환 블록체인입니다. USDT0은 가스 지불 및 가치 전송을 위한 네이티브 자산이면서 동시에 `approve`, `transfer`, `transferFrom` 및 `permit`를 지원하는 ERC20 토큰으로 기능합니다.
이 설계는 예측 가능한 달러 표시 트랜잭션 비용을 가능하게 하고 사용자 경험을 단순화합니다. 그러나 이는 잔액 의미론, 허용 안전성 및 특정 opcode 가정에 영향을 미치는 이더리움과의 행동 차이를 도입합니다.
본 문서는 Stable의 USDT0 가스 메커니즘을 명시하고, 결과적인 행동 차이를 설명하며, Stable에 배포된 스마트 컨트랙트에 필요하고 권장되는 개발 패턴을 정의합니다.
### 버전 참고사항
Stable v1.2.0에서 USDT0이 gUSDT를 대체하여 Stable의 네이티브 가스 토큰이 됩니다. 이 전환의 일부로:
* gUSDT가 폐지됩니다.
* 기존 gUSDT 잔액이 자동으로 USDT0으로 전환됩니다.
* 사용자와 애플리케이션은 더 이상 수수료를 지불하거나 가치를 이동하기 위해 래핑 및 언래핑 플로우가 필요하지 않습니다.
v1.2.0 이후 USDT0은 다음 두 가지 역할을 합니다:
* 네트워크 수수료 자산(가스), 그리고
* `approve`, `permit`, `transfer` 및 `transferFrom`을 갖춘 표준 ERC20 토큰.
### 네트워크 주소
USDT0 토큰 컨트랙트 주소:
* 테스트넷: [0x78cf24370174180738c5b8e352b6d14c83a6c9a9](https://testnet.stablescan.xyz/token/0x78cf24370174180738c5b8e352b6d14c83a6c9a9)
* 메인넷: [0x779ded0c9e1022225f8e0630b35a9b54be713736](https://stablescan.xyz/token/0x779ded0c9e1022225f8e0630b35a9b54be713736)
### 용어
* **Stable**: USDT0이 네이티브 가스 토큰인 EVM 호환 블록체인.
* **USDT0**: USDT의 옴니체인 버전으로 다음 두 가지로 기능합니다:
* 가스 및 가치 전송에 사용되는 네이티브 자산, 그리고
* approve 및 permit 기능을 가진 ERC20 토큰.
* **네이티브 잔액**: `address(x).balance`로 반환되는 USDT0으로 표시된 잔액.
* **가스 수수료**: EIP-1559 스타일 수수료 시장에서 계산된 USDT0으로 지불하는 트랜잭션 수수료.
### USDT0이란 무엇인가?
USDT0은 LayerZero의 옴니체인 대체 가능 토큰 (OFT) 표준을 사용하는 USDT의 옴니체인 표현입니다. USDT0은 USDT와 1:1로 페깅되어 있으며 전통적인 브리지 워크플로우나 래핑된 표현 없이 여러 블록체인을 이동하도록 설계되었습니다.
체인 간에 USDT0을 전송할 때, 토큰은 일부 소스 체인에서 잠기거나(체인의 네이티브 USDT 지원에 따라) 소각된 후 LayerZero의 크로스체인 메시징을 통해 목적지 체인에서 발행됩니다. 이는 1:1 페그를 유지하면서 유동성을 분산된 체인 로컬 풀이 아닌 단일 상호 운용 가능한 자산으로 통합합니다.
사용자에게 이는 더 빠른 온보딩, 운영 복잡성 감소 및 향상된 유동성 이동성을 가능하게 합니다.
### USDT0과 Stable
USDT0은 Stable의 온체인 경제와 일상적인 사용을 지원하는 핵심 자산입니다. 동일한 자산이 수수료 지불과 가치 전송 모두에 사용되기 때문에 Stable은 다음에 대한 마찰을 줄입니다:
* **일반 사용자**: 더 간단한 온보딩과 더 적은 토큰 개념
* **개발자**: 더 간단한 수수료 및 가치 흐름
* **기업**: 단순화된 회계 및 재무 운영
Stable은 또한 사용자가 LayerZero를 통해 다른 네트워크에서 USDT0을 온보딩할 수 있도록 하여 첫날부터 깊은 USDT 유동성에 액세스할 수 있습니다.
### 가정 및 전제 조건
아래 내용의 경우 독자는 다음을 이해해야 합니다:
* Solidity 실행 의미론 및 네이티브 가치 전송
* ERC20 허용 메커니즘 및 허가 플로우
* Checks-Effects-Interactions를 포함한 표준 스마트 컨트랙트 보안 패턴
### 1. 가스 및 수수료 모델
#### 1.1 개요
Stable은 모든 트랜잭션 수수료를 USDT0으로 표시합니다. 가스 가격 책정은 동적으로 조정되는 기본 수수료가 있는 EIP-1559 스타일 모델을 따릅니다.
트랜잭션 수수료는 다음과 같이 정의됩니다:
```
fee = gasUsed × baseFee
```
트랜잭션은 표준 EIP-1559 매개변수를 사용하여 `maxFeePerGas`를 지정할 수 있습니다.
*참고: Stable은 우선순위 팁을 지원하지 않습니다. `maxPriorityFeePerGas`를 설정하지 마세요. 그렇지 않으면 팁 금액이 손실됩니다.*
#### 1.2 트랜잭션 제출
클라이언트는 가장 최근 블록에서 최신 기본 수수료를 가져오고 `maxFeePerGas`를 계산할 때 안전 마진을 포함해야 합니다.
예시(설명용):
```javascript
const block = await provider.getBlock("latest");
const baseFee = block.baseFeePerGas;
const maxPriorityFeePerGas = 1n;
const maxFeePerGas = baseFee * 2n + maxPriorityFeePerGas;
```
#### 1.3 USDT0 획득
계정은 다음을 통해 USDT0을 얻습니다:
* 다른 지원되는 체인에서 USDT0 브리징
* Stable의 다른 계정으로부터 전송 받기
### 2. Stable이 USDT0을 가스 토큰으로 활성화하는 방법
Stable은 사전 청구 및 환불 결산 모델을 사용하여 USDT0으로 가스를 청구합니다.
#### 예시 트랜잭션
Alice가 Bob에게 100 USDT0을 보냅니다.
#### 2.1 Ante-handler 단계
`MonoEVMAnteHandler`에서 트랜잭션 검증 중:
1. Alice의 USDT0 잔액을 읽습니다.
2. 프로토콜은 Alice가 다음을 커버할 수 있는지 확인합니다:
* 트랜잭션 가치(100 USDT0), 그리고
* 최대 가능 가스 수수료(`gasWanted × fee`).
3. 최대 가스 수수료가 사전에 이체됩니다:
* `alice → fee_collector`로 USDT0.
#### 2.2 실행 단계
`ApplyTransaction` 동안:
1. EVM이 트랜잭션을 실행합니다.
2. 실제 가스 소비가 기록됩니다.
3. 가치 전송이 적용됩니다:
* `alice → bob`이 100 USDT0을 전송합니다.
#### 2.3 결산 단계
실행 후:
1. 프로토콜은 사전 청구된 수수료의 사용되지 않은 부분을 계산합니다:
```
refund = (gasWanted − gasUsed) × baseFee
```
2. 사용되지 않은 수수료가 환불됩니다:
* `fee_collector → alice`로 USDT0.
### 3. 잔액 의미론 및 행동 차이
#### 3.1 네이티브 잔액 가변성
이더리움에서는 컨트랙트의 네이티브 잔액이 일반적으로 컨트랙트 실행의 결과로만 변경됩니다.
Stable에서는 컨트랙트의 네이티브 USDT0 잔액이 `transferFrom` 및 `permit`를 포함한 ERC20 허용 기반 작업으로 인해 변경될 수도 있습니다. 이러한 작업은 컨트랙트 코드를 호출하지 않고도 컨트랙트의 네이티브 잔액을 줄일 수 있습니다.
결과적으로 다음 가정은 Stable에서 유효하지 않습니다:
* 컨트랙트의 네이티브 잔액은 컨트랙트가 호출된 경우에만 감소할 수 있습니다.
### 4. 컨트랙트 설계 요구 사항
#### 4.1 금지된 패턴: 미러 잔액 회계
컨트랙트는 네이티브 잔액을 미러링하기 위해 내부 변수에 의존해서는 안 됩니다.
안전하지 않은 패턴의 예:
```solidity
uint256 public deposited;
function deposit() external payable {
deposited += msg.value;
}
```
허용 기반 전송을 통해 USDT0이 고갈되면 이러한 변수는 실제 네이티브 잔액과 달라질 수 있습니다.
#### 4.2 필수 패턴: 실제 잔액 지불 능력 확인
모든 네이티브 가치 전송은 전송 직전에 `address(this).balance`를 사용하여 지불 능력을 확인해야 합니다.
예시:
```solidity
require(address(this).balance >= amount, "insufficient balance");
```
출금은 Checks-Effects-Interactions 순서를 따라야 합니다:
```solidity
uint256 amount = credit[msg.sender];
credit[msg.sender] = 0;
require(address(this).balance >= amount);
payable(msg.sender).call{value: amount}("");
```
#### 4.3 상태 진행은 잔액과 독립적이어야 함
진행, 마일스톤 또는 완료 조건에 의존하는 프로토콜 로직은 카운터나 에포크와 같은 비잔액 상태 변수를 사용하여 명시적으로 추적해야 합니다.
네이티브 잔액은 지불 시점의 지불 능력 확인에만 사용되어야 합니다.
#### 4.4 허용 노출
사용자 자금을 보관하는 컨트랙트는 외부 주소에 USDT0 허용을 부여해서는 안 됩니다.
허용이 불가피한 경우 컨트랙트는:
* 정확한 금액만 승인
* 사용 후 즉시 허용 재설정
* 잔여 고갈 위험을 알려진 제한 사항으로 처리
### 5. 주소 상태 가정
#### 5.1 EXTCODEHASH
컨트랙트는 `EXTCODEHASH(addr) == 0x0`에 의존하여 주소가 한 번도 사용되지 않았다고 추론해서는 안 됩니다.
주소 사용에 대한 모든 개념은 컨트랙트 상태 내에서 명시적으로 추적되어야 합니다.
예시:
```solidity
mapping(address => bool) public used;
```
### 6. 제로 주소 처리
Stable에서:
* `address(0)`으로의 native value 전송은 실패합니다.
* `address(0)`으로의 ERC20 USDT0 전송도 실패합니다.
제로 주소로 전송하여 USDT0을 소각하는 지원되는 메커니즘은 없습니다.
컨트랙트는 다음을 해야 합니다:
* `address(0)`을 수신자로 명시적으로 거부
* 제로 주소 소각을 가정하는 모든 로직을 재설계
* 되돌릴 수 없는 손실 의미론이 필요한 경우 명시적 싱크 컨트랙트 사용
### 7. 테스트 요구 사항
Stable 배포를 위한 테스트 스위트에는 다음이 포함되어야 합니다:
* 허용 기반 고갈 시나리오 (`approve` + `transferFrom`)
* 실제 네이티브 잔액을 사용한 지불 능력 시행
* `EXTCODEHASH`에 의존하지 않는 주소 사용 로직
* 제로 주소 전송에 대한 명시적 실패 케이스
### 8. 마이그레이션 체크리스트
이더리움에서 Stable로 컨트랙트를 마이그레이션 할 때:
* 컨트랙트 내부에서 변수로 네이티브 잔액을 미러링하는 로직 제거
* 모든 지불 능력 확인을 `address(this).balance`로 교체
* `address(0)`으로의 모든 네이티브 또는 ERC20 전송 제거
* 모든 USDT0 `approve`에 대한 검사
* `approve` 및 `permit` 기반 플로우를 다루는 테스트 추가
### 9. 요약
Stable의 USDT0을 가스 토큰으로 사용하면 예측 가능한 수수료와 통합 가치 회계를 제공하는 동시에 네이티브 잔액 동작에 대한 핵심 가정을 변경합니다.
Stable에서의 올바른 컨트랙트 설계는 다음을 필요로 합니다:
* USDT0을 이중 역할 자산으로 처리
* 실제 잔액에 대한 지불 능력 시행
* `approve` 기반 잔고 고갈 경로 회피
* Ethereum invariant에 의거한 잔고에 대한 의존성 제거
### FAQ
**현재 USDT0을 래핑된 네이티브 토큰으로 사용하고 있습니다. 업그레이드 후에는 어떤 토큰을 래핑된 네이티브로 처리해야 하나요?**
업그레이드 후 USDT0은 네이티브 토큰이자 ERC-20 토큰이 됩니다. USDT0을 직접 사용해야 하며, 래핑이나 언래핑은 더 이상 필요하지 않습니다.
**원래 USDT0 컨트랙트 주소(`0x779Ded0c9e1022225f8E0630b35a9b54bE713736`)는 어떻게 되나요?**
아무것도 변경되지 않습니다. 동일한 주소가 유효하며 계속해서 USDT0을 나타냅니다.
**업그레이드 후, 네이티브 토큰 주소는 `0x779Ded0c9e1022225f8E0630b35a9b54bE713736`인가요 (`0x0000000000000000000000000000000000001000` 대신)?**
예. 업그레이드 후 네이티브 토큰 식별자/주소는 `0x779Ded0c9e1022225f8E0630b35a9b54bE713736` 입니다.
**`0x0000000000000000000000000000000000001000`은 어떻게 되나요? 여전히 gUSDT의 토큰 주소로 사용되며, 우리 측에서 유지해야 하나요?**
아니요. 제거할 수 있습니다. 업그레이드 후에는 사용되지 않습니다.
**DEX calldata의 경우, 프로토콜이 "네이티브 토큰" 식별자로 `0x0000000000000000000000000000000000001000` 사용을 중단하고 대신 `0x779Ded0c9e1022225f8E0630b35a9b54bE713736`를 사용하게 되나요?**
맞습니다. 업그레이드 후 DEX는 `0x779Ded0c9e1022225f8E0630b35a9b54bE713736`를 네이티브 토큰 식별자로 사용해야 합니다.
## USDT 전송 집계
USDT 트랜잭션에 최적화된 블록체인으로써, Stable은 전반적인 시스템 반응성을 유지하면서도 매우 높은 수준의 토큰 전송량을 처리할 수 있도록 설계되었습니다. USDT 중심 성능과 일반 트랜잭션 다양성 간의 균형을 맞추기 위해, Stable은 USDT 전송 집계 메커니즘을 도입합니다. 이는 USDT0 전송을 고도로 병렬화되고 장애 허용적인 방식으로 번들링 및 처리하는 효율적이고 확장 가능한 솔루션입니다.
### 왜 USDT 전송 집계가 필요하나요?
대규모 USDT 사용을 지원하는 데 있어 핵심 과제는 처리량과 공정성을 동시에 최적화하는 것입니다:
* 기존 ERC20 토큰 전송은 순차적으로 처리되므로, 높은 트랜잭션 부하 시 병목 현상이 발생합니다.
* 단순히 USDT0의 처리량을 우선시하면, 다른 트랜잭션이 밀려나 체인 전반의 성능이 저하될 수 있습니다.
USDT 전송 집계 설계는 USDT0 전송을 타 트랜잭션과 분리하고 최적화함으로써, 나머지 실행 파이프라인에 영향을 주지 않고 이 문제를 해결합니다.
### 병렬 집계 및 검증
> *여기서 설명하는 내용은 현재 전략을 바탕으로 한 미래 지향적인 계획입니다. 모든 로드맵 항목과 마찬가지로, 더 많은 인사이트를 확보하고 새로운 우선순위에 따라 업데이트될 수 있습니다.*
전송 집계 시스템의 핵심은 `MapReduce` 컴퓨팅 모델에서 영감을 받은 병렬 가능한 집계 및 검증 파이프라인입니다. 각 전송을 순차적으로 처리하는 대신, 시스템은 번들 단위로 연산을 수행하며, 계정 간 입출금을 집계한 후 잔액 업데이트를 실행합니다.
#### 주요 단계
1. **계정 diff 집계**
* 각 전송은 송신자와 수신자에 매핑됩니다.
* 각 계정에 대해 토큰 이동의 순 변화(net movement)를 나타내는 diff 저널이 생성됩니다:
* 총 차감액(보냄): 음수 값
* 총 수신액(받음): 양수 값
2. **잔고 검증**
* 시스템은 전체 입력과 출력이 일치하는, 글로벌 잔액 불변성을 보장합니다.
* 각 계정의 순 변화는 병렬로 독립적으로 검증되어 잔액이 충분한지 확인됩니다.
* 잔액이 부족한 계정이 있어도 번들 실행을 멈추지 않고, 해당 계정을 별도로 표시합니다.
3. **병렬을 위한 MapReduce 모델**
* **Map 단계**: 모든 입출금 전송을 기반으로 각 계정의 순 델타(net delta)를 계산합니다.
* **Reduce 단계**: 이 델타들을 집계하여 최종 상태 업데이트를 결정합니다.
### 기술적 하이라이트
#### 병렬 계산 모델
* 프리컴파일 컨트랙트 내 병렬성을 활용하여 잔액 확인 및 diff 연산을 동시에 수행합니다.
* 기존의 순차적 ERC20 처리 대비 실행 시간을 대폭 단축할 수 있습니다.
#### 의존성 분석
* 중복 전송(예: 동일 계정에서 다수 전송)을 식별합니다.
* 실패 가능성이 높은 전송(예: 잔액 부족 예상됨)을 사전 표시하여 연쇄적인 실패를 방지합니다.
#### 모듈식 실패 핸들링
* 전송은 계정 단위로 격리되므로, 문제가 있는 계정만 영향을 받습니다.
* 충돌 없는 전송은 정상적으로 실행 및 완료됩니다.
#### 선택적 실패 처리
* 기존의 블록 내 전송 처리 방식은 성공 또는 실패 중 하나의 전체 처리 방식이었으나, Stable의 집계 모델은 계정별 실패 격리를 도입합니다:
* 특정 계정이 `현재 잔액 + 순 변화 < 0` 인 경우, 해당 계정의 전송만 실패로 처리합니다.
* 다른 계정이 포함된 전송은 정상적으로 진행됩니다.
* 이 선택적 롤백 메커니즘은, 잘못된 전송이나 악의적 전송이 전체 번들의 무결성을 해치지 않도록 보장합니다.
### 프로포저 혹은 평판 기반 정렬
실행 최적화 및 상태 충돌 방지를 위해, Stable은 집계된 전송에 대해 사전 처리 순서 지정 메커니즘을 도입합니다:
* **평판 기반 정렬**: 신뢰도 높은 이력 또는 검증된 신원을 가진 송신자는 우선 처리되어 실패 및 재정렬 위험이 줄어듭니다.
* **프로포저 기반 정렬**: 신뢰할 수 있는 프로포저 노드가 트랜잭션을 정렬하여 충돌을 최소화하고 처리량을 극대화합니다.
* **전송 번들 우선 처리**: 집계된 USDT 전송은 일반 트랜잭션보다 우선 순위로 처리되어 의존성 충돌을 줄이고 깔끔한 실행 윈도우를 확보됩니다.
Stable의 USDT 전송 집계 메커니즘은 USDT0 전송의 처리량을 극대화하면서도 일반 트랜잭션 처리 성능을 저해하지 않는 타겟형 최적화입니다. 병렬 실행, 모듈식 오류 처리, 스마트 정렬 전략을 결합함으로써, Stable은 빠르고 빈번하며 마찰 없는 토큰 전송이 일상화된 스테이블코인 기반 경제를 위한 확장 가능한 기반을 제공합니다.
## 합의
### StableBFT를 활용한 PoS 합의 알고리즘
초기 Stable 블록체인은 CometBFT 기반의 맞춤형 PoS 합의 프로토콜인 **StableBFT**를 활용하여, 높은 처리량, 낮은 지연 시간, 강력한 신뢰성을 보장합니다. StableBFT의 주요 강점은 결정론적 완결성(포크 없이 즉각적인 블록 완결 보장)과 강력한 장애 허용성(밸리데이터 중 1/3이 실패하거나 악의적인 행동을 하더라도 네트워크는 안전)입니다.
향후 Stable은 다음과 같은 두 레이어에서의 개선 사항을 구현하여 합의 성능을 보다 더 최적화할 예정입니다.
* **트랜잭션과 합의 전파 분리**: 트랜잭션과 합의 각각의 전파 과정을 분리함으로써, 트랜잭션 네트워크의 혼잡이 합의 통신에 영향을 주지 않도록 할 수 있습니다.
* **트랜잭션을 블록 프로포저에게 직접 브로드캐스트**: 기존에는 트랜잭션이 노드 간 P2P 가십(gossip)을 통해 발생하였고, 이는 네트워크 내 트랜잭션 가십 트래픽의 증가라는 단점을 낳았습니다. Stable은 트랜잭션이 블록 프로포저에게 직접적으로 브로드캐스트되는 구조를 통해, 트랜잭션 전파 효율을 개선하고자 합니다.
### 향후 로드맵: DAG 기반 합의
합의 속도를 획기적으로 증가시키기 위해, Stable은 프로토콜을 DAG 기반 설계로 업그레이드할 계획이며, 이는 최대 5배의 속도 향상을 제공할 수 있습니다.
PBFT 및 HotStuff와 같은 전통적인 view 기반 BFT 프로토콜은 안정적인 네트워크 조건 하에서 낮은 레이턴시를 유지하는 데에 최적화되어 있습니다. 그러나 일시적인 장애가 발생하면 네트워크의 성능이 크게 저하되며, 회복까지 오랜 지연이 발생하는 경우가 많습니다.
Narwhal & Tusk와 같은 1세대 DAG 기반 엔진은 데이터 전파를 트랜잭션 순서 합의와 분리함으로써 단일 프로포저에 있던 병목을 제거하고, 네트워크 불안정 상황에서의 견고함 또한 향상시킬 수 있음을 보여줍니다. 그러나 이 아키텍처들은 기존의 높이 기반 블록 구조를 따르지 않으며 멤풀 설계에 차이가 있기 때문에, CometBFT와 같은 시스템과 호환되지 않습니다.
[Autobahn](/ko/architecture/core-optimization/appendix/autobahn)은 Stable의 합의 계층과 보다 자연스럽게 통합되는 DAG 기반 PBFT 아키텍처를 제공합니다. 이 아키텍처는 정상적인 조건에서 낮은 레이턴시를 가지면서도, 네트워크 장애 발생 시에도 빠르게 회복한다는 장점을 가집니다. Stable 팀은 Autobahn 논문의 저자들과 긴밀한 관계를 유지하고 있으며, StableBFT의 성능을 극대화하기 위해 Autobahn의 아키텍처를 활용할 예정입니다.
Autobahn 위에 구축된 StableBFT는 다음 장점을 가집니다:
* 단일 리더 제한을 제거함으로써 프로포절 병렬 처리
* 데이터 전파와 트랜잭션 순서 정렬을 분리함으로써 더 빠른 완결성
* 견고한 BFT 메커니즘을 통해 네트워크 장애에 대한 향상된 복원력
이러한 고급 합의 설계는 내부 테스트 내 제어된 환경에서 200,000 TPS(합의 레이어만)를 달성한 바 있습니다.
## 실행
### Stable EVM
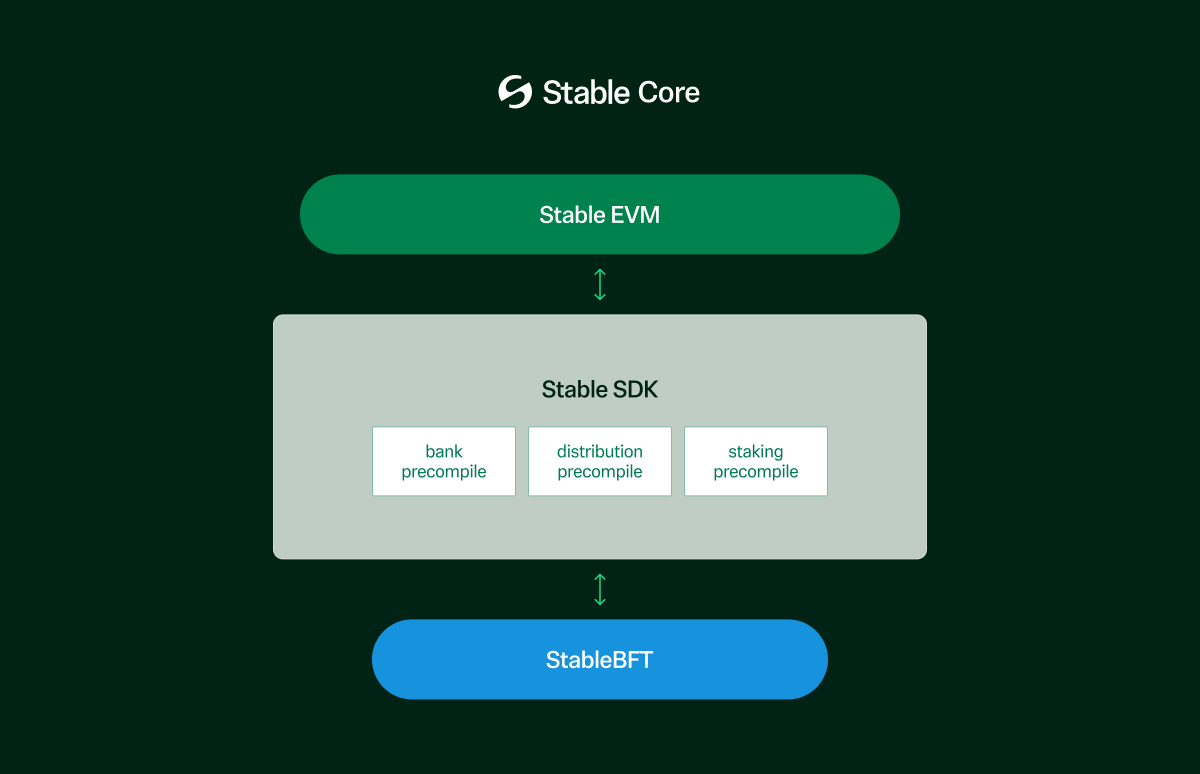 **Stable EVM**은 Stable의 Ethereum 호환 실행 계층으로, MetaMask와 같은 기존 Ethereum 도구 및 지갑을 사용하여 체인과 원활하게 상호작용할 수 있도록 합니다. Stable EVM은 EVM의 개발자 경험과 StableSDK의 모듈러한 고성능 인프라를 결합합니다.
Stable EVM과 StableSDK 간의 간극을 메우기 위해, Stable EVM은 일련의 **프리컴파일**을 도입합니다. 이 프리컴파일들은 EVM 스마트 컨트랙트가 StableSDK의 네이티브 모듈 기능에 접근할 수 있도록 하며, 핵심 체인 로직을 안전하고 아토믹하게 호출할 수 있게 합니다. 이러한 설계는 스마트 컨트랙트가 토큰 전송, 스테이킹, 거버넌스 참여와 같은 특별한 작업을 수행할 수 있도록 합니다.
### 향후 로드맵 1: 낙관적 병렬 실행
역사적으로, 블록체인 시스템은 각 트랜잭션이 순차적으로 하나씩 처리되는 ‘순차 실행’에 의존해 왔으며, 이는 모든 노드에서 결정론적인 상태를 보장하기 위함이었습니다. 이러한 설계는 일관성을 보장하지만, 동시에 처리량과 확장성에 심각한 제약을 만듭니다. 특히 현대 블록체인이 수만 건의 TPS를 지원하고자 할 때 더욱 그러합니다.
이 제약을 극복하기 위해, Stable은 **낙관적 병렬 실행(Optimistic Parallel Execution, OPE)** 을 가능하게 하는 검증된 병렬 실행 엔진인 **Block-STM**을 채택하고 있습니다. 이를 통해 트랜잭션은 결정론성을 유지하면서 병렬로 실행될 수 있으며, 성능이 크게 향상됩니다.
#### Block-STM 작동 방식
Block-STM은 낙관적 동시성 제어 메커니즘을 활용합니다. 트랜잭션은 충돌이 없다는 가정 하에 병렬로 먼저 실행되며, 이후 검증 단계에서 충돌이 감지되면 재실행을 통해 처리됩니다. 이 과정은 다음 다섯 가지 핵심 기술에 기반합니다:
**1. 다중 버전 메모리 구조 (Multi-Version Memory Structure)**
Block-STM은 각 메모리 키에 대해 여러 버전을 저장합니다:
* 각 트랜잭션은 이전 트랜잭션이 커밋한 최신 버전을 읽습니다.
* 실행 중의 읽기와 쓰기 모두 버전이 지정됩니다.
* 이후 검증 시 이러한 버전들에 대한 일관성 검사를 통해 충돌 여부를 판단합니다.
**2. Read-Set / Write-Set 기반 검증**
* 각 트랜잭션은 실행 중 읽은 키와 버전을 Read-Set에 기록합니다.
* 실행이 끝나면 Write-Set이 다중 버전 메모리에 기록됩니다.
* 검증 과정에서 다른 트랜잭션이 해당 Read-Set의 키를 수정한 경우, 이는 충돌로 간주되어 트랜잭션은 중단되고, 반복 시도 번호(incarnation number)를 증가시켜 재실행됩니다.
**3. ESTIMATE 마커를 이용한 빠른 충돌 감지**
* 트랜잭션이 실패하면 해당 Write-Set은 ESTIMATE 플래그로 마크됩니다.
* 다른 트랜잭션이 ESTIMATE로 표시된 값을 읽으면 (**`READ_ERROR`** 가 발생하면) 즉시 중단하고 재실행을 대기합니다.
* 이를 통해 전체 트랜잭션을 다시 실행하지 않고도 의존 관계를 빠르게 식별할 수 있습니다.
**4. 사전 정의된 트랜잭션 순서**
* 블록 내 모든 트랜잭션은 사전 정의된 결정론적 순서에 따라 실행됩니다.
* 검증 및 커밋 단계 또한 동일한 순서를 따릅니다.
* 이를 통해 병렬 실행 환경에서도 모든 노드가 동일한 최종 상태에 도달하도록 보장합니다.
**5. 협업 스케줄러**
* 협업 스케줄러는 실행 및 검증 워커 간에 작업을 스레드-세이프 방식으로 분배합니다.
* 인덱스가 낮은 트랜잭션을 우선 처리하여, 조기 커밋을 가속화하고 재실행을 최소화합니다.
* 스케줄러는 트랜잭션의 반복 시도 번호를 관리하며, 성공적으로 커밋될 때까지 반복 실행합니다.
#### Block-STM의 주요 이점
* **락 없이 병렬성 실현**: MVCC(Multi-Version Concurrency Control)를 활용하여, Block-STM은 뮤텍스 락 없이 여러 트랜잭션의 동시 읽기/쓰기를 가능하게 합니다. 충돌 검사는 실행 이후에만 수행되므로, 초기 처리 단계에서 최대 처리량을 확보할 수 있습니다.
* **ESTIMATE 마커를 통한 최소한의 오버헤드**: 실패한 트랜잭션은 자신의 Write-Set에 ESTIMATE 마커를 설정하여, 여기에 의존하는 트랜잭션을 조기에 중단하고 불필요한 실행을 피할 수 있도록 합니다. 이로 인해 유효한 실행 경로에 더 빠르게 도달할 수 있습니다.
* **효율적인 스케줄링 및 우선 커밋**: 협업 스케줄러를 통해 인덱스가 낮은 트랜잭션을 우선 커밋함으로써, 재시도를 최소화합니다. 이는 전체 처리량을 개선하고 실행 주기를 단축시킵니다.
* **결정론성과 합의 호환성**: 모든 트랜잭션은 고정된 순서를 따르므로, 재실행된 트랜잭션도 결국 동일한 순서로 커밋됩니다. 이를 통해 모든 노드 간 안전하고 결정론적인 상태 합의가 가능하며, 병렬화된 환경에서도 합의 무결성이 유지됩니다.
#### Stable의 OPE
**Stable EVM**은 Stable의 Ethereum 호환 실행 계층으로, MetaMask와 같은 기존 Ethereum 도구 및 지갑을 사용하여 체인과 원활하게 상호작용할 수 있도록 합니다. Stable EVM은 EVM의 개발자 경험과 StableSDK의 모듈러한 고성능 인프라를 결합합니다.
Stable EVM과 StableSDK 간의 간극을 메우기 위해, Stable EVM은 일련의 **프리컴파일**을 도입합니다. 이 프리컴파일들은 EVM 스마트 컨트랙트가 StableSDK의 네이티브 모듈 기능에 접근할 수 있도록 하며, 핵심 체인 로직을 안전하고 아토믹하게 호출할 수 있게 합니다. 이러한 설계는 스마트 컨트랙트가 토큰 전송, 스테이킹, 거버넌스 참여와 같은 특별한 작업을 수행할 수 있도록 합니다.
### 향후 로드맵 1: 낙관적 병렬 실행
역사적으로, 블록체인 시스템은 각 트랜잭션이 순차적으로 하나씩 처리되는 ‘순차 실행’에 의존해 왔으며, 이는 모든 노드에서 결정론적인 상태를 보장하기 위함이었습니다. 이러한 설계는 일관성을 보장하지만, 동시에 처리량과 확장성에 심각한 제약을 만듭니다. 특히 현대 블록체인이 수만 건의 TPS를 지원하고자 할 때 더욱 그러합니다.
이 제약을 극복하기 위해, Stable은 **낙관적 병렬 실행(Optimistic Parallel Execution, OPE)** 을 가능하게 하는 검증된 병렬 실행 엔진인 **Block-STM**을 채택하고 있습니다. 이를 통해 트랜잭션은 결정론성을 유지하면서 병렬로 실행될 수 있으며, 성능이 크게 향상됩니다.
#### Block-STM 작동 방식
Block-STM은 낙관적 동시성 제어 메커니즘을 활용합니다. 트랜잭션은 충돌이 없다는 가정 하에 병렬로 먼저 실행되며, 이후 검증 단계에서 충돌이 감지되면 재실행을 통해 처리됩니다. 이 과정은 다음 다섯 가지 핵심 기술에 기반합니다:
**1. 다중 버전 메모리 구조 (Multi-Version Memory Structure)**
Block-STM은 각 메모리 키에 대해 여러 버전을 저장합니다:
* 각 트랜잭션은 이전 트랜잭션이 커밋한 최신 버전을 읽습니다.
* 실행 중의 읽기와 쓰기 모두 버전이 지정됩니다.
* 이후 검증 시 이러한 버전들에 대한 일관성 검사를 통해 충돌 여부를 판단합니다.
**2. Read-Set / Write-Set 기반 검증**
* 각 트랜잭션은 실행 중 읽은 키와 버전을 Read-Set에 기록합니다.
* 실행이 끝나면 Write-Set이 다중 버전 메모리에 기록됩니다.
* 검증 과정에서 다른 트랜잭션이 해당 Read-Set의 키를 수정한 경우, 이는 충돌로 간주되어 트랜잭션은 중단되고, 반복 시도 번호(incarnation number)를 증가시켜 재실행됩니다.
**3. ESTIMATE 마커를 이용한 빠른 충돌 감지**
* 트랜잭션이 실패하면 해당 Write-Set은 ESTIMATE 플래그로 마크됩니다.
* 다른 트랜잭션이 ESTIMATE로 표시된 값을 읽으면 (**`READ_ERROR`** 가 발생하면) 즉시 중단하고 재실행을 대기합니다.
* 이를 통해 전체 트랜잭션을 다시 실행하지 않고도 의존 관계를 빠르게 식별할 수 있습니다.
**4. 사전 정의된 트랜잭션 순서**
* 블록 내 모든 트랜잭션은 사전 정의된 결정론적 순서에 따라 실행됩니다.
* 검증 및 커밋 단계 또한 동일한 순서를 따릅니다.
* 이를 통해 병렬 실행 환경에서도 모든 노드가 동일한 최종 상태에 도달하도록 보장합니다.
**5. 협업 스케줄러**
* 협업 스케줄러는 실행 및 검증 워커 간에 작업을 스레드-세이프 방식으로 분배합니다.
* 인덱스가 낮은 트랜잭션을 우선 처리하여, 조기 커밋을 가속화하고 재실행을 최소화합니다.
* 스케줄러는 트랜잭션의 반복 시도 번호를 관리하며, 성공적으로 커밋될 때까지 반복 실행합니다.
#### Block-STM의 주요 이점
* **락 없이 병렬성 실현**: MVCC(Multi-Version Concurrency Control)를 활용하여, Block-STM은 뮤텍스 락 없이 여러 트랜잭션의 동시 읽기/쓰기를 가능하게 합니다. 충돌 검사는 실행 이후에만 수행되므로, 초기 처리 단계에서 최대 처리량을 확보할 수 있습니다.
* **ESTIMATE 마커를 통한 최소한의 오버헤드**: 실패한 트랜잭션은 자신의 Write-Set에 ESTIMATE 마커를 설정하여, 여기에 의존하는 트랜잭션을 조기에 중단하고 불필요한 실행을 피할 수 있도록 합니다. 이로 인해 유효한 실행 경로에 더 빠르게 도달할 수 있습니다.
* **효율적인 스케줄링 및 우선 커밋**: 협업 스케줄러를 통해 인덱스가 낮은 트랜잭션을 우선 커밋함으로써, 재시도를 최소화합니다. 이는 전체 처리량을 개선하고 실행 주기를 단축시킵니다.
* **결정론성과 합의 호환성**: 모든 트랜잭션은 고정된 순서를 따르므로, 재실행된 트랜잭션도 결국 동일한 순서로 커밋됩니다. 이를 통해 모든 노드 간 안전하고 결정론적인 상태 합의가 가능하며, 병렬화된 환경에서도 합의 무결성이 유지됩니다.
#### Stable의 OPE
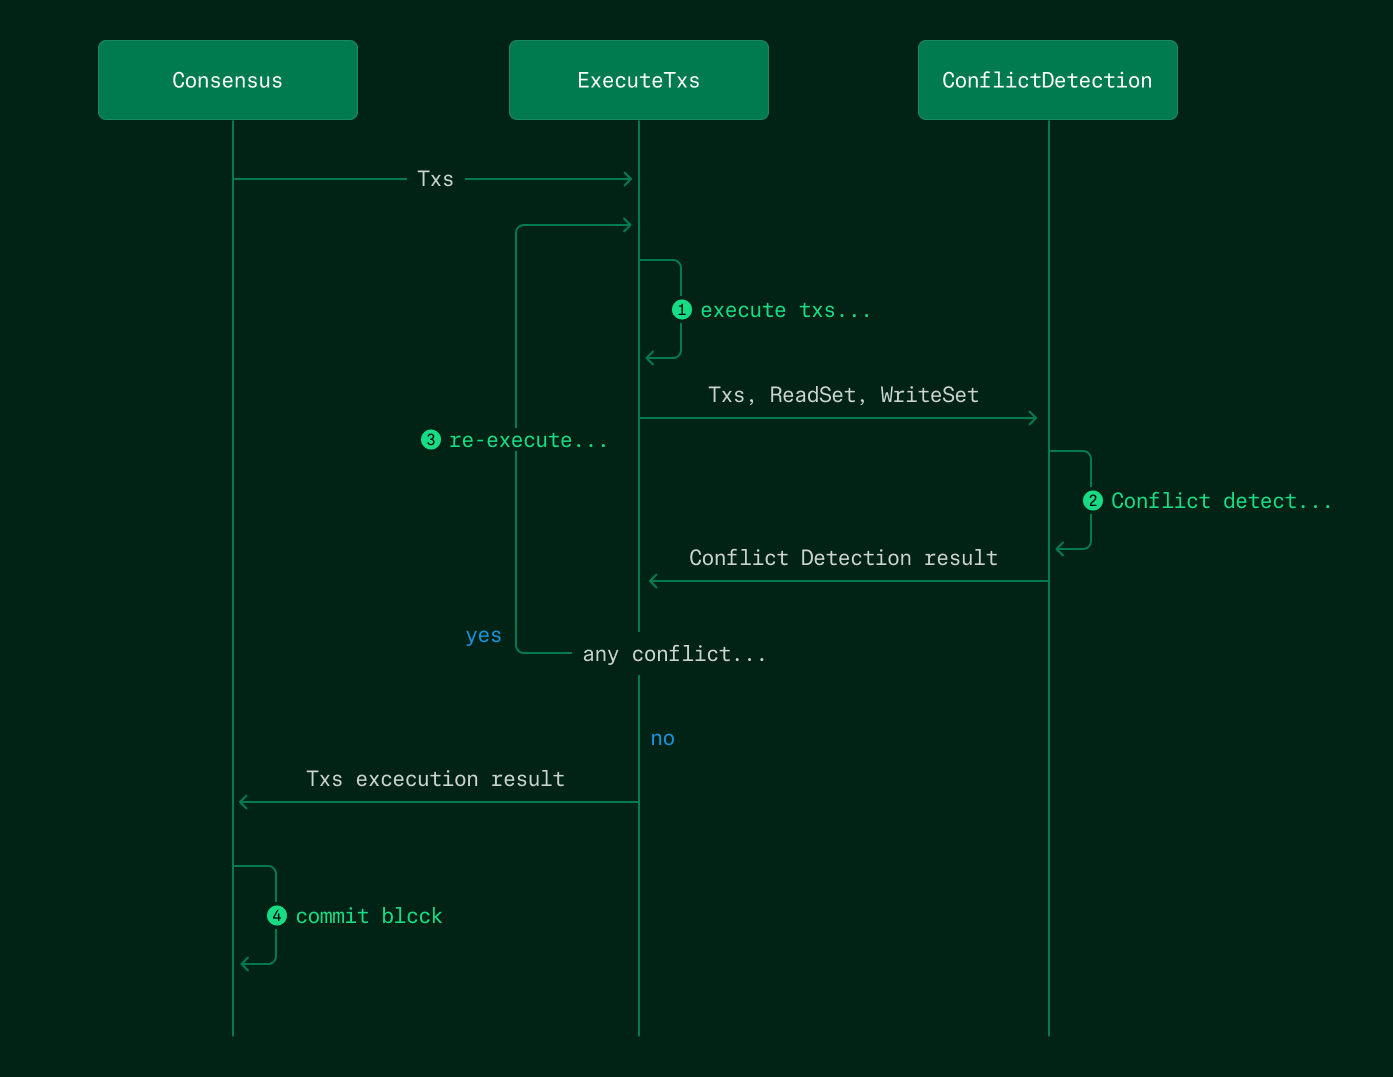 Stablechain은 **낙관적 병렬 실행(OPE)** 을 실행 계층의 핵심 기능으로 통합할 예정이며, 이는 **낙관적 블록 처리(Optimistic Block Processing, OBP)** 와 함께 사용됩니다. OPE와 OBP는 서로 보완적이지만 본질적으로 다른 전략이라는 점에 유의해야 합니다.
#### OBP란
* OBP는 병렬 전략이 아니라, 실행 타이밍과 관련이 있습니다.
* `ProcessProposal` 단계에서, Stable은 다른 노드에 블록이 전파되는 동안 해당 블록을 미리 실행합니다.
* 결과 상태는 메모리에 캐시되며, 이는 `FinalizeBlock` 단계에서 재사용되어 불필요한 시간 낭비와 중복된 연산을 줄입니다.
OPE와 OBP를 결합함으로써, Stable은 실행 지연과 리소스 충돌을 모두 최소화하고, 높은 트랜잭션 부하 환경에서도 우수한 성능을 제공합니다.
#### 예상 성능 향상
내부 벤치마크에 따르면, **Block-STM 기반 OPE**와 **StableDB** 통합을 통해 Stable은 전체 트랜잭션 처리량에서 **최소 2배 이상의 향상**을 달성할 수 있습니다.
### 향후 로드맵 2: StableVM++
OPE 및 OBP와 같은 노력은 *다수의 트랜잭션을 동시에 실행하는 방식을 최적화* 하는 데 초점을 맞추지만, 또 하나의 핵심 성능 요소는 **각 개별 트랜잭션을 얼마나 효율적으로 처리할 수 있는가**입니다.
Stable은 현재 실행 속도를 높이기 위해 대체 EVM 구현체들을 탐색하는 중입니다. 그중에서도 C++로 작성된 고성능 EVM인 **EVMONE**이 기존의 Go 기반 EVM을 대체할 유력한 후보로 떠오르고 있습니다. EVMONE으로의 전환은 이론적인 벤치마크 기준으로 **최대 6배의 EVM 실행 성능 향상**을 가져올 것으로 기대됩니다.
## 고성능 RPC
고성능 블록체인을 구현하기 위해서는 합의나 블록 생성만을 최적화해서는 충분하지 않습니다. RPC 계층은 블록체인과 사용자를 연결하는 인터페이스로, 사용자 경험에 있어 핵심적인 구성 요소입니다. Stable은 기존 RPC 설계의 한계를 극복하기 위해 새로운 RPC 전용 아키텍처를 제안합니다.
### 왜 고성능 RPC가 중요한가
#### 사용자를 위한 블록체인 진입 관문
**RPC(Remote Procedure Call)** 인터페이스는 사용자가 블록체인과 상호작용하는 주요 방법입니다:
* 지갑은 트랜잭션을 브로드캐스트하기 위해 RPC를 사용합니다.
* DApp은 UI 렌더링을 위한 온체인 데이터 조회뿐 아니라, 트랜잭션 준비 및 시뮬레이션, 로그 및 이벤트 수집 등을 위해 RPC를 사용합니다.
* 익스플로러, 인덱서, 봇 등도 모두 실시간 데이터를 위해 RPC에 의존합니다.
아무리 블록체인이 트랜잭션을 빠르게 처리하고 블록을 신속하게 생성할 수 있어도, 사용자가 RPC 단의 지연 때문에 느리다고 느낀다면 아무 소용이 없습니다. 실제로는 RPC가 전체 사용자 경험에서 병목 지점이 되는 경우가 많습니다.
Stable은 고성능 체인을 위한 로드맵에서 **RPC 최적화**를 최우선 과제로 명시하고 있습니다.
### 기존 RPC 아키텍처의 문제점
#### 모놀리식 설계와 리소스 충돌
Stablechain은 **낙관적 병렬 실행(OPE)** 을 실행 계층의 핵심 기능으로 통합할 예정이며, 이는 **낙관적 블록 처리(Optimistic Block Processing, OBP)** 와 함께 사용됩니다. OPE와 OBP는 서로 보완적이지만 본질적으로 다른 전략이라는 점에 유의해야 합니다.
#### OBP란
* OBP는 병렬 전략이 아니라, 실행 타이밍과 관련이 있습니다.
* `ProcessProposal` 단계에서, Stable은 다른 노드에 블록이 전파되는 동안 해당 블록을 미리 실행합니다.
* 결과 상태는 메모리에 캐시되며, 이는 `FinalizeBlock` 단계에서 재사용되어 불필요한 시간 낭비와 중복된 연산을 줄입니다.
OPE와 OBP를 결합함으로써, Stable은 실행 지연과 리소스 충돌을 모두 최소화하고, 높은 트랜잭션 부하 환경에서도 우수한 성능을 제공합니다.
#### 예상 성능 향상
내부 벤치마크에 따르면, **Block-STM 기반 OPE**와 **StableDB** 통합을 통해 Stable은 전체 트랜잭션 처리량에서 **최소 2배 이상의 향상**을 달성할 수 있습니다.
### 향후 로드맵 2: StableVM++
OPE 및 OBP와 같은 노력은 *다수의 트랜잭션을 동시에 실행하는 방식을 최적화* 하는 데 초점을 맞추지만, 또 하나의 핵심 성능 요소는 **각 개별 트랜잭션을 얼마나 효율적으로 처리할 수 있는가**입니다.
Stable은 현재 실행 속도를 높이기 위해 대체 EVM 구현체들을 탐색하는 중입니다. 그중에서도 C++로 작성된 고성능 EVM인 **EVMONE**이 기존의 Go 기반 EVM을 대체할 유력한 후보로 떠오르고 있습니다. EVMONE으로의 전환은 이론적인 벤치마크 기준으로 **최대 6배의 EVM 실행 성능 향상**을 가져올 것으로 기대됩니다.
## 고성능 RPC
고성능 블록체인을 구현하기 위해서는 합의나 블록 생성만을 최적화해서는 충분하지 않습니다. RPC 계층은 블록체인과 사용자를 연결하는 인터페이스로, 사용자 경험에 있어 핵심적인 구성 요소입니다. Stable은 기존 RPC 설계의 한계를 극복하기 위해 새로운 RPC 전용 아키텍처를 제안합니다.
### 왜 고성능 RPC가 중요한가
#### 사용자를 위한 블록체인 진입 관문
**RPC(Remote Procedure Call)** 인터페이스는 사용자가 블록체인과 상호작용하는 주요 방법입니다:
* 지갑은 트랜잭션을 브로드캐스트하기 위해 RPC를 사용합니다.
* DApp은 UI 렌더링을 위한 온체인 데이터 조회뿐 아니라, 트랜잭션 준비 및 시뮬레이션, 로그 및 이벤트 수집 등을 위해 RPC를 사용합니다.
* 익스플로러, 인덱서, 봇 등도 모두 실시간 데이터를 위해 RPC에 의존합니다.
아무리 블록체인이 트랜잭션을 빠르게 처리하고 블록을 신속하게 생성할 수 있어도, 사용자가 RPC 단의 지연 때문에 느리다고 느낀다면 아무 소용이 없습니다. 실제로는 RPC가 전체 사용자 경험에서 병목 지점이 되는 경우가 많습니다.
Stable은 고성능 체인을 위한 로드맵에서 **RPC 최적화**를 최우선 과제로 명시하고 있습니다.
### 기존 RPC 아키텍처의 문제점
#### 모놀리식 설계와 리소스 충돌
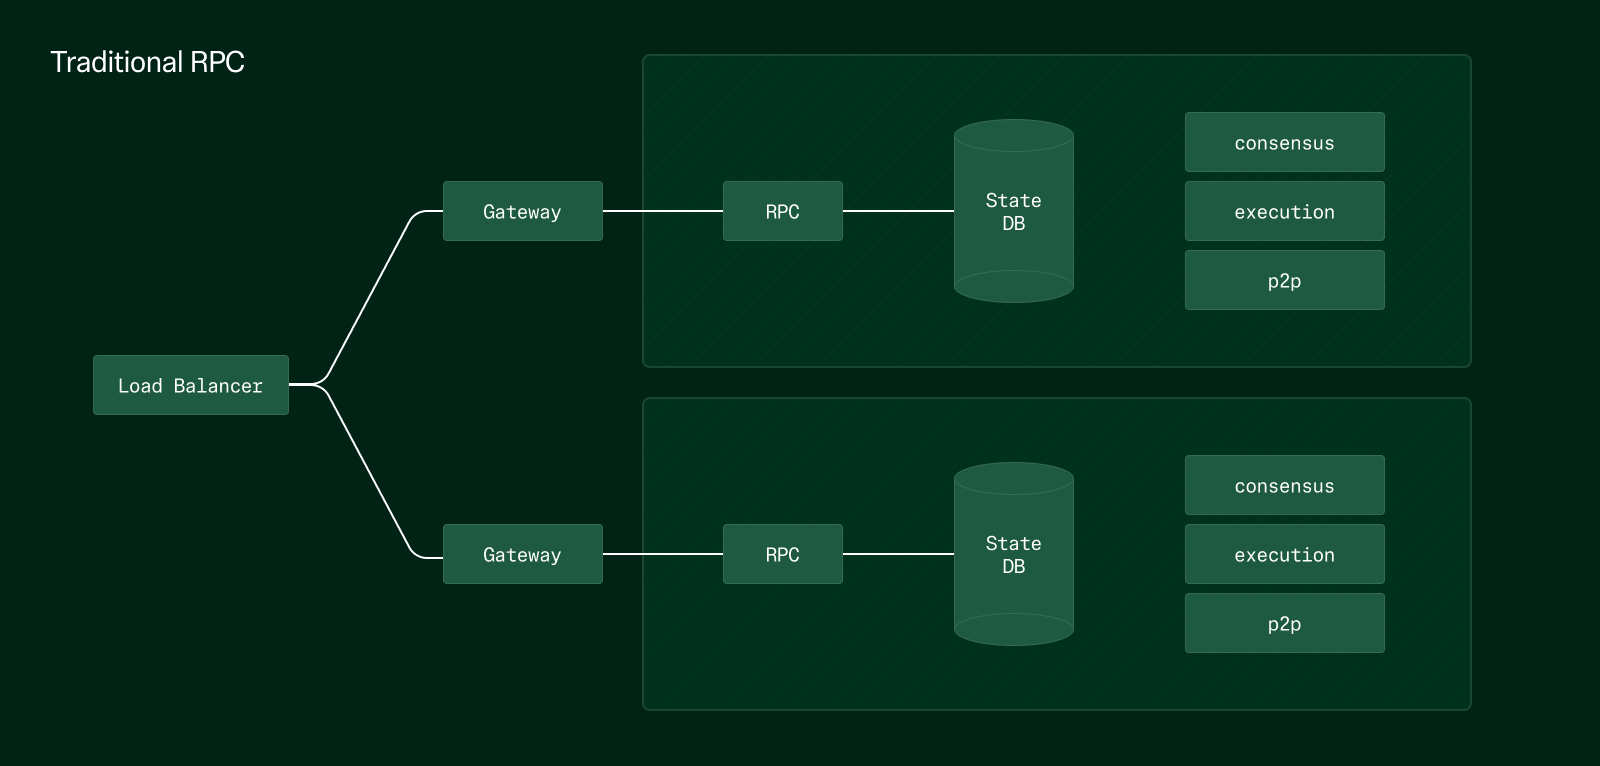 기존의 RPC 노드는 단순히 기존 풀노드를 재활용하여 RPC 엔드포인트를 추가로 노출시킨 형태입니다. 이는 다음과 같은 단점이 존재한다는 것을 의미합니다:
* 체인 동기화와 RPC 요청 처리가 동일한 인스턴스에서 수행됩니다.
* RPC를 확장하려면 풀노드를 새로 셋업해야 하며, 이로 인해 상태 동기화(state sync)나 합의 셋업과 같은 리소스 집약적인 작업이 필요합니다.
* 합의, 실행, RPC가 모두 동일한 CPU, 메모리, 디스크를 공유합니다. 예를 들어 트랜잭션 부하가 높을 때 한 컴포넌트가 자원을 독점하면, 나머지 컴포넌트가 충분한 리소스를 얻지 못해 RPC 성능이 저하됩니다.
또한 기존 아키텍처는 읽기 위주와 쓰기 위주의 연산을 구분하지 않고 동일한 방식으로 처리합니다. 예를 들어 `eth_getBalance`와 같은 읽기 쿼리는 쓰기 트랜잭션보다 훨씬 빈도 수가 많지만, 처리 방식에는 차이가 없습니다. 이러한 구조는 본질적으로 비효율적이며 확장성이 떨어집니다.
### Stable의 RPC 아키텍처
Stable은 읽기와 쓰기를 분리하고 각 경로를 독립적으로 최적화하는 split-path RPC 아키텍처를 도입합니다.
기존의 RPC 노드는 단순히 기존 풀노드를 재활용하여 RPC 엔드포인트를 추가로 노출시킨 형태입니다. 이는 다음과 같은 단점이 존재한다는 것을 의미합니다:
* 체인 동기화와 RPC 요청 처리가 동일한 인스턴스에서 수행됩니다.
* RPC를 확장하려면 풀노드를 새로 셋업해야 하며, 이로 인해 상태 동기화(state sync)나 합의 셋업과 같은 리소스 집약적인 작업이 필요합니다.
* 합의, 실행, RPC가 모두 동일한 CPU, 메모리, 디스크를 공유합니다. 예를 들어 트랜잭션 부하가 높을 때 한 컴포넌트가 자원을 독점하면, 나머지 컴포넌트가 충분한 리소스를 얻지 못해 RPC 성능이 저하됩니다.
또한 기존 아키텍처는 읽기 위주와 쓰기 위주의 연산을 구분하지 않고 동일한 방식으로 처리합니다. 예를 들어 `eth_getBalance`와 같은 읽기 쿼리는 쓰기 트랜잭션보다 훨씬 빈도 수가 많지만, 처리 방식에는 차이가 없습니다. 이러한 구조는 본질적으로 비효율적이며 확장성이 떨어집니다.
### Stable의 RPC 아키텍처
Stable은 읽기와 쓰기를 분리하고 각 경로를 독립적으로 최적화하는 split-path RPC 아키텍처를 도입합니다.
 #### 핵심 원칙
* RPC를 기능에 따라 효율적이고 경량화된 RPC 노드로 분리
* 경량 RPC를 엣지 노드(edge nodes)로 배포하여 확장성 강화
* 각 기능별 RPC의 데이터 경로를 최적화하여 지연을 줄이고 더 직접적이고 효율적인 데이터 구조로 처리
#### 성능 향상
새로운 읽기 전용 RPC 경로에 대한 내부 벤치마크 결과는 다음과 같습니다.
* 동일한 환경에서 10,000 RPS 이상의 처리량, 100ms 미만의 엔드투엔드 레이턴시
* 전체 상태 동기화나 합의 부담 없이 선형 확장 가능한 엣지 노드
Stable의 새로운 RPC 아키텍처는 높은 트래픽에서도 훨씬 더 부드럽고 빠른 사용자 경험을 제공합니다.
### 향후 계획
#### EVM View 호출 최적화
현재 진행 중인 리서치 중 하나는 EVM view 연산 (`eth_call`)에 대한 전용 지원입니다:
* 이 연산은 트랜잭션 커밋이나 상태 업데이트를 필요로 하지 않습니다.
* 현재의 상태에 대한 스냅샷만을 사용하는 경량화된 무상태(stateless) 환경에서 실행이 가능합니다.
* 이러한 작업을 위한 특화된 RPC 노드를 설계하면, 응답 시간을 더욱 단축시키고 주요 전체 노드의 부하를 줄일 수 있습니다.
#### 인덱서와 노드의 결합
인덱서를 노드에 직접 통합하면 dApp에 최대한 빠른 데이터 제공이 가능해집니다.
* 기존 아키텍처: 노드 → RPC → 인덱서 (예: The Graph) → 스토리지 → dApp
* 제안된 아키텍처: 인덱서 + 노드 → DB → dApp
* 이 아키텍처는 인덱서가 노드에 네이티브로 통합되어 있기 때문에, 네트워크 통신 단계를 제거하고 데이터 전달 속도를 획기적으로 향상시킵니다.
## 개요
### 풀스택 코어 최적화
#### 핵심 원칙
* RPC를 기능에 따라 효율적이고 경량화된 RPC 노드로 분리
* 경량 RPC를 엣지 노드(edge nodes)로 배포하여 확장성 강화
* 각 기능별 RPC의 데이터 경로를 최적화하여 지연을 줄이고 더 직접적이고 효율적인 데이터 구조로 처리
#### 성능 향상
새로운 읽기 전용 RPC 경로에 대한 내부 벤치마크 결과는 다음과 같습니다.
* 동일한 환경에서 10,000 RPS 이상의 처리량, 100ms 미만의 엔드투엔드 레이턴시
* 전체 상태 동기화나 합의 부담 없이 선형 확장 가능한 엣지 노드
Stable의 새로운 RPC 아키텍처는 높은 트래픽에서도 훨씬 더 부드럽고 빠른 사용자 경험을 제공합니다.
### 향후 계획
#### EVM View 호출 최적화
현재 진행 중인 리서치 중 하나는 EVM view 연산 (`eth_call`)에 대한 전용 지원입니다:
* 이 연산은 트랜잭션 커밋이나 상태 업데이트를 필요로 하지 않습니다.
* 현재의 상태에 대한 스냅샷만을 사용하는 경량화된 무상태(stateless) 환경에서 실행이 가능합니다.
* 이러한 작업을 위한 특화된 RPC 노드를 설계하면, 응답 시간을 더욱 단축시키고 주요 전체 노드의 부하를 줄일 수 있습니다.
#### 인덱서와 노드의 결합
인덱서를 노드에 직접 통합하면 dApp에 최대한 빠른 데이터 제공이 가능해집니다.
* 기존 아키텍처: 노드 → RPC → 인덱서 (예: The Graph) → 스토리지 → dApp
* 제안된 아키텍처: 인덱서 + 노드 → DB → dApp
* 이 아키텍처는 인덱서가 노드에 네이티브로 통합되어 있기 때문에, 네트워크 통신 단계를 제거하고 데이터 전달 속도를 획기적으로 향상시킵니다.
## 개요
### 풀스택 코어 최적화
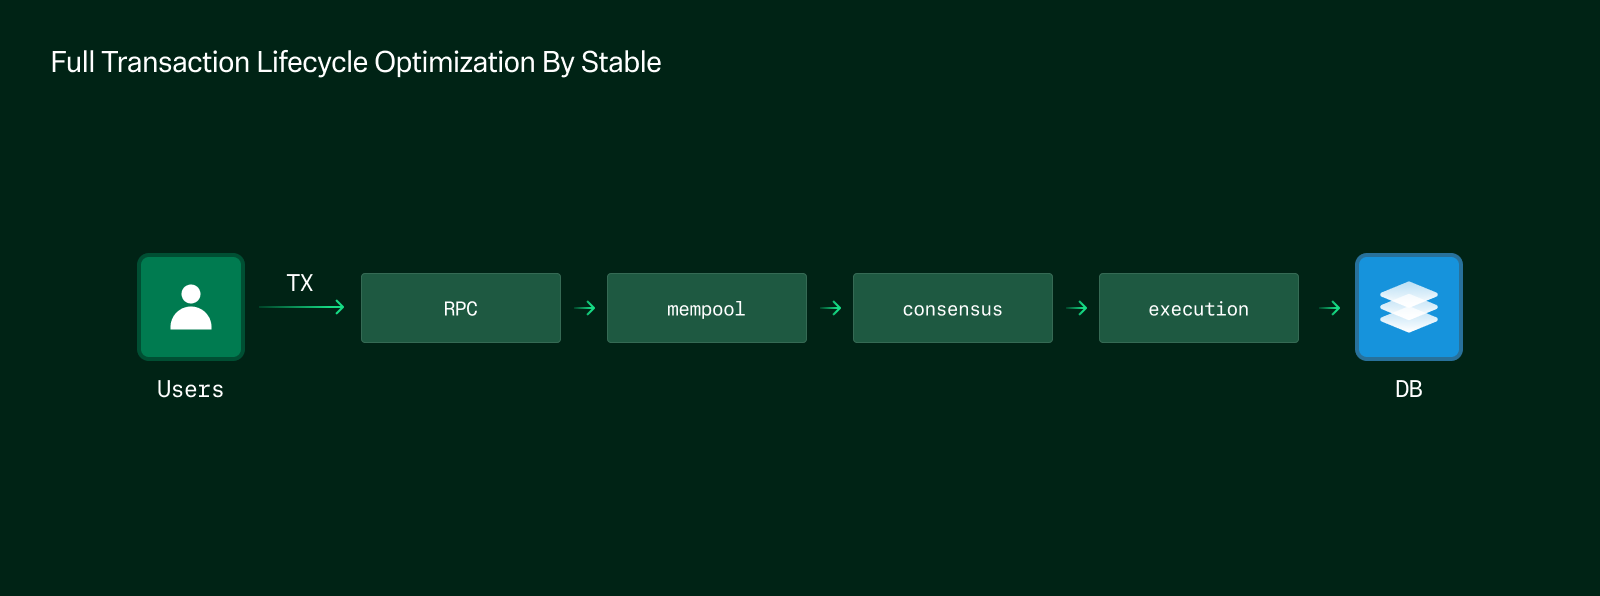 제출부터 결과 완결까지 블록체인 트랜잭션의 라이프사이클은, 강하게 연결된 여러 단계로 구성되어 있습니다. 트랜잭션은 **RPC** 인터페이스를 통해 제출되어, **멤풀**에 추가되고, 블록에 포함되며, **합의**를 통해 검증되고, **상태 머신**에 의해 실행되며, **데이터베이스**에 최종 저장됩니다. 전체 파이프라인을 모두 완료한 이후에야 사용자는 확정된 결과를 받을 수 있습니다.
단 하나의 단계만 개선하는 것으로는 충분하지 않습니다. 파이프라인 내 비효율적인 부분이 하나라도 존재한다면, 이는 전체 시스템의 성능에 악영향을 줄 수 있습니다. Stable이 블록체인 스택 전체를 최적화하는 데에 집중하는 이유입니다.
전체 네트워크에 걸쳐 Stable이 합의, 실행, 데이터베이스, RPC를 포함한 전체 스택 내 각 레이어를 어떻게 최적화하여 신뢰성 있고 고성능의 트랜잭션 처리를 가능하게 하는지 알고 싶으시다면, 다음 페이지들을 읽어보세요.
## StableDB
블록체인 성능에서 주요 병목 중 하나는 **디스크 I/O**에 있습니다. 보다 구체적으로는, 블록 실행 후 상태 데이터를 커밋하고 저장하는 작업이 핵심 병목 지점입니다. Stable은 이 문제를 해결하기 위해 `MemDB`, `VersionDB`, 메모리 매핑 파일 I/O 메커니즘 (`mmap`)와 같은 아키텍처 혁신을 도입하여 처리량을 획기적으로 향상시킵니다.
### 디스크 I/O가 병목이 되는 이유
#### 상태 전환과 저장
트랜잭션 블록이 실행될 때마다 블록체인은 하나의 상태에서 다음 상태로 전환됩니다. 이 과정은 다음과 같은 두 가지 기본 단계로 나뉩니다:
1. **상태 커밋**: 트랜잭션 실행 후, 새로운 애플리케이션 상태가 커밋됩니다
2. **상태 저장**: 커밋된 상태가 디스크에 영구적으로 저장되어, 향후 접근성과 과거 기록에 검증을 가능하게 합니다.
제출부터 결과 완결까지 블록체인 트랜잭션의 라이프사이클은, 강하게 연결된 여러 단계로 구성되어 있습니다. 트랜잭션은 **RPC** 인터페이스를 통해 제출되어, **멤풀**에 추가되고, 블록에 포함되며, **합의**를 통해 검증되고, **상태 머신**에 의해 실행되며, **데이터베이스**에 최종 저장됩니다. 전체 파이프라인을 모두 완료한 이후에야 사용자는 확정된 결과를 받을 수 있습니다.
단 하나의 단계만 개선하는 것으로는 충분하지 않습니다. 파이프라인 내 비효율적인 부분이 하나라도 존재한다면, 이는 전체 시스템의 성능에 악영향을 줄 수 있습니다. Stable이 블록체인 스택 전체를 최적화하는 데에 집중하는 이유입니다.
전체 네트워크에 걸쳐 Stable이 합의, 실행, 데이터베이스, RPC를 포함한 전체 스택 내 각 레이어를 어떻게 최적화하여 신뢰성 있고 고성능의 트랜잭션 처리를 가능하게 하는지 알고 싶으시다면, 다음 페이지들을 읽어보세요.
## StableDB
블록체인 성능에서 주요 병목 중 하나는 **디스크 I/O**에 있습니다. 보다 구체적으로는, 블록 실행 후 상태 데이터를 커밋하고 저장하는 작업이 핵심 병목 지점입니다. Stable은 이 문제를 해결하기 위해 `MemDB`, `VersionDB`, 메모리 매핑 파일 I/O 메커니즘 (`mmap`)와 같은 아키텍처 혁신을 도입하여 처리량을 획기적으로 향상시킵니다.
### 디스크 I/O가 병목이 되는 이유
#### 상태 전환과 저장
트랜잭션 블록이 실행될 때마다 블록체인은 하나의 상태에서 다음 상태로 전환됩니다. 이 과정은 다음과 같은 두 가지 기본 단계로 나뉩니다:
1. **상태 커밋**: 트랜잭션 실행 후, 새로운 애플리케이션 상태가 커밋됩니다
2. **상태 저장**: 커밋된 상태가 디스크에 영구적으로 저장되어, 향후 접근성과 과거 기록에 검증을 가능하게 합니다.
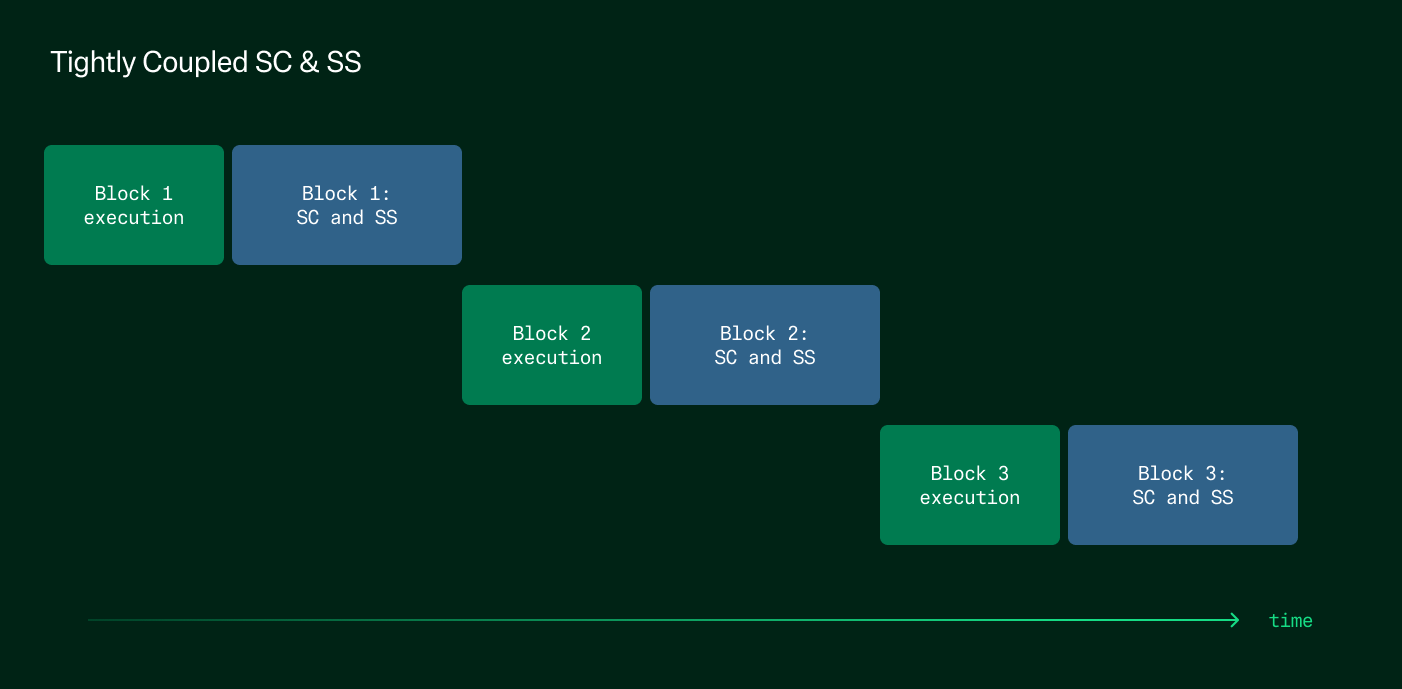 기존 아키텍처에서는, 상태 저장이 상태 커밋과 **강하게 결합되어** 있습니다. 이는 다음을 의미합니다.
* 노드는 다음 블록을 실행하기 전에 새로운 상태가 디스크에 완전히 저장될 때까지 대기해야 합니다.
* 상태 데이터는 고정된 주소를 가지지 않은 임의의 디스크 위치에 기록됩니다. 이로 인해 이후 트랜잭션 실행 시 상태 데이터를 검색하는 데 높은 레이턴시가 발생합니다.
합의 및 실행 계층이 아무리 최적화되어 있어도, 이처럼 느린 디스크 작업에 대한 의존성 때문에 시스템 전체 성능에는 상한선이 생깁니다.
### 더 높은 처리량을 위한 DB 연산 최적화
이러한 제약을 극복하기 위해 Stable은 **상태 연산의 분리** 및 **메모리 매핑 DB 최적화** 라는 두 가지 아키텍처 개선을 제안합니다.
#### 1. 상태 커밋과 저장의 분리
기존 아키텍처에서는, 상태 저장이 상태 커밋과 **강하게 결합되어** 있습니다. 이는 다음을 의미합니다.
* 노드는 다음 블록을 실행하기 전에 새로운 상태가 디스크에 완전히 저장될 때까지 대기해야 합니다.
* 상태 데이터는 고정된 주소를 가지지 않은 임의의 디스크 위치에 기록됩니다. 이로 인해 이후 트랜잭션 실행 시 상태 데이터를 검색하는 데 높은 레이턴시가 발생합니다.
합의 및 실행 계층이 아무리 최적화되어 있어도, 이처럼 느린 디스크 작업에 대한 의존성 때문에 시스템 전체 성능에는 상한선이 생깁니다.
### 더 높은 처리량을 위한 DB 연산 최적화
이러한 제약을 극복하기 위해 Stable은 **상태 연산의 분리** 및 **메모리 매핑 DB 최적화** 라는 두 가지 아키텍처 개선을 제안합니다.
#### 1. 상태 커밋과 저장의 분리
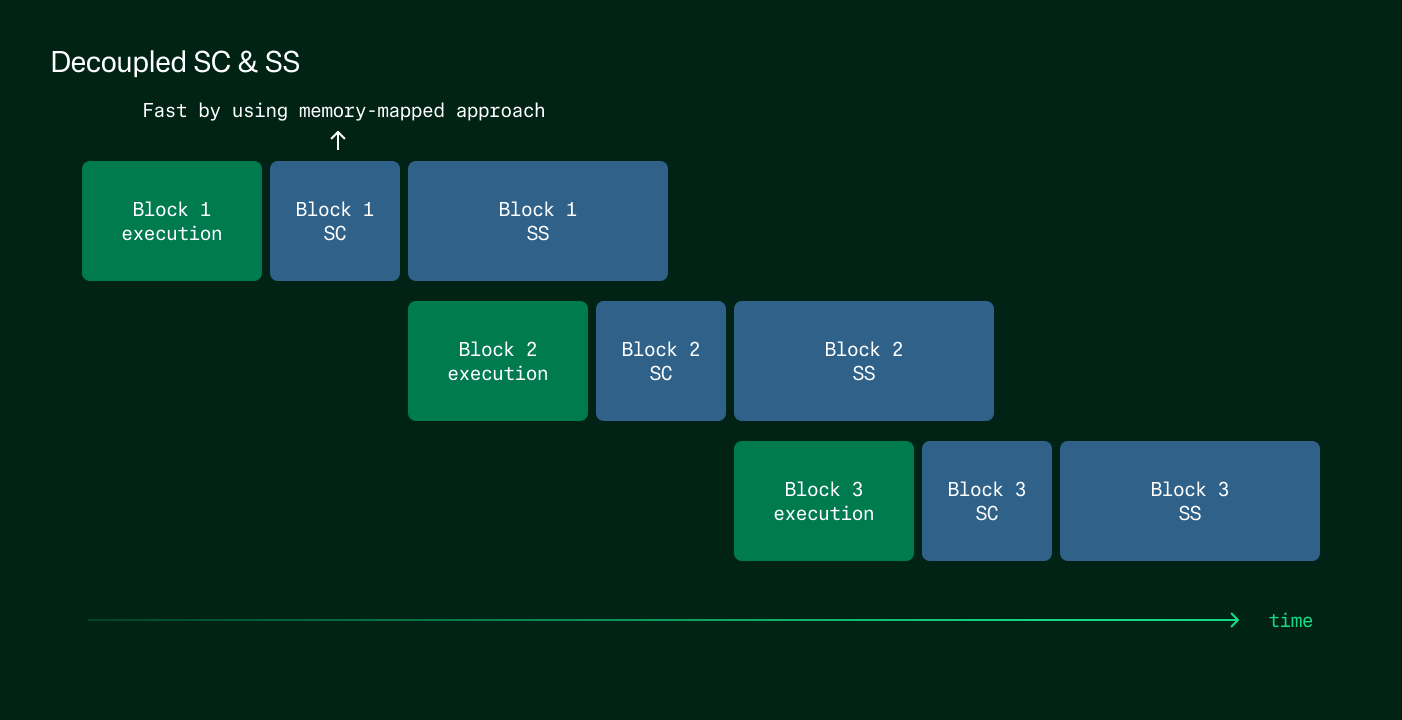 첫 번째 단계는 상태 커밋과 저장을 분리하는 것입니다:
* 새로운 상태가 커밋되면, 노드는 즉시 다음 블록을 실행합니다.
* 상태를 디스크에 저장하는 작업은 비동기적으로 백그라운드에서 처리됩니다.
이러한 분리를 통해 실행은 디스크 쓰기의 레이턴시에 영향받지 않고 즉시 진행될 수 있으며, 의존성에 의해 작업이 멈추는 현상을 제거하여 결국 전체적인 성능이 향상될 수 있습니다.
#### 2. `mmap` 을 통한`MemDB` 및 `VersionDB` 도입
Stable은 메모리 매핑 파일 I/O 메커니즘 (`mmap`)을 기반으로 한 이중 데이터베이스 모델을 도입하여 이를 보강합니다:
* **MemDB (메모리 DB)**:
* 자주 접근되는 최근/활성 데이터를 저장
* mmap을 통한 고정 주소 매핑을 사용하여 빠르고 결정론적인 조회가 가능
* 최근 수정된 상태에 접근하는 대부분의 트랜잭션에 대해 이상적인 구조
* **VersionDB (히스토리컬 DB)**:
* 오래된 과거 상태를 디스크에 저장
* 자주 접근되지 않는, 오래되거나 넓은 범위의 데이터에 대한 쿼리에 최적화됨
이 설계를 통해 **핫 데이터는 빠른 메모리 기반 구조에서 제공**되고, 콜드 데이터는 느리지만 영구적인 스토리지로 오프로드됩니다. 효율을 고려하여 상태를 분류하고 `mmap` 접근을 활용함으로써, Stable은 블록 실행 중 DB의 읽기/쓰기 지연을 크게 줄일 수 있습니다.
### 예상되는 성능 개선 및 선례
이 아키텍처 최적화는 이론적인 아이디어에 그치지 않습니다. Sei 및 Cronos와 같은 고성능 블록체인들이 유사한 구조를 이미 구현하고 있으며, 메모리 매핑 DB 및 상태 커밋/저장의 분리를 통해 **전체 TPS가 최대 2배 향상**되었음을 보고했습니다.
Stable 또한 이와 유사한 성능 향상을 기대하고 있으며, 새로운 아키텍처에서는 스토리지 레이어가 더 이상 병목이 되지 않기 때문에, 합의 및 실행 성능이 디스크 연산에 의해 제한되지 않고 자유롭게 확장될 수 있게 됩니다.
### 추가 자료
더 자세한 기술 분석과 구현 내용을 보려면 다음 문서를 참고하세요:
* [ADR-065: Cosmos Store V2 Architecture](https://docs.cosmos.network/main/build/architecture/adr-065-store-v2)
* [MemIAVL: A Practical Guide](https://hackmd.io/@yihuang/rkeCvy5xh)
* [Cronos MemIAVL Node Configuration](https://docs.cronos.org/for-node-hosts/running-nodes/memiavl)
* [Sei’s DB Design Approach](https://4pillars.io/ko/articles/sei-db)
## Autobahn
### BFT 내 트레이드오프: 레이턴시 vs. 견고성
현대의 비잔틴 장애 허용(Byzantine Fault Tolerant, BFT) 합의 프로토콜은 일반적으로 부분 동기(partial synchrony) 모델에서 동작합니다. 이 모델은 어떤 시점 이후에는 네트워크가 안정되며 메시지 지연 시간이 유한하게 유지된다는 가정에 기반합니다. 이 모델은 프로토콜 설계에 있어 실용적으로 작용해 왔지만, 실제 운영 환경에서는 장기간 상태를 안정적으로 유지하기 어렵습니다. 대신 시스템은 지속적인 동기 구간과 간헐적인 장애(예: 레이턴시 증가, 노드 장애, 공격적 조건 등)를 반복적으로 겪습니다. 이러한 일시적 장애를 **"블립(blip)"** 이라고 합니다.
이러한 조건 하에서, 기존 합의 프로토콜은 **안정적인 네트워크 환경에서의 저지연성과 장애 발생 시의 견고성 사이에서 선택**을 강요받습니다.
* PBFT, HotStuff와 같은 전통적인 **view 기반 BFT 프로토콜**은 네트워크가 안정되어 있을 때 좋은 반응성을 갖추도록 최적화되어 있습니다. 그러나 블립이 발생하면 성능이 급격히 저하되며, 이 성능 저하의 여파로 네트워크가 회복된 후에도 백로그된 요청들이 누적되어 트랜잭션 처리가 지연될 수 있습니다.
* [Narwhal & Tusk](https://arxiv.org/pdf/2105.11827)/[Bullshark](https://arxiv.org/pdf/2201.05677)와 같은 **DAG 기반 BFT 프로토콜**은 데이터 전파(DAG)와 합의(BFT)를 분리하여, 트랜잭션을 비동기적으로 각 레플리카에 전파합니다. 이러한 설계는 높은 처리량을 가능하게 하며, 네트워크 장애 중에도 시스템이 계속 진행(progress)할 수 있도록 합니다. 하지만 비동기 정렬 메커니즘의 복잡성으로 인해, 안정된 상황에서도 높은 레이턴시를 보이는 경향이 있습니다.
[**Autobahn**](https://arxiv.org/pdf/2401.10369)은 이러한 두 설계 철학을 연결하는 새로운 접근 방식을 제시합니다. Autobahn은 DAG 기반 프로토콜의 높은 처리량 및 블립 내성(blip tolerance)과, 전통적인 view 기반 합의의 낮은 레이턴시를 결합합니다. Autobahn의 핵심은 데이터 전파 계층이 합의의 진행 여부와 무관하게 지속적으로 제안을 네트워크 속도로 전파하는 고도로 병렬화된 구조입니다. 이를 기반으로 Autobahn은 낮은 레이턴시의 부분 동기 합의 프로토콜을 운영하며, 데이터 레이어 위에 올라가는 경량 스냅샷을 참조하여 프로포절을 커밋합니다.
Autobahn의 결정적인 특징은, 블립 이후에도 성능 저하 없이 복구가 될 수 있다는 점입니다. 이러한 속성은 “**seamlessness**“라 불리며, 네트워크가 안정화되면 누적된 트랜잭션 백로그를 재처리 없이 즉시 커밋할 수 있도록 보장합니다. 데이터의 가용성과 순서 정렬을 명확히 분리하고, 프로토콜에 의한 동기화 지연을 방지함으로써, Autobahn은 현실적 블록체인 환경에서 강력하면서도 반응성이 뛰어난 합의 기반을 제공합니다.
### Autobahn 아키텍처 개요
Autobahn은 두 핵심 계층 - **데이터 전파 계층**과 **합의 계층**의 책임을 명확히 분리한 구조 위에 설계되어 있습니다. 이러한 분리는 Narwhal과 같은 DAG 시스템에서 영감을 받았으며, Autobahn은 여기에 seamlessness와 낮은 레이턴시를 지원하기 위한 확장을 더했습니다.
데이터 전파 계층은 클라이언트 트랜잭션을 확장 가능하고 비동기적인 방식으로 브로드캐스트하는 역할을 합니다. 각 레플리카는 각자 트랜잭션 묶음을 전파하는 별도의 ‘차선(lane)’을 가지고 있으며, 이는 합의 상태와 무관하게 독립적으로 전파 및 인증될 수 있습니다. 각 차선은 합의가 지연되더라도 지속적으로 유지되므로, 시스템은 항상 클라이언트에게 반응성을 유지합니다.
이 위에서 Autobahn은 PBFT 스타일의 부분 동기 합의 계층을 운영합니다. 여기서 Autobahn은 각 트랜잭션 묶음이 아닌, 모든 데이터 차선의 ‘최신 상태 요약(tip cuts)’에 대해 합의를 수행합니다. 이러한 설계는 임의의 큰 데이터셋도 단일한 과정으로 커밋할 수 있게 하며, 블립의 영향을 최소화합니다.
데이터와 합의를 강하게 결합하여 리더가 실패하면 멈추는 Hotstuff나, DAG 순회 및 데이터 동기화로 인해 높은 커밋 레이턴시를 겪는 Bullshark와 비교했을때, Autobahn은 더 유연하고 빠른 합의 경험을 제공합니다. 즉, Autobahn은 DAG의 병렬화 속성을 가져가면서 레이턴시 단점은 개선한 구조입니다.
### 데이터 전파 계층: 차선과 Car
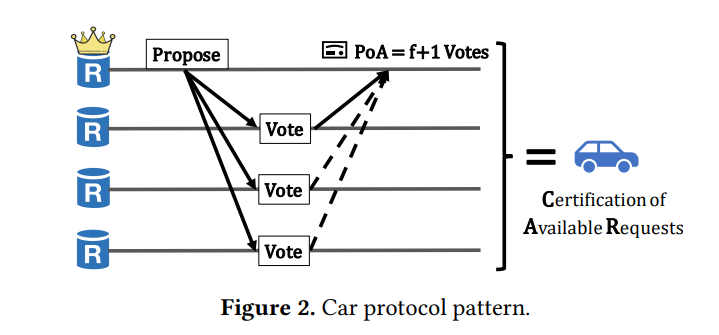
*Autobahn: Seamless high speed BFT*
Autobahn에서는 각 레플리카가 자신만의 **차선(Lane)** 에 트랜잭션을 제안합니다. 각 데이터 프로포절은 다른 레플리카 노드들의 승인(Acknowledgment)과 함께 묶여 하나의 **‘Car’**(Certification of Available Request)를 형성합니다. 이 Car들은 최소 하나의 레플리카 노드가 해당 데이터를 들고 있다는 데이터 가용성 증명(Proof of Availability, PoA) 역할을 수행합니다.
각 Car는 이전 Car를 참조하여 체인처럼 연결되므로, 차선의 최신 블록을 검증하는 것만으로도 차선 전체의 데이터 가용성을 간접적으로 증명할 수 있습니다. 이러한 형태의 연쇄적인 가용성 증명은 즉각적인 참조를 가능하게 합니다. 여기서 즉각적인 참조란, 합의 계층이 DAG 순회 없이도 최신 상태 요약(tip cut, 현재 차선 헤드의 벡터)을 참조할 수 있으며, 모든 이전 데이터에 접근할 수 있음을 알 수 있다는 의미입니다.
일반적인 DAG 프로토콜과 달리, Autobahn은 글로벌 가용성과 비중복성을 보장하기 위한 비용이 많이 드는 신뢰 가능한 브로드캐스트 단계를 피합니다. 대신, 최소한의 조율만을 사용하고, PoA(Proof of Availability)마다 하나 이상의 정직한 복제본이 데이터를 보유하고 있다고 신뢰합니다. 이를 통해 가변적인 부하나 부분적인 장애 상황에서도 높은 처리량과 낮은 지연 시간을 유지할 수 있습니다. 데이터 계층은 합의와 독립적으로 계속 진행되며, 일시적인 장애(blip) 상황에서도 시스템의 반응성을 보장합니다.
### **합의 레이어: 저지연 동의**
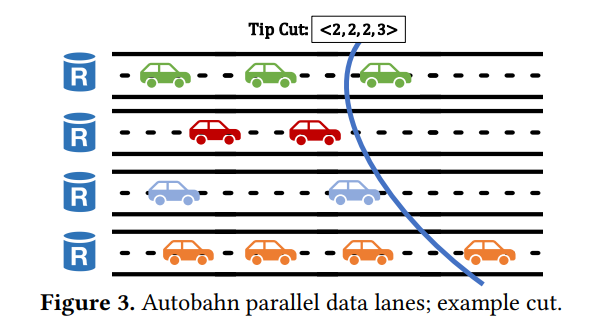
*Autobahn: Seamless high speed BFT*
Autobahn의 합의 계층은 기존 PBFT 원칙을 기반으로 하지만, 레이턴시 감소 및 원활한 복구를 위한 핵심 최적화 메커니즘을 도입합니다. 각 합의 슬롯은 모든 레플리카의 차선에서 가장 최신의 인증된 제안들을 요약한 "**tip cut**"을 커밋 대상으로 삼습니다. 합의 리더는 이 tip cut을 2단계 커밋 프로세스(Prepare → Confirm)를 통해 제안합니다.
Prepare 단계에서는, 레플리카들이 제안된 tip cut에 투표합니다. 리더가 빠르게 정족수(quorum)만큼의 투표를 받으면, Fast Path로 진입하여 세 단계의 메시지 레이턴시 안에 커밋할 수 있습니다. 만약 투표를 빠르게 모으지 못했다면, Confirm 단계로 넘어갑니다. 여기서는 다시 레플리카들의 승인을 모아 여섯 단계의 메세지 레이턴시 내에 커밋을 완료합니다.
Autobahn의 핵심 혁신은, 데이터 동기화와 합의 투표의 분리입니다. 레플리카들은 전체 프로포절 데이터를 받지 못하였더라도, 인증된 tip에 대해서만 투표할 수 있습니다. PoA가 데이터 가용성을 보장해주기 때문에, tip에 대해서만 투표하더라도 안전하다고 볼 수 있는 것입니다. 동기화는 병렬로 진행되어 실행 단계 전에 완료되고, 이를 통해 프로토콜이 멈추는 것을 방지할 수 있습니다. 리더 실패 혹은 타임아웃의 경우, 타임아웃 인증서(timeout certificate)를 이용해 뷰 변경(view change)을 트리거하는 방식으로 새 리더가 작업을 이어갈 수 있습니다.
### Autobahn의 핵심 속성
Autobahn은 BFT 프로토콜이 제공해야 하는 표준적인 **안전성(safety)** 과 **생존성(liveness)** 보장을 충족합니다. 안전성은 두 개의 올바른 레플리카가 같은 슬롯에 대해 서로 다른 블록을 커밋하는 일이 없음을 보장하며, 생존성은 글로벌 동기화 시간(Global Stabilization Time, GST) 이후, 올바른 리더가 선정되면 합의가 진행됨을 보장합니다.
Autobahn의 가장 중요한 속성은 **seamlessness**입니다. 이 특성 덕분에 합의 레이어는 임의의 크기를 가진 백로그도 상수 시간 안에 커밋할 수 있고, 프로토콜 성능 저하를 막습니다. 블립이 발생하더라도 이후 네트워크가 안정화되면, 성공적으로 전파된 모든 제안은 즉시 커밋됩니다. 이를 통해 Autobahn은 간헐적 장애 환경에서도 부드럽게 동작하며, 회복 속도와 반응성 측면에서 전통적인 BFT 프로토콜을 능가합니다.
또한, 프로토콜은 **수평 확장성**을 가집니다. 각 레플리카는 자신의 차선을 통해 전체 처리량에 기여하며, 합의 스냅샷(consensus cut) 역시 참여자 수에 따라 자연스럽게 확장됩니다. 이는 높은 성능과 견고함을 모두 요구하는 대규모 블록체인 배포에 적합합니다.
### 낮은 레이턴시와 높은 복원력의 조화
Autobahn은 주요 BFT 프로토콜인 Bullshark 및 HotStuff와 비교 테스트되었습니다. 테스트 환경은 이상적인 조건과 장애 삽입 조건 모두를 포함합니다. 결과적으로 Autobahn은 모든 테스트에서 가장 좋은 결과를 달성했습니다: Autobahn은 Bullshark 수준의 처리량(초당 230,000건 이상)을 유지하면서, 레이턴시는 50% 이상 감소시켰습니다.
좋은 네트워크 환경에서, Autobahn은 3\~6개의 메시지 레이턴시만으로 트랜잭션을 커밋하며, 이는 Bullshark의 12개 메시지 레이턴시보다 훨씬 낮습니다. 실제로 Autobahn은 약 280ms, Bullshark는 590ms 이상의 커밋 지연이 측정되었습니다. 또한 HotStuff는 블립 이후 백로그 처리로 인해 장시간 성능 저하가 발생하지만, Autobahn은 네트워크 안정화 즉시 전체 백로그를 단일 스텝으로 커밋합니다.
리더 실패나 부분적인 네트워크 분할 시에도 Autobahn은 데이터를 계속 전파하며, 합의 재개 후 누적된 프로포절들을 빠르게 커밋합니다. 이러한 성능 상의 이점은 낮은 레이턴시와 높은 처리량 및 장애 허용성을 결합하려는 블록체인 플랫폼에 Autobahn이 매우 좋은 선택지임을 보여줍니다.
### 추가 자료
더 많은 기술적 상세 내용은 다음 문서를 참고하세요:
* [Autobahn: Seamless high speed BFT](https://arxiv.org/pdf/2401.10369)
## Integrate Stable
Stable is a Layer 1 where USDT0 is both the native gas token and an ERC-20. Single-slot finality, sub-second block times, and full EVM compatibility. You bring your wallet, seed phrase, and USDT0 — there's no separate gas asset, no account migration, no new SDK to learn.
Pick the capability you're building. Every path below leads to a runnable guide on testnet within minutes.
### Pick your path
* [**Accounts**](/en/explanation/accounts-overview) — Wallets, EIP-7702 delegation, session keys, and spending limits. First-class support for user and agent accounts.
* [**Payments**](/en/explanation/payments-overview) — Send USDT0, build P2P wallets, recurring subscriptions, invoice settlement, and pay-per-call APIs.
* [**Contracts**](/en/explanation/contracts-overview) — Deploy, verify, and index contracts. Call Bank, Distribution, and Staking precompiles from Solidity.
* [**AI / Agents**](/en/explanation/agent-settlement) — Wire MCP servers and agent skills into AI editors. Price APIs per request for autonomous agents.
* [**Infrastructure**](/en/explanation/integrate-overview) — Gas waiver service, ecosystem providers (bridges, oracles, ramps), network info, and node operations.
* [**Learn**](/en/explanation/learn-overview) — Architecture, USDT0 behavior, use case narratives, and the Ethereum-to-Stable reference.
### Start in five minutes
* [**Quick start**](/en/tutorial/quick-start) — Connect, fund a wallet from the faucet, and send 0.001 USDT0 natively.
* [**Connect to Stable**](/en/reference/connect) — Chain IDs, RPC endpoints, faucet, and block explorers.
* [**Difference from Ethereum**](/en/explanation/ethereum-comparison) — What stays the same and what changes when porting from Ethereum.
### Everything else
* **Network status and versions**: [testnet](/en/reference/testnet-information) · [mainnet](/en/reference/mainnet-information) · [version history](/en/reference/testnet-version-history).
* **Tokenomics and roadmap**: [STABLE tokenomics](/en/reference/tokenomics) · [technical roadmap](/en/explanation/technical-roadmap).
* **FAQ**: [developer FAQ](/en/reference/faq) · [developer assistance](/en/reference/developer-assistance).
## Bridge USDT0 to Stable
In this tutorial, you will bridge USDT0 from Ethereum Sepolia to the Stable Testnet programmatically using TypeScript and ethers v6. You will build the script incrementally, adding one function per step.
This tutorial uses the OFT Mesh path. The OFT Adapter on Sepolia locks your tokens, LayerZero's dual-DVN verification confirms the message, and USDT0 is minted on Stable. For a full explanation of how this works, see [Bridging to Stable](/en/explanation/usdt0-bridging).
:::note
Want fewer lines of code? The [Stable SDK](/en/explanation/sdk-overview) exposes `quoteBridge` and `bridge` and picks the route (LayerZero or LI.FI) for you.
:::
### Prerequisites
* Node.js 18.0.0 or higher (`node --version` to verify)
* A Sepolia wallet with a private key you control (never use a key holding real funds)
* SepoliaETH for gas (get some from [sepoliafaucet.com](https://sepoliafaucet.com) or [faucets.chain.link/sepolia](https://faucets.chain.link/sepolia))
* Basic familiarity with running scripts from the terminal
***
### 1. Set up the project
```bash
mkdir stable-bridge && cd stable-bridge
npm init -y
npm install ethers@6 @layerzerolabs/lz-v2-utilities
npm install -D tsx
```
Your `package.json` should include:
```json
{
"name": "stable-bridge",
"version": "1.0.0",
"scripts": {
"bridge": "tsx --env-file=.env bridge.ts"
},
"dependencies": {
"@layerzerolabs/lz-v2-utilities": "^2.3.39",
"ethers": "^6.13.0"
},
"devDependencies": {
"tsx": "^4.19.0"
}
}
```
### 2. Configure your environment
Create a `.env` file with your credentials:
```bash
PRIVATE_KEY=0xYOUR_PRIVATE_KEY_HERE
SEPOLIA_RPC_URL=https://rpc.sepolia.org
```
For `SEPOLIA_RPC_URL`, any of these work:
* Public: `https://rpc.sepolia.org` or `https://ethereum-sepolia-rpc.publicnode.com`
* Alchemy: `https://eth-sepolia.g.alchemy.com/v2/YOUR_KEY`
* Infura: `https://sepolia.infura.io/v3/YOUR_KEY`
### 3. Scaffold the script
Create `bridge.ts` with the imports, configuration, and a `main` function. You will add functions to this file in the following steps, and call them from `main`.
```ts
import { ethers, Contract, Wallet, JsonRpcProvider } from "ethers";
import { Options } from "@layerzerolabs/lz-v2-utilities";
const PRIVATE_KEY = process.env.PRIVATE_KEY!;
const SEPOLIA_RPC_URL = process.env.SEPOLIA_RPC_URL || "https://rpc.sepolia.org";
// Contract addresses
const SEPOLIA_USDT0 = "0xc4DCC311c028e341fd8602D8eB89c5de94625927";
const SEPOLIA_OFT_ADAPTER = "0xc099cD946d5efCC35A99D64E808c1430cEf08126";
const STABLE_USDT0 = "0x78Cf24370174180738C5B8E352B6D14c83a6c9A9";
// Destination: Stable Testnet
const STABLE_TESTNET_EID = 40374;
// Minimal ABIs — only the functions we call
const ERC20_ABI = [
"function balanceOf(address) view returns (uint256)",
"function approve(address, uint256) returns (bool)",
"function allowance(address, address) view returns (uint256)",
"function mint(address, uint256)",
];
const OFT_ADAPTER_ABI = [
"function quoteSend((uint32 dstEid, bytes32 to, uint256 amountLD, uint256 minAmountLD, bytes extraOptions, bytes composeMsg, bytes oftCmd), bool) view returns ((uint256 nativeFee, uint256 lzTokenFee))",
"function send((uint32 dstEid, bytes32 to, uint256 amountLD, uint256 minAmountLD, bytes extraOptions, bytes composeMsg, bytes oftCmd), (uint256 nativeFee, uint256 lzTokenFee), address) payable returns ((bytes32, uint64, (uint256, uint256)), (uint256, uint256))",
];
function addressToBytes32(addr: string): string {
return ethers.zeroPadValue(ethers.getBytes(ethers.getAddress(addr)), 32);
}
// You will add functions here.
async function main() {
const provider = new JsonRpcProvider(SEPOLIA_RPC_URL);
const wallet = new Wallet(PRIVATE_KEY, provider);
const usdt0 = new Contract(SEPOLIA_USDT0, ERC20_ABI, wallet);
const oftAdapter = new Contract(SEPOLIA_OFT_ADAPTER, OFT_ADAPTER_ABI, wallet);
const amount = ethers.parseEther("1"); // 1 USDT0 (18 decimals)
// You will add function calls here.
}
main().catch((err) => {
console.error(err.message);
process.exit(1);
});
```
### 4. Mint test USDT0 on Sepolia
The test USDT0 contract on Sepolia exposes a public `mint` function. Add the following function to `bridge.ts` above `main`:
```ts
async function mint(usdt0: Contract, receiver: string, amount: bigint) {
console.log(`Minting ${ethers.formatEther(amount)} USDT0 on Sepolia...`);
const tx = await usdt0.mint(receiver, amount);
await tx.wait();
console.log(`Mint tx: ${tx.hash} confirmed`);
const balance = await usdt0.balanceOf(receiver);
console.log(`USDT0 balance: ${ethers.formatEther(balance)}`);
}
```
Then call it from `main`:
```ts
await mint(usdt0, wallet.address, amount);
```
Run the script:
```bash
npx tsx --env-file=.env bridge.ts
```
***
**Checkpoint:** You should see a non-zero USDT0 balance logged after the mint confirms.
***
### 5. Approve the OFT Adapter
Before the OFT Adapter can move your tokens, it needs an ERC-20 allowance. Add this function above `main`:
```ts
async function approve(usdt0: Contract, spender: string, owner: string, amount: bigint) {
console.log("Approving OFT Adapter...");
const tx = await usdt0.approve(spender, amount);
await tx.wait();
console.log(`Approve tx: ${tx.hash} confirmed`);
const allowance = await usdt0.allowance(owner, spender);
console.log(`Allowance: ${ethers.formatEther(allowance)}`);
}
```
Add the call in `main` after `mint`:
```ts
// await mint(usdt0, wallet.address, amount);
await approve(usdt0, SEPOLIA_OFT_ADAPTER, wallet.address, amount);
```
Run the script. You can comment out the `await mint(...)` call if you already have tokens from the previous run.
***
**Checkpoint:** The script should log a non-zero allowance after the approval confirms.
***
### 6. Quote the fee and send the bridge transaction
The `quoteSend` call returns the LayerZero messaging fee in SepoliaETH, which you pass as `msg.value` to `send`. Add this function above `main`:
```ts
async function send(oftAdapter: Contract, receiver: string, amount: bigint) {
const options = Options.newOptions().addExecutorLzReceiveOption(0, 0).toBytes();
const sendParams = {
dstEid: STABLE_TESTNET_EID,
to: addressToBytes32(receiver),
amountLD: amount,
minAmountLD: amount,
extraOptions: options,
composeMsg: "0x",
oftCmd: "0x",
};
console.log("Quoting bridge fee...");
const feeResult = await oftAdapter.quoteSend(sendParams, false);
const fee = { nativeFee: feeResult.nativeFee, lzTokenFee: feeResult.lzTokenFee };
console.log(`Bridge fee: ${ethers.formatEther(fee.nativeFee)} ETH`);
console.log("Sending bridge transaction...");
const tx = await oftAdapter.send(sendParams, fee, receiver, {
value: fee.nativeFee,
});
await tx.wait();
console.log(`Bridge tx: ${tx.hash} confirmed`);
console.log(`Sepolia Etherscan: https://sepolia.etherscan.io/tx/${tx.hash}`);
console.log(`LayerZero Scan: https://testnet.layerzeroscan.com/tx/${tx.hash}`);
}
```
Add the call in `main` after `approve`:
```ts
// await mint(usdt0, wallet.address, amount);
// await approve(usdt0, SEPOLIA_OFT_ADAPTER, wallet.address, amount);
await send(oftAdapter, wallet.address, amount);
```
### 7. Verify arrival on Stable Testnet
After sending, the script can poll the Stable Testnet RPC until the tokens arrive. Add this function above `main`:
```ts
async function verify(receiver: string) {
console.log("Waiting for DVN verification (~2 minutes)...");
const stableProvider = new JsonRpcProvider("https://rpc.testnet.stable.xyz");
const stableUsdt0 = new Contract(STABLE_USDT0,
["function balanceOf(address) view returns (uint256)"], stableProvider);
const before: bigint = await stableUsdt0.balanceOf(receiver);
for (let i = 0; i < 24; i++) {
await new Promise((r) => setTimeout(r, 5000));
const current: bigint = await stableUsdt0.balanceOf(receiver);
if (current > before) {
console.log(`\nUSDT0 on Stable: ${ethers.formatEther(current)}`);
console.log(`Explorer: https://testnet.stablescan.xyz/address/${receiver}`);
return;
}
process.stdout.write(".");
}
console.log("\nTokens have not arrived yet. Check manually:");
console.log(`Explorer: https://testnet.stablescan.xyz/address/${receiver}`);
}
```
Add the call in `main` after `send`:
```ts
// await mint(usdt0, wallet.address, amount);
// await approve(usdt0, SEPOLIA_OFT_ADAPTER, wallet.address, amount);
// await send(oftAdapter, wallet.address, amount);
await verify(wallet.address);
```
### 8. Run the complete bridge
Your `main` function should now look like this:
```ts
async function main() {
const provider = new JsonRpcProvider(SEPOLIA_RPC_URL);
const wallet = new Wallet(PRIVATE_KEY, provider);
const usdt0 = new Contract(SEPOLIA_USDT0, ERC20_ABI, wallet);
const oftAdapter = new Contract(SEPOLIA_OFT_ADAPTER, OFT_ADAPTER_ABI, wallet);
const amount = ethers.parseEther("1"); // 1 USDT0 (18 decimals)
await mint(usdt0, wallet.address, amount);
await approve(usdt0, SEPOLIA_OFT_ADAPTER, wallet.address, amount);
await send(oftAdapter, wallet.address, amount);
await verify(wallet.address);
}
```
Run it:
```bash
npx tsx --env-file=.env bridge.ts
```
***
**Checkpoint:** You should see output like this:
```
Minting 1.0 USDT0 on Sepolia...
Mint tx: 0x3a1f...c9d2 confirmed
USDT0 balance: 1.0
Approving OFT Adapter...
Approve tx: 0x7b2e...f401 confirmed
Allowance: 1.0
Quoting bridge fee...
Bridge fee: 0.000101 ETH
Sending bridge transaction...
Bridge tx: 0xa94f...8c11 confirmed
Sepolia Etherscan: https://sepolia.etherscan.io/tx/0xa94f...8c11
LayerZero Scan: https://testnet.layerzeroscan.com/tx/0xa94f...8c11
Waiting for DVN verification (~2 minutes)...
......
USDT0 on Stable: 1.0
```
You can also search your wallet address on the [Stable Testnet explorer](https://testnet.stablescan.xyz) to confirm the mint event.
***
### What you have built
You bridged USDT0 from Ethereum Sepolia to Stable Testnet. You now know how to:
* Mint test USDT0 on Sepolia using the contract's public `mint` function
* Approve an OFT Adapter to spend ERC-20 tokens on your behalf
* Construct LayerZero `sendParams` with 32-byte address encoding and executor options
* Quote the cross-chain messaging fee with `quoteSend` before committing funds
* Execute a cross-chain token transfer with `send` and confirm delivery on the destination chain
* Verify on-chain state using Stable's RPC (`https://rpc.testnet.stable.xyz`, chain ID `2201`) and Stablescan
### Next recommended
* [**Send your first USDT0**](/en/tutorial/send-usdt0) — Use the bridged USDT0 with native and ERC-20 transfers.
* [**Bridging to Stable**](/en/explanation/usdt0-bridging) — Deep dive on OFT Mesh vs Legacy Mesh mechanics.
* [**Testnet information**](/en/reference/testnet-information) — Full network parameters, RPC endpoints, and faucet details.
## Quick start
The only tools you need are Node.js, some USDT0 from the faucet and a private key. Stable uses USDT0 as its gas token, so you only need USDT0 to transact. There is no separate gas asset to fund.
:::note
Prefer a typed client? The [Stable SDK](/en/explanation/sdk-overview) wraps viem with `transfer`, `bridge`, and `swap` methods so you skip the manual ABI and decimals work.
:::
### Prerequisites
* Node.js 20 or later
* A private key you control (a fresh test key is fine)
### 1. Install and configure
Create a project, install `ethers`, and save the testnet config.
```bash
mkdir stable-quickstart && cd stable-quickstart
npm init -y && npm install ethers
```
```text
added 1 package, audited 2 packages in 1s
```
Save your private key to `.env`:
```bash
echo "PRIVATE_KEY=0xYOUR_PRIVATE_KEY_HERE" > .env
```
Create `config.ts`:
```typescript
// config.ts
import { ethers } from "ethers";
import "dotenv/config";
export const STABLE_TESTNET_RPC = "https://rpc.testnet.stable.xyz";
export const CHAIN_ID = 2201;
export const provider = new ethers.JsonRpcProvider(STABLE_TESTNET_RPC);
export const wallet = new ethers.Wallet(process.env.PRIVATE_KEY!, provider);
```
### 2. Fund the wallet
Print your address, then request testnet USDT0 from the faucet.
```typescript
// address.ts
import { wallet } from "./config";
console.log("Wallet address:", wallet.address);
```
```bash
npx tsx address.ts
```
```text
Wallet address: 0x1234...abcd
```
Go to [https://faucet.stable.xyz](https://faucet.stable.xyz), paste the address, and select the button to receive testnet USDT0. The faucet sends 1 USDT0, enough for thousands of native transfers.
### 3. Send your first transaction
Send 0.001 USDT0 natively. On Stable, USDT0 is the native asset, so a simple value transfer is the cheapest path (21,000 gas).
```typescript
// send.ts
import { ethers } from "ethers";
import { provider, wallet } from "./config";
const recipient = "0xRecipientAddress"; // replace with any address
const amount = ethers.parseEther("0.001"); // 0.001 USDT0 (18 decimals, native)
const block = await provider.getBlock("latest");
const baseFee = block!.baseFeePerGas!;
const tx = await wallet.sendTransaction({
to: recipient,
value: amount,
maxFeePerGas: baseFee * 2n,
maxPriorityFeePerGas: 0n, // always 0 on Stable
});
const receipt = await tx.wait(1);
console.log("Tx:", receipt!.hash);
console.log("Explorer:", `https://testnet.stablescan.xyz/tx/${receipt!.hash}`);
```
```bash
npx tsx send.ts
```
```text
Tx: 0x8f3a...2d41
Explorer: https://testnet.stablescan.xyz/tx/0x8f3a...2d41
```
Open the explorer link to confirm the transaction. Block time is roughly 0.7 seconds, so it should already be final.
:::warning
`maxPriorityFeePerGas` is ignored by Stable and must be set to `0`. See [Gas pricing](/en/reference/gas-pricing-api) for how the base-fee-only model changes transaction construction.
:::
### Where to go next
* [**Deploy a smart contract**](/en/tutorial/smart-contract) — Scaffold a Foundry project and deploy to Stable testnet.
* [**Build a payment app**](/en/how-to/build-p2p-payments) — Create wallet, send, receive, and query payment history.
* [**Develop with AI**](/en/how-to/develop-with-ai) — Wire MCP servers and agent skills into your AI editor.
## SDK quickstart
You'll install `@stablechain/sdk`, create a client signed by a private key, send a USDT0 transfer on Stable Testnet, and fetch a bridge and swap quote. Total time: about five minutes.
:::note
Stable uses USDT0 as the gas token. You only need testnet USDT0 to transact — there's no separate native asset to fund.
:::
### Prerequisites
* Node.js 20 or later
* A test private key with testnet USDT0. See [Fund your testnet wallet](/en/how-to/use-faucet).
### 1. Install
```bash
mkdir stable-sdk-quickstart && cd stable-sdk-quickstart
npm init -y && npm install @stablechain/sdk viem
```
```text
added 2 packages, audited 3 packages in 2s
```
Save your test key:
```bash
echo "PRIVATE_KEY=0xYOUR_TEST_KEY" > .env
```
### 2. Create a client
Create `index.ts`:
```ts
import "dotenv/config";
import { createStable, Network } from "@stablechain/sdk";
import { privateKeyToAccount } from "viem/accounts";
const account = privateKeyToAccount(process.env.PRIVATE_KEY as `0x${string}`);
const stable = createStable({
network: Network.Testnet,
account,
});
console.log("Signer:", account.address);
```
```text
Signer: 0xYourAddress
```
`createStable` accepts three signing modes: `account` (server-side, shown above), `transport` (browser wallet via `custom(window.ethereum)`), or `walletClient` (a pre-built viem `WalletClient`). See [Use the SDK with viem](/en/how-to/sdk-with-viem) for all three.
### 3. Send a USDT0 transfer
Append to `index.ts`:
```ts
const { txHash } = await stable.transfer({
from: account.address,
to: "0x000000000000000000000000000000000000dEaD",
amount: 0.001,
});
console.log("Transfer:", txHash);
```
Run it:
```bash
npx tsx index.ts
```
```text
Signer: 0xYourAddress
Transfer: 0x8f3a...2d41
```
Open the hash on the [testnet explorer](https://testnet.stablescan.xyz) to confirm.
### 4. Quote a bridge
Bridge USDT0 from Ethereum Sepolia to Stable Testnet. `quoteBridge` is a read-only call — no signature, no gas:
```ts
import { Chain } from "@stablechain/sdk";
const bridgeQuote = await stable.quoteBridge({
fromChain: Chain.Sepolia,
toChain: Chain.StableTestnet,
fromToken: "0xc4DCC311c028e341fd8602D8eB89c5de94625927",
toToken: "0x78Cf24370174180738C5B8E352B6D14c83a6c9A9",
amount: 1,
});
console.log("Bridge quote:", bridgeQuote);
```
```text
Bridge quote: { toAmount: 0.999812 }
```
Pass the quote into `stable.bridge({ ...params, quote })` to execute. The SDK picks LayerZero for USDT0 → USDT0 routes and LI.FI for everything else.
### 5. Quote a swap
Swaps run on Stable through LI.FI. The quote returns the expected output and a pre-built transaction:
```ts
const swapQuote = await stable.quoteSwap({
fromToken: "0x8a2B28364102Bea189D99A475C494330Ef2bDD0B",
toToken: "0x78Cf24370174180738C5B8E352B6D14c83a6c9A9",
amount: 1,
fromDecimals: 6,
});
console.log("You'll receive:", swapQuote.toAmount, "USDT0");
```
```text
You'll receive: 0.998 USDT0
```
Call `stable.swap({ ...params, quote: swapQuote })` to execute. Approval for ERC-20 sources is handled internally.
### Next recommended
* [**SDK reference**](/en/reference/sdk) — Every parameter, return type, and error class.
* [**Use with viem**](/en/how-to/sdk-with-viem) — Switch between private-key, browser-wallet, and pre-built `WalletClient` signing.
* [**Use with wagmi**](/en/how-to/sdk-with-wagmi) — Wire the SDK into a React app using wagmi hooks.
## Send your first USDT0
On Stable, USDT0 is both the chain's native asset and an ERC-20 token. This means `approve`, `transferFrom`, and `permit` remain fully available alongside standard value transfers, and both paths move funds from the same underlying balance.
This page walks you through sending USDT0 through both paths and confirming they draw from one balance.
:::note
Prefer a typed client? The [Stable SDK](/en/explanation/sdk-overview) exposes a single `transfer({ to, amount, token? })` that covers both paths, handles decimals on-chain, and switches the wallet's chain for you.
:::
:::note
**18 vs 6 decimals**: Native USDT0 uses 18 decimals (standard EVM precision), while the ERC-20 interface reports 6 decimals (standard USDT precision). Both reflect the same balance, so `address(x).balance` and `USDT0.balanceOf(x)` may differ by up to 0.000001 USDT0 due to fractional reconciliation. See [USDT0 behavior on Stable](/en/explanation/usdt0-behavior).
:::
### What you'll build
A two-script flow that sends 0.001 USDT0 as a native transfer, sends 0.001 USDT0 as an ERC-20 transfer, and prints both balances.
#### Demo
```text
step 1. Connect wallet → balance displayed
0.01 USDT0
step 2. Send 0.001 USDT0 (choose native or ERC-20 transfer)
step 3. Result
Sent: 0.001 USDT0
Gas fee: 0.000021 USDT0
Native balance: 0.008979 USDT0
ERC-20 balance: 0.008979 USDT0
```
### Prerequisites
* Node.js 20 or later
* A private key with testnet USDT0. See [Quick start](/en/tutorial/quick-start) to fund a wallet.
**USDT0 contract addresses**
* Mainnet: `0x779ded0c9e1022225f8e0630b35a9b54be713736`
* Testnet: `0x78cf24370174180738c5b8e352b6d14c83a6c9a9`
### Setup
```typescript
// config.ts
import { ethers } from "ethers";
import "dotenv/config";
export const STABLE_TESTNET_RPC = "https://rpc.testnet.stable.xyz";
export const CHAIN_ID = 2201;
export const USDT0_ADDRESS = "0x78Cf24370174180738C5B8E352B6D14c83a6c9A9";
export const provider = new ethers.JsonRpcProvider(STABLE_TESTNET_RPC);
export const wallet = new ethers.Wallet(process.env.PRIVATE_KEY!, provider);
```
### Option 1 (recommended): send as native transfer
Native transfers work the same as sending ETH on Ethereum. The `value` field carries the USDT0 amount. A native transfer costs only 21,000 gas, the cheapest way to send USDT0.
```typescript
// sendNative.ts
import { ethers } from "ethers";
import { provider, wallet } from "./config";
const recipient = "0xRecipientAddress";
const amount = ethers.parseUnits("0.001", 18); // 18 decimals for native
const block = await provider.getBlock("latest");
const baseFee = block!.baseFeePerGas!;
const tx = await wallet.sendTransaction({
to: recipient,
value: amount,
maxFeePerGas: baseFee * 2n,
maxPriorityFeePerGas: 0n, // always 0 on Stable
});
const receipt = await tx.wait(1);
console.log("Native transfer tx:", receipt!.hash);
```
```bash
npx tsx sendNative.ts
```
```text
Native transfer tx: 0x8f3a...2d41
```
### Option 2: send as ERC-20 transfer
USDT0 can also be sent as an ERC-20 transfer. This deducts from the same balance, but uses the ERC-20 interface with 6-decimal precision.
```typescript
// sendERC20.ts
import { ethers } from "ethers";
import { wallet, USDT0_ADDRESS } from "./config";
const recipient = "0xRecipientAddress";
const amount = ethers.parseUnits("0.001", 6); // 6 decimals for ERC-20
const usdt0 = new ethers.Contract(USDT0_ADDRESS, [
"function transfer(address to, uint256 amount) returns (bool)"
], wallet);
const tx = await usdt0.transfer(recipient, amount);
const receipt = await tx.wait(1);
console.log("ERC-20 transfer tx:", receipt!.hash);
```
```bash
npx tsx sendERC20.ts
```
```text
ERC-20 transfer tx: 0xa2b1...77c0
```
### Verify the unified balance
After either transfer, query both balances to confirm they draw from the same source.
```typescript
// balances.ts
import { ethers } from "ethers";
import { provider, wallet, USDT0_ADDRESS } from "./config";
const nativeBalance = await provider.getBalance(wallet.address);
console.log("Native balance:", ethers.formatEther(nativeBalance), "USDT0");
const usdt0 = new ethers.Contract(USDT0_ADDRESS, [
"function balanceOf(address) view returns (uint256)"
], provider);
const erc20Balance = await usdt0.balanceOf(wallet.address);
console.log("ERC-20 balance:", ethers.formatUnits(erc20Balance, 6), "USDT0");
```
```bash
npx tsx balances.ts
```
```text
Native balance: 0.008979 USDT0
ERC-20 balance: 0.008979 USDT0
```
Both values represent the same balance. They may differ by up to 0.000001 USDT0 due to [fractional balance reconciliation](/en/explanation/usdt0-behavior#balance-reconciliation).
### Next recommended
* [**Zero gas transactions**](/en/how-to/zero-gas-transactions) — Send USDT0 with gas fees paid by a waiver service.
* [**Build a P2P payment app**](/en/how-to/build-p2p-payments) — Create wallet, send, receive, and query payment history.
* [**USDT0 behavior on Stable**](/en/explanation/usdt0-behavior) — Understand dual-role balance reconciliation and contract design.
## Deploy a smart contract
In this tutorial, you will deploy a simple smart contract to the Stable Testnet and read its state from the chain. Along the way, you will learn how Stable's network is configured, how USDT0 works as a gas token, and how to point standard EVM tooling at Stable.
This tutorial assumes basic familiarity with Solidity and a Unix-like terminal. No prior Stable experience is required.
### What you'll build
A fresh Foundry project with the sample `Counter` contract, deployed to Stable testnet, with one state-changing call and one read call.
#### Demo
```text
step 1. Scaffold Foundry project → stable-hello/
step 2. Configure testnet
RPC: https://rpc.testnet.stable.xyz
Chain ID: 2201
step 3. Fund wallet from faucet (1 USDT0)
step 4. forge create Counter
Deployed to: 0xContract...
step 5. cast send Counter.setNumber(42)
step 6. cast call Counter.number()
→ 42
```
### Prerequisites
* [Foundry](https://book.getfoundry.sh/getting-started/installation) installed (`forge`, `cast`, and `anvil` available in your PATH)
* A wallet with a private key you control (a fresh test key is fine; never use a key holding real funds on testnet)
* An internet connection to reach the testnet RPC and faucet
***
### 1. Create a new Foundry project
Run the following command to scaffold a fresh project:
```bash
forge init stable-hello && cd stable-hello
```
Foundry creates a `src/` directory with a sample `Counter.sol` contract and a matching test file. You will deploy this contract as-is. The goal is to get something real on-chain, not to write novel Solidity.
### 2. Review the contract you are deploying
Open `src/Counter.sol`. It contains two functions:
```solidity
// SPDX-License-Identifier: UNLICENSED
pragma solidity ^0.8.13;
contract Counter {
uint256 public number;
function setNumber(uint256 newNumber) public {
number = newNumber;
}
function increment() public {
number++;
}
}
```
`number` is a public state variable stored on-chain. `increment()` and `setNumber()` are the two ways to change it. Reading `number` costs no gas. It is a free `eth_call`.
### 3. Configure the Stable Testnet
Create a file named `.env` at the project root to store your network credentials:
```bash
touch .env
```
Add the following, replacing the placeholder with your actual private key:
```bash
PRIVATE_KEY=0xYOUR_PRIVATE_KEY_HERE
```
Next, open `foundry.toml` and add the Stable Testnet as a named network profile. Append this block below the existing `[profile.default]` section:
```toml
[rpc_endpoints]
stable_testnet = "https://rpc.testnet.stable.xyz"
```
This tells Foundry where to send transactions when you target `stable_testnet`. Stable is EVM-compatible, so no other configuration is needed.
***
**Checkpoint:** Confirm your RPC endpoint is reachable:
```bash
cast chain-id --rpc-url https://rpc.testnet.stable.xyz
```
Expected output:
```
2201
```
Chain ID `2201` is the Stable Testnet. If you see this number, your machine can reach the network.
***
### 4. Get your wallet address
Derive your deployer address from your private key so you know which account to fund:
```bash
source .env
cast wallet address $PRIVATE_KEY
```
Copy the address that is printed. You need it in the next step.
### 5. Fund your wallet with USDT0
Stable uses **USDT0** as its gas token. The same asset you use to pay for goods and services is used directly to pay for computation. There is no secondary native token.
Visit the testnet faucet and request funds:
```
https://faucet.stable.xyz
```
Paste the address from the previous step. The faucet sends 1 USDT0 to your wallet, which is enough to deploy and interact with several contracts.
***
**Checkpoint:** Confirm your balance arrived:
```bash
cast balance $PRIVATE_KEY --rpc-url https://rpc.testnet.stable.xyz
```
You should see a non-zero value. If the balance is still `0`, wait a few seconds and re-run. Stable produces a new block roughly every 0.7 seconds, so funds settle quickly.
***
### 6. Deploy the contract
Run the deployment with `forge create`:
```bash
source .env
forge create src/Counter.sol:Counter \
--rpc-url https://rpc.testnet.stable.xyz \
--private-key $PRIVATE_KEY \
--broadcast
```
Foundry compiles the contract, broadcasts a deployment transaction, and waits for the receipt. Because block time is \~0.7 seconds, this takes only a moment.
***
**Checkpoint:** The output should look like this:
```
[⠒] Compiling...
No files changed, compilation skipped
Deployer: 0xYourAddress
Deployed to: 0xSomeContractAddress
Transaction hash: 0xSomeTxHash
```
Copy the `Deployed to` address. You need it in the next two steps.
***
### 7. Call a write function
Now call `setNumber()` to store a value on-chain:
```bash
cast send 0xSomeContractAddress "setNumber(uint256)" 42 \
--rpc-url https://rpc.testnet.stable.xyz \
--private-key $PRIVATE_KEY
```
This sends a transaction. You are paying a small USDT0 fee for the state change. The value `42` is now stored in the `number` variable on the Stable Testnet.
### 8. Read state from the chain
Call `number()` to read the value back. This is a free read, with no transaction and no gas:
```bash
cast call 0xSomeContractAddress "number()(uint256)" \
--rpc-url https://rpc.testnet.stable.xyz
```
Expected output:
```
42
```
You just wrote to and read from the Stable Testnet. The round-trip — deploy, write, read — is the core loop of EVM development, and it works identically here to any other EVM chain.
### 9. Inspect your deployment on Stablescan
Open the Stable Testnet block explorer and paste your contract address:
```
https://testnet.stablescan.xyz
```
You will see your deployment transaction and the `setNumber` call you made. Stablescan is the canonical tool for inspecting on-chain state, verifying contract source code, and reading transaction history on Stable.
***
### What you have built
You deployed a contract, sent a state-changing transaction, and read on-chain state — all on the Stable Testnet. You now know how to:
* Configure Foundry (or any EVM toolchain) to target Stable using a standard RPC endpoint
* Fund a wallet using the USDT0 faucet
* Pay for transactions with USDT0 as the gas token
* Inspect your work on Stablescan
### Next recommended
* [**Verify the contract**](/en/how-to/verify-contract) — Upload your source to Stablescan so users can read and interact with it.
* [**Index contract events**](/en/how-to/index-contract) — Subscribe to events with ethers.js and backfill historical logs.
* [**Gas pricing reference**](/en/reference/gas-pricing-api) — Understand how USDT0-denominated fees are calculated.
## Brand Kit
The Stable brand kit includes logos in multiple formats and the official color palette. Use it to keep Stable's branding consistent across projects and communications.
[Open the Stable Brand Kit](https://www.stable.xyz/brand-kit)
## Facilitators
A facilitator verifies a signed x402 payment and submits the on-chain call that settles it in USDT0 on Stable. Using a hosted facilitator means you do not run settlement infrastructure or manage gas tokens. For the rail-level context, see [Agent settlement](/en/explanation/agent-settlement).
### Overview table
| **Provider** | **Category** | **Docs / Get Started** | **Notes** |
| :---------------------------------------------- | :--------------- | :------------------------------------------------------------------------------------------------------------------------------------------- | :-------------------------------------------------------------------------------------------------------------- |
| [**Semantic Pay**](https://x402.semanticpay.io) | x402 facilitator | [https://docs.semanticpay.io/supported-chains#stable](https://docs.semanticpay.io/supported-chains#stable) | Public x402 facilitator for Stable; verifies and settles USDT0 payments via ERC-3009 |
| [**Heurist**](https://facilitator.heurist.xyz) | x402 facilitator | [https://docs.heurist.ai/x402-products/facilitator#supported-networks](https://docs.heurist.ai/x402-products/facilitator#supported-networks) | Multi-chain x402 facilitator supporting Stable; high-throughput verification and settlement with OFAC screening |
### Semantic Pay
Payment infrastructure for AI agents: trustless, P2P, and permissionless. Semantic Pay operates as an x402-compatible payment facilitator on Stable, settling USDT0 payments via ERC-3009 (`transferWithAuthorization`). Agents do not need a separate gas token in their wallets.
Developers integrating x402 on Stable point their middleware to `https://x402.semanticpay.io`. No custom settlement infrastructure is required.
**Capabilities**
* Payment payload verification (`/verify`) and on-chain settlement (`/settle`) via USDT0
* Gasless transfers using ERC-3009 `transferWithAuthorization`
* Spend limits, approval flows, and kill switches for agent oversight
* End-to-end traceability with full audit logging from intent through settlement
* Event callbacks for real-time payment lifecycle updates
**Facilitator endpoint:** `https://x402.semanticpay.io`
**Docs:** [https://docs.semanticpay.io/supported-chains#stable](https://docs.semanticpay.io/supported-chains#stable)
### Heurist
Heurist operates a multi-chain x402 facilitator that supports Stable alongside Base, Base Sepolia, and X Layer. It targets high-frequency agent workloads with throughput tuned for thousands of payment verifications and settlements per second.
Point your middleware at `https://facilitator.heurist.xyz`. No API key is required to get started.
**Capabilities**
* Payment verification and on-chain settlement across multiple networks from one endpoint
* Throughput sized for high-frequency agent traffic
* Automatic OFAC screening of sender addresses
* Real-time observability over verification and settlement activity
**Facilitator endpoint:** `https://facilitator.heurist.xyz`
**Docs:** [https://docs.heurist.ai/x402-products/facilitator#supported-networks](https://docs.heurist.ai/x402-products/facilitator#supported-networks)
### How to choose
* Use a hosted facilitator (Semantic Pay or Heurist) to start fast. No infrastructure to run, no gas tokens to manage.
* Pick by what matters most for your workload: Semantic Pay if you want Stable-native tooling with lifecycle callbacks and agent oversight controls; Heurist if you need a single endpoint that spans Stable plus other EVM networks, or if OFAC screening is a hard requirement.
* Self-host if you need full control over settlement policy, want to keep payment data in your own environment, or expect volume that justifies the operational overhead.
* Both facilitators settle x402 on Stable today. The same `/settle` endpoint can also serve as the on-chain submission target for an MPP server, since MPP's wire format only differs from x402 on the client ↔ resource-server hop. See [Build an MPP endpoint on Stable](/en/how-to/build-mpp-endpoint).
***
Have an agentic payments integration with Stable? Reach out at [bizdev@stable.xyz](mailto\:bizdev@stable.xyz).
## Wallets
Agent wallets give AI agents and autonomous systems self-custodial signing so they can participate in x402 payment flows without human-driven setup.
### Overview table
| **Provider** | **Category** | **Docs / Get Started** | **Notes** |
| :---------------------------------------------------------------- | :--------------- | :------------------------------------------------------------- | :----------------------------------------------------------------------------------------------- |
| [**Wallet Development Kit (WDK)**](https://docs.wallet.tether.io) | Agent wallet SDK | [https://docs.wallet.tether.io](https://docs.wallet.tether.io) | Tether's open-source SDK; `WalletAccountEvm` satisfies the x402 client signer interface natively |
### Wallet Development Kit (WDK) by Tether
An open-source SDK from Tether for building self-custodial AI agent wallets. WDK enables agents to generate and store private keys locally, without relying on cloud-based KMS or TEE infrastructure.
The `WalletAccountEvm` instance from WDK natively satisfies the client signer interface required by the x402 SDK. An agent equipped with WDK and USDT0 on Stable can automatically intercept 402 HTTP responses, sign ERC-3009 authorizations, and resubmit requests.
**Packages:** `@tetherto/wdk`, `@tetherto/wdk-wallet-evm`
**Capabilities**
* Self-custodial key generation and local storage
* Native x402 client signer compatibility via `WalletAccountEvm`
* Automatic 402 response interception and ERC-3009 signing
* Multi-chain support including Stable
**Docs:** [https://docs.wallet.tether.io](https://docs.wallet.tether.io)
***
Have an agent wallet integration with Stable? Reach out at [bizdev@stable.xyz](mailto\:bizdev@stable.xyz).
## Bank precompile reference
:::note
**Concept:** For what the bank module does and when to use it, see [Bank module](/en/explanation/bank-module).
:::
### Abstract
The `x/bank` module in Stable SDK only provides basic token management features.
You can transfer any token to any account without restriction, but you cannot delegate another account to transfer your tokens.
For these reasons, the `bank` precompiled contract offers additional authorization and delegation features on top of the existing `x/bank` module in Stable SDK.
### Contents
1. **[Concepts](#concepts)**
2. **[Configuration](#configuration)**
3. **[Methods](#methods)**
4. **[Events](#events)**
### Concepts
This precompiled contract provides ERC-20 standard methods - such as `transfer` and `balanceOf` for transfer and `transferFrom`, `approve` and `allowance` for delegation. You can call these methods directly without registering the contract address.
However, the `x/precompile` module must whitelist and register the contract address before you can use the `mint` and `burn` methods.
```go
func (p *Precompile) mint(
ctx sdk.Context,
contract *vm.Contract,
denom string,
method *abi.Method,
stateDB vm.StateDB,
args []interface{},
) ([]byte, error) {
// ...
// mint method is only allowed for the registered caller contract
if _, err := precompilecommon.CheckPermissions(ctx, p.precompileKeeper, contract.CallerAddress, CallerPermissions); err != nil {
return nil, err
}
```
This additional verification process guarantees that the token contract calling this precompiled contract is authorized.
To register a token contract address and its denom in the `x/precompile` module whitelist, you must submit a governance proposal.
### Configuration
The contract address and gas cost are predefined.
#### Contract address
* `0x0000000000000000000000000000000000001003` for STABLE (governance token)
### Methods
#### `mint`
Mints requested amount of new tokens and transfer to the account.
The amount of tokens to be minted must be greater than zero.
`PrecompiledBankMint` is emitted when the tokens are successfully minted and transferred to the account.
NOTE:
* Governance token minting is prohibited.
* Caller contracts calling the mint method must be registered in x/precompile module.
##### Inputs
| Name | Type | Description |
| ------ | ------- | ---------------------------------------- |
| to | address | the address to receive the minted tokens |
| amount | uint256 | the amount of tokens to be minted |
##### Outputs
| Name | Type | Description |
| ------- | ---- | ------------------------------------------------------------------------- |
| success | bool | true if the tokens are successfully minted and transferred to the account |
#### `burn`
Burns requested amount of tokens from the account.
The amount of tokens to be burned must be greater than zero.
`PrecompiledBankBurn` is emitted when the tokens are successfully burned.
NOTE:
* Burning governance token is prohibited.
* Caller contracts calling the burn method must be registered in x/precompile module.
##### Inputs
| Name | Type | Description |
| ------ | ------- | --------------------------------- |
| from | address | the address to burn the tokens |
| amount | uint256 | the amount of tokens to be burned |
##### Outputs
| Name | Type | Description |
| ------- | ---- | ------------------------------------------ |
| success | bool | true if the tokens are successfully burned |
#### `transfer`
Transfers requested amount of tokens from sender to the recipient.
Token must be set sendable. The amount of tokens to be transferred must be greater than zero.
`PrecompiledBankTransfer` is emitted when the tokens are successfully transferred.
##### Inputs
| Name | Type | Description |
| ------ | ------- | -------------------------------------- |
| to | address | the address to receive the tokens |
| amount | uint256 | the amount of tokens to be transferred |
##### Outputs
| Name | Type | Description |
| ------- | ---- | ----------------------------------------------- |
| success | bool | true if the tokens are successfully transferred |
#### `transferFrom`
Transfers requested amount of tokens from owner to recipient by authorized spender within the limits of the allowance.
Token must be set sendable.
The amount of tokens to be transferred must be greater than zero and less than or equal to the current allowance.
`PrecompiledBankTransfer` is emitted when the tokens are successfully transferred.
##### Inputs
| Name | Type | Description |
| ------ | ------- | -------------------------------------- |
| from | address | the address to transfer the tokens |
| to | address | the address to receive the tokens |
| amount | uint256 | the amount of tokens to be transferred |
##### Outputs
| Name | Type | Description |
| ------- | ---- | ----------------------------------------------- |
| success | bool | true if the tokens are successfully transferred |
#### `multiTransfer`
Transfers tokens from single account to multiple accounts.
Token must be set sendable.
The amount of tokens to be transferred to each recipient must be greater than zero.
`PrecompiledBankTransfer` is emitted per each recipient when the tokens are successfully transferred.
##### Inputs
| Name | Type | Description |
| ------ | ---------- | -------------------------------------------------------- |
| to | address\[] | the addresses to receive the transferred tokens |
| amount | uint256\[] | the amount of tokens to be transferred to each recipient |
##### Outputs
| Name | Type | Description |
| ------- | ---- | ----------------------------------------------------------------- |
| success | bool | true if the tokens are successfully transferred to each recipient |
#### `approve`
Authorizes a spender to transfer tokens from the owner’s account.
The amount of tokens to be authorized must be greater than zero.
`PrecompiledBankApproval` is emitted when the authorization is successfully set.
##### Inputs
| Name | Type | Description |
| ------- | ------- | ------------------------------------- |
| spender | address | the address to authorize |
| value | uint256 | the amount of tokens to be authorized |
##### Outputs
| Name | Type | Description |
| ------- | ---- | --------------------------------------------- |
| success | bool | true if the authorization is successfully set |
#### `revoke`
Revokes the authorization of spender for transferring tokens from owner.
`PrecompiledBankRevoke` is emitted when the authorization is successfully revoked.
##### Inputs
| Name | Type | Description |
| ------- | ------- | --------------------- |
| spender | address | the address to revoke |
##### Outputs
| Name | Type | Description |
| ------- | ---- | ------------------------------------------------- |
| success | bool | true if the authorization is successfully revoked |
#### `balanceOf`
Returns balance of tokens from the account.
##### Inputs
| Name | Type | Description |
| ------- | ------- | ---------------------------------------- |
| account | address | the address to get the balance of tokens |
##### Outputs
| Name | Type | Description |
| ------- | ------- | ----------------------------------- |
| balance | uint256 | the amount of tokens in the account |
#### `totalSupply`
Returns total supply of tokens.
##### Inputs
none
##### Outputs
| Name | Type | Description |
| ----------- | ------- | -------------------------- |
| totalSupply | uint256 | the total amount of tokens |
#### `allowance`
Returns the amount which spender is still allowed to withdraw from owner.
##### Inputs
| Name | Type | Description |
| ------- | ------- | -------------------------- |
| owner | address | the address of the owner |
| spender | address | the address of the spender |
##### Outputs
| Name | Type | Description |
| ------ | ------- | ------------------------------- |
| amount | uint256 | the amount of tokens authorized |
### Events
All events emitted from this precompiled contract are prefixed with `PrecompiledBank`.
To avoid ambiguity, token contract calling this precompiled contract should avoid using event names with the same prefix.
#### PrecompiledBankMint
| Name | Type | Indexed | Description |
| ------ | ------- | ------- | ---------------------------------------- |
| from | address | Y | the address that minted the tokens |
| to | address | Y | the address to receive the minted tokens |
| amount | uint256 | N | the amount of tokens minted |
#### PrecompiledBankBurn
| Name | Type | Indexed | Description |
| ------ | ------- | ------- | ---------------------------------- |
| from | address | Y | the address that burned the tokens |
| to | address | Y | not used in this method |
| amount | uint256 | N | the amount of tokens burned |
#### PrecompiledBankTransfer
| Name | Type | Indexed | Description |
| ------ | ------- | ------- | --------------------------------------------- |
| from | address | Y | the address that transferred the tokens |
| to | address | Y | the address to receive the transferred tokens |
| amount | uint256 | N | the amount of tokens transferred |
#### PrecompiledBankApproval
| Name | Type | Indexed | Description |
| ------- | ------- | ------- | -------------------------------------- |
| owner | address | Y | the address that authorized the tokens |
| spender | address | Y | the address to authorize |
| value | uint256 | N | the amount of tokens authorized |
#### PrecompiledBankRevoke
| Name | Type | Indexed | Description |
| ------- | ------- | ------- | ----------------------------------- |
| owner | address | Y | the address that revoked the tokens |
| spender | address | Y | the address to revoke |
| value | uint256 | N | the amount of tokens authorized |
## Bridges
Bridge providers supporting USDT0 transfers to and from Stable. For how cross-chain USDT0 movement works, see [Bridging to Stable](/en/explanation/usdt0-bridging). For a hands-on walkthrough, see the [Bridge USDT0 to Stable Testnet](/en/tutorial/bridge-usdt0) tutorial.
***
### Supported source chains
Any chain with USDT0 can bridge to Stable via the OFT Mesh. Any chain with native USDT can route through the Legacy Mesh via the Arbitrum hub. Current participants:
| Path | Example chains | Mechanism | Fee |
| :-------------- | :-------------------------------------------------------------------------------------------------------------------------------------------------------------------------- | :----------------------------------------------------- | :----------------------- |
| **OFT Mesh** | Arbitrum, Bera, Conflux, Ethereum, Flare, Hedera, Hyperliquid, Ink, Mantle, MegaETH, Monad, Morph, MP1, Optimism, Plasma, Polygon, Rootstock, Sei, Tempo, Unichain, X Layer | Burn on source, mint on Stable | Source chain gas only |
| **Legacy Mesh** | Tron, TON | Lock native USDT → Arbitrum hub → mint USDT0 on Stable | 0.03% + source chain gas |
Ethereum and Arbitrum support both paths: users holding native USDT can use the Legacy Mesh, while users holding USDT0 can use the OFT Mesh directly.
***
### Contract addresses
| | Testnet (chain ID 2201) | Mainnet (chain ID 988) |
| :-------------------------------- | :------------------------------------------- | :----------------------------------------------------------------------------------------------------------------- |
| **LayerZero EID** | `40374` | See [LayerZero deployed contracts](https://docs.layerzero.network/v2/deployments/deployed-contracts?chains=stable) |
| **LayerZero Endpoint V2** | `0x3aCAAf60502791D199a5a5F0B173D78229eBFe32` | See LayerZero docs |
| **USDT0 token** | `0x78Cf24370174180738C5B8E352B6D14c83a6c9A9` | `0x779Ded0c9e1022225f8E0630b35a9b54bE713736` |
| **USDT0 OApp (on Stable)** | N/A | `0xedaba024be4d87974d5aB11C6Dd586963CcCB027` |
| **Source USDT0 (Sepolia)** | `0xc4DCC311c028e341fd8602D8eB89c5de94625927` | Use mainnet USDT0 on source chain |
| **Source OApp (Sepolia)** | `0xc099cD946d5efCC35A99D64E808c1430cEf08126` | Use mainnet OApp on source chain |
| **LiFi Diamond (Stable mainnet)** | N/A | `0x026F252016A7C47CDEf1F05a3Fc9E20C92a49C37` |
For the full testnet contract list (LayerZero endpoint, DVN, executor), see [Testnet ecosystem contracts](/en/reference/testnet-ecosystem).
***
### STABLE OFT contracts
The STABLE token bridges to other chains using the LayerZero OFT standard. The adapter on Stable locks STABLE for outbound transfers; the upgradeable proxy on each remote chain mints and burns the wrapped supply. For the security model and a description of each contract's role, see [Bridge security and DVNs](/en/explanation/bridge-security).
| Chain | Contract | Address |
| :----------- | :----------------------------- | :------------------------------------------- |
| **Stable** | `StableOFTAdapter` | `0x386f92606b2D5E0A992ECc3704c31eF39Ff56392` |
| **BSC** | `StableOFTUpgradeable` (proxy) | `0x011EBe7d75E2C9D1E0bD0be0bEf5C36f0A90075F` |
| **HyperEVM** | `StableOFTUpgradeable` (proxy) | `0xa51dC81944a15623874981181a99D6c56B20ED56` |
:::note
The remote chain addresses differ even though both are EVM-compatible. Activating the destination address on HyperCore requires a transaction, which advances the deploy nonce and produces a different deterministic address than BSC. See [stablelabs/chain-oft](https://github.com/stablelabs/chain-oft) for the canonical config.
:::
***
### Stable's DVN operators
Stable's bridges run a 3/3 required DVN configuration: three independent operators must each sign every cross-chain message before it is accepted. There is no optional pool. The three required signers and their DVN contract addresses:
| Operator | DVN address |
| :----------------- | :------------------------------------------- |
| **LayerZero Labs** | `0x9c061c9a4782294eef65ef28cb88233a987f4bdd` |
| **Canary** | `0x8d6cc20d84fbeb5733c60436ceb8957da2ac02c8` |
| **Horizen** | `0x965a80dc87cec5848310e612dead84b543aef874` |
For the on-chain config per pathway, see [LayerZero deployed contracts](https://docs.layerzero.network/v2/deployments/deployed-contracts?chains=stable). For the security rationale, see [Bridge security and DVNs](/en/explanation/bridge-security).
***
### Bridge providers
| Provider | Type | Status | Description | Docs |
| :------------------------------------------------------------------ | :--------------------------------- | :---------------------- | :----------------------------------------------------------- | :--------------------------------------------------------------------------- |
| **[LayerZero](https://docs.layerzero.network/v2)** | Cross-chain messaging (OFT) | Live | Powers USDT0 OFT burn/mint transfers; dual DVN verification | [docs.layerzero.network/v2](https://docs.layerzero.network/v2) |
| **[Stargate](https://docs.stargate.finance/introduction/overview)** | Direct bridge (liquidity pools) | Live | Unified liquidity pools; stablecoin-optimized routing | [docs.stargate.finance](https://docs.stargate.finance/introduction/overview) |
| **[Gas.Zip](https://dev.gas.zip/overview)** | Direct bridge (liquidity routing) | Live | Liquidity routing across 350+ chains; fast finality | [dev.gas.zip](https://dev.gas.zip/overview) |
| **[LiFi](https://docs.li.fi/api-reference/introduction)** | Bridge aggregator | Live | Routes across multiple bridges and DEX swaps; SDK + REST API | [docs.li.fi](https://docs.li.fi/api-reference/introduction) |
| **[Polymer](https://docs.polymerlabs.org/docs/build/start/)** | Cross-chain interoperability (IBC) | Integration in progress | IBC-based messaging for Ethereum-native chains | [docs.polymerlabs.org](https://docs.polymerlabs.org/docs/build/start/) |
| **[Relay](https://docs.relay.link/what-is-relay)** | Intent-based bridge | Integration in progress | Gasless execution via solver network | [docs.relay.link](https://docs.relay.link/what-is-relay) |
#### LayerZero
Cross-chain messaging protocol powering USDT0 OFT burn/mint transfers with dual DVN verification.
**Capabilities**
* OFT-standard burn-on-source, mint-on-destination transfers
* Dual DVN (Decentralized Verifier Network) message verification
* Powers both OFT Mesh and Legacy Mesh paths
#### Stargate
Liquidity pool-based bridge optimized for stablecoin routing.
**Capabilities**
* Unified liquidity pools across chains
* Stablecoin-optimized routing
* Instant guaranteed finality
#### Gas.Zip
Liquidity routing protocol supporting fast transfers across 350+ chains.
**Capabilities**
* Cross-chain liquidity routing
* Fast finality
* Broad chain coverage (350+ chains)
#### LiFi
Bridge aggregator routing transfers across multiple bridges and DEX swaps.
**Capabilities**
* Multi-bridge route optimization
* SDK and REST API integration
* DEX swap aggregation
#### Polymer
IBC-based cross-chain messaging for Ethereum-native chains. Integration in progress.
**Capabilities**
* IBC protocol messaging on Ethereum
* Native interoperability without external validators
#### Relay
Intent-based bridge with gasless execution via a solver network. Integration in progress.
**Capabilities**
* Intent-based bridging
* Gasless execution for users
* Solver network settlement
***
### Fee structure
| Provider | Fee model |
| :-------------------------- | :-------------------------------------------------------------------------------------------------- |
| **LayerZero (OFT Mesh)** | Source chain gas only (no protocol fee) |
| **LayerZero (Legacy Mesh)** | 0.03% of transferred amount (charged by USDT0 team) + source chain gas |
| **Stargate** | Liquidity pool fees apply; see [Stargate docs](https://docs.stargate.finance/introduction/overview) |
| **LiFi** | Aggregator routing fee may apply depending on path |
| **Gas.Zip** | See [Gas.Zip docs](https://dev.gas.zip/overview) for current fee schedule |
| **Relay** | Solver fees; see [Relay docs](https://docs.relay.link/what-is-relay) |
***
Have a bridge integrating Stable? Reach out at [bizdev@stable.xyz](mailto\:bizdev@stable.xyz).
## Connect
This page consolidates the network details you need to connect to Stable.
### Mainnet
| **Field** | **Value** |
| :-------------- | :----------------------------------------------- |
| Network Name | Stable Mainnet |
| Chain ID | `988` |
| Currency Symbol | USDT0 |
| EVM JSON-RPC | `https://rpc.stable.xyz` |
| WebSocket | `wss://rpc.stable.xyz` |
| Block Explorer | [https://stablescan.xyz](https://stablescan.xyz) |
### Testnet
| **Field** | **Value** |
| :-------------- | :--------------------------------------------------------------- |
| Network Name | Stable Testnet |
| Chain ID | `2201` |
| Currency Symbol | USDT0 |
| EVM JSON-RPC | `https://rpc.testnet.stable.xyz` |
| WebSocket | `wss://rpc.testnet.stable.xyz` |
| Block Explorer | [https://testnet.stablescan.xyz](https://testnet.stablescan.xyz) |
For third-party RPC providers, see [RPC Providers](/en/reference/rpc-providers). For a typed client that wires these endpoints in for you, see the [Stable SDK](/en/explanation/sdk-overview).
### Rate limits
The public RPC endpoints (`https://rpc.stable.xyz` and `https://rpc.testnet.stable.xyz`) are rate-limited to **1,000 requests per 10 seconds per IP**. Requests over the limit return `HTTP 429`.
For higher throughput, use a [third-party RPC provider](/en/reference/rpc-providers).
:::note
USDT0 uses **18 decimals** as the native gas token (returned by `address(x).balance`) and **6 decimals** as an ERC-20 token (returned by `USDT0.balanceOf(x)`). Both interfaces operate on the same underlying balance. Libraries like viem and ethers.js report 18 decimals because they read the native gas token. For details on how the precision gap is reconciled, see [USDT0 Behavior on Stable](/en/explanation/usdt0-behavior).
:::
### Add Stable to your wallet
To add Stable manually, open your browser wallet's network settings and enter the values from the tables above. The required fields are:
* **Network Name**
* **RPC URL** (the EVM JSON-RPC endpoint)
* **Chain ID**
* **Currency Symbol**: `USDT0`
### Verify connectivity
Confirm your RPC endpoint is reachable by querying the chain ID:
```bash
cast chain-id --rpc-url https://rpc.stable.xyz
```
Expected output:
```text
988
```
For the testnet:
```bash
cast chain-id --rpc-url https://rpc.testnet.stable.xyz
```
Expected output:
```text
2201
```
### Next recommended
* [**Quick start**](/en/tutorial/quick-start) — Send your first testnet transaction in five minutes.
* [**Get testnet USDT0**](/en/how-to/use-faucet) — Fund a wallet from the faucet or bridge from Sepolia.
* [**USDT0 behavior on Stable**](/en/explanation/usdt0-behavior) — Understand the 18/6-decimal dual role before you code against balances.
## Custody
### Custody overview table
| **Provider** | **Category** | **Docs / Get Started** | **Notes** |
| :---------------------------------------- | :------------------------------ | :----------------------------------------------------------------------------------------------------- | :----------------------------------------- |
| [Paxos](https://paxos.com/) | MPC custody infrastructure | [https://docs.paxos.com/guides/developer/account](https://docs.paxos.com/guides/developer/account) | Trusted by Mastercard and PayPal |
| [Fireblocks](https://www.fireblocks.com/) | MPC custody infrastructure | [https://developers.fireblocks.com/docs/quickstart](https://developers.fireblocks.com/docs/quickstart) | Treasury and settlement workflows |
| [Fordefi](https://www.fordefi.com/) | MPC custody infrastructure | [https://docs.fordefi.com/](https://docs.fordefi.com/) | Policy engine and developer APIs |
| [Anchorage](https://www.anchorage.com/) | Regulated institutional custody | [https://www.anchorage.com/get-in-touch](https://www.anchorage.com/get-in-touch) | Federally chartered bank; $45B+ in custody |
### Category guide
* **MPC custody infrastructure:** Platforms using multi-party computation to distribute private key control across multiple parties. These provide secure key management, policy engines, and developer APIs for institutional digital asset operations.
* **Regulated institutional custody:** Federally regulated bank-grade custody for institutions that require a chartered custodian with direct regulatory oversight.
### MPC custody infrastructure
#### [Paxos](https://paxos.com/)
A regulated blockchain and tokenization infrastructure platform trusted by global enterprises including Mastercard and PayPal.
**Capabilities**
* Regulated custody and settlement infrastructure
* Enterprise-grade asset safekeeping
* Tokenization services for institutions
* Compliance frameworks for stablecoin operations
**Get started**: Create a developer account and follow the [Paxos developer onboarding guide](https://docs.paxos.com/guides/developer/account) to configure custody and settlement for Stable assets.
#### [Fireblocks](https://www.fireblocks.com/)
Financial infrastructure that powers custody, treasury, and digital asset operations for institutions worldwide.
**Capabilities**
* MPC-based digital asset custody
* Secure transfer and treasury workflows
* Institutional settlement network
* Stablecoin program infrastructure
**Get started**: Follow the [Fireblocks quickstart guide](https://developers.fireblocks.com/docs/quickstart) to set up a workspace, configure Stable as a supported network, and begin managing digital assets.
#### [Fordefi](https://www.fordefi.com/)
An institutional MPC wallet and security platform built for decentralized finance. Fordefi provides key management, policy controls, and developer APIs for Web3 institutions.
**Capabilities**
* MPC-based distributed key generation and threshold signing
* Institutional policy engine and approval workflows
* Developer APIs for programmatic wallet operations
* Browser extension, mobile, and API interfaces
**Get started**: Review the [Fordefi developer documentation](https://docs.fordefi.com/) to create a vault, configure approval policies, and connect to Stable via the API.
### Regulated institutional custody
#### [Anchorage](https://www.anchorage.com/)
A federally chartered national bank providing secure, regulated custody for over $45B in digital assets.
**Capabilities**
* Bank-grade digital asset custody
* Enterprise access controls
* Regulated institutional operations
* Auditable, compliant asset storage
**Get started**: Contact Anchorage through their [institutional onboarding page](https://www.anchorage.com/get-in-touch) to begin the account setup process for regulated custody of Stable assets.
***
Have custody infrastructure integrating with Stable? Reach out at [bizdev@stable.xyz](mailto\:bizdev@stable.xyz).
## Developer assistance
### FAQ
A growing collection of developer-focused questions covering topics such as:
* How do I connect to the Stable network?
* You can interact with the network using standard JSON-RPC requests compatible with common EVM tooling.
* What currency is used for transaction fees?
* You pay transaction fees in USDT0. No additional fee parameters are required beyond the standard base gas price.
* Where can I track updates?
* The Release & Change Log communicates all protocol and developer-facing changes.
* Does Stable support account abstraction?
* Yes. EIP-7702 enables EOAs to temporarily operate with smart-account behavior.
* See [EIP-7702 reference](/en/reference/eip-7702-api) and [Account abstraction how-to](/en/how-to/account-abstraction).
* Where can I see my transaction results?
* Once included in a block, results are visible through:
* balance reads
* contract state queries
* logs and emitted events
* How do I build smart contracts for Stable?
* You can use standard EVM developer workflows such as:
* Solidity-based contracts
* JSON-RPC libraries to interact with the network
This page will expand as common questions arise during public testnet usage.
### Support channels
You can engage directly with the Stable team for technical assistance.
* **Discord**: Join the developer channel at [https://discord.gg/stablexyz](https://discord.gg/stablexyz)
* **Issue Reporting**: Instructions will be provided once public repositories open
Support contacts will be updated as community platforms become available.
### Next recommended
* [**Quick start**](/en/tutorial/quick-start) — Run your first testnet transaction in five minutes.
* [**Production readiness**](/en/how-to/production-readiness) — Validate an integration before shipping to mainnet.
* [**FAQ**](/en/reference/faq) — Common answers about chain IDs, endpoints, and onboarding.
## DEXes
DEX deployments on Stable for spot trading, liquidity provision, and on-chain routing. Stable is on the [Official Uniswap v3 Deployments List](https://gov.uniswap.org/t/official-uniswap-v3-deployments-list/24323/13#p-58106-stable-4): the Uniswap v3 contracts on Stable are governance-recognized as canonical and are routed through [Stable Swap](https://swap.stable.xyz) as the default frontend.
### Overview table
| **Provider** | **Category** | **Status** | **Docs / Get Started** | **Notes** |
| :---------------------------------------- | :------------------------- | :-------------------------- | :----------------------------------------------------------------- | :------------------------------------------------------------------------------------------------------------------ |
| [**Uniswap v3**](https://swap.stable.xyz) | Concentrated-liquidity AMM | Canonical (live on mainnet) | [docs.uniswap.org](https://docs.uniswap.org/contracts/v3/overview) | Recognized on the Official Uniswap v3 Deployments List on May 12, 2026. Frontend: Stable Swap. Deployer: Protofire. |
### Uniswap v3
Canonical Uniswap v3 deployment on Stable, with concentrated-liquidity pools and standard fee tiers. Stable Swap is the actively maintained default frontend; trades route through the contracts below. Cross-chain liquidity flows in via LayerZero.
**Capabilities**
* Concentrated-liquidity AMM with v3 position NFTs
* Standard `SwapRouter02`, `Quoter V2`, and `Universal Router` integration paths
* `Permit2` support for gasless approvals
* v2-style constant-product pools also deployed for legacy routing
#### Mainnet contract addresses
Source: [RFC: Stable Application for Canonical Uniswap v3 Deployment](https://gov.uniswap.org/t/rfc-stable-application-for-canonical-uniswap-v3-deployment/26080) and the [Official Uniswap v3 Deployments List](https://gov.uniswap.org/t/official-uniswap-v3-deployments-list/24323/13#p-58106-stable-4).
| **Contract** | **Address** |
| :----------------------------------------------- | :---------------------------------------------------------------------------------------------------------------------- |
| **v3 Core Factory** | [0x88F0a512eF09175D456bc9547f914f48C013E4aA](https://stablescan.xyz/address/0x88F0a512eF09175D456bc9547f914f48C013E4aA) |
| **Universal Router** | [0x5Be52b52f3d1dbC324d2959637471a4208626144](https://stablescan.xyz/address/0x5Be52b52f3d1dbC324d2959637471a4208626144) |
| **Swap Router02** | [0x32eaf9B5d5F2CD7361c5012890C943D7de84C22a](https://stablescan.xyz/address/0x32eaf9B5d5F2CD7361c5012890C943D7de84C22a) |
| **Quoter V2** | [0xb070179E7032CdA868b53e6C1742F80c9e940d1A](https://stablescan.xyz/address/0xb070179E7032CdA868b53e6C1742F80c9e940d1A) |
| **Nonfungible Token Position Manager** | [0x3BdC3437405f7D801b6036532713fc1F179136a6](https://stablescan.xyz/address/0x3BdC3437405f7D801b6036532713fc1F179136a6) |
| **Nonfungible Token Position Descriptor V1.3.0** | [0x7Cf5987951E48ADf235cc9194bCdc708Eb692D82](https://stablescan.xyz/address/0x7Cf5987951E48ADf235cc9194bCdc708Eb692D82) |
| **NFT Descriptor Library V1.3.0** | [0xF7815833076D83161414A46c4E993dC8f22A7ADd](https://stablescan.xyz/address/0xF7815833076D83161414A46c4E993dC8f22A7ADd) |
| **Descriptor Proxy** | [0xcd2cD0E139eC5581138E18C6DBB189c53efBAE95](https://stablescan.xyz/address/0xcd2cD0E139eC5581138E18C6DBB189c53efBAE95) |
| **Proxy Admin** | [0x51D1E70B8cAbDF4F3aB056475802AB1687b3EA23](https://stablescan.xyz/address/0x51D1E70B8cAbDF4F3aB056475802AB1687b3EA23) |
| **Tick Lens** | [0x8dF0D1614aae99352045c62d24d54E72b38111ec](https://stablescan.xyz/address/0x8dF0D1614aae99352045c62d24d54E72b38111ec) |
| **v3 Migrator** | [0x2C5f4275F1a278BF328D56CB9db304e915DE3082](https://stablescan.xyz/address/0x2C5f4275F1a278BF328D56CB9db304e915DE3082) |
| **v3 Staker** | [0xA32e3E127FF46db40ab3c4775be97ED760AD7178](https://stablescan.xyz/address/0xA32e3E127FF46db40ab3c4775be97ED760AD7178) |
| **Permit2** | [0x000000000022D473030F116dDEE9F6B43aC78BA3](https://stablescan.xyz/address/0x000000000022D473030F116dDEE9F6B43aC78BA3) |
| **Multicall 2** | [0x208099D6E8a107aD485CD1374A6EC5Abd98c7F11](https://stablescan.xyz/address/0x208099D6E8a107aD485CD1374A6EC5Abd98c7F11) |
| **V2 Core Factory** | [0x25D2d657F539F2bB16eC82773cBE5ee49ddD3c69](https://stablescan.xyz/address/0x25D2d657F539F2bB16eC82773cBE5ee49ddD3c69) |
| **Uniswap V2 Router02** | [0xa571dc7c4f2369F1cA24D3a7E8a35c07Ff52bfC0](https://stablescan.xyz/address/0xa571dc7c4f2369F1cA24D3a7E8a35c07Ff52bfC0) |
:::note
Stable is recognized on the Uniswap v3 Deployments List as of May 12, 2026, following completion of the UAC governance process in April 2026. The deployment is maintained by Protofire with bridge connectivity via LayerZero.
:::
#### Quoting a swap
`Quoter V2` returns the expected output for a given input without executing a trade. Use it from any EVM tooling pointed at Stable's RPC.
```bash
cast call 0xb070179E7032CdA868b53e6C1742F80c9e940d1A \
"quoteExactInputSingle((address,address,uint256,uint24,uint160))(uint256,uint160,uint32,uint256)" \
"(,,,,0)" \
--rpc-url https://rpc.stable.xyz
```
```text
(amountOut, sqrtPriceX96After, initializedTicksCrossed, gasEstimate)
```
Replace ``, ``, ``, and `` (one of `100`, `500`, `3000`, `10000`) with the values for the pool you're quoting. For application integration, prefer the [Uniswap v3 SDK](https://docs.uniswap.org/sdk/v3/overview) or the [Universal Router](https://docs.uniswap.org/contracts/universal-router/overview) pointed at the addresses above.
***
### Have a DEX integrating Stable?
Reach the team at [bizdev@stable.xyz](mailto\:bizdev@stable.xyz) to be listed on this page.
### Next recommended
* [Connect to Stable](/en/reference/connect): chain IDs, RPC endpoints, and block explorers for mainnet and testnet.
* [Bridges](/en/reference/bridges): move USDT0 and other assets into Stable to provide liquidity or route trades.
* [Oracles](/en/reference/oracles): price feeds you can use alongside swap quotes for pricing and liquidations.
## Distribution precompile reference
:::note
**Concept:** For what the distribution module does and when to use it, see [Distribution module](/en/explanation/distribution-module).
:::
### Abstract
The `distribution` precompiled contract acts as a bridge that enables EVM environments to use the Stable SDK's `x/distribution` module functionality.
### Contents
1. **[Concepts](#concepts)**
2. **[Configuration](#configuration)**
3. **[Methods](#methods)**
4. **[Events](#events)**
### Concepts
The `distribution` precompiled contract performs additional checks to ensure that the delegator or depositor is the caller.
### Configuration
The contract address and gas cost are predefined.
#### Contract address
* `0x0000000000000000000000000000000000000801`
### Methods
#### `setWithdrawAddress`
Sets the address to receive the reward for the token delegated by the delegator to the validator.
Sometimes, when the delegator is self-delegated, the validator address is used as the delegator.
`SetWithdrawAddress` is emitted when the withdrawer address is successfully set.
##### Inputs
| Name | Type | Description |
| ----------------- | ------- | ----------------------------------------------- |
| delegatorAddress | address | the address of the delegator |
| withdrawerAddress | address | the address to receive the reward of delegation |
##### Outputs
| Name | Type | Description |
| ------- | ---- | -------------------------------------------------- |
| success | bool | true if the withdrawer address is successfully set |
#### `withdrawDelegatorRewards`
Withdraws the reward to be received by the delegator from the validator.
All types of tokens that the validator rewards to the delegator are withdrawn in a single transaction.
`WithdrawDelegatorRewards` is emitted when the reward is successfully withdrawn.
##### Inputs
| Name | Type | Description |
| ---------------- | ------- | ---------------------------- |
| delegatorAddress | address | the address of the delegator |
| validatorAddress | address | the address of the validator |
##### Outputs
| Name | Type | Description |
| ------ | ------- | --------------------------------------------------------- |
| amount | Coin\[] | rewards of various tokens to be received by the delegator |
`Coin` is a struct with the following fields:
| Name | Type | Description |
| ------ | ------- | ------------------------ |
| denom | string | the denom of the reward |
| amount | uint256 | the amount of the reward |
#### `withdrawValidatorCommission`
Withdraws the commission of the validator.
All types of tokens that the validator receives as commission are withdrawn in a single transaction.
`WithdrawValidatorCommission` is emitted when the commission is successfully withdrawn.
##### Inputs
| Name | Type | Description |
| ---------------- | ------- | ---------------------------- |
| validatorAddress | address | the address of the validator |
##### Outputs
| Name | Type | Description |
| ------ | ------- | ------------------------------------------------------------- |
| amount | Coin\[] | commissions of various tokens to be received by the validator |
#### `validatorDistributionInfo`
Returns the distribution information representing the reward the validator will receive. A validator can delegate tokens to itself at its own address to act as a delegator, called self-bonded.
##### Inputs
| Name | Type | Description |
| ---------------- | ------- | ---------------------------- |
| validatorAddress | address | the address of the validator |
##### Outputs
| Name | Type | Description |
| ---------------- | ------------------------- | ----------------------------------------- |
| distributionInfo | ValidatorDistributionInfo | distribution information of the validator |
`ValidatorDistributionInfo` is a struct with the following fields:
| Name | Type | Description |
| --------------- | ---------- | -------------------------------------------- |
| operatorAddress | address | the address of the operator of the validator |
| selfBondRewards | DecCoin\[] | the self-bonded amount of the validator |
| commission | DecCoin\[] | the commission of the validator |
`DecCoin` is a struct with the following fields:
| Name | Type | Description |
| --------- | ------- | --------------------------- |
| denom | string | the denom of the reward |
| amount | uint256 | the amount of the reward |
| precision | uint8 | the precision of the reward |
#### `validatorOutstandingRewards`
Returns the outstanding rewards of the validator. Outstanding rewards represent the total reward pool: the validator's commission and self-bonded rewards, plus the total rewards owed to delegators. For example, if validator A has delegators B, C, and D, the outstanding rewards equal A's commission and self-bonded rewards, plus the rewards of B, C, and D.
##### Inputs
| Name | Type | Description |
| ---------------- | ------- | ---------------------------- |
| validatorAddress | address | the address of the validator |
##### Outputs
| Name | Type | Description |
| ------- | ---------- | ------------------------------------ |
| rewards | DecCoin\[] | outstanding rewards of the validator |
#### `validatorCommission`
Returns the commission of the validator. This method is used to retrieve the commission of the validator before calling `withdrawValidatorCommission` method.
##### Inputs
| Name | Type | Description |
| ---------------- | ------- | ---------------------------- |
| validatorAddress | address | the address of the validator |
##### Outputs
| Name | Type | Description |
| ---------- | ---------- | --------------------------- |
| commission | DecCoin\[] | commission of the validator |
#### `validatorSlashes`
Returns the history of slashes of the validator between the starting height and ending height. Slashing is the fines imposed when a validator behaves maliciously or violates network rules such as double signing, misbehavior, or not following the chain rules.
##### Inputs
| Name | Type | Description |
| ---------------- | ------- | ---------------------------- |
| validatorAddress | address | the address of the validator |
| startingHeight | uint64 | the starting height |
| endingHeight | uint64 | the ending height |
| pageRequest | PageReq | the pagination request |
`PageReq` is a struct with the following fields:
| Name | Type | Description |
| ---------- | ------ | ------------------------------------------ |
| key | bytes | the key of the pagination |
| offset | uint64 | the offset of the pagination |
| limit | uint64 | the limit of the pagination |
| countTotal | bool | whether to count the total number of pages |
| reverse | bool | whether to reverse the pagination |
##### Outputs
| Name | Type | Description |
| ---------- | ---------------------- | ------------------------ |
| slashes | ValidatorSlashEvent\[] | slashes of the validator |
| pagination | PageResp | the pagination response |
`ValidatorSlashEvent` is a struct with the following fields:
| Name | Type | Description |
| --------------- | ------ | --------------------------- |
| validatorPeriod | uint64 | the period of the validator |
| fraction | Dec | the fraction of the slash |
`Dec` is a struct with the following fields:
| Name | Type | Description |
| --------- | ------ | ------------------------ |
| value | uint64 | the value of the Dec |
| precision | uint8 | the precision of the Dec |
`PageResp` is a struct with the following fields:
| Name | Type | Description |
| ------- | ------ | ------------------------------ |
| nextKey | bytes | the next key of the pagination |
| total | uint64 | the total number of pages |
#### `delegationRewards`
Returns the rewards that delegator receives from the validator.
##### Inputs
| Name | Type | Description |
| ---------------- | ------- | -------------------------------- |
| delegatorAddress | address | the hex address of the delegator |
| validatorAddress | address | the address of the validator |
##### Outputs
| Name | Type | Description |
| ------- | ---------- | -------------------------------------------------- |
| rewards | DecCoin\[] | rewards that delegator receives from the validator |
#### `delegationTotalRewards`
Returns the total rewards that delegator receives from all validators.
##### Inputs
| Name | Type | Description |
| ---------------- | ------- | -------------------------------- |
| delegatorAddress | address | the hex address of the delegator |
##### Outputs
| Name | Type | Description |
| ------- | ---------------------------- | --------------------------------------------------------- |
| rewards | DelegationDelegatorReward\[] | total rewards that delegator receives from all validators |
| total | DecCoin\[] | the total amount of the rewards |
`DelegationDelegatorReward` is a struct with the following fields:
| Name | Type | Description |
| ---------------- | ---------- | -------------------------------------------------- |
| validatorAddress | address | the address of the validator |
| reward | DecCoin\[] | rewards that delegator receives from the validator |
#### `delegatorValidators`
Returns the validators that delegator is bonded to.
##### Inputs
| Name | Type | Description |
| ---------------- | ------- | -------------------------------- |
| delegatorAddress | address | the hex address of the delegator |
##### Outputs
| Name | Type | Description |
| ---------- | --------- | -------------------------------------- |
| validators | string\[] | validators that delegator is bonded to |
#### `delegatorWithdrawAddress`
Returns the address to receive the reward of delegation set by `setWithdrawAddress` method.
##### Inputs
| Name | Type | Description |
| ---------------- | ------- | -------------------------------- |
| delegatorAddress | address | the hex address of the delegator |
##### Outputs
| Name | Type | Description |
| --------------- | ------- | ----------------------------------------------- |
| withdrawAddress | address | the address to receive the reward of delegation |
### Events
#### SetWithdrawAddress
| Name | Type | Indexed | Description |
| --------------- | ------- | ------- | ----------------------------------------------- |
| caller | address | Y | the address of the caller (delegator) |
| withdrawAddress | address | N | the address to receive the reward of delegation |
#### WithdrawDelegatorRewards
| Name | Type | Indexed | Description |
| ---------------- | ------- | ------- | ---------------------------- |
| delegatorAddress | address | Y | the address of the delegator |
| validatorAddress | address | Y | the address of the validator |
| amount | uint256 | N | the amount of the reward |
#### WithdrawValidatorCommission
| Name | Type | Indexed | Description |
| ---------------- | ------- | ------- | ---------------------------------- |
| validatorAddress | address | Y | the address of the validator |
| commission | uint256 | N | the total amount of the commission |
## EIP-7702
Stable supports **EIP-7702**, which allows an EOA to set its account code to an existing smart contract. EOAs keep their original address and private key while executing the delegate's logic.
:::note
**Concept:** For what EIP-7702 enables on Stable, the delegation model, and security considerations, see [EIP-7702](/en/explanation/eip-7702). For the full specification, see the [EIP-7702 spec](https://eips.ethereum.org/EIPS/eip-7702).
:::
### Transaction format
EIP-7702 uses transaction type `0x04` with an `authorizationList` field. Each authorization designates a delegate contract whose code the EOA executes for that transaction.
```typescript
{
type: 4,
to: eoa.address,
data: delegateCallData,
authorizationList: [signedAuthorization],
maxPriorityFeePerGas: 0n, // always 0 on Stable
// ... standard EIP-1559 fields
}
```
The authorization carries:
* `chainId`: must match the target chain.
* `address`: the delegate contract address.
* `nonce`: the authorization nonce (separate from the transaction nonce).
Wallets and libraries that support EIP-7702 handle the authorization format automatically.
### Tooling
* **ethers.js**: `wallet.signAuthorization({ chainId, address, nonce })` produces the signed authorization for inclusion in the `authorizationList`.
* **viem**: use `signAuthorization` with a walletClient, then pass the result to `sendTransaction`.
* **Hardhat / Foundry**: standard EIP-7702 transaction format works when your toolchain version supports the Pectra hardfork.
### Next recommended
* [**EIP-7702 concept**](/en/explanation/eip-7702) — Understand the delegation model and when to use it.
* [**Account Abstraction (EIP-7702)**](/en/reference/eip-7702-api) — Implement batch payments, spending limits, and session keys step by step.
## FAQ
### Getting started
**What is Stable?**
A Layer 1 where USDT0 is the native gas token and settlement asset. Standard EVM tooling works unchanged.
**Who is Stable for?**
Three builder profiles: payment and wallet teams moving USDT0, smart contract developers deploying to an EVM, and infrastructure teams running nodes or RPC. The [Learn overview](/en/explanation/learn-overview) has a card per path.
**Where should I start: Payments, Contracts, AI/Agents, or Infrastructure?**
* Moving USDT0 or building payment flows → [Payments](/en/explanation/payments-overview).
* Deploying contracts → [Contracts](/en/explanation/contracts-overview).
* Wiring AI editors or building agent-paid services → [Agent settlement](/en/explanation/agent-settlement).
* Running nodes or covering gas for users → [Infrastructure](/en/explanation/integrate-overview).
If you haven't connected to testnet yet, start with [Quick start](/en/tutorial/quick-start).
### Technical
**Is Stable EVM-compatible?**
Yes. Solidity, Vyper, Foundry, Hardhat, ethers, viem, and the `eth_*` JSON-RPC methods all work unchanged. Four behaviors differ from Ethereum — see [Differences from Ethereum](/en/explanation/ethereum-comparison).
**Why is USDT0 the gas token?**
So you pay fees in the asset you're already transacting in. No second token to fund, and fees stay denominated in a stablecoin. The protocol also optimizes USDT0-heavy workloads through guaranteed blockspace and transfer aggregation; see [Core concepts](/en/explanation/core-concepts).
**How do I get USDT0?**
* **Testnet:** use the faucet at [faucet.stable.xyz](https://faucet.stable.xyz), or bridge Test USDT from Ethereum Sepolia. Walkthrough in [Get testnet USDT0](/en/how-to/use-faucet).
* **Mainnet:** bridge USDT0 from another chain via LayerZero, or acquire through an exchange or custodian.
**What changes when I port a contract from Ethereum?**
Most contracts deploy unchanged. Three things to fix if they apply:
* Don't mirror native balance in internal variables. `transferFrom` can drain native without calling the contract.
* Don't transfer to `address(0)`. Both native and ERC-20 transfers to zero revert.
* Don't rely on `EXTCODEHASH` for address-reuse detection. Permit-based approvals change native balance without a nonce increment.
Full checklist: [USDT0 behavior on Stable](/en/explanation/usdt0-behavior).
### Resources
**Where do I find tokenomics, roadmap, and architecture?**
* [Tokenomics](/en/reference/tokenomics): STABLE supply, allocation, and vesting.
* [Technical roadmap](/en/explanation/technical-roadmap): phased optimization plan.
* [Tech overview](/en/explanation/tech-overview): StableBFT, Stable EVM, StableDB, and RPC design.
* [USDT-specific features](/en/explanation/usdt-features-overview): detail on gas, blockspace, aggregation, and confidential transfer.
**Where do I go for help?**
* [Developer assistance](/en/reference/developer-assistance): FAQ and reference pointers.
* [Discord](https://discord.gg/stablexyz): community support and protocol updates.
* `bizdev@stable.xyz`: partnership and integration conversations.
### Next recommended
* [**Quick start**](/en/tutorial/quick-start) — Send a first transaction on testnet.
* [**Core concepts**](/en/explanation/core-concepts) — Learn the four core concepts you need before you build.
* [**Learn overview**](/en/explanation/learn-overview) — Pick the docs path that fits what you're building.
* [**Production readiness**](/en/how-to/production-readiness) — Validate an integration before shipping to mainnet.
## Gas pricing reference
Transaction construction, gas estimation, and tooling configuration for Stable.
:::note
**Concept:** For why Stable uses a single-component fee model and how it compares to Ethereum, see [Gas pricing](/en/explanation/gas-pricing).
:::
### Transaction construction
When constructing transactions on Stable, set `maxPriorityFeePerGas` to `0`. Clients should fetch the latest base fee from the most recent block and include a safety margin when computing `maxFeePerGas`.
```javascript
// ethers.js v6
const block = await provider.getBlock("latest");
const baseFee = block.baseFeePerGas;
const maxPriorityFeePerGas = 0n; // always 0 on Stable
const maxFeePerGas = baseFee * 2n + maxPriorityFeePerGas; // double the base fee as safety margin
const tx = await wallet.sendTransaction({
to: "0xRecipientAddress",
value: parseEther("0.01"),
maxFeePerGas,
maxPriorityFeePerGas,
});
```
```text
Native USDT0 transfer confirmed. Fee ≈ 0.0000021 USDT0 at baseFee = 1 gwei.
```
### Gas estimation
Use `eth_estimateGas` and `eth_gasPrice` as you would on Ethereum. The key difference is that `eth_maxPriorityFeePerGas` will always return `0`.
```javascript
const gasPrice = await provider.send("eth_gasPrice", []);
const gasEstimate = await provider.estimateGas({
to: contractAddress,
data: callData,
});
const estimatedFeeInUSDT0 = gasPrice * gasEstimate;
```
### Tooling configuration
* **Hardhat / Foundry**: no special configuration needed; standard EVM settings work. If your config explicitly sets a priority fee, set it to `0`.
* **Wallets**: hide or disable the priority tip input field. Displaying it may confuse users since the value has no effect.
* **Monitoring**: fee analytics dashboards should not track priority fees. They will always be zero.
### Next recommended
* [**Gas pricing concept**](/en/explanation/gas-pricing) — Understand why Stable uses a single-component fee model.
* [**Ethereum comparison**](/en/explanation/ethereum-comparison) — Review every behavior difference you'll hit porting from Ethereum.
* [**JSON-RPC API**](/en/reference/json-rpc-api) — Reference the `eth_*` methods Stable exposes.
## Gas waiver protocol
This document specifies the Gas Waiver mechanism: transaction formats, marker routing, governance controls, and the Waiver Server API.
:::note
**Concept:** For what Gas Waiver is and why it exists, see [Gas waiver](/en/explanation/gas-waiver). For the how-to integration guide against the hosted Waiver Server, see [Enable gas-free transactions](/en/how-to/integrate-gas-waiver).
:::
### Abstract
Gas Waiver enables gasless end-user transactions on Stable by allowing a small set of governance-approved addresses (“waivers”) to submit transactions with `gasPrice = 0`. Stable currently operates a waiver service (the “Waiver Server”) that you can integrate with to provide gasless UX without implementing protocol-specific wrapper logic.
### Scope
This specification covers:
* Protocol-level rules for gas-waived transactions
* The wrapper transaction mechanism and marker address
* Governance-controlled authorization and allowed targets
* The Waiver Server interface for submitting signed user transactions
### Definitions
* **Waiver**: An Ethereum address registered on-chain via validator governance that is authorized to submit gas-waived transactions.
* **InnerTx**: The end user’s signed transaction with `gasPrice = 0`.
* **WrapperTx**: A transaction signed by a waiver that transports the user’s `InnerTx` to the chain and authorizes execution.
* **Marker address**: A sentinel address used to identify waiver wrapper transactions: `0x000000000000000000000000000000000000f333`.
* **AllowedTarget**: A policy that limits a waiver to specific contract addresses and method selectors.
### Overview
Gas Waiver uses a wrapper transaction pattern:
1. The user signs an `InnerTx` with `gasPrice = 0`.
2. A waiver wraps the `InnerTx` into a `WrapperTx` and broadcasts it.
3. Validators detect marker transactions, verify the waiver authorization and policy constraints, then execute the embedded `InnerTx`.
Stable operates a waiver service (Waiver Server) that is registered on-chain as an authorized waiver. You integrate with the Waiver Server API to submit signed `InnerTx` payloads.
### Protocol specification
#### Marker address routing
A transaction is treated as a waiver wrapper transaction if and only if:
* `to == 0x000000000000000000000000000000000000f333`.
The protocol interprets the transaction `data` field as an encoded inner transaction payload and processes it using the waiver verification rules below.
#### Authorization and policy checks
For each candidate wrapper transaction, validators must enforce:
1. **Waiver authorization**
* `WrapperTx.from` must be a waiver address registered on-chain via governance.
2. **Gas waiver**
* `WrapperTx.gasPrice` must equal `0`.
* `InnerTx.gasPrice` must equal `0`.
3. **Target allowlist**
* `InnerTx.to` and the method selector extracted from `InnerTx.data` must be permitted by the waiver’s `AllowedTarget` policy.
4. **Value restrictions**
* `WrapperTx.value` must equal `0`.
If any check fails, validators reject the wrapper transaction and do not execute the inner transaction.
#### Execution semantics
If all checks pass:
1. The protocol executes `InnerTx` as the user, preserving the user’s `from`, `nonce`, and call semantics.
2. Gas accounting is handled by the waiver mechanism: the user pays no gas, and the waiver transaction uses `gasPrice = 0` by definition of the feature.
3. The wrapper transaction must supply sufficient `gasLimit` to cover the execution of `InnerTx` (including overhead for unwrap and verification).
### Transaction formats
#### WrapperTx
The wrapper transaction is signed by the waiver and sent to the marker address.
```javascript
WrapperTx {
from: waiver_address,
to: 0x000000000000000000000000000000000000f333,
value: 0, // must be zero
data: RLP(InnerTx), // RLP-encoded inner transaction
gasPrice: 0, // must be zero
gasLimit: sufficient_for_inner, // must cover inner execution + overhead
nonce: waiver_nonce
}
```
#### InnerTx
The inner transaction is signed by the end user.
```javascript
InnerTx {
from: user_address,
to: target_contract,
value: value,
data: call_data,
gasPrice: 0, // must be zero
gasLimit: execution_gas,
nonce: user_nonce
}
```
### Governance-controlled access
Waiver authorization is governed on-chain by validator governance.
Governance control provides:
* Reviewable authorization of waiver addresses
* On-chain transparency of waiver registration and updates
* Revocation capability
* Per-waiver scoping via `AllowedTarget`
### Security model
#### End-user signature integrity
The user signs the `InnerTx`. The waiver cannot modify the inner transaction payload without invalidating the signature. You must still ensure that the user signs only the intended transaction payload.
#### Trust boundary
Gas Waiver introduces a service dependency if partners route submissions through the Waiver Server:
* Availability of the service affects the ability to submit gasless transactions.
* Authorization remains on-chain; only registered waiver addresses can produce valid wrapper submissions.
### Integration
You integrate by:
1. Collect a signed `InnerTx` from the user (`gasPrice = 0`).
2. Submit the signed inner transaction to the Waiver Server API.
3. Handle streamed results and surfacing transaction hashes to end users.
### Waiver server
#### Overview
The Waiver Server wraps and broadcasts signed user `InnerTx` payloads as waiver-authorized wrapper transactions. You do not need to construct wrapper transactions or operate a waiver address.
#### Endpoints and base URLs
Base URLs:
* Mainnet: TBD
* Testnet: `https://waiver.testnet.stable.xyz`
#### Authentication
All endpoints except health require bearer token authentication:
```
Authorization: Bearer
```
#### API
##### GET `/v1/health`
Health check endpoint.
Authentication: none.
##### POST `/v1/submit`
Submit a batch of signed inner transactions.
Authentication: required (`Bearer`).
Request body:
```json
{
"transactions": ["0x", "0x"]
}
```
Response is streamed as NDJSON (newline-delimited JSON). Each line corresponds to a submitted transaction index.
Example:
```json
{"index":0,"id":"abc123","success":true,"txHash":"0x..."}
{"index":1,"id":"def456","success":false,"error":{"code":"VALIDATION_FAILED","message":"invalid signature"}}
```
##### GET `/v1/submit`
WebSocket interface for streaming submissions.
Authentication: required (`Bearer`).
#### Integration example
```javascript
const WAIVER_SERVER = "https://waiver.testnet.stable.xyz";
async function submitGaslessTransaction(signedInnerTxHex, apiKey) {
const response = await fetch(`${WAIVER_SERVER}/v1/submit`, {
method: "POST",
headers: {
"Content-Type": "application/json",
"Authorization": `Bearer ${apiKey}`,
},
body: JSON.stringify({
transactions: [signedInnerTxHex],
}),
});
const reader = response.body.getReader();
const decoder = new TextDecoder();
while (true) {
const { done, value } = await reader.read();
if (done) break;
const lines = decoder.decode(value).trim().split("\n");
for (const line of lines) {
const result = JSON.parse(line);
console.log(result);
}
}
}
```
#### Creating a user InnerTx
You are responsible for constructing an `InnerTx` with `gasPrice = 0`, then collecting the user signature.
Example:
```javascript
import { ethers } from "ethers";
async function createInnerTx(userWallet, contractAddress, callData, nonce) {
const innerTx = {
to: contractAddress,
data: callData,
value: value,
gasPrice: 0, // must be 0 for waiver
gasLimit: 100000,
nonce: nonce,
chainId: 2201, // 988 for mainnet, 2201 for testnet
};
return await userWallet.signTransaction(innerTx);
}
```
#### Error codes
* `PARSE_ERROR`: Failed to parse transaction
* `INVALID_REQUEST`: Malformed request body
* `BATCH_SIZE_EXCEEDED`: Batch size exceeds allowed maximum
* `VALIDATION_FAILED`: Transaction validation failed
* `BROADCAST_FAILED`: Failed to broadcast to chain
* `RATE_LIMITED`: Rate limit exceeded
* `QUEUE_FULL`: Server queue at capacity
* `TIMEOUT`: Request timed out
### Next recommended
* [**Zero gas transactions**](/en/how-to/zero-gas-transactions) — Demo-focused walkthrough with a receipt showing zero gas fee.
* [**Enable gas-free transactions**](/en/how-to/integrate-gas-waiver) — Full hosted-API integration guide with batch submissions and error handling.
* [**Self-hosted Gas Waiver**](/en/how-to/self-hosted-gas-waiver) — Run your own waiver infrastructure without the hosted API.
## Indexers
Indexers and analytics platforms provide structured access to on-chain data, enabling developers to query transactions, balances, logs, events, and application-specific data at scale. Stable is EVM-compatible, so standard Ethereum indexing tools work seamlessly.
This page lists current and upcoming indexing providers, along with the capabilities developers can expect.
### Overview table
| **Provider** | **Category** | **Docs / Get Started** | **Notes** |
| :------------------------------------------------------------------- | :--------------------------- | :--------------------------------------------------------------------------------------------------------------------------- | :---------------------------------------------------------------- |
| [**Stablescan**](https://stablescan.xyz/) | Blockchain Explorer | [https://docs.etherscan.io/introduction](https://docs.etherscan.io/introduction) | Blockchain explorer; transaction, block, and contract visibility. |
| [**The Graph**](https://thegraph.com/explorer/participants/indexers) | Indexer | [https://thegraph.com/docs/en/developing/creating-a-subgraph/](https://thegraph.com/docs/en/developing/creating-a-subgraph/) | Build, deploy, and query subgraphs using GraphQL. |
| [**Goldsky**](https://goldsky.com/) | Indexer | [https://docs.goldsky.com/introduction](https://docs.goldsky.com/introduction) | High-performance indexing and real-time data streaming. |
| [**Ormi Labs**](https://ormilabs.com/) | Indexer | [https://docs.ormilabs.com/subgraphs/quickstart](https://docs.ormilabs.com/subgraphs/quickstart) | Next-gen subgraph indexer with real-time data capabilities. |
| [**Allium**](https://www.allium.so/) | Analytics / Data Platform | [https://docs.allium.so/](https://docs.allium.so/) | Normalized blockchain datasets & analytics tooling. |
| [**CoinMarketCap**](https://coinmarketcap.com/api/) | Market Data Aggregator | [https://coinmarketcap.com/api/documentation/v1/](https://coinmarketcap.com/api/documentation/v1/) | Market prices, listings, and tracking tools. |
| [**CoinGecko**](https://www.coingecko.com/en/api) | Market Data Aggregator | [https://docs.coingecko.com/](https://docs.coingecko.com/) | Independent market data with developer APIs. |
| [**Dexscreener**](https://docs.dexscreener.com/) | DEX Analytics | [https://docs.dexscreener.com/](https://docs.dexscreener.com/) | Real-time DEX charts, liquidity analytics, and dashboards. |
| [**DeBank**](https://debank.com/) | Portfolio / Wallet Analytics | [https://cloud.debank.com/](https://cloud.debank.com/) | EVM wallet tracking, transactions, and portfolio insights. |
### 1. Indexers
Indexers transform raw blockchain data into searchable, queryable formats. They power dashboards, analytics, wallets, block explorers, and application backends.
#### The Graph
Decentralized indexing protocol powering data access for over 75,000 projects.
**Capabilities**
* Subgraphs for Stable
* GraphQL-based querying
* Distributed indexing network
**Docs**
Follow this quick-start guide to create, deploy, and query a subgraph within minutes:
[https://thegraph.com/docs/en/developing/creating-a-subgraph/](https://thegraph.com/docs/en/developing/creating-a-subgraph/)
#### Ormi Labs
Ormi is a next-generation indexer built to deliver real-time and historical blockchain data at scale.
**Capabilities**
* Tip of the chain indexing
* Sub-second query latency
* No-code feature
**Docs**
Start querying real-time data with Ormi:
[https://docs.ormilabs.com/subgraphs/quickstart](https://docs.ormilabs.com/subgraphs/quickstart)
Learn how to query USDT0 data on Stable in real-time:
[https://docs.ormilabs.com/subgraphs/tutorials/query-usdt0](https://docs.ormilabs.com/subgraphs/tutorials/query-usdt0)
#### Goldsky
High-performance indexing platform with instant subgraphs and developer tooling.
**Capabilities**
* Subgraph deployment and management
* Webhook creation for real-time event streaming
* Multi-subgraph sync to external databases
**Docs**
[https://docs.goldsky.com/introduction](https://docs.goldsky.com/introduction)
For 24/7 support, contact [support@goldsky.com](mailto\:support@goldsky.com).
### 2. Analytics providers
Analytics tools help teams track network activity, real-world payments, dashboards, usage flows, and contract interactions.
#### Allium
A foundational data platform for engineers and analysts across the blockchain ecosystem.
**Capabilities**
* Normalized blockchain datasets
* Query tooling for analytics teams
* Enterprise data infrastructure
**Docs**
Get started with Allium’s data platform and API resources:
[https://www.allium.so/](https://www.allium.so/)
**Get started**: Sign up at [allium.so](https://www.allium.so/) to get API access, then query normalized Stable on-chain datasets using the REST API.
#### CoinMarketCap
The largest global market tracking platform for crypto assets.
**Capabilities**
* Price tracking for Stable assets
* Portfolio tool
* Market data APIs
**Docs**
Explore the CMC API and integration resources:
[https://coinmarketcap.com/api/](https://coinmarketcap.com/api/)
**Get started**: Register for an API key at [coinmarketcap.com/api](https://coinmarketcap.com/api/) and query Stable asset price and market data via the REST API.
#### CoinGecko
The world’s largest independent crypto data aggregator.
**Capabilities**
* Market listings and price data
* Historical analytics
* API access for developers
**Docs**
Access CoinGecko’s API documentation:
[https://www.coingecko.com/en/api](https://www.coingecko.com/en/api)
**Get started**: Get a free or Pro API key from [coingecko.com/en/api](https://www.coingecko.com/en/api) and query Stable token price and market data via the REST API.
#### Dexscreener
Real-time charts and analytics for decentralized venues.
**Capabilities**
* Live DEX charts
* Liquidity and pair analytics
* Trading dashboards
**Docs**
Explore Dexscreener’s API endpoints and developer tools:
[https://docs.dexscreener.com/](https://docs.dexscreener.com/)
**Get started**: Browse the [Dexscreener API docs](https://docs.dexscreener.com/) to query real-time pair data, liquidity, and trading activity for Stable-based DEX pools.
#### DeBank
Portfolio tracker for Ethereum and EVM ecosystems.
**Capabilities**
* Wallet analytics
* Transaction summaries
* Portfolio tracking across chains
**Docs**
Read DeBank’s API reference and integration documentation:
[https://docs.debank.com/](https://docs.debank.com/)
**Get started**: Sign up for [DeBank Cloud](https://cloud.debank.com/) to access API keys and query Stable wallet balances, transaction history, and portfolio data.
***
Have an indexing or analytics platform integrating Stable? Reach out at [bizdev@stable.xyz](mailto\:bizdev@stable.xyz).
## Settle invoices
Each invoice maps to a unique, deterministic nonce derived from invoice metadata: invoice number, parties, amount, and due date. This nonce drives settlement via [ERC-3009](/en/explanation/erc-3009) and creates an immutable receipt that can be reconciled with existing accounting systems.
### How it works
Both the buyer and the vendor independently compute the same nonce from the same invoice metadata. No external registry is required to coordinate payment.
The nonce is derived deterministically:
```
nonce = keccak256(invoiceNumber, vendor, buyer, amount, dueDate)
```
When the buyer signs the ERC-3009 authorization using this nonce, the on-chain settlement event serves as a tamper-proof payment receipt.
#### Settlement flow
1. **Invoice issued**: the vendor creates an invoice with a unique number, amount, and due date.
2. **Nonce computed**: both parties independently derive the same nonce from the invoice metadata.
3. **Buyer signs**: the buyer signs an ERC-3009 authorization off-chain using the deterministic nonce. The `validBefore` field can be set to the due date plus a grace period.
4. **Settlement**: the buyer or vendor submits `transferWithAuthorization` on-chain. Settlement confirms in under a second.
5. **Reconciliation**: the emitted `AuthorizationUsed` event contains the nonce, linking the on-chain settlement to the exact invoice. The `Transfer` event in the same transaction verifies sender, recipient, and amount.
#### Double-payment prevention
The nonce is consumed on-chain upon payment. The same invoice cannot be settled twice; resubmitting an authorization with an already-used nonce reverts.
### What makes it different
Traditional B2B invoicing involves bank wires (1–5 business days), manual reconciliation, and no cryptographic proof of payment tied to the invoice itself. With deterministic nonces, the on-chain payment is self-documenting: the nonce links the settlement to the exact invoice, and the blockchain event log provides an immutable audit trail.
| **Aspect** | **Traditional (bank wire)** | **Stable (ERC-3009)** |
| :------------- | :-------------------------------------- | :-------------------------------------------------------- |
| Settlement | 1–5 business days | Under 1 second |
| Reconciliation | Manual matching against bank statements | `AuthorizationUsed` event links payment to invoice nonce |
| Payment proof | Bank confirmation letter | On-chain transaction, cryptographically linked to invoice |
| Intermediaries | Correspondent banks | None |
| Fees | Wire fees ($15–45) + FX spread | \~0.00021 USDT0 (or 0 with Gas Waiver) |
**See also:**
* [ERC-3009 (Transfer With Authorization)](/en/explanation/erc-3009)
* [Gas Waiver](/en/how-to/integrate-gas-waiver)
## JSON-RPC API
### eth\_namespace
| API | support |
| ------------------------------------------- | ------- |
| eth\_syncing | ✅ |
| eth\_gasPrice | ✅ |
| eth\_maxPriorityFeePerGas | ✅ |
| eth\_feeHistory | ✅ |
| eth\_blobBaseFee | ❌ |
| eth\_chainId | ✅ |
| eth\_blockNumber | ✅ |
| eth\_getBalance | ✅ |
| eth\_getProof | ✅ |
| eth\_getHeaderByNumber | ❌ |
| eth\_getHeaderByHash | ❌ |
| eth\_getBlockByNumber | ✅ |
| eth\_getBlockByHash | ✅ |
| eth\_getUncleByBlockNumberAndIndex | ❌ |
| eth\_getUncleByBlockHashAndIndex | ❌ |
| eth\_getUncleCountByBlockNumber | ❌ |
| eth\_getUncleCountByBlockHash | ❌ |
| eth\_getCode | ✅ |
| eth\_getStorageAt | ✅ |
| eth\_getBlockReceipts | ❌ |
| eth\_call | ✅ |
| eth\_simulateV1 | ❌ |
| eth\_estimateGas | ✅ |
| eth\_createAccessList | ❌ |
| eth\_getBlockTransactionCountByNumber | ✅ |
| eth\_getBlockTransactionCountByHash | ✅ |
| eth\_getTransactionByBlockNumberAndIndex | ✅ |
| eth\_getTransactionByBlockHashAndIndex | ✅ |
| eth\_getRawTransactionByBlockNumberAndIndex | ❌ |
| eth\_getRawTransactionByBlockHashAndIndex | ❌ |
| eth\_getTransactionCount | ✅ |
| eth\_getTransactionByHash | ✅ |
| eth\_getRawTransactionByHash | ❌ |
| eth\_getTransactionReceipt | ✅ |
| eth\_sendTransaction | ✅ |
| eth\_fillTransaction | ❌ |
| eth\_sendRawTransaction | ✅ |
| eth\_sign | ✅ |
| eth\_signTransaction | ❌ |
| eth\_pendingTransactions | ✅ |
| eth\_resend | ✅ |
| eth\_accounts | ✅ |
| eth\_subscribe | ✅ |
| eth\_unsubscribe | ✅ |
| eth\_getTransactionLogs | ✅ |
| eth\_signTypedData | ✅ |
| eth\_newPendingTransactionFilter | ✅ |
| eth\_newBlockFilter | ✅ |
| eth\_newFilter | ✅ |
| eth\_getFilterChanges | ✅ |
| eth\_getFilterLogs | ✅ |
| eth\_uninstallFilter | ✅ |
| eth\_getLogs | ✅ |
### debug\_namespace
| API | support |
| ---------------------------------- | ------- |
| debug\_accountRange | ❌ |
| debug\_backtraceAt | ❌ |
| debug\_blockProfile | ✅ |
| debug\_chaindbCompact | ❌ |
| debug\_chaindbProperty | ❌ |
| debug\_cpuProfile | ✅ |
| debug\_dbAncient | ❌ |
| debug\_dbAncients | ❌ |
| debug\_dbGet | ❌ |
| debug\_dumpBlock | ❌ |
| debug\_freeOSMemory | ✅ |
| debug\_freezeClient | ❌ |
| debug\_gcStats | ✅ |
| debug\_getAccessibleState | ❌ |
| debug\_getBadBlocks | ❌ |
| debug\_getRawBlock | ❌ |
| debug\_getRawHeader | ❌ |
| debug\_getRawTransaction | ❌ |
| debug\_getModifiedAccountsByHash | ❌ |
| debug\_getModifiedAccountsByNumber | ❌ |
| debug\_getRawReceipts | ❌ |
| debug\_goTrace | ✅ |
| debug\_intermediateRoots | ✅ |
| debug\_memStats | ✅ |
| debug\_mutexProfile | ✅ |
| debug\_preimage | ❌ |
| debug\_printBlock | ✅ |
| debug\_setBlockProfileRate | ✅ |
| debug\_setGCPercent | ✅ |
| debug\_setHead | ❌ |
| debug\_setMutexProfileFraction | ✅ |
| debug\_setTrieFlushInterval | ❌ |
| debug\_stacks | ✅ |
| debug\_standardTraceBlockToFile | ❌ |
| debug\_standardTraceBadBlockToFile | ❌ |
| debug\_startCPUProfile | ✅ |
| debug\_startGoTrace | ✅ |
| debug\_stopCPUProfile | ✅ |
| debug\_stopGoTrace | ✅ |
| debug\_storageRangeAt | ❌ |
| debug\_traceBadBlock | ❌ |
| debug\_traceBlock | ❌ |
| debug\_traceBlockByNumber | ✅ |
| debug\_traceBlockByHash | ✅ |
| debug\_traceBlockFromFile | ❌ |
| debug\_traceCall | ❌ |
| debug\_traceChain | ❌ |
| debug\_traceTransaction | ✅ |
| debug\_verbosity | ❌ |
| debug\_vmodule | ❌ |
| debug\_writeBlockProfile | ✅ |
| debug\_writeMemProfile | ✅ |
| debug\_writeMutexProfile | ✅ |
### Next recommended
* [**Gas pricing reference**](/en/reference/gas-pricing-api) — Construct EIP-1559 transactions against Stable's base-fee-only model.
* [**EIP-7702 reference**](/en/reference/eip-7702-api) — Build type-4 transactions with the `authorizationList` field.
* [**System modules reference**](/en/reference/system-modules-api-overview) — Call Bank, Distribution, and Staking at their fixed precompile addresses.
## Mainnet information
Everything you need to know to access Stable Mainnet.
### Network overview
| Configuration | Value |
| ---------------- | -------------- |
| **Network Name** | Stable Mainnet |
| **Chain ID** | `988` |
| **Gas Token** | USDT0 |
| **Gov Token** | STABLE |
| **Block Time** | \~0.7 seconds |
### Block explorers
| Explorer | URL |
| -------------- | ------------------------------------------------ |
| **Stablescan** | [https://stablescan.xyz](https://stablescan.xyz) |
### RPC endpoints
#### Primary endpoints
| Type | Endpoint | Purpose |
| ---------------- | ------------------------------------------------ | ----------------- |
| **EVM JSON-RPC** | [https://rpc.stable.xyz](https://rpc.stable.xyz) | EVM transactions |
| **WebSocket** | wss\://rpc.stable.xyz | Real-time updates |
:::note
The public RPC endpoint is rate-limited to **1,000 requests per 10 seconds per IP**. Requests over the limit return `HTTP 429`. For higher throughput, use a [third-party RPC provider](/en/reference/rpc-providers).
:::
### Chain information
| Parameter | EVM |
| ------------- | ------- |
| **Chain ID** | `988` |
| **Gas Token** | `USDT0` |
| **Decimals** | 18 |
### Tools
| Tool | URL | Description |
| ------------- | --------------------------------------------------------- | --------------- |
| **Snapshots** | See [Node Operators Guide](/en/how-to/use-node-snapshots) | Chain snapshots |
## Version history
Complete version history and related documentation for the Stable Mainnet.
### Current version information
* **Current Version**: `v1.3.1`
* **Next Upgrade**: `TBD`
* **Upgrade Height**: `TBD`
* **Expected Time**: `TBD`
### Version history
#### Current & previous versions
| Version | Commit | Upgrade Height | Binary | Status |
| ---------- | --------- | -------------- | ------------------------------------------------------------------------------------------------------------------------------------------------------------------------------------------------------------------------------------------- | ------- |
| **v1.3.1** | `f85d155` | - | [AMD64](https://stable-data-dist.s3.us-east-1.amazonaws.com/mainnet/binary/stabled-1.3.1-linux-amd64-mainnet.tar.gz) / [ARM64](https://stable-data-dist.s3.us-east-1.amazonaws.com/mainnet/binary/stabled-1.3.1-linux-arm64-mainnet.tar.gz) | Current |
| **v1.3.0** | `dd103ec` | 24,077,500 | [AMD64](https://stable-data-dist.s3.us-east-1.amazonaws.com/mainnet/binary/stabled-1.3.0-linux-amd64-mainnet.tar.gz) / [ARM64](https://stable-data-dist.s3.us-east-1.amazonaws.com/mainnet/binary/stabled-1.3.0-linux-arm64-mainnet.tar.gz) | |
| **v1.2.2** | `76da1da` | - | [AMD64](https://stable-data-dist.s3.us-east-1.amazonaws.com/mainnet/binary/stabled-1.2.2-linux-amd64-mainnet.tar.gz) / [ARM64](https://stable-data-dist.s3.us-east-1.amazonaws.com/mainnet/binary/stabled-1.2.2-linux-arm64-mainnet.tar.gz) | |
| **v1.2.1** | `7955bb7` | - | [AMD64](https://stable-data-dist.s3.us-east-1.amazonaws.com/mainnet/binary/stabled-1.2.1-linux-amd64-mainnet.tar.gz) / [ARM64](https://stable-data-dist.s3.us-east-1.amazonaws.com/mainnet/binary/stabled-1.2.1-linux-arm64-mainnet.tar.gz) | |
| **v1.2.0** | `47e355b` | 12,004,000 | [AMD64](https://stable-data-dist.s3.us-east-1.amazonaws.com/mainnet/binary/stabled-1.2.0-linux-amd64-mainnet.tar.gz) / [ARM64](https://stable-data-dist.s3.us-east-1.amazonaws.com/mainnet/binary/stabled-1.2.0-linux-arm64-mainnet.tar.gz) | |
| **v1.1.4** | `c795773` | - | [AMD64](https://stable-data-dist.s3.us-east-1.amazonaws.com/mainnet/binary/stabled-1.1.4-linux-amd64-mainnet.tar.gz) / [ARM64](https://stable-data-dist.s3.us-east-1.amazonaws.com/mainnet/binary/stabled-1.1.4-linux-arm64-mainnet.tar.gz) | |
| **v1.1.2** | `3d83aa3` | 3,263,600 | [AMD64](https://stable-data-dist.s3.us-east-1.amazonaws.com/mainnet/binary/stabled-1.1.2-linux-amd64-mainnet.tar.gz) / [ARM64](https://stable-data-dist.s3.us-east-1.amazonaws.com/mainnet/binary/stabled-1.1.2-linux-arm64-mainnet.tar.gz) | |
| **v1.1.0** | `17ceaa7` | 1,694,000 | [AMD64](https://stable-data-dist.s3.us-east-1.amazonaws.com/mainnet/binary/stabled-1.1.0-linux-amd64-mainnet.tar.gz) / [ARM64](https://stable-data-dist.s3.us-east-1.amazonaws.com/mainnet/binary/stabled-1.1.0-linux-arm64-mainnet.tar.gz) | |
| **v1.0.0** | `d996084` | Genesis | [AMD64](https://stable-data-dist.s3.us-east-1.amazonaws.com/mainnet/binary/stabled-1.0.0-linux-amd64-mainnet.tar.gz) / [ARM64](https://stable-data-dist.s3.us-east-1.amazonaws.com/mainnet/binary/stabled-1.0.0-linux-arm64-mainnet.tar.gz) | Genesis |
### Related documentation
* [Upgrade Guide](/en/how-to/upgrade-node) - Step-by-step upgrade procedures
* [Mainnet Information](/en/reference/mainnet-information) - Current network details
## Network routing
Network routing providers optimizing connectivity and data delivery for applications on Stable.
### Overview table
| **Provider** | **Category** | **Docs / Get Started** | **Notes** |
| :---------------------------------- | :----------------------- | :---------------------------------- | :--------------------------------- |
| [**Optimum**](https://optimum.xyz/) | Decentralized networking | [optimum.xyz](https://optimum.xyz/) | High-performance routing for dApps |
### Optimum
A decentralized internet protocol optimized for speed and scalable web3 interactions.
**Capabilities**
* High-performance decentralized networking
* Faster application data routing
* Reliable infra for dApps
**Get started**: Visit [optimum.xyz](https://optimum.xyz/) to learn how to route your Stable dApp traffic through Optimum's decentralized network infrastructure.
***
Have a networking integration with Stable? Reach out at [bizdev@stable.xyz](mailto\:bizdev@stable.xyz).
## Network upgrades
This guide covers all configuration options for Stable nodes, including optimization for different use cases.
### Configuration files overview
Stable nodes use two main configuration files:
* **`config.toml`**: Core StableBFT configuration
* **`app.toml`**: Application-specific configuration
Both files are located in `~/.stabled/config/`
### Core configuration (config.toml)
#### Basic settings
:::code-group
```toml [Mainnet]
# The ID of the chain to join
chain_id = "stable_988-1"
# A custom human-readable name for this node
moniker = "your-node-name"
# Database backend: goleveldb | cleveldb | boltdb | rocksdb | badgerdb
db_backend = "goleveldb"
```
```toml [Testnet]
# The ID of the chain to join
chain_id = "stabletestnet_2201-1"
# A custom human-readable name for this node
moniker = "your-node-name"
# Database backend: goleveldb | cleveldb | boltdb | rocksdb | badgerdb
db_backend = "goleveldb"
```
:::
#### P2P configuration
:::code-group
```toml [Mainnet]
[p2p]
# Address to listen for incoming connections
laddr = "tcp://0.0.0.0:26656"
# Address to advertise to peers for them to dial
external_address = "YOUR_PUBLIC_IP:26656"
# Comma separated list of seed nodes
seeds = "17a539fda42863a99755547e1c9b3ec4c38a4439@seed1.stable.xyz:26656"
# Comma separated list of persistent peers
persistent_peers = "b896f6f8ca5a4d1cc40de09407df0c96e76df950@peer1.stable.xyz:26656"
```
```toml [Testnet]
[p2p]
# Address to listen for incoming connections
laddr = "tcp://0.0.0.0:26656"
# Address to advertise to peers for them to dial
external_address = "YOUR_PUBLIC_IP:26656"
# Comma separated list of seed nodes
seeds = "39e061b167162f6621ddadcf1be21d6fa585a468@seed1.testnet.stable.xyz:26656"
# Comma separated list of persistent peers
persistent_peers = "5ed0f977a26ccf290e184e364fb04e268ef16430@peer1.testnet.stable.xyz:26656"
```
:::
Additional P2P settings (same for both networks):
```toml
# Maximum number of inbound peers
max_num_inbound_peers = 50
# Maximum number of outbound peers
max_num_outbound_peers = 30
# Toggle to disable guard against peers connecting from the same ip
allow_duplicate_ip = false
# Peer connection configuration
handshake_timeout = "20s"
dial_timeout = "3s"
# Time to wait before flushing messages out on the connection
flush_throttle_timeout = "100ms"
# Maximum size of a message packet payload
max_packet_msg_payload_size = 1024
# Rate limiting
send_rate = 5120000 # 5 MB/s
recv_rate = 5120000 # 5 MB/s
# Seed mode (for seed nodes only)
seed_mode = false
# Enable peer exchange reactor
pex = true
```
#### RPC server configuration
```toml
[rpc]
# TCP or UNIX socket address for the RPC server
laddr = "tcp://127.0.0.1:26657"
# A list of origins a cross-domain request can be executed from
cors_allowed_origins = ["*"]
# A list of methods the client is allowed to use with cross-domain requests
cors_allowed_methods = ["HEAD", "GET", "POST"]
# A list of non simple headers the client is allowed to use with cross-domain requests
cors_allowed_headers = ["Origin", "Accept", "Content-Type", "X-Requested-With", "X-Server-Time"]
# TCP or UNIX socket address for the gRPC server
grpc_laddr = "tcp://127.0.0.1:9090"
# Maximum number of simultaneous connections
grpc_max_open_connections = 900
# Activate unsafe RPC commands like /dial_seeds and /unsafe_flush_mempool
unsafe = false
# Maximum number of simultaneous connections (including WebSocket)
max_open_connections = 900
# Maximum number of unique clientIDs that can connect
max_subscription_clients = 100
# Maximum number of unique queries a given client can subscribe to
max_subscriptions_per_client = 5
# How long to wait for a tx to be committed
timeout_broadcast_tx_commit = "10s"
# Maximum size of request body
max_body_bytes = 1000000
# Maximum size of request header
max_header_bytes = 1048576
```
#### Mempool configuration
```toml
[mempool]
# Mempool version to use
version = "v1"
# Recheck enabled
recheck = true
# Broadcast enabled
broadcast = true
# Maximum number of transactions in the mempool
size = 3000
# Limit the total size of all txs in the mempool
max_txs_bytes = 1073741824 # 1GB
# Size of the cache
cache_size = 10000
# Do not remove invalid transactions from the cache
keep-invalid-txs-in-cache = false
# Maximum size of a single transaction
max_tx_bytes = 1048576 # 1MB
# Maximum size of a batch of transactions to send to a peer
max_batch_bytes = 0
```
#### Consensus configuration
```toml
[consensus]
# How long we wait for a proposal block before prevoting nil
timeout_propose = "5s"
# How much timeout_propose increases with each round
timeout_propose_delta = "10ms"
# How long we wait after receiving +2/3 prevotes
timeout_prevote = "150ms"
# How much the timeout_prevote increases with each round
timeout_prevote_delta = "10ms"
# How long we wait after receiving +2/3 precommits
timeout_precommit = "150s"
# How much the timeout_precommit increases with each round
timeout_precommit_delta = "10ms"
# Make progress as soon as we have all the precommits
skip_timeout_commit = false
# Enable/disable double sign check
double_sign_check_height = 2
# EmptyBlocks mode
create_empty_blocks = true
create_empty_blocks_interval = "0s"
# Reactor sleep duration
peer_gossip_sleep_duration = "100ms"
peer_query_maj23_sleep_duration = "2s"
```
### Application configuration (app.toml)
#### Basic application settings
```toml
# Pruning strategy
pruning = "default"
# HaltHeight contains a non-zero block height at which a node will halt
halt-height = 0
# HaltTime contains a non-zero time at which a node will halt
halt-time = 0
# MinRetainBlocks defines the number of blocks for which a node will retain
min-retain-blocks = 0
# InterBlockCache enables inter-block caching
inter-block-cache = true
# IndexEvents defines the set of events in the form {eventType}.{attributeKey}
index-events = []
# IavlCacheSize set the size of the iavl tree cache
iavl-cache-size = 781250
```
#### API configuration
```toml
[api]
# Enable defines if the API server should be enabled
enable = true
# Swagger defines if swagger documentation should automatically be registered
swagger = true
# Address defines the API server to listen on
address = "tcp://0.0.0.0:1317"
# MaxOpenConnections defines the number of maximum open connections
max-open-connections = 1000
# EnabledUnsafeCORS defines if CORS should be enabled
enabled-unsafe-cors = true
```
#### gRPC configuration
```toml
[grpc]
# Enable defines if the gRPC server should be enabled
enable = true
# Address defines the gRPC server address to bind to
address = "0.0.0.0:9090"
```
#### EVM JSON-RPC configuration
```toml
[json-rpc]
# Enable the JSON-RPC server
enable = true
# Address to bind the JSON-RPC server
address = "0.0.0.0:8545"
# Address to bind the WebSocket server
ws-address = "0.0.0.0:8546"
# APIs to enable
api = "eth,net,web3,txpool,personal,debug"
# Gas cap for eth_call/estimateGas
gas-cap = 25000000
# EVM timeout for eth_call/estimateGas
evm-timeout = "5s"
# Tx fee cap for transactions
txfee-cap = 1
# Filter cap for eth_getLogs
filter-cap = 200
# FeeHistory cap
feehistory-cap = 100
# Block range cap for eth_getLogs
logs-cap = 10000
# Block range cap
block-range-cap = 10000
# HTTP timeout
http-timeout = "30s"
# HTTP idle timeout
http-idle-timeout = "120s"
# Allow unprotected transactions
allow-unprotected-txs = true
# Maximum number of transactions in the pool
max-tx-in-pool = 3000
# Enable indexer
enable-indexer = false
# Enable metrics
metrics = true
```
### Configuration profiles
#### Full node (default)
Balanced configuration for full nodes:
```bash
# config.toml adjustments
sed -i 's/^indexer = ".*"/indexer = "kv"/' ~/.stabled/config/config.toml
sed -i 's/^max_num_inbound_peers = .*/max_num_inbound_peers = 50/' ~/.stabled/config/config.toml
sed -i 's/^max_num_outbound_peers = .*/max_num_outbound_peers = 30/' ~/.stabled/config/config.toml
# app.toml adjustments
sed -i 's/^pruning = ".*"/pruning = "default"/' ~/.stabled/config/app.toml
sed -i 's/^snapshot-interval = .*/snapshot-interval = 1000/' ~/.stabled/config/app.toml
```
#### Archive node
No pruning, full history:
```bash
# config.toml adjustments
sed -i 's/^indexer = ".*"/indexer = "kv"/' ~/.stabled/config/config.toml
# app.toml adjustments
sed -i 's/^pruning = ".*"/pruning = "nothing"/' ~/.stabled/config/app.toml
```
#### RPC node
Public RPC endpoint configuration:
```bash
# config.toml adjustments
sed -i 's/^max_num_inbound_peers = .*/max_num_inbound_peers = 30/' ~/.stabled/config/config.toml
sed -i 's/^max_open_connections = .*/max_open_connections = 30/' ~/.stabled/config/config.toml
sed -i 's/^cors_allowed_origins = .*/cors_allowed_origins = ["*"]/' ~/.stabled/config/config.toml
# app.toml adjustments
sed -i 's/^enable = .*/enable = true/' ~/.stabled/config/app.toml
sed -i 's/^swagger = .*/swagger = true/' ~/.stabled/config/app.toml
sed -i 's/^enabled-unsafe-cors = .*/enabled-unsafe-cors = true/' ~/.stabled/config/app.toml
```
### Monitoring configuration
#### Prometheus metrics
```toml
# config.toml
[instrumentation]
# Enable Prometheus metrics
prometheus = true
# Metrics listen address
prometheus_listen_addr = ":26660"
# Namespace for metrics
namespace = "stablebft"
```
#### Logging
```toml
# config.toml
[log]
# Log level (trace|debug|info|warn|error|fatal|panic)
level = "info"
# Log format (plain|json)
format = "plain"
```
### Applying configuration changes
After making configuration changes:
```bash
# Restart the node
sudo systemctl restart ${SERVICE_NAME}
# Check logs for errors
sudo journalctl -u ${SERVICE_NAME} -f
# Verify configuration loaded
curl localhost:26657/status | jq '.result.node_info'
```
### Next steps
* [Set up Monitoring](/en/how-to/monitor-node) for your node
* Review [Troubleshooting Guide](/en/how-to/troubleshoot-node) for common issues
## Operate
Operate covers running a Stable node: full or archive, testnet or mainnet, from install through monitoring. For the chain-level behavior your node enforces (fee model, finality, USDT0 as gas), see [Gas pricing](/en/explanation/gas-pricing), [Finality](/en/explanation/finality), and the [Architecture overview](/en/explanation/core-optimization-overview).
### Quick links
* **[System Requirements](/en/reference/node-system-requirements)** - Hardware and software requirements for different node types
* **[Installation Guide](/en/how-to/install-node)** - Step-by-step installation instructions for various platforms
* **[Configuration](/en/reference/node-configuration)** - Detailed configuration options and best practices
* **[Snapshots & Sync](/en/how-to/use-node-snapshots)** - Fast sync options using snapshots
* **[Create a validator](/en/how-to/run-validator)** - Register a synced node as a validator and self-delegate
* **[Upgrade Guide](/en/how-to/upgrade-node)** - Node upgrade procedures and version history
* **[Monitoring](/en/how-to/monitor-node)** - Tools and metrics for node monitoring
* **[Troubleshooting](/en/how-to/troubleshoot-node)** - Common issues and solutions
To read validator data (stake, uptime, voting history) from the chain instead of running `stabled`, see [Index validator data](/en/how-to/index-validator-data).
### Node types
#### Full node
A full node maintains a complete copy of the blockchain and validates all transactions and blocks. Full nodes:
* Verify all transactions and blocks
* Maintain the entire blockchain history
* Can serve data to other nodes
* Support the network's decentralization
#### Archive node
An archive node stores the complete history of all states and can serve historical queries. Archive nodes:
* Store all historical states
* Support historical queries at any block height
* Require significantly more storage
* Essential for block explorers and analytics
### Network information
For complete network details including RPC endpoints, block explorers, and chain parameters, see:
* **[Mainnet](/en/reference/mainnet-information)** - Mainnet details
* **[Testnet](/en/reference/testnet-information)** - Testnet details
### Support and community
* **Discord**: [Join the Stable Discord](https://discord.gg/stablexyz)
### Quick start
For experienced operators who want to get started quickly:
1. Check [System Requirements](/en/reference/node-system-requirements)
2. Follow the [Installation Guide](/en/how-to/install-node)
3. Configure your node using [Configuration Guide](/en/reference/node-configuration)
4. Speed up sync with [Snapshots](/en/how-to/use-node-snapshots)
5. Monitor your node with [Monitoring Guide](/en/how-to/monitor-node)
For network parameters and RPC endpoints, see [Mainnet Information](/en/reference/mainnet-information) or [Testnet Information](/en/reference/testnet-information).
### How node ops connect to the chain
Running a node means enforcing Stable's chain-level rules. These pages explain the behavior your node implements:
* **[Contracts overview](/en/explanation/contracts-overview)** covers the fee model, JSON-RPC surface, and system modules your node serves.
* **[Finality](/en/explanation/finality)** explains single-slot finality and what "confirmed" means at the consensus layer.
* **[Architecture overview](/en/explanation/core-optimization-overview)** walks through consensus, execution, database, and RPC layers.
* **[Gas pricing](/en/explanation/gas-pricing)** explains how USDT0-denominated fees are priced and collected.
This page outlines the hardware and software requirements for running different types of Stable nodes.
### Hardware requirements
#### Full node (minimum)
| Component | Requirement | Notes |
| ----------- | ----------------------------- | ---------------------------------------- |
| **CPU** | 4 cores | AMD Ryzen 5 / Intel Core i5 or better |
| **RAM** | 8 GB | 16 GB recommended for better performance |
| **Storage** | 500 GB NVMe/SSD | Write throughput > 1000 MiBps required |
| **Network** | 100 Mbps | Stable, low-latency connection |
| **OS** | Ubuntu 22.04/24.04, Debian 12 | 64-bit Linux required |
#### Full node (recommended)
| Component | Requirement | Notes |
| ----------- | ------------ | ------------------------------------- |
| **CPU** | 8 cores | AMD Ryzen 7 / Intel Core i7 or better |
| **RAM** | 16 GB | 32 GB for optimal performance |
| **Storage** | 1 TB NVMe | Write throughput > 2000 MiBps |
| **Network** | 1 Gbps | Dedicated connection preferred |
| **OS** | Ubuntu 24.04 | Latest LTS recommended |
#### Archive node
| Component | Requirement | Notes |
| ----------- | ------------ | ----------------------------------------- |
| **CPU** | 16 cores | AMD Ryzen 9 / Intel Core i9 or equivalent |
| **RAM** | 32 GB | 64 GB recommended |
| **Storage** | 4 TB NVMe | Fast growing, plan for expansion |
| **Network** | 1 Gbps | Unmetered connection required |
| **OS** | Ubuntu 24.04 | Latest LTS recommended |
### Software requirements
#### Operating system
##### Supported distributions
* **Ubuntu 24.04 LTS** (recommended)
* **Ubuntu 22.04 LTS**
* **Debian 12 (Bookworm)**
##### System dependencies
```bash
# Update system packages
sudo apt update && sudo apt upgrade -y
# Install essential tools
sudo apt install -y \
build-essential \
git \
wget \
curl \
jq \
lz4 \
zstd \
htop \
net-tools \
ufw
```
### Network requirements
#### Bandwidth usage
| Node Type | Download | Upload | Monthly Data |
| ------------ | -------------- | ------------- | ------------ |
| Full Node | \~50 Mbps avg | \~25 Mbps avg | \~15 TB |
| Archive Node | \~100 Mbps avg | \~50 Mbps avg | \~30 TB |
### Cloud provider recommendations
#### AWS
* **Full node**: t3.xlarge or c5.xlarge
* **Archive node**: m5.2xlarge or c5.2xlarge
* **Storage**: gp3 with provisioned IOPS
#### Google Cloud
* **Full node**: n2-standard-4
* **Archive node**: n2-standard-8
* **Storage**: pd-ssd or pd-extreme
#### Azure
* **Full node**: Standard\_D4s\_v5
* **Archive node**: Standard\_D8s\_v5
* **Storage**: Premium SSD v2
#### DigitalOcean
* **Full node**: General Purpose 8GB
* **Archive node**: CPU-Optimized 16GB
* **Storage**: Volume Block Storage
### Monitoring requirements
For production deployments, ensure you have:
* **Prometheus**: For metrics collection
* **Grafana**: For visualization
* **AlertManager**: For alerting
* **Node exporter**: For system metrics
* **Log aggregation**: ELK or Loki recommended
### Security considerations
#### System hardening
* Keep OS and packages updated
* Configure automatic security updates
* Use SSH keys only (disable password auth)
* Configure fail2ban
* Enable firewall (UFW/iptables)
* Regular security audits
### Pre-installation checklist
Before proceeding with installation, verify:
* [ ] Hardware meets minimum requirements
* [ ] Operating system is supported and updated
* [ ] Storage has sufficient IOPS
* [ ] Network bandwidth is adequate
* [ ] Firewall rules are configured
* [ ] System monitoring is set up
* [ ] Backup strategy is defined
* [ ] Security measures are in place
## Oracles
Oracles provide smart contracts with off-chain data such as asset prices. RedStone operates price feeds on Stable.
### Overview table
| **Provider** | **Category** | **Supported Pairs** | **Docs / Get Started** | **Notes** |
| :-------------------------------------------- | :----------------- | :--------------------------------------------------------------------------------------------------------- | :----------------------------------------------------------------------------------------------------------------- | :-------------- |
| [**RedStone**](https://www.redstone.finance/) | Oracle Price Feeds | BTC, ETH, USDT, USDC, PYUSD, XAUt, frxUSD, FXS, LBTC, sfrxETH/ETH, sfrxUSD, SolvBTC, sthUSD, thBILL, weETH | [https://docs.redstone.finance/docs/dapps/redstone-push/](https://docs.redstone.finance/docs/dapps/redstone-push/) | Live on mainnet |
### RedStone
RedStone provides oracle price feeds on Stable through its [Push model](https://docs.redstone.finance/docs/dapps/redstone-push/). Feed contracts expose the Chainlink-compatible `AggregatorV3Interface`.
**Capabilities**
* Push-based price feeds with configurable deviation thresholds and heartbeat intervals
* Chainlink-compatible `AggregatorV3Interface` with `latestRoundData()`, `decimals()`, and `description()`
* Coverage for blue-chip assets, stablecoins, LSTs, LRTs, and yield-bearing / fundamental-priced assets
#### Mainnet price feed addresses
Source: [RedStone push feeds dashboard](https://app.redstone.finance/push-feeds?networks=stable\&testnets=true)
| **Price Feed** | **Contract Address** | **Deviation** | **Heartbeat** |
| :----------------------------- | :---------------------------------------------------------------------------------------------------------------------- | :------------ | :------------ |
| **BTC / USD** | [0x687103bA8CC2f66C94696182Ef410400Da45fb24](https://stablescan.xyz/address/0x687103bA8CC2f66C94696182Ef410400Da45fb24) | 0.5% | 6h |
| **ETH / USD** | [0x457BE3C697c644bF329C2C3ea79EbF1D254d603a](https://stablescan.xyz/address/0x457BE3C697c644bF329C2C3ea79EbF1D254d603a) | 0.5% | 6h |
| **USDT / USD** | [0x58264801fadCd8598D3EE993572ADe9cA27F42c8](https://stablescan.xyz/address/0x58264801fadCd8598D3EE993572ADe9cA27F42c8) | 0.5% | 6h |
| **USDC / USD** | [0x8ea3C667C264BbdaA1dA7638904b8671F451c7F9](https://stablescan.xyz/address/0x8ea3C667C264BbdaA1dA7638904b8671F451c7F9) | 0.5% | 6h |
| **PYUSD / USD** | [0x1c30dA143E97c228102A5cAe3960dBBB41321604](https://stablescan.xyz/address/0x1c30dA143E97c228102A5cAe3960dBBB41321604) | 0.5% | 6h |
| **XAUt / USD** | [0xd5E244accc514b56DCAD89897DD44499E7C35a05](https://stablescan.xyz/address/0xd5E244accc514b56DCAD89897DD44499E7C35a05) | 0.5% | 6h |
| **frxUSD / USD** | [0xB5197ca89507FE045e8ce9996593D35071915EB7](https://stablescan.xyz/address/0xB5197ca89507FE045e8ce9996593D35071915EB7) | 0.5% | 6h |
| **FXS / USD** | [0xC3b182aee94AECeCa39b072942f3Ce4B87465517](https://stablescan.xyz/address/0xC3b182aee94AECeCa39b072942f3Ce4B87465517) | 0.5% | 6h |
| **LBTC / USD** | [0x80295Cf12E28f3F943304BFd6C2A2C044e731aaB](https://stablescan.xyz/address/0x80295Cf12E28f3F943304BFd6C2A2C044e731aaB) | 0.5% | 6h |
| **sfrxETH / ETH** | [0x29533E113D803ab1967F6CB9495B95DC8C1EA594](https://stablescan.xyz/address/0x29533E113D803ab1967F6CB9495B95DC8C1EA594) | 0.5% | 6h |
| **sfrxUSD / FUNDAMENTAL** | [0x71784611831b9566df7301A78bC1B3d29a8737bF](https://stablescan.xyz/address/0x71784611831b9566df7301A78bC1B3d29a8737bF) | 0.5% | 6h |
| **SolvBTC / FUNDAMENTAL** | [0x58fa68A373956285dDfb340EDf755246f8DfCA16](https://stablescan.xyz/address/0x58fa68A373956285dDfb340EDf755246f8DfCA16) | 0.01% | 24h |
| **sthUSD / FUNDAMENTAL** | [0xb81131B6368b3F0a83af09dB4E39Ac23DA96C2Db](https://stablescan.xyz/address/0xb81131B6368b3F0a83af09dB4E39Ac23DA96C2Db) | 0.5% | 12h |
| **thBILL / FUNDAMENTAL / USD** | [0x7532df197a36587aeD2B9A59785c8BeD182FA62D](https://stablescan.xyz/address/0x7532df197a36587aeD2B9A59785c8BeD182FA62D) | 0.5% | 6h |
| **weETH / FUNDAMENTAL** | [0xD57b79401956BE4872D3d03F0C920639335e350F](https://stablescan.xyz/address/0xD57b79401956BE4872D3d03F0C920639335e350F) | 0.5% | 6h |
### Reading a price feed
Feed contracts implement the Chainlink-compatible [`AggregatorV3Interface`](https://docs.redstone.finance/docs/dapps/redstone-push/). The same consumer pattern used for any Chainlink-style price feed applies.
```solidity
pragma solidity ^0.8.25;
interface AggregatorV3Interface {
function latestRoundData()
external
view
returns (
uint80 roundId,
int256 answer,
uint256 startedAt,
uint256 updatedAt,
uint80 answeredInRound
);
function decimals() external view returns (uint8);
function description() external view returns (string memory);
}
contract OracleConsumer {
AggregatorV3Interface public oracle;
constructor(address oracleAddress) {
oracle = AggregatorV3Interface(oracleAddress);
}
function getLatestPriceData()
external
view
returns (
uint80 roundId,
int256 answer,
uint256 updatedAt
)
{
(roundId, answer, , updatedAt, ) = oracle.latestRoundData();
return (roundId, answer, updatedAt);
}
}
```
:::note
RedStone push feeds on Stable are currently available on mainnet only. Always verify on-chain `updatedAt` against your application's freshness tolerance before consuming a price.
:::
#### Reading a feed directly
You can read any RedStone feed without deploying a consumer contract. The following call reads the ETH/USD feed:
```bash
cast call 0x457BE3C697c644bF329C2C3ea79EbF1D254d603a "latestRoundData()(uint80,int256,uint256,uint256,uint80)" --rpc-url https://rpc.stable.xyz
```
#### Deploying a consumer to Stable mainnet
This assumes you have Foundry installed and a funded wallet. See the [Deploy Smart Contract](/en/tutorial/smart-contract) tutorial for full setup instructions.
1. Save the contract above to `src/OracleConsumer.sol` in a Foundry project.
2. Deploy with the BTC/USD mainnet feed address:
```bash
source .env ;
forge create src/OracleConsumer.sol:OracleConsumer --broadcast --rpc-url $STABLE_MAINNET_RPC_URL --private-key $PRIVATE_KEY --constructor-args 0x687103bA8CC2f66C94696182Ef410400Da45fb24
```
3. Read the latest price from your deployed contract:
```bash
cast call "getLatestPriceData()(uint80,int256,uint256)" --rpc-url $STABLE_MAINNET_RPC_URL
```
### Have an oracle integrating Stable?
Reach the team at [bizdev@stable.xyz](mailto\:bizdev@stable.xyz) to be listed on this page.
## Send and receive USDT0
On Stable, P2P payments settle in under a second. Two transfer methods are available depending on the use case.
### Native transfer
The sender signs and broadcasts a transaction directly to the recipient. This costs 21,000 gas (\~0.00021 USDT0 at 100 gwei). No contract interaction is required.
A native transfer is the simplest path: the sender signs a transaction sending USDT0 directly to the recipient. This is equivalent to entering an amount and selecting "Send" in any payment app.
For a code walkthrough, see [Send your First USDT0](/en/tutorial/send-usdt0).
### Application-initiated transfer (ERC-3009)
The sender signs an off-chain authorization. An application or facilitator submits the transaction on their behalf. Combined with the [Gas Waiver](/en/how-to/integrate-gas-waiver), the gas cost is 0.
[ERC-3009](/en/explanation/erc-3009) is more appropriate for application-initiated payments (e.g., a payment in a web app) because it separates the signer from the submitter. The sender only signs an authorization off-chain, and the application or a facilitator handles on-chain submission.
### What makes it different
On traditional payment rails, a P2P transfer involves bank processing, clearing, and settlement that can take 1–3 business days. Even on other blockchains, the sender needs to hold a volatile gas token (ETH, SOL) alongside the payment token. On Stable, the sender holds only USDT0, gas can be waived, and settlement is final in under a second.
| **Aspect** | **Traditional (bank transfer)** | **Other blockchains** | **Stable** |
| :--------------- | :------------------------------ | :-------------------------------------------------- | :--------------------------------------------------- |
| Settlement time | 1–3 business days | Seconds to minutes, depending on the chain | Under 1 second (single-slot finality) |
| Required assets | Fiat currency | Payment token + separate gas token (ETH, SOL, etc.) | USDT0 only (single asset) |
| Transaction cost | Wire / intermediary fees | Can spike with network congestion | \~0.00021 USDT0 native transfer or $0 via Gas Waiver |
**See also:**
* [Send your First USDT0](/en/tutorial/send-usdt0)
* [ERC-3009 (Transfer With Authorization)](/en/explanation/erc-3009)
* [Gas Waiver](/en/how-to/integrate-gas-waiver)
## Bill per API request
Monetize any HTTP endpoint with per-request pricing using [x402](/en/explanation/x402) middleware. A server declares its price, a client pays per call, and settlement happens within the request lifecycle. No accounts, no API keys, no billing cycles.
### How it works
The server adds x402 middleware to the endpoints it wants to monetize. When a request arrives without payment, the server responds with HTTP `402 Payment Required` and a `PAYMENT-REQUIRED` header containing the price, token, and network. The client signs an [ERC-3009](/en/explanation/erc-3009) authorization for the specified amount and resubmits. The facilitator settles the payment on-chain, and the server returns the resource.
#### Request flow
1. Client sends an HTTP request to the server.
2. Server returns `402 Payment Required` with a `PAYMENT-REQUIRED` header containing the price, token, network, and recipient.
3. Client signs an ERC-3009 authorization for the specified amount and resubmits the request with a `PAYMENT-SIGNATURE` header.
4. Facilitator verifies the signature and settles the transfer on-chain.
5. Server returns the resource with a `PAYMENT-RESPONSE` header containing the settlement receipt.
#### Pricing
Prices are denominated in USDT0 atomic units (6 decimals). A cost parameter of `"1000"` translates to exactly $0.001. A cost of `"50000"` is $0.05. This precision allows servers to set prices at fractions of a cent.
#### Infrastructure
On Stable, [Semantic Pay](https://x402.semanticpay.io) operates a public facilitator. Developers can point their middleware to this endpoint without running their own settlement infrastructure.
x402 provides middleware for Express (`@x402/express`), Hono (`@x402/hono`), and Next.js (`@x402/next`). The pattern is the same across all frameworks: create a facilitator client, register the EVM scheme, and apply middleware.
### What makes it different
Traditional API monetization requires user registration, API key management, usage tracking, billing cycles, and payment processor integration. With x402, the server attaches a payment handler to each endpoint, the client pays per request, and settlement completes within the same HTTP lifecycle. The server does not need to know who the client is, only that a valid payment was submitted.
| **Aspect** | **Traditional (API key + billing cycle)** | **Stable (x402)** |
| :----------------------- | :------------------------------------------------------------------------ | :---------------------------------------- |
| Server-side setup | Registration, API keys, usage tracking, billing cycles, payment processor | x402 payment handler per endpoint |
| Client onboarding | Account creation, API key issuance | None (wallet only) |
| Billing model | Monthly or usage-based invoicing | Per-request settlement |
| Client identity required | Yes (API key) | No (only valid payment) |
| Settlement | End of billing cycle | Within request lifecycle (under 1 second) |
| Minimum viable price | \~$0.30 (card processing floor) | $0.001 (USDT0 atomic units) |
| Client type | Human users only (sign-up required) | Any wallet: humans, AI agents, scripts |
**See also:**
* [x402 (HTTP-Native Payments)](/en/explanation/x402)
* [ERC-3009 (Transfer With Authorization)](/en/explanation/erc-3009)
* [Gas Waiver](/en/how-to/integrate-gas-waiver)
## Ramps
On/off ramp partners connect Stable to global fiat systems, enabling users and businesses to move between USDT, local currencies, and payment rails.
### On/off ramp overview table
| **Provider** | **Category** | **Docs / Get Started** | **Notes** |
| :----------------------------------------------------------------------- | :------------- | :----------------------------------------------------------------------------------------------------------- | :------------------------------------------------------------------------------------------------------- |
| [**Onmeta**](https://onmeta.in/on-off-ramp) | On/Off Ramp | [https://docs.onmeta.in/](https://docs.onmeta.in/) | Compliant fiat-to-USDT + cross-border payouts |
| [**Halliday**](https://halliday.xyz/) | On/Off Ramp | [https://docs.halliday.xyz/pages/home](https://docs.halliday.xyz/pages/home) | CEX + Stripe integration |
| [**Alchemy Pay**](https://alchemypay.org/about) | Gateway | [https://alchemypay.readme.io/docs/alchemypay-on-ramp](https://alchemypay.readme.io/docs/alchemypay-on-ramp) | 300+ payment methods |
| [**DFX**](https://www.dfx.swiss/) | Off-Ramp FX | [https://docs.dfx.swiss/](https://docs.dfx.swiss/) | Regulated stablecoin-to-fiat |
| [**Onramp Money**](https://onramp.money/) | On/Off Ramp | [https://docs.onramp.money/onramp/](https://docs.onramp.money/onramp/) | Emerging market coverage |
| [**MoonPay**](https://www.moonpay.com/business/onramps) | Universal Ramp | [https://dev.moonpay.com/docs/on-ramp-overview](https://dev.moonpay.com/docs/on-ramp-overview) | Global card + bank support |
| [**Transak**](https://transak.com/off-ramp) | On/Off Ramp | [https://docs.transak.com/](https://docs.transak.com/) | 450+ integrations |
| [**Banxa**](https://banxa.com/solutions/by-use-case/on-and-off-ramping/) | Regulated Ramp | [https://docs.banxa.com/docs/overview](https://docs.banxa.com/docs/overview) | Local rails in 100+ countries |
| [**Simplex by Nuvei**](https://www.simplex.com/) | On-Ramp | [https://buy.simplex.com](https://buy.simplex.com) | Card, Apple/Google Pay, SEPA, ACH across 245+ markets; powers downstream wallets including Atomic Wallet |
### Category guide
* **On/Off Ramps:** Platforms enabling direct conversion between fiat currencies and USDT on Stable.
* **Payment Gateways:** Services connecting apps, merchants, or fintechs to global fiat rails for seamless transactions.
* **FX & Off-Ramp Networks:** Regulated infrastructure providing compliant, stablecoin-to-fiat settlement at scale.
### On/off ramps & payment gateways
#### MoonPay
Universal crypto on/off ramp used globally for instant asset purchases.
**Capabilities**
* Card + bank + local payment rails
* Fast global onboarding
* Multi-chain support
**Get started**: Follow the [MoonPay on-ramp integration guide](https://dev.moonpay.com/docs/on-ramp-overview) to embed fiat-to-USDT purchasing on Stable into your app.
#### Transak
On/off ramp providing frictionless ways to buy, sell, and transfer crypto across 450+ apps.
**Capabilities**
* Global fiat methods
* Easy integration APIs
* Country-level compliance support
**Get started**: Review the [Transak integration docs](https://docs.transak.com/) to add on/off ramp widgets or APIs with Stable as a supported network.
#### Onmeta
On/off ramp and cross-border payout infrastructure with built-in compliance for VDA platforms.
**Capabilities**
* Fiat ↔ USDT conversion
* Compliance-ready flows
* Cross-border payouts
* Local settlement rails
**Get started**: Refer to the [Onmeta API documentation](https://docs.onmeta.in/) to integrate fiat-to-USDT conversion and cross-border payouts on Stable.
#### Halliday
End-to-end payment suite enabling seamless on/off ramping from top CEXs and payment platforms like Coinbase and Stripe.
**Capabilities**
* Direct connection to major CEXs
* Stripe + payment rail integration
* Merchant and app-friendly flows
**Get started**: Read the [Halliday integration docs](https://docs.halliday.xyz/pages/home) to connect CEX and Stripe-based payment flows to Stable in your product.
#### Alchemy Pay
Global payment gateway bridging traditional finance and crypto with 300+ payment methods.
**Capabilities**
* Global fiat on/off ramps
* Merchant payments
* Bank transfers + cards + local rails
**Get started**: Use the [Alchemy Pay on-ramp API](https://alchemypay.readme.io/docs/alchemypay-on-ramp) to add 300+ payment methods for USDT purchases on Stable.
#### DFX
Swiss-regulated decentralized FX and off-ramp network with over 100M transactions.
**Capabilities**
* Stablecoin-to-fiat conversion
* Regulated FX layer
* Deep multi-currency support
**Get started**: Consult the [DFX API documentation](https://docs.dfx.swiss/) to set up compliant stablecoin-to-fiat off-ramp flows using Stable as the source network.
#### Onramp Money
Low-cost fiat-to-crypto gateway specializing in emerging markets.
**Capabilities**
* Local payment method coverage
* Instant settlement
* 1.3M+ supported users
**Get started**: Follow the [Onramp Money developer guide](https://docs.onramp.money/onramp/) to integrate fiat-to-crypto flows for emerging market users on Stable.
#### Banxa
Regulated on/off ramp infrastructure connecting users to crypto via local rails in 100+ countries.
**Capabilities**
* Regulated fiat gateways
* Broad global coverage
* Bank and local payment options
**Get started**: Read the [Banxa integration overview](https://docs.banxa.com/docs/overview) to enable regulated on/off ramp flows with Stable as a supported network.
#### Simplex by Nuvei
Fiat-to-crypto on-ramp from Nuvei, supporting card, bank, and local payment methods across 245+ markets. Buying USDT on Stable through Simplex is also available inside any wallet or app that integrates the Simplex widget, including [Atomic Wallet](/en/reference/wallets#atomic-wallet).
**Capabilities**
* USDT on Stable purchases via Visa, Mastercard, Apple Pay, Google Pay, SEPA, and ACH
* Global coverage across 245+ markets
* White-label widget used by downstream wallets and apps (e.g., Atomic Wallet)
**Get started**: Go to [https://buy.simplex.com](https://buy.simplex.com) to buy USDT on Stable directly, or integrate the [Simplex widget](https://www.simplex.com/) to offer on-ramp purchases inside your own app.
***
Have an on/off ramp integrating Stable? Reach out at [bizdev@stable.xyz](mailto\:bizdev@stable.xyz).
## RPC providers
RPC and developer infrastructure providers supporting Stable.
### Overview table
| **Provider** | **Category** | **Docs / Get Started** | **Notes** |
| :--------------------------------------------------------------------------------------------------------------- | :----------------------- | :---------------------------------------------------------------------------------------------------------------------------- | :--------------------------------------------------- |
| [**Alchemy**](https://dashboard.alchemy.com/?utm_source=chain_partner\&utm_medium=referral\&utm_campaign=stable) | RPC + developer platform | [Get started with Alchemy](https://dashboard.alchemy.com/?utm_source=chain_partner\&utm_medium=referral\&utm_campaign=stable) | RPC, WebSocket, monitoring, SDKs |
| [**Tenderly**](https://tenderly.co/) | Simulation + debugging | [tenderly.co](https://tenderly.co/) | Real-time simulation, tracing, transaction workflows |
### Alchemy
A complete blockchain development platform trusted globally. [Get started with Alchemy](https://dashboard.alchemy.com/?utm_source=chain_partner\&utm_medium=referral\&utm_campaign=stable)
**Capabilities**
* RPC + WebSocket infrastructure
* Monitoring dashboards
* Developer APIs and SDKs
**Get started**: Create a Stable app in the [Alchemy dashboard](https://dashboard.alchemy.com/?utm_source=chain_partner\&utm_medium=referral\&utm_campaign=stable) to get an RPC URL, then use it as your JSON-RPC endpoint.
### Tenderly
A full-stack developer platform offering simulation, debugging, monitoring, and execution tooling.
**Capabilities**
* Real-time contract simulation
* Debugging and tracing
* Transaction workflows for devs
**Get started**: Set up a Stable project in the [Tenderly dashboard](https://tenderly.co/) to access simulation, debugging, and transaction tracing for your contracts.
***
Have an RPC or infrastructure integration with Stable? Reach out at [bizdev@stable.xyz](mailto\:bizdev@stable.xyz).
## SDK reference
Full surface of `@stablechain/sdk`. For a walkthrough, see [SDK quickstart](/en/tutorial/sdk-quickstart).
### Install
```bash
npm install @stablechain/sdk viem
```
```text
added 2 packages, audited 3 packages in 2s
```
`viem >= 2.0.0` is a peer dependency.
### `createStable(config)`
Construct a `StableClient`. Returns an object with the methods listed under [`StableClient`](#stableclient).
```ts
import { createStable, Network } from "@stablechain/sdk";
const stable = createStable({ network: Network.Mainnet, account });
```
```text
StableClient { transfer, quoteBridge, bridge, quoteSwap, swap }
```
#### `StableConfig`
| **Field** | **Type** | **Default** | **Description** |
| :------------- | :------------------ | :----------------------- | :------------------------------------------------------------------------ |
| `network` | `Network` | `Network.Mainnet` | Target network. |
| `rpc` | `string` | Public RPC for `network` | RPC override. |
| `account` | `viem.Account` | | Server-side signer (e.g. `privateKeyToAccount`). |
| `transport` | `viem.Transport` | | Browser-wallet transport (e.g. `custom(window.ethereum)`). |
| `walletClient` | `viem.WalletClient` | | Pre-built wallet client. Takes precedence over `account` and `transport`. |
Provide one of `account`, `transport`, or `walletClient`.
### `StableClient`
#### `transfer(params)`
Send native USDT0 or any ERC-20 on Stable. Switches the wallet to the Stable chain, fetches token decimals on-chain when missing, and waits for the receipt.
```ts
const { txHash } = await stable.transfer({
from: "0xYourAddress",
to: "0xRecipient",
amount: 10,
});
```
```text
{ txHash: "0x8f3a...2d41" }
```
| **Param** | **Type** | **Description** |
| :-------------- | :-------- | :---------------------------------------------- |
| `from` | `string` | Sender address. |
| `to` | `string` | Recipient address. |
| `amount` | `number` | Human-readable amount. |
| `token` | `string?` | ERC-20 contract address. Omit for native USDT0. |
| `tokenDecimals` | `number?` | Decimals. Fetched on-chain when omitted. |
Returns `OperationResult` (`{ txHash, toAmount? }`).
#### `quoteBridge(params)`
Preview a bridge. Read-only — no signature, no gas.
```ts
const quote = await stable.quoteBridge({
fromChain: Chain.Ethereum,
toChain: Chain.Stable,
fromToken: "0x6C96dE32CEa08842dcc4058c14d3aaAD7Fa41dee",
toToken: "0x779Ded0c9e1022225f8E0630b35a9b54bE713736",
amount: 100,
});
```
```text
{ toAmount: 99.94 }
```
Returns `BridgeQuote`.
#### `bridge(params)`
Bridge tokens cross-chain. The SDK picks the route: LayerZero for USDT0 → USDT0, LI.FI for everything else. Pass a pre-fetched `quote` to skip the internal quote call.
```ts
const { txHash } = await stable.bridge({ ...bridgeParams, quote });
```
```text
{ txHash: "0xabcd...7890" }
```
| **Param** | **Type** | **Description** |
| :------------- | :------------- | :-------------------------------------------- |
| `fromChain` | `Chain` | Source chain. |
| `toChain` | `Chain` | Destination chain. |
| `fromToken` | `string` | Source token contract address. |
| `toToken` | `string` | Destination token contract address. |
| `amount` | `number` | Human-readable amount. |
| `fromDecimals` | `number?` | Source token decimals. Defaults to `6`. |
| `recipient` | `string?` | Destination address. Defaults to signer. |
| `quote` | `BridgeQuote?` | Pre-fetched quote. Skips internal quote call. |
#### `quoteSwap(params)`
Fetch a LI.FI swap quote on Stable. Returns a pre-built transaction request and the approval address.
```ts
const quote = await stable.quoteSwap({
fromToken: "0x8a2B28364102Bea189D99A475C494330Ef2bDD0B",
toToken: "0x779Ded0c9e1022225f8E0630b35a9b54bE713736",
amount: 100,
fromDecimals: 6,
});
```
```text
{ toAmount: 99.81, fromAmount: 100000000n, fromToken: "0x8a2B...", approvalAddress: "0x...", transactionRequest: { ... } }
```
#### `swap(params)`
Swap tokens on Stable via LI.FI. Handles ERC-20 approval automatically and switches the wallet's chain when needed.
```ts
const { txHash, toAmount } = await stable.swap({ ...swapParams, quote });
```
```text
{ txHash: "0xabcd...", toAmount: 99.81 }
```
| **Param** | **Type** | **Default** | **Description** |
| :------------- | :----------- | :---------- | :----------------------------------- |
| `fromToken` | `string` | | Source token address. |
| `toToken` | `string` | | Destination token address. |
| `amount` | `number` | | Human-readable amount. |
| `fromDecimals` | `number?` | `6` | Source token decimals. |
| `toAddress` | `string?` | signer | Recipient address. |
| `quote` | `SwapQuote?` | | Pre-fetched quote. Skips LI.FI call. |
### Enums
#### `Network`
| **Value** | **Chain ID** |
| :---------------- | :----------- |
| `Network.Mainnet` | 988 |
| `Network.Testnet` | 2201 |
#### `Chain`
Used by `quoteBridge` and `bridge`. Each entry has a corresponding `CHAIN_CONFIGS` entry.
| **Enum** | **Network** | **Chain ID** |
| :-------------------- | :--------------- | :----------- |
| `Chain.Sepolia` | Ethereum Sepolia | 11155111 |
| `Chain.StableTestnet` | Stable Testnet | 2201 |
| `Chain.Stable` | Stable Mainnet | 988 |
| `Chain.Ethereum` | Ethereum | 1 |
| `Chain.Arbitrum` | Arbitrum One | 42161 |
| `Chain.Ink` | Ink | 57073 |
| `Chain.Bera` | Berachain | 80094 |
| `Chain.MegaETH` | MegaETH | 4326 |
| `Chain.Base` | Base | 8453 |
| `Chain.BSC` | BNB Smart Chain | 56 |
| `Chain.HyperEVM` | HyperEVM | 999 |
### `CHAIN_CONFIGS`
`Partial>` keyed by `Chain` enum. Each entry exposes `id`, `rpc`, `usdt`, and `decimals`. Use it when you need the canonical USDT address on a supported chain without hard-coding it.
```ts
import { CHAIN_CONFIGS, Chain } from "@stablechain/sdk";
console.log(CHAIN_CONFIGS[Chain.Stable]);
```
```text
{ id: 988, rpc: "https://rpc.stable.xyz", usdt: "0x779Ded0c9e1022225f8E0630b35a9b54bE713736", decimals: 6 }
```
### Errors
All SDK errors extend `StableError`, which extends viem's `BaseError`. Errors carry structured metadata so you can branch on `error.name` or `instanceof`.
| **Class** | **Thrown when** | **Useful fields** |
| :----------------------- | :-------------------------------------------------------------------------------- | :----------------------------------------------- |
| `StableValidationError` | A parameter fails validation (bad address, non-finite amount, unsupported chain). | `field`, `value` |
| `StableQuoteError` | A quote request to LI.FI fails. | `provider`, `httpStatus`, `providerCode`, `body` |
| `StableTransactionError` | On-chain step fails: chain switch, approval, send, or revert. | `phase`, `txHash`, `chainId`, `revertReason` |
| `StableNetworkError` | An underlying HTTP/RPC call fails. | `url` |
```ts
import { StableTransactionError } from "@stablechain/sdk";
try {
await stable.transfer({ from, to, amount: 1 });
} catch (err) {
if (err instanceof StableTransactionError && err.phase === "switch_chain") {
// user rejected the chain switch
}
throw err;
}
```
```text
StableTransactionError: transfer: wallet rejected or failed to switch to chain 988
Phase: switch_chain
Chain ID: 988
```
### Next recommended
* [**SDK quickstart**](/en/tutorial/sdk-quickstart) — Install the SDK and run your first transfer on testnet.
* [**Use with viem**](/en/how-to/sdk-with-viem) — Switch between private-key, browser-wallet, and pre-built signers.
* [**Use with wagmi**](/en/how-to/sdk-with-wagmi) — Wire the SDK into a React app with hooks.
## Staking precompile reference
:::note
**Concept:** For what the staking module does and when to use it, see [Staking module](/en/explanation/staking-module).
:::
### Abstract
The `staking` precompiled contract acts as a bridge that enables EVM environments to use the Stable SDK's `x/staking` module functionality.
### Contents
1. **[Concepts](#concepts)**
2. **[Configuration](#configuration)**
3. **[Methods](#methods)**
4. **[Events](#events)**
### Concepts
In `x/staking` module in Stable SDK, bond denom must be registered during chain initialization for staking.
Validators and delegators can only use the bond denom staking token.
The `staking` precompiled contract performs additional checks to ensure that the validator or delegator is the caller.
### Configuration
The contract address and gas cost are predefined.
#### Contract address
* `0x0000000000000000000000000000000000000800`
### Methods
#### `createValidator`
Creates a validator.
The validator must be created with an initial delegation from the operator.
For potential delegators, the validator should offer information and a plan for the commission rate.
Delegators can choose a validator to delegate their tokens to based on disclosed information, with natural regulation from market mechanisms.
`CreateValidator` is emitted when the validator is successfully registered.
##### Inputs
| Name | Type | Description |
| ----------------- | --------------- | ------------------------------------------------------------------------- |
| description | Description | information of the validator |
| commissionRates | CommissionRates | commission rate of the staking token rewarded by the validator |
| minSelfDelegation | uint256 | the minimum self-delegation amount of the validator |
| validatorAddress | address | the address of the validator |
| pubkey | string | the public key of the validator |
| value | uint256 | the amount of the staking token initially self-delegated to the validator |
`Description` is a struct with the following fields:
| Name | Type | Description |
| --------------- | ------ | --------------------------------------- |
| moniker | string | name of the validator |
| identity | string | the identity of the validator |
| website | string | the url of the validator's website |
| securityContact | string | security contract information |
| details | string | additional description of the validator |
`CommissionRates` is a struct with the following fields:
| Name | Type | Description |
| ------------- | ------- | --------------------------------------------------------------- |
| rate | uint256 | current commission rate that the validator receives |
| maxRate | uint256 | the maximum commission rate (cannot be set higher than this) |
| maxChangeRate | uint256 | the maximum commission rate that a validator can change per day |
`rate` should be set to an appropriate value acceptable to the market.
* If validator's commission rate is higher, delegator's profit is lower.
* If validator's commission rate is lower, validator's profit is lower and it makes operation difficult.
Since a high `maxRate` can make delegators concerned about an unexpected high commission rate from the validator, `maxRate` should be set carefully. `maxChangeRate` is unchangeable when initialized.
##### Outputs
| Name | Type | Description |
| ------- | ---- | ------------------------------------------------ |
| success | bool | true if the validator is successfully registered |
#### `editValidator`
Validator updates its information.
Validator only can update information except unchangeable fields such as `maxRate` and `maxChangeRate` in `CommissionRates` struct.
`EditValidator` is emitted when the validator is successfully updated.
##### Inputs
| Name | Type | Description |
| ----------------- | ----------- | ------------------------------------------------------------------ |
| description | Description | information of the validator |
| validatorAddress | address | the address of the validator |
| commissionRate | int256 | the commission rate of the staking token rewarded by the validator |
| minSelfDelegation | int256 | the minimum self-delegation amount of the validator |
##### Outputs
| Name | Type | Description |
| ------- | ---- | --------------------------------------------- |
| success | bool | true if the validator is successfully updated |
#### `delegate`
Delegator sets the amount of token to be delegated to the validator.
`Delegate` is emitted when the delegation is successfully done.
##### Inputs
| Name | Type | Description |
| ---------------- | ------- | ---------------------------------------------------------- |
| delegatorAddress | address | the address of the delegator |
| validatorAddress | address | the address of the validator |
| amount | uint256 | the amount of the staking token delegated to the validator |
##### Outputs
| Name | Type | Description |
| ------- | ---- | ------------------------------------------- |
| success | bool | true if the delegation is successfully done |
##### Events
`newShares` indicates the ownership ratio of the delegator.
The shares calculated may vary depending on the time even though the same amount of tokens are delegated.
#### `undelegate`
Delegator withdraws the amount of token delegated to the validator.
`Unbond` is emitted when the undelegation is successfully done.
##### Inputs
| Name | Type | Description |
| ---------------- | ------- | ------------------------------------------------------------------------ |
| delegatorAddress | address | the address of the delegator |
| validatorAddress | address | the address of the validator |
| amount | uint256 | the amount of the staking token willing to undelegate from the validator |
##### Outputs
| Name | Type | Description |
| ------- | ---- | --------------------------------------------- |
| success | bool | true if the undelegation is successfully done |
#### `redelegate`
Delegator redelegates the amount of token delegated to the validator to another validator.
`Redelegate` is emitted when the redelegate is successfully done.
##### Inputs
| Name | Type | Description |
| ---------------- | ------- | ------------------------------------------------ |
| delegatorAddress | address | the address of the delegator |
| validatorSrc | string | the address of the source validator |
| validatorDst | string | the address of the destination validator |
| amount | uint256 | the amount of the staking token for redelegation |
##### Outputs
| Name | Type | Description |
| ------- | ---- | ------------------------------------------- |
| success | bool | true if the redelegate is successfully done |
#### `delegation`
Returns the delegation information between a delegator and a validator.
If there is no delegation found, the `shares` and `balance` will be `0`.
##### Inputs
| Name | Type | Description |
| ---------------- | ------- | ---------------------------- |
| delegatorAddress | address | the address of the delegator |
| validatorAddress | address | the address of the validator |
##### Outputs
| Name | Type | Description |
| ------- | ------- | --------------------------------------- |
| shares | uint256 | the delegated shares |
| balance | Coin | the amount of delegated token and denom |
`Coin` is a struct with the following fields:
| Name | Type | Description |
| ------ | ------- | ------------------------ |
| denom | string | the denom of the reward |
| amount | uint256 | the amount of the reward |
#### `unbondingDelegation`
Returns the unbonding delegation information between a delegator and a validator.
If there is no unbonding delegation found, empty `UnbondingDelegationOutput` will be returned.
##### Inputs
| Name | Type | Description |
| ---------------- | ------- | ---------------------------- |
| delegatorAddress | address | the address of the delegator |
| validatorAddress | address | the address of the validator |
##### Outputs
| Name | Type | Description |
| ------------------- | ------------------------- | ------------------------------------------- |
| unbondingDelegation | UnbondingDelegationOutput | the information of the unbonding delegation |
`UnbondingDelegationOutput` is a struct with the following fields:
| Name | Type | Description |
| ---------------- | --------------------------- | --------------------------------------- |
| validatorAddress | address | the address of the validator |
| delegatorAddress | address | the address of the delegator |
| entries | UnbondingDelegationEntry\[] | the entries of the unbonding delegation |
`UnbondingDelegationEntry` is a struct with the following fields:
| Name | Type | Description |
| -------------- | ------ | -------------------------------- |
| creationHeight | uint64 | the creation height of the entry |
| completionTime | uint64 | the completion time of the entry |
| initialBalance | Coin | the initial balance of the entry |
| balance | Coin | the balance of the entry |
#### `validator`
Returns the validator information.
If there is no validator found, empty `ValidatorOutput` will be returned.
##### Inputs
| Name | Type | Description |
| ---------------- | ------- | ---------------------------- |
| validatorAddress | address | the address of the validator |
##### Outputs
| Name | Type | Description |
| --------- | --------- | -------------------------------- |
| validator | Validator | the information of the validator |
`Validator` is a struct with the following fields:
| Name | Type | Description |
| ----------------- | ------- | ------------------------------------------------------------------ |
| operatorAddress | address | the address of the validator |
| consensusPubkey | string | the public key of the validator |
| jailed | bool | whether the validator is jailed or not |
| status | int32 | the status of the validator |
| tokens | uint256 | the amount of the staking token delegated to the validator |
| delegatorShares | uint256 | the amount of the delegation shares |
| description | string | the description of the validator |
| unbondingHeight | int64 | the height at which the validator is unbonding |
| unbondingTime | int64 | the time at which the validator is unbonding |
| commission | uint256 | the commission rate of the staking token rewarded by the validator |
| minSelfDelegation | uint256 | the minimum self-delegation amount of the validator |
#### `validators`
Returns all validators matched with the status.
If there is no validator found, empty `ValidatorsOutput` will be returned.
Status, declared in `x/staking` module, can be one of the following:
* 0 : "BOND\_STATUS\_UNSPECIFIED", unspecified status
* 1 : "BOND\_STATUS\_UNBONDING", validator is unbonding
* 2 : "BOND\_STATUS\_UNBONDED", validator is unbonded
* 3 : "BOND\_STATUS\_BONDED", validator is bonded
##### Inputs
| Name | Type | Description |
| ----------- | ------- | --------------------------- |
| status | string | the status of the validator |
| pageRequest | PageReq | request for pagination |
`PageReq` is a struct with the following fields:
| Name | Type | Description |
| ---------- | ----- | --------------------------------------------------- |
| key | bytes | the key of the page |
| offset | int64 | the offset of the page |
| limit | int64 | the limit of the page |
| countTotal | bool | whether to count the total number of results or not |
| reverse | bool | whether to reverse the results or not |
##### Outputs
| Name | Type | Description |
| ------------ | ------------ | ---------------------------- |
| validators | Validator\[] | the arrays of the validators |
| pageResponse | PageResp | response for pagination |
`PageResp` is a struct with the following fields:
| Name | Type | Description |
| ------- | ------ | ------------------------------- |
| nextKey | bytes | the next key of the page |
| total | uint64 | the total number of the results |
#### `redelegation`
Returns the redelegation information of delegator, source validator and destination validator.
If there is no redelegation found, empty `RedelegationOutput` will be returned.
##### Inputs
| Name | Type | Description |
| ------------------- | ------- | ---------------------------------------- |
| delegatorAddress | address | the address of the delegator |
| srcValidatorAddress | address | the address of the source validator |
| dstValidatorAddress | address | the address of the destination validator |
##### Outputs
| Name | Type | Description |
| ------------ | ------------------ | ----------------------------------- |
| redelegation | RedelegationOutput | the information of the redelegation |
`RedelegationOutput` is a struct with the following fields:
| Name | Type | Description |
| ------------------- | -------------------- | ---------------------------------------- |
| delegatorAddress | address | the address of the delegator |
| validatorSrcAddress | address | the address of the source validator |
| validatorDstAddress | address | the address of the destination validator |
| entries | RedelegationEntry\[] | the entries of the redelegation |
`RedelegationEntry` is a struct with the following fields:
| Name | Type | Description |
| -------------- | ------ | -------------------------------- |
| creationHeight | uint64 | the creation height of the entry |
| completionTime | uint64 | the completion time of the entry |
| initialBalance | Coin | the initial balance of the entry |
| balance | Coin | the balance of the entry |
#### `redelegations`
Returns all redelegations of delegator, source validator and destination validator.
If there is no redelegation found, empty `RedelegationResponse` and `PageResp` will be returned.
##### Inputs
| Name | Type | Description |
| ------------------- | ------- | ---------------------------------------- |
| delegatorAddress | address | the address of the delegator |
| srcValidatorAddress | address | the address of the source validator |
| dstValidatorAddress | address | the address of the destination validator |
| pageRequest | PageReq | request for pagination |
##### Outputs
| Name | Type | Description |
| ------------ | ----------------------- | ------------------------------------ |
| response | RedelegationResponse\[] | the information of the redelegations |
| pageResponse | PageResp | response for pagination |
### Events
#### CreateValidator
| Name | Type | Indexed | Description |
| -------- | ------- | ------- | ------------------------------------------------------------------------- |
| valiAddr | address | Y | the address of the validator |
| value | uint256 | N | the amount of the staking token initially self-delegated to the validator |
#### EditValidator
| Name | Type | Indexed | Description |
| ----------------- | ------- | ------- | -------------------------------------------------------------------------- |
| valiAddr | address | Y | the address of the validator |
| commissionRate | int256 | N | the updated commission rate of the staking token rewarded by the validator |
| minSelfDelegation | int256 | N | the updated minimum self-delegation amount of the validator |
#### Delegate
| Name | Type | Indexed | Description |
| ------------- | ------- | ------- | ---------------------------------------------------------- |
| delegatorAddr | address | Y | the address of the delegator |
| validatorAddr | string | Y | the address of the validator |
| amount | uint256 | N | the amount of the staking token delegated to the validator |
| newShares | uint256 | N | the amount of the delegation shares after the delegation |
#### Unbond
| Name | Type | Indexed | Description |
| -------------- | ------- | ------- | -------------------------------------------------------------- |
| delegatorAddr | address | Y | the address of the delegator |
| validatorAddr | string | Y | the address of the validator |
| amount | uint256 | N | the amount of the staking token undelegated from the validator |
| completionTime | uint256 | N | the completion time of the undelegation |
#### Redelegate
| Name | Type | Indexed | Description |
| ------------------- | ------- | ------- | ------------------------------------------------ |
| delegatorAddr | address | Y | the address of the delegator |
| validatorSrcAddress | address | Y | the address of the source validator |
| validatorDstAddress | address | Y | the address of the destination validator |
| amount | uint256 | N | the amount of the staking token for redelegation |
| completionTime | uint256 | N | the completion time of the redelegate |
## Set up recurring billing
Pull-based subscriptions let a service provider collect payments on a schedule without requiring the subscriber to initiate each payment.
This pattern is enabled by [EIP-7702](/en/reference/eip-7702-api) account abstraction. The subscriber's EOA delegates execution authority to a subscription delegate contract, which the provider calls each billing cycle.
The subscriber acts only twice: once to subscribe, once to cancel.
### How it works
The subscriber delegates their EOA to a contract that enforces billing terms. Through EIP-7702, the subscriber's account temporarily gains contract logic, allowing a service provider to collect payments at each billing cycle without the subscriber signing every time.
#### Subscription lifecycle
1. **Delegate**: the subscriber delegates their EOA to a subscription delegate contract via EIP-7702.
2. **Subscribe**: the subscriber registers billing terms: provider address, amount per interval, and billing interval.
3. **Collect**: the service provider triggers collection each billing cycle. The delegate contract verifies the caller, interval, and amount before executing the USDT0 transfer.
4. **Cancel**: the subscriber revokes the subscription or clears the delegation to stop future collections.
#### Important considerations
* **Persistent delegation**: The EIP-7702 delegation persists until the subscriber explicitly changes or clears it. No re-delegation is needed each billing cycle.
* **Single delegation per EOA**: EIP-7702 supports one active delegation per EOA. If the subscriber later delegates to a different contract, the subscription delegate logic is replaced and collection fails. Use a modular delegate contract that supports multiple functions (subscriptions, batch payments, spending limits) under a single delegation.
* **Use audited delegates**: A delegate contract has full execution authority over the subscriber's EOA. Only delegate to contracts that have been audited.
### What makes it different
Traditional subscriptions store card data, retry failed charges, and manage complex billing state. With EIP-7702 subscriptions, the billing terms are enforced by the delegate logic on the subscriber's own EOA. The provider can only collect the agreed amount per interval, and the subscriber can cancel at any time by revoking the delegation.
| **Aspect** | **Traditional (card-on-file)** | **Stable** |
| :------------------ | :---------------------------------------- | :-------------------------------------- |
| Setup | Card registration with payment processor | Single EIP-7702 delegation transaction |
| Billing | Processor charges stored card | Provider calls delegate contract |
| Stored payment data | Card number, CVV held by processor | No payment credentials stored off-chain |
| Cancellation | Contact provider or card issuer | Subscriber revokes delegation on-chain |
| Overcharge risk | Depends on provider-side billing controls | Billing terms enforced by contract |
**See also:**
* [EIP-7702](/en/reference/eip-7702-api)
* [ERC-3009 (Transfer With Authorization)](/en/explanation/erc-3009)
## System modules reference
Stable exposes core settlement behavior through **System Modules**, implemented as **precompiled contracts** for gas efficiency and predictable control.
:::note
**Concept:** For what system modules do and why they're exposed as precompiles, see [System modules](/en/explanation/system-modules-overview).
:::
**Key modules:**
* [Bank Module](/en/reference/bank-module-api)
* Handles USDT transfers, balance accounting, and escrow flows
* [Distribution Module](/en/reference/distribution-module-api)
* Fee distribution and reward logic for network participants
* [Staking Module](/en/reference/staking-module-api)
* Controls validator participation and staking (coming with mainnet)
**dApps can leverage built-in modules instead of re-implementing token or settlement logic.**
## System transactions reference
:::note
**Concept:** For how system transactions bridge SDK events to the EVM and why this matters, see [System transactions](/en/explanation/system-transactions).
:::
### Abstract
System transactions provide a way for the Stable protocol to emit EVM events for Stable SDK operations. When staking events like unbonding completions occur in the SDK layer, the protocol automatically generates EVM transactions that emit corresponding events. This makes these operations fully visible to EVM tooling and applications.
### Motivation
You and your applications on Stable expect to monitor blockchain events through standard EVM interfaces like `eth_getLogs`. But critical operations happen in Stable SDK modules that don't naturally emit EVM events. This creates a visibility gap: EVM dApps can't easily track when a user's tokens finish unbonding.
System transactions bridge this gap. When the staking module completes an unbonding operation, Stable's x/stable module detects the event and generates a system transaction that calls the StableSystem precompile ( `0x0000000000000000000000000000000000009999`). And then, the precompile emits proper EVM events that any dApp can subscribe to. System transactions run with a special sender address (`0x8888888888888888888888888888888888888888`) that only the protocol can use. This prevents anyone from spoofing protocol events while keeping the event emission trustless and verifiable on-chain.
### Specification
System transactions work through three main components: the x/stable module's EndBlocker, the PrepareProposal handler, and the StableSystem precompile.
#### Architecture overview
#### StableSystem precompile
The StableSystem precompile lives at `0x0000000000000000000000000000000000009999` and handles protocol-level operations that need to emit EVM events. Currently it supports unbonding completion notifications.
```solidity
interface IStableSystem {
/// @notice Processes queued unbonding completions and emits EVM events
/// @param blockHeight The block height at which to process completions
/// @dev Only callable by system transactions (from = 0x8888888888888888888888888888888888888888)
/// @dev Processes up to 100 completions per call
/// @dev Automatically deletes processed completions from the queue
function notifyUnbondingCompletions(int64 blockHeight) external;
/// @notice Emitted when an unbonding operation completes
/// @param delegator The address that delegated the tokens
/// @param validator The validator address the tokens were delegated to
/// @param amount The amount of tokens that finished unbonding (in uusdc)
event UnbondingCompleted(
address indexed delegator,
address indexed validator,
uint256 amount
);
/// @notice The caller is not authorized (not system transaction sender)
error Unauthorized();
}
```
#### System transaction sender
System transactions use `0x8888888888888888888888888888888888888888` as the sender address. This address:
* Requires no signature verification
* Can only be used by transactions created in PrepareProposal
* Cannot be spoofed by users or contracts
* Skips fee deduction via the SystemTxDecorator ante handler
The EVM recognizes system transactions by checking `msg.sender == 0x8888888888888888888888888888888888888888`. Precompiles can use this to gate protocol-only operations.
#### Event-driven flow
When a user's unbonding period completes, here's what happens:
1. **Stable SDK Layer:** The staking module's EndBlocker completes the unbonding and emits EventTypeCompleteUnbonding with the delegator address, validator address, and amount.
2. **Detection:** The x/stable module's EndBlocker runs after staking and scans for unbonding events in the block's event log. For each completion, it queues an entry in state with the delegator address, validator address, amount, and block height.
3. **System TX Generation**: In the next block's PrepareProposal, the app queries all queued completions. If any exist, it creates a system transaction calling StableSystem.notifyUnbondingCompletions(blockHeight) with the current block height. This transaction goes at the front of the block, before any user transactions.
4. **Execution:** During block execution, the system transaction runs first. The precompile queries state for queued completions at that block height, emits an UnbondingCompleted event for each one (up to 100), and deletes them from the queue.
5. **EVM Visibility:** The events appear in transaction receipts and logs, visible to eth\_getLogs queries, block explorers, and any application monitoring the StableSystem precompile.
#### Batch processing
To prevent blocks from becoming too large, the system processes at most 100 unbonding completions per block. If 150 completions queue up:
* Block N: Creates system tx processing completions 0-99
* Block N+1: Creates system tx processing completions 100-149
The precompile queries state directly rather than receiving completion data in calldata. This keeps transaction size predictable and moves the data from expensive calldata to cheaper state reads.
### Usage examples
The most common use case is a staking dashboard that needs to notify users when their unbonding periods complete. Here's how to set up a listener for unbonding completions.
```javascript
import { ethers } from 'ethers';
// StableSystem precompile address
const STABLE_SYSTEM_ADDRESS = '0x0000000000000000000000000000000000009999';
// ABI for the UnbondingCompleted event
const STABLE_SYSTEM_ABI = [
'event UnbondingCompleted(address indexed delegator, address indexed validator, uint256 amount)'
];
// Connect to the Stable network
const provider = new ethers.JsonRpcProvider('https://rpc.testnet.stable.xyz');
const stableSystem = new ethers.Contract(
STABLE_SYSTEM_ADDRESS,
STABLE_SYSTEM_ABI,
provider
);
// Subscribe to all unbonding completions
stableSystem.on('UnbondingCompleted', (delegator, validator, amount, event) => {
console.log('Unbonding completed!');
console.log('Delegator:', delegator);
console.log('Validator:', validator);
console.log('Amount:', ethers.formatEther(amount), 'tokens');
console.log('Block:', event.log.blockNumber);
console.log('Tx Hash:', event.log.transactionHash);
});
```
This listener fires every time any user's unbonding completes. For a production dApp, filter events for specific users as shown below.
#### Filtering events for specific users
To only receive events for a particular delegator address, use the indexed event parameters to create a filter:
```javascript
// Only watch unbondings for a specific user
const userAddress = '0xabcd...';
const filter = stableSystem.filters.UnbondingCompleted(userAddress);
stableSystem.on(filter, (delegator, validator, amount, event) => {
// This only fires for the specified user's unbondings
showNotification(`Your unbonding of ${ethers.formatEther(amount)} tokens completed!`);
refreshUserBalance(userAddress);
});
```
You can also filter by validator if you're building a validator-specific dashboard:
```javascript
// Watch all unbondings from a specific validator
const validatorAddress = '0x1234...';
const validatorFilter = stableSystem.filters.UnbondingCompleted(null, validatorAddress);
stableSystem.on(validatorFilter, (delegator, validator, amount) => {
updateValidatorStats(validator, amount);
});
```
#### Querying historical events
If your dApp needs to show a history of past unbonding completions, you can query historical events using event filters with block ranges:
```javascript
// Get all unbondings for a user in the last 1000 blocks
const currentBlock = await provider.getBlockNumber();
const filter = stableSystem.filters.UnbondingCompleted(userAddress);
const events = await stableSystem.queryFilter(
filter,
currentBlock - 1000,
currentBlock
);
const unbondingHistory = events.map(event => ({
delegator: event.args.delegator,
validator: event.args.validator,
amount: ethers.formatEther(event.args.amount),
blockNumber: event.blockNumber,
txHash: event.transactionHash
}));
console.log('Recent unbondings:', unbondingHistory);
```
### Integration guide
#### Step 1: Add the Stable System contract interface
First, add the StableSystem precompile interface to your project. If you're using Foundry or Hardhat, create a new interface file:
```solidity
interface IStableSystem {
event UnbondingCompleted(
address indexed delegator,
address indexed validator,
uint256 amount
);
}
```
If you're building a pure frontend dApp without Solidity contracts, you just need the ABI fragment for the event:
```javascript
const STABLE_SYSTEM_ABI = [
'event UnbondingCompleted(address indexed delegator, address indexed validator, uint256 amount)'
];
```
#### Step 2: Set up event listeners
Initialize your ethers.js provider and create a contract instance pointing to the StableSystem precompile address. The precompile is always deployed at `0x00000000000....0000009999` on both Stable Testnet and Stable Mainnet.
*Note: The precompile is not deployed on Stable Mainnet yet, it will be provided after v1.2.0 upgrade.*
```javascript
const provider = new ethers.JsonRpcProvider(RPC_URL);
const stableSystem = new ethers.Contract(
'0x0000000000000000000000000000000000009999',
STABLE_SYSTEM_ABI,
provider
);
```
#### Step 3: Handle events in your application logic
Subscribe to events and update your application state accordingly. Common patterns include:
* **Balance Updates**: When an unbonding completes, refresh the user's token balance
* **Notification System**: Show toast notifications when the user's unbondings complete
* **Dashboard Statistics**: Update staking metrics and charts in real-time
* **Transaction History**: Add completed unbondings to the user's activity feed
#### Step 4: Handle connection issues
Since event subscriptions rely on persistent websocket connections, implement reconnection logic for production dApps:
```javascript
let reconnectAttempts = 0;
const MAX_RECONNECT_ATTEMPTS = 5;
function setupEventListener() {
const provider = new ethers.WebSocketProvider('wss://rpc.testnet.stable.xyz');
provider.on('error', (error) => {
console.error('Provider error:', error);
if (reconnectAttempts < MAX_RECONNECT_ATTEMPTS) {
reconnectAttempts++;
setTimeout(() => setupEventListener(), 5000);
}
});
const stableSystem = new ethers.Contract(
'0x0000000000000000000000000000000000009999',
STABLE_SYSTEM_ABI,
provider
);
stableSystem.on('UnbondingCompleted', handleUnbonding);
}
```
### Why this approach?
#### Compared to custom indexers
Previously, Stable SDK required you to run custom indexers that watch for SDK events and store them in a database. This adds operational overhead and introduces potential points of failure.
With system transactions, there's no need for separate indexer infrastructure. Events are natively available through the EVM's log system, which every RPC node already indexes and serves. Any standard web3 library can subscribe to these events without additional tooling.
#### Compared to polling SDK endpoints
Without system transactions, EVM dApps would need to periodically call Stable SDK REST endpoints to check if unbonding periods have completed. This creates several problems:
* **Increased latency**: Polling intervals of 5-10 seconds mean users might wait that long before seeing updates
* **Higher load**: Every dApp instance polling endpoints increases load on RPC infrastructure
* **Complexity**: dApps need to handle both web3 providers (for EVM interactions) and Stable SDK REST clients (for SDK queries)
* **No real-time updates**: Polling inherently can't provide instant notifications
System transactions provide real-time event notifications through the same websocket connections dApps already use for EVM interactions. This simplifies the developer experience and reduces infrastructure costs.
### Security guarantees
#### Trustless event emission
System transactions are created during the `PrepareProposal` ABCI phase, which only validators can execute. User-submitted transactions cannot spoof the system sender address (`0x8888888888888888888888888888888888888888`). The EVM's state transition logic enforces that only transactions to the StableSystem precompile address can skip signature verification.
This means:
* Users cannot forge unbonding completion events
* Users cannot call `notifyUnbondingCompletions` from their own transactions
* The only way to emit an `UnbondingCompleted` event is for an actual unbonding to complete in the Stable SDK staking module
#### No additional trust assumptions
System transactions don't introduce new security assumptions beyond what's already required for blockchain consensus. If you trust that validators are correctly executing blocks, you can trust that system transaction events accurately reflect Stable SDK state changes.
The event emission process is deterministic: given the same SDK events in `EndBlock`, all honest validators will produce identical system transactions during `PrepareProposal`. The consensus mechanism ensures validators agree on which system transactions to include.
#### Block finality
The Stable blockchain uses fast finality through StableBFT's consensus mechanism. Once a block is committed, it's immediately final and cannot be reorganized. This means that once you receive an `UnbondingCompleted` event, you can trust it's permanent.
There's no need to wait for multiple confirmations like on probabilistic finality chains. dApps can update user balances and display notifications immediately upon receiving the event.
### Performance & limitations
#### Batch size constraints
Each block processes at most 100 unbonding completions through system transactions. This limit exists to prevent unbounded block sizes during periods of high unbonding activity.
In practice, 100 completions per block provides throughput of \~9000 completions per minute assuming the average block time of 0.7 seconds. Normal staking activity rarely reaches this limit. During exceptional circumstances, completions might queue for several blocks before fully processing.
#### Gas consumption
System transactions consume gas during execution, which is accounted for in the block's gas limit. The gas cost scales linearly with the number of completions being processed:
* Base function call: \~21,000 gas
* Per-event emission: \~3,000 gas
* Reading state: \~2,000 gas per completion
A full batch of 100 completions consumes approximately 521,000 gas. As Stable’s block gas limit is 100,000,000, this represents less than 0.6% of available block space.
#### Notification latency
When an unbonding period completes during block N:
1. The Stable module's `EndBlock` queues the completion in block N's state
2. Block N+1's `PrepareProposal` creates a system transaction
3. The system transaction executes during block N+1, emitting the event
This means there's a one-block delay (approximately 0.7 seconds) between the unbonding completing and the EVM event being emitted. For most use cases, this latency is acceptable since the unbonding period itself is 7 days.
#### High load scenarios
If unbonding completions arrive faster than 100 per block, they accumulate in the queue. The queue is processed in FIFO order, so the oldest completions are always notified first.
During sustained high load, the queue could grow temporarily. However, once the spike subsides, subsequent blocks with fewer completions will gradually drain the queue. The system is designed to handle bursts without dropping events.
### Future extensions
The system transaction mechanism provides a general pattern for bridging any Stable SDK operation into the EVM event space. While currently used only for unbonding completions, the architecture can be extended to cover additional use cases:
#### Staking operations
Beyond unbonding, other staking events could emit EVM notifications:
* Commission rate changes by validators
* Validator jailing and unjailing
#### Governance execution
When governance proposals pass and execute, system transactions could emit events with proposal IDs and execution results. This would allow dApps to react to parameter changes or upgrades without polling the governance module.
#### Generic event bridge
The pattern could be generalized into a configurable event bridge where each module registers which SDK events should be mirrored to the EVM. This would provide comprehensive visibility into all Stable SDK operations without requiring per-module custom logic. The key architectural principle is that system transactions remain a protocol-level feature, created only by validators during block proposal.
## Ecosystem
In this document, you can find the information for bridge (LayerZero) and USDT0.
### LayerZero on Stable Testnet
| Name | Value |
| ----------------- | ------------------------------------------ |
| eid | 40374 |
| chainKey | stable-testnet |
| stage | testnet |
| endpointV2View | 0x6Ac7bdc07A0583A362F1497252872AE6c0A5F5B8 |
| endpointV2 | 0x3aCAAf60502791D199a5a5F0B173D78229eBFe32 |
| sendUln302 | 0x9eCf72299027e8AeFee5DC5351D6d92294F46d2b |
| receiveUln302 | 0xB0487596a0B62D1A71D0C33294bd6eB635Fc6B09 |
| blockedMessageLib | 0xa229b65cc2191bf60bc24efcda3487d7b5c0c9f0 |
| executor | 0x701f3927871EfcEa1235dB722f9E608aE120d243 |
| deadDVN | 0xC1868e054425D378095A003EcbA3823a5D0135C9 |
### USDT0 on Stable Testnet
| Name | Value |
| ----------- | ------------------------------------------ |
| wrapper | 0xB8CE59FC3717ada4C02eaDF9682A9e934F625ebb |
| composer | 0xe7cd86e13AC4309349F30B3435a9d337750fC82D |
| OFT | 0x779Ded0c9e1022225f8E0630b35a9b54bE713736 |
| USDT0 impl | 0x3f9E27457ac494fC729beB50e6af04Ec34e3828E |
| USDT0 proxy | 0x78Cf24370174180738C5B8E352B6D14c83a6c9A9 |
### Sepolia OFT contract and USDT0 contract (for reference)
| Name | Value |
| ------------ | ---------------------------------------------------------------------------------------------------------------------------------------------------------------------------------------------- |
| Sepolia OFT | [https://sepolia.etherscan.io/address/0xc099cd946d5efcc35a99d64e808c1430cef08126](https://sepolia.etherscan.io/address/0xc099cd946d5efcc35a99d64e808c1430cef08126) |
| Sepolia USDT | [https://sepolia.etherscan.io/address/0xc4DCC311c028e341fd8602D8eB89c5de94625927#writeContract](https://sepolia.etherscan.io/address/0xc4DCC311c028e341fd8602D8eB89c5de94625927#writeContract) |
## Testnet information
Everything you need to know to access the Stable Testnet.
### Network overview
| Configuration | Value |
| ---------------- | -------------- |
| **Network Name** | Stable Testnet |
| **Chain ID** | `2201` |
| **Gas Token** | USDT0 |
| **Gov Token** | STABLE |
| **Block Time** | \~0.7 seconds |
### Block explorers
| Explorer | URL |
| -------------- | ---------------------------------------------------------------- |
| **Stablescan** | [https://testnet.stablescan.xyz](https://testnet.stablescan.xyz) |
### RPC endpoints
#### Primary endpoints
| Type | Endpoint | Purpose |
| ---------------- | ---------------------------------------------------------------- | ----------------- |
| **EVM JSON-RPC** | [https://rpc.testnet.stable.xyz](https://rpc.testnet.stable.xyz) | EVM transactions |
| **WebSocket** | wss\://rpc.testnet.stable.xyz | Real-time updates |
:::note
The public RPC endpoint is rate-limited to **1,000 requests per 10 seconds per IP**. Requests over the limit return `HTTP 429`. For higher throughput, use a [third-party RPC provider](/en/reference/rpc-providers).
:::
### Chain information
| Parameter | EVM |
| ------------------ | ------- |
| **Chain ID** | `2201` |
| **Address Format** | `0x...` |
| **Gas Token** | `USDT0` |
| **Decimals** | 18 |
### Faucet & tools
| Tool | URL | Description |
| ------------- | --------------------------------------------------------- | --------------- |
| **Faucet** | [https://faucet.stable.xyz](https://faucet.stable.xyz) | Get test tokens |
| **Snapshots** | See [Node Operators Guide](/en/how-to/use-node-snapshots) | Chain snapshots |
## Version history
Complete version history and related documentation for the Stable Testnet.
### Current version information
* **Current Version**: `v1.3.1-rc0`
* **Next Upgrade**: `TBD`
* **Upgrade Height**: `TBD`
* **Expected Time**: `TBD`
### Version history
#### Current & previous versions
| Version | Commit | Upgrade Height | Binary | Status |
| -------------- | ---------- | -------------- | --------------------------------------------------------------------------------------------------------------------------------------------------------------------------------------------------------------------------------------------------- | ----------------------------- |
| **v1.3.1-rc0** | `75bb546` | - | [AMD64](https://stable-data-dist.s3.us-east-1.amazonaws.com/testnet/binary/stabled-1.3.1-rc0-linux-amd64-testnet.tar.gz) / [ARM64](https://stable-data-dist.s3.us-east-1.amazonaws.com/testnet/binary/stabled-1.3.1-rc0-linux-arm64-testnet.tar.gz) | Current |
| **v1.3.0-rc1** | `25b5e47` | 53,265,500 | [AMD64](https://stable-data-dist.s3.us-east-1.amazonaws.com/testnet/binary/stabled-1.3.0-rc1-linux-amd64-testnet.tar.gz) / [ARM64](https://stable-data-dist.s3.us-east-1.amazonaws.com/testnet/binary/stabled-1.3.0-rc1-linux-arm64-testnet.tar.gz) | |
| **v1.3.0-rc0** | `864d54c` | 49,855,000 | [AMD64](https://stable-data-dist.s3.us-east-1.amazonaws.com/testnet/binary/stabled-1.3.0-rc0-linux-amd64-testnet.tar.gz) / [ARM64](https://stable-data-dist.s3.us-east-1.amazonaws.com/testnet/binary/stabled-1.3.0-rc0-linux-arm64-testnet.tar.gz) | |
| **v1.2.2-rc0** | `8bd5d5e` | - | [AMD64](https://stable-data-dist.s3.us-east-1.amazonaws.com/testnet/binary/stabled-1.2.2-rc0-linux-amd64-testnet.tar.gz) / [ARM64](https://stable-data-dist.s3.us-east-1.amazonaws.com/testnet/binary/stabled-1.2.2-rc0-linux-arm64-testnet.tar.gz) | |
| **v1.2.1-rc1** | `7ff9a8a` | - | [AMD64](https://stable-data-dist.s3.us-east-1.amazonaws.com/testnet/binary/stabled-1.2.1-rc1-linux-amd64-testnet.tar.gz) / [ARM64](https://stable-data-dist.s3.us-east-1.amazonaws.com/testnet/binary/stabled-1.2.1-rc1-linux-arm64-testnet.tar.gz) | |
| **v1.2.0-rc1** | `263c033` | 41,306,450 | [AMD64](https://stable-data-dist.s3.us-east-1.amazonaws.com/testnet/binary/stabled-1.2.0-rc1-linux-amd64-testnet.tar.gz) / [ARM64](https://stable-data-dist.s3.us-east-1.amazonaws.com/testnet/binary/stabled-1.2.0-rc1-linux-arm64-testnet.tar.gz) | |
| **v1.2.0** | `ee8ca35` | 40,392,500 | [AMD64](https://stable-data-dist.s3.us-east-1.amazonaws.com/testnet/binary/stabled-1.2.0-linux-amd64-testnet.tar.gz) / [ARM64](https://stable-data-dist.s3.us-east-1.amazonaws.com/testnet/binary/stabled-1.2.0-linux-arm64-testnet.tar.gz) | |
| **v1.1.2** | `3d83aa3` | 34,649,300 | [AMD64](https://stable-data-dist.s3.us-east-1.amazonaws.com/testnet/binary/stabled-1.1.2-linux-amd64-testnet.tar.gz) / [ARM64](https://stable-data-dist.s3.us-east-1.amazonaws.com/testnet/binary/stabled-1.1.2-linux-arm64-testnet.tar.gz) | |
| **v1.1.1** | `8becd6b` | 33,152,000 | [AMD64](https://stable-data-dist.s3.us-east-1.amazonaws.com/testnet/binary/stabled-1.1.1-linux-amd64-testnet.tar.gz) / [ARM64](https://stable-data-dist.s3.us-east-1.amazonaws.com/testnet/binary/stabled-1.1.1-linux-arm64-testnet.tar.gz) | |
| **v1.1.0** | `17ceaa7` | 32,309,700 | [AMD64](https://stable-data-dist.s3.us-east-1.amazonaws.com/testnet/binary/stabled-1.1.0-linux-amd64-testnet.tar.gz) / [ARM64](https://stable-data-dist.s3.us-east-1.amazonaws.com/testnet/binary/stabled-1.1.0-linux-arm64-testnet.tar.gz) | |
| **v0.8.1** | `1eb65d5` | 30,770,000 | [AMD64](https://stable-data-dist.s3.us-east-1.amazonaws.com/testnet/binary/stabled-0.8.1-linux-amd64-testnet.tar.gz) / [ARM64](https://stable-data-dist.s3.us-east-1.amazonaws.com/testnet/binary/stabled-0.8.1-linux-arm64-testnet.tar.gz) | |
| **v0.8.0** | `e55efb6` | 29,410,999 | [AMD64](https://stable-data-dist.s3.us-east-1.amazonaws.com/testnet/binary/stabled-0.8.0-linux-amd64-testnet.tar.gz) / [ARM64](https://stable-data-dist.s3.us-east-1.amazonaws.com/testnet/binary/stabled-0.8.0-linux-arm64-testnet.tar.gz) | Bank precompile enhancements |
| **v0.7.2** | `3c53e14` | 27,258,000 | [AMD64](https://stable-data-dist.s3.us-east-1.amazonaws.com/testnet/binary/stabled-0.7.2-linux-amd64-testnet.tar.gz) / [ARM64](https://stable-data-dist.s3.us-east-1.amazonaws.com/testnet/binary/stabled-0.7.2-linux-arm64-testnet.tar.gz) | StableBFT integration |
| **v0.6.0** | `5cc1ad6` | 19,587,000 | [AMD64](https://stable-data-dist.s3.us-east-1.amazonaws.com/testnet/binary/stabled-0.6.0-linux-amd64-testnet.tar.gz) | Minor fixes |
| **v0.5.0** | `919281d` | 18,719,000 | [AMD64](https://stable-data-dist.s3.us-east-1.amazonaws.com/testnet/binary/stabled-0.5.0-linux-amd64-testnet.tar.gz) | Minor fixes |
| **v0.4.0** | `c6240c0` | 18,666,150 | [AMD64](https://stable-data-dist.s3.us-east-1.amazonaws.com/testnet/binary/stabled-0.4.0-linux-amd64-testnet.tar.gz) | Stable SDK v0.53.4 |
| **v0.3.0** | `a4f5ac5` | 9,166,131 | [AMD64](https://stable-data-dist.s3.us-east-1.amazonaws.com/testnet/binary/stabled-0.3.0-linux-amd64-testnet.tar.gz) | EVM value transfer allow list |
| **v0.2.1** | `53e6e073` | - | [AMD64](https://stable-data-dist.s3.us-east-1.amazonaws.com/testnet/binary/stabled-0.2.1-linux-amd64-testnet.tar.gz) | Non-breaking update |
| **v0.2.0** | `8bdd771` | 8,956,584 | [AMD64](https://stable-data-dist.s3.us-east-1.amazonaws.com/testnet/binary/stabled-0.2.0-linux-amd64-testnet.tar.gz) | Feature update |
| **v0.1.0** | `10dfg542` | Genesis | [AMD64](https://stable-data-dist.s3.us-east-1.amazonaws.com/testnet/binary/stabled-0.1.0-linux-amd64-testnet.tar.gz) | Genesis (2025-04-07) |
### Related documentation
* [Upgrade Guide](/en/how-to/upgrade-node) - Step-by-step upgrade procedures
* [Testnet Information](/en/reference/testnet-information) - Current network details
## Tokenomics
STABLE is the governance token of the Stable Mainnet. It secures the network through delegated Proof-of-Stake, governs protocol upgrades, and entitles stakers to a share of USDT0 gas revenue distributed by validators.
### Overview
| Item | Details |
| :--------------- | :----------------------------- |
| **Symbol** | STABLE |
| **Total supply** | 100,000,000,000 tokens |
| **Standard** | ERC-20 (on Stable Mainnet EVM) |
| **Decimals** | 18 |
STABLE is the governance token of the Stable Mainnet and Ecosystem, designed to support long-term economic alignment across validators, developers, and users.
***
### Token allocation
**Total supply:** 100,000,000,000 STABLE tokens
| Category | Allocation | Amount of STABLE |
| :------------------------ | :--------- | :--------------- |
| **Investors & advisors** | 25% | 25,000,000,000 |
| **Team** | 25% | 25,000,000,000 |
| **Ecosystem & community** | 40% | 40,000,000,000 |
| **Genesis distribution** | 10% | 10,000,000,000 |
| **Total** | 100% | 100,000,000,000 |
***
### Emission model & supply schedule
* Total supply is fixed at 100,000,000,000 STABLE tokens.
* Only a portion of supply enters circulation at launch of the Stable Mainnet.
* Team and Investors & advisors allocations follow a 4-year linear vesting model, with a 1-year cliff, to ensure long-term commitment.
***
### Allocations
#### Genesis distribution - 10% of total token supply
* Designed to bootstrap usage, provide liquidity to market, conduct airdrop events, reward early supporters and campaigns with exchanges and ecosystem partners.
**Vesting schedule**
* 100% unlocked at the Stable Mainnet launch
#### Ecosystem & community - 40% of total token supply
Supports long-term ecosystem and community growth:
* Support the development of the Stable software and ecosystem
* Developer grants
* User onboarding incentives
* Payment partner integrations
* On-chain activity rewards
* Hackathons, ambassador programs
* Infrastructure grants
**Vesting schedule**
* **Initial unlock:** 8% of total supply unlocked at the Stable Mainnet launch. These tokens fund incentives for strategic launch partners, liquidity needs, and early ecosystem growth campaigns.
* **Total vesting period:** 3-year linear vesting thereafter for the 32% of total supply
#### Team - 25% of total token supply
* Allocated to founding team members, engineers, researchers, and contributors
* Designed to ensure long-term alignment between the team and the Stable ecosystem.
**Vesting schedule**
* **1-year cliff:** No tokens are unlocked in the first 12 months
* **Total vesting period:** 48 months linear vesting from the Stable Mainnet launch
#### Investors & advisors - 25% of total token supply
* Allocated for fundraising rounds and advisory support.
**Vesting schedule**
* **1-year cliff:** No tokens are unlocked in the first 12 months
* **Total vesting period:** 48 months linear vesting from the Stable Mainnet launch
***
### Emissions chart
***
### Economic design principles
Stable's token economics were designed around three foundational goals:
#### 1. Power a payments-optimized Layer 1
The STABLE token incentivizes high-throughput, low-latency infrastructure, supporting sub-second block confirmations and enterprise settlement guarantees.
#### 2. Support sustainable ecosystem growth
40% of total token supply is dedicated to long-term growth, focusing on key development and growth areas.
* Developer grants
* Partner integrations
* New ecosystem applications
#### 3. Align long-term contributors via vesting
The team allocation uses a 4-year linear vesting model, with a 1-year cliff, ensuring long-term alignment and continued contributions toward network development.
***
### Utility of the STABLE token
The STABLE Token is an ERC-20 governance token on the Stable Mainnet. It can be used for:
* Electing validators
* Voting on protocol upgrades
* Handling governance proposals
* Serving as a credential to receive gas fee distribution from validators
On the Stable network, all transactions use USDT0 as the native gas token. These USDT0 gas fees are collected into a treasury managed by smart contracts. When token holders stake their STABLE tokens to validators, validators may choose to distribute gas fees from the treasury proportionally to stakers.
## Wallets
### Wallets overview table
| **Provider** | **Category** | **Security Method** | **Docs / Get Started** | **Notes** |
| :----------------------------------------------------------------- | :---------------------------------------- | :------------------------------------------------------ | :----------------------------------------------------------------------------------------------------------------------------------------------------------------------------------------- | :----------------------------------------------------------------------------------------------------------------------------------------------------- |
| Stable Pay | User Wallet | TSS-MPC-based self-custody | [https://blog.stable.xyz/introducing-stable-pay-the-stablecoin-payment-wallet-on-stablechain](https://blog.stable.xyz/introducing-stable-pay-the-stablecoin-payment-wallet-on-stablechain) | USDT-native payment wallet built on Stable; optimized for instant transfers |
| [Wallet Development Kit by Tether (WDK)](https://wallet.tether.io) | Wallet SDK | Self-custody | [https://docs.wallet.tether.io](https://docs.wallet.tether.io) | Tether's open-source SDK for building self-custodial wallets across multi-chain |
| [Binance Wallet](https://www.binance.com/en/web3wallet) | User Wallet | MPC-based self-custody / semi-custody wallet | [https://developers.binance.com/docs/binance-spot-api-docs/README](https://developers.binance.com/docs/binance-spot-api-docs/README) | Multi-chain wallet, supports Stable USDT |
| [Reown](https://reown.com/) (formerly WalletConnect / WalletKit) | Connectivity / Wallet Infra | Protocol-level signing & secure relay | [https://docs.reown.com/appkit/overview](https://docs.reown.com/appkit/overview) | Supports 600+ wallets, multi-chain, SDK-based integration, ideal for embedded wallet flows |
| [Bitget Wallet](https://web3.bitget.com/en) | User Wallet | Non-custodial wallet (private keys managed by user) | [https://web3.bitget.com/en/docs/](https://web3.bitget.com/en/docs/) | Built-in dApp browser; multi-asset & multi-chain support |
| [Gate Wallet](https://www.gate.com/) (Gate Onchain) | User Wallet | Exchange-linked wallet | [https://www.gate.com/](https://www.gate.com/) | Exchange-linked wallet; suitable for CEX ↔ wallet flows |
| [OKX Wallet](https://web3.okx.com/) (OKX Onchain) | User Wallet | Non-custodial / MPC for recovery | [https://www.okx.com/earn/onchain-earn](https://www.okx.com/earn/onchain-earn) | Multi-chain wallet with exchange integration |
| [Anchorage](https://www.anchorage.com/) | Custodial / Institutional Wallet | Bank-grade regulated custody (federally chartered bank) | [https://www.anchorage.com/who-we-serve](https://www.anchorage.com/who-we-serve) | Institutional-grade custody for stable assets |
| [Dynamic](https://www.dynamic.xyz/) | Embedded / In-App Wallet Infra | Managed-key / custody-infra via SDK or backend | [https://www.dynamic.xyz/docs/introduction/welcome](https://www.dynamic.xyz/docs/introduction/welcome) | Enables apps to embed wallet flows without external wallets |
| [Alchemy](https://www.alchemy.com/) | Smart Wallets & Account Abstraction Infra | Bundler + Paymaster infrastructure (ERC-4337) | [https://docs.alchemy.com](https://docs.alchemy.com) | Powers AA wallets; supports sponsored gas, smart accounts |
| [Atomic Wallet](https://atomicwallet.io/) | User Wallet | Non-custodial (keys stored on user device) | [https://atomicwallet.io/assets-status](https://atomicwallet.io/assets-status) | Multi-asset mobile, desktop, and browser-extension wallet; buy USDT on Stable via the built-in [Simplex](/en/reference/ramps#simplex-by-nuvei) on-ramp |
### Category guide
* **User Wallets:** These are traditional consumer-facing wallets such as mobile apps, browser extensions, or exchange-linked wallets. They allow users to hold USDT, make transfers, connect to dApps, and interact directly with Stable.
* **Wallet SDK:** A software development kit that provides developers with prebuilt tools, APIs, and infrastructure to integrate wallet creation, key management, transaction signing, and blockchain interactions directly into their applications.
* **Custodial / Institutional Wallets:** Platforms providing regulated, enterprise-grade asset custody for institutions. These solutions focus on compliance, governance controls, secure key management, and treasury operations rather than end-user flows.
* **Embedded / In-App Wallets:** Wallets generated inside applications through SDKs or backend systems. These enable seamless onboarding for mainstream users without requiring them to install or understand external crypto wallets.
* **Smart Wallets / Account Abstraction:** Programmable wallets that support custom logic such as gasless transactions, bundled operations, or automated execution. These extend basic wallet functionality with developer-defined behaviors.
* **MPC Wallet Providers:** Key-management systems using multi-party computation (MPC) to distribute private key control across multiple parties or devices. Ideal for apps or enterprises needing high-security custody without traditional seed phrases.
* **Connectivity Providers:** Protocols such as WalletConnect (Reown) that connect wallets and dApps. They don't store assets or act as wallets themselves; instead, they provide secure communication channels for transaction signing and interaction.
### 1. User wallets
These are end-user wallets offered by major global exchanges. They allow users to hold USDT, transfer funds, and connect to applications on Stable.
#### Stable Pay
A non-custodial payment wallet built on Stable, designed for fast, stablecoin-native transactions. Stable Pay delivers instant USDT payments, predictable fees, and a simple user experience optimized for everyday transfers and commerce.
**Capabilities**
* Non-custodial wallet for Stable
* Instant USDT payments
* Predictable and consistent transaction costs
* Built directly on Stable’s USDT-native settlement layer
* Consumer-friendly UI designed for payments and commerce
#### Binance Wallet
A widely used multi-chain wallet integrated with the world’s largest exchange by volume.
**Capabilities**
* Supports Stable USDT
* Direct integration with Binance ecosystem
* Mobile and extension wallet options
#### Bitget Wallet
A multi-asset wallet connected to the Bitget exchange ecosystem, supporting crypto, stocks, and ETFs.
**Capabilities**
* Supports Stable USDT
* Built-in dApp browser
* Seamless integration with Bitget trading accounts
#### Gate Wallet (Gate Onchain)
A wallet product backed by one of the largest spot exchanges globally.
**Capabilities**
* Supports Stable USDT
* Easy transfers between Gate exchange and wallet
* dApp and web-app connectivity
#### OKX Wallet (OKX Onchain)
A powerful, multi-chain wallet used globally.
**Capabilities**
* Supports Stable USDT
* Deep OKX ecosystem integration
* Web, mobile, and extension wallet options
#### Atomic Wallet
A non-custodial multi-asset wallet available on desktop, mobile, and as a browser extension. Atomic Wallet integrates the [Simplex by Nuvei](/en/reference/ramps#simplex-by-nuvei) on-ramp, so users can buy USDT on Stable directly inside the app with cards, Apple Pay, Google Pay, or bank transfer.
**Capabilities**
* Holds, sends, and receives USDT on Stable
* Private keys stored locally on the user device
* In-app buy flow for USDT on Stable via Simplex
* Available on Windows, macOS, Linux, iOS, Android, and Chrome
**Get started**: Download Atomic Wallet from [atomicwallet.io](https://atomicwallet.io/downloads), add Stable as a network, and use the in-app Buy flow to purchase USDT on Stable through Simplex.
### 2. Wallet SDK
#### Development Kit by Tether (WDK)
An open-source SDK from Tether for building self-custodial wallets across any platform and blockchain.
**Capabilities**
* Multi-Chain Support: Bitcoin, Ethereum, TON, TRON, Solana, Spark, and more
* Agentic Wallets: Native support for AI agent wallets and x402 payments on Stable
* DeFi Integration: Plug-in support for swaps, bridges, and lending protocols
* Extensible Design: Add custom modules for new blockchains or protocols
**Get started**: Install [`@tetherto/wdk`](https://www.npmjs.com/package/@tetherto/wdk) and [`@tetherto/wdk-wallet-evm`](https://www.npmjs.com/package/@tetherto/wdk-wallet-evm), then follow the [WDK documentation](https://docs.wallet.tether.io) to configure Stable as your target chain.
### 3. Custodial & institutional wallets
#### Anchorage
A federally chartered national bank providing institutional-grade custody for digital assets.
**Capabilities**
* Secure custody for Stable USDT
* Full compliance and regulatory oversight
* Enterprise-grade key management and access controls
### 4. Embedded / in-app wallets
Wallets embedded directly into applications via SDKs, enabling seamless user onboarding and payment flows.
#### Dynamic
Enterprise-grade wallet infrastructure serving thousands of applications and over 40M users.
**Capabilities**
* Wallet creation and authentication
* Embedded wallet flows
* User onboarding for apps and fintechs
**Get started**: Follow the [Dynamic SDK setup docs](https://docs.dynamic.xyz/introduction/welcome) to install the SDK and configure Stable as a supported network in your app.
#### Reown (formerly WalletConnect)
A widely adopted standard for connecting wallets to applications.
**Capabilities**
* Secure wallet-to-dApp connections
* Supports mobile, desktop, and extension wallets
* Broad ecosystem compatibility
**Reown SDK for wallet onboarding**
Stable supports integrations with the **Reown SDK** to help developers deliver seamless wallet and onboarding experiences for users.
Reown provides an open-source, all-in-one SDK that serves as the official gateway to the WalletConnect Network. It enables smooth wallet connections, transactions, logins, embedded wallets (email and social login), on-chain payments, in-app swaps, and more within your application.
**Get Started**
* Visit Reown's documentation: [https://docs.reown.com/overview](https://docs.reown.com/overview)
### 5. Smart wallets & account abstraction
Infrastructure enabling programmable wallets, gasless transactions, spending rules, and advanced UX.
#### Overview table
| **Provider** | **Category** | **Security Method** | **Docs / Get Started** | **Notes** |
| :------------------------------------------ | :------------------------------------ | :------------------------------------- | :------------------------------------------------------------------------------------- | :------------------------------------ |
| [**Holdstation**](https://holdstation.com/) | Smart Wallet (AA) | Smart contract wallet + biometric auth | [https://docs.holdstation.com/holdstation/](https://docs.holdstation.com/holdstation/) | Gasless flows, DeFi-native wallet |
| [**Daimo**](https://pay.daimo.com/) | AA Payments Wallet | Smart account, no seed phrase | [https://paydocs.daimo.com/](https://paydocs.daimo.com/) | One-click payments, stablecoin-first |
| [**Alchemy**](https://alchemy.com) | AA Infrastructure (Bundler/Paymaster) | Bundler + paymaster infra (ERC-4337) | [https://docs.alchemy.com](https://docs.alchemy.com) | Enables AA wallets to build on Stable |
#### Alchemy
Alchemy provides the core AA infrastructure and APIs needed to deploy smart accounts, sponsor gas, and build consumer-grade wallets.
**Capabilities**
* Smart account SDK & APIs
* Paymaster support for gasless actions
* Gas abstraction tooling
* Scalable infra for smart wallet developers
**Get started**: Use the [Alchemy smart account SDK](https://docs.alchemy.com) to deploy ERC-4337 smart accounts and configure a paymaster for sponsored gas on Stable.
**Docs**\
[https://docs.alchemy.com](https://docs.alchemy.com)
#### Holdstation
A smart contract wallet offering account abstraction and biometric-secured interactions.\
**Capabilities**
* Full AA-enabled smart wallet
* Gasless transactions and sponsored fees
* Biometric authorization and session keys
* Integrated trading and DeFi execution layer
**Get started**: Explore the [Holdstation developer docs](https://docs.holdstation.com/holdstation/) to integrate smart wallet flows and sponsored transactions into your application.
#### Daimo
A consumer-grade, account-abstraction wallet designed for instant stablecoin spending and payments.\
**Capabilities**
* AA-based UX with smart wallet execution
* One-click payments across any chain
* No seed phrases; secure key recovery
* Ideal for payments apps and stablecoin utilities
**Get started**: Visit the [Daimo Pay documentation](https://paydocs.daimo.com/) to add one-click stablecoin payment flows to your application on Stable.
### Stable network setup
#### Adding Stable to your wallet
**Network parameters :**
* **Network Name:** Stable
* **Chain ID:** 988
* **Currency:** USDT0
* **RPC URL:** [https://rpc.stable.xyz](https://rpc.stable.xyz)
* **Block Explorer:** [https://stablescan.xyz](https://stablescan.xyz)
#### Building wallet integrations
You can add Stable support by:
* Enabling signing and gas estimation via Stable RPC
* Supporting USDT-native transfers
* Integrating WalletConnect for dApps
* Adding Stable to chain lists or metadata registries
### Have a wallet integrating Stable?
You can reach the team at [bizdev@stable.xyz](mailto\:bizdev@stable.xyz) to be listed in this section.
## Account abstraction with EIP-7702
This guide walks through applying EIP-7702 to an EOA and using the delegation for three patterns: batch payments, spending limits, and session keys. The EOA keeps its address and private key throughout.
:::note
**Concept:** For what EIP-7702 enables on Stable and the security considerations, see [EIP-7702](/en/explanation/eip-7702).
:::
### Prerequisites
* Understanding of EOA vs. smart contract accounts (EOAs have no code by default).
* Familiarity with EVM transaction types ([EIP-2718](https://eips.ethereum.org/EIPS/eip-2718)).
### Overview
EIP-7702 introduces a new transaction type (`0x04`) that carries an `authorizationList`. Each authorization designates a smart contract whose code the EOA will execute for that transaction. The flow is:
1. **Choose or deploy a delegate contract**: a standard Solidity contract implementing the logic you want EOAs to use. You can use a deployed contract or deploy your own. Use an audited contract whenever possible.
2. **Sign an authorization**: the EOA owner signs a message authorizing the delegate contract.
3. **Submit an EIP-7702 transaction**: the transaction includes the authorization, and the EOA runs the delegate's code during execution.
### Use case: batch transactions
The steps below walk through this flow using `Multicall3` as the delegate contract. `Multicall3` is a widely deployed utility contract that aggregates multiple calls into a single transaction. By designating `Multicall3` as the EIP-7702 delegate, an EOA can batch arbitrary contract interactions (token transfers, approvals, contract reads, or any combination) into one atomic transaction. Batch payments are one example: instead of sending ten separate transactions for a payroll run, the EOA executes them all at once.
#### Step 1: Use Multicall3 as a delegate contract
`Multicall3` is deployed at `0xcA11bde05977b3631167028862bE2a173976CA11` on Stable. Since it's already deployed and widely used, you don't need to deploy your own delegate. Signing an EIP-7702 authorization grants the delegate full execution authority over your EOA.
```solidity
// Multicall3 interface (relevant functions only)
interface IMulticall3 {
struct Call3 {
address target;
bool allowFailure;
bytes callData;
}
struct Result {
bool success;
bytes returnData;
}
/// @notice Aggregate calls, allowing each to succeed or fail independently
function aggregate3(Call3[] calldata calls)
external payable returns (Result[] memory returnData);
}
```
#### Step 2: Sign an authorization
The EOA owner signs an authorization that designates the delegate contract. This authorization is included in the EIP-7702 transaction.
```javascript
// config.ts
import { ethers } from "ethers";
export const STABLE_TESTNET_RPC = "https://rpc.testnet.stable.xyz";
export const STABLE_TESTNET_CHAIN_ID = 2201;
export const USDT0_ADDRESS = "0x78Cf24370174180738C5B8E352B6D14c83a6c9A9";
export const DELEGATE_ADDRESS = "0xcA11bde05977b3631167028862bE2a173976CA11";
export const provider = new ethers.JsonRpcProvider(STABLE_TESTNET_RPC);
export const wallet = new ethers.Wallet(process.env.PRIVATE_KEY, provider);
```
```javascript
// signAuthorization.ts
import { ethers } from "ethers";
import { DELEGATE_ADDRESS, STABLE_TESTNET_CHAIN_ID, provider, wallet } from "./config";
export async function signAuthorization() {
const authorization = {
chainId: STABLE_TESTNET_CHAIN_ID,
address: DELEGATE_ADDRESS,
nonce: await provider.getTransactionCount(wallet.address),
};
return wallet.signAuthorization(authorization);
}
```
#### Step 3: Submit an EIP-7702 transaction
Combine the authorization with a call to `Multicall3.aggregate3`. This example batches three USDT0 transfers in a single transaction.
```javascript
import { ethers } from "ethers";
import { wallet, USDT0_ADDRESS } from "./config";
import { signAuthorization } from "./signAuthorization";
const usdt0Interface = new ethers.Interface([
"function transfer(address to, uint256 amount)",
]);
const batchInterface = new ethers.Interface([
"function aggregate3((address target, bool allowFailure, bytes callData)[] calls) returns ((bool success, bytes returnData)[])",
]);
async function main() {
const recipients = [
{ to: "0xAlice...", amount: ethers.parseUnits("100", 6) },
{ to: "0xBob...", amount: ethers.parseUnits("200", 6) },
{ to: "0xCarol...", amount: ethers.parseUnits("150", 6) },
];
const batchData = batchInterface.encodeFunctionData("aggregate3", [
recipients.map(({ to, amount }) => ({
target: USDT0_ADDRESS,
allowFailure: false,
callData: usdt0Interface.encodeFunctionData("transfer", [to, amount]),
})),
]);
const signedAuth = await signAuthorization();
const tx = await wallet.sendTransaction({
type: 4, // EIP-7702 transaction type
to: wallet.address, // call is directed at the EOA itself
data: batchData, // aggregate3 call to execute
authorizationList: [signedAuth],
maxPriorityFeePerGas: 0n,
});
const receipt = await tx.wait(1);
console.log("Batch transactions executed in tx:", receipt.hash);
}
```
```text
Batch transactions executed in tx: 0x...
```
The EOA executes all three calls in a single atomic transaction via `Multicall3.aggregate3`. The delegation persists until explicitly changed or cleared. While this example shows batch payments, the same pattern works for any combination of contract calls.
### Use case: spending limits
A delegate contract can enforce per-transaction or daily caps on an EOA without account migration.
```solidity
// SPDX-License-Identifier: MIT
pragma solidity ^0.8.24;
/// @title SpendingLimitExecutor
/// @notice Delegate contract that enforces daily spending caps
contract SpendingLimitExecutor {
mapping(address => uint256) public dailyLimit;
mapping(address => uint256) public spentToday;
mapping(address => uint256) public lastResetDay;
function setDailyLimit(uint256 limit) external {
dailyLimit[msg.sender] = limit;
}
function executeWithLimit(
address target,
uint256 value,
bytes calldata data
) external payable {
uint256 today = block.timestamp / 1 days;
if (today > lastResetDay[msg.sender]) {
spentToday[msg.sender] = 0;
lastResetDay[msg.sender] = today;
}
spentToday[msg.sender] += value;
require(
spentToday[msg.sender] <= dailyLimit[msg.sender],
"daily limit exceeded"
);
(bool success,) = target.call{value: value}(data);
require(success, "call failed");
}
}
```
### Use case: session keys
Session keys allow a dApp to execute transactions on behalf of an EOA within scoped permissions: a time window and an allowed set of target contracts. This is useful for dApps where frequent on-chain interactions would otherwise require repeated wallet approvals.
```solidity
// SPDX-License-Identifier: MIT
pragma solidity ^0.8.24;
/// @title SessionKeyExecutor
/// @notice Delegate contract that grants scoped, time-limited access to a session key
contract SessionKeyExecutor {
struct Session {
address key;
uint256 validUntil;
uint256 spendingLimit;
uint256 spent;
}
mapping(address => Session) public sessions;
mapping(address => mapping(address => bool)) public allowedTargets;
/// @notice Register a session key with scoped permissions
function startSession(
address key,
uint256 validUntil,
uint256 spendingLimit,
address[] calldata targets
) external {
sessions[msg.sender] = Session({
key: key,
validUntil: validUntil,
spendingLimit: spendingLimit,
spent: 0
});
for (uint256 i = 0; i < targets.length; i++) {
allowedTargets[msg.sender][targets[i]] = true;
}
}
/// @notice Execute a call using the session key
function executeAsSessionKey(
address owner,
address target,
uint256 value,
bytes calldata data
) external {
Session storage session = sessions[owner];
require(msg.sender == session.key, "not session key");
require(block.timestamp <= session.validUntil, "session expired");
require(allowedTargets[owner][target], "target not allowed");
uint256 beforeBalance = owner.balance;
(bool success,) = target.call{value: value}(data);
require(success, "call failed");
session.spent += owner.balance - beforeBalance;
require(session.spent <= session.spendingLimit, "budget exceeded");
}
/// @notice Revoke the active session
function revokeSession() external {
delete sessions[msg.sender];
}
}
```
### Important considerations
* **Persistent delegation**: the delegation persists until the EOA explicitly changes or clears it. It is not limited to a single transaction.
* **Gas costs**: EIP-7702 transactions have slightly higher base gas due to authorization processing, offset when the delegate batches multiple calls.
* **Use audited delegates**: a malicious delegate contract can drain the EOA's assets. Only delegate to contracts that have been audited.
### Key takeaways
* EIP-7702 lets EOAs execute smart contract logic without migrating to a new account type.
* On Stable, EIP-7702 enables batch payments, spending limits, and scoped session keys on existing EOAs.
* The delegation persists until explicitly changed. Always use an audited delegate contract.
### Next recommended
* [**Subscribe and collect**](/en/how-to/subscribe-and-collect) — Apply EIP-7702 to recurring subscription payments with a SubscriptionManager.
* [**EIP-7702 concept**](/en/explanation/eip-7702) — Understand the delegation model before you ship it.
* [**EIP-7702 reference**](/en/reference/eip-7702-api) — Look up the `0x04` transaction format and authorization fields.
## Build an MPP endpoint on Stable
This guide walks through writing a custom [MPP](/en/explanation/mpp) payment method for USDT0 on Stable and serving an MPP-gated endpoint. The buyer signs an [ERC-3009](/en/explanation/erc-3009) `transferWithAuthorization`, the server validates it through `mppx`'s `verify()` hook, and settlement happens in a separate step you control.
:::note
**Concept:** For what MPP is and how it relates to x402, see [Machine Payments Protocol (MPP)](/en/explanation/mpp). For the x402 equivalent, see [Build a pay-per-call API](/en/how-to/build-pay-per-call).
:::
:::note
The example uses Stable mainnet. Use small amounts when testing.
:::
### What you'll build
An HTTP endpoint that returns `402 Payment Required` with an MPP `WWW-Authenticate` challenge, accepts a signed credential in the `Authorization` header, verifies it, settles `transferWithAuthorization` on USDT0, and returns the response with a `Payment-Receipt` header.
```text
step 1. Client: GET /weather (no Authorization header)
Server: 402 Payment Required
WWW-Authenticate: Payment realm="...", challenges="[...usdt0-stable charge for $0.001...]"
step 2. Client signs an ERC-3009 authorization with their viem account
step 3. Client: GET /weather + Authorization header containing the serialized credential
Server: verify() validates the EIP-712 signature
Server: settle() submits transferWithAuthorization on Stable
(~700ms block confirmation)
Server: 200 OK { weather: "sunny" }
Payment-Receipt: reference="0x8f3a...", status="success"
step 4. Verify settlement on Stablescan
https://stablescan.xyz/tx/0x8f3a...
```
### Prerequisites
* A funded USDT0 wallet on Stable. See [Use the faucet](/en/how-to/use-faucet) or [Move USDT0](/en/tutorial/send-usdt0).
* Node 20+ with `mppx`, `viem`, and `zod` installed.
* A seller account (an EOA) on Stable. For the default settlement path, the seller pays gas in USDT0; the [Gas Waiver](#alternative-settle-through-the-gas-waiver) section shows the zero-gas variant.
```bash
npm install mppx viem zod express
```
### 1. Define the shared schema
`Method.from()` declares the intent and the schemas for the request (Challenge) and the credential payload. Both client and server import this definition.
```typescript
// src/method.ts
import { Method } from "mppx";
import { z } from "zod";
import { parseUnits } from "viem";
export const USDT0_STABLE = "0x779Ded0c9e1022225f8E0630b35a9b54bE713736";
export const CHAIN_ID = 988;
// Request: the Challenge payload the server sends to the client.
const zRequest = z.pipe(
z.object({
chainId: z.literal(CHAIN_ID),
asset: z.literal(USDT0_STABLE),
amount: z.string(), // human-readable, e.g. "0.001"
decimals: z.literal(6),
payTo: z.string().regex(/^0x[a-fA-F0-9]{40}$/),
validAfter: z.number().int().nonnegative(),
validBefore: z.number().int().positive(),
nonce: z.string().regex(/^0x[a-fA-F0-9]{64}$/),
}),
z.transform(({ amount, decimals, ...rest }) => ({
...rest,
amount: parseUnits(amount, decimals).toString(), // atomic units
})),
);
// Credential payload: what the client returns after signing.
const zPayload = z.object({
from: z.string().regex(/^0x[a-fA-F0-9]{40}$/),
signature: z.string().regex(/^0x[a-fA-F0-9]{130}$/), // 65-byte hex
});
export const usdt0Stable = Method.from({
intent: "charge",
name: "usdt0-stable",
schema: { request: zRequest, credential: { payload: zPayload } },
});
// EIP-712 domain + type, used by both client and server.
export const EIP712_DOMAIN = {
name: "USDT0",
version: "1",
chainId: CHAIN_ID,
verifyingContract: USDT0_STABLE,
} as const;
export const TRANSFER_WITH_AUTHORIZATION_TYPES = {
TransferWithAuthorization: [
{ name: "from", type: "address" },
{ name: "to", type: "address" },
{ name: "value", type: "uint256" },
{ name: "validAfter", type: "uint256" },
{ name: "validBefore", type: "uint256" },
{ name: "nonce", type: "bytes32" },
],
} as const;
```
```text
usdt0Stable.name === "usdt0-stable"
usdt0Stable.intent === "charge"
```
### 2. Server: verify the credential
`Method.toServer` wires `verify()` into `mppx`. The function receives the deserialized credential (challenge + payload) and must throw on invalid proofs or return a `Receipt`.
```typescript
// src/server-method.ts
import { Method, Receipt } from "mppx";
import { verifyTypedData } from "viem";
import {
usdt0Stable,
EIP712_DOMAIN,
TRANSFER_WITH_AUTHORIZATION_TYPES,
} from "./method";
export const usdt0StableServer = Method.toServer(usdt0Stable, {
async verify({ credential }) {
const { request } = credential.challenge;
const { from, signature } = credential.payload;
const valid = await verifyTypedData({
address: from as `0x${string}`,
domain: EIP712_DOMAIN,
types: TRANSFER_WITH_AUTHORIZATION_TYPES,
primaryType: "TransferWithAuthorization",
message: {
from: from as `0x${string}`,
to: request.payTo as `0x${string}`,
value: BigInt(request.amount),
validAfter: BigInt(request.validAfter),
validBefore: BigInt(request.validBefore),
nonce: request.nonce as `0x${string}`,
},
signature: signature as `0x${string}`,
});
if (!valid) throw new Error("Invalid ERC-3009 signature");
// The Receipt's reference is filled in with the tx hash after settle().
return Receipt.from({
method: usdt0Stable.name,
reference: "pending",
status: "success",
timestamp: new Date().toISOString(),
});
},
});
```
```text
{
method: "usdt0-stable",
reference: "pending",
status: "success",
timestamp: "2026-06-01T12:34:56.000Z"
}
```
:::warning
`verify()` checks the signature but does not check nonce uniqueness or whether the authorization has already been spent. The chain enforces both at submission time: `transferWithAuthorization` reverts on a used nonce. The settle step turns those reverts into errors the server can surface to the client.
:::
### 3. Settle: submit `transferWithAuthorization`
Settlement is intentionally separate from `verify()`. After `verify()` returns, you submit the authorization on-chain through whichever path fits your operational model. Three options, in order of recommendation.
#### Default: server submits directly
The seller's EOA submits `transferWithAuthorization` to USDT0 with the signed authorization. The seller pays gas in USDT0 (Stable's native gas token), so there is no separate gas-token balance to manage.
```typescript
// src/settle.ts
import { createWalletClient, http, parseSignature } from "viem";
import { privateKeyToAccount } from "viem/accounts";
import { stable } from "viem/chains";
import { USDT0_STABLE } from "./method";
const USDT0_ABI = [
{
name: "transferWithAuthorization",
type: "function",
stateMutability: "nonpayable",
inputs: [
{ name: "from", type: "address" },
{ name: "to", type: "address" },
{ name: "value", type: "uint256" },
{ name: "validAfter", type: "uint256" },
{ name: "validBefore", type: "uint256" },
{ name: "nonce", type: "bytes32" },
{ name: "v", type: "uint8" },
{ name: "r", type: "bytes32" },
{ name: "s", type: "bytes32" },
],
outputs: [],
},
] as const;
const seller = privateKeyToAccount(process.env.SELLER_KEY as `0x${string}`);
const wallet = createWalletClient({
account: seller,
chain: stable,
transport: http("https://rpc.stable.xyz"),
});
export async function settleDirect(credential: {
challenge: { request: any };
payload: { from: string; signature: string };
}): Promise<{ txHash: `0x${string}` }> {
const { request } = credential.challenge;
const { v, r, s } = parseSignature(credential.payload.signature as `0x${string}`);
const txHash = await wallet.writeContract({
address: USDT0_STABLE,
abi: USDT0_ABI,
functionName: "transferWithAuthorization",
args: [
credential.payload.from as `0x${string}`,
request.payTo as `0x${string}`,
BigInt(request.amount),
BigInt(request.validAfter),
BigInt(request.validBefore),
request.nonce as `0x${string}`,
Number(v),
r as `0x${string}`,
s as `0x${string}`,
],
});
return { txHash };
}
```
```text
{ txHash: "0x8f3a1b2c..." }
```
#### Alternative: settle through the Gas Waiver
Use Stable's [Gas Waiver](/en/how-to/integrate-gas-waiver) to submit the inner transaction at `gasPrice = 0`. The seller still signs the wrapping transaction, but pays no gas. Requires a Waiver Server API key.
```typescript
// src/settle-waiver.ts
import { encodeFunctionData } from "viem";
import { USDT0_STABLE } from "./method";
import { USDT0_ABI } from "./settle";
const WAIVER_SERVER = "https://waiver.stable.xyz"; // mainnet endpoint
export async function settleViaWaiver(
credential: { challenge: { request: any }; payload: { from: string; signature: string } },
signedInnerTxHex: `0x${string}`,
): Promise<{ txHash: `0x${string}` }> {
const res = await fetch(`${WAIVER_SERVER}/v1/submit`, {
method: "POST",
headers: {
"Content-Type": "application/json",
Authorization: `Bearer ${process.env.WAIVER_API_KEY}`,
},
body: JSON.stringify({ transactions: [signedInnerTxHex] }),
});
const lines = (await res.text()).trim().split("\n");
const result = JSON.parse(lines[0]);
if (!result.success) throw new Error(`Settle failed: ${result.error?.message}`);
return { txHash: result.txHash };
}
```
```text
{ txHash: "0x8f3a1b2c..." }
```
See [Gas waiver protocol](/en/reference/gas-waiver-api) for how to build the signed inner transaction (`gasPrice: 0`, encoded `transferWithAuthorization` call) before posting.
#### Alternative: hand off to an x402 facilitator
If you already operate an x402 facilitator integration ([Semantic Pay](https://docs.semanticpay.io) or [Heurist](https://docs.heurist.ai/x402-products/facilitator)), you can reuse it as a settlement target. POST a `paymentPayload` to `/settle`; the facilitator submits the on-chain call.
The exact `paymentPayload` shape is x402-middleware-internal and not specified at the wire level. The simplest path is to use the facilitator's own SDK to build the payload, or stick with the direct-submission path above. The facilitator does not need to speak MPP; it sees only the `transferWithAuthorization` fields.
### 4. Client: sign a credential
`Method.toClient` wires `createCredential()` into `mppx`. The client reads the Challenge, signs the EIP-712 authorization with the agent's viem account, and serializes the credential.
```typescript
// src/client-method.ts
import { Credential, Method } from "mppx";
import { hexToSignature, parseSignature } from "viem";
import { privateKeyToAccount } from "viem/accounts";
import {
usdt0Stable,
EIP712_DOMAIN,
TRANSFER_WITH_AUTHORIZATION_TYPES,
} from "./method";
export function createUsdt0StableClient(privateKey: `0x${string}`) {
const account = privateKeyToAccount(privateKey);
return Method.toClient(usdt0Stable, {
async createCredential({ challenge }) {
const { request } = challenge;
const signature = await account.signTypedData({
domain: EIP712_DOMAIN,
types: TRANSFER_WITH_AUTHORIZATION_TYPES,
primaryType: "TransferWithAuthorization",
message: {
from: account.address,
to: request.payTo as `0x${string}`,
value: BigInt(request.amount),
validAfter: BigInt(request.validAfter),
validBefore: BigInt(request.validBefore),
nonce: request.nonce as `0x${string}`,
},
});
return Credential.serialize({
challenge,
payload: { from: account.address, signature },
});
},
});
}
```
```text
"eyJjaGFsbGVuZ2UiOnsi..." // base64-serialized credential, ~600 bytes
```
### 5. Wire the server together
Use `mppx`'s Express middleware to issue Challenges, parse incoming `Authorization` headers, run `verify()`, call your settle function, and emit the `Payment-Receipt` header.
```typescript
// src/server.ts
import express from "express";
import { Mppx } from "mppx/express";
import { randomBytes } from "node:crypto";
import { usdt0StableServer } from "./server-method";
import { settleDirect } from "./settle";
const PAY_TO = process.env.PAY_TO_ADDRESS as `0x${string}`;
const PORT = Number(process.env.PORT ?? 4022);
const mppx = Mppx.create({
secretKey: process.env.MPP_SECRET_KEY!,
methods: [usdt0StableServer],
onVerified: async ({ credential, receipt }) => {
const { txHash } = await settleDirect(credential);
return { ...receipt, reference: txHash };
},
});
const app = express();
app.get(
"/weather",
mppx.charge({
amount: "0.001",
method: "usdt0-stable",
request: {
chainId: 988,
asset: "0x779Ded0c9e1022225f8E0630b35a9b54bE713736",
decimals: 6,
payTo: PAY_TO,
validAfter: 0,
validBefore: Math.floor(Date.now() / 1000) + 300,
nonce: `0x${randomBytes(32).toString("hex")}`,
},
})((_req, res) => {
res.json({ weather: "sunny", temperature: 70 });
}),
);
app.listen(PORT, () => {
console.log(`MPP server listening on http://localhost:${PORT}`);
});
```
```text
MPP server listening on http://localhost:4022
```
### 6. Run the flow end to end
Start the server, confirm the Challenge, run a client, and confirm settlement.
:::warning
The next step settles a real USDT0 payment on Stable mainnet. Use a dedicated wallet and small amounts.
:::
#### Confirm the Challenge
```bash
curl -i http://localhost:4022/weather
```
```text
HTTP/1.1 402 Payment Required
WWW-Authenticate: Payment realm="...", challenges="[{\"method\":\"usdt0-stable\",\"request\":{...}}]"
Content-Type: application/json
{"error":"Payment required"}
```
#### Send a paid request
```typescript
// src/client.ts
import { Mppx } from "mppx/client";
import { createUsdt0StableClient } from "./client-method";
const client = Mppx.create({
methods: [createUsdt0StableClient(process.env.BUYER_KEY as `0x${string}`)],
});
const res = await fetch("http://localhost:4022/weather", {
// mppx wraps fetch with the 402 retry loop:
...client.fetchOptions(),
});
console.log(res.status, await res.json());
console.log("Payment-Receipt:", res.headers.get("Payment-Receipt"));
```
```bash
npx tsx src/client.ts
```
```text
200 { weather: "sunny", temperature: 70 }
Payment-Receipt: reference="0x8f3a1b2c...", status="success", timestamp="2026-06-01T12:34:56.000Z"
```
#### Verify on Stablescan
Open `https://stablescan.xyz/tx/0x8f3a1b2c...` and confirm the `transferWithAuthorization` settled to your `PAY_TO` address.
### What you just did
* Paid in USDT0, denominated in dollars, with no gas-token balance to manage on the buyer side.
* Used MPP's `WWW-Authenticate` / `Authorization` / `Payment-Receipt` wire format on the client-server hop.
* Settled with `transferWithAuthorization` on Stable in the same HTTP request lifecycle (\~700 ms block time).
### Next recommended
* [**MPP concept**](/en/explanation/mpp) — Read how MPP relates to x402 and what the other intents look like.
* [**MPP sessions**](/en/explanation/mpp-sessions) — Stream micropayments with off-chain vouchers when per-request settlement is too expensive.
* [**Facilitators**](/en/reference/agentic-facilitators) — Use Semantic Pay or Heurist as the settlement target instead of submitting directly.
## Learn P2P payments
This guide walks through building a P2P payment application on Stable. The app handles the full payment lifecycle: the sender transfers USDT0 directly, the receiver detects the incoming payment in real time, and both can query their own transaction history. Same architecture as any wallet or payment interface, whether a mobile app, web checkout, or backend service.
No middleware, no intermediary. For the conceptual overview, see [P2P payments](/en/reference/p2p-payments). To skip the ABI work and reach a working `transfer` in a few lines, use the [Stable SDK](/en/explanation/sdk-overview).
### What you'll build
Five scripts forming a minimal payment app:
* `wallet.ts` — create or restore a wallet.
* `getBalance.ts` — query the current USDT0 balance.
* `send.ts` — send USDT0 to another address.
* `receive.ts` — watch for incoming payments in real time.
* `history.ts` — query past Transfer events for an address.
#### Demo
```text
step 1. Alice creates wallet → address: 0xAlice...
step 2. Alice's balance: 0.01 USDT0
step 3. Alice sends 0.001 USDT0 to Bob
tx: 0x8f3a...2d41
gas fee: 0.000021 USDT0
Alice balance: 0.008979 USDT0
step 4. Bob receives payment (real-time event)
from: 0xAlice...
amount: 0.001 USDT0
tx: 0x8f3a...2d41
```
### Prerequisites
* Node.js 20 or later.
* A private key with testnet USDT0 (see [Quick start](/en/tutorial/quick-start) to fund a wallet).
### Project setup
```bash
mkdir stable-p2p && cd stable-p2p
npm init -y && npm install ethers dotenv
```
```text
added 2 packages, audited 3 packages in 1s
```
Create `config.ts` shared by every script:
```typescript
// config.ts
import { ethers } from "ethers";
import "dotenv/config";
export const STABLE_RPC = "https://rpc.testnet.stable.xyz";
export const STABLE_WS = "wss://rpc.testnet.stable.xyz";
export const USDT0_ADDRESS = "0x78Cf24370174180738C5B8E352B6D14c83a6c9A9";
export const provider = new ethers.JsonRpcProvider(STABLE_RPC);
```
### 1. Create or restore a wallet
A wallet is a key pair derived from a seed phrase. Generate one for a new user and return the phrase so they can back it up. A returning user restores their wallet from the same phrase.
```typescript
// wallet.ts
import { ethers } from "ethers";
import { provider } from "./config";
/** Create a new wallet for a new user. */
export function createWallet() {
const wallet = ethers.Wallet.createRandom(provider);
return {
wallet,
address: wallet.address,
seedPhrase: wallet.mnemonic!.phrase, // display to user for backup
};
}
/** Restore a wallet from a seed phrase (returning user). */
export function restoreWallet(seedPhrase: string) {
const wallet = ethers.Wallet.fromPhrase(seedPhrase, provider);
return { wallet, address: wallet.address };
}
if (import.meta.url === `file://${process.argv[1]}`) {
const { address, seedPhrase } = createWallet();
console.log("Address: ", address);
console.log("Seed phrase:", seedPhrase);
}
```
```bash
npx tsx wallet.ts
```
```text
Address: 0xAlice...1234
Seed phrase: liberty shoot ... (12 words)
```
### 2. Check the balance
USDT0 is the native asset on Stable, so balance queries work exactly like ETH on Ethereum. Native balance is 18 decimals, use `formatEther` for display.
```typescript
// getBalance.ts
import { ethers } from "ethers";
import { provider } from "./config";
export async function getBalance(address: string) {
const balance = await provider.getBalance(address);
return ethers.formatEther(balance); // 18 decimals
}
if (import.meta.url === `file://${process.argv[1]}`) {
const address = process.argv[2];
const balance = await getBalance(address);
console.log("Balance:", balance, "USDT0");
}
```
```bash
npx tsx getBalance.ts 0xAlice...1234
```
```text
Balance: 0.01 USDT0
```
### 3. Send a payment
The sender signs and submits a transfer directly. On Stable, USDT0 is the native asset, so a simple value transfer is the cheapest path (21,000 gas). This is the same code path as "Send" in any payment app.
```typescript
// send.ts
import { ethers } from "ethers";
import { provider } from "./config";
export async function sendPayment(
senderKey: string,
recipient: string,
amount: string // e.g. "0.001" for 0.001 USDT0
) {
const wallet = new ethers.Wallet(senderKey, provider);
const block = await provider.getBlock("latest");
const baseFee = block!.baseFeePerGas!;
const tx = await wallet.sendTransaction({
to: recipient,
value: ethers.parseEther(amount),
maxFeePerGas: baseFee * 2n,
maxPriorityFeePerGas: 0n, // always 0 on Stable
});
console.log("Payment sent:", tx.hash);
const receipt = await tx.wait(1);
if (receipt!.status === 1) console.log("Payment settled");
return tx.hash;
}
if (import.meta.url === `file://${process.argv[1]}`) {
const [, , recipient, amount] = process.argv;
await sendPayment(process.env.PRIVATE_KEY!, recipient, amount);
}
```
```bash
npx tsx send.ts 0xBob...5678 0.001
```
```text
Payment sent: 0x8f3a...2d41
Payment settled
```
### 4. Receive payments in real time
The receiver listens for incoming `Transfer` events. This is equivalent to push notifications in a traditional payment app. On Stable, single-slot finality means the receiver sees a payment almost instantly.
```typescript
// receive.ts
import { ethers } from "ethers";
import { STABLE_WS, USDT0_ADDRESS } from "./config";
const wsProvider = new ethers.WebSocketProvider(STABLE_WS);
const usdt0 = new ethers.Contract(
USDT0_ADDRESS,
["event Transfer(address indexed from, address indexed to, uint256 value)"],
wsProvider
);
export function watchIncomingPayments(address: string) {
const filter = usdt0.filters.Transfer(null, address);
usdt0.on(filter, (from: string, to: string, value: bigint, event: any) => {
console.log("Payment received:");
console.log(" from: ", from);
console.log(" amount:", ethers.formatUnits(value, 6), "USDT0");
console.log(" tx: ", event.log.transactionHash);
});
console.log("Watching for incoming payments to", address);
}
if (import.meta.url === `file://${process.argv[1]}`) {
watchIncomingPayments(process.argv[2]);
}
```
```bash
npx tsx receive.ts 0xBob...5678
```
```text
Watching for incoming payments to 0xBob...5678
Payment received:
from: 0xAlice...1234
amount: 0.001 USDT0
tx: 0x8f3a...2d41
```
:::note
Native transfers (value transfers) also emit a `Transfer` event on the USDT0 ERC-20 contract because USDT0 is both the native asset and an ERC-20 token on Stable. A single event listener covers both transfer methods.
:::
### 5. Query transaction history
Query past `Transfer` events to build a transaction history view, like a bank statement or transaction list in any payment app.
```typescript
// history.ts
import { ethers } from "ethers";
import { provider, USDT0_ADDRESS } from "./config";
const usdt0 = new ethers.Contract(
USDT0_ADDRESS,
["event Transfer(address indexed from, address indexed to, uint256 value)"],
provider
);
export async function getTransactionHistory(address: string, fromBlock?: number) {
if (fromBlock === undefined) {
const latest = await provider.getBlockNumber();
fromBlock = Math.max(0, latest - 10_000);
}
const [sentEvents, receivedEvents] = await Promise.all([
usdt0.queryFilter(usdt0.filters.Transfer(address, null), fromBlock),
usdt0.queryFilter(usdt0.filters.Transfer(null, address), fromBlock),
]);
return [
...sentEvents.map((e: any) => ({
type: "sent" as const,
counterparty: e.args[1],
amount: ethers.formatUnits(e.args[2], 6),
txHash: e.transactionHash,
block: e.blockNumber,
})),
...receivedEvents.map((e: any) => ({
type: "received" as const,
counterparty: e.args[0],
amount: ethers.formatUnits(e.args[2], 6),
txHash: e.transactionHash,
block: e.blockNumber,
})),
].sort((a, b) => b.block - a.block);
}
if (import.meta.url === `file://${process.argv[1]}`) {
const history = await getTransactionHistory(process.argv[2]);
for (const tx of history) {
console.log(`${tx.type} ${tx.amount} USDT0 ${tx.counterparty} ${tx.txHash}`);
}
}
```
```bash
npx tsx history.ts 0xAlice...1234
```
```text
sent 0.001 USDT0 0xBob...5678 0x8f3a...2d41
received 0.01 USDT0 0xFaucet... 0x22b1...3f09
```
:::warning
Scanning wide block ranges (millions of blocks) can time out and exceed RPC rate limits. For production, use the [Stablescan Etherscan-compatible API](https://stablescan.xyz) for paginated history queries — every transaction is already indexed.
:::
### Next recommended
* [**Subscribe and collect**](/en/how-to/subscribe-and-collect) — Pull-based recurring subscriptions with EIP-7702 delegation.
* [**Paying with invoice**](/en/how-to/pay-with-invoice) — Settle invoices with ERC-3009 and deterministic nonces.
* [**Send your first USDT0**](/en/tutorial/send-usdt0) — Reference the basic native vs. ERC-20 transfer flow.
## Build a pay-per-call API
This guide walks through monetizing an API endpoint with x402. The server adds a payment handler, the client pays per request, and settlement happens within the HTTP lifecycle.
:::note
**Concept:** For the x402 protocol and why it fits Stable, see [x402](/en/explanation/x402). For the high-level use case model, see [Pay-per-call APIs](/en/reference/pay-per-call).
:::
:::note
The Semantic facilitator currently operates on mainnet only. The examples in this guide use Stable mainnet. Use small amounts when testing.
:::
### What you'll build
A paid HTTP API where the server responds with `402 Payment Required`, the client pays per request, and the facilitator settles USDT0 on-chain within the HTTP lifecycle.
#### Demo
```text
step 1. Client: GET /weather (no payment)
Server: 402 Payment Required
PAYMENT-REQUIRED: { amount: "1000", asset: USDT0, network: eip155:988 }
step 2. Client signs ERC-3009 authorization
step 3. Client: GET /weather + PAYMENT-SIGNATURE header
Server: forwards to facilitator → transferWithAuthorization settles on-chain
(~700ms block confirmation)
Server: 200 OK { weather: "sunny", temperature: 70 }
PAYMENT-SETTLE-RESPONSE: { txHash: "0x8f3a...", paid: "0.001 USDT0" }
step 4. Verify settlement on Stablescan
https://stablescan.xyz/tx/0x8f3a...
```
### Overview
**Seller (server):**
```typescript
// --- Server ---
app.use(paymentMiddleware({
"GET /weather": {
price: { amount: "1000", asset: USDT0 },
payTo: sellerAddress,
},
"POST /inference": {
price: { amount: "50000", asset: USDT0 },
payTo: sellerAddress,
},
}, resourceServer));
// Routes not listed in the config are not gated.
```
**Buyer (client):**
```typescript
// --- Client ---
account = new WalletAccountEvm(seedPhrase, { provider: RPC });
client = new x402Client();
fetchWithPayment = wrapFetchWithPayment(fetch, client);
weatherResponse = fetchWithPayment("https://api.example.com/weather");
inferenceResponse = fetchWithPayment("https://api.example.com/inference", {
method: "POST",
headers: { "Content-Type": "application/json" },
body: JSON.stringify({ prompt: "Hello" }),
});
// For each paid request:
// 1. Initial request returns 402 with PAYMENT-REQUIRED header
// 2. Client signs ERC-3009 authorization with wallet
// 3. Client retries with PAYMENT-SIGNATURE header
// 4. Facilitator settles on-chain, server returns the response
```
### Seller: set up paid endpoints
The seller adds x402 middleware to define which routes require payment. When a request arrives without payment, the middleware responds with `402 Payment Required` and the payment terms. When a valid payment header is present, the middleware forwards it to a facilitator that verifies the signature and settles the payment on-chain. The seller only configures the price and the receiving address; the facilitator handles verification and settlement.
```bash
npm install express @x402/express @x402/evm @x402/core
```
#### Pricing
Each route specifies the payment amount in USDT0 base units (6 decimals), the network, and the address to receive funds. For example, `"1000"` equals `$0.001` and `"50000"` equals `$0.05`.
```typescript
price: {
amount: "1000", // base units (6 decimals)
asset: USDT0_STABLE, // USDT0 contract address
extra: { name: "USDT0", version: "1", decimals: 6 }, // EIP-712 domain info
}
```
The `extra` fields (`name`, `version`, `decimals`) are used by the buyer's client for EIP-712 signature construction and must match the on-chain USDT0 contract.
#### Route configuration
Routes are mapped using the `METHOD /path` format. Each route specifies the accepted payment scheme, network, price, and the address to receive funds (`payTo`). The `description` and `mimeType` fields help buyers and AI agents discover what the endpoint provides. Routes not listed in the config are not gated and behave like normal Express routes.
```typescript
// server.ts
import express from "express";
import { paymentMiddleware, x402ResourceServer } from "@x402/express";
import { ExactEvmScheme } from "@x402/evm/exact/server";
import { HTTPFacilitatorClient } from "@x402/core/server";
const PAY_TO = process.env.PAY_TO_ADDRESS as `0x${string}`;
const FACILITATOR_URL = "https://x402.semanticpay.io/";
const STABLE_NETWORK = "eip155:988"; // Stable Mainnet CAIP-2 ID
const USDT0_STABLE = "0x779Ded0c9e1022225f8E0630b35a9b54bE713736";
const facilitatorClient = new HTTPFacilitatorClient({ url: FACILITATOR_URL });
const resourceServer = new x402ResourceServer(facilitatorClient)
.register(STABLE_NETWORK, new ExactEvmScheme());
const app = express();
app.use(
paymentMiddleware(
{
// Example 1: Configure a paid GET route
"GET /weather": {
accepts: [
{
scheme: "exact",
network: STABLE_NETWORK,
price: {
amount: "1000", // $0.001
asset: USDT0_STABLE,
extra: { name: "USDT0", version: "1", decimals: 6 },
},
payTo: PAY_TO,
},
],
description: "Weather data",
mimeType: "application/json",
},
// Example 2: Configure a paid POST route
"POST /inference": {
accepts: [
{
scheme: "exact",
network: STABLE_NETWORK,
price: {
amount: "50000", // $0.05
asset: USDT0_STABLE,
extra: { name: "USDT0", version: "1", decimals: 6 },
},
payTo: PAY_TO,
},
],
description: "AI inference endpoint",
mimeType: "application/json",
},
},
resourceServer,
),
);
app.get("/weather", (req, res) => {
res.json({ weather: "sunny", temperature: 70 });
});
app.post("/inference", (req, res) => {
const { prompt } = req.body;
res.json({ result: `Inference result for: ${prompt}` });
});
// Not listed in the config, so no payment required.
app.get("/health", (req, res) => {
res.json({ status: "ok", payTo: PAY_TO });
});
const PORT = process.env.PORT || 4021;
app.listen(PORT, () => {
console.log(`Server listening at http://localhost:${PORT}`);
console.log(`GET /health - free`);
console.log(`GET /weather - $0.001 per request`);
console.log(`POST /inference - $0.05 per request`);
});
```
:::note
x402 also provides middleware for Hono (`@x402/hono`) and Next.js (`@x402/next`). The pattern is the same: create a facilitator client, register the EVM scheme, and apply middleware.
:::
### Buyer: make paid requests
The buyer accesses paid endpoints without going through manual payment flows. The buyer does not pay gas. The facilitator settles on-chain, and the buyer only pays the exact amount specified in the payment requirements.
```bash
npm install @x402/fetch @x402/evm @tetherto/wdk-wallet-evm
```
#### Create a wallet and check balance
```typescript
// client.ts
import WalletManagerEvm from "@tetherto/wdk-wallet-evm";
const account = await new WalletManagerEvm(process.env.SEED_PHRASE!, {
provider: "https://rpc.stable.xyz",
}).getAccount(0);
console.log("Buyer address:", account.address);
// USDT0 uses 6 decimals. A balance of 1000000 equals 1.00 USDT0.
const USDT0_STABLE = "0x779Ded0c9e1022225f8E0630b35a9b54bE713736";
const balance = await account.getTokenBalance(USDT0_STABLE);
console.log("USDT0 balance:", Number(balance) / 1e6, "USDT0");
```
#### Connect to x402 and make a paid request
`WalletAccountEvm` satisfies the signer interface that x402 expects, so it can be registered directly as the signer for the x402 client. Once registered, requests sent through the x402-enabled client handle 402 payment flows automatically.
```typescript
import { x402Client, wrapFetchWithPayment } from "@x402/fetch";
import { registerExactEvmScheme } from "@x402/evm/exact/client";
const client = new x402Client();
registerExactEvmScheme(client, { signer: account });
const fetchWithPayment = wrapFetchWithPayment(fetch, client);
const response = await fetchWithPayment("http://localhost:4021/weather");
const data = await response.json();
console.log("Response:", data);
```
Under the hood, `fetchWithPayment` intercepts the 402 response, parses the payment requirements (amount, token, network, recipient), signs an ERC-3009 `transferWithAuthorization` with the WDK wallet, and retries the request with the `PAYMENT-SIGNATURE` header.
:::note
If you prefer Axios, use `@x402/axios` with `wrapAxiosWithPayment` for the same automatic payment handling.
:::
### Test the payment flow
Start the server and verify both the paid and free routes.
:::warning
This test flow runs on Stable mainnet. Each successful paid request settles a real USDT0 payment through the hosted facilitator. Use a dedicated wallet and small amounts only.
:::
#### 1. Confirm the 402 response
```bash
curl -i http://localhost:4021/weather
```
The response should be `402 Payment Required` with a `PAYMENT-REQUIRED` header containing the price, asset, and network.
#### 2. Run the client
```bash
npx tsx client.ts
```
The client handles the full cycle: receives the 402, signs the authorization, retries with payment, and prints the response.
#### 3. Read the receipt
After a successful paid request, the buyer can read the `PAYMENT-SETTLE-RESPONSE` header from the server response and parse the settlement receipt.
```typescript
// (continued) client.ts
import { x402HTTPClient } from "@x402/fetch";
const httpClient = new x402HTTPClient(client);
const receipt = httpClient.getPaymentSettleResponse(
(name) => response.headers.get(name),
);
console.log("Payment receipt:", JSON.stringify(receipt, null, 2));
```
### Test without the live facilitator
Because the Semantic facilitator is mainnet-only, you can't point your server at a testnet facilitator today. To iterate on server logic, route handlers, and middleware behavior without settling real payments, stub the facilitator client.
```typescript
// server.test.ts
import { x402ResourceServer } from "@x402/express";
import { ExactEvmScheme } from "@x402/evm/exact/server";
// Stub facilitator: accepts any signature, returns a fake settlement.
const stubFacilitatorClient = {
verify: async () => ({ isValid: true, payer: "0xMockPayer" }),
settle: async () => ({
success: true,
txHash: "0xMOCK000000000000000000000000000000000000000000000000000000000001",
networkId: "eip155:988",
}),
};
export const testResourceServer = new x402ResourceServer(stubFacilitatorClient as any)
.register("eip155:988", new ExactEvmScheme());
```
Run unit tests against the stub to validate:
* 402 responses include the correct `PAYMENT-REQUIRED` payload.
* Requests with a valid `PAYMENT-SIGNATURE` header reach the handler.
* Requests with a missing or malformed header get rejected before the handler runs.
When you're ready to exercise real settlement, swap back to `HTTPFacilitatorClient` and run on mainnet with small amounts.
:::warning
Stubbed settlement only verifies middleware behavior. It doesn't prove your route handler is idempotent under real network latency or concurrent payments. Always finish with a live mainnet test against small amounts before shipping.
:::
### Advanced: lifecycle hooks
x402 provides hooks to intercept and customize payment processing at key points in the flow. For example, the server can run logic before verification (e.g., checking API keys or subscriber status) to bypass payment for authorized requests, and the client can enforce spending limits before signing.
For the full hook reference and examples, see [x402 Lifecycle Hooks](https://x402.semanticpay.io/docs/hooks).
### Next recommended
* [**x402 concept**](/en/explanation/x402) — Understand the protocol and where it fits.
* [**ERC-3009**](/en/explanation/erc-3009) — Review the settlement standard x402 uses.
* [**Paying with MCP server**](/en/how-to/pay-with-mcp) — Wrap this API as an MCP tool so AI clients can call it through prompts.
## Create a wallet
A Stable wallet is an Ethereum-standard key pair. Any wallet library that produces an EVM account works on Stable without modification. This guide shows two paths: ethers.js for most applications, and Tether's [WDK (Wallet Development Kit)](https://github.com/tetherto/wdk) for integrations that want a turnkey self-custody layer for agents and payments.
:::note
No registration, no Stable-specific account setup. A wallet can immediately receive USDT0 from the [testnet faucet](/en/how-to/use-faucet) or a mainnet transfer.
:::
### Prerequisites
* Node.js 20 or later.
### Option 1: ethers.js
Install the library and generate a key pair.
```bash
npm install ethers
```
```typescript
// wallet.ts
import { ethers } from "ethers";
const provider = new ethers.JsonRpcProvider("https://rpc.testnet.stable.xyz");
/** Create a new wallet for a new user. */
export function createWallet() {
const wallet = ethers.Wallet.createRandom(provider);
return {
wallet,
address: wallet.address,
seedPhrase: wallet.mnemonic!.phrase, // show to the user once for backup
};
}
/** Restore a wallet from a seed phrase (returning user). */
export function restoreWallet(seedPhrase: string) {
const wallet = ethers.Wallet.fromPhrase(seedPhrase, provider);
return { wallet, address: wallet.address };
}
if (import.meta.url === `file://${process.argv[1]}`) {
const { address, seedPhrase } = createWallet();
console.log("Address: ", address);
console.log("Seed phrase:", seedPhrase);
}
```
```bash
npx tsx wallet.ts
```
```text
Address: 0xAlice...1234
Seed phrase: liberty shoot ... (12 words)
```
:::warning
Never log or store the seed phrase in plain text in production. Encrypt it at rest, or use a secrets manager. `ethers.Wallet.createRandom` returns the phrase once per call — if you lose it, funds are unrecoverable.
:::
### Option 2: Tether WDK
The WDK wraps key derivation, signing, and transaction submission into a single interface. It's the right choice when you want self-custody without re-implementing common account flows, and it integrates directly with [x402](/en/how-to/build-pay-per-call) for agent payments.
```bash
npm install @tetherto/wdk @tetherto/wdk-wallet-evm
```
```typescript
// wallet-wdk.ts
import WDK from "@tetherto/wdk";
import WalletManagerEvm from "@tetherto/wdk-wallet-evm";
function initWdk(seedPhrase: string) {
return new WDK(seedPhrase)
.registerWallet("stable", WalletManagerEvm, {
provider: "https://rpc.testnet.stable.xyz",
});
}
/** Create a new wallet for a new user. */
export async function createWallet() {
const seedPhrase = WDK.getRandomSeedPhrase();
const wdk = initWdk(seedPhrase);
const account = await wdk.getAccount("stable", 0);
return {
account,
address: await account.getAddress(),
seedPhrase, // show to the user once for backup
};
}
/** Restore a wallet from a seed phrase (returning user). */
export async function restoreWallet(seedPhrase: string) {
const wdk = initWdk(seedPhrase);
const account = await wdk.getAccount("stable", 0);
return { account, address: await account.getAddress() };
}
```
```bash
npx tsx wallet-wdk.ts
```
```text
Address: 0xAlice...1234
Seed phrase: liberty shoot ... (12 words)
```
### Fund the wallet
Before the wallet can transact, it needs USDT0 for gas. On testnet, request from the faucet:
```bash
open https://faucet.stable.xyz
```
Paste the address and select the button to receive 1 testnet USDT0 (enough for thousands of native transfers). For mainnet, send USDT0 from any supported exchange or bridge; see [Bridging to Stable](/en/explanation/usdt0-bridging).
### Check the balance
Native USDT0 uses 18 decimals. The native balance is the one gas is paid from.
```typescript
// balance.ts
import { ethers } from "ethers";
const provider = new ethers.JsonRpcProvider("https://rpc.testnet.stable.xyz");
const balance = await provider.getBalance("0xYourAddress");
console.log("Balance:", ethers.formatEther(balance), "USDT0");
```
```bash
npx tsx balance.ts
```
```text
Balance: 1.0 USDT0
```
### Next recommended
* [**Delegate with EIP-7702**](/en/how-to/account-abstraction) — Add batch payments, spending limits, and session keys to this wallet.
* [**Send your first USDT0**](/en/tutorial/send-usdt0) — Native and ERC-20 transfers on the same balance.
* [**Fund a testnet wallet**](/en/how-to/use-faucet) — Faucet and Sepolia bridge options for larger test balances.
Stable provides MCP servers, agent skills, and plain-text documentation files so AI editors and coding agents can work with Stable directly. This page covers how to wire each piece into your workflow, a copy-pasteable context block for non-MCP AI tools, and starter prompts for common tasks.
### MCP servers
Stable runs two MCP servers. **Docs MCP** searches this docs site for concepts, guides, code snippets, and contract references. **Runtime MCP** interacts with the Stable chain for balance queries, transaction simulation, and execution.
Both servers can be added to any MCP-compatible client.
#### Cursor
Open your MCP configuration file and add:
```json
{
"mcpServers": {
"stable-docs": {
"url": "https://docs.stable.xyz/mcp"
},
"stable-runtime": {
"url": "https://runtime.stable.xyz/mcp"
}
}
}
```
Restart Cursor. Verify by asking: "How do I send USDT0 on Stable?"
#### Claude Code
```bash
claude mcp add stable-docs https://docs.stable.xyz/mcp
claude mcp add stable-runtime https://runtime.stable.xyz/mcp
```
Verify by asking: "Search Stable docs for Gas Waiver integration steps."
### Agent skills
Agent skills are predefined workflows that combine Docs MCP and Runtime MCP. When you ask an AI to perform a task like "send 100 USDT0 to three addresses," the skill handles the full sequence: look up the relevant docs, resolve addresses and parameters, check balances, simulate the transaction, and execute after approval.
Skills are available as a Claude Code plugin.
#### Install
```bash
claude plugin add stable-xyz/agent-skills
```
Or install from the Claude Code marketplace.
For the full skill definitions and source, see the [agent-skills repository](https://github.com/stable-xyz/agent-skills).
### Plain-text docs
For AI tools that do not support MCP, Stable documentation is available as static text files.
| **File** | **URL** | **Content** |
| :-------------- | :----------------------------------------------------------------------------- | :-------------------------------------- |
| `llms.txt` | [https://docs.stable.xyz/llms.txt](https://docs.stable.xyz/llms.txt) | Page index with titles and descriptions |
| `llms-full.txt` | [https://docs.stable.xyz/llms-full.txt](https://docs.stable.xyz/llms-full.txt) | Full documentation in a single file |
These files are static snapshots. For the most current content, use Docs MCP.
#### Cursor
1. Go to **Settings > Features > Docs**.
2. Select **Add** and enter `https://docs.stable.xyz/llms-full.txt`.
3. Reference in chat with `@Stable`.
#### Other tools
Download `llms-full.txt` and include it in your project context or system prompt.
### Stable context block
Paste this at the top of any AI chat or system prompt. It gives the model everything it needs to generate correct Stable code on the first attempt.
```markdown
# Stable chain context
Stable is a Layer 1 where USDT0 is the native gas token. Fully EVM-compatible.
All standard EVM tools (Hardhat, Foundry, ethers.js, viem) work unchanged once
you adjust three gas fields (see Behavioral differences below).
## Network
| Field | Mainnet | Testnet |
| :-------------- | :--------------------------------------- | :----------------------------------------- |
| Chain ID | 988 | 2201 |
| RPC | https://rpc.stable.xyz | https://rpc.testnet.stable.xyz |
| Explorer | https://stablescan.xyz | https://testnet.stablescan.xyz |
| Currency symbol | USDT0 | USDT0 |
## USDT0 contract addresses
- Mainnet: 0x779ded0c9e1022225f8e0630b35a9b54be713736
- Testnet: 0x78cf24370174180738c5b8e352b6d14c83a6c9a9
## Behavioral differences from Ethereum
1. **Gas token is USDT0, not ETH.** The `value` field in native transfers
carries USDT0. Fees are denominated in USDT0.
2. **`maxPriorityFeePerGas` is always 0.** No tip-based ordering. Set it
explicitly to `0n` or validators will reject or ignore tip components.
3. **USDT0 has a dual role**: native asset (18 decimals) AND ERC-20 (6 decimals)
on the same balance. `address(x).balance` reports 18-decimal wei;
`USDT0.balanceOf(x)` reports 6-decimal units. Values may differ by up to
0.000001 USDT0 due to fractional reconciliation. Never mirror native
balance in an internal variable; always query at payout time.
4. **Transfer events are emitted for native transfers too.** A single Transfer
event listener on the USDT0 ERC-20 contract covers both transfer paths.
5. **Single-slot finality (~700ms).** Once a block is committed, it cannot
be reorged. No need to wait multiple confirmations.
6. **Gas Waiver** lets applications cover gas: user signs with `gasPrice = 0`,
a governance-registered waiver wraps and submits. Contracts must be on
the waiver's AllowedTarget policy.
7. **EIP-7702** is supported for delegating an EOA to a contract (type-4 tx).
8. **Precompile addresses**: Bank `0x...1003`, Distribution `0x...0801`,
Staking `0x...0800`, StableSystem `0x...9999`.
## Common mistakes to avoid
- Copying Ethereum priority-fee constants (2 gwei tips, etc.) — has no effect
on Stable and can be rejected by wallets.
- Using `ethers.parseUnits(x, 18)` for ERC-20 USDT0 amounts. ERC-20 uses 6
decimals; native transfers use 18.
- Mirroring native balance in a `uint256 deposited` variable — USDT0
allowance-based operations (transferFrom, permit) can reduce a contract's
native balance without invoking its code.
- Sending native or ERC-20 USDT0 to `address(0)` — both revert on Stable.
- Assuming `EXTCODEHASH == 0` means an address is unused. On Stable,
permit-based approvals can change state without incrementing nonce.
- Writing `value: ethers.parseEther(amount, "ether")` and expecting ETH
semantics. That transfer sends USDT0.
```
### Starter prompts
Copy any of these into your AI editor after loading the context block above.
#### Deploy a contract
```text
Use Foundry to scaffold a project called `stable-escrow`. Write a minimal
Escrow contract in Solidity ^0.8.24 with deposit() and withdraw(amount)
functions that transfer USDT0 natively. Use address(this).balance for
solvency checks (never mirror the balance in a uint256). Reject
address(0) recipients. Then produce a deployment command using
`forge create` pointed at Stable testnet (RPC https://rpc.testnet.stable.xyz,
chain ID 2201).
```
#### Send USDT0
```text
Write a TypeScript script using ethers v6 that sends 0.001 USDT0 natively
from the wallet loaded from PRIVATE_KEY. Use base-fee-only EIP-1559 gas
(maxPriorityFeePerGas = 0n, maxFeePerGas = 2 * baseFeePerGas). Target
Stable testnet. Log the tx hash and a Stablescan explorer URL.
```
#### Set up EIP-7702 delegation
```text
Write a TypeScript script using ethers v6 that:
1. Signs an EIP-7702 authorization delegating my EOA to Multicall3 at
0xcA11bde05977b3631167028862bE2a173976CA11 on Stable testnet
(chain ID 2201).
2. Sends a type-4 transaction with authorizationList: [signedAuth],
to: wallet.address (self-call), and data that invokes aggregate3()
to batch three USDT0 transfers (100, 200, 150 USDT0 with 6 decimals).
3. Use maxPriorityFeePerGas: 0n.
```
#### Build a subscription contract
```text
Write a SubscriptionManager Solidity contract for EIP-7702 delegation on
Stable. It runs on a subscriber's EOA. Expose:
- subscribe(bytes32 subId, address provider, uint256 amount, uint256 interval)
callable only when msg.sender == address(this) (subscriber on their own EOA).
- collect(bytes32 subId) callable only by the registered provider, only
when block.timestamp >= nextChargeAt; advances nextChargeAt by interval
and transfers USDT0 to the provider. Use IERC20 USDT0 at the testnet
address 0x78cf24370174180738c5b8e352b6d14c83a6c9a9.
- cancelSubscription(bytes32 subId) callable only by the subscriber.
Emit events for SubscriptionCreated, SubscriptionCollected, SubscriptionCancelled.
```
#### Build an x402 pay-per-call API
```text
Write an Express server in TypeScript that exposes GET /weather priced
at $0.001 USDT0 (amount: "1000", 6 decimals) using @x402/express,
@x402/evm/exact/server, and HTTPFacilitatorClient pointed at
https://x402.semanticpay.io/. Use Stable mainnet (CAIP-2 eip155:988,
USDT0 at 0x779Ded0c9e1022225f8E0630b35a9b54bE713736). The handler should
return { weather: "sunny", temperature: 70 }. Read PAY_TO_ADDRESS from
env. Print the configured routes on startup.
```
### Next recommended
* [**Paying with MCP server**](/en/how-to/pay-with-mcp) — Wrap a paid API as an MCP tool so AI clients can call and pay for it.
* [**Quick start**](/en/tutorial/quick-start) — Pair the AI context with a first-transaction run in five minutes.
* [**Difference from Ethereum**](/en/explanation/ethereum-comparison) — Deep-dive on the gas and USDT0 semantics in the context block.
## Index contract events
Indexing turns on-chain events into data your application can react to: balance updates, transaction history, UI notifications. This guide shows how to subscribe to events from a deployed Stable contract using ethers.js and how to backfill historical events so you don't miss any emitted while your service was offline.
### Prerequisites
* A deployed contract on Stable testnet or mainnet. If you need one, see [Deploy](/en/tutorial/smart-contract) and [Verify](/en/how-to/verify-contract).
* Node.js 20 or later.
* The contract address and the ABI of the events you want to index.
### 1. Install and configure
```bash
npm install ethers
```
```typescript
// config.ts
import { ethers } from "ethers";
export const STABLE_TESTNET_RPC = "https://rpc.testnet.stable.xyz";
export const STABLE_TESTNET_WS = "wss://rpc.testnet.stable.xyz";
export const CONTRACT_ADDRESS = "0xDeployedContractAddress";
// Minimal ABI: only the events you want to index.
export const CONTRACT_ABI = [
"event NumberUpdated(address indexed caller, uint256 oldValue, uint256 newValue)",
];
```
### 2. Subscribe to live events
Use a WebSocket provider so you receive events as soon as validators finalize each block. WebSocket avoids polling overhead and keeps notification latency close to block time (\~0.7 seconds on Stable).
```typescript
// watchLive.ts
import { ethers } from "ethers";
import { STABLE_TESTNET_WS, CONTRACT_ADDRESS, CONTRACT_ABI } from "./config";
const provider = new ethers.WebSocketProvider(STABLE_TESTNET_WS);
const contract = new ethers.Contract(CONTRACT_ADDRESS, CONTRACT_ABI, provider);
contract.on("NumberUpdated", (caller, oldValue, newValue, event) => {
console.log("NumberUpdated:");
console.log(" caller: ", caller);
console.log(" oldValue: ", oldValue.toString());
console.log(" newValue: ", newValue.toString());
console.log(" tx: ", event.log.transactionHash);
console.log(" block: ", event.log.blockNumber);
});
console.log("Listening for NumberUpdated events...");
```
```bash
npx tsx watchLive.ts
```
```text
Listening for NumberUpdated events...
NumberUpdated:
caller: 0x1234...abcd
oldValue: 0
newValue: 42
tx: 0x8f3a...2d41
block: 1284371
```
Events arrive in real time as callers invoke your contract.
### 3. Backfill historical events
When a service starts, you usually need to catch up on events emitted while it was offline. Use `queryFilter` with a block range.
```typescript
// backfill.ts
import { ethers } from "ethers";
import { STABLE_TESTNET_RPC, CONTRACT_ADDRESS, CONTRACT_ABI } from "./config";
const provider = new ethers.JsonRpcProvider(STABLE_TESTNET_RPC);
const contract = new ethers.Contract(CONTRACT_ADDRESS, CONTRACT_ABI, provider);
const latest = await provider.getBlockNumber();
const fromBlock = Math.max(0, latest - 10_000); // last ~10k blocks
const events = await contract.queryFilter(
contract.filters.NumberUpdated(),
fromBlock,
latest
);
for (const event of events) {
console.log(
`[block ${event.blockNumber}]`,
event.args.caller,
"set number to",
event.args.newValue.toString()
);
}
console.log(`Backfilled ${events.length} events from block ${fromBlock} to ${latest}`);
```
```bash
npx tsx backfill.ts
```
```text
[block 1282351] 0x1234...abcd set number to 10
[block 1283092] 0xef01...2345 set number to 25
[block 1284371] 0x1234...abcd set number to 42
Backfilled 3 events from block 1282351 to 1284371
```
:::warning
Wide block ranges (millions of blocks) can exceed RPC rate limits and time out. For production indexers, paginate by 10k-block windows or use [Stablescan's Etherscan-compatible API](/en/how-to/build-p2p-payments#transaction-history) for indexed historical queries.
:::
### 4. Filter events by indexed arguments
Events with `indexed` parameters (like `caller` above) can be filtered server-side. Pass the filter value instead of reading every event and filtering in your app.
```typescript
// watchUser.ts
import { ethers } from "ethers";
import { STABLE_TESTNET_WS, CONTRACT_ADDRESS, CONTRACT_ABI } from "./config";
const provider = new ethers.WebSocketProvider(STABLE_TESTNET_WS);
const contract = new ethers.Contract(CONTRACT_ADDRESS, CONTRACT_ABI, provider);
const userAddress = "0x1234...abcd";
const filter = contract.filters.NumberUpdated(userAddress);
contract.on(filter, (caller, oldValue, newValue, event) => {
console.log(`${caller} set number to ${newValue.toString()}`);
});
console.log(`Watching NumberUpdated for ${userAddress}...`);
```
```bash
npx tsx watchUser.ts
```
```text
Watching NumberUpdated for 0x1234...abcd...
0x1234...abcd set number to 42
```
### Handle connection drops
WebSocket connections can drop. For production indexers, implement reconnection logic so you don't miss events.
```typescript
// resilientWatch.ts
import { ethers } from "ethers";
import { STABLE_TESTNET_WS, CONTRACT_ADDRESS, CONTRACT_ABI } from "./config";
let reconnectAttempts = 0;
const MAX_RECONNECT = 5;
function setupWatcher() {
const provider = new ethers.WebSocketProvider(STABLE_TESTNET_WS);
const contract = new ethers.Contract(CONTRACT_ADDRESS, CONTRACT_ABI, provider);
contract.on("NumberUpdated", (caller, oldValue, newValue) => {
console.log(`${caller} set number to ${newValue.toString()}`);
});
provider.websocket.onerror = (err: any) => {
console.error("Provider error:", err);
if (reconnectAttempts < MAX_RECONNECT) {
reconnectAttempts++;
setTimeout(setupWatcher, 5000);
}
};
}
setupWatcher();
```
### Next recommended
* [**Track unbonding completions**](/en/how-to/track-unbonding) — Index system transaction events (unbonding completions) emitted by the protocol.
* [**Build a P2P payment app**](/en/how-to/build-p2p-payments) — Apply indexing to USDT0 Transfer events and build a payment history view.
* [**JSON-RPC reference**](/en/reference/json-rpc-api) — See which `eth_getLogs` and related methods Stable supports.
## Index validator data
Validator data lives on-chain and is readable over standard EVM JSON-RPC. You query current state through the staking, slashing, and governance precompiles, and you reconstruct history from their event logs. This means an indexer or analytics platform reads everything it needs through `eth_call` and `eth_getLogs`, with no access to a node's `stabled` CLI or Cosmos REST.
:::note
**Concept:** For what the staking module tracks and how delegation works, see [Staking module](/en/explanation/staking-module). For per-method inputs and outputs, see the [Staking precompile reference](/en/reference/staking-module-api).
:::
### Where each data point comes from
| **Data point** | **Source** | **How to read it** |
| :-------------------------------- | :-------------------------------------- | :---------------------------------------------------------------- |
| Validator name, identity, website | Staking precompile `validators()` | `description.moniker` and related fields |
| Stake (bonded tokens) | Staking precompile `validators()` | `tokens` field |
| Commission | Staking precompile `validators()` | `commission` field |
| Stake changes over time | Staking precompile events | `Delegate`, `Unbond`, `Redelegate` logs |
| Join date | Staking precompile event | `CreateValidator` log → block timestamp |
| Uptime | Slashing precompile `getSigningInfos()` | `(signedBlocksWindow − missedBlocksCounter) / signedBlocksWindow` |
| Voting history (aggregate) | Gov precompile `getTallyResult()` | Per-proposal tally |
| Voting history (per validator) | Gov precompile events | `Vote`, `VoteWeighted` logs, voter = operator address |
### Precompile addresses
| **Module** | **Address** | **Use for** |
| :----------- | :------------------------------------------- | :-------------------------------------------------- |
| Staking | `0x0000000000000000000000000000000000000800` | Validator set, stake, commission, delegation events |
| Distribution | `0x0000000000000000000000000000000000000801` | Rewards and commission withdrawals |
| Gov | `0x0000000000000000000000000000000000000805` | Proposals, tallies, and vote logs |
| Slashing | `0x0000000000000000000000000000000000000806` | Signing info and uptime |
Connect to Mainnet (Chain ID `988`) at `https://rpc.stable.xyz`. See [Mainnet information](/en/reference/mainnet-information) for endpoints and limits.
### Validator name, stake, and commission
Call `validators()` on the staking precompile to read the current validator set. Pass a bond status to filter (for example `BOND_STATUS_BONDED`). Each entry exposes the validator's `description` (including `moniker`), `tokens` (bonded stake), and `commission`.
```typescript
// validators.ts
import { createPublicClient, http } from "viem";
const STAKING_PRECOMPILE = "0x0000000000000000000000000000000000000800";
const client = createPublicClient({
transport: http("https://rpc.stable.xyz"),
});
// See the staking precompile reference for the full validators() ABI and structs.
const validators = await client.readContract({
address: STAKING_PRECOMPILE,
abi: stakingAbi,
functionName: "validators",
args: ["BOND_STATUS_BONDED", { key: "0x", offset: 0n, limit: 100n, countTotal: true, reverse: false }],
});
for (const v of validators[0]) {
console.log(v.description.moniker, v.tokens.toString(), v.commission.toString());
}
```
```text
StableNode-01 4500000000000000000000000 50000000000000000
StableNode-02 3900000000000000000000000 100000000000000000
```
The `tokens` and `commission` values are scaled to 18 decimals. Divide `commission` by 1e18 to get the rate as a fraction (for example `0.05` for 5%). For the complete `Validator` struct and the `BOND_STATUS_*` values, see the [Staking precompile reference](/en/reference/staking-module-api#validators).
### Stake changes over time
`validators()` returns a snapshot. To track how stake moved, index the staking precompile's delegation events. `Delegate`, `Unbond`, and `Redelegate` carry the indexed `validatorAddr` and the `amount`, so you can attribute every stake change to a validator and block.
```typescript
// stakeChanges.ts
import { parseAbiItem } from "viem";
const logs = await client.getLogs({
address: STAKING_PRECOMPILE,
event: parseAbiItem(
"event Delegate(address indexed delegatorAddr, string indexed validatorAddr, uint256 amount, uint256 newShares)"
),
fromBlock: 0n,
toBlock: "latest",
});
console.log(`${logs.length} delegations indexed`);
```
```text
1842 delegations indexed
```
`Unbond` and `Redelegate` follow the same shape and additionally carry a `completionTime`. See the [Events section](/en/reference/staking-module-api#events) of the staking reference for exact signatures.
### Join date
A validator's join date is the block timestamp of its `CreateValidator` event. The event is indexed by validator address, so you filter for a single validator or sweep the full set, then resolve each log's `blockNumber` to a timestamp with `eth_getBlockByNumber`.
```typescript
// joinDate.ts
import { parseAbiItem } from "viem";
const logs = await client.getLogs({
address: STAKING_PRECOMPILE,
event: parseAbiItem("event CreateValidator(address indexed valiAddr, uint256 value)"),
fromBlock: 0n,
toBlock: "latest",
});
for (const log of logs) {
const block = await client.getBlock({ blockNumber: log.blockNumber });
console.log(log.args.valiAddr, new Date(Number(block.timestamp) * 1000).toISOString());
}
```
```text
0xAbc...123 2025-11-04T09:12:44.000Z
0xDef...456 2025-12-18T17:03:01.000Z
```
:::warning
Genesis validators have no `CreateValidator` event. They were created in the genesis block, not by a transaction, so no log exists. Treat their join date as the chain genesis: **2025-10-29**. Index `CreateValidator` for everyone who joined after genesis, and backfill the genesis set from the genesis validator list.
:::
### Uptime
Read signing information from the slashing precompile (`0x...806`) using `getSigningInfos()`. Each record reports `signedBlocksWindow` (the size of the sliding window) and `missedBlocksCounter` (blocks missed within it). Compute uptime as:
```text
uptime = (signedBlocksWindow − missedBlocksCounter) / signedBlocksWindow
```
A validator with a `signedBlocksWindow` of `10000` and a `missedBlocksCounter` of `25` has 99.75% uptime over the window. This is a rolling figure, not lifetime uptime. To track uptime history, snapshot the counters on a fixed interval and store each reading.
:::note
The slashing precompile follows the Cosmos EVM `x/slashing` interface. Its address is listed in the [system modules precompile table](/en/how-to/use-system-modules#whats-exposed). Generate the exact method ABI from the chain's precompile interface.
:::
### Voting history
Governance data has two layers. For the aggregate outcome of a proposal, call `getTallyResult()` on the gov precompile (`0x...805`). For who voted what, index the `Vote` and `VoteWeighted` event logs. The voter address in these logs is the validator's operator address, so you can join votes to validators directly.
```typescript
// votes.ts
import { parseAbiItem } from "viem";
const GOV_PRECOMPILE = "0x0000000000000000000000000000000000000805";
const logs = await client.getLogs({
address: GOV_PRECOMPILE,
event: parseAbiItem(
"event Vote(uint64 indexed proposalId, address indexed voter, uint8 option, uint256 weight)"
),
fromBlock: 0n,
toBlock: "latest",
});
console.log(`${logs.length} votes indexed across all proposals`);
```
```text
38 votes indexed across all proposals
```
Live vote logs are confirmed for every proposal to date (proposals #1 through #7). Use `getTallyResult()` when you only need the final counts per proposal, and the event logs when you need per-validator records.
:::note
The gov precompile follows the Cosmos EVM `x/gov` interface. Its address is listed in the [system modules precompile table](/en/how-to/use-system-modules#whats-exposed). Generate the exact method ABI and the `VoteOption` enum from the chain's precompile interface.
:::
### Next recommended
* [**Staking precompile reference**](/en/reference/staking-module-api) — Look up the full validators(), delegation methods, and event signatures.
* [**Create a validator**](/en/how-to/run-validator) — Register a synced node as a validator so it appears in the data above.
* [**Indexers and analytics**](/en/reference/indexers) — Browse indexing providers that already serve normalized Stable data.
* [**Mainnet information**](/en/reference/mainnet-information) — Get Chain ID, RPC endpoints, and rate limits before you start indexing.
This guide provides detailed instructions for installing and setting up a Stable node on various platforms.
### Prerequisites
Before starting the installation, ensure you have:
* Met all [System Requirements](/en/reference/node-system-requirements)
* Root or sudo access to your server
* Basic knowledge of Linux command line
### Installation method
Use the pre-compiled binaries for your platform. Stable does not currently support building from source.
#### Mainnet
##### Linux AMD64
```bash
# Download the latest binary for AMD64 architecture
wget https://stable-data-dist.s3.us-east-1.amazonaws.com/mainnet/binary/stabled-latest-linux-amd64-mainnet.tar.gz
# Extract the archive
tar -xvzf stabled-latest-linux-amd64-mainnet.tar.gz
# Move binary to system path
sudo mv stabled /usr/bin/
# Verify installation
stabled version
```
##### Linux ARM64
```bash
# Download the binary for ARM64 architecture
wget https://stable-data-dist.s3.us-east-1.amazonaws.com/mainnet/binary/stabled-latest-linux-arm64-mainnet.tar.gz
# Extract and install
tar -xvzf stabled-latest-linux-arm64-mainnet.tar.gz
sudo mv stabled /usr/bin/
# Verify installation
stabled version
```
#### Testnet
##### Linux AMD64
```bash
# Download the latest binary for AMD64 architecture
wget https://stable-data-dist.s3.us-east-1.amazonaws.com/testnet/binary/stabled-latest-linux-amd64-testnet.tar.gz
# Extract the archive
tar -xvzf stabled-latest-linux-amd64-testnet.tar.gz
# Move binary to system path
sudo mv stabled /usr/bin/
# Verify installation
stabled version
```
##### Linux ARM64
```bash
# Download the binary for ARM64 architecture
wget https://stable-data-dist.s3.us-east-1.amazonaws.com/testnet/binary/stabled-latest-linux-arm64-testnet.tar.gz
# Extract and install
tar -xvzf stabled-latest-linux-arm64-testnet.tar.gz
sudo mv stabled /usr/bin/
# Verify installation
stabled version
```
### Node initialization
After installing the binary, initialize your node:
#### Step 1: set node name
```bash
# Set your node's moniker (choose a unique name)
export MONIKER="your-node-name"
```
#### Step 2: initialize the node
#### Mainnet
```bash
# Initialize with the mainnet chain ID
stabled init $MONIKER --chain-id stable_988-1
# This creates the configuration directory at ~/.stabled/
```
> **Note**: For current network parameters including chain ID, see [Mainnet Information](/en/reference/mainnet-information)
#### Testnet
```bash
# Initialize with the testnet chain ID
stabled init $MONIKER --chain-id stabletestnet_2201-1
# This creates the configuration directory at ~/.stabled/
```
> **Note**: For current network parameters including chain ID, see [Testnet Information](/en/reference/testnet-information)
#### Step 3: download genesis file
:::code-group
```bash [Mainnet]
# Create backup of default genesis
mv ~/.stabled/config/genesis.json ~/.stabled/config/genesis.json.backup
# Download mainnet genesis
wget https://stable-data-dist.s3.us-east-1.amazonaws.com/mainnet/configuration/genesis.zip
unzip genesis.zip
# Move genesis to config directory
cp genesis.json ~/.stabled/config/genesis.json
# Verify genesis checksum
sha256sum ~/.stabled/config/genesis.json
# Expected: e1ceda79a3cc48a1028ca8646a2e9e2d156f610637cfb8b428ca8354277921f1
```
```bash [Testnet]
# Create backup of default genesis
mv ~/.stabled/config/genesis.json ~/.stabled/config/genesis.json.backup
# Download testnet genesis
wget https://stable-data-dist.s3.us-east-1.amazonaws.com/testnet/configuration/genesis.zip
unzip genesis.zip
# Move genesis to config directory
cp genesis.json ~/.stabled/config/genesis.json
# Verify genesis checksum
sha256sum ~/.stabled/config/genesis.json
# Expected: 66afbb6e57e6faf019b3021de299125cddab61d433f28894db751252f5b8eaf2
```
:::
#### Step 4: configure node
##### Download configuration files
:::code-group
```bash [Mainnet]
# Download optimized configuration (choose one based on your node type)
# For RPC/Full nodes:
wget https://stable-data-dist.s3.us-east-1.amazonaws.com/mainnet/configuration/rpc_node_config.zip
unzip rpc_node_config.zip
# For Archive nodes:
# wget https://stable-data-dist.s3.us-east-1.amazonaws.com/mainnet/configuration/archive_node_config.zip
# unzip archive_node_config.zip
# Backup original config
cp ~/.stabled/config/config.toml ~/.stabled/config/config.toml.backup
# Apply new configuration
cp config.toml ~/.stabled/config/config.toml
# Update moniker in config
sed -i "s/^moniker = \".*\"/moniker = \"$MONIKER\"/" ~/.stabled/config/config.toml
```
```bash [Testnet]
# Download optimized configuration
wget https://stable-data-dist.s3.us-east-1.amazonaws.com/testnet/configuration/rpc_node_config.zip
unzip rpc_node_config.zip
# Backup original config
cp ~/.stabled/config/config.toml ~/.stabled/config/config.toml.backup
# Apply new configuration
cp config.toml ~/.stabled/config/config.toml
# Update moniker in config
sed -i "s/^moniker = \".*\"/moniker = \"$MONIKER\"/" ~/.stabled/config/config.toml
```
:::
##### Essential configuration updates
Edit `~/.stabled/config/app.toml`:
```toml
# Enable JSON-RPC for EVM compatibility
[json-rpc]
enable = true
address = "0.0.0.0:8545"
ws-address = "0.0.0.0:8546"
allow-unprotected-txs = true
```
Edit `~/.stabled/config/config.toml`:
:::code-group
```toml [Mainnet]
# P2P Configuration
[p2p]
# Maximum number of peers
max_num_inbound_peers = 50
max_num_outbound_peers = 30
# Seed nodes
seeds = "9aa181b20248e948567cb47a15eae35d58cd549d@seed1.stable.xyz:46656"
# Persistent peers (mainnet seed nodes)
persistent_peers = "b896f6f8ca5a4d1cc40de09407df0c96e76df950@peer1.stable.xyz:26656"
# Enable peer exchange
pex = true
# RPC Configuration
[rpc]
# Listen address
laddr = "tcp://0.0.0.0:26657"
# Maximum number of simultaneous connections
max_open_connections = 900
# CORS settings (adjust for production)
cors_allowed_origins = ["*"]
```
```toml [Testnet]
# P2P Configuration
[p2p]
# Maximum number of peers
max_num_inbound_peers = 50
max_num_outbound_peers = 30
# Seed nodes
seeds = "6f3195823f7e5ee6f911a0a0ceb9ea689e0dc5bd@seed1.testnet.stable.xyz:56656"
# Persistent peers (testnet seed nodes)
persistent_peers = "128accd3e8ee379bfdf54560c21345451c7048c7@peer1.testnet.stable.xyz:26656"
# Enable peer exchange
pex = true
# RPC Configuration
[rpc]
# Listen address
laddr = "tcp://0.0.0.0:26657"
# Maximum number of simultaneous connections
max_open_connections = 900
# CORS settings (adjust for production)
cors_allowed_origins = ["*"]
```
:::
### Systemd service setup
Create a systemd service for automatic management:
#### Step 1: create service file
:::code-group
```bash [Mainnet]
sudo tee /etc/systemd/system/stabled.service > /dev/null < /dev/null <> ~/.bashrc
echo "export DAEMON_NAME=stabled" >> ~/.bashrc
echo "export DAEMON_HOME=$HOME/.stabled" >> ~/.bashrc
echo "export DAEMON_ALLOW_DOWNLOAD_BINARIES=true" >> ~/.bashrc
echo "export DAEMON_RESTART_AFTER_UPGRADE=true" >> ~/.bashrc
echo "export DAEMON_LOG_BUFFER_SIZE=512" >> ~/.bashrc
echo "export UNSAFE_SKIP_BACKUP=true" >> ~/.bashrc
# Load variables
source ~/.bashrc
```
#### Step 3: setup Cosmovisor directory structure
```bash
# Create cosmovisor directory structure
mkdir -p ~/.stabled/cosmovisor/genesis/bin
mkdir -p ~/.stabled/cosmovisor/upgrades
# Copy current binary to genesis
cp /usr/bin/stabled ~/.stabled/cosmovisor/genesis/bin/
# Create current symlink
ln -s ~/.stabled/cosmovisor/genesis ~/.stabled/cosmovisor/current
# Verify setup
ls -la ~/.stabled/cosmovisor/
cosmovisor run version
```
#### Step 4: set environment variable
```bash
# Set service name (default: stable)
export SERVICE_NAME=stable
```
#### Step 5: create service file
:::code-group
```bash [Mainnet]
sudo tee /etc/systemd/system/${SERVICE_NAME}.service > /dev/null < /dev/null < /dev/null < /dev/null <`
### Overview
The integration flow has three steps:
1. **Build an InnerTx**: the user signs a transaction with `gasPrice = 0`.
2. **Submit to Waiver Server**: submit the signed transaction to the Waiver Server API.
3. **Handle the response**: the waiver server wraps and broadcasts the transaction. Process the streamed results and surface the transaction hash to the user.
### Step 1: create the user's InnerTx
The user signs a standard transaction with `gasPrice = 0`. The `to` address and method selector must be permitted by the waiver's `AllowedTarget` policy.
```typescript
// config.ts
export const CONFIG = {
RPC_URL: "https://rpc.testnet.stable.xyz",
CHAIN_ID: 2201, // 988 for mainnet
WAIVER_SERVER: "https://waiver.testnet.stable.xyz",
USDT0_ADDRESS: "0x78Cf24370174180738C5B8E352B6D14c83a6c9A9",
};
```
```typescript
import { ethers } from "ethers";
import { CONFIG } from "./config";
const provider = new ethers.JsonRpcProvider(CONFIG.RPC_URL);
const usdt0 = new ethers.Contract(CONFIG.USDT0_ADDRESS, [
"function transfer(address to, uint256 amount) returns (bool)"
], provider);
const callData = usdt0.interface.encodeFunctionData("transfer", [
recipientAddress,
ethers.parseUnits("0.01", 18)
]);
const gasEstimate = await provider.estimateGas({
from: userWallet.address,
to: CONFIG.USDT0_ADDRESS,
data: callData,
});
const nonce = await provider.getTransactionCount(userWallet.address);
const innerTx = {
to: CONFIG.USDT0_ADDRESS,
data: callData,
value: 0,
gasPrice: 0,
gasLimit: gasEstimate,
nonce: nonce,
chainId: CONFIG.CHAIN_ID,
};
const signedInnerTx = await userWallet.signTransaction(innerTx);
```
:::warning
`gasPrice` must be `0`. If it is non-zero, the waiver server rejects the transaction.
:::
### Step 2: submit to the Waiver Server
```typescript
import { CONFIG } from "./config";
const API_KEY = process.env.WAIVER_API_KEY;
const response = await fetch(`${CONFIG.WAIVER_SERVER}/v1/submit`, {
method: "POST",
headers: {
"Content-Type": "application/json",
"Authorization": `Bearer ${API_KEY}`,
},
body: JSON.stringify({
transactions: [signedInnerTx],
}),
});
```
#### Batch submissions
You can submit multiple signed transactions in a single request:
```typescript
body: JSON.stringify({
transactions: [signedTx1, signedTx2, signedTx3],
})
```
Each result line includes an `index` field corresponding to the transaction's position in the array.
### Step 3: handle the response
The response is streamed as NDJSON (newline-delimited JSON). Each line corresponds to one submitted transaction.
```typescript
const reader = response.body.getReader();
const decoder = new TextDecoder();
while (true) {
const { done, value } = await reader.read();
if (done) break;
const lines = decoder.decode(value).trim().split("\n");
for (const line of lines) {
const result = JSON.parse(line);
if (result.success) {
console.log(`tx ${result.index} confirmed: ${result.txHash}`);
} else {
console.error(`tx ${result.index} failed: ${result.error.message}`);
}
}
}
```
**Success response:**
```json
{"index": 0, "id": "abc123", "success": true, "txHash": "0x..."}
```
**Failure response:**
```json
{"index": 1, "id": "def456", "success": false, "error": {"code": "VALIDATION_FAILED", "message": "invalid signature"}}
```
### Error codes
| **Code** | **Description** |
| :-------------------- | :------------------------------------------------------------------------- |
| `PARSE_ERROR` | Failed to parse transaction |
| `INVALID_REQUEST` | Malformed request body |
| `BATCH_SIZE_EXCEEDED` | Batch size exceeds allowed maximum |
| `VALIDATION_FAILED` | Transaction validation failed (e.g., invalid signature, disallowed target) |
| `BROADCAST_FAILED` | Failed to broadcast to chain |
| `RATE_LIMITED` | Rate limit exceeded |
| `QUEUE_FULL` | Server queue at capacity |
| `TIMEOUT` | Request timed out |
### API reference
#### GET `/v1/health`
Health check endpoint. Authentication: none.
#### POST `/v1/submit`
Submit a batch of signed inner transactions. Authentication: required (Bearer).
**Request body:**
```json
{
"transactions": ["0x", "0x"]
}
```
Response is streamed as NDJSON. Each line corresponds to a submitted transaction index.
#### GET `/v1/submit`
WebSocket interface for streaming submissions. Authentication: required (Bearer).
### Key takeaways
* Gas Waiver is a server-side integration: your backend submits signed user transactions to the Waiver Server. Users never interact with the Waiver Server directly.
* The user always signs the InnerTx, preserving signature integrity. The waiver cannot modify the user's transaction.
* The target contract must be on the waiver's `AllowedTarget` list.
### Next recommended
* [**Zero gas transactions**](/en/how-to/zero-gas-transactions) — See the demo-focused flow and how to verify zero gas on a receipt.
* [**Self-hosted Gas Waiver**](/en/how-to/self-hosted-gas-waiver) — Run your own waiver without the hosted API.
* [**Gas waiver protocol**](/en/reference/gas-waiver-api) — Full wrapper transaction spec and governance model.
* [**Stable SDK**](/en/explanation/sdk-overview) — Use the typed client to sign user transactions you then submit to the Waiver Server.
Comprehensive guide for monitoring Stable nodes and performing routine maintenance tasks.
### Monitoring stack overview
#### Recommended stack
* **Prometheus**: Metrics collection
* **Grafana**: Visualization and dashboards
* **AlertManager**: Alert routing and management
* **Node Exporter**: System metrics
* **Loki**: Log aggregation (optional)
### Quick monitoring setup
#### Step 1: enable Prometheus metrics
```toml
# Edit ~/.stabled/config/config.toml
[instrumentation]
prometheus = true
prometheus_listen_addr = ":26660"
namespace = "stablebft"
```
Restart node:
```bash
sudo systemctl restart ${SERVICE_NAME}
```
#### Step 2: install Prometheus
```bash
# Download Prometheus
wget https://github.com/prometheus/prometheus/releases/download/v2.45.0/prometheus-2.45.0.linux-amd64.tar.gz
tar xvf prometheus-2.45.0.linux-amd64.tar.gz
sudo mv prometheus-2.45.0.linux-amd64 /opt/prometheus
# Create config
sudo tee /opt/prometheus/prometheus.yml > /dev/null < /dev/null < 3 |
| `stablebft_consensus_block_interval` | Block time | > 10s |
| `stablebft_p2p_peers` | Connected peers | \< 3 |
| `stablebft_mempool_size` | Mempool size | > 1500 |
| `stablebft_mempool_failed_txs` | Failed transactions | > 100/min |
#### System metrics
| Metric | Description | Alert Threshold |
| ---------------------------------- | ---------------- | ---------------- |
| `node_cpu_seconds_total` | CPU usage | > 80% for 5m |
| `node_memory_MemAvailable_bytes` | Available memory | \< 10% |
| `node_filesystem_avail_bytes` | Available disk | \< 10% |
| `node_network_receive_bytes_total` | Network RX | > 100MB/s |
| `node_disk_io_time_seconds_total` | Disk I/O | > 80% |
| `node_load15` | System load | > CPU cores \* 2 |
### Grafana dashboard setup
#### Import Stable dashboard
```json
{
"dashboard": {
"title": "Stable Node Monitoring",
"panels": [
{
"title": "Block Height",
"targets": [
{
"expr": "stablebft_consensus_height{chain_id=\"stabletestnet_2201-1\"}"
}
]
},
{
"title": "Peers",
"targets": [
{
"expr": "stablebft_p2p_peers"
}
]
},
{
"title": "Block Time",
"targets": [
{
"expr": "rate(stablebft_consensus_height[1m]) * 60"
}
]
},
{
"title": "Mempool Size",
"targets": [
{
"expr": "stablebft_mempool_size"
}
]
}
]
}
}
```
#### Custom dashboard import
Import dashboards via Grafana UI:
```bash
# Navigate to Dashboards > Import > Upload JSON file
# Or use Dashboard ID in Grafana's dashboard library
```
### AlertManager configuration
#### Install AlertManager
```bash
# Download AlertManager
wget https://github.com/prometheus/alertmanager/releases/download/v0.26.0/alertmanager-0.26.0.linux-amd64.tar.gz
tar xvf alertmanager-0.26.0.linux-amd64.tar.gz
sudo mv alertmanager-0.26.0.linux-amd64 /opt/alertmanager
# Configure
sudo tee /opt/alertmanager/alertmanager.yml > /dev/null < 1500
for: 10m
labels:
severity: warning
annotations:
summary: "High mempool size: {{ $value }}"
- alert: DiskSpaceLow
expr: node_filesystem_avail_bytes{mountpoint="/"} / node_filesystem_size_bytes{mountpoint="/"} < 0.1
for: 5m
labels:
severity: critical
annotations:
summary: "Low disk space: {{ $value | humanizePercentage }}"
- alert: HighCPUUsage
expr: 100 - (avg by(instance) (irate(node_cpu_seconds_total{mode="idle"}[5m])) * 100) > 80
for: 10m
labels:
severity: warning
annotations:
summary: "High CPU usage: {{ $value }}%"
```
### Log monitoring
#### Systemd logs
```bash
# View recent logs
sudo journalctl -u ${SERVICE_NAME} -n 100
# Follow logs
sudo journalctl -u ${SERVICE_NAME} -f
# Filter by time
sudo journalctl -u ${SERVICE_NAME} --since "1 hour ago"
# Export logs
sudo journalctl -u ${SERVICE_NAME} --since today > stable-logs-$(date +%Y%m%d).log
```
#### Log analysis scripts
```bash
#!/bin/bash
# analyze-logs.sh
# Count errors in last hour
echo "Errors in last hour:"
sudo journalctl -u ${SERVICE_NAME} --since "1 hour ago" | grep -c ERROR
# Show peer connections
echo "Peer connections:"
sudo journalctl -u ${SERVICE_NAME} --since "10 minutes ago" | grep "Peer connection" | tail -10
# Check for consensus issues
echo "Consensus rounds:"
sudo journalctl -u ${SERVICE_NAME} --since "30 minutes ago" | grep -E "enterNewRound|Timeout" | tail -20
# Memory usage patterns
echo "Memory warnings:"
sudo journalctl -u ${SERVICE_NAME} --since "1 day ago" | grep -i memory
```
#### Loki setup (optional)
```bash
# Install Loki
wget https://github.com/grafana/loki/releases/download/v2.9.0/loki-linux-amd64.zip
unzip loki-linux-amd64.zip
sudo mv loki-linux-amd64 /usr/local/bin/loki
# Install Promtail
wget https://github.com/grafana/loki/releases/download/v2.9.0/promtail-linux-amd64.zip
unzip promtail-linux-amd64.zip
sudo mv promtail-linux-amd64 /usr/local/bin/promtail
# Configure Promtail
sudo tee /etc/promtail-config.yml > /dev/null < ~/reports/daily_$(date +%Y%m%d).log
curl -s localhost:26657/status | jq >> ~/reports/daily_$(date +%Y%m%d).log
```
#### Weekly maintenance
```bash
#!/bin/bash
# weekly-maintenance.sh
# Prune old data
stabled prune
# Compact database
stabled compact
# Update peer list
wget https://raw.githubusercontent.com/stable-chain/networks/main/testnet/peers.txt
cat peers.txt >> ~/.stabled/config/config.toml
# Create snapshot (optional)
./create-snapshot.sh
# System updates
sudo apt update
sudo apt upgrade -y
# Restart node (during low activity)
sudo systemctl restart ${SERVICE_NAME}
```
#### Database maintenance
```bash
# Check database size
du -sh ~/.stabled/data/
# Analyze database
stabled debug db stats ~/.stabled/data
```
### Performance monitoring
#### Resource usage tracking
```bash
#!/bin/bash
# track-resources.sh
while true; do
TIMESTAMP=$(date '+%Y-%m-%d %H:%M:%S')
CPU=$(top -bn1 | grep "stabled" | awk '{print $9}')
MEM=$(top -bn1 | grep "stabled" | awk '{print $10}')
IO=$(iostat -x 1 2 | tail -n2 | awk '{print $14}')
echo "$TIMESTAMP,CPU:$CPU,MEM:$MEM,IO:$IO" >> ~/metrics/resources.csv
sleep 60
done
```
#### Query performance
```bash
# Monitor RPC response times
while true; do
START=$(date +%s%N)
curl -s http://localhost:26657/status > /dev/null
END=$(date +%s%N)
DIFF=$((($END - $START) / 1000000))
echo "RPC response time: ${DIFF}ms"
sleep 5
done
```
### Monitoring best practices
1. **Set up redundant monitoring**
* Use external monitoring services
* Implement cross-node monitoring
* Set up dead man's switch alerts
2. **Alert fatigue prevention**
* Tune alert thresholds based on baseline
* Use alert grouping and inhibition
* Implement escalation policies
3. **Data retention**
* Keep metrics for 30 days minimum
* Archive important logs
* Regular backup of monitoring configs
4. **Security**
* Secure Grafana with strong passwords
* Use HTTPS for all endpoints
* Restrict prometheus access
5. **Documentation**
* Document all custom metrics
* Maintain runbooks for alerts
* Keep dashboard descriptions updated
### Next steps
* [Review Troubleshooting Guide](/en/how-to/troubleshoot-node) for issue resolution
* [Configure Upgrades](/en/how-to/upgrade-node) with monitoring
* Set up custom alerts based on your requirements
## Paying with invoice
This guide walks through settling an invoice on-chain using [ERC-3009](/en/explanation/erc-3009) with a deterministic nonce derived from invoice metadata. The nonce links each payment to its invoice and prevents double payment.
:::note
**Concept:** For the invoice settlement model and comparison to traditional B2B invoicing, see [Invoice settlement](/en/reference/invoices).
:::
### What you'll build
A full invoice lifecycle: the buyer signs an ERC-3009 authorization off-chain, the vendor submits it on-chain, and reconciliation matches the resulting `AuthorizationUsed` event back to the invoice by deterministic nonce.
#### Demo
```text
step 1. Invoice issued
number: INV-2026-001234
amount: 5000 USDT0
dueDate: 2026-04-30
step 2. Buyer signs authorization (off-chain, no gas)
nonce: 0xa1b2...c3d4 (from invoice metadata)
signature: 0xf0e9...1234
step 3. Vendor submits transferWithAuthorization
tx: 0x8f3a...2d41
amount: 5000 USDT0 transferred to vendor
step 4. Reconciliation
AuthorizationUsed(nonce=0xa1b2...) → invoice INV-2026-001234
Transfer event verified for correct amount and parties
ERP: marked PAID at block 1284371
```
### Overview
**Buyer:**
```
─── Buyer ───────────────────────────────────────────
nonce = getInvoiceNonce(invoice)
authorization = { from: buyer, to: vendor, value: amount, nonce, ... }
signature = signTypedData(authorization)
// Option A: Buyer submits the transaction directly.
usdt0.transferWithAuthorization(authorization, signature)
// Option B: Buyer sends {authorization, signature} to the vendor.
// The vendor (or a facilitator) submits on the buyer's behalf.
```
**Vendor:**
```
─── Vendor ──────────────────────────────────────────
// If Option B: submit transferWithAuthorization using the buyer's signature
// Reconcile via AuthorizationUsed event
on AuthorizationUsed(authorizer, nonce):
invoice = nonceToInvoice.get(nonce)
transferLog = receipt.logs.find(Transfer matching invoice.buyer, invoice.vendor, invoice.amount)
if transferLog:
erpSystem.markPaid(invoice.id, txHash, settledAt)
```
### Configuration
```typescript
// config.ts
import { ethers } from "ethers";
export const STABLE_TESTNET_RPC = "https://rpc.testnet.stable.xyz";
export const CHAIN_ID = 2201;
export const USDT0_ADDRESS = "0x78Cf24370174180738C5B8E352B6D14c83a6c9A9";
export const provider = new ethers.JsonRpcProvider(STABLE_TESTNET_RPC);
export const EIP712_DOMAIN = {
name: "USDT0",
version: "1",
chainId: CHAIN_ID,
verifyingContract: USDT0_ADDRESS,
};
export const TRANSFER_WITH_AUTHORIZATION_TYPE = {
TransferWithAuthorization: [
{ name: "from", type: "address" },
{ name: "to", type: "address" },
{ name: "value", type: "uint256" },
{ name: "validAfter", type: "uint256" },
{ name: "validBefore", type: "uint256" },
{ name: "nonce", type: "bytes32" },
],
};
export interface Invoice {
number: string; // e.g. "INV-2026-001234"
vendor: string; // vendor wallet address
buyer: string; // buyer wallet address
amount: bigint; // amount in USDT0 atomic units (6 decimals)
dueDate: number; // Unix timestamp
}
```
### Step 1: Generate a deterministic nonce
Both the buyer and the vendor can independently compute the same nonce from invoice metadata. No external registry is needed.
```typescript
// nonce.ts
import { ethers } from "ethers";
import { Invoice } from "./config";
export function getInvoiceNonce(invoice: Invoice): string {
return ethers.solidityPackedKeccak256(
["string", "address", "address", "uint256", "uint256"],
[
invoice.number,
invoice.vendor,
invoice.buyer,
invoice.amount,
invoice.dueDate,
]
);
}
// Example
const invoice: Invoice = {
number: "INV-2026-001234",
vendor: "0xVendorAddress",
buyer: "0xBuyerAddress",
amount: ethers.parseUnits("5000", 6), // 5,000 USDT0
dueDate: Math.floor(new Date("2026-04-30").getTime() / 1000),
};
const nonce = getInvoiceNonce(invoice);
// Same input always produces the same nonce.
// This nonce is consumed on-chain upon payment, preventing double payment.
```
### Step 2: Sign the authorization (buyer)
The buyer signs an ERC-3009 `transferWithAuthorization` using the deterministic nonce from Step 1.
```typescript
// sign-invoice.ts
import { ethers } from "ethers";
import {
provider,
EIP712_DOMAIN,
TRANSFER_WITH_AUTHORIZATION_TYPE,
Invoice,
} from "./config";
import { getInvoiceNonce } from "./nonce";
const buyerWallet = new ethers.Wallet(process.env.BUYER_KEY!, provider);
async function signInvoiceAuthorization(invoice: Invoice) {
const nonce = getInvoiceNonce(invoice);
const gracePeriod = 30 * 24 * 60 * 60; // 30 days after due date
const authorization = {
from: invoice.buyer,
to: invoice.vendor,
value: invoice.amount,
validAfter: 0,
validBefore: invoice.dueDate + gracePeriod,
nonce,
};
const signature = await buyerWallet.signTypedData(
EIP712_DOMAIN,
TRANSFER_WITH_AUTHORIZATION_TYPE,
authorization
);
return { authorization, signature };
}
```
### Step 3: Submit the transaction
Two options depending on who submits.
#### Option A: Buyer submits
The buyer submits the `transferWithAuthorization` transaction directly and pays gas. Use this when the buyer controls when and how the payment is executed, for example when the buyer's accounting system needs the tx hash tied to an internal approval flow.
```typescript
// pay.ts
import { ethers } from "ethers";
import { provider, USDT0_ADDRESS } from "./config";
const buyerWallet = new ethers.Wallet(process.env.BUYER_KEY!, provider);
const usdt0 = new ethers.Contract(
USDT0_ADDRESS,
[
"function transferWithAuthorization(address from, address to, uint256 value, uint256 validAfter, uint256 validBefore, bytes32 nonce, uint8 v, bytes32 r, bytes32 s)",
],
buyerWallet,
);
async function payInvoice(
authorization: { from: string; to: string; value: bigint; validAfter: number; validBefore: number; nonce: string },
signature: string,
) {
const { v, r, s } = ethers.Signature.from(signature);
const tx = await usdt0.transferWithAuthorization(
authorization.from,
authorization.to,
authorization.value,
authorization.validAfter,
authorization.validBefore,
authorization.nonce,
v, r, s,
);
const receipt = await tx.wait(1);
console.log("Invoice paid, tx:", receipt.hash);
// The nonce is now consumed; the same invoice cannot be paid twice.
return { txHash: receipt.hash, blockNumber: receipt.blockNumber };
}
```
#### Option B: Vendor submits
The buyer sends `{authorization, signature}` to the vendor through API, email, or any channel. The vendor (or a facilitator) submits the transaction on the buyer's behalf, so the buyer does not need to manage gas. Use this when the vendor needs synchronous confirmation within the same request flow.
```typescript
// settle.ts
import { ethers } from "ethers";
import { provider, USDT0_ADDRESS } from "./config";
const vendorWallet = new ethers.Wallet(process.env.VENDOR_KEY!, provider);
const usdt0 = new ethers.Contract(
USDT0_ADDRESS,
[
"function transferWithAuthorization(address from, address to, uint256 value, uint256 validAfter, uint256 validBefore, bytes32 nonce, uint8 v, bytes32 r, bytes32 s)",
],
vendorWallet,
);
async function settleInvoice(
authorization: { from: string; to: string; value: bigint; validAfter: number; validBefore: number; nonce: string },
signature: string,
) {
const { v, r, s } = ethers.Signature.from(signature);
const tx = await usdt0.transferWithAuthorization(
authorization.from,
authorization.to,
authorization.value,
authorization.validAfter,
authorization.validBefore,
authorization.nonce,
v, r, s,
);
const receipt = await tx.wait(1);
console.log("Invoice settled, tx:", receipt.hash);
return { txHash: receipt.hash, blockNumber: receipt.blockNumber };
}
```
### Step 4: Reconcile via on-chain events (vendor)
Regardless of who submitted the transaction, every invoice payment emits an `AuthorizationUsed` event carrying the deterministic nonce. The vendor listens for this event and matches it to a pending invoice by nonce. Because the nonce is derived from invoice metadata, matching is exact.
:::note
Matching by nonce identifies which invoice was paid, but the vendor should also verify the `Transfer` event in the same transaction to confirm that the correct amount was sent to the correct recipient. The code below includes this verification.
:::
```typescript
// reconcile.ts
import { ethers } from "ethers";
import { provider, USDT0_ADDRESS, Invoice } from "./config";
import { getInvoiceNonce } from "./nonce";
const usdt0 = new ethers.Contract(
USDT0_ADDRESS,
[
"event AuthorizationUsed(address indexed authorizer, bytes32 indexed nonce)",
"event Transfer(address indexed from, address indexed to, uint256 value)",
],
provider,
);
// Build a lookup map: nonce -> invoice.
// In production, this comes from your invoice database.
const invoices: Invoice[] = [
{
number: "INV-2026-001234",
vendor: "0xVendorAddress",
buyer: "0xBuyerAddress",
amount: ethers.parseUnits("5000", 6),
dueDate: Math.floor(new Date("2026-04-30").getTime() / 1000),
},
];
const nonceToInvoice = new Map();
for (const inv of invoices) {
nonceToInvoice.set(getInvoiceNonce(inv), inv);
}
usdt0.on("AuthorizationUsed", async (authorizer: string, nonce: string, event: any) => {
const invoice = nonceToInvoice.get(nonce);
if (!invoice) return; // not one of our invoices
const receipt = await event.getTransactionReceipt();
const transferLog = receipt.logs
.map((log: any) => {
try { return usdt0.interface.parseLog(log); } catch { return null; }
})
.find(
(parsed: any) =>
parsed?.name === "Transfer" &&
parsed.args[0].toLowerCase() === invoice.buyer.toLowerCase() &&
parsed.args[1].toLowerCase() === invoice.vendor.toLowerCase() &&
parsed.args[2] === invoice.amount
);
if (!transferLog) {
console.error("No matching Transfer event for invoice:", invoice.number);
return;
}
// All checks passed
console.log(`Invoice ${invoice.number} PAID`);
console.log(" tx:", receipt.hash);
console.log(" settled at block:", receipt.blockNumber);
// In production: update your ERP/accounting system here
// erpSystem.markPaid(invoice.number, receipt.hash, receipt.blockNumber);
});
console.log("Listening for invoice settlements...");
```
```bash
npx tsx reconcile.ts
```
```text
Listening for invoice settlements...
Invoice INV-2026-001234 PAID
tx: 0x8f3a...2d41
settled at block: 1284371
```
### Handle failed payments
A submitted `transferWithAuthorization` can revert for several reasons. Detect and surface each one to the vendor or buyer so the invoice can be retried or closed.
| **Revert reason** | **Cause** | **Recovery** |
| :----------------------------------------------- | :------------------------------------------------------------------------ | :------------------------------------------------------------------ |
| `FiatTokenV2: invalid signature` | Signature doesn't match the authorization fields. | Ask buyer to re-sign with unchanged invoice data. |
| `FiatTokenV2: authorization is used or canceled` | Nonce was already consumed (double-submission) or the buyer cancelled it. | Mark the invoice as already-paid; look up the original tx by nonce. |
| `FiatTokenV2: authorization is not yet valid` | Submitted before `validAfter`. | Wait until `validAfter` or issue a new authorization. |
| `FiatTokenV2: authorization is expired` | Submitted after `validBefore`. | Issue a new authorization with an extended window. |
| `FiatTokenV2: transfer amount exceeds balance` | Buyer's USDT0 balance is insufficient. | Notify buyer to fund their wallet, then retry the same signature. |
Catch reverts and classify them before retrying.
```typescript
// retry.ts
import { ethers } from "ethers";
async function submitWithRetry(
submit: () => Promise,
): Promise {
try {
const tx = await submit();
const receipt = await tx.wait(1);
return receipt!.hash;
} catch (err: any) {
const reason = err?.info?.error?.message || err?.reason || err?.message || "";
if (reason.includes("authorization is used or canceled")) {
// Lookup the original tx by AuthorizationUsed event; mark invoice paid.
throw new Error("ALREADY_PAID");
}
if (reason.includes("authorization is expired")) {
throw new Error("AUTHORIZATION_EXPIRED");
}
if (reason.includes("invalid signature")) {
throw new Error("INVALID_SIGNATURE");
}
if (reason.includes("transfer amount exceeds balance")) {
throw new Error("INSUFFICIENT_BALANCE");
}
throw err;
}
}
```
:::warning
Never retry a failed submission without classifying the error. Blind retries on a reverted transferWithAuthorization can pass validation after the buyer tops up their balance, which may not match the buyer's latest intent.
:::
### Next recommended
* [**Invoice settlement concept**](/en/reference/invoices) — Understand the deterministic-nonce reconciliation model.
* [**ERC-3009**](/en/explanation/erc-3009) — Review the signed-authorization standard behind this flow.
* [**Enable gas-free transactions**](/en/how-to/integrate-gas-waiver) — Combine with Gas Waiver to eliminate gas from the settlement path.
## Paying with MCP server
This guide shows how to bridge x402-enabled APIs to [MCP](https://modelcontextprotocol.io) tools so AI clients can call and pay for them through natural-language prompts. It builds on the server from [Build a pay-per-call API](/en/how-to/build-pay-per-call).
### What you'll build
An MCP server that wraps x402-paid endpoints as tools. The AI client types a natural-language prompt, each tool call triggers a paid x402 request, and settlement is visible on Stablescan. The user never sees a wallet prompt.
#### Demo
```text
step 1. User in Claude: "Pull financials for ACME Corp and assess credit risk."
step 2. Client calls get_company_financials("ACME")
→ MCP handler: fetchWithPayment("/financials?ticker=ACME")
→ 402 Payment Required → sign ERC-3009 → retry
→ Facilitator settles $0.01 USDT0 on-chain
→ tx: 0x8f3a...aaaa
→ 200 OK { revenue, debt_ratio, cash_flow }
step 3. Client calls assess_credit_risk(financials)
→ MCP handler: fetchWithPayment("/credit-risk", POST)
→ Facilitator settles $0.05 USDT0 on-chain
→ tx: 0x9bc4...bbbb
→ 200 OK { score: 72, rating: "moderate" }
step 4. Claude responds:
"ACME Corp has a credit risk score of 72 (moderate). Revenue is stable
but debt-to-equity ratio is elevated at 1.8x..."
```
Both `tx` values are visible on [https://stablescan.xyz](https://stablescan.xyz).
:::note
**Agent wallet funding**: The MCP server signs payments with a seed phrase you control. Fund that wallet with USDT0 on mainnet before starting the server. A balance of at least `$0.10` covers several paid calls; `$1.00` is plenty for extended testing. Top up as needed using a standard USDT0 transfer to the wallet's address.
:::
### Overview
**MCP Server:**
```typescript
// --- MCP Server ---
// Bridge x402-enabled APIs to MCP tools
tools = {
"get_company_financials": {
handler: (ticker) =>
fetchWithPayment("https://api.example.com/financials?ticker=" + ticker),
},
"assess_credit_risk": {
handler: (financials) =>
fetchWithPayment("https://api.example.com/credit-risk", {
method: "POST",
body: JSON.stringify({ financials }),
}),
},
}
```
**User (via AI client):**
```
─── AI Client ───────────────────────────────────────
User: "Pull financials for ACME Corp and assess their credit risk."
Client calls get_company_financials tool
→ MCP server sends x402 paid request
→ Facilitator settles USDT0 on-chain
→ API returns financial data
Client calls assess_credit_risk tool with the result
→ MCP server sends x402 paid request
→ Facilitator settles USDT0 on-chain
→ API returns risk assessment
→ Client responds with the combined result
```
### Prerequisites
* A running x402 server (see [Build a pay-per-call API](/en/how-to/build-pay-per-call)).
* An MCP-compatible AI client (Claude Desktop, Claude Code, etc.).
### Step 1: Create the MCP server
The MCP server acts as a bridge between AI clients and x402-enabled APIs. Each tool makes a paid request using the x402 client SDK and returns the result.
```bash
npm install @modelcontextprotocol/sdk @x402/fetch @x402/evm @tetherto/wdk-wallet-evm
```
```typescript
// mcp-server.ts
import { McpServer } from "@modelcontextprotocol/sdk/server/mcp.js";
import { StdioServerTransport } from "@modelcontextprotocol/sdk/server/stdio.js";
import WalletManagerEvm from "@tetherto/wdk-wallet-evm";
import { x402Client, wrapFetchWithPayment } from "@x402/fetch";
import { registerExactEvmScheme } from "@x402/evm/exact/client";
import { z } from "zod";
// --- Wallet and x402 client ---
const account = await new WalletManagerEvm(process.env.SEED_PHRASE!, {
provider: "https://rpc.stable.xyz",
}).getAccount(0);
const client = new x402Client();
registerExactEvmScheme(client, { signer: account });
const fetchWithPayment = wrapFetchWithPayment(fetch, client);
// --- x402 API base URL ---
const API_BASE = process.env.API_BASE || "http://localhost:4021";
// --- MCP server ---
const server = new McpServer({
name: "x402-payments",
version: "1.0.0",
});
server.tool(
"get_company_financials",
"Get company financial data by ticker (paid endpoint, $0.01 per call)",
{ ticker: z.string().describe("Company ticker symbol (e.g. ACME)") },
async ({ ticker }) => {
const response = await fetchWithPayment(`${API_BASE}/financials?ticker=${ticker}`);
const data = await response.json();
return { content: [{ type: "text", text: JSON.stringify(data) }] };
},
);
server.tool(
"assess_credit_risk",
"Assess credit risk from financial data (paid endpoint, $0.05 per call)",
{ financials: z.string().describe("JSON string of company financial data") },
async ({ financials }) => {
const response = await fetchWithPayment(`${API_BASE}/credit-risk`, {
method: "POST",
headers: { "Content-Type": "application/json" },
body: financials,
});
const data = await response.json();
return { content: [{ type: "text", text: JSON.stringify(data) }] };
},
);
server.tool(
"check_balance",
"Check the USDT0 balance of the payment wallet",
{},
async () => {
const USDT0_STABLE = "0x779Ded0c9e1022225f8E0630b35a9b54bE713736";
const balance = await account.getTokenBalance(USDT0_STABLE);
const formatted = (Number(balance) / 1e6).toFixed(2);
return {
content: [{ type: "text", text: `Wallet balance: ${formatted} USDT0` }],
};
},
);
// --- Start ---
const transport = new StdioServerTransport();
await server.connect(transport);
```
Each tool handler calls `fetchWithPayment`, which handles the full x402 payment cycle automatically. The AI client only sees the tool name, description, and parameters.
### Step 2: Configure your AI client
Add the MCP server to your AI client's configuration.
**Claude Desktop** (`claude_desktop_config.json`):
```json
{
"mcpServers": {
"x402-payments": {
"command": "npx",
"args": ["tsx", "/path/to/mcp-server.ts"],
"env": {
"SEED_PHRASE": "your seed phrase here",
"API_BASE": "https://api.example.com"
}
}
}
}
```
**Claude Code:**
```bash
claude mcp add x402-payments -- npx tsx /path/to/mcp-server.ts
```
After configuration, restart your AI client. The tools should appear in the available tool list.
:::warning
The seed phrase in the MCP configuration controls real funds. Store it securely using your OS keychain or a secrets manager rather than in plain-text config files.
:::
### Step 3: Type the prompt and use it
Once configured, the AI client can call paid APIs through the user's prompt:
**User:** "Pull financials for ACME Corp and assess their credit risk."
1. Client calls `get_company_financials("ACME")`: $0.01 paid via x402. Returns revenue, debt ratio, cash flow, etc.
2. Client calls `assess_credit_risk(financials)`: $0.05 paid via x402. Returns risk score, rating, key factors.
3. Client responds: "ACME Corp has a credit risk score of 72 (moderate). Revenue is stable but debt-to-equity ratio is elevated at 1.8x..."
Individual tools also work on their own:
* "Pull financials for ACME Corp" calls `get_company_financials` ($0.01).
* "Assess credit risk for this data" calls `assess_credit_risk` ($0.05).
* "How much USDT0 do I have left?" calls `check_balance`.
The user does not interact with wallets, signatures, or payment flows. The MCP server handles payment for each tool call transparently.
### Spending controls
To prevent unexpected spending, consider adding controls to the MCP server.
```typescript
const MAX_PER_CALL = 100_000; // $0.10 in base units
const MAX_PER_SESSION = 5_000_000; // $5.00 in base units
let sessionSpent = 0n;
function checkSpendingLimit(amount: bigint) {
if (amount > BigInt(MAX_PER_CALL)) {
throw new Error(`Amount exceeds per-call limit of $${MAX_PER_CALL / 1e6}`);
}
if (sessionSpent + amount > BigInt(MAX_PER_SESSION)) {
throw new Error(`Session spending limit of $${MAX_PER_SESSION / 1e6} reached`);
}
sessionSpent += amount;
}
```
These limits run server-side. The AI client cannot modify or bypass them.
### Next recommended
* [**Build a pay-per-call API**](/en/how-to/build-pay-per-call) — Set up the x402 server this MCP server bridges.
* [**x402 concept**](/en/explanation/x402) — Review the settlement protocol behind these payments.
* [**Develop with AI**](/en/how-to/develop-with-ai) — Wire Stable's Docs and Runtime MCP servers into the same AI client.
## Production readiness
Work through each section below before switching from testnet to mainnet.
### Before you launch
* **Network targets.** Your application reads mainnet values, not testnet: chain ID `988`, RPC `https://rpc.stable.xyz`, explorer `https://stablescan.xyz`. Full configuration is in [Connect](/en/reference/connect).
* **Contracts verified.** Deployed contracts are verified on [stablescan.xyz](https://stablescan.xyz) so users and partners can inspect them.
* **Mainnet funding path.** You have a documented way for production wallets to acquire USDT0: direct, bridge via LayerZero, or custodian. Faucets are testnet-only.
* **Environment isolation.** Keys, RPC credentials, and signing paths are separated between testnet and mainnet.
### Security checks
USDT0's dual-role behavior breaks a handful of assumptions ported from Ethereum. Each item below should be validated. The full list is in the [migration checklist](/en/explanation/usdt0-behavior).
**Solvency checks read real native balance, not a mirror.**
:::warning
Tracking deposited native value in an internal variable is unsafe. An external `USDT0.transferFrom` call can drain the contract's native balance without invoking any contract code.
:::
```solidity
// SAFE — checks real balance at the moment of transfer
function withdraw() external {
uint256 amount = credit[msg.sender];
credit[msg.sender] = 0;
require(address(this).balance >= amount, "insufficient balance");
payable(msg.sender).call{value: amount}("");
}
```
**Allowance-based drain paths are covered by tests.** Every `approve` / `transferFrom` / `permit` path has a test that attempts to drain the contract's native balance.
**Zero-address transfers are rejected before the call.**
:::warning
Both native and ERC-20 transfers to `address(0)` revert on Stable. Validate recipients explicitly, or your transaction will fail.
:::
```solidity
require(recipient != address(0), "zero address recipient");
payable(recipient).call{value: amount}("");
```
**Address-reuse detection does not rely on `EXTCODEHASH`.** Permit-based approvals change native balance without a nonce increment, so `EXTCODEHASH` can oscillate between zero hash and empty hash. Use explicit tracking instead.
### Performance and reliability
* **RPC redundancy.** Production traffic has a failover plan. Third-party providers are listed in [RPC providers](/en/reference/rpc-providers).
* **Gas estimation.** Transactions set `maxPriorityFeePerGas` to `0` and compute `maxFeePerGas` from the current base fee. See [Gas pricing](/en/reference/gas-pricing-api).
* **Block time.** Blocks are produced roughly every 0.7 seconds with single-slot finality. Poll intervals and confirmation thresholds are tuned to this cadence.
* **Retries.** Transient RPC errors are retried idempotently. For financially sensitive flows, inclusion is verified via receipts or logs before downstream state changes.
### Operational ownership
* **Monitoring.** If you run your own nodes, alerts watch block production, peer health, and RPC latency; see [Monitoring](/en/how-to/monitor-node). If you use a third-party RPC, track provider SLAs and failover telemetry.
* **Upgrades.** Protocol releases are tracked so node operators can schedule upgrades; see [Mainnet version history](/en/reference/mainnet-version-history).
* **Runbooks.** Rollback procedures exist for contract pauses, key rotation, and RPC provider switches.
### Support and escalation
* [Developer assistance](/en/reference/developer-assistance): FAQ and reference pointers.
* [Discord](https://discord.gg/stablexyz): community support and protocol updates.
* `bizdev@stable.xyz`: partnership and integration conversations.
### Next recommended
* [**USDT0 behavior**](/en/explanation/usdt0-behavior) — Read the full migration checklist and contract design requirements.
* [**Mainnet information**](/en/reference/mainnet-information) — Check mainnet chain parameters and version history.
* [**RPC providers**](/en/reference/rpc-providers) — Pick third-party RPC providers for redundancy.
* [**Monitoring**](/en/how-to/monitor-node) — Wire metrics and alerts for block production and RPC health.
A validator is a synced full node that has registered on-chain and bonded stake. You install and sync the node first, then register it by calling `createValidator` on the staking precompile (`0x0000000000000000000000000000000000000800`). This page covers the registration step. For the node itself, see [Install a node](/en/how-to/install-node) and [Node configuration](/en/reference/node-configuration).
:::warning
Register only after your node is fully synced. A validator that signs before it has caught up can double-sign and be permanently removed from the set (tombstoned). Set `double_sign_check_height = 2` or higher in `config.toml` before you start (see [Node configuration](/en/reference/node-configuration#consensus-configuration)). Setting it to `1` performs no check.
:::
### Prerequisites
* A fully synced full node on Mainnet (Chain ID `988`). See [Install a node](/en/how-to/install-node).
* `double_sign_check_height` set to `2` or higher in `~/.stabled/config/config.toml`.
* [Foundry](https://book.getfoundry.sh/) installed for `cast`, used to call the precompile.
* The staking amount funded on your validator's EVM address, in USDT0.
Confirm the node has caught up before going further. `catching_up` must be `false`.
```bash
curl -s localhost:26657/status | jq '.result.sync_info.catching_up'
```
```text
false
```
### Step 1: prepare validator keys
Create the operator account, then read the two values `createValidator` needs: the consensus public key (base64) and the validator's EVM address.
```bash
# Create the validator operator account
stabled keys add validator
# Consensus public key (base64) — save this
stabled comet show-validator | jq .key
# Derive the validator's EVM address (0x form)
stabled keys parse $(stabled keys show validator -a)
```
```text
"AbCd...base64PubKey...=="
# ...
# then, evm address is 0xCAEA59C7476C87D0FF6BE6F04DA207601D5BE7D0
```
:::warning
Back up `~/.stabled/config/priv_validator_key.json` offline and never run two nodes with the same key. Two instances signing with one key is double-signing and results in a permanent slash.
:::
### Step 2: set up environment
```bash
# Staking precompile contract address
export STAKING_ADDRESS="0x0000000000000000000000000000000000000800"
# Mainnet EVM RPC
export RPC_URL="https://rpc.stable.xyz"
# Your operator private key and validator EVM address
export PRIVATE_KEY="your_private_key_here"
export VALIDATOR_ADDRESS="0xYourValidatorAddress"
# Consensus pubkey from Step 1
export PUBKEY="AbCd...base64PubKey...=="
# Self-delegation amount in wei (18 decimals). 1000000000000000000 = 1 token
export AMOUNT="1000000000000000000"
```
### Step 3: create the validator
Call `createValidator` on the staking precompile. The function takes a `description` tuple, a `commissionRates` tuple, the minimum self-delegation, the validator address, the consensus pubkey, and the bonded amount. Encode and send it with `cast`.
```bash
# createValidator(
# (moniker, identity, website, securityContact, details),
# (rate, maxRate, maxChangeRate),
# minSelfDelegation, validatorAddress, pubkey, value
# )
cast send "$STAKING_ADDRESS" \
"createValidator((string,string,string,string,string),(uint256,uint256,uint256),uint256,address,string,uint256)" \
"(\"My Validator\",\"keybase-id\",\"https://example.com\",\"security@example.com\",\"My validator description\")" \
"(100000000000000000,200000000000000000,10000000000000000)" \
"1000000000000000000" \
"$VALIDATOR_ADDRESS" \
"$PUBKEY" \
"$AMOUNT" \
--rpc-url "$RPC_URL" \
--private-key "$PRIVATE_KEY"
```
```text
transactionHash 0x4f...c2
status 1 (success)
```
The commission tuple is `(rate, maxRate, maxChangeRate)`, each scaled to 18 decimals. The example sets a 10% rate (`100000000000000000`), a 20% ceiling, and a 1% maximum daily change. `maxRate` and `maxChangeRate` are fixed at creation and cannot be edited later. A successful call emits a `CreateValidator` event. See the [staking precompile reference](/en/reference/staking-module-api#createvalidator) for every field.
### Step 4: verify
Confirm the validator is registered and bonded by reading it back from the staking precompile, then check it is signing blocks.
```bash
# Read your validator's on-chain record
cast call "$STAKING_ADDRESS" \
"validator(address)" "$VALIDATOR_ADDRESS" \
--rpc-url "$RPC_URL"
# Confirm the node reports validator info
curl -s localhost:26657/status | jq '.result.validator_info'
```
```text
# validator() returns the moniker, tokens, commission, and a bonded status (3)
# validator_info shows your consensus address with non-zero voting power
```
### Add self-delegation
To bond more stake to your own validator after creation, call `delegate` on the same precompile.
```bash
cast send "$STAKING_ADDRESS" \
"delegate(address,address,uint256)" \
"$VALIDATOR_ADDRESS" "$VALIDATOR_ADDRESS" "$AMOUNT" \
--rpc-url "$RPC_URL" \
--private-key "$PRIVATE_KEY"
```
```text
status 1 (success)
```
### After registration
Keep the validator healthy and ready for network upgrades:
* **Monitor signing and missed blocks** with the Prometheus and Grafana stack in [Monitor a node](/en/how-to/monitor-node).
* **Automate upgrades** so you don't miss an upgrade height. See the Cosmovisor setup in [Install a node](/en/how-to/install-node#cosmovisor-setup-recommended-for-automatic-upgrades) and [Upgrade a node](/en/how-to/upgrade-node).
* **Diagnose problems** (not syncing, not signing) with [Troubleshoot a node](/en/how-to/troubleshoot-node).
### Next recommended
* [**Staking precompile reference**](/en/reference/staking-module-api) — Look up the full createValidator, delegate, and editValidator signatures and structs.
* [**Node configuration**](/en/reference/node-configuration) — Set double\_sign\_check\_height and other validator-critical config before you register.
* [**Monitor a node**](/en/how-to/monitor-node) — Track signing, missed blocks, and resource usage so you catch problems before a slash.
* [**Index validator data**](/en/how-to/index-validator-data) — Read your validator's stake, uptime, and voting history on-chain once it is live.
## Use the SDK with viem
`@stablechain/sdk` is built on viem. `createStable` accepts three signing modes, and you pick one based on where the code runs: server-side with a private key, browser-side with the user's wallet, or with a `WalletClient` you've already constructed (for example, in a wagmi app).
This guide shows each mode end-to-end.
### Server-side: private-key `Account`
Use `privateKeyToAccount` from viem to sign with a private key held by your backend.
```ts
import "dotenv/config";
import { createStable, Network } from "@stablechain/sdk";
import { privateKeyToAccount } from "viem/accounts";
const account = privateKeyToAccount(process.env.PRIVATE_KEY as `0x${string}`);
const stable = createStable({
network: Network.Mainnet,
account,
});
const { txHash } = await stable.transfer({
from: account.address,
to: "0xRecipient",
amount: 5,
});
console.log(txHash);
```
```text
0x8f3a...2d41
```
### Browser-side: `Transport` from a wallet
Pass `custom(window.ethereum)` (or any EIP-1193 provider) as `transport`. The SDK builds the `WalletClient` and reads the signer address from the provider.
```ts
import { createStable, Network } from "@stablechain/sdk";
import { custom } from "viem";
const stable = createStable({
network: Network.Mainnet,
transport: custom(window.ethereum),
});
const [from] = await window.ethereum.request({ method: "eth_requestAccounts" });
const { txHash } = await stable.transfer({
from,
to: "0xRecipient",
amount: 5,
});
```
```text
0x8f3a...2d41
```
:::warning
`transfer`, `bridge`, and `swap` call `switchChain` to put the wallet on the right network. If the user rejects, the SDK throws `StableTransactionError` with `phase: "switch_chain"`. Catch it and surface a retry to the user.
:::
### Bring your own `WalletClient`
When you already have a `WalletClient` (for example, from wagmi or a custom signer), pass it directly. It takes precedence over `account` and `transport`.
```ts
import { createStable, Network } from "@stablechain/sdk";
import { createWalletClient, custom } from "viem";
import { stable as stableChain } from "viem/chains";
const walletClient = createWalletClient({
chain: stableChain,
transport: custom(window.ethereum),
});
const [from] = await walletClient.requestAddresses();
const stable = createStable({
network: Network.Mainnet,
walletClient,
});
const { txHash } = await stable.transfer({ from, to: "0xRecipient", amount: 5 });
```
```text
0x8f3a...2d41
```
### Pick a mode
| **Mode** | **Use when** |
| :------------- | :---------------------------------------------------------------------------- |
| `account` | Backend services, scripts, agents — anywhere you hold the key. |
| `transport` | Browser apps where the user signs with MetaMask or a wagmi-less custom flow. |
| `walletClient` | You already have a configured `WalletClient` (wagmi, RainbowKit, ConnectKit). |
### Next recommended
* [**Use with wagmi**](/en/how-to/sdk-with-wagmi) — Wire the SDK into a React app through wagmi hooks.
* [**SDK reference**](/en/reference/sdk) — Every config field, method, enum, and error class.
* [**SDK quickstart**](/en/tutorial/sdk-quickstart) — Run your first transfer, bridge, and swap on testnet.
## Use the SDK with wagmi
`createStable` accepts a viem `WalletClient`, which is exactly what wagmi's `useWalletClient` returns. You connect the wallet through wagmi as you normally would, then memoize a `StableClient` whenever the wallet client changes.
This guide assumes wagmi v2 and `@tanstack/react-query`.
### 1. Configure wagmi
Add Stable to the wagmi config. viem ships chain definitions for both networks.
```ts
import { http, createConfig } from "wagmi";
import { stable as stableMainnet, stableTestnet } from "viem/chains";
import { injected } from "wagmi/connectors";
export const wagmiConfig = createConfig({
chains: [stableMainnet, stableTestnet],
connectors: [injected()],
transports: {
[stableMainnet.id]: http(),
[stableTestnet.id]: http(),
},
});
```
```text
WagmiConfig { chains: [988, 2201], connectors: [injected] }
```
### 2. Build a hook that returns a `StableClient`
Memoize a `StableClient` against the current `WalletClient`. Recreate it when the wallet client identity changes.
```tsx
import { useMemo } from "react";
import { useWalletClient } from "wagmi";
import { createStable, Network, type StableClient } from "@stablechain/sdk";
export function useStable(network: Network = Network.Mainnet): StableClient | null {
const { data: walletClient } = useWalletClient();
return useMemo(() => {
if (!walletClient) return null;
return createStable({ network, walletClient });
}, [walletClient, network]);
}
```
:::warning
`useWalletClient()` returns `undefined` before the user connects. Always guard before calling SDK methods, or the destructured `walletClient` will be falsy and `createStable` will not have a signer.
:::
### 3. Use it in a component
```tsx
import { useAccount, useChainId } from "wagmi";
import { Network } from "@stablechain/sdk";
import { useStable } from "./useStable";
export function PayButton() {
const { address } = useAccount();
const chainId = useChainId();
const stable = useStable(Network.Mainnet);
async function onClick() {
if (!stable || !address) return;
const { txHash } = await stable.transfer({
from: address,
to: "0xRecipient",
amount: 1,
});
console.log("Sent:", txHash);
}
return (
);
}
```
```text
Sent: 0x8f3a...2d41
```
### 4. Bridge and swap from React
The same `stable` instance handles bridge and swap. Fetch the quote in an effect or a `useQuery`, then execute on click.
```tsx
const stable = useStable(Network.Mainnet);
const onSwap = async () => {
if (!stable) return;
const quote = await stable.quoteSwap({
fromToken: "0x8a2B28364102Bea189D99A475C494330Ef2bDD0B",
toToken: "0x779Ded0c9e1022225f8E0630b35a9b54bE713736",
amount: 100,
fromDecimals: 6,
});
const { txHash, toAmount } = await stable.swap({
fromToken: quote.fromToken,
toToken: "0x779Ded0c9e1022225f8E0630b35a9b54bE713736",
amount: 100,
fromDecimals: 6,
quote,
});
console.log({ txHash, toAmount });
};
```
```text
{ txHash: "0xabcd...", toAmount: 99.81 }
```
:::note
Caching quotes with `useQuery` works well: pass `quoteSwap` / `quoteBridge` as the query function and forward the cached `quote` into `swap` / `bridge`. The SDK skips its internal quote call when one is provided.
:::
### Next recommended
* [**SDK reference**](/en/reference/sdk) — Every method, config field, and error class.
* [**Use with viem**](/en/how-to/sdk-with-viem) — Compare the three signing modes side-by-side.
* [**SDK quickstart**](/en/tutorial/sdk-quickstart) — Run your first transfer, bridge, and swap on testnet.
## Self-hosted gas waiver
Self-hosted Gas Waiver lets you operate your own waiver infrastructure instead of using the hosted Waiver Server API. You register a waiver address through on-chain governance, then broadcast wrapper transactions directly to the network.
This guide covers registering a waiver address, collecting signed user transactions, constructing wrapper transactions, and broadcasting them.
:::note
**Concept:** For what Gas Waiver is and why it exists, see [Gas waiver](/en/explanation/gas-waiver). For the full protocol specification (wrapper transaction mechanism, authorization, policy checks, execution semantics, security model), see [Gas waiver protocol](/en/reference/gas-waiver-api).
:::
For the hosted Waiver Server API integration path, see [Enable gas-free transactions](/en/how-to/integrate-gas-waiver).
### Prerequisites
* A waiver address registered on-chain via validator governance.
* `AllowedTarget` policy configured for your target contracts.
### Overview
The self-hosted flow:
1. **Collect a signed InnerTx** from the user with `gasPrice = 0`.
2. **Construct a WrapperTx**: RLP-encode the InnerTx and wrap it in a transaction sent to the marker address.
3. **Broadcast** the WrapperTx via `eth_sendRawTransaction`.
### Step 1: Collect the user's InnerTx
The user signs a transaction with `gasPrice = 0`. The `to` address and method selector must match your waiver's `AllowedTarget` policy.
```typescript
// config.ts
export const CONFIG = {
RPC_URL: "https://rpc.testnet.stable.xyz",
CHAIN_ID: 2201, // 988 for mainnet
MARKER_ADDRESS: "0x000000000000000000000000000000000000f333",
USDT0_ADDRESS: "0x78Cf24370174180738C5B8E352B6D14c83a6c9A9",
};
```
```typescript
// collectInnerTx.ts
import { ethers } from "ethers";
import { CONFIG } from "./config";
const provider = new ethers.JsonRpcProvider(CONFIG.RPC_URL);
const usdt0 = new ethers.Contract(CONFIG.USDT0_ADDRESS, [
"function transfer(address to, uint256 amount) returns (bool)"
], provider);
const callData = usdt0.interface.encodeFunctionData("transfer", [
recipientAddress,
ethers.parseUnits("0.01", 18)
]);
const gasEstimate = await provider.estimateGas({
from: userWallet.address,
to: CONFIG.USDT0_ADDRESS,
data: callData,
});
const nonce = await provider.getTransactionCount(userWallet.address);
const innerTx = {
to: CONFIG.USDT0_ADDRESS,
data: callData,
value: 0,
gasPrice: 0,
gasLimit: gasEstimate,
nonce: nonce,
chainId: CONFIG.CHAIN_ID,
};
const signedInnerTx = await userWallet.signTransaction(innerTx);
```
### Step 2: Construct the WrapperTx
RLP-encode the signed InnerTx and wrap it in a transaction to the marker address. The `gasLimit` must cover both the inner execution and the wrapping overhead.
```typescript
// constructWrapper.ts
import { ethers } from "ethers";
import { CONFIG } from "./config";
const innerTxBytes = ethers.decodeRlp(signedInnerTx);
const rlpEncoded = ethers.encodeRlp(innerTxBytes);
const waiverNonce = await provider.getTransactionCount(waiverWallet.address);
const wrapperTx = {
to: CONFIG.MARKER_ADDRESS,
data: rlpEncoded,
value: 0,
gasPrice: 0,
gasLimit: (gasEstimate * 12n / 10n) * 2n, // ~2x inner gas for overhead
nonce: waiverNonce,
chainId: CONFIG.CHAIN_ID,
};
const signedWrapperTx = await waiverWallet.signTransaction(wrapperTx);
```
:::warning
Both `InnerTx.gasPrice` and `WrapperTx.gasPrice` must be `0`. `WrapperTx.value` must also be `0`. If any of these conditions are not met, validators will reject the transaction.
:::
### Step 3: Broadcast
Submit the signed WrapperTx via standard JSON-RPC.
```typescript
// broadcast.ts
const txHash = await provider.send("eth_sendRawTransaction", [signedWrapperTx]);
console.log("Wrapper tx broadcast:", txHash);
const receipt = await provider.waitForTransaction(txHash);
console.log("Confirmed:", receipt.status === 1);
```
```text
Wrapper tx broadcast: 0x...
Confirmed: true
```
### Key takeaways
* Self-hosted waiver requires a waiver address registered through on-chain validator governance.
* The WrapperTx is sent to the marker address (`0x...f333`) with the RLP-encoded InnerTx as data.
* Both InnerTx and WrapperTx must have `gasPrice = 0` and `value = 0`.
### Next recommended
* [**Gas waiver concept**](/en/explanation/gas-waiver) — Understand the mechanism before you run your own.
* [**Gas waiver protocol**](/en/reference/gas-waiver-api) — Reference the full protocol spec for marker routing, authorization, and execution semantics.
* [**Enable gas-free transactions**](/en/how-to/integrate-gas-waiver) — Use the hosted Waiver Server API instead of self-hosting.
## Subscribe and collect
This guide walks through building a subscription payment system where the subscriber authorizes once and the service provider collects each billing cycle automatically via EIP-7702 account abstraction.
:::note
**Concept:** For the subscription model, trade-offs, and comparison to card-on-file billing, see [Subscription billing](/en/reference/subscriptions).
:::
### What you'll build
A full subscription lifecycle: the subscriber delegates and subscribes once, the provider collects on schedule (second cycle shown to prove repeat behavior), and the subscriber cancels.
#### Demo
```text
step 1. Subscriber delegates EOA to SubscriptionManager (EIP-7702)
tx: 0x7702...aaaa
step 2. Subscriber registers subscription (10 USDT0 / 30 days)
subscriptionId: 0xabc...
nextChargeAt: 2026-05-23T12:00:00Z
step 3. Provider calls collect() on day 30
collected: 10 USDT0
gas cost: ~0.000050 USDT0
nextChargeAt: 2026-06-22T12:00:00Z
step 4. Provider calls collect() on day 60
collected: 10 USDT0
gas cost: ~0.000050 USDT0
nextChargeAt: 2026-07-22T12:00:00Z
step 5. Subscriber cancels
subscription: inactive
```
### Overview
**Subscriber:**
```
─── Subscriber ───────────────────────────────────────
// One-time setup: delegate EOA to the subscription contract
signAuthorization(delegateContract)
sendTransaction({ type: 4, authorizationList: [signedAuth] })
// Subscribe: set billing terms on own EOA
sendTransaction({ to: self, data: subscribe(subscriptionId, provider, amount, interval) })
// Cancel: revoke billing access at any time
sendTransaction({ to: self, data: cancelSubscription(subscriptionId) })
```
**Service provider:**
```
─── Service Provider ────────────────────────────────
// Each billing cycle: collect payment from subscriber's EOA
// The delegate contract verifies caller, billing schedule, and amount
sendTransaction({ to: subscriberEOA, data: collect(subscriptionId) })
// Automate with a cron job matching the billing interval
// The contract reverts if called before the interval has elapsed
```
### Delegate contract
Subscription billing works by delegating the subscriber's EOA to a contract that enforces billing terms. Through EIP-7702, the subscriber's account temporarily gains contract logic, allowing a service provider to collect payments at each billing cycle without requiring the subscriber to sign every time.
You can use an existing deployed contract or deploy your own. The example below is a minimal `SubscriptionManager` contract that supports three operations:
* `subscribe`: register billing terms for a `subscriptionId`.
* `collect`: provider pulls the next scheduled payment for that `subscriptionId`.
* `cancelSubscription`: subscriber revokes a specific subscription.
```solidity
// SPDX-License-Identifier: MIT
pragma solidity ^0.8.24;
import "@openzeppelin/contracts/token/ERC20/IERC20.sol";
/// @title SubscriptionManager (example)
/// @notice Delegate contract for EIP-7702 subscription billing.
/// Runs on the subscriber's EOA via delegation.
contract SubscriptionManager {
struct Subscription {
address provider;
uint256 amount;
uint256 interval;
uint256 nextChargeAt;
bool active;
}
// Keyed by subscriptionId.
// Storage is already per subscriber EOA under delegation.
mapping(bytes32 => Subscription) public subscriptions;
IERC20 public immutable usdt0;
event SubscriptionCreated(
bytes32 indexed subscriptionId,
address indexed provider,
uint256 amount,
uint256 interval,
uint256 nextChargeAt
);
event SubscriptionCollected(
bytes32 indexed subscriptionId,
address indexed provider,
uint256 amount,
uint256 collectedAt
);
event SubscriptionCancelled(bytes32 indexed subscriptionId);
constructor(address _usdt0) {
usdt0 = IERC20(_usdt0);
}
/// @notice Register a subscription. Called by the subscriber on their own EOA.
function subscribe(
bytes32 subscriptionId,
address provider,
uint256 amount,
uint256 interval
) external {
require(msg.sender == address(this), "subscriber only");
require(provider != address(0), "invalid provider");
require(amount > 0, "invalid amount");
require(interval > 0, "invalid interval");
require(!subscriptions[subscriptionId].active, "already exists");
uint256 nextChargeAt = block.timestamp + interval;
subscriptions[subscriptionId] = Subscription({
provider: provider,
amount: amount,
interval: interval,
nextChargeAt: nextChargeAt,
active: true
});
emit SubscriptionCreated(subscriptionId, provider, amount, interval, nextChargeAt);
}
/// @notice Collect a payment for a specific subscription. Called by the service provider.
function collect(bytes32 subscriptionId) external {
Subscription storage sub = subscriptions[subscriptionId];
require(sub.active, "not active");
require(msg.sender == sub.provider, "not provider");
require(block.timestamp >= sub.nextChargeAt, "too early");
sub.nextChargeAt += sub.interval;
require(usdt0.transfer(sub.provider, sub.amount), "transfer failed");
emit SubscriptionCollected(subscriptionId, sub.provider, sub.amount, block.timestamp);
}
/// @notice Cancel a specific subscription. Called by the subscriber.
function cancelSubscription(bytes32 subscriptionId) external {
require(msg.sender == address(this), "subscriber only");
require(subscriptions[subscriptionId].active, "not active");
delete subscriptions[subscriptionId];
emit SubscriptionCancelled(subscriptionId);
}
}
```
:::note
This contract is provided as a reference implementation for testing purposes. A delegate contract has full execution authority over the subscriber's EOA, so in production, use an audited and verified contract. For more context on EIP-7702 delegation and security, see [EIP-7702](/en/explanation/eip-7702).
:::
### Configuration
```typescript
// config.ts
import { ethers } from "ethers";
export const STABLE_TESTNET_RPC = "https://rpc.testnet.stable.xyz";
export const CHAIN_ID = 2201;
export const USDT0_ADDRESS = "0x78Cf24370174180738C5B8E352B6D14c83a6c9A9";
export const SUBSCRIPTION_MANAGER = "0xYourDeployedSubscriptionManager";
export const provider = new ethers.JsonRpcProvider(STABLE_TESTNET_RPC);
export const subscriberWallet = new ethers.Wallet(process.env.SUBSCRIBER_KEY!, provider);
```
### Step 1: Delegate the subscriber's EOA (EIP-7702)
The subscriber signs an EIP-7702 authorization to delegate their EOA to the `SubscriptionManager`. After this, the subscriber's EOA executes the delegate contract's logic.
```typescript
// delegate.ts
import { subscriberWallet, provider, CHAIN_ID, SUBSCRIPTION_MANAGER } from "./config";
const authorization = {
chainId: CHAIN_ID,
address: SUBSCRIPTION_MANAGER,
nonce: await provider.getTransactionCount(subscriberWallet.address),
};
const signedAuth = await subscriberWallet.signAuthorization(authorization);
const tx = await subscriberWallet.sendTransaction({
type: 4,
to: subscriberWallet.address,
authorizationList: [signedAuth],
maxPriorityFeePerGas: 0n,
});
const receipt = await tx.wait(1);
console.log("Delegation tx:", receipt.hash);
```
```bash
npx tsx delegate.ts
```
```text
Delegation tx: 0x7702...aaaa
```
### Step 2: Register a subscription (subscriber)
The subscriber calls `subscribe()` on their own EOA. Since the EOA is delegated, this executes `SubscriptionManager.subscribe`.
```typescript
// subscribe.ts
import { ethers } from "ethers";
import { subscriberWallet } from "./config";
const subscriptionManager = new ethers.Interface([
"function subscribe(bytes32 subscriptionId, address provider, uint256 amount, uint256 interval)",
]);
const serviceProvider = "0xServiceProviderAddress";
const monthlyAmount = ethers.parseUnits("10", 6); // 10 USDT0
const interval = 30 * 24 * 60 * 60; // 30 days in seconds
// Derive a unique subscriptionId from provider + plan name + local nonce
const subscriptionId = ethers.solidityPackedKeccak256(
["address", "string", "uint256"],
[serviceProvider, "pro-monthly", 1]
);
const tx = await subscriberWallet.sendTransaction({
to: subscriberWallet.address, // call self (delegate code executes)
data: subscriptionManager.encodeFunctionData("subscribe", [
subscriptionId,
serviceProvider,
monthlyAmount,
interval,
]),
maxPriorityFeePerGas: 0n,
});
const receipt = await tx.wait(1);
console.log("Subscription registered, tx:", receipt.hash);
console.log("Subscription ID:", subscriptionId);
```
```bash
npx tsx subscribe.ts
```
```text
Subscription registered, tx: 0xabcd...1234
Subscription ID: 0xfedc...9876
```
### Step 3: Collect a payment (service provider)
Each billing cycle, the service provider calls `collect(subscriptionId)` on the subscriber's EOA. The delegate logic verifies the caller, billing schedule, and amount before transferring USDT0.
```typescript
// collect.ts
import { ethers } from "ethers";
const provider = new ethers.JsonRpcProvider("https://rpc.testnet.stable.xyz");
const providerWallet = new ethers.Wallet(process.env.PROVIDER_KEY!, provider);
const subscriptionManager = new ethers.Interface([
"function collect(bytes32 subscriptionId)",
]);
const subscriberEOA = "0xSubscriberEOAAddress";
const subscriptionId = "0xYourSubscriptionId";
const tx = await providerWallet.sendTransaction({
to: subscriberEOA, // subscriber's EOA (runs delegate code)
data: subscriptionManager.encodeFunctionData("collect", [subscriptionId]),
maxPriorityFeePerGas: 0n,
});
const receipt = await tx.wait(1);
console.log("Payment collected, tx:", receipt.hash);
console.log("Gas used:", receipt.gasUsed.toString());
// In production, run this on a cron schedule matching the billing interval.
// The delegate contract will revert if called before the interval has elapsed.
```
```bash
npx tsx collect.ts
```
```text
Payment collected, tx: 0x8f3a...2d41
Gas used: 52000
```
A `collect()` call costs roughly **50k-55k gas** on Stable (21k base + 7702 delegation overhead + ERC-20 `transfer`). At a 1 gwei base fee, that's approximately `0.000050 USDT0` per billing cycle paid by the provider.
### Step 4: Cancel a subscription (subscriber)
The subscriber calls `cancelSubscription(subscriptionId)` on their own EOA to revoke billing access for that specific subscription.
```typescript
// cancel.ts
import { ethers } from "ethers";
import { subscriberWallet } from "./config";
const subscriptionManager = new ethers.Interface([
"function cancelSubscription(bytes32 subscriptionId)",
]);
const subscriptionId = "0xYourSubscriptionId";
const tx = await subscriberWallet.sendTransaction({
to: subscriberWallet.address,
data: subscriptionManager.encodeFunctionData("cancelSubscription", [subscriptionId]),
maxPriorityFeePerGas: 0n,
});
const receipt = await tx.wait(1);
console.log("Subscription cancelled, tx:", receipt.hash);
```
```bash
npx tsx cancel.ts
```
```text
Subscription cancelled, tx: 0xdef0...5678
```
### Security model
The subscriber is authorizing the delegate contract to pull funds from their EOA. Understand exactly what that authorization covers and how to limit exposure.
**What the subscriber is authorizing.** By delegating to `SubscriptionManager`, the subscriber grants the contract's logic full execution authority over their EOA. The delegate can only transfer funds under the conditions coded into it: caller is the registered provider, the interval has elapsed, the amount matches the stored subscription. It cannot transfer to other addresses or bypass the interval check, because the contract code doesn't allow those actions.
**Failure modes to mitigate.**
* **Malicious delegate upgrade**: if the `SubscriptionManager` is a proxy whose implementation can be changed by an admin, the authorization effectively trusts that admin. Delegate only to immutable contracts or proxies with transparent, time-locked upgrades.
* **Provider compromise**: if the provider's key leaks, an attacker can collect early payments up to the per-cycle amount. Subscribers should set a `spendingLimit` per subscription and monitor for unauthorized `SubscriptionCollected` events.
* **Delegation replacement**: subscribing again with a different delegate wipes the subscription state. Use a modular delegate that supports multiple functions (subscription, batch payments, spending limits) under a single delegation, rather than one delegate per feature.
* **Replayable signatures**: all signatures use EIP-7702 nonces tied to the subscriber's EOA, so they can't replay across chains or across delegations.
**Recommended guardrails.**
* Audit the delegate contract before production use.
* Keep per-subscription amounts small relative to the subscriber's balance.
* Monitor `SubscriptionCreated` / `SubscriptionCollected` events and surface them to the subscriber.
* Offer the subscriber a clear "cancel" UI that calls `cancelSubscription(subscriptionId)` on their own EOA.
### Important considerations
* **Persistent delegation**: the EIP-7702 delegation persists until the subscriber explicitly changes or clears it. No re-delegation needed each billing cycle.
* **Single delegation per EOA**: if the subscriber later delegates to a different contract, the subscription delegate logic is replaced and collection fails. Use a modular delegate contract that supports multiple functions (subscriptions, batch payments, spending limits, session keys) under a single delegation.
* **Schedule behavior**: this example advances `nextChargeAt` by one interval on each successful collection. If more than one billing period has elapsed, repeated `collect()` calls can catch up one period at a time. Extend the logic if your product requires a different policy.
* **Use audited delegates**: only delegate to contracts that have been audited.
### Next recommended
* [**Subscription billing concept**](/en/reference/subscriptions) — Understand the pull-based billing model.
* [**Account abstraction**](/en/how-to/account-abstraction) — See how batch payments, spending limits, and session keys combine under one delegation.
* [**EIP-7702 concept**](/en/explanation/eip-7702) — Review the delegation model that makes this possible.
## Tracking unbonding completions
When an unbonding period completes, the protocol emits an `UnbondingCompleted` event through the `StableSystem` precompile (`0x0000000000000000000000000000000000009999`) via a system transaction. This lets dApps notify users and update balances in real time without running custom indexers or polling REST endpoints.
:::note
**Concept:** For how system transactions bridge SDK-layer events to the EVM and why it matters, see [System transactions](/en/explanation/system-transactions).
:::
### Prerequisites
* Understanding of [System transactions](/en/explanation/system-transactions).
* Familiarity with [Staking](/en/explanation/staking-module), specifically `undelegate` and the unbonding process.
* Experience with contract event subscription and filtering using a standard web3 library (e.g. [ethers.js](https://docs.ethers.org/) v6).
### Overview
* **Set up the contract instance**: create a contract instance for the StableSystem precompile.
* **Handle events in your application**: subscribe to real-time events or query historical data depending on your application logic.
* **Handle connection issues**: implement reconnection logic for persistent WebSocket subscriptions.
### Step 1: Set up the contract instance
Create a contract instance for the `StableSystem` precompile using the `UnbondingCompleted` event ABI.
```typescript
// config.ts
import { ethers } from "ethers";
export const STABLE_SYSTEM_ADDRESS =
"0x0000000000000000000000000000000000009999";
export const STABLE_SYSTEM_ABI = [
"event UnbondingCompleted(address indexed delegator, address indexed validator, uint256 amount)",
];
export const provider = new ethers.JsonRpcProvider("https://rpc.testnet.stable.xyz");
export const stableSystem = new ethers.Contract(
STABLE_SYSTEM_ADDRESS,
STABLE_SYSTEM_ABI,
provider
);
```
### Step 2: Handle events in your application
Subscribe to real-time events, query historical data, or both depending on your application logic.
#### Real-time subscription
Subscribe to `UnbondingCompleted` events for real-time notifications when any unbonding completes. Useful for triggering balance updates, sending notifications, or refreshing dashboard statistics.
```typescript
// subscribeBasic.ts
import { stableSystem } from "./config";
stableSystem.on("UnbondingCompleted", (delegator, validator, amount, event) => {
console.log("Unbonding completed:");
console.log(" Delegator:", delegator);
console.log(" Validator:", validator);
console.log(" Amount:", ethers.formatEther(amount), "tokens");
console.log(" Block:", event.log.blockNumber);
console.log(" Tx Hash:", event.log.transactionHash);
});
```
#### Filter by user
To only receive events for a particular delegator address, use the indexed event parameters to create a filter.
```typescript
// subscribeByUser.ts
import { ethers } from "ethers";
import { stableSystem } from "./config";
const userAddress = "0xabcd...";
const filter = stableSystem.filters.UnbondingCompleted(userAddress);
stableSystem.on(filter, (delegator, validator, amount, event) => {
refreshUserBalance(userAddress);
showNotification(
`Your unbonding of ${ethers.formatEther(amount)} tokens completed!`
);
});
```
#### Filter by validator
```typescript
// subscribeByValidator.ts
import { stableSystem } from "./config";
const validatorAddress = "0x1234...";
const validatorFilter = stableSystem.filters.UnbondingCompleted(
null,
validatorAddress
);
stableSystem.on(validatorFilter, (delegator, validator, amount) => {
updateValidatorStats(validator, amount);
});
```
#### Historical query
If your dApp needs to show a history of past unbonding completions, query historical events using event filters with block ranges.
```typescript
// queryHistory.ts
import { ethers } from "ethers";
import { provider, stableSystem } from "./config";
async function getUnbondingHistory(
userAddress: string,
fromBlock: number,
toBlock: number
) {
const filter = stableSystem.filters.UnbondingCompleted(userAddress);
const events = await stableSystem.queryFilter(filter, fromBlock, toBlock);
return events.map((event) => ({
delegator: event.args.delegator,
validator: event.args.validator,
amount: ethers.formatEther(event.args.amount),
blockNumber: event.blockNumber,
txHash: event.transactionHash,
}));
}
const currentBlock = await provider.getBlockNumber();
const history = await getUnbondingHistory(
"0xabcd...",
currentBlock - 1000,
currentBlock
);
```
### Step 3: Handle connection issues
Event subscriptions rely on persistent WebSocket connections. Implement reconnection logic for production dApps.
```typescript
// subscribeWithReconnection.ts
import { ethers } from "ethers";
import { STABLE_SYSTEM_ADDRESS, STABLE_SYSTEM_ABI } from "./config";
let reconnectAttempts = 0;
const MAX_RECONNECT_ATTEMPTS = 5;
function handleUnbonding(delegator: string, validator: string, amount: bigint) {
console.log("Unbonding completed:", { delegator, validator, amount });
}
function setupEventListener() {
const wsProvider = new ethers.WebSocketProvider("wss://rpc.testnet.stable.xyz");
wsProvider.on("error", (error) => {
console.error("Provider error:", error);
if (reconnectAttempts < MAX_RECONNECT_ATTEMPTS) {
reconnectAttempts++;
setTimeout(() => setupEventListener(), 5000);
}
});
const stableSystem = new ethers.Contract(
STABLE_SYSTEM_ADDRESS,
STABLE_SYSTEM_ABI,
wsProvider
);
stableSystem.on("UnbondingCompleted", handleUnbonding);
}
setupEventListener();
```
### Next recommended
* [**System transactions concept**](/en/explanation/system-transactions) — Understand how protocol-level events reach the EVM.
* [**Staking module concept**](/en/explanation/staking-module) — Review the delegation and unbonding flow.
* [**Staking precompile reference**](/en/reference/staking-module-api) — Look up the methods that trigger the events tracked here.
This comprehensive guide helps diagnose and resolve common issues with Stable nodes.
### Quick diagnostics
#### Node health check script
```bash
#!/bin/bash
# quick-diagnosis.sh
# Set service name (default: stable)
export SERVICE_NAME=stable
echo "=== Stable Node Diagnostics ==="
echo "Timestamp: $(date)"
echo ""
# 1. Service Status
echo "1. SERVICE STATUS:"
systemctl status ${SERVICE_NAME} --no-pager | head -10
# 2. Sync Status
echo -e "\n2. SYNC STATUS:"
curl -s localhost:26657/status | jq '.result.sync_info' 2>/dev/null || echo "RPC not responding"
# 3. Peer Connections
echo -e "\n3. PEER COUNT:"
curl -s localhost:26657/net_info | jq '.result.n_peers' 2>/dev/null || echo "Cannot get peer info"
# 4. Recent Errors
echo -e "\n4. RECENT ERRORS (last 20):"
sudo journalctl -u ${SERVICE_NAME} --since "1 hour ago" | grep -i error | tail -20
# 5. System Resources
echo -e "\n5. SYSTEM RESOURCES:"
df -h / | grep -v Filesystem
free -h | grep Mem
top -bn1 | grep "load average"
# 6. Port Status
echo -e "\n6. PORT STATUS:"
ss -tulpn | grep ${SERVICE_NAME} || echo "No ${SERVICE_NAME} ports found"
echo -e "\n=== Diagnostics Complete ==="
```
### Common issues and solutions
#### Node won't start
##### Issue: binary not found
**Error message:**
```
stabled: command not found
```
**Solution:**
```bash
# Check if binary exists
ls -la /usr/bin/stabled
# If missing, reinstall (use arm64 if needed)
wget https://stable-data-dist.s3.us-east-1.amazonaws.com/testnet/binary/stabled-0.7.2-linux-amd64-testnet.tar.gz
tar -xvzf stabled-0.7.2-linux-amd64-testnet.tar.gz
sudo mv stabled /usr/bin/
sudo chmod +x /usr/bin/stabled
```
##### Issue: permission denied
**Error message:**
```
Error: open /home/user/.stabled/config/config.toml: permission denied
```
**Solution:**
```bash
# Fix ownership
sudo chown -R $USER:$USER ~/.stabled/
# Fix permissions
chmod 700 ~/.stabled/
chmod 600 ~/.stabled/config/*.json
chmod 644 ~/.stabled/config/*.toml
```
##### Issue: address already in use
**Error message:**
```
Error: listen tcp 0.0.0.0:26657: bind: address already in use
```
**Solution:**
```bash
# Find process using port
sudo lsof -i :26657
# Kill the process
sudo kill -9
# Or change port in config
sed -i 's/laddr = "tcp:\/\/0.0.0.0:26657"/laddr = "tcp:\/\/0.0.0.0:26658"/' ~/.stabled/config/config.toml
```
#### Sync issues
##### Issue: node stuck at certain height
**Symptoms:**
* Block height not increasing
* No new blocks for > 1 minute
**Solution:**
```bash
# 1. Check peers
curl localhost:26657/net_info | jq '.result.n_peers'
# If no peers, add persistent peers
echo "persistent_peers = \"5ed0f977a26ccf290e184e364fb04e268ef16430@37.187.147.27:26656,128accd3e8ee379bfdf54560c21345451c7048c7@37.187.147.22:26656\"" >> ~/.stabled/config/config.toml
# 2. Reset and resync
sudo systemctl stop ${SERVICE_NAME}
stabled comet unsafe-reset-all --keep-addr-book
sudo systemctl start ${SERVICE_NAME}
# 3. Use snapshot (see Snapshots guide)
```
##### Issue: "wrong Block.Header.AppHash" error
**Error message:**
```
panic: Wrong Block.Header.AppHash. Expected XXXX, got YYYY
```
**Solution:**
```bash
# This indicates state corruption - rollback to previous block
sudo systemctl stop ${SERVICE_NAME}
# Rollback one block
stabled rollback
# Restart node
sudo systemctl start ${SERVICE_NAME}
# If rollback doesn't work, restore from snapshot
# Backup important files
cp ~/.stabled/config/priv_validator_key.json ~/backup/
cp ~/.stabled/config/node_key.json ~/backup/
# Reset state
stabled comet unsafe-reset-all
# Restore from snapshot
wget https://stable-data-dist.s3.us-east-1.amazonaws.com/testnet/snapshots/snapshot.tar.lz4
tar -I lz4 -xf snapshot.tar.lz4 -C ~/.stabled/
sudo systemctl start ${SERVICE_NAME}
```
##### Issue: slow sync speed
**Symptoms:**
* Less than 100 blocks/minute
* High CPU/disk usage
**Solution:**
```bash
# 1. Check disk I/O
iostat -x 1 5
# 2. Optimize configuration
cat >> ~/.stabled/config/config.toml <> ~/.stabled/config/config.toml < db_dump.txt
# 4. If repair fails, resync
rm -rf ~/.stabled/data
# Restore from snapshot
# 5. Start node
sudo systemctl start ${SERVICE_NAME}
```
##### Issue: "too many open files"
**Error message:**
```
accept: too many open files
```
**Solution:**
```bash
# 1. Check current limits
ulimit -n
# 2. Increase limits
echo "* soft nofile 65535" | sudo tee -a /etc/security/limits.conf
echo "* hard nofile 65535" | sudo tee -a /etc/security/limits.conf
# 3. Update systemd service
sudo sed -i '/\[Service\]/a LimitNOFILE=65535' /etc/systemd/system/stabled.service
# 4. Reload and restart
sudo systemctl daemon-reload
sudo systemctl restart ${SERVICE_NAME}
```
#### Memory issues
##### Issue: out of memory (OOM) kills
**Symptoms:**
```
stabled.service: Main process exited, code=killed, status=9/KILL
```
**Solution:**
```bash
# 1. Check memory usage
free -h
dmesg | grep -i "killed process"
# 2. Add swap space
sudo fallocate -l 8G /swapfile
sudo chmod 600 /swapfile
sudo mkswap /swapfile
sudo swapon /swapfile
echo '/swapfile none swap sw 0 0' | sudo tee -a /etc/fstab
# 3. Optimize memory usage
cat >> ~/.stabled/config/app.toml < $OUTPUT_DIR/system.txt
df -h >> $OUTPUT_DIR/system.txt
free -h >> $OUTPUT_DIR/system.txt
# Service status
systemctl status ${SERVICE_NAME} --no-pager > $OUTPUT_DIR/service-status.txt
# Recent logs
sudo journalctl -u ${SERVICE_NAME} --since "1 hour ago" > $OUTPUT_DIR/recent-logs.txt
# Config files (remove sensitive data)
grep -v "priv" ~/.stabled/config/config.toml > $OUTPUT_DIR/config.toml
grep -v "priv" ~/.stabled/config/app.toml > $OUTPUT_DIR/app.toml
# Node status
curl -s localhost:26657/status > $OUTPUT_DIR/node-status.json 2>/dev/null
# Create archive
tar -czf $OUTPUT_DIR.tar.gz $OUTPUT_DIR/
echo "Debug info collected: $OUTPUT_DIR.tar.gz"
echo "Share this file when requesting support"
```
### Next steps
* Review [Monitoring Setup](/en/how-to/monitor-node) to prevent issues
* Check [Upgrade Guide](/en/how-to/upgrade-node) for version-specific issues
This guide covers the upgrade process for Stable nodes, including upgrade procedures and rollback strategies.
> For complete version history and upgrade details, see [Version History](/en/reference/testnet-version-history).
### Upgrade types
#### Soft upgrades (non-breaking)
* Can be performed at any time
* Backward compatible
#### Hard upgrades (breaking)
* Requires upgrade at specific height
* Not backward compatible
#### Emergency upgrades
* Critical security fixes
* Immediate action required
* May require chain halt
### Standard upgrade procedure
#### Step 1: preparation
```bash
# Check current version
stabled version --long
# Backup critical data
cp -r ~/.stabled/config ~/stable-backup-$(date +%Y%m%d)/
# For validators only: Backup validator state
cp ~/.stabled/data/priv_validator_state.json ~/stable-backup-$(date +%Y%m%d)/
# Check disk space (need 2x current data size)
df -h ~/.stabled
```
#### Step 2: download new binary
```bash
# For v1.2.0-rc1 upgrade (January 22, 2026)
# Choose your architecture:
# Linux AMD64
BINARY_URL="https://stable-data-dist.s3.us-east-1.amazonaws.com/testnet/binary/stabled-1.2.0-rc1-linux-amd64-testnet.tar.gz"
# OR Linux ARM64
BINARY_URL="https://stable-data-dist.s3.us-east-1.amazonaws.com/testnet/binary/stabled-1.2.0-rc1-linux-arm64-testnet.tar.gz"
# Download new binary
wget $BINARY_URL
# Extract to temporary location
tar -xvzf stabled-1.2.0-rc1-linux-*.tar.gz -C /tmp/
# Verify new version
/tmp/stabled version --long
```
#### Step 3: perform upgrade
##### For soft upgrades
```bash
# Stop node
sudo systemctl stop ${SERVICE_NAME}
# Backup current binary
sudo mv /usr/bin/stabled /usr/bin/stabled.backup
# Install new binary
sudo mv /tmp/stabled /usr/bin/stabled
sudo chmod +x /usr/bin/stabled
# Verify installation
stabled version --long
# Start node
sudo systemctl start ${SERVICE_NAME}
# Monitor logs
sudo journalctl -u ${SERVICE_NAME} -f
```
##### For hard upgrades
```bash
# Monitor for upgrade height
while true; do
HEIGHT=$(curl -s localhost:26657/status | jq -r '.result.sync_info.latest_block_height')
echo "Current height: $HEIGHT"
if [ $HEIGHT -ge $UPGRADE_HEIGHT ]; then
break
fi
sleep 10
done
# Node will halt automatically at upgrade height
# Wait for halt message in logs
sudo journalctl -u ${SERVICE_NAME} -f | grep "UPGRADE"
# Once halted, perform upgrade
sudo systemctl stop ${SERVICE_NAME}
sudo mv /usr/bin/stabled /usr/bin/stabled.backup
sudo mv /tmp/stabled /usr/bin/stabled
# Start with new binary
sudo systemctl start ${SERVICE_NAME}
```
#### Step 4: post-upgrade verification
```bash
# Check node status
curl -s localhost:26657/status | jq '.result'
# Verify version
curl -s localhost:26657/status | jq '.result.node_info.version'
# Check peers
curl -s localhost:26657/net_info | jq '.result.n_peers'
# Monitor sync status
watch -n 2 'curl -s localhost:26657/status | jq ".result.sync_info"'
# Check for errors
sudo journalctl -u ${SERVICE_NAME} --since "10 minutes ago" | grep -i error
```
### Cosmovisor setup (automated upgrades)
Cosmovisor automates the upgrade process for coordinated upgrades.
#### Installation
```bash
# Install cosmovisor
go install cosmossdk.io/tools/cosmovisor/cmd/cosmovisor@latest
# Or download binary
wget https://github.com/cosmos/cosmos-sdk/releases/download/cosmovisor%2Fv1.7.0/cosmovisor-v1.7.0-linux-amd64.tar.gz
tar -xzf cosmovisor-v1.7.0-linux-amd64.tar.gz
sudo mv cosmovisor /usr/bin/
```
#### Configuration
```bash
# Set environment variables
cat >> ~/.bashrc < /dev/null < > export.json
# 3. Wait for coordinated restart instructions
```
### Next steps
* [Version History](/en/reference/testnet-version-history) - Complete upgrade history and release notes
* [Monitor your node](/en/how-to/monitor-node) after upgrades
* Review [Troubleshooting](/en/how-to/troubleshoot-node) for common issues
## Get testnet USDT0
Stable uses USDT0 as the gas token, so you need USDT0 in your wallet to submit transactions. There are two ways to fund a testnet wallet: the faucet for small amounts, or bridging from Ethereum Sepolia for larger amounts.
### Faucet
The faucet is the fastest way to get testnet USDT0 for basic development and testing.
1. Visit [https://faucet.stable.xyz](https://faucet.stable.xyz).
2. Connect your browser wallet or paste a wallet address.
3. Select the button to receive testnet USDT0.
The faucet sends 1 USDT0 per request, which is enough to deploy and interact with several contracts.
#### Verify your balance
Confirm the funds arrived:
```bash
cast balance YOUR_ADDRESS --rpc-url https://rpc.testnet.stable.xyz
```
You should see a non-zero value. If the balance is still `0`, wait a few seconds and re-run. Stable produces a new block roughly every 0.7 seconds, so funds settle quickly.
### Bridge from Sepolia (larger amounts)
If you need more USDT0 than the faucet provides, you can bridge Test USDT from Ethereum Sepolia to the Stable Testnet.
#### 1. Mint Test USDT on Sepolia
Call the `mint` function on the [Ethereum Sepolia Test USDT contract](https://sepolia.etherscan.io/token/0xc4DCC311c028e341fd8602D8eB89c5de94625927#writeContract) to get the desired amount.
#### 2. Bridge to Stable Testnet
Send a cross-chain transfer to the LayerZero bridge contract on Ethereum Sepolia to bridge Test USDT to the Stable Testnet.
For the full bridge script and contract addresses, see [Bridge USDT0 to Stable](/en/tutorial/bridge-usdt0).
This guide covers various methods to synchronize your Stable node quickly using snapshots and state sync.
### Sync methods overview
| Method | Sync Time | Storage Required | Use Case |
| -------------------- | --------- | ---------------- | ------------------------------ |
| **Pruned Snapshot** | \~10 min | \< 5 GiB | Regular full nodes |
| **Archive Snapshot** | \~1 hours | \~500 GB | Archive nodes, block explorers |
### Official snapshots
Stable provides official snapshots updated daily (00:00 UTC).
#### Snapshot information
#### Mainnet
| Type | Compression | Size | URL | Update Frequency |
| ----------- | ----------- | -------- | -------------------------------------------------------------------------------------------------------- | ---------------- |
| **Pruned** | LZ4 | \< 5 GiB | [Download](https://stable-data-dist.s3.us-east-1.amazonaws.com/mainnet/snapshots/snapshot.tar.lz4) | Daily |
| **Archive** | ZSTD | \~300 GB | [Download](https://stable-data-dist.s3.us-east-1.amazonaws.com/mainnet/snapshots/stable_archive.tar.zst) | Weekly |
#### Testnet
| Type | Compression | Size | URL | Update Frequency |
| ----------- | ----------- | -------- | -------------------------------------------------------------------------------------------------------- | ---------------- |
| **Pruned** | LZ4 | \< 5 GiB | [Download](https://stable-data-dist.s3.us-east-1.amazonaws.com/testnet/snapshots/snapshot.tar.lz4) | Daily |
| **Archive** | ZSTD | \~800 GB | [Download](https://stable-data-dist.s3.us-east-1.amazonaws.com/testnet/snapshots/stable_archive.tar.zst) | Weekly |
### Using pruned snapshots
Pruned snapshots contain recent blockchain state (last 100-1000 blocks).
#### Step 1: set environment variable
```bash
# Set service name (default: stable)
export SERVICE_NAME=stable
```
#### Step 2: stop node service
```bash
# Stop the running node
sudo systemctl stop ${SERVICE_NAME}
# Verify it's stopped
sudo systemctl status ${SERVICE_NAME}
```
#### Step 3: backup current data (optional)
```bash
# Create backup directory
mkdir -p ~/stable-backup
# Backup current state (optional, requires significant space)
cp -r ~/.stabled/data ~/stable-backup/
```
#### Step 4: download and extract pruned snapshot
:::code-group
```bash [Mainnet]
# Install dependencies
sudo apt install -y wget zstd pv
# Create snapshot directory
mkdir -p ~/snapshot
cd ~/snapshot
# Download pruned snapshot with progress
wget -c https://stable-data-dist.s3.us-east-1.amazonaws.com/mainnet/snapshots/snapshot.tar.lz4
# Remove old data
rm -rf ~/.stabled/data/*
# Extract snapshot with progress indicator
pv stable_pruned.tar.zst | zstd -d -c | tar -xf - -C ~/.stabled/
# Alternative extraction without pv
zstd -d stable_pruned.tar.zst -c | tar -xvf - -C ~/.stabled/
# Clean up
rm stable_pruned.tar.zst
```
```bash [Testnet]
# Install dependencies
sudo apt install -y wget lz4 pv
# Create snapshot directory
mkdir -p ~/snapshot
cd ~/snapshot
# Download pruned snapshot with progress
wget -c https://stable-data-dist.s3.us-east-1.amazonaws.com/testnet/snapshots/snapshot.tar.lz4
# Alternative: Download with resume support
curl -C - -o snapshot.tar.lz4 https://stable-data-dist.s3.us-east-1.amazonaws.com/testnet/snapshots/snapshot.tar.lz4
# Remove old data
rm -rf ~/.stabled/data/*
# Extract snapshot with progress indicator
pv snapshot.tar.lz4 | tar -I lz4 -xf - -C ~/.stabled/
# Alternative extraction without pv
tar -I lz4 -xvf snapshot.tar.lz4 -C ~/.stabled/
# Clean up
rm snapshot.tar.lz4
```
:::
#### Step 5: restart node
```bash
# Start the node
sudo systemctl start ${SERVICE_NAME}
# Check status
sudo systemctl status ${SERVICE_NAME}
# Monitor logs
sudo journalctl -u stabled -f
```
### Using archive snapshots
Archive snapshots contain complete blockchain history.
#### Step 1: prepare system
```bash
# Stop node
sudo systemctl stop ${SERVICE_NAME}
# Install dependencies
sudo apt install -y wget zstd pv
# Check available disk space (need 2x snapshot size)
df -h ~/.stabled
```
#### Step 2: download and extract archive snapshot
:::code-group
```bash [Mainnet]
# Create working directory
mkdir -p ~/snapshot
cd ~/snapshot
# Download archive snapshot
wget -c https://stable-data-dist.s3.us-east-1.amazonaws.com/mainnet/snapshots/stable_archive.tar.zst
# Clear old data
rm -rf ~/.stabled/data/*
# Extract with high memory for better performance
pv stable_archive.tar.zst | zstd -d --long=31 --memory=2048MB -c - | tar -xf - -C ~/.stabled/
# Alternative: Standard extraction
zstd -d --long=31 stable_archive.tar.zst -c | tar -xvf - -C ~/.stabled/
# Clean up
rm stable_archive.tar.zst
```
```bash [Testnet]
# Create working directory
mkdir -p ~/snapshot
cd ~/snapshot
# Download archive snapshot
wget -c https://stable-data-dist.s3.us-east-1.amazonaws.com/testnet/snapshots/stable_archive.tar.zst
# Clear old data
rm -rf ~/.stabled/data/*
# Extract with high memory for better performance
pv archive.tar.zst | zstd -d --long=31 --memory=2048MB -c - | tar -xf - -C ~/.stabled/
# Alternative: Standard extraction
zstd -d --long=31 archive.tar.zst -c | tar -xvf - -C ~/.stabled/
# Clean up
rm archive.tar.zst
```
:::
#### Step 3: start node
```bash
# Start service
sudo systemctl start ${SERVICE_NAME}
# Verify sync status
curl -s localhost:26657/status | jq '.result.sync_info'
```
### Creating your own snapshots
#### Manual snapshot creation
```bash
# Stop node
sudo systemctl stop ${SERVICE_NAME}
# Create snapshot archive
cd ~/.stabled
tar -cf - data/ | lz4 -9 > ~/stable-snapshot-$(date +%Y%m%d).tar.lz4
# Create checksum
sha256sum ~/stable-snapshot-*.tar.lz4 > checksums.txt
# Restart node
sudo systemctl start ${SERVICE_NAME}
```
#### Automated snapshot script
```bash
#!/bin/bash
# snapshot.sh - Automated snapshot creation
# Configuration
SNAPSHOT_DIR="/var/snapshots"
STABLED_HOME="$HOME/.stabled"
KEEP_DAYS=7
# Create snapshot directory
mkdir -p $SNAPSHOT_DIR
# Stop node
sudo systemctl stop ${SERVICE_NAME}
# Create snapshot
SNAPSHOT_NAME="stable-snapshot-$(date +%Y%m%d-%H%M%S).tar.lz4"
tar -cf - -C $STABLED_HOME data/ | lz4 -9 > $SNAPSHOT_DIR/$SNAPSHOT_NAME
# Generate metadata
cat > $SNAPSHOT_DIR/latest.json < {
console.log("Unbonding completed for:", delegator);
console.log("Amount:", ethers.formatEther(amount), "STABLE");
console.log("Tx:", event.log.transactionHash);
});
console.log("Listening for UnbondingCompleted events...");
```
```bash
npx tsx watchUnbonding.ts
```
```text
Listening for UnbondingCompleted events...
Unbonding completed for: 0xabcd...
Amount: 100.0 STABLE
Tx: 0x12ab...
```
For the full system-transaction mechanism and the filter-by-user / historical-query patterns, see [Track unbonding completions](/en/how-to/track-unbonding).
### Per-module references
Each precompile's full method list, events, and authorization rules live in its reference page.
* [Bank precompile](/en/reference/bank-module-api): STABLE token transfers and supply queries.
* [Distribution precompile](/en/reference/distribution-module-api): reward claims and commission.
* [Staking precompile](/en/reference/staking-module-api): delegate, undelegate, redelegate, validator queries.
* [System transactions](/en/reference/system-transactions-api): StableSystem event format and authorization.
### Next recommended
* [**Track unbonding completions**](/en/how-to/track-unbonding) — Subscribe to the UnbondingCompleted event emitted via the StableSystem precompile.
* [**System modules reference**](/en/reference/system-modules-api-overview) — Jump to the per-module ABI, method signatures, and event schemas.
* [**System modules concept**](/en/explanation/system-modules-overview) — Understand why Stable exposes SDK modules through precompiles.
## Verify a smart contract
Verification uploads your contract's source code to the block explorer and proves it compiles to the deployed bytecode. Once verified, users can read state, call functions, and audit the source on Stablescan without re-hosting your code. This guide walks through verifying a Foundry-deployed contract on Stable.
### Prerequisites
* A contract already deployed on Stable testnet or mainnet. If you haven't deployed yet, see [Deploy a smart contract](/en/tutorial/smart-contract).
* Foundry installed (`forge` available in your PATH).
* The deployed contract address from your `forge create` output.
### 1. Confirm the deployed address
Make sure you have the `Deployed to` address from your earlier deployment. From the [Deploy a smart contract](/en/tutorial/smart-contract) flow, this was the value printed after `forge create`.
```bash
cast code 0xDeployedContractAddress --rpc-url https://rpc.testnet.stable.xyz | head -c 20
```
```text
0x6080604052600436...
```
A non-empty bytecode confirms the contract is deployed at that address.
### 2. Run forge verify-contract
Foundry's verification flow submits your source to the Stablescan verifier.
```bash
forge verify-contract \
0xDeployedContractAddress \
src/Counter.sol:Counter \
--chain-id 2201 \
--verifier blockscout \
--verifier-url https://testnet.stablescan.xyz/api \
--watch
```
```text
Start verifying contract `0xDeployedContractAddress` deployed on 2201
Submitting verification of contract: Counter
Submitted contract for verification:
Response: `OK`
GUID: `abc123...`
URL: https://testnet.stablescan.xyz/address/0xDeployedContractAddress
Contract verification status:
Response: `OK`
Details: `Pass - Verified`
Contract successfully verified
```
`--watch` blocks until verification finishes so you don't have to poll. On mainnet, swap the chain ID to `988` and the verifier URL to `https://stablescan.xyz/api`.
:::note
**Constructor arguments**: If your contract takes constructor arguments, add `--constructor-args $(cast abi-encode "constructor(uint256,address)" 42 0xSomeAddress)` to the command. Without this flag, verification fails for any contract with a non-empty constructor.
:::
### 3. Confirm verification on Stablescan
Open the contract page on the explorer.
```text
https://testnet.stablescan.xyz/address/0xDeployedContractAddress
```
The **Contract** tab should now show source code, a green "Verified" badge, and the full ABI. Users can read state under **Read Contract** and send transactions under **Write Contract**.
### Troubleshooting
* **"Bytecode does not match"**: your source compiles to different bytecode than what's deployed. Most often caused by mismatched Solidity version or optimizer settings. Pass `--compiler-version` and `--optimizer-runs` explicitly to match your `foundry.toml`.
* **"GUID not found"**: the verifier hasn't registered your submission yet. Re-run with `--watch` or manually check the URL printed in the response.
* **Contract uses libraries**: add `--libraries src/Lib.sol:Lib:0xDeployedLibAddress` for each linked library.
### Next recommended
* [**Index contract events**](/en/how-to/index-contract) — Subscribe to on-chain events with ethers.js and build a live event stream.
* [**Deploy a smart contract**](/en/tutorial/smart-contract) — Scaffold a fresh Foundry project and deploy to Stable testnet.
* [**JSON-RPC reference**](/en/reference/json-rpc-api) — See which `eth_*` methods Stable supports for on-chain interactions.
## Work with USDT0 as gas
On Stable, USDT0 is both the chain's native asset and an ERC-20 token. The gas token is USDT0, not a separate native asset. Standard Ethereum gas estimation works once you adjust three things: `maxPriorityFeePerGas` is always `0`, `baseFee` is denominated in USDT0, and the `value` field in a native transfer carries USDT0 (not ETH).
This guide shows how to construct transactions correctly on Stable and what to change when porting Ethereum code.
### What changes vs. Ethereum
| **Field** | **Ethereum** | **Stable** |
| :-------------------------------- | :----------------- | :------------------- |
| Gas token | ETH | USDT0 |
| `maxPriorityFeePerGas` | Used for ordering | Ignored (set to `0`) |
| `baseFeePerGas` | Denominated in ETH | Denominated in USDT0 |
| `value` (native transfer) | Transfers ETH | Transfers USDT0 |
| EIP-1559 transaction format | Supported | Supported |
| `eth_estimateGas`, `eth_gasPrice` | Supported | Supported |
| `eth_maxPriorityFeePerGas` | Returns a tip | Returns `0` |
Because the transaction format is unchanged, existing ethers.js, viem, Hardhat, and Foundry code runs on Stable without changes. The differences are in how you *compute* gas fields, not how you encode them.
### Construct a transaction
Fetch the base fee, set `maxPriorityFeePerGas` to `0`, and double the base fee as a safety margin.
```typescript
// sendNative.ts
import { ethers } from "ethers";
import "dotenv/config";
const provider = new ethers.JsonRpcProvider("https://rpc.testnet.stable.xyz");
const wallet = new ethers.Wallet(process.env.PRIVATE_KEY!, provider);
const block = await provider.getBlock("latest");
const baseFee = block!.baseFeePerGas!;
const maxPriorityFeePerGas = 0n; // always 0 on Stable
const maxFeePerGas = baseFee * 2n + maxPriorityFeePerGas; // 2x headroom
const tx = await wallet.sendTransaction({
to: "0xRecipientAddress",
value: ethers.parseEther("0.001"), // 0.001 USDT0, 18 decimals
maxFeePerGas,
maxPriorityFeePerGas,
});
const receipt = await tx.wait(1);
console.log("Tx:", receipt!.hash);
console.log("Gas used:", receipt!.gasUsed.toString());
console.log("Effective gas price:", receipt!.gasPrice.toString(), "(USDT0 wei-equivalent)");
```
```bash
npx tsx sendNative.ts
```
```text
Tx: 0x8f3a...2d41
Gas used: 21000
Effective gas price: 1000000000 (USDT0 wei-equivalent)
```
The effective gas price is a USDT0-denominated value. At `1 gwei`, a 21,000-gas native transfer costs approximately `0.000021` USDT0.
### Estimate gas cost in USDT0
`eth_estimateGas` and `eth_gasPrice` behave identically to Ethereum. The result is already in USDT0 because that is the gas token.
```typescript
// estimate.ts
import { ethers } from "ethers";
const provider = new ethers.JsonRpcProvider("https://rpc.testnet.stable.xyz");
const gasPrice = await provider.send("eth_gasPrice", []);
const gasEstimate = await provider.estimateGas({
to: "0xContractAddress",
data: "0x...",
});
const feeInUSDT0 = BigInt(gasPrice) * gasEstimate;
console.log("Estimated fee:", ethers.formatEther(feeInUSDT0), "USDT0");
```
```bash
npx tsx estimate.ts
```
```text
Estimated fee: 0.000021 USDT0
```
:::warning
`eth_maxPriorityFeePerGas` always returns `0` on Stable. If your wallet or SDK adds the RPC-returned priority fee on top of the base fee, it still works, but fee UIs that display a separate tip will show `0` and should be hidden.
:::
### Tooling configuration
* **Hardhat / Foundry**: no special configuration needed. Standard EVM settings work. If your config explicitly sets a priority fee, set it to `0`.
* **Wallets**: hide or disable the priority tip input field. Displaying it is misleading because the value has no effect on ordering or inclusion.
* **Monitoring**: fee analytics dashboards should not chart priority fees. They are always zero on Stable.
### Common mistakes when porting from Ethereum
* **Applying an ETH-denominated tip**: copying a priority-fee constant from Ethereum doesn't produce faster inclusion. Stable orders transactions by base fee only.
* **Treating `value` as ETH**: a native transfer's `value` is USDT0. Don't convert it through ETH/USD prices.
* **Hard-coding a fee cap**: set `maxFeePerGas` from the live `baseFeePerGas` (e.g., `baseFee * 2`) rather than a fixed value, so transactions don't stall when the base fee rises.
### Next recommended
* [**Gas pricing reference**](/en/reference/gas-pricing-api) — Full base-fee model, EIP-1559 format, and `eth_*` method behavior.
* [**Zero gas transactions**](/en/how-to/zero-gas-transactions) — Let an application cover gas via the Gas Waiver.
* [**USDT0 behavior on Stable**](/en/explanation/usdt0-behavior) — Balance reconciliation and contract design with USDT0's dual role.
## Zero gas transactions
Gas Waiver lets an application cover gas on behalf of a user. The user signs a transaction with `gasPrice = 0`, a governance-registered waiver wraps it, and validators execute the call at zero cost to the user. This guide walks through a qualifying transfer, shows how to verify gas was waived, and explains what the waiver does and doesn't cover.
:::note
**Concept**: For the wrapper transaction mechanism, authorization model, and security guarantees, see [Gas waiver](/en/explanation/gas-waiver) and the [Gas waiver protocol reference](/en/reference/gas-waiver-api).
:::
### What you'll build
A two-script flow that submits a USDT0 transfer through the hosted Waiver Server, fetches the receipt, and confirms `gasPrice = 0`.
#### Demo
```text
step 1. Connect wallet, balance displayed as 0.01 USDT0
step 2. Send transaction via Gas Waiver → [Run]
step 3. Result
tx: 0x8f3a...2d41
Gas fee paid by you: 0.000000 USDT0
Balance after: 0.01 USDT0
```
### When the waiver applies
A transaction qualifies when all of these hold:
* The user signs the inner transaction with `gasPrice = 0`.
* The submitter is a governance-registered waiver address.
* The target `to` address and method selector are on the waiver's `AllowedTarget` policy.
* The wrapper is sent to the marker address `0x000000000000000000000000000000000000f333` with `value = 0` and `gasPrice = 0`.
If any of these fails, validators reject the wrapper without executing the inner call. Contract calls not listed in `AllowedTarget` are not covered. Arbitrary self-serve waivers are not possible; every waiver must be registered through validator governance.
### Prerequisites
* An API key for the Waiver Server, issued by the Stable team.
* The target contract address and method selector registered on the waiver's `AllowedTarget` policy.
* A user wallet on testnet with no USDT0 required for gas.
### Step 1: sign a qualifying InnerTx
The user signs a standard transaction with `gasPrice = 0`. In this example the call is a USDT0 `transfer`, which is a common `AllowedTarget` for application-covered gas flows.
```typescript
// config.ts
import { ethers } from "ethers";
import "dotenv/config";
export const CONFIG = {
RPC_URL: "https://rpc.testnet.stable.xyz",
CHAIN_ID: 2201, // 988 for mainnet
WAIVER_SERVER: "https://waiver.testnet.stable.xyz",
USDT0_ADDRESS: "0x78Cf24370174180738C5B8E352B6D14c83a6c9A9",
};
export const provider = new ethers.JsonRpcProvider(CONFIG.RPC_URL);
export const userWallet = new ethers.Wallet(process.env.USER_PRIVATE_KEY!, provider);
```
```typescript
// signInner.ts
import { ethers } from "ethers";
import { CONFIG, provider, userWallet } from "./config";
const usdt0 = new ethers.Contract(CONFIG.USDT0_ADDRESS, [
"function transfer(address to, uint256 amount) returns (bool)"
], provider);
const callData = usdt0.interface.encodeFunctionData("transfer", [
"0xRecipientAddress",
ethers.parseUnits("0.001", 18),
]);
const gasLimit = await provider.estimateGas({
from: userWallet.address,
to: CONFIG.USDT0_ADDRESS,
data: callData,
});
const nonce = await provider.getTransactionCount(userWallet.address);
const innerTx = {
to: CONFIG.USDT0_ADDRESS,
data: callData,
value: 0,
gasPrice: 0,
gasLimit,
nonce,
chainId: CONFIG.CHAIN_ID,
};
export const signedInnerTx = await userWallet.signTransaction(innerTx);
console.log("Signed InnerTx:", signedInnerTx);
```
```bash
npx tsx signInner.ts
```
```text
Signed InnerTx: 0xf8a8...c1
```
:::warning
`gasPrice` must be `0`. A non-zero value causes the waiver server to reject the submission and validators to reject the wrapper.
:::
### Step 2: submit through the Waiver Server
The Waiver Server wraps the signed inner transaction and broadcasts it. You need a server-issued API key.
```typescript
// submit.ts
import { CONFIG } from "./config";
import { signedInnerTx } from "./signInner";
const response = await fetch(`${CONFIG.WAIVER_SERVER}/v1/submit`, {
method: "POST",
headers: {
"Content-Type": "application/json",
Authorization: `Bearer ${process.env.WAIVER_API_KEY}`,
},
body: JSON.stringify({ transactions: [signedInnerTx] }),
});
const reader = response.body!.getReader();
const decoder = new TextDecoder();
let txHash = "";
while (true) {
const { done, value } = await reader.read();
if (done) break;
for (const line of decoder.decode(value).trim().split("\n")) {
const result = JSON.parse(line);
if (result.success) {
txHash = result.txHash;
console.log(`tx confirmed: ${txHash}`);
} else {
console.error(`tx failed: ${result.error.message}`);
}
}
}
export { txHash };
```
```bash
npx tsx submit.ts
```
```text
tx confirmed: 0x8f3a...2d41
```
### Step 3: verify the receipt shows zero gas
Fetch the receipt and confirm `effectiveGasPrice` is 0. That is the cryptographic proof that the user paid no gas.
```typescript
// verify.ts
import { provider } from "./config";
import { txHash } from "./submit";
const receipt = await provider.getTransactionReceipt(txHash);
const gasUsed = receipt!.gasUsed;
const effectiveGasPrice = receipt!.gasPrice;
const totalFee = gasUsed * effectiveGasPrice;
console.log("Gas used: ", gasUsed.toString());
console.log("Effective gas price:", effectiveGasPrice.toString());
console.log("Gas fee paid: ", `${totalFee.toString()} USDT0 (wei-equivalent)`);
```
```bash
npx tsx verify.ts
```
```text
Gas used: 21000
Effective gas price: 0
Gas fee paid: 0 USDT0 (wei-equivalent)
```
An `effectiveGasPrice` of `0` confirms the transaction executed under a registered waiver and the user was not charged.
### What Gas Waiver doesn't cover
* **Contracts outside `AllowedTarget`**: arbitrary contract calls aren't covered. Every target is scoped per waiver through governance.
* **User-submitted wrappers**: if the user submits directly to `0x...f333`, it fails. Only registered waiver addresses can wrap.
* **Fee extraction**: validators don't accept a non-zero `gasPrice` on either the inner or wrapper transaction.
For the full policy model and per-waiver scope rules, see [Gas waiver protocol](/en/reference/gas-waiver-api).
### Next recommended
* [**Integrate the Waiver Server**](/en/how-to/integrate-gas-waiver) — Full API reference, batch submissions, error codes, and NDJSON streaming.
* [**Self-hosted Gas Waiver**](/en/how-to/self-hosted-gas-waiver) — Register your own waiver address and broadcast wrappers without the hosted API.
* [**Gas waiver protocol**](/en/reference/gas-waiver-api) — Read the full spec: marker routing, wrapper format, governance controls.
## Accounts guides
Every guide, concept, and reference under the Accounts tab, grouped by what you're trying to do.
### Set up a wallet
* [**Create a wallet**](/en/how-to/create-wallet) — Generate a new key pair or restore from a seed phrase using ethers.js or the Tether WDK.
* [**Agent wallets**](/en/reference/agentic-wallets) — Self-custodied wallets for AI agents — how they differ from user wallets.
### Delegate the account (EIP-7702)
* [**EIP-7702 concept**](/en/explanation/eip-7702) — What EIP-7702 enables on Stable and the security model.
* [**Account abstraction how-to**](/en/how-to/account-abstraction) — Apply EIP-7702 to batch payments, spending limits, and session keys.
### Reference
* [**EIP-7702 API**](/en/reference/eip-7702-api) — Type-4 transaction format and the authorization list.
* [**Subscribe and collect**](/en/how-to/subscribe-and-collect) — Apply an EIP-7702 delegate to a subscription payment flow (cross-listed).
## Accounts on Stable
An account on Stable is a standard Ethereum EOA that can optionally execute smart contract logic through [EIP-7702 delegation](/en/explanation/eip-7702). Users keep one address and one private key across wallets, batch payments, recurring subscriptions, and session keys. Agents run the same account model without any custodial middleware.
### What you can build
* **Wallets** from a seed phrase, with native USDT0 balance queries and signed transactions.
* **Batched payments**: execute multiple transfers in one atomic transaction via a delegated EOA.
* **Spending limits**: enforce per-transaction or per-day caps on the EOA itself through delegate logic.
* **Session keys**: grant a scoped, time-bound, budget-bound key to a dApp so users don't re-sign every action.
* **Agent wallets**: fund an AI agent with a self-custodied key and let it pay for x402 services autonomously. See [Agentic wallets](/en/reference/agentic-wallets) for providers and integration patterns.
### How Stable differs
* **One address for everything.** No account migration to unlock smart contract features. EIP-7702 delegates code *onto* the existing EOA.
* **USDT0-only gas.** Users don't need a separate native token. A new account funds with USDT0 and can transact immediately.
* **Multi-function delegate pattern.** A single delegate can combine batch, spending limits, session keys, and subscriptions so one delegation covers every feature you ship.
### Start here
* [**Create a wallet**](/en/how-to/create-wallet) — Generate or restore a wallet with ethers.js or the Tether WDK.
* [**Delegate with EIP-7702**](/en/how-to/account-abstraction) — Apply batch payments, spending limits, and session keys to an existing EOA.
* [**Stable SDK**](/en/explanation/sdk-overview) — Use the typed client to sign and send transactions from any account.
### Next recommended
* [**Accounts guide index**](/en/explanation/accounts-index) — Jump to the full list of account guides and references.
* [**EIP-7702 concept**](/en/explanation/eip-7702) — Why delegation works without account migration.
* [**Subscribe and collect**](/en/how-to/subscribe-and-collect) — Apply the Accounts model to a recurring payment flow.
## Agent settlement
Agent settlement is Stable's rail for machine payments. An agent holds a USDT0 balance, pays for a resource over HTTP, and the payment settles on-chain in the same request cycle. The agent spends down from one balance for both the payment and the network fee. There is no separate gas token, no sign-up, and no API key rotation.
### Why this matters for agents
Agents transact differently from humans. They run continuously, make many small payments, and cannot complete sign-up flows or rotate API keys. Settlement on Stable matches that workload:
* **USDT0 is the gas token and the payment token.** An agent wallet holds a single asset and spends it down for both fees and payments.
* **Sub-cent, predictable fees.** Fees are denominated in dollars, so agents can budget cost per action without converting from a volatile gas asset.
* **Sub-second finality.** A paid HTTP call settles inside the request lifecycle (\~700 ms block time), which makes high-frequency machine traffic viable.
* **USDT distribution.** USDT is the most widely held stablecoin; Stable is the venue purpose-built for it.
### How the layers fit
Two layers do different jobs and are complementary, not alternatives:
* **x402** is the *payment standard*. It is an HTTP-native protocol where a server responds with `402 Payment Required`, a client signs an authorization, and a facilitator submits it.
* **MPP (Machine Payments Protocol)** is the IETF-track standard that supersedes x402 with broader intents and multi-rail support; x402 is the backward-compatible subset Stable supports today. See [MPP](/en/explanation/mpp).
* **Stable** is the *settlement layer*. It is where the on-chain transfer of USDT0 actually happens.
A **facilitator** sits between the two: it verifies the signed payment and submits the on-chain call so the developer does not run settlement infrastructure. See [Facilitators](/en/reference/agentic-facilitators) for the providers that support Stable today.
```text
agent (client) ──HTTP──▶ resource server ──signed payment──▶ facilitator ──tx──▶ Stable
(returns 402) (verify + submit) (USDT0 settles)
```
### What you can build
* **Pay-per-call APIs** priced per request in USDT0, settled via x402 or MPP.
* **Agent-to-agent commerce** where one agent pays another for a service over HTTP.
* **Paid MCP tools** that wrap x402 endpoints so an AI client calls and pays for them through prompts.
* **Autonomous procurement** against a budgeted USDT0 balance.
* **Usage-based billing** that settles per request instead of per invoice.
* **Agent wallets** funded with USDT0 only, no custodial middleware.
### Start here
* [**Build a pay-per-call API**](/en/how-to/build-pay-per-call) — Stand up an x402-gated endpoint and settle a real USDT0 payment in the request.
* [**Build an MPP endpoint on Stable**](/en/how-to/build-mpp-endpoint) — Write the three MPP custom-method hooks for USDT0 and settle on Stable.
* [**Develop with AI**](/en/how-to/develop-with-ai) — Wire Docs MCP and Runtime MCP into your AI editor and paste the Stable context block.
* [**Pay with an MCP server**](/en/how-to/pay-with-mcp) — Expose x402-paid APIs as MCP tools an agent can call through natural-language prompts.
### Next recommended
* [**x402 in depth**](/en/explanation/x402) — Read how the HTTP payment protocol works end to end on Stable.
* [**MPP**](/en/explanation/mpp) — The broader IETF-track standard that x402 belongs to.
* [**Facilitators**](/en/reference/agentic-facilitators) — See which facilitators already settle USDT0 payments on Stable.
## AI and agents guides
Every guide, concept, and reference under the AI/Agents tab, grouped by what you're trying to do.
### Equip an AI editor
* [**Develop with AI**](/en/how-to/develop-with-ai) — Install Docs MCP, Runtime MCP, agent skills, and paste the Stable context block.
* [**Create an agent wallet**](/en/how-to/create-wallet) — Self-custodied key via WDK — the foundation for agent payments.
### Monetise and consume services
* [**Build a pay-per-call API**](/en/how-to/build-pay-per-call) — Price any HTTP endpoint per request in USDT0 with x402 middleware.
* [**Pay with an MCP server**](/en/how-to/pay-with-mcp) — Wrap x402-paid APIs as MCP tools so an AI client calls and pays for them.
### Reference
* [**Agentic facilitators**](/en/reference/agentic-facilitators) — Settlement services for agent-to-agent commerce on Stable.
* [**Agent wallets**](/en/reference/agentic-wallets) — Wallet specs for autonomous agent use.
### Foundation concepts
* [**x402 (HTTP-native payments)**](/en/explanation/x402) — The HTTP protocol agents use to pay per request.
* [**MPP**](/en/explanation/mpp) — The broader IETF-track standard that x402 belongs to, with sessions and multi-rail support.
* [**ERC-3009**](/en/explanation/erc-3009) — The signed-authorization standard x402 settles through.
## Autobahn
### Tradeoffs in BFT: latency vs. robustness
Modern Byzantine Fault Tolerant (BFT) consensus protocols typically operate under the partial synchrony model. This model assumes that the network eventually stabilizes and message delays remain bounded. While practical for protocol design, real-world deployments rarely enjoy long periods of uninterrupted stability. Instead, systems frequently experience periods of synchrony followed by short disruptions such as latency spikes, node outages, or adversarial conditions. These transient disruptions are referred to as **“blips”**.
Under such conditions, existing consensus protocols are forced to **choose between low latency in stable network conditions and robustness in the presence of faults.**
* **Traditional view-based BFT protocols**, such as PBFT and HotStuff, are optimized for responsiveness during good intervals when the network is stable. However, they suffer from degraded performance when a blip occurs. This degradation, known as a hangover, can persist even after the network has recovered, as backlogged requests accumulate and delay subsequent transactions.
* **DAG-based BFT protocols**, such as [Narwhal & Tusk](https://arxiv.org/pdf/2105.11827)/[Bullshark](https://arxiv.org/pdf/2201.05677), decouple data dissemination (DAG) from consensus (BFT) and propagate transactions asynchronously across replicas. This design enables high throughput and allows the system to continue making progress during network disruptions. However, these protocols tend to incur high latency even during good intervals due to the complexity of their asynchronous ordering mechanisms.
[**Autobahn**](https://arxiv.org/pdf/2401.10369) introduces a new approach that bridges these two design philosophies. It combines the high throughput and blip tolerance of DAG-based protocols with the low latency performance of traditional view-based consensus. At the core of Autobahn is a highly parallel data dissemination layer that continuously propagates proposals at network speed, regardless of consensus progress. On top of this layer, Autobahn runs a low-latency, partially synchronous consensus protocol that commits proposals by referencing lightweight snapshots of the data layer.
A defining feature of Autobahn is its ability to recover from blips without performance degradation. This property, referred to as **seamlessness**, ensures that the system resumes full throughput and low latency immediately after the network stabilizes. No costly reprocessing of backlogged transactions is required. By cleanly separating data availability from ordering and avoiding protocol-induced synchronization delays, Autobahn offers a robust yet responsive foundation for blockchain consensus in real-world conditions.
### Autobahn architecture overview
Autobahn is architected around a clear separation of responsibilities between its two core layers: a **data dissemination layer** and a **consensus layer**. This decoupling is inspired by the design of DAG-based systems like Narwhal, but Autobahn enhances this structure to support seamlessness and lower latency.
The data dissemination layer is responsible for broadcasting client transactions in a scalable, asynchronous manner. It allows each replica to maintain its own lane of transaction batches, which can be propagated and certified independently of the consensus state. These lanes grow continuously, even when the consensus process stalls, ensuring that the system remains responsive to clients at all times.
On top of this, Autobahn runs a partially synchronous consensus layer based on a PBFT-style protocol. However, instead of reaching agreement on individual batches of transactions, consensus is reached on "tip cuts,” which are compact summaries of the latest state of all data lanes. This design allows Autobahn to commit arbitrarily large amounts of data in a single step, minimizing the impact of blips.
HotStuff tightly couples data and consensus, causing stalls when a leader fails. Bullshark incurs high commit latencies due to DAG traversal and data synchronization. Autobahn provides a smoother and faster consensus experience, inheriting the parallelism of DAGs while avoiding their latency pitfalls.
### Data dissemination layer: lanes and cars

*Autobahn: Seamless high speed BFT*
In Autobahn, each replica proposes transactions in its own independently advancing chain called a **lane**. Each data proposal in a lane is bundled with a set of acknowledgments from other replicas, forming what the authors call a "**car**" (short for Certification of Available Request). These cars act as proof of availability (PoA), ensuring that at least one correct replica holds the data and can retransmit it if needed.
Cars are chained together by including a reference to the previous car in each new proposal. This structure guarantees that validating the tip of a lane implies the availability of the entire lane history. This transitive proof of availability is key to Autobahn's instant referencing. The consensus layer can refer to a tip cut (a vector of current lane heads) and know that all prior data is retrievable without performing DAG traversal or additional synchronization.
Unlike typical DAG protocols, Autobahn avoids the costly reliable broadcast steps that enforce global availability and non-equivocation. Instead, it uses minimal coordination and trusts that at least one honest replica per PoA holds the data. This enables high throughput and low tail latency even under varying load or partial failures. The data layer continues progressing independently of consensus, ensuring responsiveness during blips.
### Consensus layer: low-latency agreement

*Autobahn: Seamless high speed BFT*
The consensus layer in Autobahn builds upon classic PBFT principles but introduces key optimizations to reduce latency and support seamless recovery. Each consensus slot targets the commitment of a "**tip cut**" that captures the latest certified proposal from every replica's lane. The consensus leader proposes this cut using a two-phase commit process: Prepare and Confirm.
During the Prepare phase, replicas vote on the proposed tip cut. If the leader receives enough votes quickly (a full quorum), it can enter the Fast Path and commit immediately with only 3 message delays. If not, it proceeds to the Confirm phase, collecting another quorum of acknowledgments before finalizing the commit in 6 message delays.
A key innovation is the decoupling of data synchronization from consensus voting. Replicas are allowed to vote based on the certified tips alone, even if they haven’t received the full proposal data yet. This is safe because the PoA ensures retrievability. Synchronization happens in parallel and finishes before the execution stage, avoiding protocol stalls. In the event of leader failure or timeout, view changes are triggered using timeout certificates, and new leaders can resume progress efficiently.
### Key properties of Autobahn
Autobahn satisfies the standard **safety** and **liveness** guarantees expected from BFT protocols. Safety ensures that no two correct replicas commit different blocks for the same slot. Liveness guarantees progress after global stabilization time (GST) as long as a correct leader is eventually selected.
More importantly, Autobahn achieves **seamlessness**. It avoids protocol-induced hangovers by allowing the consensus layer to commit arbitrarily large data backlogs in constant time. Even after a blip, as soon as synchrony returns, all data proposals that were successfully disseminated can be committed immediately. This enables Autobahn to operate smoothly in environments with intermittent faults, outperforming traditional BFT protocols in both recovery time and system responsiveness.
In addition, the protocol **scales horizontally**. Each replica contributes to the system's throughput via its own lane, and consensus cuts grow naturally with the number of participants. This makes Autobahn suitable for large-scale deployments requiring both high performance and robustness.
### Low latency meets high resilience
Autobahn was evaluated against leading BFT protocols, particularly Bullshark and HotStuff, under both ideal and fault-injected conditions. The results demonstrate that Autobahn achieves the best of both worlds: it matches Bullshark’s throughput, processing over 230,000 transactions per second, while reducing its latency by more than 50%.
Under good network conditions, Autobahn commits transactions with just 3 to 6 message delays, compared to Bullshark’s 12. This translates to commit latencies as low as 280ms in practice, versus over 590ms for Bullshark. Unlike HotStuff, which suffers from long hangovers after blips due to backlog processing delays, Autobahn commits its entire backlog in a single step as soon as the network stabilizes.
In scenarios involving leader failures or partial network partitions, Autobahn demonstrates seamless recovery. It continues disseminating data during faults and quickly commits accumulated proposals once consensus resumes. These performance advantages make Autobahn a compelling choice for blockchain platforms seeking to combine low-latency responsiveness with high throughput and fault tolerance.
### Further reading
For more technical deep-dives and details, refer to:
* [Autobahn: Seamless high speed BFT](https://arxiv.org/pdf/2401.10369)
### Next recommended
* [**Consensus**](/en/explanation/consensus) — Return to StableBFT, the consensus implementation that Autobahn evolves.
* [**Finality**](/en/explanation/finality) — Use Stable's single-slot finality when building against the RPC.
## Bank module
The `x/bank` module in Stable's SDK handles token balances, transfers, and supply. Its EVM surface (the **bank precompile**) wraps this module and adds ERC-20 semantics plus an authorization layer for privileged mint/burn operations. Contracts that need to move tokens on Stable call the precompile directly without deploying their own token implementation.
### What it exposes
The bank precompile provides standard ERC-20 methods:
* `transfer`, `balanceOf`, `totalSupply`
* `approve`, `transferFrom`, `allowance`, `revoke`
These work from any caller. No registration required.
It also provides privileged methods:
* `mint`: mints new tokens and transfers them to an account.
* `burn`: destroys tokens held by an account.
* `multiTransfer`: moves tokens from one sender to many recipients in a single call.
Mint and burn require the caller contract to be registered on the `x/precompile` allowlist via a governance proposal. Governance-token minting is blocked outright. This keeps supply inflation gated to authorized contracts only.
### When to use it
* A DeFi contract needs to move STABLE or USDT0 on behalf of users: call `transfer` or `transferFrom` directly on the precompile.
* A protocol contract mints or burns tokens based on business logic: register through governance first, then call `mint` / `burn`.
* A payments contract needs one-to-many disbursement: call `multiTransfer` in a single transaction instead of looping transfers.
### Where to find the ABI
The full method signatures, event payloads, and authorization flow are in the [Bank precompile reference](/en/reference/bank-module-api).
### Next recommended
* [**Bank precompile reference**](/en/reference/bank-module-api) — Call `transfer`, `approve`, `mint`, `burn`, and read events.
* [**System modules overview**](/en/explanation/system-modules-overview) — Return to the full list of precompile-exposed modules.
* [**USDT as gas**](/en/explanation/usdt-as-gas-token) — Understand the dual-role asset model the bank module manages.
## Bridge security and DVNs
A LayerZero bridge is only as secure as the verification layer that confirms a message sent on one chain happened on another. That layer is a Decentralized Verifier Network (DVN). This page explains what DVNs do, how Stable configures them on its bridges, and why a compromise of any single DVN does not put Stable at risk.
### How DVNs work
When a LayerZero message moves from chain A to chain B, the destination contract does not execute it until a configured set of DVNs independently attests that the message is real. Each application picks its own configuration:
* **Required DVNs.** Every required DVN must sign before the message is accepted.
* **Optional DVNs with an N-of-M threshold.** An optional pool can be added on top of the required set, with a threshold like 2-of-5 that must be met in addition to required signatures.
* **Block confirmation depth.** The number of source-chain confirmations DVNs wait for before signing.
The safety of a bridge is entirely a function of this configuration. A 1/1 setup with a single DVN as the sole verifier means any compromise of that one DVN's signing key allows an attacker to forge cross-chain messages. A 3/3 across three independent operators requires all three to be compromised simultaneously. The difference is the difference between losing a bridge to a single stolen key and surviving a targeted attack on one operator.
### Stable's configuration
Stable's bridges run a **3/3 required DVN** configuration with three independent operators: **LayerZero Labs**, **Canary**, and **Horizen**. All three must sign every cross-chain message before the destination contract will execute it. There is no optional pool with a threshold; the required set is the entire verification surface.
A single compromised signing key, including LayerZero's own, does nothing against this posture. Forging a message would require simultaneous compromise of all three independent operators.
For DVN contract addresses, see [Bridges: Stable's DVN operators](/en/reference/bridges#stable-s-dvn-operators).
### STABLE OFT architecture
The STABLE token bridges to other chains using LayerZero's Omnichain Fungible Token (OFT) standard. Two contract types are deployed:
* **`StableOFTAdapter`** on Stable. The adapter locks STABLE on the home chain and emits a LayerZero message when STABLE is sent cross-chain.
* **`StableOFTUpgradeable`** on each remote chain. This contract mints STABLE on the destination when the message is verified by the configured DVNs, and burns it on the return path so the home-chain supply remains canonical.
For deployed addresses on each chain, see [Bridges: STABLE OFT contracts](/en/reference/bridges#stable-oft-contracts).
### Operational dependencies
Stable's own bridge security is independent of upstream protocols, but cross-chain flow through Stable can still pause when partner protocols pause their own bridges. For example, when USDT0 pauses cross-chain mint and burn, USDT0 cannot move to or from Stable until USDT0 resumes. Funds within Stable continue to move freely; only the specific cross-chain action is unavailable.
Application surfaces routing through partner bridges should communicate this clearly so users understand the distinction: their funds are not at risk, only that a particular cross-chain path is temporarily unavailable.
### Next recommended
* [**Bridging USDT0 to Stable**](/en/explanation/usdt0-bridging) — See how USDT0 reaches Stable through the OFT Mesh and Legacy Mesh.
* [**Bridge providers and addresses**](/en/reference/bridges) — Reference contract addresses, DVN operators, and supported bridge providers.
* [**LayerZero DVN documentation**](https://docs.layerzero.network/v2/concepts/protocol/security-stack-dvns) — Read LayerZero's spec for required and optional DVN verification.
## Overview
New to Stable? Run the [Quick start](/en/tutorial/quick-start) first. It takes five minutes and sends a testnet transaction so the rest of the tab has something to plug into.
### Explore
* [**Accounts**](/en/explanation/accounts-overview) — Create wallets, delegate EOAs with EIP-7702, and scope session keys for users and agents.
* [**Payments**](/en/explanation/payments-overview) — Send USDT0, build P2P and subscription flows, settle invoices with ERC-3009, and price APIs with x402.
* [**Contracts**](/en/explanation/contracts-overview) — Deploy, verify, and index Solidity contracts, and call Bank / Distribution / Staking precompiles.
* [**AI and agents**](/en/explanation/agent-settlement) — Wire MCP servers into AI clients and expose x402-paid tools agents can call through prompts.
### Start here
* [**Quick start**](/en/tutorial/quick-start) — Connect to testnet, fund a wallet, and send your first USDT0 transaction.
* [**Send your first USDT0**](/en/tutorial/send-usdt0) — Native and ERC-20 transfers on the same balance, with TypeScript examples.
* [**Deploy a smart contract**](/en/tutorial/smart-contract) — Scaffold Foundry, configure Stable, and deploy the Counter contract.
* [**Stable SDK**](/en/explanation/sdk-overview) — Use the typed TypeScript client for transfer, bridge, and swap on Stable.
## Confidential transfer
**Confidential Transfer** is a privacy layer on Stable that shields the **amount** of a USDT0 transfer while keeping sender and recipient addresses publicly visible. The shielded amount is readable only by the transacting parties and authorized regulatory auditors, using zero-knowledge (ZK) cryptography to prove validity without revealing the value. The feature is under development; this page describes the target model.
### The problem it solves
Standard on-chain transfers are fully transparent; anyone can read the sender, recipient, and amount. For business payments, that transparency is a data-leakage problem:
* A retailer paying suppliers on-chain exposes order volumes and wholesale pricing to any observer.
* A treasury moving funds between accounts advertises its position sizes.
* A payroll run publishes salary data to the entire network.
Full opacity (Monero-style) would solve this but breaks compliance: regulators and auditors can't verify the transaction. Selective confidentiality (amounts hidden, parties auditable) is the model Stable targets.
### What stays visible, what doesn't
| Field | Visible on-chain | Shielded |
| :----------------- | :--------------- | :------- |
| Sender address | ✓ | |
| Recipient address | ✓ | |
| Transfer amount | | ✓ |
| Auxiliary metadata | | ✓ |
The shielded amount is encrypted. Valid proofs attest that the transfer is balance-consistent (no inflation, no negative amounts) without revealing the value itself. Only the sender, recipient, and authorized regulatory auditors can decrypt the shielded value.
### How it fits the compliance model
Two properties make the design auditable:
* **Deterministic auditor access.** Regulatory auditors hold keys that decrypt shielded amounts for transactions in their jurisdiction. Business privacy is preserved against random observers; compliance scrutiny is not.
* **Standard address transparency.** AML/KYC tooling that operates on address-level flows (sanction checks, source-of-funds analysis) works against the same public address graph as any transparent chain.
### When to use it
Confidential Transfer fits any flow where the amount is commercially sensitive but the counterparties are appropriately public:
* Supplier and invoice payments where order sizes reveal pricing.
* Treasury operations where position sizes reveal strategy.
* Payroll where individual salaries shouldn't be indexable by competitors.
* Large OTC settlements where price discovery against orderbook tape is a risk.
For flows that need address-level privacy as well (e.g. whistleblower donations), Confidential Transfer alone isn't sufficient. Those use cases need additional address-obscuring primitives that Stable doesn't provide.
### Status
Confidential Transfer is in development. See [Roadmap](/en/explanation/technical-roadmap) for timing. The mechanism will ship as a dedicated transfer path alongside standard USDT0 transfers; existing applications that don't opt in are unaffected.
### Next recommended
* [**USDT as gas**](/en/explanation/usdt-as-gas-token) — Understand the asset model confidential transfers shield.
* [**Flow of funds**](/en/explanation/flow-of-funds) — See where confidentiality fits in the end-to-end payment lifecycle.
* [**Roadmap**](/en/explanation/technical-roadmap) — Track when confidential transfer ships.
## Consensus
### PoS consensus with StableBFT
Stable Blockchain leverages **StableBFT**, a customized PoS consensus protocol built on CometBFT, to deliver high throughput, low latency, and strong reliability. StableBFT provides deterministic finality (blocks are final on inclusion, without forks) and Byzantine fault tolerance up to 1/3 of validators failing or acting maliciously.
To further optimize consensus performance, Stable plans to implement the following improvements in the near future:
* **Decoupled Transaction and Consensus Gossiping**: Separating the transaction gossiping layer from the consensus gossiping layer prevents network congestion on the transaction side from interfering with consensus communications.
* **Direct Transaction Broadcasting to the Block Proposer**: In the current model, transactions propagate through peer-to-peer gossiping among nodes, creating high gossip traffic across the network. Stable aims to improve efficiency by enabling transactions to broadcast directly to the block proposer.
### Future roadmap: DAG-based consensus
To significantly accelerate consensus, Stable intends to upgrade its protocol to a DAG-based design capable of delivering up to 5x speed improvements.
Traditional view-based BFT protocols like PBFT and HotStuff are optimized for low latency under stable network conditions. However, they degrade significantly during disruptions, often experiencing long recovery delays after temporary faults.
First-generation DAG-based engines like Narwhal and Tusk demonstrate that decoupling data dissemination from consensus ordering can eliminate single-proposer bottlenecks and also improve robustness under network instability. However, their architecture is not directly compatible with systems like CometBFT, as they diverge from conventional height-based block semantics and mempool designs.
[Autobahn](/en/explanation/autobahn) offers a PBFT-on-DAG architecture that integrates more naturally with Stable’s consensus layer, while delivering low latency under normal conditions and fast recovery in the face of network faults. The Stable team maintains a close relationship with the authors of the Autobahn paper and will leverage Autobahn’s architecture to maximize the performance of StableBFT.
StableBFT, built atop Autobahn, will enable:
* Parallel proposal processing by eliminating the single-leader limitation.
* Faster finality by separating data propagation from final ordering.
* Enhanced resilience against network adversities through robust BFT mechanisms.
This advanced consensus design supports much higher throughput based on the internal proof-of-concept, which has demonstrated over 200,000 TPS (Consensus only) in controlled environments.
### Next recommended
* [**Autobahn**](/en/explanation/autobahn) — Read the protocol paper that underpins StableBFT's DAG-based upgrade path.
* [**Execution**](/en/explanation/execution) — See how blocks move from consensus into parallel execution.
* [**Finality**](/en/explanation/finality) — Apply Stable's single-slot finality when building against the RPC.
## Contracts guides
Every guide, concept, and reference under the Contracts tab, grouped by what you're trying to do.
### Build and ship a contract
* [**Deploy**](/en/tutorial/smart-contract) — Scaffold a Foundry project and deploy Counter to Stable testnet.
* [**Verify**](/en/how-to/verify-contract) — Upload source to Stablescan so users can read and call your contract.
* [**Index events**](/en/how-to/index-contract) — Build a live event stream with ethers.js, plus historical backfill.
### Call system modules
* [**Use system modules**](/en/how-to/use-system-modules) — Call Bank, Distribution, and Staking precompiles from Solidity or ethers.js.
* [**Track unbonding completions**](/en/how-to/track-unbonding) — Subscribe to the UnbondingCompleted event emitted via the StableSystem precompile.
### Reference
* [**System modules reference**](/en/reference/system-modules-api-overview) — Precompile addresses and per-module ABI pointers.
* [**JSON-RPC API**](/en/reference/json-rpc-api) — Supported `eth_*`, `net_*`, `web3_*`, and `debug_*` methods.
### Foundation concepts
* [**USDT0 behavior on Stable**](/en/explanation/usdt0-behavior) — Dual-role balance, reconciliation events, and contract design rules.
* [**Difference from Ethereum**](/en/explanation/ethereum-comparison) — Gas token, finality, priority tips, and EVM compatibility.
## Contracts on Stable
Stable is fully EVM-compatible. Solidity, Vyper, Hardhat, Foundry, ethers.js, and viem work unchanged. Existing contracts deploy as-is once you point tooling at Stable's RPC. On top of the standard EVM, Stable exposes protocol-level modules (Bank, Distribution, Staking) as precompiled contracts at fixed addresses, so your Solidity can call into staking and reward distribution without re-implementing them.
### What you can build
* **Standard application contracts** (ERC-20, ERC-721, escrows, AMMs) with any EVM toolchain.
* **Verified, indexed contracts** on Stablescan with live event streams through ethers.js.
* **Protocol-integrated contracts** that call Bank / Distribution / Staking precompiles from Solidity.
* **System-transaction listeners** that watch for protocol-emitted events (for example, unbonding completions) through standard `eth_getLogs`.
### How Stable differs
* **USDT0 is the gas token.** `maxPriorityFeePerGas` must be `0`. The `value` field in native transfers carries USDT0, not ETH. See [Work with USDT0 as gas](/en/how-to/work-with-usdt-gas).
* **USDT0 has a dual role.** Contracts that hold native USDT0 can have their balance changed by ERC-20 `transferFrom` or `permit` — never mirror native balance in a `uint256`. See [USDT0 behavior on Stable](/en/explanation/usdt0-behavior).
* **Precompile addresses are fixed across testnet and mainnet.** Burn them into your contract as constants.
### Start here
* [**Deploy**](/en/tutorial/smart-contract) — Scaffold Foundry, configure Stable, and deploy Counter.
* [**Verify**](/en/how-to/verify-contract) — Upload source to Stablescan with forge verify-contract.
* [**Index**](/en/how-to/index-contract) — Subscribe to events with ethers.js and backfill historical logs.
### Next recommended
* [**Contracts guide index**](/en/explanation/contracts-index) — Full list of contract guides, precompile references, and system module ABIs.
* [**Use system modules**](/en/how-to/use-system-modules) — Call Bank / Distribution / Staking from Solidity and ethers.js.
* [**JSON-RPC reference**](/en/reference/json-rpc-api) — Which `eth_*` and `debug_*` methods Stable supports.
## Core concepts
Four concepts are enough to start building. Each section defines the concept, shows it, and links to the full reference.
### USDT0 as gas
You pay transaction fees in USDT0, the same asset you're already holding and transacting in. There's no second token to fund or manage.
USDT0 is both the native gas asset (18 decimals, read via `address(x).balance`) and an ERC-20 token (6 decimals, read via `USDT0.balanceOf(x)`). Both interfaces operate on the same underlying balance, and the protocol reconciles the 12-digit precision gap automatically.
```solidity
// Both read the same balance:
uint256 native = address(user).balance; // 18 decimals
uint256 erc20 = IERC20(USDT0).balanceOf(user); // 6 decimals
```
:::warning
Balance reconciliation emits extra `Transfer` events at the reserve address `0x6D11e1A6BdCC974ebE1cA73CC2c1Ea3fDE624370`. Indexers that replay `Transfer` events must filter transfers to and from this address, or they will silently double-count balances.
:::
Read more: [USDT0 as gas](/en/explanation/usdt-as-gas-token) · [USDT0 behavior on Stable](/en/explanation/usdt0-behavior).
### Guaranteed blockspace
Stable reserves a portion of each block's capacity for pre-allocated enterprise workloads. Reserved traffic settles with predictable latency and cost even when general traffic is congested; it doesn't compete in the fee market.
This behavior is transparent at the caller level. You submit transactions the normal way; allocations are applied at the protocol level for enrolled accounts.
Read more: [Guaranteed blockspace](/en/explanation/guaranteed-blockspace).
### USDT transfer aggregator
High-volume USDT0 transfers are batched and verified in parallel using a MapReduce-inspired pipeline. Per-account failures are isolated, so one bad transfer doesn't abort the batch.
The caller-side transfer API is unchanged. You submit transfers the normal way and gain throughput without code changes.
Read more: [USDT transfer aggregator](/en/explanation/usdt-transfer-aggregator).
### EVM compatibility
Standard EVM tooling works unchanged. At the EVM level, three behaviors differ from Ethereum (USDT0 as gas, covered above, is the fourth).
**Single-slot finality.** A transaction is final once included in a block. Blocks are produced roughly every 0.7 seconds.
**No priority tips.** `maxPriorityFeePerGas` is always ignored. The effective gas price is the base fee set by the protocol.
```typescript
import { ethers } from "ethers";
const block = await provider.getBlock("latest");
const baseFee = block.baseFeePerGas;
const tx = await wallet.sendTransaction({
to: "0xRecipientAddress",
value: ethers.parseEther("0.1"),
maxFeePerGas: baseFee * 2n, // 2x base fee as safety margin
maxPriorityFeePerGas: 0n, // always 0 on Stable
});
await tx.wait();
console.log("Included at gas price:", tx.gasPrice?.toString());
```
```text
Included at gas price: 1000000000
```
**Dual-role USDT0, porting risks.** Contracts ported from Ethereum should not mirror native balance, should reject `address(0)` transfers, and should not rely on `EXTCODEHASH` for address-reuse detection.
:::warning
Porting a contract that mirrors native balance in an internal variable is unsafe on Stable. An external `USDT0.transferFrom` call can drain the contract's native balance without invoking any contract code. Always solvency-check with `address(this).balance` at the moment of transfer.
:::
Read more: [Differences from Ethereum](/en/explanation/ethereum-comparison) · [Contracts on Stable](/en/explanation/contracts-overview) · [USDT0 migration checklist](/en/explanation/usdt0-behavior).
### Confidential transfer (planned)
Stable has a planned feature for zero-knowledge transfers that hide amounts while staying auditable for authorized parties. It is not yet live.
Read more: [Confidential transfer](/en/explanation/confidential-transfer).
### Next recommended
* [**Quick start**](/en/tutorial/quick-start) — Connect to testnet and send a first transaction.
* [**USDT0 behavior**](/en/explanation/usdt0-behavior) — Port a contract to Stable without hitting dual-role gotchas.
* [**Gas pricing**](/en/reference/gas-pricing-api) — Construct transactions correctly on Stable's fee model.
* [**Production readiness**](/en/how-to/production-readiness) — Validate an integration before shipping to mainnet.
## Overview
### Full stack core optimization
The lifecycle of a blockchain transaction, from submission to finalized result, passes through multiple tightly connected stages. A transaction is first submitted through the **RPC** interface, added to the **mempool**, packaged into a block, validated through **consensus**, executed by the **state machine**, and finally written to persistent storage in the **database**. Only after completing this full pipeline does the user receive a confirmed result.
Improving just one stage in isolation is not enough. Any inefficiency in the pipeline can impact the overall performance of the system. This is why Stable focuses on optimizing the blockchain stack from top to bottom.
The following pages describe how Stable upgrades each layer of its architecture (Consensus, Execution, Database, and RPC) to ensure reliable and high-performance transaction processing.
### Next recommended
* [**Consensus**](/en/explanation/consensus) — Learn how StableBFT extends CometBFT for high throughput and low latency.
* [**Execution**](/en/explanation/execution) — See how Stable EVM runs transactions in parallel with Block-STM and Optimistic Block Processing.
* [**Storage (StableDB)**](/en/explanation/stable-db) — Understand how decoupled state commitment and memory-mapped storage remove the disk I/O bottleneck.
* [**High performance RPC**](/en/explanation/high-performance-rpc) — Understand the split-path RPC architecture separating reads from writes.
## Distribution module
The `x/distribution` module handles staking-reward accrual and withdrawal for delegators and validators. Its precompile bridges this behavior into the EVM so a Solidity contract can claim rewards, set withdraw addresses, and query outstanding rewards without interacting with the Cosmos SDK directly.
### What it exposes
* **Set withdraw address**: a delegator designates which address receives their rewards. By default, rewards go to the delegator's own address; setting a withdraw address routes them elsewhere (useful for contract-managed staking).
* **Withdraw delegator rewards**: claims all outstanding rewards from a single validator in one call.
* **Withdraw validator commission**: a validator claims their accumulated commission from delegators' rewards.
* **Query methods**: read reward balances, commission rates, and community-pool state without a transaction.
### Authorization semantics
The precompile checks that the caller is the delegator (or validator) whose state is being modified. You cannot claim someone else's rewards or change their withdraw address.
### When to use it
* A vault or staking aggregator claims rewards on a schedule: call `withdrawDelegatorRewards` directly.
* A DAO routes staking rewards to a treasury address: set a withdraw address once, then rewards flow automatically.
* A front-end displays current reward balances: use the query methods (no transaction needed).
### Where to find the ABI
Full method signatures, input/output types, and emitted events are in the [Distribution precompile reference](/en/reference/distribution-module-api).
### Next recommended
* [**Distribution precompile reference**](/en/reference/distribution-module-api) — Call `withdrawDelegatorRewards`, set withdraw addresses, and read reward balances.
* [**Staking module**](/en/explanation/staking-module) — See how delegation (the source of these rewards) works.
* [**System transactions**](/en/explanation/system-transactions) — Learn how unbonding completions reach the EVM as events.
## EIP-7702
Stable supports **EIP-7702**, which allows an EOA to **set its account code to an existing smart contract**. The EOA executes that contract's logic while keeping its original address and private key. The delegation is persistent until the EOA explicitly changes or clears it.
For a full specification, see [EIP-7702](https://eips.ethereum.org/EIPS/eip-7702).
### What EIP-7702 enables on Stable
EIP-7702 lets existing EOAs execute smart contract logic without account migration. In Stable's USDT-centric payment environment, this supports patterns such as:
* **Batch payments**: multiple calls (e.g., paying several recipients in a payroll run) execute in a single atomic transaction.
* **Spending limits**: a delegate contract enforces daily caps or per-transaction limits on the EOA.
* **Session keys**: an EOA grants a dApp scoped, time-limited transaction permissions without exposing the owner's private key.
:::note
**Ready to implement?** See the [Account Abstraction (EIP-7702) implementation guide](/en/reference/eip-7702-api) for contract templates, authorization signing, and transaction submission.
:::
### How it works
EIP-7702 introduces a new transaction type (`0x04`) that carries an `authorizationList`. Each authorization designates a smart contract whose code the EOA will execute for that transaction. The flow is:
1. **Choose or deploy a delegate contract**: a standard Solidity contract that implements the logic you want the EOA to run. You can use an existing deployed contract or deploy your own. Use an audited contract whenever possible.
2. **Sign an authorization**: the EOA owner signs a message designating the delegate contract.
3. **Submit an EIP-7702 transaction**: the transaction includes the authorization, and the EOA runs the delegate's code during execution.
After submission, the EOA's account code is set to the delegate. Subsequent transactions to the EOA execute the delegate's logic until the owner clears or replaces the delegation.
### What doesn't change
* **No new account needed**: users keep their existing EOA address and private key. There is no migration step.
* **Existing keys still sign**: the EOA's private key signs the authorization and any follow-on transactions. EIP-7702 does not introduce a new signing scheme.
* **Standard EVM execution**: the delegate runs as regular contract code. Tooling that debugs or traces contract execution works unchanged.
### Security considerations
* **Delegate access is total.** The delegate contract has full execution authority over the EOA for the duration of the delegation. Treat delegate selection as a trust decision: a malicious delegate can drain assets.
* **Delegation persists.** It does not expire at the end of a single transaction. The owner must explicitly clear or replace the delegation when they no longer want it.
* **Gas costs are slightly higher** due to authorization processing, but this is offset when the delegate batches multiple calls. On Stable, where the base fee is 1 gwei and gas is denominated in USDT0, the additional authorization overhead stays well under a cent, comparable to a standard ERC-20 transfer in cost.
### Next recommended
* [**Account Abstraction (EIP-7702)**](/en/reference/eip-7702-api) — Implement batch payments, spending limits, and session keys against a delegate contract.
* [**USDT as gas**](/en/explanation/usdt-as-gas-token) — Understand the gas model that EIP-7702 transactions run on.
* [**Gas waiver**](/en/explanation/gas-waiver) — Compare delegation to gas-waived flows where an application pays the user's gas instead.
## Settle with signed authorizations
ERC-3009 lets a token holder authorize a transfer by signing a message. Anyone can then submit that signed authorization to execute the transfer on-chain. The sender never needs to call the contract directly.
This is the settlement mechanism behind [x402](/en/explanation/x402) payments on Stable.
### What problem does it solve?
#### The allowance problem
The traditional ERC-20 pattern for third-party transfers is `approve` + `transferFrom`. The sender first calls `approve` to grant a spending allowance, then the third party calls `transferFrom` to move funds. This has well-known issues:
* **Two transactions required**: The sender must send an on-chain `approve` transaction before any transfer can happen. This costs gas and adds latency.
* **Infinite allowance risk**: To avoid repeated approval transactions, many applications request unlimited spending permission, creating a significant security risk.
ERC-3009 takes a different approach. Instead of granting an allowance, the sender signs a one-time authorization for a specific transfer. No separate approval step, no lingering spending permissions.
#### The sequential nonce problem
ERC-2612 (`permit`) also enables signed authorizations, but it uses sequential nonces. Multiple permits carry ordering dependencies: if nonce 5 is not consumed, nonce 6 can never execute.
ERC-3009 solves this with **unique nonces**. Each authorization uses a 32-byte value instead of a sequential counter. Multiple authorizations can be created and submitted independently, in any order, without depending on each other.
#### Comparison
| **Property** | **ERC-20** (`approve`) | **ERC-2612** (`permit`) | **ERC-3009** |
| :------------------------ | :----------------------------- | :-------------------------------- | :------------------------------ |
| On-chain steps | 2 (`approve` + `transferFrom`) | 1 (`transferFrom`) | 1 (`transferWithAuthorization`) |
| Uses allowance model | Required (on-chain tx) | Yes (sets allowance via `permit`) | Not required (signature) |
| Nonce model | Sequential | Sequential | Unique |
| Concurrent authorizations | No | No | Yes |
### How it works
#### transferWithAuthorization
The sender signs an EIP-712 typed data message containing the transfer details. Anyone can then call `transferWithAuthorization` on the token contract with that signed message. The contract verifies the signature, checks the validity window, executes the transfer, and marks the nonce as used.
The signed authorization contains:
* `from`: address of the sender (the signer)
* `to`: address of the recipient
* `value`: transfer amount
* `validAfter`: earliest time this authorization can be executed (Unix timestamp)
* `validBefore`: latest time this authorization can be executed (Unix timestamp)
* `nonce`: 32-byte value ensuring uniqueness
The time window (`validAfter`/`validBefore`) gives the sender precise control over when the transfer can happen. An authorization can be scheduled for the future, given a deadline, or both. If the window expires before submission, the authorization becomes invalid and the funds stay with the sender.
#### receiveWithAuthorization
This function works identically to `transferWithAuthorization`, with one additional check: **the caller must be the recipient**. This prevents front-running attacks where a third party observes a pending authorization and submits it first to manipulate transaction ordering.
This is useful in payment scenarios where the recipient (a merchant or service provider) should be the one to initiate settlement.
#### cancelAuthorization
The sender can revoke an unused authorization before it is executed. The sender signs an EIP-712 cancellation message, and the contract marks the nonce as used without executing the transfer. The original authorization can no longer be submitted.
### Built-in safety properties
* **One-time use**: Each unique nonce can only be used once. Resubmitting the same signed authorization reverts.
* **Time-bound**: The `validAfter`/`validBefore` window ensures authorizations do not remain valid indefinitely.
* **Self-contained**: One signature authorizes one specific transfer to one specific recipient for one specific amount. No lingering permissions.
* **Non-custodial**: The submitter never holds the sender's funds. The transfer moves directly from sender to recipient within the contract.
### ERC-3009 on Stable
USDT0 on Stable natively implements ERC-3009. Any application can use `transferWithAuthorization` without deploying additional contracts or relay infrastructure.
#### Single-asset settlement
On Ethereum, even with ERC-3009, the submitter needs ETH to pay gas for calling `transferWithAuthorization`. The transfer itself is in USDT, but execution depends on a separate native asset.
On Stable, USDT0 serves as both the payment token and the gas token. The entire payment lifecycle, from authorization to on-chain settlement, runs on a single stablecoin. No separate native asset is needed at any step.
This property is what makes ERC-3009 on Stable a strong foundation for higher-level payment protocols. [x402](/en/explanation/x402) leverages this directly, using ERC-3009 as its on-chain settlement mechanism within standard HTTP communication.
### Key takeaways
* ERC-3009 lets a token holder authorize a transfer by signing a message. Anyone can submit that signed authorization to execute the transfer.
* It replaces the ERC-20 allowance model with one-time-use, self-contained authorizations. No `approve` step, no lingering permissions, no double-spend risk.
* Unique nonces allow multiple authorizations to be created and submitted concurrently, in any order.
* USDT0 on Stable natively supports ERC-3009, and because settlement can be completed using USDT0 alone, it provides a practical foundation for x402.
**See also:**
* [USDT as Gas](/en/explanation/usdt-as-gas-token)
* [USDT0 Behavior on Stable](/en/explanation/usdt0-behavior)
* [x402 (HTTP-Native Payments)](/en/explanation/x402)
## Ethereum comparison
Stable is fully EVM-compatible, so most Ethereum tools, libraries, and contract patterns work without modification. The sections below walk through what stays the same and what changes when you move from Ethereum to Stable.
### What stays the same
Stable maintains full compatibility with the Ethereum development ecosystem:
| **Area** | **Compatibility** |
| :---------------- | :------------------------------------------------------------------------------------------------------------------------------------------------------------------------------------------------- |
| Languages | Solidity, Vyper |
| Tooling | Hardhat, Foundry |
| Libraries | ethers.js, web3.js |
| Contract patterns | All standard EVM conventions (ERC-20, ERC-721, ERC-1155, proxies, etc.) |
| RPC interface | Most `eth_*` methods supported (`eth_call`, `eth_sendRawTransaction`, `eth_getBalance`, `eth_getLogs`, `eth_estimateGas`, etc.). For the full list, see [JSON-RPC API](/en/reference/json-rpc-api) |
Existing smart contracts, deployment scripts, and frontend integrations target Stable by changing the RPC endpoint and chain ID.
### What is different
Four behaviors differ from Ethereum.
#### 1. Single-slot finality
Ethereum requires multiple block confirmations before a transaction is considered final. Stable provides single-slot finality: a transaction is final once included in a block.
For developers, this means:
* Once a transaction appears in a confirmed block, its state changes are final and irreversible.
* Applications can safely rely on block inclusion as confirmation of settlement.
Even with deterministic finality, applications handling financially sensitive flows should:
* Verify transaction success via RPC or emitted events before proceeding with dependent actions (e.g., unlocks, redemptions).
* Implement retry and reconciliation logic for automation and batch operations to handle transient submission or RPC errors.
#### 2. Gas token: USDT0
On Stable, transaction fees are paid in USDT0, not a volatile native token. This provides USDT-denominated, predictable low gas costs.
* Users need USDT0 in their wallet to submit transactions.
* The `value` field in transactions still works for sending USDT0, similar to how ETH is sent on Ethereum.
* See [USDT as gas](/en/explanation/usdt-as-gas-token) for details.
#### 3. No priority tips
Stable uses a single-component gas model. There is no tip-based transaction ordering.
* `maxPriorityFeePerGas` is ignored (always 0).
* Transaction ordering is not influenced by fee bidding.
* Wallets should hide or disable the priority tip input field.
* See [Gas pricing](/en/explanation/gas-pricing) for details.
#### 4. USDT0 dual-role behavior
USDT0 functions as both the native gas token and an ERC-20 token. This introduces behavioral differences around balance semantics, allowance safety, and certain opcode assumptions. For the full details, see [USDT0 behavior on Stable](/en/explanation/usdt0-behavior).
### Quick comparison
| **Parameter** | **Stable** | **Ethereum** |
| :------------------------------------ | :----------------- | :------------------------ |
| Gas token | USDT0 | ETH |
| Finality | Single-slot | Multi-block confirmations |
| Block time | \~0.7 seconds | \~12 seconds |
| Priority tip (`maxPriorityFeePerGas`) | Ignored (always 0) | Used for ordering |
| EIP-1559 transaction format | Supported | Supported |
| EVM compatibility | Full | N/A |
### Next recommended
* [**USDT as gas**](/en/explanation/usdt-as-gas-token) — Understand the asset model that replaces ETH for gas.
* [**Gas pricing**](/en/explanation/gas-pricing) — Review the single-component fee model in detail.
* [**USDT0 behavior on Stable**](/en/explanation/usdt0-behavior) — Audit contracts for dual-role asset semantics, allowance safety, and `EXTCODEHASH` behavior.
## Compatibility with the Ethereum ecosystem
Stable is fully compatible with the Ethereum Virtual Machine (EVM), allowing developers to use familiar tools, libraries, and contract patterns without modification.
This ensures seamless migration of existing applications and straightforward onboarding for teams already building in the Ethereum ecosystem.
**Key compatibility features**
* **Languages**: Supports Solidity and Vyper for smart contract development.
* **Tooling**: Works out of the box with standard frameworks such as Hardhat and Foundry.
* **Libraries**: Fully compatible with ethers.js, web3.js, and other common JSON-RPC clients.
* **Contract patterns**: Adheres to standard EVM conventions, including ERC-20 approvals, event emission, and access-control mechanisms.
* **RPC interface**: Exposes the same JSON-RPC methods used by Ethereum networks, so your existing integrations and indexers function without code changes.
## Execution
### Stable EVM
**Stable EVM** is Stable's Ethereum-compatible execution layer. Existing Ethereum tools and wallets like MetaMask interact with Stable unchanged. Stable EVM combines the EVM's developer experience with the modular infrastructure of the Stable SDK.
To bridge the gap between the Stable EVM and the Stable SDK, Stable EVM introduces a set of **precompiles**. These precompiles expose native Stable SDK module functionality to EVM smart contracts, enabling them to call into the core chain logic securely and atomically. Smart contracts can then perform privileged operations such as token transfers, staking, or governance participation.
### Future roadmap 1: Optimistic parallel execution
Historically, blockchain systems have relied on sequential execution, where each transaction is processed one after another to ensure deterministic state across all nodes. While this design guarantees consistency, it severely limits throughput and scalability, especially as modern blockchains aim to support tens of thousands of transactions per second.
To overcome this constraint, Stable is adopting **Block-STM**, a proven parallel execution engine that enables **Optimistic Parallel Execution (OPE)**. This allows transactions to be executed in parallel while preserving determinism, significantly enhancing performance.
#### How Block-STM works
Block-STM uses an optimistic concurrency control mechanism: transactions are first executed in parallel under the assumption that they won’t conflict. Then, during a validation phase, any conflicts are detected and handled through re-execution. The process relies on the following five key techniques:
**1. Multi-version memory structure**
Block-STM stores multiple versions of each memory key:
* Each transaction reads the latest version committed by prior transactions.
* During execution, both reads and writes are versioned.
* Later, during validation, these versions are checked for consistency to detect conflicts.
**2. Read-Set / Write-Set based validation**
* During execution, each transaction logs the keys and versions it reads in a Read-Set.
* At the end of execution, it records its Write-Set into the multi-version memory.
* During validation, if another transaction has modified any key in the Read-Set, the transaction is marked as conflicting. It is then aborted and re-executed with an incremented incarnation number.
**3. Fast conflict detection with ESTIMATE markers**
* When a transaction fails, its Write-Set is marked with an ESTIMATE flag.
* If another transaction reads an ESTIMATE-marked value, it immediately halts and waits for re-execution (triggered by a `READ_ERROR`).
* This helps reduce overhead by quickly identifying dependencies without re-executing the full transaction set.
**4. Preset transaction order**
* All transactions within a block are executed according to a preset, deterministic order.
* Validation and commit stages also follow this same order.
* This ensures that even with parallel execution, all nodes reach the same final state.
**5. Collaborative scheduler**
* A Collaborative Scheduler distributes tasks between execution and validation workers in a thread-safe manner.
* It prioritizes lower-index transactions to accelerate early commits and minimize re-execution.
* The scheduler manages transaction incarnations for repeated attempts until they commit successfully.
#### Key benefits of Block-STM
* **Parallelism Without Locks**: By leveraging MVCC (Multi-Version Concurrency Control), Block-STM allows multiple transactions to read and write concurrently without the need for mutex locks. Conflicts are only checked after execution, allowing maximum throughput during the initial processing phase.
* **Minimal Overhead via ESTIMATE Markers**: Failed transactions flag their Write-Sets with ESTIMATE markers, signaling dependent transactions to pause early, avoiding wasted execution. This results in faster convergence on valid execution paths.
* **Efficient Scheduling and Prioritized Commits**: Using the Collaborative Scheduler, the system minimizes retries by committing lower-index transactions first. This improves overall throughput and shortens execution cycles.
* **Determinism and Consensus Compatibility**: Because every transaction adheres to a fixed order, even re-executed transactions ultimately commit in the same sequence. This ensures safe and deterministic state agreement across all nodes, preserving consensus integrity even in a parallelized environment.
#### OPE on Stable
Stable will incorporate **Optimistic Parallel Execution (OPE)** as a core feature of its execution layer, in conjunction with **Optimistic Block Processing (OBP)**. Please note that OPE and OBP are complementary but fundamentally different strategies.
#### About OBP
* OBP is not about parallelism, but about execution timing.
* During the `ProcessProposal` stage, Stable pre-executes blocks while they are being gossiped to other nodes.
* The resulting state is cached in memory and reused during `FinalizeBlock`, saving time and reducing duplicate computation.
By combining OPE and OBP, Stable can minimize both execution latency and resource contention, delivering superior performance under high transaction load.
#### Expected performance gains
Internal benchmarks suggest that with **Block-STM-based OPE** and **StableDB** integration, Stable can achieve **at least 2x throughput improvements** in end-to-end transaction processing.
### Future roadmap 2: StableVM++
While efforts like Optimistic Parallel Execution (OPE) and Optimistic Block Processing (OBP) focus on optimizing *how multiple transactions are executed concurrently*, there’s another vital performance lever: **how efficiently each individual transaction is processed**.
Stable is currently exploring alternative EVM implementations to boost execution speed. Among the candidates, **EVMONE**, a high-performance EVM written in C++, stands out as a strong contender to replace the existing Go-based EVM. This switch is projected to deliver up to a **6x increase in EVM execution performance** based on theoretical benchmarks.
### Next recommended
* [**Storage (StableDB)**](/en/explanation/stable-db) — See how decoupled state commitment feeds execution without blocking on disk I/O.
* [**High performance RPC**](/en/explanation/high-performance-rpc) — Understand the split-path RPC that surfaces execution results to clients.
* [**Ethereum compatibility**](/en/explanation/ethereum-compatibility) — Port existing contracts using standard EVM tooling against Stable.
## Finality rules & compatibility guarantees
Stable processes transactions within an EVM-based execution environment. When a block includes a transaction, the chain applies its effects to state and makes them immediately visible to applications, contracts, and indexers.
#### Execution confirmation
A transaction is considered **confirmed** once:
* It is successfully included in a produced block
* State changes (balances, storage, events) can be observed through RPC
During the public testnet phase:
* Treat confirmed state as valid for application logic
* Use monitoring systems to track block continuity
#### Settlement considerations
Stable provides single-slot finality, meaning transactions are finalized as soon as they are included in a valid block.
**For developers, this ensures:**
* Once a transaction appears in a confirmed block, its state changes are final and irreversible.
* Applications can safely rely on block inclusion as confirmation of settlement.
**Even with deterministic finality, applications handling financially sensitive flows should:**
* Verify transaction success via RPC or emitted events before proceeding with dependent actions (e.g., unlocks, redemptions).
* Implement retry and reconciliation logic for automation and batch operations to handle transient submission or RPC errors.
#### Compatibility commitments
Stable intends to maintain a consistent execution surface for developers throughout testnet growth phases.
**Current commitments:**
* Stable will maintain published system module interfaces and execution behavior unless explicitly noted
* Any potentially disruptive changes will be:
* Announced in advance
* Documented in the Release & Change Log
* Accompanied by migration instructions when necessary
Future updates will introduce:
* A formal compatibility policy
* Change-level classification for developer-facing features
* Clear handling guidance for version transitions
## Flow of Funds
Stable is the first blockchain purpose-built for stablecoin payments. The network is optimized for high-throughput, low-latency stablecoin transactions, delivering P2P payments and merchant acceptance with immediate settlement in USDT. Application-layer gas sponsorship and waivers allow providers to offer a zero-fee experience for end users, providing the feel of a mainstream payments network while abstracting away the complexity of blockchain systems.
This page describes the complete lifecycle of funds on Stable: how USDT enters the network, moves between participants, and exits back to fiat rails.
### 1. Customer deposit (on-ramp)
A user brings money into the network through one of three primary channels:
* **Crypto transfer**: Any major cryptocurrency is bridged or converted to USDT0 on Stable. USDT0 is the omnichain standard for USDT and the primary form factor on the network.
* **Fiat on-ramp**: Card, ACH, or local payment method converts fiat to USDT0, delivered directly into the user's wallet.
* **CEX withdrawal**: The user withdraws USDT from a supporting centralized exchange, selecting Stable as the destination network. The exchange settles directly into the user's wallet.
In all cases the end state is the same: the user's wallet holds USDT (as USDT0) directly on Stable.
### 2. P2P / merchant transfer (on-chain pay-in)
Once funds are on Stable, the customer sends USDT directly to another user or merchant. Key properties of on-chain transfers:
* **Instant settlement**: transfers settle on-chain immediately.
* **Non-custodial**: in the case of a non-custodial wallet, no PSP or intermediary ever touches user balances between source and destination.
* **Single asset**: because USDT is both the gas and settlement asset, there are no extra tokens in the flow and no hidden spreads.
* **Zero-gas option**: gas waivers allow end users to move funds without needing to manage blockchain fees. See [Gas Waiver](/en/reference/gas-waiver-api) for details.
### 3. User / merchant balance
Merchants receive USDT in their Stable wallet under their own direct control. Funds are held on-chain under the user or merchant's custody. These wallets can be created and managed by a payments provider on behalf of the user.
### 4. Merchant withdrawal (off-ramp / payout)
When a merchant or user requests off-chain fiat settlement:
1. The provider initiates a conversion (USDT → fiat) via banking or payout rails.
2. Funds are credited to the merchant's chosen account.
The provider re-enters the flow only to cash merchants out, not during intra-ecosystem transfers. Day-to-day P2P flows require no intermediation; providers participate only at deposit (USDT transfer to a merchant's account) or withdrawal (USDT → fiat).
### Cross-asset trades
Stable also supports scenarios where the payer holds a non-USDT cryptocurrency.
#### User trades into another cryptocurrency
A user may hold or trade into another cryptocurrency (e.g., BTC or ETH) through an integrated exchange, broker, or on-chain DEX. At the point of payment the system automatically converts the selected cryptocurrency into USDT, which is then transmitted to the merchant's Stable wallet. All on-chain settlement continues to occur in USDT regardless of the user's preferred asset.
#### Merchant acceptance of cryptocurrency payments
Merchants do not need to accept or manage multiple cryptocurrencies directly. They are always credited with USDT in their Stable wallet, preserving a single settlement currency across the network. This design minimizes FX exposure for merchants and simplifies reconciliation and reporting.
#### Provider's role in conversion
The conversion logic (e.g., BTC → USDT) may be handled by an exchange partner, liquidity provider, or the payments provider's own treasury. The merchant remains insulated from volatility or liquidity risks; they only ever receive USDT.
### Next recommended
* [**USDT as gas**](/en/explanation/usdt-as-gas-token) — Understand how USDT0 serves as both native gas and ERC-20 balance on Stable.
* [**Bridging to Stable**](/en/explanation/usdt0-bridging) — See how USDT0 moves onto Stable from other chains via OFT Mesh or Legacy Mesh.
* [**Send your first USDT0**](/en/tutorial/send-usdt0) — Submit a USDT0 transfer on testnet using standard EVM tooling.
## Gas pricing
Stable uses a simplified, single-component gas fee model designed to remove fee volatility and deliver predictable, low transaction costs. Transaction ordering is not influenced by tip bidding. The effective gas price is determined solely by the protocol's base fee.
### Why this model
Three properties fall out of the single-component design:
* **Predictable costs**: fees are based purely on base execution cost. Tip auctions don't introduce variance.
* **USDT-denominated pricing**: gas is priced in USDT0, so a developer or user reasoning about cost in dollar terms doesn't have to account for native-token price fluctuations.
* **Extremely low fees**: at a base fee of 1 gwei, a native USDT0 transfer (21,000 gas) costs approximately **0.0000021 USDT0**. Even complex contract interactions stay well under a cent.
### How it compares to Ethereum
| **Parameter** | **Stable** | **Ethereum** |
| :------------------------------------ | :----------------- | :---------------- |
| Gas token | USDT0 | ETH |
| Base fee | Yes | Yes |
| Priority tip (`maxPriorityFeePerGas`) | Ignored (always 0) | Used for ordering |
| EIP-1559 transaction format | Supported | Supported |
Stable accepts EIP-1559 (Type 2) transactions, but `maxPriorityFeePerGas` is always ignored. Transaction ordering is not influenced by tip bidding.
### Implications
* **Wallets** should hide or disable priority-tip input fields. Displaying them may confuse users since the value has no effect.
* **Analytics dashboards** should not track priority fees. They will always be zero.
* **Transaction-construction tooling** should set `maxPriorityFeePerGas` to `0` explicitly, then compute `maxFeePerGas` from the latest block's base fee with a safety margin.
### Next recommended
* [**Gas pricing reference**](/en/reference/gas-pricing-api) — Construct transactions, estimate gas, and configure tooling against Stable's fee model.
* [**USDT as gas**](/en/explanation/usdt-as-gas-token) — See how USDT0 serves as both native gas and ERC-20 balance.
* [**Ethereum comparison**](/en/explanation/ethereum-comparison) — Review every behavior difference you'll encounter porting from Ethereum.
## Gas waiver
Governance-approved addresses (called **waivers**) submit a wrapper transaction that carries the user's signed payload and executes it at `gasPrice = 0`. The user holds no USDT0 and pays no gas. Stable operates one such waiver as a hosted service; partners can also register their own waiver addresses through validator governance.
### How it works
Gas Waiver uses a wrapper-transaction pattern:
1. **The user signs an `InnerTx`** with `gasPrice = 0`. The user's signature is preserved end-to-end; the waiver cannot modify the payload without invalidating it.
2. **A waiver wraps the `InnerTx` into a `WrapperTx`** sent to a protocol marker address (`0x000000000000000000000000000000000000f333`) with `value = 0`, `gasPrice = 0`, and the signed `InnerTx` as its data payload.
3. **Validators detect the marker**, check the waiver's authorization and policy constraints, and execute the inner transaction under the user's identity (`from`, `nonce`, call semantics).
Gas accounting is handled inside the waiver mechanism. The user pays nothing; the wrapper pays nothing; validators absorb the cost against the per-waiver policy.
### Authorization and policy
Waivers are controlled by validator governance, not application logic. Governance provides:
* **Reviewable registration**: every waiver address is registered on-chain and visible in state.
* **Revocation**: validators can remove a misbehaving waiver at any time.
* **Scoped access via `AllowedTarget`**: each waiver is bound to a specific set of target contracts and method selectors. The protocol rejects any wrapper whose inner `to` address and method selector fall outside that scope.
A valid wrapper transaction satisfies all of the following:
* `WrapperTx.to == 0x000000000000000000000000000000000000f333` (the marker address).
* `WrapperTx.from` is a waiver registered on-chain via governance.
* `WrapperTx.gasPrice == 0` and `InnerTx.gasPrice == 0`.
* `WrapperTx.value == 0`.
* `InnerTx.to` and the extracted method selector are permitted by the waiver's `AllowedTarget` policy.
If any condition fails, validators reject the wrapper without executing the inner transaction.
### Security model
* **User signature integrity**: the user signs the `InnerTx`. The waiver cannot mutate the payload without invalidating the signature. Partners are still responsible for ensuring the user signs only the intended payload.
* **On-chain authorization**: authorization lives on-chain. Only governance-registered waiver addresses can produce a valid wrapper submission, regardless of where the request originates.
* **Service-availability boundary**: when partners route through Stable's hosted Waiver Server, submission availability depends on the service. The protocol-level authorization guarantees are unaffected.
### When to use Gas Waiver
Gas Waiver fits any flow where the end user shouldn't have to hold USDT0 for gas:
* Consumer apps onboarding users who have no stablecoin balance yet.
* Agent-driven flows where the agent's wallet funds the gas.
* Enterprise payment rails where the operator absorbs network costs.
For flows where the user does hold USDT0 but wants to bundle multiple calls into one signed transaction, see [EIP-7702 delegation](/en/reference/eip-7702-api) instead.
### Next recommended
* [**Enable gas-free transactions**](/en/how-to/integrate-gas-waiver) — Integrate the hosted Waiver Server API with API-key submission and NDJSON responses.
* [**Gas waiver protocol**](/en/reference/gas-waiver-api) — Read the full protocol spec: marker routing, wrapper format, governance controls.
* [**USDT as gas**](/en/explanation/usdt-as-gas-token) — Understand the gas token that the waiver covers.
## Guaranteed blockspace
**Guaranteed Blockspace** is a dedicated blockspace-allocation model that reserves a fixed share of every block's capacity for enrolled enterprise partners, regardless of broader network conditions. Transactions routed through the guaranteed path execute with predictable latency and cost. Payroll, settlement, and supplier payments don't compete with public mempool traffic.
:::note
**Planned.** Guaranteed Blockspace is a forward-looking roadmap item. See [Roadmap](/en/explanation/technical-roadmap) for timing.
:::
### Why this matters
General-purpose chains weren't designed for fee predictability under load:
* **Ethereum**: on May 1, 2022, the Yuga Labs "Otherside" NFT mint pushed peak gas above 8,000 gwei and burned over $200M in fees, breaking any workload that required deterministic cost.
* **Low-fee networks** like Solana and Base attract MEV and arbitrage spam, so legitimate transactions compete with bot traffic for inclusion.

*Source: MEV and the Limits of Scaling by Flashbots and Robert Miller*
Enterprise payment flows can't tolerate this variance. Guaranteed Blockspace addresses it directly.
### How the guarantee works
The guarantee is enforced at three layers:
* **Guaranteed mempool**: validators pull guaranteed transactions from a dedicated mempool, isolated from public traffic.
* **Validator-level reservation**: each validator reserves a predefined portion of every block's gas capacity for the guaranteed lane. Deterministic inclusion falls out of this.
* **Dedicated RPC nodes**: the Guaranteed Blockspace API routes transactions through isolated RPC endpoints, so submission latency doesn't spike with public RPC load.
The result, for an enrolled partner:
* **Exclusive routing path**: submissions don't compete with public mempool traffic.
* **Guaranteed inclusion**: capacity is reserved in every block regardless of network congestion.
* **No decentralization trade-off**: validator openness and network participation are preserved; the guarantee lives alongside the public lane, not above it.
* **Reliable on-chain performance** for business-critical operations, even under load.
### Next recommended
* [**Guaranteed settlement**](/en/explanation/upcoming-use-cases) — See the payment pattern that depends on guaranteed blockspace: timed DvP settlement cycles with deterministic inclusion.
* [**USDT as gas**](/en/explanation/usdt-as-gas-token) — Understand the asset that flows through guaranteed blockspace.
* [**Tokenomics**](/en/reference/tokenomics) — Review how STABLE staking underpins validator blockspace guarantees.
## High performance RPC
In the pursuit of a high-performance blockchain, it's not enough to only optimize consensus or block production. The RPC layer is a critical component of the end-to-end user experience because it is the interface between the blockchain and its users. Stable proposes a new RPC-dedicated architecture to overcome the limitations of traditional RPC design.
### Why high-performance RPC matters
#### The user's gateway to the blockchain
The **Remote Procedure Call (RPC)** interface is the primary way users interact with the blockchain:
* Wallets use RPC to broadcast transactions.
* dApps query state via RPC to render UI with on-chain data, to prepare and simulate transactions, fetch logs and events, etc.
* Explorers, indexers, and bots all rely on RPC for real-time data.
Even if the blockchain can process transactions at lightning speed and produce blocks rapidly, none of it matters if users experience latency and delays due to a slow RPC. In practice, RPC is often the bottleneck in the overall user experience.
Stable’s roadmap toward a high-performance chain explicitly includes **RPC optimization** as a first-class priority.
### The problem with traditional RPC architecture
#### Monolithic design and resource contention
Traditionally, an RPC node is simply a repurposed full node with additional RPC endpoints exposed. This means:
* Syncing the chain and serving RPC requests occur on the same instance.
* To scale RPC, teams must spin up entire new full nodes, triggering resource-heavy operations like state sync and consensus setup.
* Consensus, execution, and RPC all share the same CPU, memory, and disk. During periods of high transaction load, a busy component **starves the others**, degrading RPC performance.
In addition, traditional RPC architecture treats read-heavy and write-heavy operations identically. Even though read queries (e.g., `eth_getBalance`) vastly outnumber write transactions, there is no differentiation in how they are handled. This design is inherently inefficient and non-scalable.
### The Stable RPC architecture
Stable introduces a split-path RPC architecture that separates reads from writes and optimizes each independently.
#### Core principles
* Separate the RPC into efficient lightweight RPC nodes based on functionality.
* Use lightweight RPCs as edge nodes to enhance scalability.
* Optimize the data path of function-specific RPCs to reduce latency, offering more direct access or management through more efficient data structures
#### Performance gains
Internal benchmarks of the new read RPC path demonstrate:
* Supports throughput of over 10,000 RPS, with end-to-end latency under 100ms in the same environment.
* Linear scalability of edge nodes, with no need for full state sync or consensus overhead.
Stable’s new RPC architecture results in a significantly smoother and faster user experience, even during high traffic events.
### Future work
#### Optimizing EVM view calls
One exciting area of ongoing research is dedicated support for EVM view operations (`eth_call`):
* These do not require transaction commitment or state updates.
* Execution can happen on lightweight stateless environments using only the current state snapshot.
* A specialized RPC node could be designed specifically for these operations, delivering even faster response times and reducing load on primary full nodes.
#### Integration of indexer directly to the node
By integrating an indexer directly into the node, it becomes possible to serve the fastest possible data to dApps.
* Typical architectures: Node → RPC → Indexer (e.g., The Graph) → Storage → dApp
* Proposed Architecture: Node with Indexer → DB → dApp
* This architecture enables much faster data delivery as the indexer is natively integrated into the node, removing the network communication steps.
### Next recommended
* [**JSON-RPC API**](/en/reference/json-rpc-api) — Use the `eth_*` methods Stable exposes for contract reads, transaction submission, and log filtering.
* [**Execution**](/en/explanation/execution) — See how execution feeds state to the RPC layer.
* [**Storage (StableDB)**](/en/explanation/stable-db) — Review the storage layer the RPC reads query.
## Overview
Stable is an EVM-compatible Layer 1 where USDT0 is the native gas token. Most Ethereum tools, libraries, and contract patterns work without modification. You connect by pointing your RPC to Stable and switching the chain ID.
### Connect and fund
* [**Connect**](/en/reference/connect) — Mainnet and testnet chain IDs, RPC endpoints, block explorers.
* [**Fund your testnet wallet**](/en/how-to/use-faucet) — Get testnet USDT0 via the faucet or bridge from Sepolia.
* [**Stable SDK**](/en/explanation/sdk-overview) — Use the typed TypeScript client for transfer, bridge, and swap.
### Build with USDT0
* [**Send your first USDT0**](/en/tutorial/send-usdt0) — Native and ERC-20 transfers with TypeScript examples.
* [**USDT0 behavior on Stable**](/en/explanation/usdt0-behavior) — Dual-role balance reconciliation, contract design requirements, migration checklist.
* [**Differences from Ethereum**](/en/explanation/ethereum-comparison) — Single-slot finality, USDT0 gas, no priority tips.
* [**Zero-gas transactions**](/en/how-to/integrate-gas-waiver) — Gas Waiver integration via the Waiver Server API.
### Payments
* [**ERC-3009**](/en/explanation/erc-3009) — Transfer With Authorization: the on-chain settlement primitive.
* [**x402**](/en/explanation/x402) — HTTP-native payments with no accounts or API keys.
* [**P2P payments**](/en/reference/p2p-payments) — Native and ERC-3009 delegated transfers.
### Ecosystem
Providers and infrastructure already live on Stable: bridges, [the canonical Uniswap v3 deployment](/en/reference/dexes), oracles, RPCs, wallets, custody, and more. Browse the [Ecosystem](/en/reference/bridges) section for the full list.
## Key features
Stable is a delegated Proof-of-Stake Layer 1 with single-slot finality, full EVM compatibility, and USDT0 as the native gas token. The features below are the ones that shape day-to-day integration. Each links to the page that covers it in depth.
### Protocol-level features
| Feature | What it means |
| :------------------------- | :--------------------------------------------------------------------------------------------------- |
| **Single-slot finality** | A transaction is final once it's in a block. No multi-block confirmation wait. |
| **Full EVM compatibility** | Solidity, Vyper, Foundry, Hardhat, ethers, viem, and `eth_*` RPC methods work unchanged. |
| **USDT0 as gas** | One asset serves as both native balance and ERC-20. No separate gas token to hold. |
| **Cross-chain bridging** | USDT0 moves onto Stable from Ethereum, Arbitrum, HyperEVM, Tron, and other chains via LayerZero OFT. |
### USDT-specific features
* [**USDT as gas**](/en/explanation/usdt-as-gas-token) — USDT0 serves as both the native gas token and an ERC-20 token on the same balance.
* [**Gas waiver**](/en/explanation/gas-waiver) — Governance-authorized waivers submit wrapper transactions that execute at zero gas price on the user's behalf.
* [**Guaranteed blockspace**](/en/explanation/guaranteed-blockspace) — Enterprise partners secure reserved capacity in every block for payment flows.
* [**USDT transfer aggregator**](/en/explanation/usdt-transfer-aggregator) — High-volume USDT0 transfers batch into parallelized, fault-tolerant settlement bundles.
* [**Confidential transfer**](/en/explanation/confidential-transfer) — Zero-knowledge cryptography shields transfer amounts while keeping parties auditable.
For which upgrades are live today and which are on the roadmap, see [Roadmap](/en/explanation/technical-roadmap).
### Next recommended
* [**Ethereum comparison**](/en/explanation/ethereum-comparison) — Identify what stays the same and what changes when you port from Ethereum to Stable.
* [**Flow of funds**](/en/explanation/flow-of-funds) — Trace USDT from on-ramp through on-chain transfer to off-ramp settlement.
* [**Architecture overview**](/en/explanation/core-optimization-overview) — Walk through the consensus, execution, database, and RPC layers that deliver these features.
## Learn
### Foundation
* [**Overview**](/en/explanation/overview) — What Stable is and how to read this documentation.
* [**Key features**](/en/explanation/key-features) — Headline specs: single-slot finality, USDT0 as gas, full EVM compatibility.
* [**Difference from Ethereum**](/en/explanation/ethereum-comparison) — What stays the same and what changes when you port from Ethereum.
* [**Core concepts**](/en/explanation/core-concepts) — USDT0 dual role, guaranteed blockspace, transfer aggregator, finality.
### USDT0 behavior
* [**USDT0 behavior on Stable**](/en/explanation/usdt0-behavior) — Dual-role balance, reconciliation events, and contract design rules.
* [**USDT as gas**](/en/explanation/usdt-as-gas-token) — Why Stable uses USDT0 to pay for gas and what that means for fees.
* [**Flow of funds**](/en/explanation/flow-of-funds) — How USDT moves end-to-end across Stable.
* [**USDT0 features**](/en/explanation/usdt-features-overview) — Every USDT0-specific feature with links to each.
### Architecture
* [**Technical overview**](/en/explanation/tech-overview) — Consensus, execution, database, and RPC layers in one page.
* [**Core optimizations**](/en/explanation/core-optimization-overview) — The performance work behind sub-second finality.
* [**Finality**](/en/explanation/finality) — Single-slot finality, reorg behavior, and what "confirmed" means.
* [**Gas pricing**](/en/explanation/gas-pricing) — Base-fee-only model priced in USDT0.
### Use case narratives
* [**Payments**](/en/explanation/use-case-payments) — Why Stable fits P2P, subscriptions, invoices, and pay-per-call.
* [**Payroll**](/en/explanation/use-case-payroll) — Batched and scheduled payroll runs on Stable.
* [**Sponsored transactions**](/en/explanation/use-case-sponsored) — Letting applications cover gas for their users.
* [**Private transfers**](/en/explanation/use-case-private) — Upcoming confidential payment flows.
## MPP sessions
A session is an MPP payment intent that batches many small payments into a single on-chain settlement. The client deposits funds into an escrow once, then signs cheap off-chain vouchers for each request. Only the net amount settles on-chain, which makes sub-cent per-request economics viable for streaming workloads.
### How a session works
1. **Deposit.** The client transfers a budget into a session-escrow contract on the settlement layer. The escrow holds the funds and exposes a settlement function that pays the seller and refunds the remainder.
2. **Voucher per request.** For each paid request, the client signs an off-chain voucher carrying `(sessionId, cumulativeAmount, nonce, expiry)`. The server checks that the cumulative amount is monotonically increasing and within the deposited balance. No on-chain action is needed at this step.
3. **Settle.** At the end of the session or on a configured cadence, a facilitator submits the latest voucher to the escrow. The escrow pays the seller the cumulative amount and returns the remaining balance to the client. Only this transaction touches the chain.
A session is finalized when the latest voucher is settled or when the voucher expiry passes.
### When to use sessions vs. charge
| **Workload** | **Best intent** |
| :---------------------------------------------------------------------------------------------------------------- | :-------------- |
| Pay-per-token LLM inference, pay-per-frame video, real-time data streams. Many small payments to the same seller. | Session |
| One-off paid API calls, single-purchase resources, agent-to-agent commerce where each transaction stands alone. | Charge |
The break-even point depends on how expensive the per-request on-chain settlement is relative to the request price. As soon as you are paying more in gas than in payment, sessions are the right pattern.
### Agent use cases
* **Token-priced LLM inference.** A client streams completions and signs a voucher per token batch; the inference server settles at session end.
* **Frame-priced video.** An agent consuming a generated video signs vouchers per N frames; the renderer settles when the stream closes.
* **Real-time data feeds.** A subscriber pays per tick of an oracle or market-data stream, settling once per session window.
### Status on Stable
Sessions require two pieces that Stable does not currently provide:
1. A session-aware escrow contract for USDT0 that holds the deposit and exposes a `settleVouchers` (or equivalent) function.
2. A facilitator that issues vouchers on the seller side and verifies them on the buyer side, batching submissions to the escrow.
Until both ship, MPP sessions are not usable on Stable. For high-frequency agent payments today, the lowest-overhead pattern is the **charge** intent submitted through Stable's [Gas Waiver](/en/how-to/integrate-gas-waiver), which removes per-transaction gas cost on the seller's side and keeps the buyer's USDT0 balance as the only asset to manage. See [Build an MPP endpoint on Stable](/en/how-to/build-mpp-endpoint) for the per-request charge pattern.
### Next recommended
* [**MPP concept**](/en/explanation/mpp) — Read the broader standard, including charge and subscription intents.
* [**Agent settlement**](/en/explanation/agent-settlement) — See where MPP sessions would sit in the agent-payment rail on Stable.
* [**Build an MPP endpoint on Stable**](/en/how-to/build-mpp-endpoint) — Use the charge intent today while sessions are forthcoming.
## Machine Payments Protocol (MPP)
MPP (Machine Payments Protocol) is an open standard for paying for HTTP resources in the same request that asks for them. It extends [x402](/en/explanation/x402) with new payment intents (charge, subscription, session), multi-rail support (stablecoins, cards, Lightning), production features (idempotency, body-digest binding, expiration), and additional transports (MCP, WebSocket). The protocol is on the IETF standards track.
### MPP and x402
MPP clients are backward compatible: an MPP client can call an existing x402 server without changes. Where the two protocols differ:
| **Aspect** | **x402** | **MPP** |
| :------------------------ | :------------------------------------------------------------ | :------------------------------------------------------- |
| Payment intents | Per-request charge | Charge, subscription, session |
| Rails | Blockchain only | Stablecoins, cards, Lightning, custom |
| Production features | Limited | Idempotency, body-digest binding, expiration |
| Transports | HTTP | HTTP, MCP/JSON-RPC, WebSocket |
| Headers (client ↔ server) | `PAYMENT-REQUIRED` / `PAYMENT-SIGNATURE` / `PAYMENT-RESPONSE` | `WWW-Authenticate` / `Authorization` / `Payment-Receipt` |
| Governance | Community protocol | IETF standards track |
| Method authorship | Foundation-controlled | Permissionless |
### Challenge, credential, receipt
MPP wraps every paid request in a three-step exchange between the client and the resource server:
1. **Challenge.** The server responds with `402 Payment Required` and a `WWW-Authenticate` header that names the supported methods, the amount, and an expiration.
2. **Credential.** The client picks a method, signs a proof of payment, and resubmits the request with an `Authorization` header carrying the serialized credential.
3. **Receipt.** The server verifies the credential, settles the payment, and returns the response with a `Payment-Receipt` header containing the settlement reference.
A challenge can be cryptographically bound to the request body via a body digest, so a credential signed for one request cannot be reused on a different one.
### Payment intents
**Charge.** A one-time payment for a single resource. The credential authorizes one transfer of an exact amount.
**Subscription.** Recurring payments under a single scoped credential. The credential authorizes repeated charges across a billing period, with the rail enforcing renewal cadence.
**Session.** Pay-as-you-go with off-chain vouchers. The client deposits funds into an escrow once, then signs cheap off-chain vouchers for each request. Only the net amount settles on-chain. See [MPP sessions](/en/explanation/mpp-sessions) for details.
### Transports
MPP defines the same challenge / credential / receipt exchange over multiple transports:
* **HTTP.** The default. Headers as listed above.
* **MCP / JSON-RPC.** Lets an MCP server monetize individual tool calls. An AI client signs a credential before invoking the tool.
* **WebSocket.** Persistent connections with in-band voucher top-ups, designed for streaming sessions.
### MPP on Stable
MPP does not ship a Stable payment method. The `mppx` SDK ([wevm/mppx](https://github.com/wevm/mppx)) includes methods for Tempo and Stripe, and `mpp.dev` lists Tempo, Stripe, Lightning, Solana, Stellar, Monad, and RedotPay. Stable is not on either list today.
The standard is permissionless, so you can author your own method. For USDT0 on Stable, the `verify()` hook is signature validation against ERC-3009, and settlement is delegated to an existing settlement service: an x402 facilitator like [Semantic Pay](https://docs.semanticpay.io) or [Heurist](https://docs.heurist.ai/x402-products/facilitator), or Stable's own [Gas Waiver](/en/how-to/integrate-gas-waiver). See [Build an MPP endpoint on Stable](/en/how-to/build-mpp-endpoint) for the full walkthrough.
### Next recommended
* [**Build an MPP endpoint on Stable**](/en/how-to/build-mpp-endpoint) — Write the three MPP custom-method hooks for USDT0 and settle a real payment.
* [**MPP sessions**](/en/explanation/mpp-sessions) — Stream micropayments with off-chain vouchers and one net settlement.
* [**x402**](/en/explanation/x402) — Read the original HTTP-402 protocol that MPP generalizes.
## Overview
Stable is a Layer 1 where USDT0 is the native gas token, and standard EVM tooling (Solidity, Foundry, Hardhat, ethers, viem, and the `eth_*` JSON-RPC methods) works unchanged.
Point your RPC at Stable and confirm the chain ID:
```text
988
```
make sure you have [foundry](https://www.getfoundry.sh/) installed to test the following command:
```bash
cast chain-id --rpc-url https://rpc.stable.xyz
```
For the full list of endpoints (mainnet and testnet), see [Connect](/en/reference/connect).
### What to read next
If you haven't sent a transaction on Stable yet, start with [Quick start](/en/tutorial/quick-start) for a quick walkthrough on testnet. Then pick the path that matches what you're building:
* Wallets, delegation, and agent accounts → [Accounts](/en/explanation/accounts-overview).
* Moving USDT0 or building payment flows → [Payments](/en/explanation/payments-overview).
* Deploying smart contracts → [Contracts](/en/explanation/contracts-overview).
* Wiring AI editors or building agent-paid services → [Agent settlement](/en/explanation/agent-settlement).
* Running a full or archive node, ecosystem providers, or covering gas → [Infrastructure](/en/explanation/integrate-overview).
Before you ship, [Core concepts](/en/explanation/core-concepts) covers four behaviors that differ from Ethereum (USDT0 dual role, guaranteed blockspace, transfer aggregator, EVM finality). [Production readiness](/en/how-to/production-readiness) is the mainnet-readiness checklist.
## Use cases overview
Stable supports multiple payment patterns, from simple wallet-to-wallet transfers to agent-driven service payments. The use cases below cover the patterns that are production-ready today. For patterns on the horizon (guaranteed settlement, confidential payments, agent-to-agent commerce), see [Upcoming use cases](/en/explanation/upcoming-use-cases).
### Live use cases
* [**P2P payments**](/en/reference/p2p-payments) — Wallet-to-wallet USDT0 transfers. Sub-second settlement, zero gas via Gas Waiver.
* [**Subscription billing**](/en/reference/subscriptions) — Pull-based recurring billing via EIP-7702. Subscriber authorizes once, provider collects each cycle.
* [**Invoice settlement**](/en/reference/invoices) — B2B invoice payment with deterministic nonces. On-chain settlement links automatically to the invoice.
* [**Pay-per-call APIs**](/en/reference/pay-per-call) — Per-request HTTP payments via x402 middleware. No accounts, no API keys, no billing cycles.
### Shared foundations
Most patterns build on the same two protocols:
* **[ERC-3009](/en/explanation/erc-3009)**: signed authorizations for delegated settlement. Used by invoices, pay-per-call, and P2P application-initiated transfers.
* **[x402](/en/explanation/x402)**: HTTP-native payments over standard headers. Used by pay-per-call APIs and MCP-driven payment flows.
* **[EIP-7702](/en/explanation/eip-7702)**: EOA delegation for recurring authorization. Used by subscription billing.
### Next recommended
* [**ERC-3009**](/en/explanation/erc-3009) — Start with the core settlement standard.
* [**Upcoming use cases**](/en/explanation/upcoming-use-cases) — Preview agent-to-agent commerce, guaranteed settlement, and confidential payments.
## Payments guides
Every guide, concept, and reference under the Payments tab, grouped by what you're trying to do.
### Send and transfer
* [**Send your first USDT0**](/en/tutorial/send-usdt0) — Native and ERC-20 transfers on the same balance.
* [**Zero gas transactions**](/en/how-to/zero-gas-transactions) — Transfer USDT0 with the fee covered by a Gas Waiver.
* [**Work with USDT0 as gas**](/en/how-to/work-with-usdt-gas) — Construct transactions correctly: priority tip 0, `value` in USDT0.
* [**Bridge USDT0 to Stable**](/en/tutorial/bridge-usdt0) — Bridge from Ethereum Sepolia using LayerZero OFT.
### Build a payment flow
* [**Learn P2P payments**](/en/how-to/build-p2p-payments) — Wallet + send + receive + history in one app.
* [**Subscribe and collect**](/en/how-to/subscribe-and-collect) — Pull-based recurring billing via EIP-7702.
* [**Paying with invoice**](/en/how-to/pay-with-invoice) — ERC-3009 with deterministic nonces for invoice settlement.
* [**Build a pay-per-call API**](/en/how-to/build-pay-per-call) — Monetise HTTP endpoints with x402 middleware.
### Protocols and references
* [**ERC-3009**](/en/explanation/erc-3009) — Transfer With Authorization: the signed-settlement primitive.
* [**x402 (HTTP-native payments)**](/en/explanation/x402) — Server responds 402, client signs, facilitator settles on-chain.
* [**P2P payments reference**](/en/reference/p2p-payments) — Model overview and comparison to traditional rails.
* [**Subscriptions reference**](/en/reference/subscriptions) — Pull-based billing model and trade-offs.
* [**Invoices reference**](/en/reference/invoices) — Deterministic-nonce settlement model.
* [**Pay-per-call reference**](/en/reference/pay-per-call) — x402 pricing and endpoint discovery model.
* [**Upcoming use cases**](/en/explanation/upcoming-use-cases) — Guaranteed settlement, confidential payments, agent-to-agent.
## Payments on Stable
Stable is built around payments. USDT0 is the native asset and the gas token, so settlement and fees share one balance. Single-slot finality means a transfer clears in under a second. ERC-3009, EIP-7702, and x402 are native primitives, not workarounds — you can settle with a signature, pull from a delegated account, or charge per HTTP request without running a billing stack.
### What you can build
* **P2P transfers** — native USDT0 sends with 21k gas and sub-second finality.
* **Subscriptions** — pull-based recurring billing with EIP-7702 delegation.
* **Invoice settlement** — ERC-3009 `transferWithAuthorization` with deterministic nonces for exact reconciliation.
* **Pay-per-call APIs** — x402 middleware for per-request USDT0 payments; no API keys, no sign-ups.
* **Zero-gas UX** — application-sponsored transactions via the Gas Waiver service.
* **Cross-chain USDT0** — LayerZero OFT bridging from Ethereum and other networks.
### How Stable differs
* **One asset for everything**: the sender doesn't hold a separate gas token.
* **Native ERC-3009**: USDT0 implements `transferWithAuthorization` directly, so payments settle with a signature and no approve step.
* **Deterministic finality**: a block is final the moment it's committed. No confirmation waits.
* **Native x402**: the facilitator pays no gas through the Gas Waiver, so per-request settlement costs stay below a cent.
### Start here
* [**Send your first USDT0**](/en/tutorial/send-usdt0) — Native and ERC-20 transfers on the same balance.
* [**Zero gas transactions**](/en/how-to/zero-gas-transactions) — Transfer USDT0 with the fee covered by a Gas Waiver.
* [**Learn P2P payments**](/en/how-to/build-p2p-payments) — Build a wallet + send + receive + history app from scratch.
* [**Build a pay-per-call API**](/en/how-to/build-pay-per-call) — Price HTTP endpoints per request with x402.
* [**Stable SDK**](/en/explanation/sdk-overview) — Use the typed client for transfer, bridge, and swap in a few lines.
### Payment primitives
* [**ERC-3009**](/en/explanation/erc-3009) — Transfer With Authorization: the settlement standard behind invoices and x402.
* [**x402 (HTTP-native payments)**](/en/explanation/x402) — Server responds 402, client signs ERC-3009, facilitator settles on-chain.
### Next recommended
* [**Payments guide index**](/en/explanation/payments-index) — Every guide, concept, and reference under the Payments tab.
* [**Subscribe and collect**](/en/how-to/subscribe-and-collect) — Pull-based recurring billing via EIP-7702.
* [**Paying with invoice**](/en/how-to/pay-with-invoice) — ERC-3009 with deterministic nonces for exact reconciliation.
## Stable SDK
`@stablechain/sdk` is the official TypeScript client for Stable. It wraps viem with a small, typed API for the operations you reach for most: transfer USDT0, bridge between chains, and swap tokens on Stable. Routing, approvals, decimals, and chain switching are handled for you.
```ts
import { createStable, Network } from "@stablechain/sdk";
import { privateKeyToAccount } from "viem/accounts";
const stable = createStable({
network: Network.Mainnet,
account: privateKeyToAccount("0x..."),
});
const { txHash } = await stable.transfer({
from: "0xYourAddress",
to: "0xRecipient",
amount: 10,
});
```
```text
txHash: 0x8f3a...2d41
```
### What the SDK does
* **`transfer`** — send native USDT0 or any ERC-20 on Stable. Gas is paid in USDT0 automatically.
* **`quoteBridge` / `bridge`** — cross-chain transfers. LayerZero for USDT0 → USDT0, LI.FI for everything else. Route is picked for you.
* **`quoteSwap` / `swap`** — same-chain token swaps via LI.FI, with ERC-20 approval handled internally.
The SDK is published on npm as [`@stablechain/sdk`](https://www.npmjs.com/package/@stablechain/sdk) and requires `viem >= 2.0.0` as a peer dependency.
### When to use it (and when not to)
Use the SDK when you want a typed, opinionated client that hides routing and approval boilerplate. Drop down to raw viem or ethers when you need direct control over transaction construction, custom gas strategies, or contract calls outside transfer / bridge / swap.
:::note
The SDK signs with any viem-compatible signer: a private-key `Account`, a browser `Transport` like `custom(window.ethereum)`, or a pre-built `WalletClient` (for example, the one returned by wagmi's `useWalletClient`).
:::
### Start here
* [**Quickstart**](/en/tutorial/sdk-quickstart) — Install the SDK and run your first transfer, bridge, and swap on testnet.
* [**SDK reference**](/en/reference/sdk) — Every method, config option, enum, and error class.
* [**Use with viem**](/en/how-to/sdk-with-viem) — Server-side accounts, browser wallets, and bring-your-own `WalletClient`.
* [**Use with wagmi**](/en/how-to/sdk-with-wagmi) — Wire the SDK into a React app with `useWalletClient` and hooks.
### Next recommended
* [**Install from npm**](https://www.npmjs.com/package/@stablechain/sdk) — View the package on npmjs.com and check the latest version.
* [**Connect to Stable**](/en/reference/connect) — Chain IDs, RPC endpoints, and explorers for mainnet and testnet.
* [**Fund a testnet wallet**](/en/how-to/use-faucet) — Get testnet USDT0 from the faucet before running the quickstart.
## Storage (StableDB)
One of the main bottlenecks in end-to-end blockchain performance is **Disk I/O**. Specifically, committing and storing state data after block execution creates the key bottleneck. Stable tackles this problem with architectural innovations such as `MemDB`, `VersionDB`, and memory-mapped storage (`mmap`) to dramatically improve throughput.
### Why disk I/O is a bottleneck
#### State transition and persistence
Every time a block of transactions is executed, the blockchain transitions from one state to the next. This process has two fundamental stages:
1. **State Commitment**: The new application state is committed after transaction execution.
2. **State Storage**: The committed state is persisted to disk for long-term access and historical verification.
In conventional architectures, state storage is **tightly coupled** with state commitment. This means that:
* The node must wait for the new state to be fully stored on disk before proceeding with the next block's execution.
* The state data is written in random disk locations that are not mapped to fixed addresses. This leads to high latency when retrieving state data during execution of subsequent transactions.
Even if consensus and execution layers are heavily optimized, this serialized dependency on slow disk operations caps the achievable performance of the entire system.
### Optimizing DB operations for higher throughput
To overcome these limitations, Stable proposes a two-fold architectural enhancement focused on **decoupling state operations** and **introducing memory-mapped DB optimizations**.
#### 1. Decoupling state commitment and storage
The first step is to decouple the state commitment from its storage:
* After committing a new state, the node immediately proceeds to execute the next block.
* The actual persistence of state to disk occurs asynchronously in the background.
This separation allows execution to happen instantly and leapfrog the latency of slow disk writes, thereby eliminating blocking dependencies and eventually improving end-to-end performance.
#### 2. Introducing `MemDB` and `VersionDB` via `mmap`
Stable enhances this with a dual-database model powered by `mmap` (memory-mapped file access):
* **MemDB (Memory DB)**:
* Stores recent and active states that are frequently accessed.
* Uses fixed address mapping via `mmap`, enabling fast and deterministic lookups.
* Ideal for most transaction workloads which target recently modified state.
* **VersionDB (Historical DB)**:
* Stores older, historical states on disk.
* Optimized for archival and long-range queries, not for high-frequency access.
This design ensures that **hot data is served from fast, memory-resident structures**, while cold data is offloaded to slower, persistent storage. By combining `mmap` access with smart state tiering, Stable can significantly reduce the DB read/write latency during block execution.
### Expected gains and precedents
This architectural optimization is not just theoretical. It is already being implemented by high-performance blockchains such as Sei and Cronos. Both have adopted similar decoupled architectures with memory-mapped DBs and have observed **up to 2x increases in overall TPS**.
Stable also anticipates comparable gains, as the architecture will no longer be bottlenecked by the storage layer. Instead, consensus and execution performance can scale without being throttled by disk operations.
### Further reading
For more technical deep-dives and implementation details, refer to:
* [ADR-065: Cosmos Store V2 Architecture](https://docs.cosmos.network/main/build/architecture/adr-065-store-v2)
* [MemIAVL: A Practical Guide](https://hackmd.io/@yihuang/rkeCvy5xh)
* [Cronos MemIAVL Node Configuration](https://docs.cronos.org/for-node-hosts/running-nodes/memiavl)
* [Sei’s DB Design Approach](https://4pillars.io/ko/articles/sei-db)
### Next recommended
* [**High performance RPC**](/en/explanation/high-performance-rpc) — See how the RPC layer exposes state reads without contending with writes.
* [**Execution**](/en/explanation/execution) — Understand how execution writes into the storage layer covered here.
* [**Consensus**](/en/explanation/consensus) — Review the consensus layer that orders blocks before they reach storage.
## Staking module
The `x/staking` module controls validator participation and delegation on Stable. Its precompile makes these operations callable from Solidity, so a contract can delegate STABLE, undelegate after the unbonding period, redelegate between validators, or query validator state without leaving the EVM.
### What it exposes
* **Create validator**: register a new validator with description, commission rate, and initial self-delegation.
* **Edit validator**: update validator metadata and commission parameters.
* **Delegate**: stake STABLE with a validator.
* **Undelegate**: begin unbonding from a validator (the tokens become available after the unbonding period).
* **Redelegate**: move stake between validators without unbonding.
* **Cancel unbonding delegation**: reverse an in-progress unbonding before the period completes.
* **Query methods**: read validator sets, delegation records, unbonding records, and parameters.
### Authorization semantics
The precompile performs two checks:
1. The bond denom (staking token) must be registered at chain initialization. On Stable this is the STABLE token.
2. The caller must match the validator or delegator whose state is being modified. You cannot delegate on someone else's behalf by calling the precompile directly.
### Unbonding completions
When an unbonding period finishes, the tokens become liquid, but the SDK handles this quietly and the EVM doesn't see a direct event. Stable's [system transaction](/en/explanation/system-transactions) mechanism bridges this: the protocol emits an `UnbondingCompleted` event through the `StableSystem` precompile once the unbonding clears, so dApps can subscribe via standard EVM logs.
### When to use it
* A staking protocol manages delegation from a vault contract: call `delegate` and `undelegate` as users deposit and withdraw.
* A governance dashboard needs a live validator set: use the query methods.
* A restaking or liquid-staking product tracks unbonding completions: subscribe to the `UnbondingCompleted` event (see [Tracking unbonding completions](/en/how-to/track-unbonding) once that guide ships).
### Where to find the ABI
Full method signatures, struct definitions, and emitted events are in the [Staking precompile reference](/en/reference/staking-module-api).
### Next recommended
* [**Staking precompile reference**](/en/reference/staking-module-api) — Call `delegate`, `undelegate`, `redelegate`, and read validator state.
* [**System transactions**](/en/explanation/system-transactions) — Learn how unbonding completions reach the EVM as events.
* [**Distribution module**](/en/explanation/distribution-module) — Withdraw rewards earned from the delegations managed here.
## System modules
Stable's core protocol behavior lives in SDK modules: `x/bank`, `x/distribution`, `x/staking`. To make this behavior accessible from the EVM, Stable exposes each module as a **precompiled contract** at a fixed address. Contracts written in Solidity call the precompile directly, and the EVM routes the call into the native SDK handler. Precompiles are implemented at the protocol level, making them significantly more gas-efficient than an equivalent Solidity re-implementation.
### The three modules
| Module | Precompile address | Purpose |
| :--------------------------------------------------------- | :--------------------- | :--------------------------------------------------------------------------------------------- |
| [Bank](/en/explanation/bank-module) | `0x0000…1003` (STABLE) | Token transfers, balance accounting, allowance management, mint/burn for authorized contracts. |
| [Distribution](/en/explanation/distribution-module) | `0x0000…0801` | Staking-reward claims, reward queries, withdraw-address management. |
| [Staking](/en/explanation/staking-module) | `0x0000…0800` | Delegation, undelegation, redelegation, validator queries. |
| [System transactions](/en/explanation/system-transactions) | `0x0000…9999` | Protocol-emitted EVM events for SDK-layer operations (e.g. unbonding completions). |
Each page above explains what the module does, when to use it, and where to find its ABI.
### Why precompiles, not Solidity
Two reasons:
* **Gas efficiency.** A precompile runs in the protocol's native execution path. An equivalent Solidity contract would re-implement the same logic with significantly higher gas cost.
* **Single source of truth.** Staking, distribution, and token supply are protocol-level state. Exposing them through precompiles avoids maintaining a duplicate Solidity implementation that could drift from the SDK.
### Authorization
Some precompile methods (`mint`, `burn`, protocol-level staking operations) require caller authorization. The `x/precompile` module maintains an on-chain whitelist, and calls from unregistered contracts revert. This keeps privileged operations governance-gated without blocking general EVM use of read/transfer methods.
### Next recommended
* [**Bank module**](/en/explanation/bank-module) — Understand token transfers, allowances, and the mint/burn authorization model.
* [**Staking module**](/en/explanation/staking-module) — See how delegation and validator management reach the EVM.
* [**System transactions**](/en/explanation/system-transactions) — Learn how protocol-level events like unbonding completions surface as EVM logs.
## System transactions
EVM applications subscribe to on-chain activity through standard interfaces like `eth_getLogs`. But some of the most important operations on Stable (staking unbonding completions, for example) happen inside SDK modules that don't naturally emit EVM events. **System transactions** close this visibility gap: the protocol itself submits EVM transactions that emit events for SDK-layer operations, making them indexable through the same log stream dApps already use.
### Why this matters
Consider tracking when a user's tokens finish unbonding. Without system transactions, a dApp would need to either:
* Run a separate indexer that watches for SDK events and stores them in its own database. Operational overhead plus a new failure point.
* Poll a REST endpoint periodically. 5–10 second latency, higher RPC load, two client stacks (web3 + REST) to maintain.
System transactions give dApps real-time event notifications through the same WebSocket connections they already use for EVM logs. No separate indexer. No REST polling.
### How the flow works
```
1. Protocol event: An SDK-layer operation completes (e.g. staking unbonding).
2. Detection: The x/stable EndBlocker detects the event and queues it in state.
3. System TX: In the next block's PrepareProposal, the protocol generates a
system transaction calling the StableSystem precompile.
4. EVM emission: The precompile processes the queued entries and emits standard
EVM events — dApps see them through eth_getLogs and subscriptions.
```
The system transaction is created by validators during block proposal, not by users. It lands at the front of the block, before any user transactions.
### The StableSystem precompile
Events flow through the `StableSystem` precompile at `0x0000000000000000000000000000000000009999`. Today it emits one event (`UnbondingCompleted`) for staking unbondings. The protocol is designed to extend this to other SDK operations (validator commission changes, governance execution) under the same pattern.
### Security model
Two properties keep the event stream trustworthy:
* **Protocol-only sender.** System transactions use `0x8888888888888888888888888888888888888888` as their sender. The EVM state-transition rules only allow transactions to the `StableSystem` precompile from this address to skip signature verification. Users cannot forge events or call restricted precompile functions from their own transactions.
* **Deterministic emission.** Every honest validator produces the same system transaction for the same protocol events. There's no additional trust assumption beyond standard consensus.
### Batch processing
To bound block size, each block processes at most 100 unbonding completions. At Stable's \~700 ms block time, that's roughly 9,000 completions per minute, well above typical staking activity. If a burst exceeds the per-block limit, completions queue in FIFO order and drain over subsequent blocks.
There's a one-block (\~700 ms) delay between the SDK event and the EVM emission, which is negligible relative to the 7-day unbonding period itself.
### Where to find the ABI
The `StableSystem` interface, event signatures, and sender-authorization rules are in the [System transactions reference](/en/reference/system-transactions-api).
### Next recommended
* [**System transactions reference**](/en/reference/system-transactions-api) — Review the `IStableSystem` interface, gas accounting, and authorization rules.
* [**Staking module**](/en/explanation/staking-module) — See the SDK operations that surface as system-transaction events.
* [**System modules overview**](/en/explanation/system-modules-overview) — Return to the precompile-exposed module list.
## Tech overview
:::note
**What's live today:** StableBFT consensus, Stable EVM (full EVM compatibility), and the split-path RPC layer are all production-ready. StableDB ships in the v1.4.0 upgrade. Autobahn (DAG-based consensus) and StableVM++ (optimistic parallel execution) are roadmap items. See the [Roadmap](/en/explanation/technical-roadmap) for timelines.
:::
You can deploy Solidity or Vyper contracts on Stable today using Hardhat, Foundry, or any standard EVM tooling, and your contracts work without modification. What changes: gas is paid in USDT0, transactions reach single-slot finality, and every layer of the stack is tuned for stablecoin throughput.
### StableBFT
**Status: Live**
Stable Blockchain leverages **StableBFT**, a customized PoS consensus protocol built on CometBFT, for high throughput, low latency, and strong reliability across the network.
:::note
**Planned:** DAG-based **Autobahn** consensus with decoupled data dissemination. See the [Roadmap](/en/explanation/technical-roadmap#phase-3-full-stack-optimized-layer-for-usdt).
:::
### Stable EVM
**Status: Live**
**Stable EVM** is Stable's Ethereum-compatible execution layer. Standard Ethereum tools and wallets interact with the chain unchanged. A set of **precompiles** bridges Stable EVM to the Stable SDK, letting EVM smart contracts call into core chain logic atomically.
:::note
**Planned:** **StableVM++** with optimistic parallel execution (Block-STM). See the [Roadmap](/en/explanation/technical-roadmap#phase-3-full-stack-optimized-layer-for-usdt).
:::
### StableDB
**Status: Ships in v1.4.0**
Stable fixes a major blockchain bottleneck: slow disk storage after each block. It separates state commitment from storage so blocks process without delay. `MemDB` and `VersionDB`, powered by `mmap`, keep recent data in memory while older data is stored efficiently, boosting overall throughput.
### High performance RPC
**Status: Live**
A slow RPC layer ruins the user experience even on a fast chain. Stable addresses this with a **split-path architecture** that separates operations by function, deploying lightweight, specialized RPC nodes for faster response times.
:::note
**Planned:** RPC nodes optimized for EVM view calls, plus a node-integrated indexer. See the [Roadmap](/en/explanation/technical-roadmap#phase-3-full-stack-optimized-layer-for-usdt).
:::
## Roadmap
Stable optimizes every layer of the transaction pipeline (consensus, execution, storage, RPC, and USDT-specific flows) across three phases. This page marks what's shipped, what's in progress, and what's still ahead.
### Phase 1: Foundational layer for USDT
Status: **Live on mainnet.**
#### StableBFT: Live
A customized PoS consensus protocol built on CometBFT. Delivers deterministic finality and Byzantine fault tolerance up to one-third of validators. See [Consensus](/en/explanation/consensus) for the current implementation.
#### USDT as native gas: Live
USDT0 is the native asset for gas payment and value transfer, and simultaneously supports the ERC-20 surface (`approve`, `transfer`, `transferFrom`, `permit`). See [USDT as gas](/en/explanation/usdt-as-gas-token).
#### Stable Pay & Stable Name: In progress
Stable Pay is a Web2.5 UX wallet experience designed to simplify onboarding for new users while remaining compatible with existing Web3 wallets. Stable Name is a user-friendly aliasing system that replaces raw EVM addresses with human-readable identifiers for sending and receiving tokens.
### Phase 2: Experience layer for USDT
Status: **In development.** State DB optimization ships in the v1.4.0 upgrade. The remaining items are still in development.
#### State DB optimization: Ships in v1.4.0
Stable decouples state commitment from state storage. Validators commit the latest state in memory while historical state is deferred to disk. `MemDB` and `VersionDB` powered by `mmap` handle real-time commitment without blocking on disk I/O. See [Storage (StableDB)](/en/explanation/stable-db).
#### Optimistic parallel execution: Planned
Real-world telemetry shows 60–80% of transactions interact with disjoint state and can safely execute in parallel. Stable will execute transactions optimistically under the no-conflict assumption, with rollback and sequential re-execution on detected conflicts. This preserves correctness while improving throughput.
#### USDT Transfer Aggregator: Planned
Aggregating mechanism that groups USDT0 transfers and processes them collectively, reducing per-transaction overhead and improving overall throughput. See [USDT transfer aggregator](/en/explanation/usdt-transfer-aggregator).
#### Guaranteed blockspace: Planned
Reserved block capacity for enterprise partners, enforced through validator-level reservations and dedicated RPC endpoints. Delivers predictable latency for mission-critical payment flows even under network congestion. See [Guaranteed blockspace](/en/explanation/guaranteed-blockspace).
### Phase 3: Full-stack optimized layer for USDT
Status: **Planned.**
#### StableBFT on Autobahn
DAG-based BFT consensus that integrates naturally with Stable's CometBFT-based consensus layer. See [StableBFT](/en/explanation/consensus) for the current protocol and [Autobahn](/en/explanation/autobahn) for the target architecture. Internal proof-of-concept has demonstrated over 200,000 TPS (consensus only) in controlled environments.
#### StableVM++
High-performance execution engine that replaces the Go-based EVM with a C++ implementation. Projected to deliver up to a 6x improvement in EVM execution speed.
#### High performance RPC
A full RPC stack covering node-level enhancements (real-time chain state processing), node-integrated indexing (low-latency application APIs), scalable pub/sub over WebSocket, and a hybrid load balancer that routes by operation type. See [High performance RPC](/en/explanation/high-performance-rpc) for the current split-path architecture.
### Next recommended
* [**Architecture overview**](/en/explanation/core-optimization-overview) — Walk through the current state of the stack the roadmap evolves.
* [**Tokenomics**](/en/reference/tokenomics) — Review the economic model that funds validator incentives across the roadmap.
* [**Tech overview**](/en/explanation/tech-overview) — Return to the architecture summary.
## Upcoming use cases
Stable is building toward payment patterns that go beyond simple transfers and API billing. The cases below cover time-guaranteed settlement, privacy-preserving payments, and autonomous agent commerce. Some are functional today in early form; others depend on Stable features currently in development.
### Guaranteed settlement
Reliable payment settlement backed by reserved block capacity, ensuring transaction inclusion regardless of network conditions.
#### Concept
Some payments are part of a timed settlement cycle, not a standalone transfer. In these flows, settlement must complete before the cycle closes so the next state transition can proceed as scheduled. If the required payments are delayed past that window, the cycle may fail, roll to the next window, or require manual recovery.
Stable's [Guaranteed Blockspace](/en/explanation/guaranteed-blockspace) addresses this by reserving execution capacity for qualifying payment flows. The goal is not simply faster settlement, but operationally reliable completion within exact timing constraints.
#### Expected scenario
A tokenized asset platform runs scheduled DvP (Delivery versus Payment) settlement every few minutes. Cash legs are submitted as a batch, and securities are released only if the full payment batch is included before the current settlement cycle closes. Under normal conditions, this clears immediately. During burst traffic, partial inclusion would create a failed or rolled settlement cycle. With Guaranteed Settlement, the platform reserves capacity for the payment batch so the cycle can close deterministically.
#### What enables it
Guaranteed blockspace turns on-chain payment into a schedulable operation. Settlement cycles can be designed with hard timing assumptions, batch payments can be committed atomically within a single window, and upstream systems can treat block inclusion as a dependency rather than a hope.
### Confidential payments
Privacy-preserving USDT0 transfers where selected transaction details are shielded from public observers while remaining verifiable by the transacting parties and authorized auditors.
#### Concept
Standard on-chain transfers are fully transparent; anyone can see the sender, recipient, and amount. For business payments, this transparency can expose commercially sensitive information to anyone monitoring the chain.
Stable is developing [Confidential Transfer](/en/explanation/confidential-transfer), a privacy layer using zero-knowledge cryptography that enables selective confidentiality for on-chain transactions. The shielded values are accessible only to the involved parties and authorized regulatory auditors.
#### Expected scenario
A large retailer settles inventory procurement with multiple suppliers on-chain. On a transparent chain, competitors can monitor these transactions to reverse-engineer supplier relationships, order volumes, and wholesale pricing. With confidential transfers, the commercially sensitive details are shielded while the on-chain record still serves as a verifiable settlement receipt for both parties and authorized auditors.
### Agent-to-agent payment
Payments initiated and settled between AI agents autonomously, without human approval or intervention in the transaction loop.
#### Concept
As AI agents take on more operational tasks, they will need to procure services from other agents. In current workflows, this requires a human in the loop to approve each purchase, select a vendor, or verify that the counterparty is trustworthy. Agent-to-agent payment removes that bottleneck by letting agents find, evaluate, and pay for services autonomously within a single transaction loop.
This pattern depends on several emerging protocols working together: agent discovery and trust ([ERC-8004](https://eips.ethereum.org/EIPS/eip-8004)), secure communication ([XMTP](https://xmtp.org)), and a payment rail that can settle in real time ([x402](/en/explanation/x402)).
#### Expected flow
1. **Discover**: the buyer agent queries an ERC-8004 Identity Registry to find agents that offer the required capability (e.g., image generation). The registry returns matching agent identities with associated metadata.
2. **Verify**: the buyer checks the ERC-8004 registries for each candidate. Identity, reputation scores, and validation proofs determine which providers are trustworthy enough to transact with.
3. **Negotiate**: the buyer sends task parameters to the selected provider over XMTP. The two agents agree on price, deadline, and deliverable format through encrypted messaging.
4. **Pay**: the buyer calls the provider's HTTP endpoint. The provider responds with 402. The buyer signs an ERC-3009 authorization and retries with the payment header. The facilitator settles the payment on Stable, and the provider returns the result.
5. **Rate**: after delivery, the buyer posts feedback to the ERC-8004 Reputation Registry, updating the provider's score for future interactions.
#### What enables it
Agent-to-agent payment turns service procurement into a fully programmable loop. Agents can compare providers, switch vendors, and settle payments in real time without human scheduling or approval queues. This makes it possible to build autonomous supply chains where agents continuously source, pay for, and deliver services at machine speed, scaling commerce beyond what manual coordination can support.
### Next recommended
* [**Guaranteed blockspace**](/en/explanation/guaranteed-blockspace) — Review the protocol-level mechanism behind guaranteed settlement.
* [**Confidential transfer**](/en/explanation/confidential-transfer) — See the privacy model Stable is building.
* [**x402**](/en/explanation/x402) — Understand the settlement protocol behind agent-to-agent flows.
## USDT as gas
**You pay fees in USDT0. No second token, no wrapping, no ETH-equivalent to keep topped up.** USDT0 serves as both the native gas token and an ERC-20 token on the same balance. The same asset that moves as payment also pays for the transaction that moves it. Fees are denominated in dollars, not a volatile native token.
This design comes with behavioral differences from Ethereum that affect balance semantics, allowance safety, and certain opcode assumptions. If you're porting a contract from Ethereum, see [USDT0 behavior on Stable](/en/explanation/usdt0-behavior) for the migration checklist before deploying.
### Abstract
Stable is an EVM-compatible blockchain that uses USDT0 as its native gas token. USDT0 simultaneously functions as the native asset for gas payment and value transfer, and as an ERC-20 token supporting `approve`, `transfer`, `transferFrom`, and `permit`.
This document specifies Stable's USDT0 gas mechanism, describes the resulting behavioral differences, and defines required and recommended development patterns for smart contracts deployed on Stable.
### Version note
With Stable v1.2.0, USDT0 becomes the native gas token on Stable, replacing gUSDT. As part of this transition:
* gUSDT is being sunset.
* Existing gUSDT balances are automatically converted to USDT0.
* Users and applications no longer need wrapping and unwrapping flows to pay fees or move value.
After v1.2.0, USDT0 serves as both:
* the network fee asset (gas), and
* a standard ERC20 token with `approve`, `permit`, `transfer`, and `transferFrom`.
### Network addresses
USDT0 token contract addresses:
* Testnet: [0x78cf24370174180738c5b8e352b6d14c83a6c9a9](https://testnet.stablescan.xyz/token/0x78cf24370174180738c5b8e352b6d14c83a6c9a9)
* Mainnet: [0x779ded0c9e1022225f8e0630b35a9b54be713736](https://stablescan.xyz/token/0x779ded0c9e1022225f8e0630b35a9b54be713736)
### Terminology
* **Stable**: An EVM-compatible blockchain where USDT0 is the native gas token.
* **USDT0**: An omnichain version of USDT that functions both as:
* the native asset used for gas and value transfers, and
* an ERC20 token with allowance and permit semantics.
* **Native balance**: The balance returned by `address(x).balance`, denominated in USDT0.
* **Gas fee**: The transaction fee paid in USDT0, calculated under an EIP-1559-style fee market.
### What is USDT0?
USDT0 is an omnichain representation of USDT using LayerZero’s Omnichain Fungible Token (OFT) standard. USDT0 is pegged 1:1 with USDT and is designed to move across multiple blockchains without requiring traditional bridge workflows or wrapped representations.
When transferring USDT0 across chains, the token is locked on some source chains (depending on the chain’s native USDT support) or burned. It is then minted on the destination chain via LayerZero’s cross-chain messaging. This preserves a 1:1 peg while consolidating liquidity into a single interoperable asset rather than fragmented chain-local pools.
For users, this enables faster onboarding, reduced operational complexity, and improved liquidity mobility.
### USDT0 and Stable
USDT0 is the core asset that powers Stable’s onchain economics and day-to-day usage. Because the same asset is used for both paying fees and transferring value, Stable reduces friction for:
* **Everyday users**: Simpler onboarding and fewer token concepts
* **Developers**: Simpler fee and value flows
* **Enterprises**: Simplified accounting and treasury operations
Stable can also access deep USDT liquidity from day one by enabling users to onboard USDT0 from other networks via LayerZero.
### Assumptions and prerequisites
For the content below, you are expected to understand:
* Solidity execution semantics and native value transfers
* ERC20 allowance mechanics and permit flows
* Standard smart contract security patterns, including Checks-Effects-Interactions
### 1. Gas and fee model
#### 1.1 Overview
Stable denominates all transaction fees in USDT0. Gas pricing follows an EIP-1559-style model with a dynamically adjusting base fee.
The transaction fee is defined as:
```
fee = gasUsed × baseFee
```
Transactions may specify `maxFeePerGas` using standard EIP-1559 parameters.
*Note: Stable does not support priority tips. Do not set `maxPriorityFeePerGas`, or the tip amount will be lost.*
#### 1.2 Transaction submission
Clients should fetch the latest base fee from the most recent block and include a safety margin when computing `maxFeePerGas`.
Example (illustrative):
```javascript
const block = await provider.getBlock("latest");
const baseFee = block.baseFeePerGas;
const maxPriorityFeePerGas = 1n;
const maxFeePerGas = baseFee * 2n + maxPriorityFeePerGas;
```
#### 1.3 Acquiring USDT0
Accounts obtain USDT0 by:
* Bridging USDT0 from other supported chains
* Receiving transfers from other accounts on Stable
### 2. How Stable enables USDT0 as the gas token
Stable charges gas in USDT0 using a pre-charge and refund settlement model.
#### Example transaction
Alice sends 100 USDT0 to Bob.
#### 2.1 Ante-handler phase
During transaction validation in `MonoEVMAnteHandler`:
1. Alice’s USDT0 balance is read.
2. The protocol verifies Alice can cover:
* the transaction value (100 USDT0), and
* the maximum possible gas fee (`gasWanted × fee`).
3. The maximum gas fee is transferred upfront:
* `alice → fee_collector` in USDT0.
#### 2.2 Execution phase
During `ApplyTransaction`:
1. The EVM executes the transaction.
2. Actual gas consumption is recorded.
3. The value transfer is applied:
* `alice → bob` transfers 100 USDT0.
#### 2.3 Settlement phase
After execution:
1. The protocol computes the unused portion of the pre-charged fee:
```
refund = (gasWanted − gasUsed) × baseFee
```
2. The unused fee is refunded:
* `fee_collector → alice` in USDT0.
### 3. Balance semantics and behavioral differences
#### 3.1 Native balance mutability
On Ethereum, a contract’s native balance typically changes only as a result of contract execution.
On Stable, a contract’s native USDT0 balance may also change due to ERC20 allowance-based operations, including `transferFrom` and `permit`. These operations can reduce a contract’s native balance without invoking any contract code.
As a result, the following assumption is invalid on Stable:
* A contract’s native balance can only decrease if the contract is called.
### 4. Contract design requirements
#### 4.1 Prohibited pattern: mirrored balance accounting
Contracts must not rely on internal variables to mirror native balance.
Example of an unsafe pattern:
```solidity
uint256 public deposited;
function deposit() external payable {
deposited += msg.value;
}
```
Such variables can diverge from the actual native balance if USDT0 is drained through allowance-based transfers.
#### 4.2 Required pattern: real-balance solvency checks
All native value transfers must verify solvency using `address(this).balance` immediately before transfer.
Example:
```solidity
require(address(this).balance >= amount, "insufficient balance");
```
Withdrawals must follow Checks-Effects-Interactions ordering:
```solidity
uint256 amount = credit[msg.sender];
credit[msg.sender] = 0;
require(address(this).balance >= amount);
payable(msg.sender).call{value: amount}("");
```
#### 4.3 State progression must be balance-independent
Protocol logic that depends on progression, milestones, or completion conditions must track these explicitly using non-balance state variables, such as counters or epochs.
Native balances must be used only for solvency verification at the moment of payout.
#### 4.4 Allowance exposure
Contracts that custody user funds should not grant USDT0 allowances to external addresses.
If allowances are unavoidable, contracts should:
* Approve only exact amounts
* Reset allowances immediately after use
* Treat residual drain risk as a known limitation
### 5. Address state assumptions
#### 5.1 EXTCODEHASH
Contracts must not rely on `EXTCODEHASH(addr) == 0x0` to infer that an address has never been used.
Any notion of address usage must be tracked explicitly within contract state.
Example:
```solidity
mapping(address => bool) public used;
```
### 6. Zero address handling
On Stable:
* Native USDT0 transfers to `address(0)` revert.
* ERC20 USDT0 transfers to `address(0)` also revert.
There is no supported mechanism for burning USDT0 by transferring to the zero address.
Contracts must:
* Explicitly reject `address(0)` as a recipient
* Redesign any logic that assumes zero-address burns
* Use explicit sink contracts if irreversible loss semantics are required
### 7. Testing requirements
Test suites for Stable deployments should include:
* Allowance-based drain scenarios (`approve` + `transferFrom`)
* Solvency enforcement using real native balance
* Address usage logic without reliance on `EXTCODEHASH`
* Explicit failure cases for zero-address transfers
### 8. Migration checklist
When porting contracts from Ethereum to Stable:
* Remove internal native balance mirrors
* Replace all solvency checks with `address(this).balance`
* Remove all native or ERC20 transfers to `address(0)`
* Audit all USDT0 approvals
* Add tests covering permit and allowance-based flows
### 9. Summary
Stable’s use of USDT0 as a gas token provides predictable fees and unified value accounting while changing core assumptions about native balance behavior.
Correct contract design on Stable requires:
* Treating USDT0 as a dual-role asset
* Enforcing solvency against real balances
* Avoiding allowance-based drain paths
* Eliminating reliance on Ethereum-specific balance and address assumptions
### FAQ
**We’re using USDT0 as the wrapped native token today. After this upgrade, which token should be treated as the wrapped native?**
USDT0 becomes both the native token and an ERC-20 token after the upgrade. You should use USDT0 directly, and wrapping or unwrapping is no longer required.
**What happens to the original USDT0 contract address (`0x779Ded0c9e1022225f8E0630b35a9b54bE713736`)?**
Nothing changes. The same address remains valid and continues to represent USDT0.
**After the upgrade, is the native token address `0x779Ded0c9e1022225f8E0630b35a9b54bE713736` (instead of `0x0000000000000000000000000000000000001000`)?**
Yes. After the upgrade, the native token identifier/address is `0x779Ded0c9e1022225f8E0630b35a9b54bE713736`.
**What about `0x0000000000000000000000000000000000001000`? Is it still used as the token address for gUSDT, and should we keep it on our side?**
No. You can remove it. It will not be used after the upgrade.
**For DEX calldata, will protocols stop using `0x0000000000000000000000000000000000001000` as the “native token” identifier and use `0x779Ded0c9e1022225f8E0630b35a9b54bE713736` instead?**
Correct. After the upgrade, DEXs should use `0x779Ded0c9e1022225f8E0630b35a9b54bE713736` as the native token identifier.
### Next recommended
* [**Send your first USDT0**](/en/tutorial/send-usdt0) — Submit a USDT0 transfer on testnet using standard EVM tooling.
* [**Gas pricing**](/en/reference/gas-pricing-api) — Build transactions against Stable's single-component fee model.
* [**USDT0 behavior on Stable**](/en/explanation/usdt0-behavior) — Audit contracts for dual-role asset semantics, balance reconciliation, and `EXTCODEHASH` behavior.
## Overview
Stable's USDT-specific features aren't a menu of independent options. They compose. Each one removes a specific friction that shows up when stablecoin payments move from demos to production. This page explains why the five features exist together.
### The friction stack
Most stablecoin payment architecture on general-purpose chains runs into the same stack of problems:
1. **Users have to hold a second token** (ETH, SOL) to pay gas for a transaction that moves stablecoins. An onboarding step that bleeds conversion.
2. **Even with a second token, the user has to cover gas.** This breaks the "send a dollar for a dollar" mental model that merchants and payment apps need.
3. **Transaction costs fluctuate** with network activity. Payroll, treasury ops, and batch settlements can't plan cost or inclusion.
4. **Per-transaction limits cap throughput.** High-volume USDT flows hit chain-wide contention and degrade alongside unrelated activity.
5. **Every transaction is publicly observable.** Supplier payments, salary runs, and treasury moves leak commercially sensitive data.
### How the features compose
Stable addresses each friction with a dedicated mechanism:
| Friction | Mechanism | Page |
| :-------------------------- | :-------------------------------------------- | :------------------------------------------------------------------- |
| Separate gas token | USDT0 is the native gas token | [USDT as gas](/en/explanation/usdt-as-gas-token) |
| User pays gas at all | Governance-authorized waivers cover gas | [Gas waiver](/en/explanation/gas-waiver) |
| Cost and inclusion variance | Reserved block capacity for enrolled partners | [Guaranteed blockspace](/en/explanation/guaranteed-blockspace) |
| Throughput ceiling | Parallelized USDT0 transfer batching | [USDT transfer aggregator](/en/explanation/usdt-transfer-aggregator) |
| Public amount visibility | Selective privacy via ZK cryptography | [Confidential transfer](/en/explanation/confidential-transfer) |
Any one of these helps. Taken together, they make Stable a chain where a payments team can model cost, latency, and privacy the same way they would on a traditional card network, with the settlement finality of a blockchain.
For the full set of Stable's differences from a general-purpose EVM chain, see [Ethereum comparison](/en/explanation/ethereum-comparison). For a worked example of USDT moving end-to-end through these features, see [Flow of funds](/en/explanation/flow-of-funds).
### Next recommended
* [**USDT as gas**](/en/explanation/usdt-as-gas-token) — Understand the asset that replaces ETH for gas and payment at once.
* [**Flow of funds**](/en/explanation/flow-of-funds) — Trace USDT from on-ramp through on-chain transfer to off-ramp settlement.
* [**Bridging to Stable**](/en/explanation/usdt0-bridging) — See how USDT0 moves onto Stable from other chains.
## USDT transfer aggregator
The **USDT Transfer Aggregator** bundles USDT0 transfers into parallelized, fault-tolerant batches instead of processing each transfer sequentially. It isolates USDT0 throughput from the rest of the execution pipeline so high-volume stablecoin activity doesn't crowd out other transactions.
:::note
**Planned.** The aggregator is a forward-looking roadmap item. The content below describes the target design. See [Roadmap](/en/explanation/technical-roadmap) for timing.
:::
### Why it exists
Two constraints pull against each other:
* Traditional ERC-20 transfers are processed sequentially. Under high load, that's a bottleneck.
* Simply giving USDT0 priority would crowd out other transactions and degrade general chain performance.
The aggregator resolves this by pulling USDT0 transfers into a dedicated parallel pipeline, leaving the main execution path untouched for everything else.
### Parallel aggregation and verification
At the heart of the transfer aggregation system is a parallelizable aggregation and verification pipeline, inspired by the `MapReduce` computational model. Instead of processing each transfer in order, the system performs bundle-level computation, aggregating inputs and outputs across accounts before executing balance updates.
#### Key steps
1. **Aggregate Account Diffs**
* Each transfer is mapped to a sender and recipient.
* A diff journal is generated for each account representing the net token movement:
* Negative values for total debits (send).
* Positive values for total credits (receive).
2. **Balance Verification**
* The system ensures global balance invariants: total input equals total output.
* Each account's net change is verified independently in parallel to confirm sufficient funds.
* Accounts without sufficient balance are flagged without halting the bundle.
3. **MapReduce Model for Parallelism**
* **Map Phase**: Compute the net delta for each account based on all incoming/outgoing transfers.
* **Reduce Phase**: Aggregate these deltas to determine the final state update.
### Technical highlights
#### Parallel computation model
* Leverages parallelism in precompiled contracts to check balances and compute diffs concurrently.
* Greatly reduces execution time compared to traditional, sequential ERC20 processing.
#### Dependency analysis
* Identifies overlapping transfers (e.g., multiple sends from the same account).
* Pre-flags high-risk transfers (e.g., likely insufficient funds) to minimize cascading failures.
#### Modular failure handling
* Transfers are isolated at the account level, so only problematic accounts are affected.
* Non-conflicting transfers execute and finalize normally.
#### Selective failure handling
Traditional transfer handling is all-or-nothing within a block. Stable’s aggregation model introduces granular, per-account failure isolation:
* If an account’s `current balance + net diff < 0`, the system marks only that account’s transfers as failed.
* Transfers involving other accounts proceed as normal.
* This selective rollback mechanism ensures that invalid or malicious transfers do not compromise the integrity of an entire bundle.
### Proposer-driven or reputation-based sorting
To further optimize execution and avoid state conflicts, Stable incorporates pre-processing ordering mechanisms for aggregated transfers:
* **Reputation-Based Sorting**: Senders with strong histories or proven reliability are prioritized, reducing risk of failures and reordering.
* **Proposer-Based Ordering**: Transactions may be sorted by a trusted proposer node that structures the bundle to minimize conflicts and maximize throughput.
* **Bundled Transfer Prioritization**: Aggregated USDT transfers are prioritized before general transactions, reducing dependency collisions and unlocking cleaner execution windows.
Stable's USDT Transfer Aggregator is a targeted optimization that maximizes throughput for USDT0 transfers without degrading general transaction processing. By combining parallel execution, modular failure handling, and smart ordering strategies, Stable offers a scalable foundation for stablecoin-driven economies. Fast, frequent, and frictionless token transfers are the norm.
### Next recommended
* [**Payments use cases**](/en/explanation/payment-use-cases-overview) — See the payment patterns that benefit most from aggregated throughput: P2P, subscriptions, pay-per-call.
* [**Execution**](/en/explanation/execution) — See the parallel execution engine the aggregator builds on.
* [**USDT as gas**](/en/explanation/usdt-as-gas-token) — Understand the asset model the aggregator moves.
## USDT0 behavior on Stable
**If you're porting a contract from Ethereum, read this page before deploying.** USDT0 on Stable is both the native gas token and an ERC-20 token on the same balance. Four Ethereum-assumed behaviors break as a result: a contract's native balance can change without a call into the contract, `EXTCODEHASH` can oscillate between zero and empty hash, zero-address transfers revert, and a single logical transfer can emit multiple `Transfer` events from fractional-balance reconciliation.
This page walks through each case and gives safe contract patterns. If you only read one section, read the [Migration checklist](#migration-checklist). It's the port-your-Ethereum-contract-here summary.
### Dual-role overview
USDT0 on Stable is both the native gas token and an ERC-20 token. This dual-role model affects balance behavior, contract design, and event handling. The sections below walk through every case where the dual role changes expected behavior.
For background on why USDT0 operates this way, see [USDT as gas](/en/explanation/usdt-as-gas-token). To experience the behavior through real transfers, see [Send your first USDT0](/en/tutorial/send-usdt0).
### Balance reconciliation
USDT0 uses 18 decimals as the native asset and 6 decimals as an ERC-20 token. Native transfers and ERC-20 transfers operate on the same underlying balance, but the 12-digit precision gap means the system must reconcile fractional amounts when a transfer involves sub-integer precision.
```
before
0.000001 USDT0 (ERC-20) + 0.000000000000000000 USDT0 (internal)
// address(account).balance = 0.000001000000000000
// USDT0.balanceOf(account) = 0.000001
if transfer 0.0000001 USDT0 to another account
after
0.000000 USDT0 (ERC-20) + 0.000000900000000000 USDT0 (internal)
// address(account).balance = 0.000000900000000000
// USDT0.balanceOf(account) = 0.000000
```
This can cause `address(account).balance` and `USDT0.balanceOf(account)` to differ by up to 0.000001 USDT0.
### Event handling
Each reconciliation transfer emits an additional `Transfer` event. A single logical USDT0 transfer can produce up to two extra `Transfer` events depending on how the sender's and receiver's fractional balances are affected:
* **Sender adjustment**: If the sender's fractional balance is insufficient, 0.000001 USDT0 is moved from the sender to the reserve address. This emits an extra `Transfer` event.
* **Receiver adjustment**: If the receiver's fractional balance overflows, 0.000001 USDT0 is moved from the reserve address to the receiver. This emits an extra `Transfer` event.
* **Both adjustments**: If both conditions occur in the same transfer, the reserve is bypassed. The sender transfers 0.000001 USDT0 directly to the receiver as part of the main transfer. No extra event is emitted.
These auxiliary events involve the reserve address `0x6D11e1A6BdCC974ebE1cA73CC2c1Ea3fDE624370`. Indexers and off-chain services that track USDT0 balances by replaying `Transfer` events must filter or account for transfers to and from this address.
### Contract design requirements
#### Native balance mutability
On Ethereum, a contract's native balance typically changes only as a result of contract execution. On Stable, a contract's native USDT0 balance may also change due to ERC-20 allowance-based operations, including `transferFrom` and `permit`. These operations can reduce a contract's native balance without invoking any contract code.
As a result, the following assumption is invalid on Stable:
> A contract's native balance can only decrease if the contract is called.
#### Do not mirror native balance
On Ethereum, it is common to track deposits with an internal variable. On Stable, this is unsafe because ERC-20 `transferFrom` can drain the native balance externally.
```solidity
// UNSAFE on Stable
uint256 public deposited;
function deposit() external payable {
deposited += msg.value;
}
```
#### Always check real balance before transfers
All native value transfers must verify solvency using `address(this).balance` just before transfer, not internal accounting variables:
```solidity
// SAFE
function withdraw() external {
uint256 amount = credit[msg.sender];
credit[msg.sender] = 0;
require(address(this).balance >= amount, "insufficient balance");
payable(msg.sender).call{value: amount}("");
}
```
#### State progression must be balance-independent
Protocol logic that depends on progression, milestones, or completion conditions must track these explicitly using non-balance state variables, such as counters or epochs. Native balances should be used only for solvency verification at the moment of payout.
#### No zero-address transfers
On Stable, both native and ERC-20 transfers to `address(0)` revert.
```solidity
// REVERT on Stable
payable(address(0)).call{value: amount}("")
USDT0.transfer(address(0), amount);
```
Any contract logic that sends native USDT0 should validate the recipient and explicitly reject `address(0)` before the transfer call:
```solidity
// SAFE
require(recipient != address(0), "zero address recipient");
payable(recipient).call{value: amount}("");
```
If a contract uses zero-address transfers as a burn mechanism, it must be redesigned. Use explicit sink contracts if irreversible loss semantics are required.
#### EXTCODEHASH behavior
On Ethereum, the `EXTCODEHASH` opcode returns:
* **Zero hash** (`0x0000...`): if an address has never been used (nonce=0, balance=0, no code).
* **Empty hash** (`0xc5d2…a470`, the Keccak-256 hash of empty code): if an address exists but has no code.
On Ethereum, once an address transitions from zero hash to empty hash, it cannot return to zero hash. On Stable, because USDT0 supports `permit()`-based approvals, an address can create approvals without sending a transaction. Combined with `transferFrom()`, this allows native balance changes without nonce increment, potentially allowing `EXTCODEHASH` to oscillate between zero hash and empty hash.
```solidity
// UNSAFE on Stable
function isUnusedAddress(address addr) public view returns (bool) {
bytes32 codeHash;
assembly {
codeHash := extcodehash(addr)
}
return codeHash == bytes32(0);
}
```
Use explicit tracking instead:
```solidity
// SAFE
contract SafeAddressTracker {
mapping(address => bool) public hasBeenUsed;
function markAsUsed(address addr) internal {
hasBeenUsed[addr] = true;
}
function isUnused(address addr) public view returns (bool) {
return !hasBeenUsed[addr];
}
}
```
### Testing requirements
Test suites for Stable deployments should include:
* Allowance-based drain scenarios (`approve` + `transferFrom`)
* Solvency enforcement using real native balance
* Address usage logic without reliance on `EXTCODEHASH`
* Explicit failure cases for zero-address transfers
### Migration checklist
When porting contracts from Ethereum to Stable:
* Remove internal native balance mirrors
* Replace all solvency checks with `address(this).balance`
* Remove all native or ERC-20 transfers to `address(0)`
* Audit all USDT0 approvals
* Add tests covering `permit` and allowance-based flows
* Verify off-chain indexers handle auxiliary `Transfer` events from fractional balance reconciliation
### Key takeaways
Correct contract design on Stable requires:
* Treating USDT0 as a dual-role asset
* Enforcing solvency against real balances
* Avoiding allowance-based drain paths
* Eliminating reliance on Ethereum-specific balance and address assumptions
Off-chain services and indexers should:
* Account for auxiliary `Transfer` events from fractional balance reconciliation
* Use direct balance queries instead of event-based balance reconstruction
### Next recommended
* [**USDT as gas**](/en/explanation/usdt-as-gas-token) — Understand why USDT0 operates as both the native asset and an ERC-20 token.
* [**Send your first USDT0**](/en/tutorial/send-usdt0) — Submit a USDT0 transfer on testnet via native and ERC-20 paths.
* [**Ethereum comparison**](/en/explanation/ethereum-comparison) — Review every behavior difference when porting from Ethereum.
## Bridging to Stable
USDT reaches Stable via one of two bridge paths, depending on what form it takes on the source chain. Both paths deliver USDT0 into the user's wallet on Stable.
:::note
**Two paths, one outcome:**
* **OFT Mesh**: source chain already has USDT0. Burn on source, mint on Stable. 1:1 across chains. Examples: Arbitrum, Ethereum, Optimism, Polygon, Unichain, Ink, Bera, Mantle, Hyperliquid, MegaETH (21 chains total).
* **Legacy Mesh**: source chain has native USDT only. Routes through Arbitrum as hub. 0.03% fee on the transferred amount. Examples: Tron, TON.
:::
The sections below describe each path in detail.
### USDT0 OFT Mesh vs Legacy Mesh
Stable participates in two complementary cross-chain transfer networks.
#### OFT Mesh
Any chain that supports USDT0 can participate in the OFT Mesh. Within the OFT Mesh, USDT0 cross-chain transfers maintain a 1:1 value ratio. When a transfer occurs, the USDT0 tokens on the source chain are burned and an equivalent amount is minted on the destination chain. Current OFT Mesh participants include Arbitrum, Bera, Conflux, Ethereum, Flare, Hedera, Hyperliquid, Ink, Mantle, MegaETH, Monad, Morph, MP1, Optimism, Plasma, Polygon, Rootstock, Sei, Stable, Tempo, Unichain, and X Layer.
#### Legacy Mesh
Any chain with native USDT (rather than USDT0) can route through the Legacy Mesh. The Legacy Mesh follows a hub-and-spoke architecture with Arbitrum serving as the central hub for USDT0. This model leverages a USDT0 liquidity pool on Arbitrum. The USDT0 team charges a 0.03% fee on the transferred amount. Current Legacy Mesh participants include Tron and TON.
Ethereum and Arbitrum participate in both meshes: users on these chains can bridge via the OFT path (burn/mint USDT0) or the Legacy path (lock native USDT through the Arbitrum hub).
***
### Path 1: Bridging USDT0 to Stable (OFT-supported chains)
This path applies when the user already holds USDT0 on an OFT-supported source chain such as Arbitrum or Ink.
#### Actors
| Name | On-chain? | Responsible party |
| --------------------- | --------- | --------------------------- |
| User | N/A | User |
| USDT0 OUpgradable | ✅ | Smart contract by USDT0 |
| LayerZero Endpoint V2 | ✅ | Smart contract by LayerZero |
| MessageLib Registry | ✅ | Smart contract by LayerZero |
| Executor | ❌ | LayerZero Labs |
| USDT0 DVN | ❌ | USDT0 |
| Canary DVN | ❌ | Canary |
| LayerZero DVN | ❌ | LayerZero Labs |
#### Flow diagram
첫 번째 단계는 상태 커밋과 저장을 분리하는 것입니다:
* 새로운 상태가 커밋되면, 노드는 즉시 다음 블록을 실행합니다.
* 상태를 디스크에 저장하는 작업은 비동기적으로 백그라운드에서 처리됩니다.
이러한 분리를 통해 실행은 디스크 쓰기의 레이턴시에 영향받지 않고 즉시 진행될 수 있으며, 의존성에 의해 작업이 멈추는 현상을 제거하여 결국 전체적인 성능이 향상될 수 있습니다.
#### 2. `mmap` 을 통한`MemDB` 및 `VersionDB` 도입
Stable은 메모리 매핑 파일 I/O 메커니즘 (`mmap`)을 기반으로 한 이중 데이터베이스 모델을 도입하여 이를 보강합니다:
* **MemDB (메모리 DB)**:
* 자주 접근되는 최근/활성 데이터를 저장
* mmap을 통한 고정 주소 매핑을 사용하여 빠르고 결정론적인 조회가 가능
* 최근 수정된 상태에 접근하는 대부분의 트랜잭션에 대해 이상적인 구조
* **VersionDB (히스토리컬 DB)**:
* 오래된 과거 상태를 디스크에 저장
* 자주 접근되지 않는, 오래되거나 넓은 범위의 데이터에 대한 쿼리에 최적화됨
이 설계를 통해 **핫 데이터는 빠른 메모리 기반 구조에서 제공**되고, 콜드 데이터는 느리지만 영구적인 스토리지로 오프로드됩니다. 효율을 고려하여 상태를 분류하고 `mmap` 접근을 활용함으로써, Stable은 블록 실행 중 DB의 읽기/쓰기 지연을 크게 줄일 수 있습니다.
### 예상되는 성능 개선 및 선례
이 아키텍처 최적화는 이론적인 아이디어에 그치지 않습니다. Sei 및 Cronos와 같은 고성능 블록체인들이 유사한 구조를 이미 구현하고 있으며, 메모리 매핑 DB 및 상태 커밋/저장의 분리를 통해 **전체 TPS가 최대 2배 향상**되었음을 보고했습니다.
Stable 또한 이와 유사한 성능 향상을 기대하고 있으며, 새로운 아키텍처에서는 스토리지 레이어가 더 이상 병목이 되지 않기 때문에, 합의 및 실행 성능이 디스크 연산에 의해 제한되지 않고 자유롭게 확장될 수 있게 됩니다.
### 추가 자료
더 자세한 기술 분석과 구현 내용을 보려면 다음 문서를 참고하세요:
* [ADR-065: Cosmos Store V2 Architecture](https://docs.cosmos.network/main/build/architecture/adr-065-store-v2)
* [MemIAVL: A Practical Guide](https://hackmd.io/@yihuang/rkeCvy5xh)
* [Cronos MemIAVL Node Configuration](https://docs.cronos.org/for-node-hosts/running-nodes/memiavl)
* [Sei’s DB Design Approach](https://4pillars.io/ko/articles/sei-db)
## Autobahn
### BFT 내 트레이드오프: 레이턴시 vs. 견고성
현대의 비잔틴 장애 허용(Byzantine Fault Tolerant, BFT) 합의 프로토콜은 일반적으로 부분 동기(partial synchrony) 모델에서 동작합니다. 이 모델은 어떤 시점 이후에는 네트워크가 안정되며 메시지 지연 시간이 유한하게 유지된다는 가정에 기반합니다. 이 모델은 프로토콜 설계에 있어 실용적으로 작용해 왔지만, 실제 운영 환경에서는 장기간 상태를 안정적으로 유지하기 어렵습니다. 대신 시스템은 지속적인 동기 구간과 간헐적인 장애(예: 레이턴시 증가, 노드 장애, 공격적 조건 등)를 반복적으로 겪습니다. 이러한 일시적 장애를 **"블립(blip)"** 이라고 합니다.
이러한 조건 하에서, 기존 합의 프로토콜은 **안정적인 네트워크 환경에서의 저지연성과 장애 발생 시의 견고성 사이에서 선택**을 강요받습니다.
* PBFT, HotStuff와 같은 전통적인 **view 기반 BFT 프로토콜**은 네트워크가 안정되어 있을 때 좋은 반응성을 갖추도록 최적화되어 있습니다. 그러나 블립이 발생하면 성능이 급격히 저하되며, 이 성능 저하의 여파로 네트워크가 회복된 후에도 백로그된 요청들이 누적되어 트랜잭션 처리가 지연될 수 있습니다.
* [Narwhal & Tusk](https://arxiv.org/pdf/2105.11827)/[Bullshark](https://arxiv.org/pdf/2201.05677)와 같은 **DAG 기반 BFT 프로토콜**은 데이터 전파(DAG)와 합의(BFT)를 분리하여, 트랜잭션을 비동기적으로 각 레플리카에 전파합니다. 이러한 설계는 높은 처리량을 가능하게 하며, 네트워크 장애 중에도 시스템이 계속 진행(progress)할 수 있도록 합니다. 하지만 비동기 정렬 메커니즘의 복잡성으로 인해, 안정된 상황에서도 높은 레이턴시를 보이는 경향이 있습니다.
[**Autobahn**](https://arxiv.org/pdf/2401.10369)은 이러한 두 설계 철학을 연결하는 새로운 접근 방식을 제시합니다. Autobahn은 DAG 기반 프로토콜의 높은 처리량 및 블립 내성(blip tolerance)과, 전통적인 view 기반 합의의 낮은 레이턴시를 결합합니다. Autobahn의 핵심은 데이터 전파 계층이 합의의 진행 여부와 무관하게 지속적으로 제안을 네트워크 속도로 전파하는 고도로 병렬화된 구조입니다. 이를 기반으로 Autobahn은 낮은 레이턴시의 부분 동기 합의 프로토콜을 운영하며, 데이터 레이어 위에 올라가는 경량 스냅샷을 참조하여 프로포절을 커밋합니다.
Autobahn의 결정적인 특징은, 블립 이후에도 성능 저하 없이 복구가 될 수 있다는 점입니다. 이러한 속성은 “**seamlessness**“라 불리며, 네트워크가 안정화되면 누적된 트랜잭션 백로그를 재처리 없이 즉시 커밋할 수 있도록 보장합니다. 데이터의 가용성과 순서 정렬을 명확히 분리하고, 프로토콜에 의한 동기화 지연을 방지함으로써, Autobahn은 현실적 블록체인 환경에서 강력하면서도 반응성이 뛰어난 합의 기반을 제공합니다.
### Autobahn 아키텍처 개요
Autobahn은 두 핵심 계층 - **데이터 전파 계층**과 **합의 계층**의 책임을 명확히 분리한 구조 위에 설계되어 있습니다. 이러한 분리는 Narwhal과 같은 DAG 시스템에서 영감을 받았으며, Autobahn은 여기에 seamlessness와 낮은 레이턴시를 지원하기 위한 확장을 더했습니다.
데이터 전파 계층은 클라이언트 트랜잭션을 확장 가능하고 비동기적인 방식으로 브로드캐스트하는 역할을 합니다. 각 레플리카는 각자 트랜잭션 묶음을 전파하는 별도의 ‘차선(lane)’을 가지고 있으며, 이는 합의 상태와 무관하게 독립적으로 전파 및 인증될 수 있습니다. 각 차선은 합의가 지연되더라도 지속적으로 유지되므로, 시스템은 항상 클라이언트에게 반응성을 유지합니다.
이 위에서 Autobahn은 PBFT 스타일의 부분 동기 합의 계층을 운영합니다. 여기서 Autobahn은 각 트랜잭션 묶음이 아닌, 모든 데이터 차선의 ‘최신 상태 요약(tip cuts)’에 대해 합의를 수행합니다. 이러한 설계는 임의의 큰 데이터셋도 단일한 과정으로 커밋할 수 있게 하며, 블립의 영향을 최소화합니다.
데이터와 합의를 강하게 결합하여 리더가 실패하면 멈추는 Hotstuff나, DAG 순회 및 데이터 동기화로 인해 높은 커밋 레이턴시를 겪는 Bullshark와 비교했을때, Autobahn은 더 유연하고 빠른 합의 경험을 제공합니다. 즉, Autobahn은 DAG의 병렬화 속성을 가져가면서 레이턴시 단점은 개선한 구조입니다.
### 데이터 전파 계층: 차선과 Car

*Autobahn: Seamless high speed BFT*
Autobahn에서는 각 레플리카가 자신만의 **차선(Lane)** 에 트랜잭션을 제안합니다. 각 데이터 프로포절은 다른 레플리카 노드들의 승인(Acknowledgment)과 함께 묶여 하나의 **‘Car’**(Certification of Available Request)를 형성합니다. 이 Car들은 최소 하나의 레플리카 노드가 해당 데이터를 들고 있다는 데이터 가용성 증명(Proof of Availability, PoA) 역할을 수행합니다.
각 Car는 이전 Car를 참조하여 체인처럼 연결되므로, 차선의 최신 블록을 검증하는 것만으로도 차선 전체의 데이터 가용성을 간접적으로 증명할 수 있습니다. 이러한 형태의 연쇄적인 가용성 증명은 즉각적인 참조를 가능하게 합니다. 여기서 즉각적인 참조란, 합의 계층이 DAG 순회 없이도 최신 상태 요약(tip cut, 현재 차선 헤드의 벡터)을 참조할 수 있으며, 모든 이전 데이터에 접근할 수 있음을 알 수 있다는 의미입니다.
일반적인 DAG 프로토콜과 달리, Autobahn은 글로벌 가용성과 비중복성을 보장하기 위한 비용이 많이 드는 신뢰 가능한 브로드캐스트 단계를 피합니다. 대신, 최소한의 조율만을 사용하고, PoA(Proof of Availability)마다 하나 이상의 정직한 복제본이 데이터를 보유하고 있다고 신뢰합니다. 이를 통해 가변적인 부하나 부분적인 장애 상황에서도 높은 처리량과 낮은 지연 시간을 유지할 수 있습니다. 데이터 계층은 합의와 독립적으로 계속 진행되며, 일시적인 장애(blip) 상황에서도 시스템의 반응성을 보장합니다.
### **합의 레이어: 저지연 동의**

*Autobahn: Seamless high speed BFT*
Autobahn의 합의 계층은 기존 PBFT 원칙을 기반으로 하지만, 레이턴시 감소 및 원활한 복구를 위한 핵심 최적화 메커니즘을 도입합니다. 각 합의 슬롯은 모든 레플리카의 차선에서 가장 최신의 인증된 제안들을 요약한 "**tip cut**"을 커밋 대상으로 삼습니다. 합의 리더는 이 tip cut을 2단계 커밋 프로세스(Prepare → Confirm)를 통해 제안합니다.
Prepare 단계에서는, 레플리카들이 제안된 tip cut에 투표합니다. 리더가 빠르게 정족수(quorum)만큼의 투표를 받으면, Fast Path로 진입하여 세 단계의 메시지 레이턴시 안에 커밋할 수 있습니다. 만약 투표를 빠르게 모으지 못했다면, Confirm 단계로 넘어갑니다. 여기서는 다시 레플리카들의 승인을 모아 여섯 단계의 메세지 레이턴시 내에 커밋을 완료합니다.
Autobahn의 핵심 혁신은, 데이터 동기화와 합의 투표의 분리입니다. 레플리카들은 전체 프로포절 데이터를 받지 못하였더라도, 인증된 tip에 대해서만 투표할 수 있습니다. PoA가 데이터 가용성을 보장해주기 때문에, tip에 대해서만 투표하더라도 안전하다고 볼 수 있는 것입니다. 동기화는 병렬로 진행되어 실행 단계 전에 완료되고, 이를 통해 프로토콜이 멈추는 것을 방지할 수 있습니다. 리더 실패 혹은 타임아웃의 경우, 타임아웃 인증서(timeout certificate)를 이용해 뷰 변경(view change)을 트리거하는 방식으로 새 리더가 작업을 이어갈 수 있습니다.
### Autobahn의 핵심 속성
Autobahn은 BFT 프로토콜이 제공해야 하는 표준적인 **안전성(safety)** 과 **생존성(liveness)** 보장을 충족합니다. 안전성은 두 개의 올바른 레플리카가 같은 슬롯에 대해 서로 다른 블록을 커밋하는 일이 없음을 보장하며, 생존성은 글로벌 동기화 시간(Global Stabilization Time, GST) 이후, 올바른 리더가 선정되면 합의가 진행됨을 보장합니다.
Autobahn의 가장 중요한 속성은 **seamlessness**입니다. 이 특성 덕분에 합의 레이어는 임의의 크기를 가진 백로그도 상수 시간 안에 커밋할 수 있고, 프로토콜 성능 저하를 막습니다. 블립이 발생하더라도 이후 네트워크가 안정화되면, 성공적으로 전파된 모든 제안은 즉시 커밋됩니다. 이를 통해 Autobahn은 간헐적 장애 환경에서도 부드럽게 동작하며, 회복 속도와 반응성 측면에서 전통적인 BFT 프로토콜을 능가합니다.
또한, 프로토콜은 **수평 확장성**을 가집니다. 각 레플리카는 자신의 차선을 통해 전체 처리량에 기여하며, 합의 스냅샷(consensus cut) 역시 참여자 수에 따라 자연스럽게 확장됩니다. 이는 높은 성능과 견고함을 모두 요구하는 대규모 블록체인 배포에 적합합니다.
### 낮은 레이턴시와 높은 복원력의 조화
Autobahn은 주요 BFT 프로토콜인 Bullshark 및 HotStuff와 비교 테스트되었습니다. 테스트 환경은 이상적인 조건과 장애 삽입 조건 모두를 포함합니다. 결과적으로 Autobahn은 모든 테스트에서 가장 좋은 결과를 달성했습니다: Autobahn은 Bullshark 수준의 처리량(초당 230,000건 이상)을 유지하면서, 레이턴시는 50% 이상 감소시켰습니다.
좋은 네트워크 환경에서, Autobahn은 3\~6개의 메시지 레이턴시만으로 트랜잭션을 커밋하며, 이는 Bullshark의 12개 메시지 레이턴시보다 훨씬 낮습니다. 실제로 Autobahn은 약 280ms, Bullshark는 590ms 이상의 커밋 지연이 측정되었습니다. 또한 HotStuff는 블립 이후 백로그 처리로 인해 장시간 성능 저하가 발생하지만, Autobahn은 네트워크 안정화 즉시 전체 백로그를 단일 스텝으로 커밋합니다.
리더 실패나 부분적인 네트워크 분할 시에도 Autobahn은 데이터를 계속 전파하며, 합의 재개 후 누적된 프로포절들을 빠르게 커밋합니다. 이러한 성능 상의 이점은 낮은 레이턴시와 높은 처리량 및 장애 허용성을 결합하려는 블록체인 플랫폼에 Autobahn이 매우 좋은 선택지임을 보여줍니다.
### 추가 자료
더 많은 기술적 상세 내용은 다음 문서를 참고하세요:
* [Autobahn: Seamless high speed BFT](https://arxiv.org/pdf/2401.10369)
## Integrate Stable
Stable is a Layer 1 where USDT0 is both the native gas token and an ERC-20. Single-slot finality, sub-second block times, and full EVM compatibility. You bring your wallet, seed phrase, and USDT0 — there's no separate gas asset, no account migration, no new SDK to learn.
Pick the capability you're building. Every path below leads to a runnable guide on testnet within minutes.
### Pick your path
* [**Accounts**](/en/explanation/accounts-overview) — Wallets, EIP-7702 delegation, session keys, and spending limits. First-class support for user and agent accounts.
* [**Payments**](/en/explanation/payments-overview) — Send USDT0, build P2P wallets, recurring subscriptions, invoice settlement, and pay-per-call APIs.
* [**Contracts**](/en/explanation/contracts-overview) — Deploy, verify, and index contracts. Call Bank, Distribution, and Staking precompiles from Solidity.
* [**AI / Agents**](/en/explanation/agent-settlement) — Wire MCP servers and agent skills into AI editors. Price APIs per request for autonomous agents.
* [**Infrastructure**](/en/explanation/integrate-overview) — Gas waiver service, ecosystem providers (bridges, oracles, ramps), network info, and node operations.
* [**Learn**](/en/explanation/learn-overview) — Architecture, USDT0 behavior, use case narratives, and the Ethereum-to-Stable reference.
### Start in five minutes
* [**Quick start**](/en/tutorial/quick-start) — Connect, fund a wallet from the faucet, and send 0.001 USDT0 natively.
* [**Connect to Stable**](/en/reference/connect) — Chain IDs, RPC endpoints, faucet, and block explorers.
* [**Difference from Ethereum**](/en/explanation/ethereum-comparison) — What stays the same and what changes when porting from Ethereum.
### Everything else
* **Network status and versions**: [testnet](/en/reference/testnet-information) · [mainnet](/en/reference/mainnet-information) · [version history](/en/reference/testnet-version-history).
* **Tokenomics and roadmap**: [STABLE tokenomics](/en/reference/tokenomics) · [technical roadmap](/en/explanation/technical-roadmap).
* **FAQ**: [developer FAQ](/en/reference/faq) · [developer assistance](/en/reference/developer-assistance).
## Bridge USDT0 to Stable
In this tutorial, you will bridge USDT0 from Ethereum Sepolia to the Stable Testnet programmatically using TypeScript and ethers v6. You will build the script incrementally, adding one function per step.
This tutorial uses the OFT Mesh path. The OFT Adapter on Sepolia locks your tokens, LayerZero's dual-DVN verification confirms the message, and USDT0 is minted on Stable. For a full explanation of how this works, see [Bridging to Stable](/en/explanation/usdt0-bridging).
:::note
Want fewer lines of code? The [Stable SDK](/en/explanation/sdk-overview) exposes `quoteBridge` and `bridge` and picks the route (LayerZero or LI.FI) for you.
:::
### Prerequisites
* Node.js 18.0.0 or higher (`node --version` to verify)
* A Sepolia wallet with a private key you control (never use a key holding real funds)
* SepoliaETH for gas (get some from [sepoliafaucet.com](https://sepoliafaucet.com) or [faucets.chain.link/sepolia](https://faucets.chain.link/sepolia))
* Basic familiarity with running scripts from the terminal
***
### 1. Set up the project
```bash
mkdir stable-bridge && cd stable-bridge
npm init -y
npm install ethers@6 @layerzerolabs/lz-v2-utilities
npm install -D tsx
```
Your `package.json` should include:
```json
{
"name": "stable-bridge",
"version": "1.0.0",
"scripts": {
"bridge": "tsx --env-file=.env bridge.ts"
},
"dependencies": {
"@layerzerolabs/lz-v2-utilities": "^2.3.39",
"ethers": "^6.13.0"
},
"devDependencies": {
"tsx": "^4.19.0"
}
}
```
### 2. Configure your environment
Create a `.env` file with your credentials:
```bash
PRIVATE_KEY=0xYOUR_PRIVATE_KEY_HERE
SEPOLIA_RPC_URL=https://rpc.sepolia.org
```
For `SEPOLIA_RPC_URL`, any of these work:
* Public: `https://rpc.sepolia.org` or `https://ethereum-sepolia-rpc.publicnode.com`
* Alchemy: `https://eth-sepolia.g.alchemy.com/v2/YOUR_KEY`
* Infura: `https://sepolia.infura.io/v3/YOUR_KEY`
### 3. Scaffold the script
Create `bridge.ts` with the imports, configuration, and a `main` function. You will add functions to this file in the following steps, and call them from `main`.
```ts
import { ethers, Contract, Wallet, JsonRpcProvider } from "ethers";
import { Options } from "@layerzerolabs/lz-v2-utilities";
const PRIVATE_KEY = process.env.PRIVATE_KEY!;
const SEPOLIA_RPC_URL = process.env.SEPOLIA_RPC_URL || "https://rpc.sepolia.org";
// Contract addresses
const SEPOLIA_USDT0 = "0xc4DCC311c028e341fd8602D8eB89c5de94625927";
const SEPOLIA_OFT_ADAPTER = "0xc099cD946d5efCC35A99D64E808c1430cEf08126";
const STABLE_USDT0 = "0x78Cf24370174180738C5B8E352B6D14c83a6c9A9";
// Destination: Stable Testnet
const STABLE_TESTNET_EID = 40374;
// Minimal ABIs — only the functions we call
const ERC20_ABI = [
"function balanceOf(address) view returns (uint256)",
"function approve(address, uint256) returns (bool)",
"function allowance(address, address) view returns (uint256)",
"function mint(address, uint256)",
];
const OFT_ADAPTER_ABI = [
"function quoteSend((uint32 dstEid, bytes32 to, uint256 amountLD, uint256 minAmountLD, bytes extraOptions, bytes composeMsg, bytes oftCmd), bool) view returns ((uint256 nativeFee, uint256 lzTokenFee))",
"function send((uint32 dstEid, bytes32 to, uint256 amountLD, uint256 minAmountLD, bytes extraOptions, bytes composeMsg, bytes oftCmd), (uint256 nativeFee, uint256 lzTokenFee), address) payable returns ((bytes32, uint64, (uint256, uint256)), (uint256, uint256))",
];
function addressToBytes32(addr: string): string {
return ethers.zeroPadValue(ethers.getBytes(ethers.getAddress(addr)), 32);
}
// You will add functions here.
async function main() {
const provider = new JsonRpcProvider(SEPOLIA_RPC_URL);
const wallet = new Wallet(PRIVATE_KEY, provider);
const usdt0 = new Contract(SEPOLIA_USDT0, ERC20_ABI, wallet);
const oftAdapter = new Contract(SEPOLIA_OFT_ADAPTER, OFT_ADAPTER_ABI, wallet);
const amount = ethers.parseEther("1"); // 1 USDT0 (18 decimals)
// You will add function calls here.
}
main().catch((err) => {
console.error(err.message);
process.exit(1);
});
```
### 4. Mint test USDT0 on Sepolia
The test USDT0 contract on Sepolia exposes a public `mint` function. Add the following function to `bridge.ts` above `main`:
```ts
async function mint(usdt0: Contract, receiver: string, amount: bigint) {
console.log(`Minting ${ethers.formatEther(amount)} USDT0 on Sepolia...`);
const tx = await usdt0.mint(receiver, amount);
await tx.wait();
console.log(`Mint tx: ${tx.hash} confirmed`);
const balance = await usdt0.balanceOf(receiver);
console.log(`USDT0 balance: ${ethers.formatEther(balance)}`);
}
```
Then call it from `main`:
```ts
await mint(usdt0, wallet.address, amount);
```
Run the script:
```bash
npx tsx --env-file=.env bridge.ts
```
***
**Checkpoint:** You should see a non-zero USDT0 balance logged after the mint confirms.
***
### 5. Approve the OFT Adapter
Before the OFT Adapter can move your tokens, it needs an ERC-20 allowance. Add this function above `main`:
```ts
async function approve(usdt0: Contract, spender: string, owner: string, amount: bigint) {
console.log("Approving OFT Adapter...");
const tx = await usdt0.approve(spender, amount);
await tx.wait();
console.log(`Approve tx: ${tx.hash} confirmed`);
const allowance = await usdt0.allowance(owner, spender);
console.log(`Allowance: ${ethers.formatEther(allowance)}`);
}
```
Add the call in `main` after `mint`:
```ts
// await mint(usdt0, wallet.address, amount);
await approve(usdt0, SEPOLIA_OFT_ADAPTER, wallet.address, amount);
```
Run the script. You can comment out the `await mint(...)` call if you already have tokens from the previous run.
***
**Checkpoint:** The script should log a non-zero allowance after the approval confirms.
***
### 6. Quote the fee and send the bridge transaction
The `quoteSend` call returns the LayerZero messaging fee in SepoliaETH, which you pass as `msg.value` to `send`. Add this function above `main`:
```ts
async function send(oftAdapter: Contract, receiver: string, amount: bigint) {
const options = Options.newOptions().addExecutorLzReceiveOption(0, 0).toBytes();
const sendParams = {
dstEid: STABLE_TESTNET_EID,
to: addressToBytes32(receiver),
amountLD: amount,
minAmountLD: amount,
extraOptions: options,
composeMsg: "0x",
oftCmd: "0x",
};
console.log("Quoting bridge fee...");
const feeResult = await oftAdapter.quoteSend(sendParams, false);
const fee = { nativeFee: feeResult.nativeFee, lzTokenFee: feeResult.lzTokenFee };
console.log(`Bridge fee: ${ethers.formatEther(fee.nativeFee)} ETH`);
console.log("Sending bridge transaction...");
const tx = await oftAdapter.send(sendParams, fee, receiver, {
value: fee.nativeFee,
});
await tx.wait();
console.log(`Bridge tx: ${tx.hash} confirmed`);
console.log(`Sepolia Etherscan: https://sepolia.etherscan.io/tx/${tx.hash}`);
console.log(`LayerZero Scan: https://testnet.layerzeroscan.com/tx/${tx.hash}`);
}
```
Add the call in `main` after `approve`:
```ts
// await mint(usdt0, wallet.address, amount);
// await approve(usdt0, SEPOLIA_OFT_ADAPTER, wallet.address, amount);
await send(oftAdapter, wallet.address, amount);
```
### 7. Verify arrival on Stable Testnet
After sending, the script can poll the Stable Testnet RPC until the tokens arrive. Add this function above `main`:
```ts
async function verify(receiver: string) {
console.log("Waiting for DVN verification (~2 minutes)...");
const stableProvider = new JsonRpcProvider("https://rpc.testnet.stable.xyz");
const stableUsdt0 = new Contract(STABLE_USDT0,
["function balanceOf(address) view returns (uint256)"], stableProvider);
const before: bigint = await stableUsdt0.balanceOf(receiver);
for (let i = 0; i < 24; i++) {
await new Promise((r) => setTimeout(r, 5000));
const current: bigint = await stableUsdt0.balanceOf(receiver);
if (current > before) {
console.log(`\nUSDT0 on Stable: ${ethers.formatEther(current)}`);
console.log(`Explorer: https://testnet.stablescan.xyz/address/${receiver}`);
return;
}
process.stdout.write(".");
}
console.log("\nTokens have not arrived yet. Check manually:");
console.log(`Explorer: https://testnet.stablescan.xyz/address/${receiver}`);
}
```
Add the call in `main` after `send`:
```ts
// await mint(usdt0, wallet.address, amount);
// await approve(usdt0, SEPOLIA_OFT_ADAPTER, wallet.address, amount);
// await send(oftAdapter, wallet.address, amount);
await verify(wallet.address);
```
### 8. Run the complete bridge
Your `main` function should now look like this:
```ts
async function main() {
const provider = new JsonRpcProvider(SEPOLIA_RPC_URL);
const wallet = new Wallet(PRIVATE_KEY, provider);
const usdt0 = new Contract(SEPOLIA_USDT0, ERC20_ABI, wallet);
const oftAdapter = new Contract(SEPOLIA_OFT_ADAPTER, OFT_ADAPTER_ABI, wallet);
const amount = ethers.parseEther("1"); // 1 USDT0 (18 decimals)
await mint(usdt0, wallet.address, amount);
await approve(usdt0, SEPOLIA_OFT_ADAPTER, wallet.address, amount);
await send(oftAdapter, wallet.address, amount);
await verify(wallet.address);
}
```
Run it:
```bash
npx tsx --env-file=.env bridge.ts
```
***
**Checkpoint:** You should see output like this:
```
Minting 1.0 USDT0 on Sepolia...
Mint tx: 0x3a1f...c9d2 confirmed
USDT0 balance: 1.0
Approving OFT Adapter...
Approve tx: 0x7b2e...f401 confirmed
Allowance: 1.0
Quoting bridge fee...
Bridge fee: 0.000101 ETH
Sending bridge transaction...
Bridge tx: 0xa94f...8c11 confirmed
Sepolia Etherscan: https://sepolia.etherscan.io/tx/0xa94f...8c11
LayerZero Scan: https://testnet.layerzeroscan.com/tx/0xa94f...8c11
Waiting for DVN verification (~2 minutes)...
......
USDT0 on Stable: 1.0
```
You can also search your wallet address on the [Stable Testnet explorer](https://testnet.stablescan.xyz) to confirm the mint event.
***
### What you have built
You bridged USDT0 from Ethereum Sepolia to Stable Testnet. You now know how to:
* Mint test USDT0 on Sepolia using the contract's public `mint` function
* Approve an OFT Adapter to spend ERC-20 tokens on your behalf
* Construct LayerZero `sendParams` with 32-byte address encoding and executor options
* Quote the cross-chain messaging fee with `quoteSend` before committing funds
* Execute a cross-chain token transfer with `send` and confirm delivery on the destination chain
* Verify on-chain state using Stable's RPC (`https://rpc.testnet.stable.xyz`, chain ID `2201`) and Stablescan
### Next recommended
* [**Send your first USDT0**](/en/tutorial/send-usdt0) — Use the bridged USDT0 with native and ERC-20 transfers.
* [**Bridging to Stable**](/en/explanation/usdt0-bridging) — Deep dive on OFT Mesh vs Legacy Mesh mechanics.
* [**Testnet information**](/en/reference/testnet-information) — Full network parameters, RPC endpoints, and faucet details.
## Quick start
The only tools you need are Node.js, some USDT0 from the faucet and a private key. Stable uses USDT0 as its gas token, so you only need USDT0 to transact. There is no separate gas asset to fund.
:::note
Prefer a typed client? The [Stable SDK](/en/explanation/sdk-overview) wraps viem with `transfer`, `bridge`, and `swap` methods so you skip the manual ABI and decimals work.
:::
### Prerequisites
* Node.js 20 or later
* A private key you control (a fresh test key is fine)
### 1. Install and configure
Create a project, install `ethers`, and save the testnet config.
```bash
mkdir stable-quickstart && cd stable-quickstart
npm init -y && npm install ethers
```
```text
added 1 package, audited 2 packages in 1s
```
Save your private key to `.env`:
```bash
echo "PRIVATE_KEY=0xYOUR_PRIVATE_KEY_HERE" > .env
```
Create `config.ts`:
```typescript
// config.ts
import { ethers } from "ethers";
import "dotenv/config";
export const STABLE_TESTNET_RPC = "https://rpc.testnet.stable.xyz";
export const CHAIN_ID = 2201;
export const provider = new ethers.JsonRpcProvider(STABLE_TESTNET_RPC);
export const wallet = new ethers.Wallet(process.env.PRIVATE_KEY!, provider);
```
### 2. Fund the wallet
Print your address, then request testnet USDT0 from the faucet.
```typescript
// address.ts
import { wallet } from "./config";
console.log("Wallet address:", wallet.address);
```
```bash
npx tsx address.ts
```
```text
Wallet address: 0x1234...abcd
```
Go to [https://faucet.stable.xyz](https://faucet.stable.xyz), paste the address, and select the button to receive testnet USDT0. The faucet sends 1 USDT0, enough for thousands of native transfers.
### 3. Send your first transaction
Send 0.001 USDT0 natively. On Stable, USDT0 is the native asset, so a simple value transfer is the cheapest path (21,000 gas).
```typescript
// send.ts
import { ethers } from "ethers";
import { provider, wallet } from "./config";
const recipient = "0xRecipientAddress"; // replace with any address
const amount = ethers.parseEther("0.001"); // 0.001 USDT0 (18 decimals, native)
const block = await provider.getBlock("latest");
const baseFee = block!.baseFeePerGas!;
const tx = await wallet.sendTransaction({
to: recipient,
value: amount,
maxFeePerGas: baseFee * 2n,
maxPriorityFeePerGas: 0n, // always 0 on Stable
});
const receipt = await tx.wait(1);
console.log("Tx:", receipt!.hash);
console.log("Explorer:", `https://testnet.stablescan.xyz/tx/${receipt!.hash}`);
```
```bash
npx tsx send.ts
```
```text
Tx: 0x8f3a...2d41
Explorer: https://testnet.stablescan.xyz/tx/0x8f3a...2d41
```
Open the explorer link to confirm the transaction. Block time is roughly 0.7 seconds, so it should already be final.
:::warning
`maxPriorityFeePerGas` is ignored by Stable and must be set to `0`. See [Gas pricing](/en/reference/gas-pricing-api) for how the base-fee-only model changes transaction construction.
:::
### Where to go next
* [**Deploy a smart contract**](/en/tutorial/smart-contract) — Scaffold a Foundry project and deploy to Stable testnet.
* [**Build a payment app**](/en/how-to/build-p2p-payments) — Create wallet, send, receive, and query payment history.
* [**Develop with AI**](/en/how-to/develop-with-ai) — Wire MCP servers and agent skills into your AI editor.
## SDK quickstart
You'll install `@stablechain/sdk`, create a client signed by a private key, send a USDT0 transfer on Stable Testnet, and fetch a bridge and swap quote. Total time: about five minutes.
:::note
Stable uses USDT0 as the gas token. You only need testnet USDT0 to transact — there's no separate native asset to fund.
:::
### Prerequisites
* Node.js 20 or later
* A test private key with testnet USDT0. See [Fund your testnet wallet](/en/how-to/use-faucet).
### 1. Install
```bash
mkdir stable-sdk-quickstart && cd stable-sdk-quickstart
npm init -y && npm install @stablechain/sdk viem
```
```text
added 2 packages, audited 3 packages in 2s
```
Save your test key:
```bash
echo "PRIVATE_KEY=0xYOUR_TEST_KEY" > .env
```
### 2. Create a client
Create `index.ts`:
```ts
import "dotenv/config";
import { createStable, Network } from "@stablechain/sdk";
import { privateKeyToAccount } from "viem/accounts";
const account = privateKeyToAccount(process.env.PRIVATE_KEY as `0x${string}`);
const stable = createStable({
network: Network.Testnet,
account,
});
console.log("Signer:", account.address);
```
```text
Signer: 0xYourAddress
```
`createStable` accepts three signing modes: `account` (server-side, shown above), `transport` (browser wallet via `custom(window.ethereum)`), or `walletClient` (a pre-built viem `WalletClient`). See [Use the SDK with viem](/en/how-to/sdk-with-viem) for all three.
### 3. Send a USDT0 transfer
Append to `index.ts`:
```ts
const { txHash } = await stable.transfer({
from: account.address,
to: "0x000000000000000000000000000000000000dEaD",
amount: 0.001,
});
console.log("Transfer:", txHash);
```
Run it:
```bash
npx tsx index.ts
```
```text
Signer: 0xYourAddress
Transfer: 0x8f3a...2d41
```
Open the hash on the [testnet explorer](https://testnet.stablescan.xyz) to confirm.
### 4. Quote a bridge
Bridge USDT0 from Ethereum Sepolia to Stable Testnet. `quoteBridge` is a read-only call — no signature, no gas:
```ts
import { Chain } from "@stablechain/sdk";
const bridgeQuote = await stable.quoteBridge({
fromChain: Chain.Sepolia,
toChain: Chain.StableTestnet,
fromToken: "0xc4DCC311c028e341fd8602D8eB89c5de94625927",
toToken: "0x78Cf24370174180738C5B8E352B6D14c83a6c9A9",
amount: 1,
});
console.log("Bridge quote:", bridgeQuote);
```
```text
Bridge quote: { toAmount: 0.999812 }
```
Pass the quote into `stable.bridge({ ...params, quote })` to execute. The SDK picks LayerZero for USDT0 → USDT0 routes and LI.FI for everything else.
### 5. Quote a swap
Swaps run on Stable through LI.FI. The quote returns the expected output and a pre-built transaction:
```ts
const swapQuote = await stable.quoteSwap({
fromToken: "0x8a2B28364102Bea189D99A475C494330Ef2bDD0B",
toToken: "0x78Cf24370174180738C5B8E352B6D14c83a6c9A9",
amount: 1,
fromDecimals: 6,
});
console.log("You'll receive:", swapQuote.toAmount, "USDT0");
```
```text
You'll receive: 0.998 USDT0
```
Call `stable.swap({ ...params, quote: swapQuote })` to execute. Approval for ERC-20 sources is handled internally.
### Next recommended
* [**SDK reference**](/en/reference/sdk) — Every parameter, return type, and error class.
* [**Use with viem**](/en/how-to/sdk-with-viem) — Switch between private-key, browser-wallet, and pre-built `WalletClient` signing.
* [**Use with wagmi**](/en/how-to/sdk-with-wagmi) — Wire the SDK into a React app using wagmi hooks.
## Send your first USDT0
On Stable, USDT0 is both the chain's native asset and an ERC-20 token. This means `approve`, `transferFrom`, and `permit` remain fully available alongside standard value transfers, and both paths move funds from the same underlying balance.
This page walks you through sending USDT0 through both paths and confirming they draw from one balance.
:::note
Prefer a typed client? The [Stable SDK](/en/explanation/sdk-overview) exposes a single `transfer({ to, amount, token? })` that covers both paths, handles decimals on-chain, and switches the wallet's chain for you.
:::
:::note
**18 vs 6 decimals**: Native USDT0 uses 18 decimals (standard EVM precision), while the ERC-20 interface reports 6 decimals (standard USDT precision). Both reflect the same balance, so `address(x).balance` and `USDT0.balanceOf(x)` may differ by up to 0.000001 USDT0 due to fractional reconciliation. See [USDT0 behavior on Stable](/en/explanation/usdt0-behavior).
:::
### What you'll build
A two-script flow that sends 0.001 USDT0 as a native transfer, sends 0.001 USDT0 as an ERC-20 transfer, and prints both balances.
#### Demo
```text
step 1. Connect wallet → balance displayed
0.01 USDT0
step 2. Send 0.001 USDT0 (choose native or ERC-20 transfer)
step 3. Result
Sent: 0.001 USDT0
Gas fee: 0.000021 USDT0
Native balance: 0.008979 USDT0
ERC-20 balance: 0.008979 USDT0
```
### Prerequisites
* Node.js 20 or later
* A private key with testnet USDT0. See [Quick start](/en/tutorial/quick-start) to fund a wallet.
**USDT0 contract addresses**
* Mainnet: `0x779ded0c9e1022225f8e0630b35a9b54be713736`
* Testnet: `0x78cf24370174180738c5b8e352b6d14c83a6c9a9`
### Setup
```typescript
// config.ts
import { ethers } from "ethers";
import "dotenv/config";
export const STABLE_TESTNET_RPC = "https://rpc.testnet.stable.xyz";
export const CHAIN_ID = 2201;
export const USDT0_ADDRESS = "0x78Cf24370174180738C5B8E352B6D14c83a6c9A9";
export const provider = new ethers.JsonRpcProvider(STABLE_TESTNET_RPC);
export const wallet = new ethers.Wallet(process.env.PRIVATE_KEY!, provider);
```
### Option 1 (recommended): send as native transfer
Native transfers work the same as sending ETH on Ethereum. The `value` field carries the USDT0 amount. A native transfer costs only 21,000 gas, the cheapest way to send USDT0.
```typescript
// sendNative.ts
import { ethers } from "ethers";
import { provider, wallet } from "./config";
const recipient = "0xRecipientAddress";
const amount = ethers.parseUnits("0.001", 18); // 18 decimals for native
const block = await provider.getBlock("latest");
const baseFee = block!.baseFeePerGas!;
const tx = await wallet.sendTransaction({
to: recipient,
value: amount,
maxFeePerGas: baseFee * 2n,
maxPriorityFeePerGas: 0n, // always 0 on Stable
});
const receipt = await tx.wait(1);
console.log("Native transfer tx:", receipt!.hash);
```
```bash
npx tsx sendNative.ts
```
```text
Native transfer tx: 0x8f3a...2d41
```
### Option 2: send as ERC-20 transfer
USDT0 can also be sent as an ERC-20 transfer. This deducts from the same balance, but uses the ERC-20 interface with 6-decimal precision.
```typescript
// sendERC20.ts
import { ethers } from "ethers";
import { wallet, USDT0_ADDRESS } from "./config";
const recipient = "0xRecipientAddress";
const amount = ethers.parseUnits("0.001", 6); // 6 decimals for ERC-20
const usdt0 = new ethers.Contract(USDT0_ADDRESS, [
"function transfer(address to, uint256 amount) returns (bool)"
], wallet);
const tx = await usdt0.transfer(recipient, amount);
const receipt = await tx.wait(1);
console.log("ERC-20 transfer tx:", receipt!.hash);
```
```bash
npx tsx sendERC20.ts
```
```text
ERC-20 transfer tx: 0xa2b1...77c0
```
### Verify the unified balance
After either transfer, query both balances to confirm they draw from the same source.
```typescript
// balances.ts
import { ethers } from "ethers";
import { provider, wallet, USDT0_ADDRESS } from "./config";
const nativeBalance = await provider.getBalance(wallet.address);
console.log("Native balance:", ethers.formatEther(nativeBalance), "USDT0");
const usdt0 = new ethers.Contract(USDT0_ADDRESS, [
"function balanceOf(address) view returns (uint256)"
], provider);
const erc20Balance = await usdt0.balanceOf(wallet.address);
console.log("ERC-20 balance:", ethers.formatUnits(erc20Balance, 6), "USDT0");
```
```bash
npx tsx balances.ts
```
```text
Native balance: 0.008979 USDT0
ERC-20 balance: 0.008979 USDT0
```
Both values represent the same balance. They may differ by up to 0.000001 USDT0 due to [fractional balance reconciliation](/en/explanation/usdt0-behavior#balance-reconciliation).
### Next recommended
* [**Zero gas transactions**](/en/how-to/zero-gas-transactions) — Send USDT0 with gas fees paid by a waiver service.
* [**Build a P2P payment app**](/en/how-to/build-p2p-payments) — Create wallet, send, receive, and query payment history.
* [**USDT0 behavior on Stable**](/en/explanation/usdt0-behavior) — Understand dual-role balance reconciliation and contract design.
## Deploy a smart contract
In this tutorial, you will deploy a simple smart contract to the Stable Testnet and read its state from the chain. Along the way, you will learn how Stable's network is configured, how USDT0 works as a gas token, and how to point standard EVM tooling at Stable.
This tutorial assumes basic familiarity with Solidity and a Unix-like terminal. No prior Stable experience is required.
### What you'll build
A fresh Foundry project with the sample `Counter` contract, deployed to Stable testnet, with one state-changing call and one read call.
#### Demo
```text
step 1. Scaffold Foundry project → stable-hello/
step 2. Configure testnet
RPC: https://rpc.testnet.stable.xyz
Chain ID: 2201
step 3. Fund wallet from faucet (1 USDT0)
step 4. forge create Counter
Deployed to: 0xContract...
step 5. cast send Counter.setNumber(42)
step 6. cast call Counter.number()
→ 42
```
### Prerequisites
* [Foundry](https://book.getfoundry.sh/getting-started/installation) installed (`forge`, `cast`, and `anvil` available in your PATH)
* A wallet with a private key you control (a fresh test key is fine; never use a key holding real funds on testnet)
* An internet connection to reach the testnet RPC and faucet
***
### 1. Create a new Foundry project
Run the following command to scaffold a fresh project:
```bash
forge init stable-hello && cd stable-hello
```
Foundry creates a `src/` directory with a sample `Counter.sol` contract and a matching test file. You will deploy this contract as-is. The goal is to get something real on-chain, not to write novel Solidity.
### 2. Review the contract you are deploying
Open `src/Counter.sol`. It contains two functions:
```solidity
// SPDX-License-Identifier: UNLICENSED
pragma solidity ^0.8.13;
contract Counter {
uint256 public number;
function setNumber(uint256 newNumber) public {
number = newNumber;
}
function increment() public {
number++;
}
}
```
`number` is a public state variable stored on-chain. `increment()` and `setNumber()` are the two ways to change it. Reading `number` costs no gas. It is a free `eth_call`.
### 3. Configure the Stable Testnet
Create a file named `.env` at the project root to store your network credentials:
```bash
touch .env
```
Add the following, replacing the placeholder with your actual private key:
```bash
PRIVATE_KEY=0xYOUR_PRIVATE_KEY_HERE
```
Next, open `foundry.toml` and add the Stable Testnet as a named network profile. Append this block below the existing `[profile.default]` section:
```toml
[rpc_endpoints]
stable_testnet = "https://rpc.testnet.stable.xyz"
```
This tells Foundry where to send transactions when you target `stable_testnet`. Stable is EVM-compatible, so no other configuration is needed.
***
**Checkpoint:** Confirm your RPC endpoint is reachable:
```bash
cast chain-id --rpc-url https://rpc.testnet.stable.xyz
```
Expected output:
```
2201
```
Chain ID `2201` is the Stable Testnet. If you see this number, your machine can reach the network.
***
### 4. Get your wallet address
Derive your deployer address from your private key so you know which account to fund:
```bash
source .env
cast wallet address $PRIVATE_KEY
```
Copy the address that is printed. You need it in the next step.
### 5. Fund your wallet with USDT0
Stable uses **USDT0** as its gas token. The same asset you use to pay for goods and services is used directly to pay for computation. There is no secondary native token.
Visit the testnet faucet and request funds:
```
https://faucet.stable.xyz
```
Paste the address from the previous step. The faucet sends 1 USDT0 to your wallet, which is enough to deploy and interact with several contracts.
***
**Checkpoint:** Confirm your balance arrived:
```bash
cast balance $PRIVATE_KEY --rpc-url https://rpc.testnet.stable.xyz
```
You should see a non-zero value. If the balance is still `0`, wait a few seconds and re-run. Stable produces a new block roughly every 0.7 seconds, so funds settle quickly.
***
### 6. Deploy the contract
Run the deployment with `forge create`:
```bash
source .env
forge create src/Counter.sol:Counter \
--rpc-url https://rpc.testnet.stable.xyz \
--private-key $PRIVATE_KEY \
--broadcast
```
Foundry compiles the contract, broadcasts a deployment transaction, and waits for the receipt. Because block time is \~0.7 seconds, this takes only a moment.
***
**Checkpoint:** The output should look like this:
```
[⠒] Compiling...
No files changed, compilation skipped
Deployer: 0xYourAddress
Deployed to: 0xSomeContractAddress
Transaction hash: 0xSomeTxHash
```
Copy the `Deployed to` address. You need it in the next two steps.
***
### 7. Call a write function
Now call `setNumber()` to store a value on-chain:
```bash
cast send 0xSomeContractAddress "setNumber(uint256)" 42 \
--rpc-url https://rpc.testnet.stable.xyz \
--private-key $PRIVATE_KEY
```
This sends a transaction. You are paying a small USDT0 fee for the state change. The value `42` is now stored in the `number` variable on the Stable Testnet.
### 8. Read state from the chain
Call `number()` to read the value back. This is a free read, with no transaction and no gas:
```bash
cast call 0xSomeContractAddress "number()(uint256)" \
--rpc-url https://rpc.testnet.stable.xyz
```
Expected output:
```
42
```
You just wrote to and read from the Stable Testnet. The round-trip — deploy, write, read — is the core loop of EVM development, and it works identically here to any other EVM chain.
### 9. Inspect your deployment on Stablescan
Open the Stable Testnet block explorer and paste your contract address:
```
https://testnet.stablescan.xyz
```
You will see your deployment transaction and the `setNumber` call you made. Stablescan is the canonical tool for inspecting on-chain state, verifying contract source code, and reading transaction history on Stable.
***
### What you have built
You deployed a contract, sent a state-changing transaction, and read on-chain state — all on the Stable Testnet. You now know how to:
* Configure Foundry (or any EVM toolchain) to target Stable using a standard RPC endpoint
* Fund a wallet using the USDT0 faucet
* Pay for transactions with USDT0 as the gas token
* Inspect your work on Stablescan
### Next recommended
* [**Verify the contract**](/en/how-to/verify-contract) — Upload your source to Stablescan so users can read and interact with it.
* [**Index contract events**](/en/how-to/index-contract) — Subscribe to events with ethers.js and backfill historical logs.
* [**Gas pricing reference**](/en/reference/gas-pricing-api) — Understand how USDT0-denominated fees are calculated.
## Brand Kit
The Stable brand kit includes logos in multiple formats and the official color palette. Use it to keep Stable's branding consistent across projects and communications.
[Open the Stable Brand Kit](https://www.stable.xyz/brand-kit)
## Facilitators
A facilitator verifies a signed x402 payment and submits the on-chain call that settles it in USDT0 on Stable. Using a hosted facilitator means you do not run settlement infrastructure or manage gas tokens. For the rail-level context, see [Agent settlement](/en/explanation/agent-settlement).
### Overview table
| **Provider** | **Category** | **Docs / Get Started** | **Notes** |
| :---------------------------------------------- | :--------------- | :------------------------------------------------------------------------------------------------------------------------------------------- | :-------------------------------------------------------------------------------------------------------------- |
| [**Semantic Pay**](https://x402.semanticpay.io) | x402 facilitator | [https://docs.semanticpay.io/supported-chains#stable](https://docs.semanticpay.io/supported-chains#stable) | Public x402 facilitator for Stable; verifies and settles USDT0 payments via ERC-3009 |
| [**Heurist**](https://facilitator.heurist.xyz) | x402 facilitator | [https://docs.heurist.ai/x402-products/facilitator#supported-networks](https://docs.heurist.ai/x402-products/facilitator#supported-networks) | Multi-chain x402 facilitator supporting Stable; high-throughput verification and settlement with OFAC screening |
### Semantic Pay
Payment infrastructure for AI agents: trustless, P2P, and permissionless. Semantic Pay operates as an x402-compatible payment facilitator on Stable, settling USDT0 payments via ERC-3009 (`transferWithAuthorization`). Agents do not need a separate gas token in their wallets.
Developers integrating x402 on Stable point their middleware to `https://x402.semanticpay.io`. No custom settlement infrastructure is required.
**Capabilities**
* Payment payload verification (`/verify`) and on-chain settlement (`/settle`) via USDT0
* Gasless transfers using ERC-3009 `transferWithAuthorization`
* Spend limits, approval flows, and kill switches for agent oversight
* End-to-end traceability with full audit logging from intent through settlement
* Event callbacks for real-time payment lifecycle updates
**Facilitator endpoint:** `https://x402.semanticpay.io`
**Docs:** [https://docs.semanticpay.io/supported-chains#stable](https://docs.semanticpay.io/supported-chains#stable)
### Heurist
Heurist operates a multi-chain x402 facilitator that supports Stable alongside Base, Base Sepolia, and X Layer. It targets high-frequency agent workloads with throughput tuned for thousands of payment verifications and settlements per second.
Point your middleware at `https://facilitator.heurist.xyz`. No API key is required to get started.
**Capabilities**
* Payment verification and on-chain settlement across multiple networks from one endpoint
* Throughput sized for high-frequency agent traffic
* Automatic OFAC screening of sender addresses
* Real-time observability over verification and settlement activity
**Facilitator endpoint:** `https://facilitator.heurist.xyz`
**Docs:** [https://docs.heurist.ai/x402-products/facilitator#supported-networks](https://docs.heurist.ai/x402-products/facilitator#supported-networks)
### How to choose
* Use a hosted facilitator (Semantic Pay or Heurist) to start fast. No infrastructure to run, no gas tokens to manage.
* Pick by what matters most for your workload: Semantic Pay if you want Stable-native tooling with lifecycle callbacks and agent oversight controls; Heurist if you need a single endpoint that spans Stable plus other EVM networks, or if OFAC screening is a hard requirement.
* Self-host if you need full control over settlement policy, want to keep payment data in your own environment, or expect volume that justifies the operational overhead.
* Both facilitators settle x402 on Stable today. The same `/settle` endpoint can also serve as the on-chain submission target for an MPP server, since MPP's wire format only differs from x402 on the client ↔ resource-server hop. See [Build an MPP endpoint on Stable](/en/how-to/build-mpp-endpoint).
***
Have an agentic payments integration with Stable? Reach out at [bizdev@stable.xyz](mailto\:bizdev@stable.xyz).
## Wallets
Agent wallets give AI agents and autonomous systems self-custodial signing so they can participate in x402 payment flows without human-driven setup.
### Overview table
| **Provider** | **Category** | **Docs / Get Started** | **Notes** |
| :---------------------------------------------------------------- | :--------------- | :------------------------------------------------------------- | :----------------------------------------------------------------------------------------------- |
| [**Wallet Development Kit (WDK)**](https://docs.wallet.tether.io) | Agent wallet SDK | [https://docs.wallet.tether.io](https://docs.wallet.tether.io) | Tether's open-source SDK; `WalletAccountEvm` satisfies the x402 client signer interface natively |
### Wallet Development Kit (WDK) by Tether
An open-source SDK from Tether for building self-custodial AI agent wallets. WDK enables agents to generate and store private keys locally, without relying on cloud-based KMS or TEE infrastructure.
The `WalletAccountEvm` instance from WDK natively satisfies the client signer interface required by the x402 SDK. An agent equipped with WDK and USDT0 on Stable can automatically intercept 402 HTTP responses, sign ERC-3009 authorizations, and resubmit requests.
**Packages:** `@tetherto/wdk`, `@tetherto/wdk-wallet-evm`
**Capabilities**
* Self-custodial key generation and local storage
* Native x402 client signer compatibility via `WalletAccountEvm`
* Automatic 402 response interception and ERC-3009 signing
* Multi-chain support including Stable
**Docs:** [https://docs.wallet.tether.io](https://docs.wallet.tether.io)
***
Have an agent wallet integration with Stable? Reach out at [bizdev@stable.xyz](mailto\:bizdev@stable.xyz).
## Bank precompile reference
:::note
**Concept:** For what the bank module does and when to use it, see [Bank module](/en/explanation/bank-module).
:::
### Abstract
The `x/bank` module in Stable SDK only provides basic token management features.
You can transfer any token to any account without restriction, but you cannot delegate another account to transfer your tokens.
For these reasons, the `bank` precompiled contract offers additional authorization and delegation features on top of the existing `x/bank` module in Stable SDK.
### Contents
1. **[Concepts](#concepts)**
2. **[Configuration](#configuration)**
3. **[Methods](#methods)**
4. **[Events](#events)**
### Concepts
This precompiled contract provides ERC-20 standard methods - such as `transfer` and `balanceOf` for transfer and `transferFrom`, `approve` and `allowance` for delegation. You can call these methods directly without registering the contract address.
However, the `x/precompile` module must whitelist and register the contract address before you can use the `mint` and `burn` methods.
```go
func (p *Precompile) mint(
ctx sdk.Context,
contract *vm.Contract,
denom string,
method *abi.Method,
stateDB vm.StateDB,
args []interface{},
) ([]byte, error) {
// ...
// mint method is only allowed for the registered caller contract
if _, err := precompilecommon.CheckPermissions(ctx, p.precompileKeeper, contract.CallerAddress, CallerPermissions); err != nil {
return nil, err
}
```
This additional verification process guarantees that the token contract calling this precompiled contract is authorized.
To register a token contract address and its denom in the `x/precompile` module whitelist, you must submit a governance proposal.
### Configuration
The contract address and gas cost are predefined.
#### Contract address
* `0x0000000000000000000000000000000000001003` for STABLE (governance token)
### Methods
#### `mint`
Mints requested amount of new tokens and transfer to the account.
The amount of tokens to be minted must be greater than zero.
`PrecompiledBankMint` is emitted when the tokens are successfully minted and transferred to the account.
NOTE:
* Governance token minting is prohibited.
* Caller contracts calling the mint method must be registered in x/precompile module.
##### Inputs
| Name | Type | Description |
| ------ | ------- | ---------------------------------------- |
| to | address | the address to receive the minted tokens |
| amount | uint256 | the amount of tokens to be minted |
##### Outputs
| Name | Type | Description |
| ------- | ---- | ------------------------------------------------------------------------- |
| success | bool | true if the tokens are successfully minted and transferred to the account |
#### `burn`
Burns requested amount of tokens from the account.
The amount of tokens to be burned must be greater than zero.
`PrecompiledBankBurn` is emitted when the tokens are successfully burned.
NOTE:
* Burning governance token is prohibited.
* Caller contracts calling the burn method must be registered in x/precompile module.
##### Inputs
| Name | Type | Description |
| ------ | ------- | --------------------------------- |
| from | address | the address to burn the tokens |
| amount | uint256 | the amount of tokens to be burned |
##### Outputs
| Name | Type | Description |
| ------- | ---- | ------------------------------------------ |
| success | bool | true if the tokens are successfully burned |
#### `transfer`
Transfers requested amount of tokens from sender to the recipient.
Token must be set sendable. The amount of tokens to be transferred must be greater than zero.
`PrecompiledBankTransfer` is emitted when the tokens are successfully transferred.
##### Inputs
| Name | Type | Description |
| ------ | ------- | -------------------------------------- |
| to | address | the address to receive the tokens |
| amount | uint256 | the amount of tokens to be transferred |
##### Outputs
| Name | Type | Description |
| ------- | ---- | ----------------------------------------------- |
| success | bool | true if the tokens are successfully transferred |
#### `transferFrom`
Transfers requested amount of tokens from owner to recipient by authorized spender within the limits of the allowance.
Token must be set sendable.
The amount of tokens to be transferred must be greater than zero and less than or equal to the current allowance.
`PrecompiledBankTransfer` is emitted when the tokens are successfully transferred.
##### Inputs
| Name | Type | Description |
| ------ | ------- | -------------------------------------- |
| from | address | the address to transfer the tokens |
| to | address | the address to receive the tokens |
| amount | uint256 | the amount of tokens to be transferred |
##### Outputs
| Name | Type | Description |
| ------- | ---- | ----------------------------------------------- |
| success | bool | true if the tokens are successfully transferred |
#### `multiTransfer`
Transfers tokens from single account to multiple accounts.
Token must be set sendable.
The amount of tokens to be transferred to each recipient must be greater than zero.
`PrecompiledBankTransfer` is emitted per each recipient when the tokens are successfully transferred.
##### Inputs
| Name | Type | Description |
| ------ | ---------- | -------------------------------------------------------- |
| to | address\[] | the addresses to receive the transferred tokens |
| amount | uint256\[] | the amount of tokens to be transferred to each recipient |
##### Outputs
| Name | Type | Description |
| ------- | ---- | ----------------------------------------------------------------- |
| success | bool | true if the tokens are successfully transferred to each recipient |
#### `approve`
Authorizes a spender to transfer tokens from the owner’s account.
The amount of tokens to be authorized must be greater than zero.
`PrecompiledBankApproval` is emitted when the authorization is successfully set.
##### Inputs
| Name | Type | Description |
| ------- | ------- | ------------------------------------- |
| spender | address | the address to authorize |
| value | uint256 | the amount of tokens to be authorized |
##### Outputs
| Name | Type | Description |
| ------- | ---- | --------------------------------------------- |
| success | bool | true if the authorization is successfully set |
#### `revoke`
Revokes the authorization of spender for transferring tokens from owner.
`PrecompiledBankRevoke` is emitted when the authorization is successfully revoked.
##### Inputs
| Name | Type | Description |
| ------- | ------- | --------------------- |
| spender | address | the address to revoke |
##### Outputs
| Name | Type | Description |
| ------- | ---- | ------------------------------------------------- |
| success | bool | true if the authorization is successfully revoked |
#### `balanceOf`
Returns balance of tokens from the account.
##### Inputs
| Name | Type | Description |
| ------- | ------- | ---------------------------------------- |
| account | address | the address to get the balance of tokens |
##### Outputs
| Name | Type | Description |
| ------- | ------- | ----------------------------------- |
| balance | uint256 | the amount of tokens in the account |
#### `totalSupply`
Returns total supply of tokens.
##### Inputs
none
##### Outputs
| Name | Type | Description |
| ----------- | ------- | -------------------------- |
| totalSupply | uint256 | the total amount of tokens |
#### `allowance`
Returns the amount which spender is still allowed to withdraw from owner.
##### Inputs
| Name | Type | Description |
| ------- | ------- | -------------------------- |
| owner | address | the address of the owner |
| spender | address | the address of the spender |
##### Outputs
| Name | Type | Description |
| ------ | ------- | ------------------------------- |
| amount | uint256 | the amount of tokens authorized |
### Events
All events emitted from this precompiled contract are prefixed with `PrecompiledBank`.
To avoid ambiguity, token contract calling this precompiled contract should avoid using event names with the same prefix.
#### PrecompiledBankMint
| Name | Type | Indexed | Description |
| ------ | ------- | ------- | ---------------------------------------- |
| from | address | Y | the address that minted the tokens |
| to | address | Y | the address to receive the minted tokens |
| amount | uint256 | N | the amount of tokens minted |
#### PrecompiledBankBurn
| Name | Type | Indexed | Description |
| ------ | ------- | ------- | ---------------------------------- |
| from | address | Y | the address that burned the tokens |
| to | address | Y | not used in this method |
| amount | uint256 | N | the amount of tokens burned |
#### PrecompiledBankTransfer
| Name | Type | Indexed | Description |
| ------ | ------- | ------- | --------------------------------------------- |
| from | address | Y | the address that transferred the tokens |
| to | address | Y | the address to receive the transferred tokens |
| amount | uint256 | N | the amount of tokens transferred |
#### PrecompiledBankApproval
| Name | Type | Indexed | Description |
| ------- | ------- | ------- | -------------------------------------- |
| owner | address | Y | the address that authorized the tokens |
| spender | address | Y | the address to authorize |
| value | uint256 | N | the amount of tokens authorized |
#### PrecompiledBankRevoke
| Name | Type | Indexed | Description |
| ------- | ------- | ------- | ----------------------------------- |
| owner | address | Y | the address that revoked the tokens |
| spender | address | Y | the address to revoke |
| value | uint256 | N | the amount of tokens authorized |
## Bridges
Bridge providers supporting USDT0 transfers to and from Stable. For how cross-chain USDT0 movement works, see [Bridging to Stable](/en/explanation/usdt0-bridging). For a hands-on walkthrough, see the [Bridge USDT0 to Stable Testnet](/en/tutorial/bridge-usdt0) tutorial.
***
### Supported source chains
Any chain with USDT0 can bridge to Stable via the OFT Mesh. Any chain with native USDT can route through the Legacy Mesh via the Arbitrum hub. Current participants:
| Path | Example chains | Mechanism | Fee |
| :-------------- | :-------------------------------------------------------------------------------------------------------------------------------------------------------------------------- | :----------------------------------------------------- | :----------------------- |
| **OFT Mesh** | Arbitrum, Bera, Conflux, Ethereum, Flare, Hedera, Hyperliquid, Ink, Mantle, MegaETH, Monad, Morph, MP1, Optimism, Plasma, Polygon, Rootstock, Sei, Tempo, Unichain, X Layer | Burn on source, mint on Stable | Source chain gas only |
| **Legacy Mesh** | Tron, TON | Lock native USDT → Arbitrum hub → mint USDT0 on Stable | 0.03% + source chain gas |
Ethereum and Arbitrum support both paths: users holding native USDT can use the Legacy Mesh, while users holding USDT0 can use the OFT Mesh directly.
***
### Contract addresses
| | Testnet (chain ID 2201) | Mainnet (chain ID 988) |
| :-------------------------------- | :------------------------------------------- | :----------------------------------------------------------------------------------------------------------------- |
| **LayerZero EID** | `40374` | See [LayerZero deployed contracts](https://docs.layerzero.network/v2/deployments/deployed-contracts?chains=stable) |
| **LayerZero Endpoint V2** | `0x3aCAAf60502791D199a5a5F0B173D78229eBFe32` | See LayerZero docs |
| **USDT0 token** | `0x78Cf24370174180738C5B8E352B6D14c83a6c9A9` | `0x779Ded0c9e1022225f8E0630b35a9b54bE713736` |
| **USDT0 OApp (on Stable)** | N/A | `0xedaba024be4d87974d5aB11C6Dd586963CcCB027` |
| **Source USDT0 (Sepolia)** | `0xc4DCC311c028e341fd8602D8eB89c5de94625927` | Use mainnet USDT0 on source chain |
| **Source OApp (Sepolia)** | `0xc099cD946d5efCC35A99D64E808c1430cEf08126` | Use mainnet OApp on source chain |
| **LiFi Diamond (Stable mainnet)** | N/A | `0x026F252016A7C47CDEf1F05a3Fc9E20C92a49C37` |
For the full testnet contract list (LayerZero endpoint, DVN, executor), see [Testnet ecosystem contracts](/en/reference/testnet-ecosystem).
***
### STABLE OFT contracts
The STABLE token bridges to other chains using the LayerZero OFT standard. The adapter on Stable locks STABLE for outbound transfers; the upgradeable proxy on each remote chain mints and burns the wrapped supply. For the security model and a description of each contract's role, see [Bridge security and DVNs](/en/explanation/bridge-security).
| Chain | Contract | Address |
| :----------- | :----------------------------- | :------------------------------------------- |
| **Stable** | `StableOFTAdapter` | `0x386f92606b2D5E0A992ECc3704c31eF39Ff56392` |
| **BSC** | `StableOFTUpgradeable` (proxy) | `0x011EBe7d75E2C9D1E0bD0be0bEf5C36f0A90075F` |
| **HyperEVM** | `StableOFTUpgradeable` (proxy) | `0xa51dC81944a15623874981181a99D6c56B20ED56` |
:::note
The remote chain addresses differ even though both are EVM-compatible. Activating the destination address on HyperCore requires a transaction, which advances the deploy nonce and produces a different deterministic address than BSC. See [stablelabs/chain-oft](https://github.com/stablelabs/chain-oft) for the canonical config.
:::
***
### Stable's DVN operators
Stable's bridges run a 3/3 required DVN configuration: three independent operators must each sign every cross-chain message before it is accepted. There is no optional pool. The three required signers and their DVN contract addresses:
| Operator | DVN address |
| :----------------- | :------------------------------------------- |
| **LayerZero Labs** | `0x9c061c9a4782294eef65ef28cb88233a987f4bdd` |
| **Canary** | `0x8d6cc20d84fbeb5733c60436ceb8957da2ac02c8` |
| **Horizen** | `0x965a80dc87cec5848310e612dead84b543aef874` |
For the on-chain config per pathway, see [LayerZero deployed contracts](https://docs.layerzero.network/v2/deployments/deployed-contracts?chains=stable). For the security rationale, see [Bridge security and DVNs](/en/explanation/bridge-security).
***
### Bridge providers
| Provider | Type | Status | Description | Docs |
| :------------------------------------------------------------------ | :--------------------------------- | :---------------------- | :----------------------------------------------------------- | :--------------------------------------------------------------------------- |
| **[LayerZero](https://docs.layerzero.network/v2)** | Cross-chain messaging (OFT) | Live | Powers USDT0 OFT burn/mint transfers; dual DVN verification | [docs.layerzero.network/v2](https://docs.layerzero.network/v2) |
| **[Stargate](https://docs.stargate.finance/introduction/overview)** | Direct bridge (liquidity pools) | Live | Unified liquidity pools; stablecoin-optimized routing | [docs.stargate.finance](https://docs.stargate.finance/introduction/overview) |
| **[Gas.Zip](https://dev.gas.zip/overview)** | Direct bridge (liquidity routing) | Live | Liquidity routing across 350+ chains; fast finality | [dev.gas.zip](https://dev.gas.zip/overview) |
| **[LiFi](https://docs.li.fi/api-reference/introduction)** | Bridge aggregator | Live | Routes across multiple bridges and DEX swaps; SDK + REST API | [docs.li.fi](https://docs.li.fi/api-reference/introduction) |
| **[Polymer](https://docs.polymerlabs.org/docs/build/start/)** | Cross-chain interoperability (IBC) | Integration in progress | IBC-based messaging for Ethereum-native chains | [docs.polymerlabs.org](https://docs.polymerlabs.org/docs/build/start/) |
| **[Relay](https://docs.relay.link/what-is-relay)** | Intent-based bridge | Integration in progress | Gasless execution via solver network | [docs.relay.link](https://docs.relay.link/what-is-relay) |
#### LayerZero
Cross-chain messaging protocol powering USDT0 OFT burn/mint transfers with dual DVN verification.
**Capabilities**
* OFT-standard burn-on-source, mint-on-destination transfers
* Dual DVN (Decentralized Verifier Network) message verification
* Powers both OFT Mesh and Legacy Mesh paths
#### Stargate
Liquidity pool-based bridge optimized for stablecoin routing.
**Capabilities**
* Unified liquidity pools across chains
* Stablecoin-optimized routing
* Instant guaranteed finality
#### Gas.Zip
Liquidity routing protocol supporting fast transfers across 350+ chains.
**Capabilities**
* Cross-chain liquidity routing
* Fast finality
* Broad chain coverage (350+ chains)
#### LiFi
Bridge aggregator routing transfers across multiple bridges and DEX swaps.
**Capabilities**
* Multi-bridge route optimization
* SDK and REST API integration
* DEX swap aggregation
#### Polymer
IBC-based cross-chain messaging for Ethereum-native chains. Integration in progress.
**Capabilities**
* IBC protocol messaging on Ethereum
* Native interoperability without external validators
#### Relay
Intent-based bridge with gasless execution via a solver network. Integration in progress.
**Capabilities**
* Intent-based bridging
* Gasless execution for users
* Solver network settlement
***
### Fee structure
| Provider | Fee model |
| :-------------------------- | :-------------------------------------------------------------------------------------------------- |
| **LayerZero (OFT Mesh)** | Source chain gas only (no protocol fee) |
| **LayerZero (Legacy Mesh)** | 0.03% of transferred amount (charged by USDT0 team) + source chain gas |
| **Stargate** | Liquidity pool fees apply; see [Stargate docs](https://docs.stargate.finance/introduction/overview) |
| **LiFi** | Aggregator routing fee may apply depending on path |
| **Gas.Zip** | See [Gas.Zip docs](https://dev.gas.zip/overview) for current fee schedule |
| **Relay** | Solver fees; see [Relay docs](https://docs.relay.link/what-is-relay) |
***
Have a bridge integrating Stable? Reach out at [bizdev@stable.xyz](mailto\:bizdev@stable.xyz).
## Connect
This page consolidates the network details you need to connect to Stable.
### Mainnet
| **Field** | **Value** |
| :-------------- | :----------------------------------------------- |
| Network Name | Stable Mainnet |
| Chain ID | `988` |
| Currency Symbol | USDT0 |
| EVM JSON-RPC | `https://rpc.stable.xyz` |
| WebSocket | `wss://rpc.stable.xyz` |
| Block Explorer | [https://stablescan.xyz](https://stablescan.xyz) |
### Testnet
| **Field** | **Value** |
| :-------------- | :--------------------------------------------------------------- |
| Network Name | Stable Testnet |
| Chain ID | `2201` |
| Currency Symbol | USDT0 |
| EVM JSON-RPC | `https://rpc.testnet.stable.xyz` |
| WebSocket | `wss://rpc.testnet.stable.xyz` |
| Block Explorer | [https://testnet.stablescan.xyz](https://testnet.stablescan.xyz) |
For third-party RPC providers, see [RPC Providers](/en/reference/rpc-providers). For a typed client that wires these endpoints in for you, see the [Stable SDK](/en/explanation/sdk-overview).
### Rate limits
The public RPC endpoints (`https://rpc.stable.xyz` and `https://rpc.testnet.stable.xyz`) are rate-limited to **1,000 requests per 10 seconds per IP**. Requests over the limit return `HTTP 429`.
For higher throughput, use a [third-party RPC provider](/en/reference/rpc-providers).
:::note
USDT0 uses **18 decimals** as the native gas token (returned by `address(x).balance`) and **6 decimals** as an ERC-20 token (returned by `USDT0.balanceOf(x)`). Both interfaces operate on the same underlying balance. Libraries like viem and ethers.js report 18 decimals because they read the native gas token. For details on how the precision gap is reconciled, see [USDT0 Behavior on Stable](/en/explanation/usdt0-behavior).
:::
### Add Stable to your wallet
To add Stable manually, open your browser wallet's network settings and enter the values from the tables above. The required fields are:
* **Network Name**
* **RPC URL** (the EVM JSON-RPC endpoint)
* **Chain ID**
* **Currency Symbol**: `USDT0`
### Verify connectivity
Confirm your RPC endpoint is reachable by querying the chain ID:
```bash
cast chain-id --rpc-url https://rpc.stable.xyz
```
Expected output:
```text
988
```
For the testnet:
```bash
cast chain-id --rpc-url https://rpc.testnet.stable.xyz
```
Expected output:
```text
2201
```
### Next recommended
* [**Quick start**](/en/tutorial/quick-start) — Send your first testnet transaction in five minutes.
* [**Get testnet USDT0**](/en/how-to/use-faucet) — Fund a wallet from the faucet or bridge from Sepolia.
* [**USDT0 behavior on Stable**](/en/explanation/usdt0-behavior) — Understand the 18/6-decimal dual role before you code against balances.
## Custody
### Custody overview table
| **Provider** | **Category** | **Docs / Get Started** | **Notes** |
| :---------------------------------------- | :------------------------------ | :----------------------------------------------------------------------------------------------------- | :----------------------------------------- |
| [Paxos](https://paxos.com/) | MPC custody infrastructure | [https://docs.paxos.com/guides/developer/account](https://docs.paxos.com/guides/developer/account) | Trusted by Mastercard and PayPal |
| [Fireblocks](https://www.fireblocks.com/) | MPC custody infrastructure | [https://developers.fireblocks.com/docs/quickstart](https://developers.fireblocks.com/docs/quickstart) | Treasury and settlement workflows |
| [Fordefi](https://www.fordefi.com/) | MPC custody infrastructure | [https://docs.fordefi.com/](https://docs.fordefi.com/) | Policy engine and developer APIs |
| [Anchorage](https://www.anchorage.com/) | Regulated institutional custody | [https://www.anchorage.com/get-in-touch](https://www.anchorage.com/get-in-touch) | Federally chartered bank; $45B+ in custody |
### Category guide
* **MPC custody infrastructure:** Platforms using multi-party computation to distribute private key control across multiple parties. These provide secure key management, policy engines, and developer APIs for institutional digital asset operations.
* **Regulated institutional custody:** Federally regulated bank-grade custody for institutions that require a chartered custodian with direct regulatory oversight.
### MPC custody infrastructure
#### [Paxos](https://paxos.com/)
A regulated blockchain and tokenization infrastructure platform trusted by global enterprises including Mastercard and PayPal.
**Capabilities**
* Regulated custody and settlement infrastructure
* Enterprise-grade asset safekeeping
* Tokenization services for institutions
* Compliance frameworks for stablecoin operations
**Get started**: Create a developer account and follow the [Paxos developer onboarding guide](https://docs.paxos.com/guides/developer/account) to configure custody and settlement for Stable assets.
#### [Fireblocks](https://www.fireblocks.com/)
Financial infrastructure that powers custody, treasury, and digital asset operations for institutions worldwide.
**Capabilities**
* MPC-based digital asset custody
* Secure transfer and treasury workflows
* Institutional settlement network
* Stablecoin program infrastructure
**Get started**: Follow the [Fireblocks quickstart guide](https://developers.fireblocks.com/docs/quickstart) to set up a workspace, configure Stable as a supported network, and begin managing digital assets.
#### [Fordefi](https://www.fordefi.com/)
An institutional MPC wallet and security platform built for decentralized finance. Fordefi provides key management, policy controls, and developer APIs for Web3 institutions.
**Capabilities**
* MPC-based distributed key generation and threshold signing
* Institutional policy engine and approval workflows
* Developer APIs for programmatic wallet operations
* Browser extension, mobile, and API interfaces
**Get started**: Review the [Fordefi developer documentation](https://docs.fordefi.com/) to create a vault, configure approval policies, and connect to Stable via the API.
### Regulated institutional custody
#### [Anchorage](https://www.anchorage.com/)
A federally chartered national bank providing secure, regulated custody for over $45B in digital assets.
**Capabilities**
* Bank-grade digital asset custody
* Enterprise access controls
* Regulated institutional operations
* Auditable, compliant asset storage
**Get started**: Contact Anchorage through their [institutional onboarding page](https://www.anchorage.com/get-in-touch) to begin the account setup process for regulated custody of Stable assets.
***
Have custody infrastructure integrating with Stable? Reach out at [bizdev@stable.xyz](mailto\:bizdev@stable.xyz).
## Developer assistance
### FAQ
A growing collection of developer-focused questions covering topics such as:
* How do I connect to the Stable network?
* You can interact with the network using standard JSON-RPC requests compatible with common EVM tooling.
* What currency is used for transaction fees?
* You pay transaction fees in USDT0. No additional fee parameters are required beyond the standard base gas price.
* Where can I track updates?
* The Release & Change Log communicates all protocol and developer-facing changes.
* Does Stable support account abstraction?
* Yes. EIP-7702 enables EOAs to temporarily operate with smart-account behavior.
* See [EIP-7702 reference](/en/reference/eip-7702-api) and [Account abstraction how-to](/en/how-to/account-abstraction).
* Where can I see my transaction results?
* Once included in a block, results are visible through:
* balance reads
* contract state queries
* logs and emitted events
* How do I build smart contracts for Stable?
* You can use standard EVM developer workflows such as:
* Solidity-based contracts
* JSON-RPC libraries to interact with the network
This page will expand as common questions arise during public testnet usage.
### Support channels
You can engage directly with the Stable team for technical assistance.
* **Discord**: Join the developer channel at [https://discord.gg/stablexyz](https://discord.gg/stablexyz)
* **Issue Reporting**: Instructions will be provided once public repositories open
Support contacts will be updated as community platforms become available.
### Next recommended
* [**Quick start**](/en/tutorial/quick-start) — Run your first testnet transaction in five minutes.
* [**Production readiness**](/en/how-to/production-readiness) — Validate an integration before shipping to mainnet.
* [**FAQ**](/en/reference/faq) — Common answers about chain IDs, endpoints, and onboarding.
## DEXes
DEX deployments on Stable for spot trading, liquidity provision, and on-chain routing. Stable is on the [Official Uniswap v3 Deployments List](https://gov.uniswap.org/t/official-uniswap-v3-deployments-list/24323/13#p-58106-stable-4): the Uniswap v3 contracts on Stable are governance-recognized as canonical and are routed through [Stable Swap](https://swap.stable.xyz) as the default frontend.
### Overview table
| **Provider** | **Category** | **Status** | **Docs / Get Started** | **Notes** |
| :---------------------------------------- | :------------------------- | :-------------------------- | :----------------------------------------------------------------- | :------------------------------------------------------------------------------------------------------------------ |
| [**Uniswap v3**](https://swap.stable.xyz) | Concentrated-liquidity AMM | Canonical (live on mainnet) | [docs.uniswap.org](https://docs.uniswap.org/contracts/v3/overview) | Recognized on the Official Uniswap v3 Deployments List on May 12, 2026. Frontend: Stable Swap. Deployer: Protofire. |
### Uniswap v3
Canonical Uniswap v3 deployment on Stable, with concentrated-liquidity pools and standard fee tiers. Stable Swap is the actively maintained default frontend; trades route through the contracts below. Cross-chain liquidity flows in via LayerZero.
**Capabilities**
* Concentrated-liquidity AMM with v3 position NFTs
* Standard `SwapRouter02`, `Quoter V2`, and `Universal Router` integration paths
* `Permit2` support for gasless approvals
* v2-style constant-product pools also deployed for legacy routing
#### Mainnet contract addresses
Source: [RFC: Stable Application for Canonical Uniswap v3 Deployment](https://gov.uniswap.org/t/rfc-stable-application-for-canonical-uniswap-v3-deployment/26080) and the [Official Uniswap v3 Deployments List](https://gov.uniswap.org/t/official-uniswap-v3-deployments-list/24323/13#p-58106-stable-4).
| **Contract** | **Address** |
| :----------------------------------------------- | :---------------------------------------------------------------------------------------------------------------------- |
| **v3 Core Factory** | [0x88F0a512eF09175D456bc9547f914f48C013E4aA](https://stablescan.xyz/address/0x88F0a512eF09175D456bc9547f914f48C013E4aA) |
| **Universal Router** | [0x5Be52b52f3d1dbC324d2959637471a4208626144](https://stablescan.xyz/address/0x5Be52b52f3d1dbC324d2959637471a4208626144) |
| **Swap Router02** | [0x32eaf9B5d5F2CD7361c5012890C943D7de84C22a](https://stablescan.xyz/address/0x32eaf9B5d5F2CD7361c5012890C943D7de84C22a) |
| **Quoter V2** | [0xb070179E7032CdA868b53e6C1742F80c9e940d1A](https://stablescan.xyz/address/0xb070179E7032CdA868b53e6C1742F80c9e940d1A) |
| **Nonfungible Token Position Manager** | [0x3BdC3437405f7D801b6036532713fc1F179136a6](https://stablescan.xyz/address/0x3BdC3437405f7D801b6036532713fc1F179136a6) |
| **Nonfungible Token Position Descriptor V1.3.0** | [0x7Cf5987951E48ADf235cc9194bCdc708Eb692D82](https://stablescan.xyz/address/0x7Cf5987951E48ADf235cc9194bCdc708Eb692D82) |
| **NFT Descriptor Library V1.3.0** | [0xF7815833076D83161414A46c4E993dC8f22A7ADd](https://stablescan.xyz/address/0xF7815833076D83161414A46c4E993dC8f22A7ADd) |
| **Descriptor Proxy** | [0xcd2cD0E139eC5581138E18C6DBB189c53efBAE95](https://stablescan.xyz/address/0xcd2cD0E139eC5581138E18C6DBB189c53efBAE95) |
| **Proxy Admin** | [0x51D1E70B8cAbDF4F3aB056475802AB1687b3EA23](https://stablescan.xyz/address/0x51D1E70B8cAbDF4F3aB056475802AB1687b3EA23) |
| **Tick Lens** | [0x8dF0D1614aae99352045c62d24d54E72b38111ec](https://stablescan.xyz/address/0x8dF0D1614aae99352045c62d24d54E72b38111ec) |
| **v3 Migrator** | [0x2C5f4275F1a278BF328D56CB9db304e915DE3082](https://stablescan.xyz/address/0x2C5f4275F1a278BF328D56CB9db304e915DE3082) |
| **v3 Staker** | [0xA32e3E127FF46db40ab3c4775be97ED760AD7178](https://stablescan.xyz/address/0xA32e3E127FF46db40ab3c4775be97ED760AD7178) |
| **Permit2** | [0x000000000022D473030F116dDEE9F6B43aC78BA3](https://stablescan.xyz/address/0x000000000022D473030F116dDEE9F6B43aC78BA3) |
| **Multicall 2** | [0x208099D6E8a107aD485CD1374A6EC5Abd98c7F11](https://stablescan.xyz/address/0x208099D6E8a107aD485CD1374A6EC5Abd98c7F11) |
| **V2 Core Factory** | [0x25D2d657F539F2bB16eC82773cBE5ee49ddD3c69](https://stablescan.xyz/address/0x25D2d657F539F2bB16eC82773cBE5ee49ddD3c69) |
| **Uniswap V2 Router02** | [0xa571dc7c4f2369F1cA24D3a7E8a35c07Ff52bfC0](https://stablescan.xyz/address/0xa571dc7c4f2369F1cA24D3a7E8a35c07Ff52bfC0) |
:::note
Stable is recognized on the Uniswap v3 Deployments List as of May 12, 2026, following completion of the UAC governance process in April 2026. The deployment is maintained by Protofire with bridge connectivity via LayerZero.
:::
#### Quoting a swap
`Quoter V2` returns the expected output for a given input without executing a trade. Use it from any EVM tooling pointed at Stable's RPC.
```bash
cast call 0xb070179E7032CdA868b53e6C1742F80c9e940d1A \
"quoteExactInputSingle((address,address,uint256,uint24,uint160))(uint256,uint160,uint32,uint256)" \
"(,,,,0)" \
--rpc-url https://rpc.stable.xyz
```
```text
(amountOut, sqrtPriceX96After, initializedTicksCrossed, gasEstimate)
```
Replace ``, ``, ``, and `` (one of `100`, `500`, `3000`, `10000`) with the values for the pool you're quoting. For application integration, prefer the [Uniswap v3 SDK](https://docs.uniswap.org/sdk/v3/overview) or the [Universal Router](https://docs.uniswap.org/contracts/universal-router/overview) pointed at the addresses above.
***
### Have a DEX integrating Stable?
Reach the team at [bizdev@stable.xyz](mailto\:bizdev@stable.xyz) to be listed on this page.
### Next recommended
* [Connect to Stable](/en/reference/connect): chain IDs, RPC endpoints, and block explorers for mainnet and testnet.
* [Bridges](/en/reference/bridges): move USDT0 and other assets into Stable to provide liquidity or route trades.
* [Oracles](/en/reference/oracles): price feeds you can use alongside swap quotes for pricing and liquidations.
## Distribution precompile reference
:::note
**Concept:** For what the distribution module does and when to use it, see [Distribution module](/en/explanation/distribution-module).
:::
### Abstract
The `distribution` precompiled contract acts as a bridge that enables EVM environments to use the Stable SDK's `x/distribution` module functionality.
### Contents
1. **[Concepts](#concepts)**
2. **[Configuration](#configuration)**
3. **[Methods](#methods)**
4. **[Events](#events)**
### Concepts
The `distribution` precompiled contract performs additional checks to ensure that the delegator or depositor is the caller.
### Configuration
The contract address and gas cost are predefined.
#### Contract address
* `0x0000000000000000000000000000000000000801`
### Methods
#### `setWithdrawAddress`
Sets the address to receive the reward for the token delegated by the delegator to the validator.
Sometimes, when the delegator is self-delegated, the validator address is used as the delegator.
`SetWithdrawAddress` is emitted when the withdrawer address is successfully set.
##### Inputs
| Name | Type | Description |
| ----------------- | ------- | ----------------------------------------------- |
| delegatorAddress | address | the address of the delegator |
| withdrawerAddress | address | the address to receive the reward of delegation |
##### Outputs
| Name | Type | Description |
| ------- | ---- | -------------------------------------------------- |
| success | bool | true if the withdrawer address is successfully set |
#### `withdrawDelegatorRewards`
Withdraws the reward to be received by the delegator from the validator.
All types of tokens that the validator rewards to the delegator are withdrawn in a single transaction.
`WithdrawDelegatorRewards` is emitted when the reward is successfully withdrawn.
##### Inputs
| Name | Type | Description |
| ---------------- | ------- | ---------------------------- |
| delegatorAddress | address | the address of the delegator |
| validatorAddress | address | the address of the validator |
##### Outputs
| Name | Type | Description |
| ------ | ------- | --------------------------------------------------------- |
| amount | Coin\[] | rewards of various tokens to be received by the delegator |
`Coin` is a struct with the following fields:
| Name | Type | Description |
| ------ | ------- | ------------------------ |
| denom | string | the denom of the reward |
| amount | uint256 | the amount of the reward |
#### `withdrawValidatorCommission`
Withdraws the commission of the validator.
All types of tokens that the validator receives as commission are withdrawn in a single transaction.
`WithdrawValidatorCommission` is emitted when the commission is successfully withdrawn.
##### Inputs
| Name | Type | Description |
| ---------------- | ------- | ---------------------------- |
| validatorAddress | address | the address of the validator |
##### Outputs
| Name | Type | Description |
| ------ | ------- | ------------------------------------------------------------- |
| amount | Coin\[] | commissions of various tokens to be received by the validator |
#### `validatorDistributionInfo`
Returns the distribution information representing the reward the validator will receive. A validator can delegate tokens to itself at its own address to act as a delegator, called self-bonded.
##### Inputs
| Name | Type | Description |
| ---------------- | ------- | ---------------------------- |
| validatorAddress | address | the address of the validator |
##### Outputs
| Name | Type | Description |
| ---------------- | ------------------------- | ----------------------------------------- |
| distributionInfo | ValidatorDistributionInfo | distribution information of the validator |
`ValidatorDistributionInfo` is a struct with the following fields:
| Name | Type | Description |
| --------------- | ---------- | -------------------------------------------- |
| operatorAddress | address | the address of the operator of the validator |
| selfBondRewards | DecCoin\[] | the self-bonded amount of the validator |
| commission | DecCoin\[] | the commission of the validator |
`DecCoin` is a struct with the following fields:
| Name | Type | Description |
| --------- | ------- | --------------------------- |
| denom | string | the denom of the reward |
| amount | uint256 | the amount of the reward |
| precision | uint8 | the precision of the reward |
#### `validatorOutstandingRewards`
Returns the outstanding rewards of the validator. Outstanding rewards represent the total reward pool: the validator's commission and self-bonded rewards, plus the total rewards owed to delegators. For example, if validator A has delegators B, C, and D, the outstanding rewards equal A's commission and self-bonded rewards, plus the rewards of B, C, and D.
##### Inputs
| Name | Type | Description |
| ---------------- | ------- | ---------------------------- |
| validatorAddress | address | the address of the validator |
##### Outputs
| Name | Type | Description |
| ------- | ---------- | ------------------------------------ |
| rewards | DecCoin\[] | outstanding rewards of the validator |
#### `validatorCommission`
Returns the commission of the validator. This method is used to retrieve the commission of the validator before calling `withdrawValidatorCommission` method.
##### Inputs
| Name | Type | Description |
| ---------------- | ------- | ---------------------------- |
| validatorAddress | address | the address of the validator |
##### Outputs
| Name | Type | Description |
| ---------- | ---------- | --------------------------- |
| commission | DecCoin\[] | commission of the validator |
#### `validatorSlashes`
Returns the history of slashes of the validator between the starting height and ending height. Slashing is the fines imposed when a validator behaves maliciously or violates network rules such as double signing, misbehavior, or not following the chain rules.
##### Inputs
| Name | Type | Description |
| ---------------- | ------- | ---------------------------- |
| validatorAddress | address | the address of the validator |
| startingHeight | uint64 | the starting height |
| endingHeight | uint64 | the ending height |
| pageRequest | PageReq | the pagination request |
`PageReq` is a struct with the following fields:
| Name | Type | Description |
| ---------- | ------ | ------------------------------------------ |
| key | bytes | the key of the pagination |
| offset | uint64 | the offset of the pagination |
| limit | uint64 | the limit of the pagination |
| countTotal | bool | whether to count the total number of pages |
| reverse | bool | whether to reverse the pagination |
##### Outputs
| Name | Type | Description |
| ---------- | ---------------------- | ------------------------ |
| slashes | ValidatorSlashEvent\[] | slashes of the validator |
| pagination | PageResp | the pagination response |
`ValidatorSlashEvent` is a struct with the following fields:
| Name | Type | Description |
| --------------- | ------ | --------------------------- |
| validatorPeriod | uint64 | the period of the validator |
| fraction | Dec | the fraction of the slash |
`Dec` is a struct with the following fields:
| Name | Type | Description |
| --------- | ------ | ------------------------ |
| value | uint64 | the value of the Dec |
| precision | uint8 | the precision of the Dec |
`PageResp` is a struct with the following fields:
| Name | Type | Description |
| ------- | ------ | ------------------------------ |
| nextKey | bytes | the next key of the pagination |
| total | uint64 | the total number of pages |
#### `delegationRewards`
Returns the rewards that delegator receives from the validator.
##### Inputs
| Name | Type | Description |
| ---------------- | ------- | -------------------------------- |
| delegatorAddress | address | the hex address of the delegator |
| validatorAddress | address | the address of the validator |
##### Outputs
| Name | Type | Description |
| ------- | ---------- | -------------------------------------------------- |
| rewards | DecCoin\[] | rewards that delegator receives from the validator |
#### `delegationTotalRewards`
Returns the total rewards that delegator receives from all validators.
##### Inputs
| Name | Type | Description |
| ---------------- | ------- | -------------------------------- |
| delegatorAddress | address | the hex address of the delegator |
##### Outputs
| Name | Type | Description |
| ------- | ---------------------------- | --------------------------------------------------------- |
| rewards | DelegationDelegatorReward\[] | total rewards that delegator receives from all validators |
| total | DecCoin\[] | the total amount of the rewards |
`DelegationDelegatorReward` is a struct with the following fields:
| Name | Type | Description |
| ---------------- | ---------- | -------------------------------------------------- |
| validatorAddress | address | the address of the validator |
| reward | DecCoin\[] | rewards that delegator receives from the validator |
#### `delegatorValidators`
Returns the validators that delegator is bonded to.
##### Inputs
| Name | Type | Description |
| ---------------- | ------- | -------------------------------- |
| delegatorAddress | address | the hex address of the delegator |
##### Outputs
| Name | Type | Description |
| ---------- | --------- | -------------------------------------- |
| validators | string\[] | validators that delegator is bonded to |
#### `delegatorWithdrawAddress`
Returns the address to receive the reward of delegation set by `setWithdrawAddress` method.
##### Inputs
| Name | Type | Description |
| ---------------- | ------- | -------------------------------- |
| delegatorAddress | address | the hex address of the delegator |
##### Outputs
| Name | Type | Description |
| --------------- | ------- | ----------------------------------------------- |
| withdrawAddress | address | the address to receive the reward of delegation |
### Events
#### SetWithdrawAddress
| Name | Type | Indexed | Description |
| --------------- | ------- | ------- | ----------------------------------------------- |
| caller | address | Y | the address of the caller (delegator) |
| withdrawAddress | address | N | the address to receive the reward of delegation |
#### WithdrawDelegatorRewards
| Name | Type | Indexed | Description |
| ---------------- | ------- | ------- | ---------------------------- |
| delegatorAddress | address | Y | the address of the delegator |
| validatorAddress | address | Y | the address of the validator |
| amount | uint256 | N | the amount of the reward |
#### WithdrawValidatorCommission
| Name | Type | Indexed | Description |
| ---------------- | ------- | ------- | ---------------------------------- |
| validatorAddress | address | Y | the address of the validator |
| commission | uint256 | N | the total amount of the commission |
## EIP-7702
Stable supports **EIP-7702**, which allows an EOA to set its account code to an existing smart contract. EOAs keep their original address and private key while executing the delegate's logic.
:::note
**Concept:** For what EIP-7702 enables on Stable, the delegation model, and security considerations, see [EIP-7702](/en/explanation/eip-7702). For the full specification, see the [EIP-7702 spec](https://eips.ethereum.org/EIPS/eip-7702).
:::
### Transaction format
EIP-7702 uses transaction type `0x04` with an `authorizationList` field. Each authorization designates a delegate contract whose code the EOA executes for that transaction.
```typescript
{
type: 4,
to: eoa.address,
data: delegateCallData,
authorizationList: [signedAuthorization],
maxPriorityFeePerGas: 0n, // always 0 on Stable
// ... standard EIP-1559 fields
}
```
The authorization carries:
* `chainId`: must match the target chain.
* `address`: the delegate contract address.
* `nonce`: the authorization nonce (separate from the transaction nonce).
Wallets and libraries that support EIP-7702 handle the authorization format automatically.
### Tooling
* **ethers.js**: `wallet.signAuthorization({ chainId, address, nonce })` produces the signed authorization for inclusion in the `authorizationList`.
* **viem**: use `signAuthorization` with a walletClient, then pass the result to `sendTransaction`.
* **Hardhat / Foundry**: standard EIP-7702 transaction format works when your toolchain version supports the Pectra hardfork.
### Next recommended
* [**EIP-7702 concept**](/en/explanation/eip-7702) — Understand the delegation model and when to use it.
* [**Account Abstraction (EIP-7702)**](/en/reference/eip-7702-api) — Implement batch payments, spending limits, and session keys step by step.
## FAQ
### Getting started
**What is Stable?**
A Layer 1 where USDT0 is the native gas token and settlement asset. Standard EVM tooling works unchanged.
**Who is Stable for?**
Three builder profiles: payment and wallet teams moving USDT0, smart contract developers deploying to an EVM, and infrastructure teams running nodes or RPC. The [Learn overview](/en/explanation/learn-overview) has a card per path.
**Where should I start: Payments, Contracts, AI/Agents, or Infrastructure?**
* Moving USDT0 or building payment flows → [Payments](/en/explanation/payments-overview).
* Deploying contracts → [Contracts](/en/explanation/contracts-overview).
* Wiring AI editors or building agent-paid services → [Agent settlement](/en/explanation/agent-settlement).
* Running nodes or covering gas for users → [Infrastructure](/en/explanation/integrate-overview).
If you haven't connected to testnet yet, start with [Quick start](/en/tutorial/quick-start).
### Technical
**Is Stable EVM-compatible?**
Yes. Solidity, Vyper, Foundry, Hardhat, ethers, viem, and the `eth_*` JSON-RPC methods all work unchanged. Four behaviors differ from Ethereum — see [Differences from Ethereum](/en/explanation/ethereum-comparison).
**Why is USDT0 the gas token?**
So you pay fees in the asset you're already transacting in. No second token to fund, and fees stay denominated in a stablecoin. The protocol also optimizes USDT0-heavy workloads through guaranteed blockspace and transfer aggregation; see [Core concepts](/en/explanation/core-concepts).
**How do I get USDT0?**
* **Testnet:** use the faucet at [faucet.stable.xyz](https://faucet.stable.xyz), or bridge Test USDT from Ethereum Sepolia. Walkthrough in [Get testnet USDT0](/en/how-to/use-faucet).
* **Mainnet:** bridge USDT0 from another chain via LayerZero, or acquire through an exchange or custodian.
**What changes when I port a contract from Ethereum?**
Most contracts deploy unchanged. Three things to fix if they apply:
* Don't mirror native balance in internal variables. `transferFrom` can drain native without calling the contract.
* Don't transfer to `address(0)`. Both native and ERC-20 transfers to zero revert.
* Don't rely on `EXTCODEHASH` for address-reuse detection. Permit-based approvals change native balance without a nonce increment.
Full checklist: [USDT0 behavior on Stable](/en/explanation/usdt0-behavior).
### Resources
**Where do I find tokenomics, roadmap, and architecture?**
* [Tokenomics](/en/reference/tokenomics): STABLE supply, allocation, and vesting.
* [Technical roadmap](/en/explanation/technical-roadmap): phased optimization plan.
* [Tech overview](/en/explanation/tech-overview): StableBFT, Stable EVM, StableDB, and RPC design.
* [USDT-specific features](/en/explanation/usdt-features-overview): detail on gas, blockspace, aggregation, and confidential transfer.
**Where do I go for help?**
* [Developer assistance](/en/reference/developer-assistance): FAQ and reference pointers.
* [Discord](https://discord.gg/stablexyz): community support and protocol updates.
* `bizdev@stable.xyz`: partnership and integration conversations.
### Next recommended
* [**Quick start**](/en/tutorial/quick-start) — Send a first transaction on testnet.
* [**Core concepts**](/en/explanation/core-concepts) — Learn the four core concepts you need before you build.
* [**Learn overview**](/en/explanation/learn-overview) — Pick the docs path that fits what you're building.
* [**Production readiness**](/en/how-to/production-readiness) — Validate an integration before shipping to mainnet.
## Gas pricing reference
Transaction construction, gas estimation, and tooling configuration for Stable.
:::note
**Concept:** For why Stable uses a single-component fee model and how it compares to Ethereum, see [Gas pricing](/en/explanation/gas-pricing).
:::
### Transaction construction
When constructing transactions on Stable, set `maxPriorityFeePerGas` to `0`. Clients should fetch the latest base fee from the most recent block and include a safety margin when computing `maxFeePerGas`.
```javascript
// ethers.js v6
const block = await provider.getBlock("latest");
const baseFee = block.baseFeePerGas;
const maxPriorityFeePerGas = 0n; // always 0 on Stable
const maxFeePerGas = baseFee * 2n + maxPriorityFeePerGas; // double the base fee as safety margin
const tx = await wallet.sendTransaction({
to: "0xRecipientAddress",
value: parseEther("0.01"),
maxFeePerGas,
maxPriorityFeePerGas,
});
```
```text
Native USDT0 transfer confirmed. Fee ≈ 0.0000021 USDT0 at baseFee = 1 gwei.
```
### Gas estimation
Use `eth_estimateGas` and `eth_gasPrice` as you would on Ethereum. The key difference is that `eth_maxPriorityFeePerGas` will always return `0`.
```javascript
const gasPrice = await provider.send("eth_gasPrice", []);
const gasEstimate = await provider.estimateGas({
to: contractAddress,
data: callData,
});
const estimatedFeeInUSDT0 = gasPrice * gasEstimate;
```
### Tooling configuration
* **Hardhat / Foundry**: no special configuration needed; standard EVM settings work. If your config explicitly sets a priority fee, set it to `0`.
* **Wallets**: hide or disable the priority tip input field. Displaying it may confuse users since the value has no effect.
* **Monitoring**: fee analytics dashboards should not track priority fees. They will always be zero.
### Next recommended
* [**Gas pricing concept**](/en/explanation/gas-pricing) — Understand why Stable uses a single-component fee model.
* [**Ethereum comparison**](/en/explanation/ethereum-comparison) — Review every behavior difference you'll hit porting from Ethereum.
* [**JSON-RPC API**](/en/reference/json-rpc-api) — Reference the `eth_*` methods Stable exposes.
## Gas waiver protocol
This document specifies the Gas Waiver mechanism: transaction formats, marker routing, governance controls, and the Waiver Server API.
:::note
**Concept:** For what Gas Waiver is and why it exists, see [Gas waiver](/en/explanation/gas-waiver). For the how-to integration guide against the hosted Waiver Server, see [Enable gas-free transactions](/en/how-to/integrate-gas-waiver).
:::
### Abstract
Gas Waiver enables gasless end-user transactions on Stable by allowing a small set of governance-approved addresses (“waivers”) to submit transactions with `gasPrice = 0`. Stable currently operates a waiver service (the “Waiver Server”) that you can integrate with to provide gasless UX without implementing protocol-specific wrapper logic.
### Scope
This specification covers:
* Protocol-level rules for gas-waived transactions
* The wrapper transaction mechanism and marker address
* Governance-controlled authorization and allowed targets
* The Waiver Server interface for submitting signed user transactions
### Definitions
* **Waiver**: An Ethereum address registered on-chain via validator governance that is authorized to submit gas-waived transactions.
* **InnerTx**: The end user’s signed transaction with `gasPrice = 0`.
* **WrapperTx**: A transaction signed by a waiver that transports the user’s `InnerTx` to the chain and authorizes execution.
* **Marker address**: A sentinel address used to identify waiver wrapper transactions: `0x000000000000000000000000000000000000f333`.
* **AllowedTarget**: A policy that limits a waiver to specific contract addresses and method selectors.
### Overview
Gas Waiver uses a wrapper transaction pattern:
1. The user signs an `InnerTx` with `gasPrice = 0`.
2. A waiver wraps the `InnerTx` into a `WrapperTx` and broadcasts it.
3. Validators detect marker transactions, verify the waiver authorization and policy constraints, then execute the embedded `InnerTx`.
Stable operates a waiver service (Waiver Server) that is registered on-chain as an authorized waiver. You integrate with the Waiver Server API to submit signed `InnerTx` payloads.
### Protocol specification
#### Marker address routing
A transaction is treated as a waiver wrapper transaction if and only if:
* `to == 0x000000000000000000000000000000000000f333`.
The protocol interprets the transaction `data` field as an encoded inner transaction payload and processes it using the waiver verification rules below.
#### Authorization and policy checks
For each candidate wrapper transaction, validators must enforce:
1. **Waiver authorization**
* `WrapperTx.from` must be a waiver address registered on-chain via governance.
2. **Gas waiver**
* `WrapperTx.gasPrice` must equal `0`.
* `InnerTx.gasPrice` must equal `0`.
3. **Target allowlist**
* `InnerTx.to` and the method selector extracted from `InnerTx.data` must be permitted by the waiver’s `AllowedTarget` policy.
4. **Value restrictions**
* `WrapperTx.value` must equal `0`.
If any check fails, validators reject the wrapper transaction and do not execute the inner transaction.
#### Execution semantics
If all checks pass:
1. The protocol executes `InnerTx` as the user, preserving the user’s `from`, `nonce`, and call semantics.
2. Gas accounting is handled by the waiver mechanism: the user pays no gas, and the waiver transaction uses `gasPrice = 0` by definition of the feature.
3. The wrapper transaction must supply sufficient `gasLimit` to cover the execution of `InnerTx` (including overhead for unwrap and verification).
### Transaction formats
#### WrapperTx
The wrapper transaction is signed by the waiver and sent to the marker address.
```javascript
WrapperTx {
from: waiver_address,
to: 0x000000000000000000000000000000000000f333,
value: 0, // must be zero
data: RLP(InnerTx), // RLP-encoded inner transaction
gasPrice: 0, // must be zero
gasLimit: sufficient_for_inner, // must cover inner execution + overhead
nonce: waiver_nonce
}
```
#### InnerTx
The inner transaction is signed by the end user.
```javascript
InnerTx {
from: user_address,
to: target_contract,
value: value,
data: call_data,
gasPrice: 0, // must be zero
gasLimit: execution_gas,
nonce: user_nonce
}
```
### Governance-controlled access
Waiver authorization is governed on-chain by validator governance.
Governance control provides:
* Reviewable authorization of waiver addresses
* On-chain transparency of waiver registration and updates
* Revocation capability
* Per-waiver scoping via `AllowedTarget`
### Security model
#### End-user signature integrity
The user signs the `InnerTx`. The waiver cannot modify the inner transaction payload without invalidating the signature. You must still ensure that the user signs only the intended transaction payload.
#### Trust boundary
Gas Waiver introduces a service dependency if partners route submissions through the Waiver Server:
* Availability of the service affects the ability to submit gasless transactions.
* Authorization remains on-chain; only registered waiver addresses can produce valid wrapper submissions.
### Integration
You integrate by:
1. Collect a signed `InnerTx` from the user (`gasPrice = 0`).
2. Submit the signed inner transaction to the Waiver Server API.
3. Handle streamed results and surfacing transaction hashes to end users.
### Waiver server
#### Overview
The Waiver Server wraps and broadcasts signed user `InnerTx` payloads as waiver-authorized wrapper transactions. You do not need to construct wrapper transactions or operate a waiver address.
#### Endpoints and base URLs
Base URLs:
* Mainnet: TBD
* Testnet: `https://waiver.testnet.stable.xyz`
#### Authentication
All endpoints except health require bearer token authentication:
```
Authorization: Bearer
```
#### API
##### GET `/v1/health`
Health check endpoint.
Authentication: none.
##### POST `/v1/submit`
Submit a batch of signed inner transactions.
Authentication: required (`Bearer`).
Request body:
```json
{
"transactions": ["0x", "0x"]
}
```
Response is streamed as NDJSON (newline-delimited JSON). Each line corresponds to a submitted transaction index.
Example:
```json
{"index":0,"id":"abc123","success":true,"txHash":"0x..."}
{"index":1,"id":"def456","success":false,"error":{"code":"VALIDATION_FAILED","message":"invalid signature"}}
```
##### GET `/v1/submit`
WebSocket interface for streaming submissions.
Authentication: required (`Bearer`).
#### Integration example
```javascript
const WAIVER_SERVER = "https://waiver.testnet.stable.xyz";
async function submitGaslessTransaction(signedInnerTxHex, apiKey) {
const response = await fetch(`${WAIVER_SERVER}/v1/submit`, {
method: "POST",
headers: {
"Content-Type": "application/json",
"Authorization": `Bearer ${apiKey}`,
},
body: JSON.stringify({
transactions: [signedInnerTxHex],
}),
});
const reader = response.body.getReader();
const decoder = new TextDecoder();
while (true) {
const { done, value } = await reader.read();
if (done) break;
const lines = decoder.decode(value).trim().split("\n");
for (const line of lines) {
const result = JSON.parse(line);
console.log(result);
}
}
}
```
#### Creating a user InnerTx
You are responsible for constructing an `InnerTx` with `gasPrice = 0`, then collecting the user signature.
Example:
```javascript
import { ethers } from "ethers";
async function createInnerTx(userWallet, contractAddress, callData, nonce) {
const innerTx = {
to: contractAddress,
data: callData,
value: value,
gasPrice: 0, // must be 0 for waiver
gasLimit: 100000,
nonce: nonce,
chainId: 2201, // 988 for mainnet, 2201 for testnet
};
return await userWallet.signTransaction(innerTx);
}
```
#### Error codes
* `PARSE_ERROR`: Failed to parse transaction
* `INVALID_REQUEST`: Malformed request body
* `BATCH_SIZE_EXCEEDED`: Batch size exceeds allowed maximum
* `VALIDATION_FAILED`: Transaction validation failed
* `BROADCAST_FAILED`: Failed to broadcast to chain
* `RATE_LIMITED`: Rate limit exceeded
* `QUEUE_FULL`: Server queue at capacity
* `TIMEOUT`: Request timed out
### Next recommended
* [**Zero gas transactions**](/en/how-to/zero-gas-transactions) — Demo-focused walkthrough with a receipt showing zero gas fee.
* [**Enable gas-free transactions**](/en/how-to/integrate-gas-waiver) — Full hosted-API integration guide with batch submissions and error handling.
* [**Self-hosted Gas Waiver**](/en/how-to/self-hosted-gas-waiver) — Run your own waiver infrastructure without the hosted API.
## Indexers
Indexers and analytics platforms provide structured access to on-chain data, enabling developers to query transactions, balances, logs, events, and application-specific data at scale. Stable is EVM-compatible, so standard Ethereum indexing tools work seamlessly.
This page lists current and upcoming indexing providers, along with the capabilities developers can expect.
### Overview table
| **Provider** | **Category** | **Docs / Get Started** | **Notes** |
| :------------------------------------------------------------------- | :--------------------------- | :--------------------------------------------------------------------------------------------------------------------------- | :---------------------------------------------------------------- |
| [**Stablescan**](https://stablescan.xyz/) | Blockchain Explorer | [https://docs.etherscan.io/introduction](https://docs.etherscan.io/introduction) | Blockchain explorer; transaction, block, and contract visibility. |
| [**The Graph**](https://thegraph.com/explorer/participants/indexers) | Indexer | [https://thegraph.com/docs/en/developing/creating-a-subgraph/](https://thegraph.com/docs/en/developing/creating-a-subgraph/) | Build, deploy, and query subgraphs using GraphQL. |
| [**Goldsky**](https://goldsky.com/) | Indexer | [https://docs.goldsky.com/introduction](https://docs.goldsky.com/introduction) | High-performance indexing and real-time data streaming. |
| [**Ormi Labs**](https://ormilabs.com/) | Indexer | [https://docs.ormilabs.com/subgraphs/quickstart](https://docs.ormilabs.com/subgraphs/quickstart) | Next-gen subgraph indexer with real-time data capabilities. |
| [**Allium**](https://www.allium.so/) | Analytics / Data Platform | [https://docs.allium.so/](https://docs.allium.so/) | Normalized blockchain datasets & analytics tooling. |
| [**CoinMarketCap**](https://coinmarketcap.com/api/) | Market Data Aggregator | [https://coinmarketcap.com/api/documentation/v1/](https://coinmarketcap.com/api/documentation/v1/) | Market prices, listings, and tracking tools. |
| [**CoinGecko**](https://www.coingecko.com/en/api) | Market Data Aggregator | [https://docs.coingecko.com/](https://docs.coingecko.com/) | Independent market data with developer APIs. |
| [**Dexscreener**](https://docs.dexscreener.com/) | DEX Analytics | [https://docs.dexscreener.com/](https://docs.dexscreener.com/) | Real-time DEX charts, liquidity analytics, and dashboards. |
| [**DeBank**](https://debank.com/) | Portfolio / Wallet Analytics | [https://cloud.debank.com/](https://cloud.debank.com/) | EVM wallet tracking, transactions, and portfolio insights. |
### 1. Indexers
Indexers transform raw blockchain data into searchable, queryable formats. They power dashboards, analytics, wallets, block explorers, and application backends.
#### The Graph
Decentralized indexing protocol powering data access for over 75,000 projects.
**Capabilities**
* Subgraphs for Stable
* GraphQL-based querying
* Distributed indexing network
**Docs**
Follow this quick-start guide to create, deploy, and query a subgraph within minutes:
[https://thegraph.com/docs/en/developing/creating-a-subgraph/](https://thegraph.com/docs/en/developing/creating-a-subgraph/)
#### Ormi Labs
Ormi is a next-generation indexer built to deliver real-time and historical blockchain data at scale.
**Capabilities**
* Tip of the chain indexing
* Sub-second query latency
* No-code feature
**Docs**
Start querying real-time data with Ormi:
[https://docs.ormilabs.com/subgraphs/quickstart](https://docs.ormilabs.com/subgraphs/quickstart)
Learn how to query USDT0 data on Stable in real-time:
[https://docs.ormilabs.com/subgraphs/tutorials/query-usdt0](https://docs.ormilabs.com/subgraphs/tutorials/query-usdt0)
#### Goldsky
High-performance indexing platform with instant subgraphs and developer tooling.
**Capabilities**
* Subgraph deployment and management
* Webhook creation for real-time event streaming
* Multi-subgraph sync to external databases
**Docs**
[https://docs.goldsky.com/introduction](https://docs.goldsky.com/introduction)
For 24/7 support, contact [support@goldsky.com](mailto\:support@goldsky.com).
### 2. Analytics providers
Analytics tools help teams track network activity, real-world payments, dashboards, usage flows, and contract interactions.
#### Allium
A foundational data platform for engineers and analysts across the blockchain ecosystem.
**Capabilities**
* Normalized blockchain datasets
* Query tooling for analytics teams
* Enterprise data infrastructure
**Docs**
Get started with Allium’s data platform and API resources:
[https://www.allium.so/](https://www.allium.so/)
**Get started**: Sign up at [allium.so](https://www.allium.so/) to get API access, then query normalized Stable on-chain datasets using the REST API.
#### CoinMarketCap
The largest global market tracking platform for crypto assets.
**Capabilities**
* Price tracking for Stable assets
* Portfolio tool
* Market data APIs
**Docs**
Explore the CMC API and integration resources:
[https://coinmarketcap.com/api/](https://coinmarketcap.com/api/)
**Get started**: Register for an API key at [coinmarketcap.com/api](https://coinmarketcap.com/api/) and query Stable asset price and market data via the REST API.
#### CoinGecko
The world’s largest independent crypto data aggregator.
**Capabilities**
* Market listings and price data
* Historical analytics
* API access for developers
**Docs**
Access CoinGecko’s API documentation:
[https://www.coingecko.com/en/api](https://www.coingecko.com/en/api)
**Get started**: Get a free or Pro API key from [coingecko.com/en/api](https://www.coingecko.com/en/api) and query Stable token price and market data via the REST API.
#### Dexscreener
Real-time charts and analytics for decentralized venues.
**Capabilities**
* Live DEX charts
* Liquidity and pair analytics
* Trading dashboards
**Docs**
Explore Dexscreener’s API endpoints and developer tools:
[https://docs.dexscreener.com/](https://docs.dexscreener.com/)
**Get started**: Browse the [Dexscreener API docs](https://docs.dexscreener.com/) to query real-time pair data, liquidity, and trading activity for Stable-based DEX pools.
#### DeBank
Portfolio tracker for Ethereum and EVM ecosystems.
**Capabilities**
* Wallet analytics
* Transaction summaries
* Portfolio tracking across chains
**Docs**
Read DeBank’s API reference and integration documentation:
[https://docs.debank.com/](https://docs.debank.com/)
**Get started**: Sign up for [DeBank Cloud](https://cloud.debank.com/) to access API keys and query Stable wallet balances, transaction history, and portfolio data.
***
Have an indexing or analytics platform integrating Stable? Reach out at [bizdev@stable.xyz](mailto\:bizdev@stable.xyz).
## Settle invoices
Each invoice maps to a unique, deterministic nonce derived from invoice metadata: invoice number, parties, amount, and due date. This nonce drives settlement via [ERC-3009](/en/explanation/erc-3009) and creates an immutable receipt that can be reconciled with existing accounting systems.
### How it works
Both the buyer and the vendor independently compute the same nonce from the same invoice metadata. No external registry is required to coordinate payment.
The nonce is derived deterministically:
```
nonce = keccak256(invoiceNumber, vendor, buyer, amount, dueDate)
```
When the buyer signs the ERC-3009 authorization using this nonce, the on-chain settlement event serves as a tamper-proof payment receipt.
#### Settlement flow
1. **Invoice issued**: the vendor creates an invoice with a unique number, amount, and due date.
2. **Nonce computed**: both parties independently derive the same nonce from the invoice metadata.
3. **Buyer signs**: the buyer signs an ERC-3009 authorization off-chain using the deterministic nonce. The `validBefore` field can be set to the due date plus a grace period.
4. **Settlement**: the buyer or vendor submits `transferWithAuthorization` on-chain. Settlement confirms in under a second.
5. **Reconciliation**: the emitted `AuthorizationUsed` event contains the nonce, linking the on-chain settlement to the exact invoice. The `Transfer` event in the same transaction verifies sender, recipient, and amount.
#### Double-payment prevention
The nonce is consumed on-chain upon payment. The same invoice cannot be settled twice; resubmitting an authorization with an already-used nonce reverts.
### What makes it different
Traditional B2B invoicing involves bank wires (1–5 business days), manual reconciliation, and no cryptographic proof of payment tied to the invoice itself. With deterministic nonces, the on-chain payment is self-documenting: the nonce links the settlement to the exact invoice, and the blockchain event log provides an immutable audit trail.
| **Aspect** | **Traditional (bank wire)** | **Stable (ERC-3009)** |
| :------------- | :-------------------------------------- | :-------------------------------------------------------- |
| Settlement | 1–5 business days | Under 1 second |
| Reconciliation | Manual matching against bank statements | `AuthorizationUsed` event links payment to invoice nonce |
| Payment proof | Bank confirmation letter | On-chain transaction, cryptographically linked to invoice |
| Intermediaries | Correspondent banks | None |
| Fees | Wire fees ($15–45) + FX spread | \~0.00021 USDT0 (or 0 with Gas Waiver) |
**See also:**
* [ERC-3009 (Transfer With Authorization)](/en/explanation/erc-3009)
* [Gas Waiver](/en/how-to/integrate-gas-waiver)
## JSON-RPC API
### eth\_namespace
| API | support |
| ------------------------------------------- | ------- |
| eth\_syncing | ✅ |
| eth\_gasPrice | ✅ |
| eth\_maxPriorityFeePerGas | ✅ |
| eth\_feeHistory | ✅ |
| eth\_blobBaseFee | ❌ |
| eth\_chainId | ✅ |
| eth\_blockNumber | ✅ |
| eth\_getBalance | ✅ |
| eth\_getProof | ✅ |
| eth\_getHeaderByNumber | ❌ |
| eth\_getHeaderByHash | ❌ |
| eth\_getBlockByNumber | ✅ |
| eth\_getBlockByHash | ✅ |
| eth\_getUncleByBlockNumberAndIndex | ❌ |
| eth\_getUncleByBlockHashAndIndex | ❌ |
| eth\_getUncleCountByBlockNumber | ❌ |
| eth\_getUncleCountByBlockHash | ❌ |
| eth\_getCode | ✅ |
| eth\_getStorageAt | ✅ |
| eth\_getBlockReceipts | ❌ |
| eth\_call | ✅ |
| eth\_simulateV1 | ❌ |
| eth\_estimateGas | ✅ |
| eth\_createAccessList | ❌ |
| eth\_getBlockTransactionCountByNumber | ✅ |
| eth\_getBlockTransactionCountByHash | ✅ |
| eth\_getTransactionByBlockNumberAndIndex | ✅ |
| eth\_getTransactionByBlockHashAndIndex | ✅ |
| eth\_getRawTransactionByBlockNumberAndIndex | ❌ |
| eth\_getRawTransactionByBlockHashAndIndex | ❌ |
| eth\_getTransactionCount | ✅ |
| eth\_getTransactionByHash | ✅ |
| eth\_getRawTransactionByHash | ❌ |
| eth\_getTransactionReceipt | ✅ |
| eth\_sendTransaction | ✅ |
| eth\_fillTransaction | ❌ |
| eth\_sendRawTransaction | ✅ |
| eth\_sign | ✅ |
| eth\_signTransaction | ❌ |
| eth\_pendingTransactions | ✅ |
| eth\_resend | ✅ |
| eth\_accounts | ✅ |
| eth\_subscribe | ✅ |
| eth\_unsubscribe | ✅ |
| eth\_getTransactionLogs | ✅ |
| eth\_signTypedData | ✅ |
| eth\_newPendingTransactionFilter | ✅ |
| eth\_newBlockFilter | ✅ |
| eth\_newFilter | ✅ |
| eth\_getFilterChanges | ✅ |
| eth\_getFilterLogs | ✅ |
| eth\_uninstallFilter | ✅ |
| eth\_getLogs | ✅ |
### debug\_namespace
| API | support |
| ---------------------------------- | ------- |
| debug\_accountRange | ❌ |
| debug\_backtraceAt | ❌ |
| debug\_blockProfile | ✅ |
| debug\_chaindbCompact | ❌ |
| debug\_chaindbProperty | ❌ |
| debug\_cpuProfile | ✅ |
| debug\_dbAncient | ❌ |
| debug\_dbAncients | ❌ |
| debug\_dbGet | ❌ |
| debug\_dumpBlock | ❌ |
| debug\_freeOSMemory | ✅ |
| debug\_freezeClient | ❌ |
| debug\_gcStats | ✅ |
| debug\_getAccessibleState | ❌ |
| debug\_getBadBlocks | ❌ |
| debug\_getRawBlock | ❌ |
| debug\_getRawHeader | ❌ |
| debug\_getRawTransaction | ❌ |
| debug\_getModifiedAccountsByHash | ❌ |
| debug\_getModifiedAccountsByNumber | ❌ |
| debug\_getRawReceipts | ❌ |
| debug\_goTrace | ✅ |
| debug\_intermediateRoots | ✅ |
| debug\_memStats | ✅ |
| debug\_mutexProfile | ✅ |
| debug\_preimage | ❌ |
| debug\_printBlock | ✅ |
| debug\_setBlockProfileRate | ✅ |
| debug\_setGCPercent | ✅ |
| debug\_setHead | ❌ |
| debug\_setMutexProfileFraction | ✅ |
| debug\_setTrieFlushInterval | ❌ |
| debug\_stacks | ✅ |
| debug\_standardTraceBlockToFile | ❌ |
| debug\_standardTraceBadBlockToFile | ❌ |
| debug\_startCPUProfile | ✅ |
| debug\_startGoTrace | ✅ |
| debug\_stopCPUProfile | ✅ |
| debug\_stopGoTrace | ✅ |
| debug\_storageRangeAt | ❌ |
| debug\_traceBadBlock | ❌ |
| debug\_traceBlock | ❌ |
| debug\_traceBlockByNumber | ✅ |
| debug\_traceBlockByHash | ✅ |
| debug\_traceBlockFromFile | ❌ |
| debug\_traceCall | ❌ |
| debug\_traceChain | ❌ |
| debug\_traceTransaction | ✅ |
| debug\_verbosity | ❌ |
| debug\_vmodule | ❌ |
| debug\_writeBlockProfile | ✅ |
| debug\_writeMemProfile | ✅ |
| debug\_writeMutexProfile | ✅ |
### Next recommended
* [**Gas pricing reference**](/en/reference/gas-pricing-api) — Construct EIP-1559 transactions against Stable's base-fee-only model.
* [**EIP-7702 reference**](/en/reference/eip-7702-api) — Build type-4 transactions with the `authorizationList` field.
* [**System modules reference**](/en/reference/system-modules-api-overview) — Call Bank, Distribution, and Staking at their fixed precompile addresses.
## Mainnet information
Everything you need to know to access Stable Mainnet.
### Network overview
| Configuration | Value |
| ---------------- | -------------- |
| **Network Name** | Stable Mainnet |
| **Chain ID** | `988` |
| **Gas Token** | USDT0 |
| **Gov Token** | STABLE |
| **Block Time** | \~0.7 seconds |
### Block explorers
| Explorer | URL |
| -------------- | ------------------------------------------------ |
| **Stablescan** | [https://stablescan.xyz](https://stablescan.xyz) |
### RPC endpoints
#### Primary endpoints
| Type | Endpoint | Purpose |
| ---------------- | ------------------------------------------------ | ----------------- |
| **EVM JSON-RPC** | [https://rpc.stable.xyz](https://rpc.stable.xyz) | EVM transactions |
| **WebSocket** | wss\://rpc.stable.xyz | Real-time updates |
:::note
The public RPC endpoint is rate-limited to **1,000 requests per 10 seconds per IP**. Requests over the limit return `HTTP 429`. For higher throughput, use a [third-party RPC provider](/en/reference/rpc-providers).
:::
### Chain information
| Parameter | EVM |
| ------------- | ------- |
| **Chain ID** | `988` |
| **Gas Token** | `USDT0` |
| **Decimals** | 18 |
### Tools
| Tool | URL | Description |
| ------------- | --------------------------------------------------------- | --------------- |
| **Snapshots** | See [Node Operators Guide](/en/how-to/use-node-snapshots) | Chain snapshots |
## Version history
Complete version history and related documentation for the Stable Mainnet.
### Current version information
* **Current Version**: `v1.3.1`
* **Next Upgrade**: `TBD`
* **Upgrade Height**: `TBD`
* **Expected Time**: `TBD`
### Version history
#### Current & previous versions
| Version | Commit | Upgrade Height | Binary | Status |
| ---------- | --------- | -------------- | ------------------------------------------------------------------------------------------------------------------------------------------------------------------------------------------------------------------------------------------- | ------- |
| **v1.3.1** | `f85d155` | - | [AMD64](https://stable-data-dist.s3.us-east-1.amazonaws.com/mainnet/binary/stabled-1.3.1-linux-amd64-mainnet.tar.gz) / [ARM64](https://stable-data-dist.s3.us-east-1.amazonaws.com/mainnet/binary/stabled-1.3.1-linux-arm64-mainnet.tar.gz) | Current |
| **v1.3.0** | `dd103ec` | 24,077,500 | [AMD64](https://stable-data-dist.s3.us-east-1.amazonaws.com/mainnet/binary/stabled-1.3.0-linux-amd64-mainnet.tar.gz) / [ARM64](https://stable-data-dist.s3.us-east-1.amazonaws.com/mainnet/binary/stabled-1.3.0-linux-arm64-mainnet.tar.gz) | |
| **v1.2.2** | `76da1da` | - | [AMD64](https://stable-data-dist.s3.us-east-1.amazonaws.com/mainnet/binary/stabled-1.2.2-linux-amd64-mainnet.tar.gz) / [ARM64](https://stable-data-dist.s3.us-east-1.amazonaws.com/mainnet/binary/stabled-1.2.2-linux-arm64-mainnet.tar.gz) | |
| **v1.2.1** | `7955bb7` | - | [AMD64](https://stable-data-dist.s3.us-east-1.amazonaws.com/mainnet/binary/stabled-1.2.1-linux-amd64-mainnet.tar.gz) / [ARM64](https://stable-data-dist.s3.us-east-1.amazonaws.com/mainnet/binary/stabled-1.2.1-linux-arm64-mainnet.tar.gz) | |
| **v1.2.0** | `47e355b` | 12,004,000 | [AMD64](https://stable-data-dist.s3.us-east-1.amazonaws.com/mainnet/binary/stabled-1.2.0-linux-amd64-mainnet.tar.gz) / [ARM64](https://stable-data-dist.s3.us-east-1.amazonaws.com/mainnet/binary/stabled-1.2.0-linux-arm64-mainnet.tar.gz) | |
| **v1.1.4** | `c795773` | - | [AMD64](https://stable-data-dist.s3.us-east-1.amazonaws.com/mainnet/binary/stabled-1.1.4-linux-amd64-mainnet.tar.gz) / [ARM64](https://stable-data-dist.s3.us-east-1.amazonaws.com/mainnet/binary/stabled-1.1.4-linux-arm64-mainnet.tar.gz) | |
| **v1.1.2** | `3d83aa3` | 3,263,600 | [AMD64](https://stable-data-dist.s3.us-east-1.amazonaws.com/mainnet/binary/stabled-1.1.2-linux-amd64-mainnet.tar.gz) / [ARM64](https://stable-data-dist.s3.us-east-1.amazonaws.com/mainnet/binary/stabled-1.1.2-linux-arm64-mainnet.tar.gz) | |
| **v1.1.0** | `17ceaa7` | 1,694,000 | [AMD64](https://stable-data-dist.s3.us-east-1.amazonaws.com/mainnet/binary/stabled-1.1.0-linux-amd64-mainnet.tar.gz) / [ARM64](https://stable-data-dist.s3.us-east-1.amazonaws.com/mainnet/binary/stabled-1.1.0-linux-arm64-mainnet.tar.gz) | |
| **v1.0.0** | `d996084` | Genesis | [AMD64](https://stable-data-dist.s3.us-east-1.amazonaws.com/mainnet/binary/stabled-1.0.0-linux-amd64-mainnet.tar.gz) / [ARM64](https://stable-data-dist.s3.us-east-1.amazonaws.com/mainnet/binary/stabled-1.0.0-linux-arm64-mainnet.tar.gz) | Genesis |
### Related documentation
* [Upgrade Guide](/en/how-to/upgrade-node) - Step-by-step upgrade procedures
* [Mainnet Information](/en/reference/mainnet-information) - Current network details
## Network routing
Network routing providers optimizing connectivity and data delivery for applications on Stable.
### Overview table
| **Provider** | **Category** | **Docs / Get Started** | **Notes** |
| :---------------------------------- | :----------------------- | :---------------------------------- | :--------------------------------- |
| [**Optimum**](https://optimum.xyz/) | Decentralized networking | [optimum.xyz](https://optimum.xyz/) | High-performance routing for dApps |
### Optimum
A decentralized internet protocol optimized for speed and scalable web3 interactions.
**Capabilities**
* High-performance decentralized networking
* Faster application data routing
* Reliable infra for dApps
**Get started**: Visit [optimum.xyz](https://optimum.xyz/) to learn how to route your Stable dApp traffic through Optimum's decentralized network infrastructure.
***
Have a networking integration with Stable? Reach out at [bizdev@stable.xyz](mailto\:bizdev@stable.xyz).
## Network upgrades
This guide covers all configuration options for Stable nodes, including optimization for different use cases.
### Configuration files overview
Stable nodes use two main configuration files:
* **`config.toml`**: Core StableBFT configuration
* **`app.toml`**: Application-specific configuration
Both files are located in `~/.stabled/config/`
### Core configuration (config.toml)
#### Basic settings
:::code-group
```toml [Mainnet]
# The ID of the chain to join
chain_id = "stable_988-1"
# A custom human-readable name for this node
moniker = "your-node-name"
# Database backend: goleveldb | cleveldb | boltdb | rocksdb | badgerdb
db_backend = "goleveldb"
```
```toml [Testnet]
# The ID of the chain to join
chain_id = "stabletestnet_2201-1"
# A custom human-readable name for this node
moniker = "your-node-name"
# Database backend: goleveldb | cleveldb | boltdb | rocksdb | badgerdb
db_backend = "goleveldb"
```
:::
#### P2P configuration
:::code-group
```toml [Mainnet]
[p2p]
# Address to listen for incoming connections
laddr = "tcp://0.0.0.0:26656"
# Address to advertise to peers for them to dial
external_address = "YOUR_PUBLIC_IP:26656"
# Comma separated list of seed nodes
seeds = "17a539fda42863a99755547e1c9b3ec4c38a4439@seed1.stable.xyz:26656"
# Comma separated list of persistent peers
persistent_peers = "b896f6f8ca5a4d1cc40de09407df0c96e76df950@peer1.stable.xyz:26656"
```
```toml [Testnet]
[p2p]
# Address to listen for incoming connections
laddr = "tcp://0.0.0.0:26656"
# Address to advertise to peers for them to dial
external_address = "YOUR_PUBLIC_IP:26656"
# Comma separated list of seed nodes
seeds = "39e061b167162f6621ddadcf1be21d6fa585a468@seed1.testnet.stable.xyz:26656"
# Comma separated list of persistent peers
persistent_peers = "5ed0f977a26ccf290e184e364fb04e268ef16430@peer1.testnet.stable.xyz:26656"
```
:::
Additional P2P settings (same for both networks):
```toml
# Maximum number of inbound peers
max_num_inbound_peers = 50
# Maximum number of outbound peers
max_num_outbound_peers = 30
# Toggle to disable guard against peers connecting from the same ip
allow_duplicate_ip = false
# Peer connection configuration
handshake_timeout = "20s"
dial_timeout = "3s"
# Time to wait before flushing messages out on the connection
flush_throttle_timeout = "100ms"
# Maximum size of a message packet payload
max_packet_msg_payload_size = 1024
# Rate limiting
send_rate = 5120000 # 5 MB/s
recv_rate = 5120000 # 5 MB/s
# Seed mode (for seed nodes only)
seed_mode = false
# Enable peer exchange reactor
pex = true
```
#### RPC server configuration
```toml
[rpc]
# TCP or UNIX socket address for the RPC server
laddr = "tcp://127.0.0.1:26657"
# A list of origins a cross-domain request can be executed from
cors_allowed_origins = ["*"]
# A list of methods the client is allowed to use with cross-domain requests
cors_allowed_methods = ["HEAD", "GET", "POST"]
# A list of non simple headers the client is allowed to use with cross-domain requests
cors_allowed_headers = ["Origin", "Accept", "Content-Type", "X-Requested-With", "X-Server-Time"]
# TCP or UNIX socket address for the gRPC server
grpc_laddr = "tcp://127.0.0.1:9090"
# Maximum number of simultaneous connections
grpc_max_open_connections = 900
# Activate unsafe RPC commands like /dial_seeds and /unsafe_flush_mempool
unsafe = false
# Maximum number of simultaneous connections (including WebSocket)
max_open_connections = 900
# Maximum number of unique clientIDs that can connect
max_subscription_clients = 100
# Maximum number of unique queries a given client can subscribe to
max_subscriptions_per_client = 5
# How long to wait for a tx to be committed
timeout_broadcast_tx_commit = "10s"
# Maximum size of request body
max_body_bytes = 1000000
# Maximum size of request header
max_header_bytes = 1048576
```
#### Mempool configuration
```toml
[mempool]
# Mempool version to use
version = "v1"
# Recheck enabled
recheck = true
# Broadcast enabled
broadcast = true
# Maximum number of transactions in the mempool
size = 3000
# Limit the total size of all txs in the mempool
max_txs_bytes = 1073741824 # 1GB
# Size of the cache
cache_size = 10000
# Do not remove invalid transactions from the cache
keep-invalid-txs-in-cache = false
# Maximum size of a single transaction
max_tx_bytes = 1048576 # 1MB
# Maximum size of a batch of transactions to send to a peer
max_batch_bytes = 0
```
#### Consensus configuration
```toml
[consensus]
# How long we wait for a proposal block before prevoting nil
timeout_propose = "5s"
# How much timeout_propose increases with each round
timeout_propose_delta = "10ms"
# How long we wait after receiving +2/3 prevotes
timeout_prevote = "150ms"
# How much the timeout_prevote increases with each round
timeout_prevote_delta = "10ms"
# How long we wait after receiving +2/3 precommits
timeout_precommit = "150s"
# How much the timeout_precommit increases with each round
timeout_precommit_delta = "10ms"
# Make progress as soon as we have all the precommits
skip_timeout_commit = false
# Enable/disable double sign check
double_sign_check_height = 2
# EmptyBlocks mode
create_empty_blocks = true
create_empty_blocks_interval = "0s"
# Reactor sleep duration
peer_gossip_sleep_duration = "100ms"
peer_query_maj23_sleep_duration = "2s"
```
### Application configuration (app.toml)
#### Basic application settings
```toml
# Pruning strategy
pruning = "default"
# HaltHeight contains a non-zero block height at which a node will halt
halt-height = 0
# HaltTime contains a non-zero time at which a node will halt
halt-time = 0
# MinRetainBlocks defines the number of blocks for which a node will retain
min-retain-blocks = 0
# InterBlockCache enables inter-block caching
inter-block-cache = true
# IndexEvents defines the set of events in the form {eventType}.{attributeKey}
index-events = []
# IavlCacheSize set the size of the iavl tree cache
iavl-cache-size = 781250
```
#### API configuration
```toml
[api]
# Enable defines if the API server should be enabled
enable = true
# Swagger defines if swagger documentation should automatically be registered
swagger = true
# Address defines the API server to listen on
address = "tcp://0.0.0.0:1317"
# MaxOpenConnections defines the number of maximum open connections
max-open-connections = 1000
# EnabledUnsafeCORS defines if CORS should be enabled
enabled-unsafe-cors = true
```
#### gRPC configuration
```toml
[grpc]
# Enable defines if the gRPC server should be enabled
enable = true
# Address defines the gRPC server address to bind to
address = "0.0.0.0:9090"
```
#### EVM JSON-RPC configuration
```toml
[json-rpc]
# Enable the JSON-RPC server
enable = true
# Address to bind the JSON-RPC server
address = "0.0.0.0:8545"
# Address to bind the WebSocket server
ws-address = "0.0.0.0:8546"
# APIs to enable
api = "eth,net,web3,txpool,personal,debug"
# Gas cap for eth_call/estimateGas
gas-cap = 25000000
# EVM timeout for eth_call/estimateGas
evm-timeout = "5s"
# Tx fee cap for transactions
txfee-cap = 1
# Filter cap for eth_getLogs
filter-cap = 200
# FeeHistory cap
feehistory-cap = 100
# Block range cap for eth_getLogs
logs-cap = 10000
# Block range cap
block-range-cap = 10000
# HTTP timeout
http-timeout = "30s"
# HTTP idle timeout
http-idle-timeout = "120s"
# Allow unprotected transactions
allow-unprotected-txs = true
# Maximum number of transactions in the pool
max-tx-in-pool = 3000
# Enable indexer
enable-indexer = false
# Enable metrics
metrics = true
```
### Configuration profiles
#### Full node (default)
Balanced configuration for full nodes:
```bash
# config.toml adjustments
sed -i 's/^indexer = ".*"/indexer = "kv"/' ~/.stabled/config/config.toml
sed -i 's/^max_num_inbound_peers = .*/max_num_inbound_peers = 50/' ~/.stabled/config/config.toml
sed -i 's/^max_num_outbound_peers = .*/max_num_outbound_peers = 30/' ~/.stabled/config/config.toml
# app.toml adjustments
sed -i 's/^pruning = ".*"/pruning = "default"/' ~/.stabled/config/app.toml
sed -i 's/^snapshot-interval = .*/snapshot-interval = 1000/' ~/.stabled/config/app.toml
```
#### Archive node
No pruning, full history:
```bash
# config.toml adjustments
sed -i 's/^indexer = ".*"/indexer = "kv"/' ~/.stabled/config/config.toml
# app.toml adjustments
sed -i 's/^pruning = ".*"/pruning = "nothing"/' ~/.stabled/config/app.toml
```
#### RPC node
Public RPC endpoint configuration:
```bash
# config.toml adjustments
sed -i 's/^max_num_inbound_peers = .*/max_num_inbound_peers = 30/' ~/.stabled/config/config.toml
sed -i 's/^max_open_connections = .*/max_open_connections = 30/' ~/.stabled/config/config.toml
sed -i 's/^cors_allowed_origins = .*/cors_allowed_origins = ["*"]/' ~/.stabled/config/config.toml
# app.toml adjustments
sed -i 's/^enable = .*/enable = true/' ~/.stabled/config/app.toml
sed -i 's/^swagger = .*/swagger = true/' ~/.stabled/config/app.toml
sed -i 's/^enabled-unsafe-cors = .*/enabled-unsafe-cors = true/' ~/.stabled/config/app.toml
```
### Monitoring configuration
#### Prometheus metrics
```toml
# config.toml
[instrumentation]
# Enable Prometheus metrics
prometheus = true
# Metrics listen address
prometheus_listen_addr = ":26660"
# Namespace for metrics
namespace = "stablebft"
```
#### Logging
```toml
# config.toml
[log]
# Log level (trace|debug|info|warn|error|fatal|panic)
level = "info"
# Log format (plain|json)
format = "plain"
```
### Applying configuration changes
After making configuration changes:
```bash
# Restart the node
sudo systemctl restart ${SERVICE_NAME}
# Check logs for errors
sudo journalctl -u ${SERVICE_NAME} -f
# Verify configuration loaded
curl localhost:26657/status | jq '.result.node_info'
```
### Next steps
* [Set up Monitoring](/en/how-to/monitor-node) for your node
* Review [Troubleshooting Guide](/en/how-to/troubleshoot-node) for common issues
## Operate
Operate covers running a Stable node: full or archive, testnet or mainnet, from install through monitoring. For the chain-level behavior your node enforces (fee model, finality, USDT0 as gas), see [Gas pricing](/en/explanation/gas-pricing), [Finality](/en/explanation/finality), and the [Architecture overview](/en/explanation/core-optimization-overview).
### Quick links
* **[System Requirements](/en/reference/node-system-requirements)** - Hardware and software requirements for different node types
* **[Installation Guide](/en/how-to/install-node)** - Step-by-step installation instructions for various platforms
* **[Configuration](/en/reference/node-configuration)** - Detailed configuration options and best practices
* **[Snapshots & Sync](/en/how-to/use-node-snapshots)** - Fast sync options using snapshots
* **[Create a validator](/en/how-to/run-validator)** - Register a synced node as a validator and self-delegate
* **[Upgrade Guide](/en/how-to/upgrade-node)** - Node upgrade procedures and version history
* **[Monitoring](/en/how-to/monitor-node)** - Tools and metrics for node monitoring
* **[Troubleshooting](/en/how-to/troubleshoot-node)** - Common issues and solutions
To read validator data (stake, uptime, voting history) from the chain instead of running `stabled`, see [Index validator data](/en/how-to/index-validator-data).
### Node types
#### Full node
A full node maintains a complete copy of the blockchain and validates all transactions and blocks. Full nodes:
* Verify all transactions and blocks
* Maintain the entire blockchain history
* Can serve data to other nodes
* Support the network's decentralization
#### Archive node
An archive node stores the complete history of all states and can serve historical queries. Archive nodes:
* Store all historical states
* Support historical queries at any block height
* Require significantly more storage
* Essential for block explorers and analytics
### Network information
For complete network details including RPC endpoints, block explorers, and chain parameters, see:
* **[Mainnet](/en/reference/mainnet-information)** - Mainnet details
* **[Testnet](/en/reference/testnet-information)** - Testnet details
### Support and community
* **Discord**: [Join the Stable Discord](https://discord.gg/stablexyz)
### Quick start
For experienced operators who want to get started quickly:
1. Check [System Requirements](/en/reference/node-system-requirements)
2. Follow the [Installation Guide](/en/how-to/install-node)
3. Configure your node using [Configuration Guide](/en/reference/node-configuration)
4. Speed up sync with [Snapshots](/en/how-to/use-node-snapshots)
5. Monitor your node with [Monitoring Guide](/en/how-to/monitor-node)
For network parameters and RPC endpoints, see [Mainnet Information](/en/reference/mainnet-information) or [Testnet Information](/en/reference/testnet-information).
### How node ops connect to the chain
Running a node means enforcing Stable's chain-level rules. These pages explain the behavior your node implements:
* **[Contracts overview](/en/explanation/contracts-overview)** covers the fee model, JSON-RPC surface, and system modules your node serves.
* **[Finality](/en/explanation/finality)** explains single-slot finality and what "confirmed" means at the consensus layer.
* **[Architecture overview](/en/explanation/core-optimization-overview)** walks through consensus, execution, database, and RPC layers.
* **[Gas pricing](/en/explanation/gas-pricing)** explains how USDT0-denominated fees are priced and collected.
This page outlines the hardware and software requirements for running different types of Stable nodes.
### Hardware requirements
#### Full node (minimum)
| Component | Requirement | Notes |
| ----------- | ----------------------------- | ---------------------------------------- |
| **CPU** | 4 cores | AMD Ryzen 5 / Intel Core i5 or better |
| **RAM** | 8 GB | 16 GB recommended for better performance |
| **Storage** | 500 GB NVMe/SSD | Write throughput > 1000 MiBps required |
| **Network** | 100 Mbps | Stable, low-latency connection |
| **OS** | Ubuntu 22.04/24.04, Debian 12 | 64-bit Linux required |
#### Full node (recommended)
| Component | Requirement | Notes |
| ----------- | ------------ | ------------------------------------- |
| **CPU** | 8 cores | AMD Ryzen 7 / Intel Core i7 or better |
| **RAM** | 16 GB | 32 GB for optimal performance |
| **Storage** | 1 TB NVMe | Write throughput > 2000 MiBps |
| **Network** | 1 Gbps | Dedicated connection preferred |
| **OS** | Ubuntu 24.04 | Latest LTS recommended |
#### Archive node
| Component | Requirement | Notes |
| ----------- | ------------ | ----------------------------------------- |
| **CPU** | 16 cores | AMD Ryzen 9 / Intel Core i9 or equivalent |
| **RAM** | 32 GB | 64 GB recommended |
| **Storage** | 4 TB NVMe | Fast growing, plan for expansion |
| **Network** | 1 Gbps | Unmetered connection required |
| **OS** | Ubuntu 24.04 | Latest LTS recommended |
### Software requirements
#### Operating system
##### Supported distributions
* **Ubuntu 24.04 LTS** (recommended)
* **Ubuntu 22.04 LTS**
* **Debian 12 (Bookworm)**
##### System dependencies
```bash
# Update system packages
sudo apt update && sudo apt upgrade -y
# Install essential tools
sudo apt install -y \
build-essential \
git \
wget \
curl \
jq \
lz4 \
zstd \
htop \
net-tools \
ufw
```
### Network requirements
#### Bandwidth usage
| Node Type | Download | Upload | Monthly Data |
| ------------ | -------------- | ------------- | ------------ |
| Full Node | \~50 Mbps avg | \~25 Mbps avg | \~15 TB |
| Archive Node | \~100 Mbps avg | \~50 Mbps avg | \~30 TB |
### Cloud provider recommendations
#### AWS
* **Full node**: t3.xlarge or c5.xlarge
* **Archive node**: m5.2xlarge or c5.2xlarge
* **Storage**: gp3 with provisioned IOPS
#### Google Cloud
* **Full node**: n2-standard-4
* **Archive node**: n2-standard-8
* **Storage**: pd-ssd or pd-extreme
#### Azure
* **Full node**: Standard\_D4s\_v5
* **Archive node**: Standard\_D8s\_v5
* **Storage**: Premium SSD v2
#### DigitalOcean
* **Full node**: General Purpose 8GB
* **Archive node**: CPU-Optimized 16GB
* **Storage**: Volume Block Storage
### Monitoring requirements
For production deployments, ensure you have:
* **Prometheus**: For metrics collection
* **Grafana**: For visualization
* **AlertManager**: For alerting
* **Node exporter**: For system metrics
* **Log aggregation**: ELK or Loki recommended
### Security considerations
#### System hardening
* Keep OS and packages updated
* Configure automatic security updates
* Use SSH keys only (disable password auth)
* Configure fail2ban
* Enable firewall (UFW/iptables)
* Regular security audits
### Pre-installation checklist
Before proceeding with installation, verify:
* [ ] Hardware meets minimum requirements
* [ ] Operating system is supported and updated
* [ ] Storage has sufficient IOPS
* [ ] Network bandwidth is adequate
* [ ] Firewall rules are configured
* [ ] System monitoring is set up
* [ ] Backup strategy is defined
* [ ] Security measures are in place
## Oracles
Oracles provide smart contracts with off-chain data such as asset prices. RedStone operates price feeds on Stable.
### Overview table
| **Provider** | **Category** | **Supported Pairs** | **Docs / Get Started** | **Notes** |
| :-------------------------------------------- | :----------------- | :--------------------------------------------------------------------------------------------------------- | :----------------------------------------------------------------------------------------------------------------- | :-------------- |
| [**RedStone**](https://www.redstone.finance/) | Oracle Price Feeds | BTC, ETH, USDT, USDC, PYUSD, XAUt, frxUSD, FXS, LBTC, sfrxETH/ETH, sfrxUSD, SolvBTC, sthUSD, thBILL, weETH | [https://docs.redstone.finance/docs/dapps/redstone-push/](https://docs.redstone.finance/docs/dapps/redstone-push/) | Live on mainnet |
### RedStone
RedStone provides oracle price feeds on Stable through its [Push model](https://docs.redstone.finance/docs/dapps/redstone-push/). Feed contracts expose the Chainlink-compatible `AggregatorV3Interface`.
**Capabilities**
* Push-based price feeds with configurable deviation thresholds and heartbeat intervals
* Chainlink-compatible `AggregatorV3Interface` with `latestRoundData()`, `decimals()`, and `description()`
* Coverage for blue-chip assets, stablecoins, LSTs, LRTs, and yield-bearing / fundamental-priced assets
#### Mainnet price feed addresses
Source: [RedStone push feeds dashboard](https://app.redstone.finance/push-feeds?networks=stable\&testnets=true)
| **Price Feed** | **Contract Address** | **Deviation** | **Heartbeat** |
| :----------------------------- | :---------------------------------------------------------------------------------------------------------------------- | :------------ | :------------ |
| **BTC / USD** | [0x687103bA8CC2f66C94696182Ef410400Da45fb24](https://stablescan.xyz/address/0x687103bA8CC2f66C94696182Ef410400Da45fb24) | 0.5% | 6h |
| **ETH / USD** | [0x457BE3C697c644bF329C2C3ea79EbF1D254d603a](https://stablescan.xyz/address/0x457BE3C697c644bF329C2C3ea79EbF1D254d603a) | 0.5% | 6h |
| **USDT / USD** | [0x58264801fadCd8598D3EE993572ADe9cA27F42c8](https://stablescan.xyz/address/0x58264801fadCd8598D3EE993572ADe9cA27F42c8) | 0.5% | 6h |
| **USDC / USD** | [0x8ea3C667C264BbdaA1dA7638904b8671F451c7F9](https://stablescan.xyz/address/0x8ea3C667C264BbdaA1dA7638904b8671F451c7F9) | 0.5% | 6h |
| **PYUSD / USD** | [0x1c30dA143E97c228102A5cAe3960dBBB41321604](https://stablescan.xyz/address/0x1c30dA143E97c228102A5cAe3960dBBB41321604) | 0.5% | 6h |
| **XAUt / USD** | [0xd5E244accc514b56DCAD89897DD44499E7C35a05](https://stablescan.xyz/address/0xd5E244accc514b56DCAD89897DD44499E7C35a05) | 0.5% | 6h |
| **frxUSD / USD** | [0xB5197ca89507FE045e8ce9996593D35071915EB7](https://stablescan.xyz/address/0xB5197ca89507FE045e8ce9996593D35071915EB7) | 0.5% | 6h |
| **FXS / USD** | [0xC3b182aee94AECeCa39b072942f3Ce4B87465517](https://stablescan.xyz/address/0xC3b182aee94AECeCa39b072942f3Ce4B87465517) | 0.5% | 6h |
| **LBTC / USD** | [0x80295Cf12E28f3F943304BFd6C2A2C044e731aaB](https://stablescan.xyz/address/0x80295Cf12E28f3F943304BFd6C2A2C044e731aaB) | 0.5% | 6h |
| **sfrxETH / ETH** | [0x29533E113D803ab1967F6CB9495B95DC8C1EA594](https://stablescan.xyz/address/0x29533E113D803ab1967F6CB9495B95DC8C1EA594) | 0.5% | 6h |
| **sfrxUSD / FUNDAMENTAL** | [0x71784611831b9566df7301A78bC1B3d29a8737bF](https://stablescan.xyz/address/0x71784611831b9566df7301A78bC1B3d29a8737bF) | 0.5% | 6h |
| **SolvBTC / FUNDAMENTAL** | [0x58fa68A373956285dDfb340EDf755246f8DfCA16](https://stablescan.xyz/address/0x58fa68A373956285dDfb340EDf755246f8DfCA16) | 0.01% | 24h |
| **sthUSD / FUNDAMENTAL** | [0xb81131B6368b3F0a83af09dB4E39Ac23DA96C2Db](https://stablescan.xyz/address/0xb81131B6368b3F0a83af09dB4E39Ac23DA96C2Db) | 0.5% | 12h |
| **thBILL / FUNDAMENTAL / USD** | [0x7532df197a36587aeD2B9A59785c8BeD182FA62D](https://stablescan.xyz/address/0x7532df197a36587aeD2B9A59785c8BeD182FA62D) | 0.5% | 6h |
| **weETH / FUNDAMENTAL** | [0xD57b79401956BE4872D3d03F0C920639335e350F](https://stablescan.xyz/address/0xD57b79401956BE4872D3d03F0C920639335e350F) | 0.5% | 6h |
### Reading a price feed
Feed contracts implement the Chainlink-compatible [`AggregatorV3Interface`](https://docs.redstone.finance/docs/dapps/redstone-push/). The same consumer pattern used for any Chainlink-style price feed applies.
```solidity
pragma solidity ^0.8.25;
interface AggregatorV3Interface {
function latestRoundData()
external
view
returns (
uint80 roundId,
int256 answer,
uint256 startedAt,
uint256 updatedAt,
uint80 answeredInRound
);
function decimals() external view returns (uint8);
function description() external view returns (string memory);
}
contract OracleConsumer {
AggregatorV3Interface public oracle;
constructor(address oracleAddress) {
oracle = AggregatorV3Interface(oracleAddress);
}
function getLatestPriceData()
external
view
returns (
uint80 roundId,
int256 answer,
uint256 updatedAt
)
{
(roundId, answer, , updatedAt, ) = oracle.latestRoundData();
return (roundId, answer, updatedAt);
}
}
```
:::note
RedStone push feeds on Stable are currently available on mainnet only. Always verify on-chain `updatedAt` against your application's freshness tolerance before consuming a price.
:::
#### Reading a feed directly
You can read any RedStone feed without deploying a consumer contract. The following call reads the ETH/USD feed:
```bash
cast call 0x457BE3C697c644bF329C2C3ea79EbF1D254d603a "latestRoundData()(uint80,int256,uint256,uint256,uint80)" --rpc-url https://rpc.stable.xyz
```
#### Deploying a consumer to Stable mainnet
This assumes you have Foundry installed and a funded wallet. See the [Deploy Smart Contract](/en/tutorial/smart-contract) tutorial for full setup instructions.
1. Save the contract above to `src/OracleConsumer.sol` in a Foundry project.
2. Deploy with the BTC/USD mainnet feed address:
```bash
source .env ;
forge create src/OracleConsumer.sol:OracleConsumer --broadcast --rpc-url $STABLE_MAINNET_RPC_URL --private-key $PRIVATE_KEY --constructor-args 0x687103bA8CC2f66C94696182Ef410400Da45fb24
```
3. Read the latest price from your deployed contract:
```bash
cast call "getLatestPriceData()(uint80,int256,uint256)" --rpc-url $STABLE_MAINNET_RPC_URL
```
### Have an oracle integrating Stable?
Reach the team at [bizdev@stable.xyz](mailto\:bizdev@stable.xyz) to be listed on this page.
## Send and receive USDT0
On Stable, P2P payments settle in under a second. Two transfer methods are available depending on the use case.
### Native transfer
The sender signs and broadcasts a transaction directly to the recipient. This costs 21,000 gas (\~0.00021 USDT0 at 100 gwei). No contract interaction is required.
A native transfer is the simplest path: the sender signs a transaction sending USDT0 directly to the recipient. This is equivalent to entering an amount and selecting "Send" in any payment app.
For a code walkthrough, see [Send your First USDT0](/en/tutorial/send-usdt0).
### Application-initiated transfer (ERC-3009)
The sender signs an off-chain authorization. An application or facilitator submits the transaction on their behalf. Combined with the [Gas Waiver](/en/how-to/integrate-gas-waiver), the gas cost is 0.
[ERC-3009](/en/explanation/erc-3009) is more appropriate for application-initiated payments (e.g., a payment in a web app) because it separates the signer from the submitter. The sender only signs an authorization off-chain, and the application or a facilitator handles on-chain submission.
### What makes it different
On traditional payment rails, a P2P transfer involves bank processing, clearing, and settlement that can take 1–3 business days. Even on other blockchains, the sender needs to hold a volatile gas token (ETH, SOL) alongside the payment token. On Stable, the sender holds only USDT0, gas can be waived, and settlement is final in under a second.
| **Aspect** | **Traditional (bank transfer)** | **Other blockchains** | **Stable** |
| :--------------- | :------------------------------ | :-------------------------------------------------- | :--------------------------------------------------- |
| Settlement time | 1–3 business days | Seconds to minutes, depending on the chain | Under 1 second (single-slot finality) |
| Required assets | Fiat currency | Payment token + separate gas token (ETH, SOL, etc.) | USDT0 only (single asset) |
| Transaction cost | Wire / intermediary fees | Can spike with network congestion | \~0.00021 USDT0 native transfer or $0 via Gas Waiver |
**See also:**
* [Send your First USDT0](/en/tutorial/send-usdt0)
* [ERC-3009 (Transfer With Authorization)](/en/explanation/erc-3009)
* [Gas Waiver](/en/how-to/integrate-gas-waiver)
## Bill per API request
Monetize any HTTP endpoint with per-request pricing using [x402](/en/explanation/x402) middleware. A server declares its price, a client pays per call, and settlement happens within the request lifecycle. No accounts, no API keys, no billing cycles.
### How it works
The server adds x402 middleware to the endpoints it wants to monetize. When a request arrives without payment, the server responds with HTTP `402 Payment Required` and a `PAYMENT-REQUIRED` header containing the price, token, and network. The client signs an [ERC-3009](/en/explanation/erc-3009) authorization for the specified amount and resubmits. The facilitator settles the payment on-chain, and the server returns the resource.
#### Request flow
1. Client sends an HTTP request to the server.
2. Server returns `402 Payment Required` with a `PAYMENT-REQUIRED` header containing the price, token, network, and recipient.
3. Client signs an ERC-3009 authorization for the specified amount and resubmits the request with a `PAYMENT-SIGNATURE` header.
4. Facilitator verifies the signature and settles the transfer on-chain.
5. Server returns the resource with a `PAYMENT-RESPONSE` header containing the settlement receipt.
#### Pricing
Prices are denominated in USDT0 atomic units (6 decimals). A cost parameter of `"1000"` translates to exactly $0.001. A cost of `"50000"` is $0.05. This precision allows servers to set prices at fractions of a cent.
#### Infrastructure
On Stable, [Semantic Pay](https://x402.semanticpay.io) operates a public facilitator. Developers can point their middleware to this endpoint without running their own settlement infrastructure.
x402 provides middleware for Express (`@x402/express`), Hono (`@x402/hono`), and Next.js (`@x402/next`). The pattern is the same across all frameworks: create a facilitator client, register the EVM scheme, and apply middleware.
### What makes it different
Traditional API monetization requires user registration, API key management, usage tracking, billing cycles, and payment processor integration. With x402, the server attaches a payment handler to each endpoint, the client pays per request, and settlement completes within the same HTTP lifecycle. The server does not need to know who the client is, only that a valid payment was submitted.
| **Aspect** | **Traditional (API key + billing cycle)** | **Stable (x402)** |
| :----------------------- | :------------------------------------------------------------------------ | :---------------------------------------- |
| Server-side setup | Registration, API keys, usage tracking, billing cycles, payment processor | x402 payment handler per endpoint |
| Client onboarding | Account creation, API key issuance | None (wallet only) |
| Billing model | Monthly or usage-based invoicing | Per-request settlement |
| Client identity required | Yes (API key) | No (only valid payment) |
| Settlement | End of billing cycle | Within request lifecycle (under 1 second) |
| Minimum viable price | \~$0.30 (card processing floor) | $0.001 (USDT0 atomic units) |
| Client type | Human users only (sign-up required) | Any wallet: humans, AI agents, scripts |
**See also:**
* [x402 (HTTP-Native Payments)](/en/explanation/x402)
* [ERC-3009 (Transfer With Authorization)](/en/explanation/erc-3009)
* [Gas Waiver](/en/how-to/integrate-gas-waiver)
## Ramps
On/off ramp partners connect Stable to global fiat systems, enabling users and businesses to move between USDT, local currencies, and payment rails.
### On/off ramp overview table
| **Provider** | **Category** | **Docs / Get Started** | **Notes** |
| :----------------------------------------------------------------------- | :------------- | :----------------------------------------------------------------------------------------------------------- | :------------------------------------------------------------------------------------------------------- |
| [**Onmeta**](https://onmeta.in/on-off-ramp) | On/Off Ramp | [https://docs.onmeta.in/](https://docs.onmeta.in/) | Compliant fiat-to-USDT + cross-border payouts |
| [**Halliday**](https://halliday.xyz/) | On/Off Ramp | [https://docs.halliday.xyz/pages/home](https://docs.halliday.xyz/pages/home) | CEX + Stripe integration |
| [**Alchemy Pay**](https://alchemypay.org/about) | Gateway | [https://alchemypay.readme.io/docs/alchemypay-on-ramp](https://alchemypay.readme.io/docs/alchemypay-on-ramp) | 300+ payment methods |
| [**DFX**](https://www.dfx.swiss/) | Off-Ramp FX | [https://docs.dfx.swiss/](https://docs.dfx.swiss/) | Regulated stablecoin-to-fiat |
| [**Onramp Money**](https://onramp.money/) | On/Off Ramp | [https://docs.onramp.money/onramp/](https://docs.onramp.money/onramp/) | Emerging market coverage |
| [**MoonPay**](https://www.moonpay.com/business/onramps) | Universal Ramp | [https://dev.moonpay.com/docs/on-ramp-overview](https://dev.moonpay.com/docs/on-ramp-overview) | Global card + bank support |
| [**Transak**](https://transak.com/off-ramp) | On/Off Ramp | [https://docs.transak.com/](https://docs.transak.com/) | 450+ integrations |
| [**Banxa**](https://banxa.com/solutions/by-use-case/on-and-off-ramping/) | Regulated Ramp | [https://docs.banxa.com/docs/overview](https://docs.banxa.com/docs/overview) | Local rails in 100+ countries |
| [**Simplex by Nuvei**](https://www.simplex.com/) | On-Ramp | [https://buy.simplex.com](https://buy.simplex.com) | Card, Apple/Google Pay, SEPA, ACH across 245+ markets; powers downstream wallets including Atomic Wallet |
### Category guide
* **On/Off Ramps:** Platforms enabling direct conversion between fiat currencies and USDT on Stable.
* **Payment Gateways:** Services connecting apps, merchants, or fintechs to global fiat rails for seamless transactions.
* **FX & Off-Ramp Networks:** Regulated infrastructure providing compliant, stablecoin-to-fiat settlement at scale.
### On/off ramps & payment gateways
#### MoonPay
Universal crypto on/off ramp used globally for instant asset purchases.
**Capabilities**
* Card + bank + local payment rails
* Fast global onboarding
* Multi-chain support
**Get started**: Follow the [MoonPay on-ramp integration guide](https://dev.moonpay.com/docs/on-ramp-overview) to embed fiat-to-USDT purchasing on Stable into your app.
#### Transak
On/off ramp providing frictionless ways to buy, sell, and transfer crypto across 450+ apps.
**Capabilities**
* Global fiat methods
* Easy integration APIs
* Country-level compliance support
**Get started**: Review the [Transak integration docs](https://docs.transak.com/) to add on/off ramp widgets or APIs with Stable as a supported network.
#### Onmeta
On/off ramp and cross-border payout infrastructure with built-in compliance for VDA platforms.
**Capabilities**
* Fiat ↔ USDT conversion
* Compliance-ready flows
* Cross-border payouts
* Local settlement rails
**Get started**: Refer to the [Onmeta API documentation](https://docs.onmeta.in/) to integrate fiat-to-USDT conversion and cross-border payouts on Stable.
#### Halliday
End-to-end payment suite enabling seamless on/off ramping from top CEXs and payment platforms like Coinbase and Stripe.
**Capabilities**
* Direct connection to major CEXs
* Stripe + payment rail integration
* Merchant and app-friendly flows
**Get started**: Read the [Halliday integration docs](https://docs.halliday.xyz/pages/home) to connect CEX and Stripe-based payment flows to Stable in your product.
#### Alchemy Pay
Global payment gateway bridging traditional finance and crypto with 300+ payment methods.
**Capabilities**
* Global fiat on/off ramps
* Merchant payments
* Bank transfers + cards + local rails
**Get started**: Use the [Alchemy Pay on-ramp API](https://alchemypay.readme.io/docs/alchemypay-on-ramp) to add 300+ payment methods for USDT purchases on Stable.
#### DFX
Swiss-regulated decentralized FX and off-ramp network with over 100M transactions.
**Capabilities**
* Stablecoin-to-fiat conversion
* Regulated FX layer
* Deep multi-currency support
**Get started**: Consult the [DFX API documentation](https://docs.dfx.swiss/) to set up compliant stablecoin-to-fiat off-ramp flows using Stable as the source network.
#### Onramp Money
Low-cost fiat-to-crypto gateway specializing in emerging markets.
**Capabilities**
* Local payment method coverage
* Instant settlement
* 1.3M+ supported users
**Get started**: Follow the [Onramp Money developer guide](https://docs.onramp.money/onramp/) to integrate fiat-to-crypto flows for emerging market users on Stable.
#### Banxa
Regulated on/off ramp infrastructure connecting users to crypto via local rails in 100+ countries.
**Capabilities**
* Regulated fiat gateways
* Broad global coverage
* Bank and local payment options
**Get started**: Read the [Banxa integration overview](https://docs.banxa.com/docs/overview) to enable regulated on/off ramp flows with Stable as a supported network.
#### Simplex by Nuvei
Fiat-to-crypto on-ramp from Nuvei, supporting card, bank, and local payment methods across 245+ markets. Buying USDT on Stable through Simplex is also available inside any wallet or app that integrates the Simplex widget, including [Atomic Wallet](/en/reference/wallets#atomic-wallet).
**Capabilities**
* USDT on Stable purchases via Visa, Mastercard, Apple Pay, Google Pay, SEPA, and ACH
* Global coverage across 245+ markets
* White-label widget used by downstream wallets and apps (e.g., Atomic Wallet)
**Get started**: Go to [https://buy.simplex.com](https://buy.simplex.com) to buy USDT on Stable directly, or integrate the [Simplex widget](https://www.simplex.com/) to offer on-ramp purchases inside your own app.
***
Have an on/off ramp integrating Stable? Reach out at [bizdev@stable.xyz](mailto\:bizdev@stable.xyz).
## RPC providers
RPC and developer infrastructure providers supporting Stable.
### Overview table
| **Provider** | **Category** | **Docs / Get Started** | **Notes** |
| :--------------------------------------------------------------------------------------------------------------- | :----------------------- | :---------------------------------------------------------------------------------------------------------------------------- | :--------------------------------------------------- |
| [**Alchemy**](https://dashboard.alchemy.com/?utm_source=chain_partner\&utm_medium=referral\&utm_campaign=stable) | RPC + developer platform | [Get started with Alchemy](https://dashboard.alchemy.com/?utm_source=chain_partner\&utm_medium=referral\&utm_campaign=stable) | RPC, WebSocket, monitoring, SDKs |
| [**Tenderly**](https://tenderly.co/) | Simulation + debugging | [tenderly.co](https://tenderly.co/) | Real-time simulation, tracing, transaction workflows |
### Alchemy
A complete blockchain development platform trusted globally. [Get started with Alchemy](https://dashboard.alchemy.com/?utm_source=chain_partner\&utm_medium=referral\&utm_campaign=stable)
**Capabilities**
* RPC + WebSocket infrastructure
* Monitoring dashboards
* Developer APIs and SDKs
**Get started**: Create a Stable app in the [Alchemy dashboard](https://dashboard.alchemy.com/?utm_source=chain_partner\&utm_medium=referral\&utm_campaign=stable) to get an RPC URL, then use it as your JSON-RPC endpoint.
### Tenderly
A full-stack developer platform offering simulation, debugging, monitoring, and execution tooling.
**Capabilities**
* Real-time contract simulation
* Debugging and tracing
* Transaction workflows for devs
**Get started**: Set up a Stable project in the [Tenderly dashboard](https://tenderly.co/) to access simulation, debugging, and transaction tracing for your contracts.
***
Have an RPC or infrastructure integration with Stable? Reach out at [bizdev@stable.xyz](mailto\:bizdev@stable.xyz).
## SDK reference
Full surface of `@stablechain/sdk`. For a walkthrough, see [SDK quickstart](/en/tutorial/sdk-quickstart).
### Install
```bash
npm install @stablechain/sdk viem
```
```text
added 2 packages, audited 3 packages in 2s
```
`viem >= 2.0.0` is a peer dependency.
### `createStable(config)`
Construct a `StableClient`. Returns an object with the methods listed under [`StableClient`](#stableclient).
```ts
import { createStable, Network } from "@stablechain/sdk";
const stable = createStable({ network: Network.Mainnet, account });
```
```text
StableClient { transfer, quoteBridge, bridge, quoteSwap, swap }
```
#### `StableConfig`
| **Field** | **Type** | **Default** | **Description** |
| :------------- | :------------------ | :----------------------- | :------------------------------------------------------------------------ |
| `network` | `Network` | `Network.Mainnet` | Target network. |
| `rpc` | `string` | Public RPC for `network` | RPC override. |
| `account` | `viem.Account` | | Server-side signer (e.g. `privateKeyToAccount`). |
| `transport` | `viem.Transport` | | Browser-wallet transport (e.g. `custom(window.ethereum)`). |
| `walletClient` | `viem.WalletClient` | | Pre-built wallet client. Takes precedence over `account` and `transport`. |
Provide one of `account`, `transport`, or `walletClient`.
### `StableClient`
#### `transfer(params)`
Send native USDT0 or any ERC-20 on Stable. Switches the wallet to the Stable chain, fetches token decimals on-chain when missing, and waits for the receipt.
```ts
const { txHash } = await stable.transfer({
from: "0xYourAddress",
to: "0xRecipient",
amount: 10,
});
```
```text
{ txHash: "0x8f3a...2d41" }
```
| **Param** | **Type** | **Description** |
| :-------------- | :-------- | :---------------------------------------------- |
| `from` | `string` | Sender address. |
| `to` | `string` | Recipient address. |
| `amount` | `number` | Human-readable amount. |
| `token` | `string?` | ERC-20 contract address. Omit for native USDT0. |
| `tokenDecimals` | `number?` | Decimals. Fetched on-chain when omitted. |
Returns `OperationResult` (`{ txHash, toAmount? }`).
#### `quoteBridge(params)`
Preview a bridge. Read-only — no signature, no gas.
```ts
const quote = await stable.quoteBridge({
fromChain: Chain.Ethereum,
toChain: Chain.Stable,
fromToken: "0x6C96dE32CEa08842dcc4058c14d3aaAD7Fa41dee",
toToken: "0x779Ded0c9e1022225f8E0630b35a9b54bE713736",
amount: 100,
});
```
```text
{ toAmount: 99.94 }
```
Returns `BridgeQuote`.
#### `bridge(params)`
Bridge tokens cross-chain. The SDK picks the route: LayerZero for USDT0 → USDT0, LI.FI for everything else. Pass a pre-fetched `quote` to skip the internal quote call.
```ts
const { txHash } = await stable.bridge({ ...bridgeParams, quote });
```
```text
{ txHash: "0xabcd...7890" }
```
| **Param** | **Type** | **Description** |
| :------------- | :------------- | :-------------------------------------------- |
| `fromChain` | `Chain` | Source chain. |
| `toChain` | `Chain` | Destination chain. |
| `fromToken` | `string` | Source token contract address. |
| `toToken` | `string` | Destination token contract address. |
| `amount` | `number` | Human-readable amount. |
| `fromDecimals` | `number?` | Source token decimals. Defaults to `6`. |
| `recipient` | `string?` | Destination address. Defaults to signer. |
| `quote` | `BridgeQuote?` | Pre-fetched quote. Skips internal quote call. |
#### `quoteSwap(params)`
Fetch a LI.FI swap quote on Stable. Returns a pre-built transaction request and the approval address.
```ts
const quote = await stable.quoteSwap({
fromToken: "0x8a2B28364102Bea189D99A475C494330Ef2bDD0B",
toToken: "0x779Ded0c9e1022225f8E0630b35a9b54bE713736",
amount: 100,
fromDecimals: 6,
});
```
```text
{ toAmount: 99.81, fromAmount: 100000000n, fromToken: "0x8a2B...", approvalAddress: "0x...", transactionRequest: { ... } }
```
#### `swap(params)`
Swap tokens on Stable via LI.FI. Handles ERC-20 approval automatically and switches the wallet's chain when needed.
```ts
const { txHash, toAmount } = await stable.swap({ ...swapParams, quote });
```
```text
{ txHash: "0xabcd...", toAmount: 99.81 }
```
| **Param** | **Type** | **Default** | **Description** |
| :------------- | :----------- | :---------- | :----------------------------------- |
| `fromToken` | `string` | | Source token address. |
| `toToken` | `string` | | Destination token address. |
| `amount` | `number` | | Human-readable amount. |
| `fromDecimals` | `number?` | `6` | Source token decimals. |
| `toAddress` | `string?` | signer | Recipient address. |
| `quote` | `SwapQuote?` | | Pre-fetched quote. Skips LI.FI call. |
### Enums
#### `Network`
| **Value** | **Chain ID** |
| :---------------- | :----------- |
| `Network.Mainnet` | 988 |
| `Network.Testnet` | 2201 |
#### `Chain`
Used by `quoteBridge` and `bridge`. Each entry has a corresponding `CHAIN_CONFIGS` entry.
| **Enum** | **Network** | **Chain ID** |
| :-------------------- | :--------------- | :----------- |
| `Chain.Sepolia` | Ethereum Sepolia | 11155111 |
| `Chain.StableTestnet` | Stable Testnet | 2201 |
| `Chain.Stable` | Stable Mainnet | 988 |
| `Chain.Ethereum` | Ethereum | 1 |
| `Chain.Arbitrum` | Arbitrum One | 42161 |
| `Chain.Ink` | Ink | 57073 |
| `Chain.Bera` | Berachain | 80094 |
| `Chain.MegaETH` | MegaETH | 4326 |
| `Chain.Base` | Base | 8453 |
| `Chain.BSC` | BNB Smart Chain | 56 |
| `Chain.HyperEVM` | HyperEVM | 999 |
### `CHAIN_CONFIGS`
`Partial>` keyed by `Chain` enum. Each entry exposes `id`, `rpc`, `usdt`, and `decimals`. Use it when you need the canonical USDT address on a supported chain without hard-coding it.
```ts
import { CHAIN_CONFIGS, Chain } from "@stablechain/sdk";
console.log(CHAIN_CONFIGS[Chain.Stable]);
```
```text
{ id: 988, rpc: "https://rpc.stable.xyz", usdt: "0x779Ded0c9e1022225f8E0630b35a9b54bE713736", decimals: 6 }
```
### Errors
All SDK errors extend `StableError`, which extends viem's `BaseError`. Errors carry structured metadata so you can branch on `error.name` or `instanceof`.
| **Class** | **Thrown when** | **Useful fields** |
| :----------------------- | :-------------------------------------------------------------------------------- | :----------------------------------------------- |
| `StableValidationError` | A parameter fails validation (bad address, non-finite amount, unsupported chain). | `field`, `value` |
| `StableQuoteError` | A quote request to LI.FI fails. | `provider`, `httpStatus`, `providerCode`, `body` |
| `StableTransactionError` | On-chain step fails: chain switch, approval, send, or revert. | `phase`, `txHash`, `chainId`, `revertReason` |
| `StableNetworkError` | An underlying HTTP/RPC call fails. | `url` |
```ts
import { StableTransactionError } from "@stablechain/sdk";
try {
await stable.transfer({ from, to, amount: 1 });
} catch (err) {
if (err instanceof StableTransactionError && err.phase === "switch_chain") {
// user rejected the chain switch
}
throw err;
}
```
```text
StableTransactionError: transfer: wallet rejected or failed to switch to chain 988
Phase: switch_chain
Chain ID: 988
```
### Next recommended
* [**SDK quickstart**](/en/tutorial/sdk-quickstart) — Install the SDK and run your first transfer on testnet.
* [**Use with viem**](/en/how-to/sdk-with-viem) — Switch between private-key, browser-wallet, and pre-built signers.
* [**Use with wagmi**](/en/how-to/sdk-with-wagmi) — Wire the SDK into a React app with hooks.
## Staking precompile reference
:::note
**Concept:** For what the staking module does and when to use it, see [Staking module](/en/explanation/staking-module).
:::
### Abstract
The `staking` precompiled contract acts as a bridge that enables EVM environments to use the Stable SDK's `x/staking` module functionality.
### Contents
1. **[Concepts](#concepts)**
2. **[Configuration](#configuration)**
3. **[Methods](#methods)**
4. **[Events](#events)**
### Concepts
In `x/staking` module in Stable SDK, bond denom must be registered during chain initialization for staking.
Validators and delegators can only use the bond denom staking token.
The `staking` precompiled contract performs additional checks to ensure that the validator or delegator is the caller.
### Configuration
The contract address and gas cost are predefined.
#### Contract address
* `0x0000000000000000000000000000000000000800`
### Methods
#### `createValidator`
Creates a validator.
The validator must be created with an initial delegation from the operator.
For potential delegators, the validator should offer information and a plan for the commission rate.
Delegators can choose a validator to delegate their tokens to based on disclosed information, with natural regulation from market mechanisms.
`CreateValidator` is emitted when the validator is successfully registered.
##### Inputs
| Name | Type | Description |
| ----------------- | --------------- | ------------------------------------------------------------------------- |
| description | Description | information of the validator |
| commissionRates | CommissionRates | commission rate of the staking token rewarded by the validator |
| minSelfDelegation | uint256 | the minimum self-delegation amount of the validator |
| validatorAddress | address | the address of the validator |
| pubkey | string | the public key of the validator |
| value | uint256 | the amount of the staking token initially self-delegated to the validator |
`Description` is a struct with the following fields:
| Name | Type | Description |
| --------------- | ------ | --------------------------------------- |
| moniker | string | name of the validator |
| identity | string | the identity of the validator |
| website | string | the url of the validator's website |
| securityContact | string | security contract information |
| details | string | additional description of the validator |
`CommissionRates` is a struct with the following fields:
| Name | Type | Description |
| ------------- | ------- | --------------------------------------------------------------- |
| rate | uint256 | current commission rate that the validator receives |
| maxRate | uint256 | the maximum commission rate (cannot be set higher than this) |
| maxChangeRate | uint256 | the maximum commission rate that a validator can change per day |
`rate` should be set to an appropriate value acceptable to the market.
* If validator's commission rate is higher, delegator's profit is lower.
* If validator's commission rate is lower, validator's profit is lower and it makes operation difficult.
Since a high `maxRate` can make delegators concerned about an unexpected high commission rate from the validator, `maxRate` should be set carefully. `maxChangeRate` is unchangeable when initialized.
##### Outputs
| Name | Type | Description |
| ------- | ---- | ------------------------------------------------ |
| success | bool | true if the validator is successfully registered |
#### `editValidator`
Validator updates its information.
Validator only can update information except unchangeable fields such as `maxRate` and `maxChangeRate` in `CommissionRates` struct.
`EditValidator` is emitted when the validator is successfully updated.
##### Inputs
| Name | Type | Description |
| ----------------- | ----------- | ------------------------------------------------------------------ |
| description | Description | information of the validator |
| validatorAddress | address | the address of the validator |
| commissionRate | int256 | the commission rate of the staking token rewarded by the validator |
| minSelfDelegation | int256 | the minimum self-delegation amount of the validator |
##### Outputs
| Name | Type | Description |
| ------- | ---- | --------------------------------------------- |
| success | bool | true if the validator is successfully updated |
#### `delegate`
Delegator sets the amount of token to be delegated to the validator.
`Delegate` is emitted when the delegation is successfully done.
##### Inputs
| Name | Type | Description |
| ---------------- | ------- | ---------------------------------------------------------- |
| delegatorAddress | address | the address of the delegator |
| validatorAddress | address | the address of the validator |
| amount | uint256 | the amount of the staking token delegated to the validator |
##### Outputs
| Name | Type | Description |
| ------- | ---- | ------------------------------------------- |
| success | bool | true if the delegation is successfully done |
##### Events
`newShares` indicates the ownership ratio of the delegator.
The shares calculated may vary depending on the time even though the same amount of tokens are delegated.
#### `undelegate`
Delegator withdraws the amount of token delegated to the validator.
`Unbond` is emitted when the undelegation is successfully done.
##### Inputs
| Name | Type | Description |
| ---------------- | ------- | ------------------------------------------------------------------------ |
| delegatorAddress | address | the address of the delegator |
| validatorAddress | address | the address of the validator |
| amount | uint256 | the amount of the staking token willing to undelegate from the validator |
##### Outputs
| Name | Type | Description |
| ------- | ---- | --------------------------------------------- |
| success | bool | true if the undelegation is successfully done |
#### `redelegate`
Delegator redelegates the amount of token delegated to the validator to another validator.
`Redelegate` is emitted when the redelegate is successfully done.
##### Inputs
| Name | Type | Description |
| ---------------- | ------- | ------------------------------------------------ |
| delegatorAddress | address | the address of the delegator |
| validatorSrc | string | the address of the source validator |
| validatorDst | string | the address of the destination validator |
| amount | uint256 | the amount of the staking token for redelegation |
##### Outputs
| Name | Type | Description |
| ------- | ---- | ------------------------------------------- |
| success | bool | true if the redelegate is successfully done |
#### `delegation`
Returns the delegation information between a delegator and a validator.
If there is no delegation found, the `shares` and `balance` will be `0`.
##### Inputs
| Name | Type | Description |
| ---------------- | ------- | ---------------------------- |
| delegatorAddress | address | the address of the delegator |
| validatorAddress | address | the address of the validator |
##### Outputs
| Name | Type | Description |
| ------- | ------- | --------------------------------------- |
| shares | uint256 | the delegated shares |
| balance | Coin | the amount of delegated token and denom |
`Coin` is a struct with the following fields:
| Name | Type | Description |
| ------ | ------- | ------------------------ |
| denom | string | the denom of the reward |
| amount | uint256 | the amount of the reward |
#### `unbondingDelegation`
Returns the unbonding delegation information between a delegator and a validator.
If there is no unbonding delegation found, empty `UnbondingDelegationOutput` will be returned.
##### Inputs
| Name | Type | Description |
| ---------------- | ------- | ---------------------------- |
| delegatorAddress | address | the address of the delegator |
| validatorAddress | address | the address of the validator |
##### Outputs
| Name | Type | Description |
| ------------------- | ------------------------- | ------------------------------------------- |
| unbondingDelegation | UnbondingDelegationOutput | the information of the unbonding delegation |
`UnbondingDelegationOutput` is a struct with the following fields:
| Name | Type | Description |
| ---------------- | --------------------------- | --------------------------------------- |
| validatorAddress | address | the address of the validator |
| delegatorAddress | address | the address of the delegator |
| entries | UnbondingDelegationEntry\[] | the entries of the unbonding delegation |
`UnbondingDelegationEntry` is a struct with the following fields:
| Name | Type | Description |
| -------------- | ------ | -------------------------------- |
| creationHeight | uint64 | the creation height of the entry |
| completionTime | uint64 | the completion time of the entry |
| initialBalance | Coin | the initial balance of the entry |
| balance | Coin | the balance of the entry |
#### `validator`
Returns the validator information.
If there is no validator found, empty `ValidatorOutput` will be returned.
##### Inputs
| Name | Type | Description |
| ---------------- | ------- | ---------------------------- |
| validatorAddress | address | the address of the validator |
##### Outputs
| Name | Type | Description |
| --------- | --------- | -------------------------------- |
| validator | Validator | the information of the validator |
`Validator` is a struct with the following fields:
| Name | Type | Description |
| ----------------- | ------- | ------------------------------------------------------------------ |
| operatorAddress | address | the address of the validator |
| consensusPubkey | string | the public key of the validator |
| jailed | bool | whether the validator is jailed or not |
| status | int32 | the status of the validator |
| tokens | uint256 | the amount of the staking token delegated to the validator |
| delegatorShares | uint256 | the amount of the delegation shares |
| description | string | the description of the validator |
| unbondingHeight | int64 | the height at which the validator is unbonding |
| unbondingTime | int64 | the time at which the validator is unbonding |
| commission | uint256 | the commission rate of the staking token rewarded by the validator |
| minSelfDelegation | uint256 | the minimum self-delegation amount of the validator |
#### `validators`
Returns all validators matched with the status.
If there is no validator found, empty `ValidatorsOutput` will be returned.
Status, declared in `x/staking` module, can be one of the following:
* 0 : "BOND\_STATUS\_UNSPECIFIED", unspecified status
* 1 : "BOND\_STATUS\_UNBONDING", validator is unbonding
* 2 : "BOND\_STATUS\_UNBONDED", validator is unbonded
* 3 : "BOND\_STATUS\_BONDED", validator is bonded
##### Inputs
| Name | Type | Description |
| ----------- | ------- | --------------------------- |
| status | string | the status of the validator |
| pageRequest | PageReq | request for pagination |
`PageReq` is a struct with the following fields:
| Name | Type | Description |
| ---------- | ----- | --------------------------------------------------- |
| key | bytes | the key of the page |
| offset | int64 | the offset of the page |
| limit | int64 | the limit of the page |
| countTotal | bool | whether to count the total number of results or not |
| reverse | bool | whether to reverse the results or not |
##### Outputs
| Name | Type | Description |
| ------------ | ------------ | ---------------------------- |
| validators | Validator\[] | the arrays of the validators |
| pageResponse | PageResp | response for pagination |
`PageResp` is a struct with the following fields:
| Name | Type | Description |
| ------- | ------ | ------------------------------- |
| nextKey | bytes | the next key of the page |
| total | uint64 | the total number of the results |
#### `redelegation`
Returns the redelegation information of delegator, source validator and destination validator.
If there is no redelegation found, empty `RedelegationOutput` will be returned.
##### Inputs
| Name | Type | Description |
| ------------------- | ------- | ---------------------------------------- |
| delegatorAddress | address | the address of the delegator |
| srcValidatorAddress | address | the address of the source validator |
| dstValidatorAddress | address | the address of the destination validator |
##### Outputs
| Name | Type | Description |
| ------------ | ------------------ | ----------------------------------- |
| redelegation | RedelegationOutput | the information of the redelegation |
`RedelegationOutput` is a struct with the following fields:
| Name | Type | Description |
| ------------------- | -------------------- | ---------------------------------------- |
| delegatorAddress | address | the address of the delegator |
| validatorSrcAddress | address | the address of the source validator |
| validatorDstAddress | address | the address of the destination validator |
| entries | RedelegationEntry\[] | the entries of the redelegation |
`RedelegationEntry` is a struct with the following fields:
| Name | Type | Description |
| -------------- | ------ | -------------------------------- |
| creationHeight | uint64 | the creation height of the entry |
| completionTime | uint64 | the completion time of the entry |
| initialBalance | Coin | the initial balance of the entry |
| balance | Coin | the balance of the entry |
#### `redelegations`
Returns all redelegations of delegator, source validator and destination validator.
If there is no redelegation found, empty `RedelegationResponse` and `PageResp` will be returned.
##### Inputs
| Name | Type | Description |
| ------------------- | ------- | ---------------------------------------- |
| delegatorAddress | address | the address of the delegator |
| srcValidatorAddress | address | the address of the source validator |
| dstValidatorAddress | address | the address of the destination validator |
| pageRequest | PageReq | request for pagination |
##### Outputs
| Name | Type | Description |
| ------------ | ----------------------- | ------------------------------------ |
| response | RedelegationResponse\[] | the information of the redelegations |
| pageResponse | PageResp | response for pagination |
### Events
#### CreateValidator
| Name | Type | Indexed | Description |
| -------- | ------- | ------- | ------------------------------------------------------------------------- |
| valiAddr | address | Y | the address of the validator |
| value | uint256 | N | the amount of the staking token initially self-delegated to the validator |
#### EditValidator
| Name | Type | Indexed | Description |
| ----------------- | ------- | ------- | -------------------------------------------------------------------------- |
| valiAddr | address | Y | the address of the validator |
| commissionRate | int256 | N | the updated commission rate of the staking token rewarded by the validator |
| minSelfDelegation | int256 | N | the updated minimum self-delegation amount of the validator |
#### Delegate
| Name | Type | Indexed | Description |
| ------------- | ------- | ------- | ---------------------------------------------------------- |
| delegatorAddr | address | Y | the address of the delegator |
| validatorAddr | string | Y | the address of the validator |
| amount | uint256 | N | the amount of the staking token delegated to the validator |
| newShares | uint256 | N | the amount of the delegation shares after the delegation |
#### Unbond
| Name | Type | Indexed | Description |
| -------------- | ------- | ------- | -------------------------------------------------------------- |
| delegatorAddr | address | Y | the address of the delegator |
| validatorAddr | string | Y | the address of the validator |
| amount | uint256 | N | the amount of the staking token undelegated from the validator |
| completionTime | uint256 | N | the completion time of the undelegation |
#### Redelegate
| Name | Type | Indexed | Description |
| ------------------- | ------- | ------- | ------------------------------------------------ |
| delegatorAddr | address | Y | the address of the delegator |
| validatorSrcAddress | address | Y | the address of the source validator |
| validatorDstAddress | address | Y | the address of the destination validator |
| amount | uint256 | N | the amount of the staking token for redelegation |
| completionTime | uint256 | N | the completion time of the redelegate |
## Set up recurring billing
Pull-based subscriptions let a service provider collect payments on a schedule without requiring the subscriber to initiate each payment.
This pattern is enabled by [EIP-7702](/en/reference/eip-7702-api) account abstraction. The subscriber's EOA delegates execution authority to a subscription delegate contract, which the provider calls each billing cycle.
The subscriber acts only twice: once to subscribe, once to cancel.
### How it works
The subscriber delegates their EOA to a contract that enforces billing terms. Through EIP-7702, the subscriber's account temporarily gains contract logic, allowing a service provider to collect payments at each billing cycle without the subscriber signing every time.
#### Subscription lifecycle
1. **Delegate**: the subscriber delegates their EOA to a subscription delegate contract via EIP-7702.
2. **Subscribe**: the subscriber registers billing terms: provider address, amount per interval, and billing interval.
3. **Collect**: the service provider triggers collection each billing cycle. The delegate contract verifies the caller, interval, and amount before executing the USDT0 transfer.
4. **Cancel**: the subscriber revokes the subscription or clears the delegation to stop future collections.
#### Important considerations
* **Persistent delegation**: The EIP-7702 delegation persists until the subscriber explicitly changes or clears it. No re-delegation is needed each billing cycle.
* **Single delegation per EOA**: EIP-7702 supports one active delegation per EOA. If the subscriber later delegates to a different contract, the subscription delegate logic is replaced and collection fails. Use a modular delegate contract that supports multiple functions (subscriptions, batch payments, spending limits) under a single delegation.
* **Use audited delegates**: A delegate contract has full execution authority over the subscriber's EOA. Only delegate to contracts that have been audited.
### What makes it different
Traditional subscriptions store card data, retry failed charges, and manage complex billing state. With EIP-7702 subscriptions, the billing terms are enforced by the delegate logic on the subscriber's own EOA. The provider can only collect the agreed amount per interval, and the subscriber can cancel at any time by revoking the delegation.
| **Aspect** | **Traditional (card-on-file)** | **Stable** |
| :------------------ | :---------------------------------------- | :-------------------------------------- |
| Setup | Card registration with payment processor | Single EIP-7702 delegation transaction |
| Billing | Processor charges stored card | Provider calls delegate contract |
| Stored payment data | Card number, CVV held by processor | No payment credentials stored off-chain |
| Cancellation | Contact provider or card issuer | Subscriber revokes delegation on-chain |
| Overcharge risk | Depends on provider-side billing controls | Billing terms enforced by contract |
**See also:**
* [EIP-7702](/en/reference/eip-7702-api)
* [ERC-3009 (Transfer With Authorization)](/en/explanation/erc-3009)
## System modules reference
Stable exposes core settlement behavior through **System Modules**, implemented as **precompiled contracts** for gas efficiency and predictable control.
:::note
**Concept:** For what system modules do and why they're exposed as precompiles, see [System modules](/en/explanation/system-modules-overview).
:::
**Key modules:**
* [Bank Module](/en/reference/bank-module-api)
* Handles USDT transfers, balance accounting, and escrow flows
* [Distribution Module](/en/reference/distribution-module-api)
* Fee distribution and reward logic for network participants
* [Staking Module](/en/reference/staking-module-api)
* Controls validator participation and staking (coming with mainnet)
**dApps can leverage built-in modules instead of re-implementing token or settlement logic.**
## System transactions reference
:::note
**Concept:** For how system transactions bridge SDK events to the EVM and why this matters, see [System transactions](/en/explanation/system-transactions).
:::
### Abstract
System transactions provide a way for the Stable protocol to emit EVM events for Stable SDK operations. When staking events like unbonding completions occur in the SDK layer, the protocol automatically generates EVM transactions that emit corresponding events. This makes these operations fully visible to EVM tooling and applications.
### Motivation
You and your applications on Stable expect to monitor blockchain events through standard EVM interfaces like `eth_getLogs`. But critical operations happen in Stable SDK modules that don't naturally emit EVM events. This creates a visibility gap: EVM dApps can't easily track when a user's tokens finish unbonding.
System transactions bridge this gap. When the staking module completes an unbonding operation, Stable's x/stable module detects the event and generates a system transaction that calls the StableSystem precompile ( `0x0000000000000000000000000000000000009999`). And then, the precompile emits proper EVM events that any dApp can subscribe to. System transactions run with a special sender address (`0x8888888888888888888888888888888888888888`) that only the protocol can use. This prevents anyone from spoofing protocol events while keeping the event emission trustless and verifiable on-chain.
### Specification
System transactions work through three main components: the x/stable module's EndBlocker, the PrepareProposal handler, and the StableSystem precompile.
#### Architecture overview
#### StableSystem precompile
The StableSystem precompile lives at `0x0000000000000000000000000000000000009999` and handles protocol-level operations that need to emit EVM events. Currently it supports unbonding completion notifications.
```solidity
interface IStableSystem {
/// @notice Processes queued unbonding completions and emits EVM events
/// @param blockHeight The block height at which to process completions
/// @dev Only callable by system transactions (from = 0x8888888888888888888888888888888888888888)
/// @dev Processes up to 100 completions per call
/// @dev Automatically deletes processed completions from the queue
function notifyUnbondingCompletions(int64 blockHeight) external;
/// @notice Emitted when an unbonding operation completes
/// @param delegator The address that delegated the tokens
/// @param validator The validator address the tokens were delegated to
/// @param amount The amount of tokens that finished unbonding (in uusdc)
event UnbondingCompleted(
address indexed delegator,
address indexed validator,
uint256 amount
);
/// @notice The caller is not authorized (not system transaction sender)
error Unauthorized();
}
```
#### System transaction sender
System transactions use `0x8888888888888888888888888888888888888888` as the sender address. This address:
* Requires no signature verification
* Can only be used by transactions created in PrepareProposal
* Cannot be spoofed by users or contracts
* Skips fee deduction via the SystemTxDecorator ante handler
The EVM recognizes system transactions by checking `msg.sender == 0x8888888888888888888888888888888888888888`. Precompiles can use this to gate protocol-only operations.
#### Event-driven flow
When a user's unbonding period completes, here's what happens:
1. **Stable SDK Layer:** The staking module's EndBlocker completes the unbonding and emits EventTypeCompleteUnbonding with the delegator address, validator address, and amount.
2. **Detection:** The x/stable module's EndBlocker runs after staking and scans for unbonding events in the block's event log. For each completion, it queues an entry in state with the delegator address, validator address, amount, and block height.
3. **System TX Generation**: In the next block's PrepareProposal, the app queries all queued completions. If any exist, it creates a system transaction calling StableSystem.notifyUnbondingCompletions(blockHeight) with the current block height. This transaction goes at the front of the block, before any user transactions.
4. **Execution:** During block execution, the system transaction runs first. The precompile queries state for queued completions at that block height, emits an UnbondingCompleted event for each one (up to 100), and deletes them from the queue.
5. **EVM Visibility:** The events appear in transaction receipts and logs, visible to eth\_getLogs queries, block explorers, and any application monitoring the StableSystem precompile.
#### Batch processing
To prevent blocks from becoming too large, the system processes at most 100 unbonding completions per block. If 150 completions queue up:
* Block N: Creates system tx processing completions 0-99
* Block N+1: Creates system tx processing completions 100-149
The precompile queries state directly rather than receiving completion data in calldata. This keeps transaction size predictable and moves the data from expensive calldata to cheaper state reads.
### Usage examples
The most common use case is a staking dashboard that needs to notify users when their unbonding periods complete. Here's how to set up a listener for unbonding completions.
```javascript
import { ethers } from 'ethers';
// StableSystem precompile address
const STABLE_SYSTEM_ADDRESS = '0x0000000000000000000000000000000000009999';
// ABI for the UnbondingCompleted event
const STABLE_SYSTEM_ABI = [
'event UnbondingCompleted(address indexed delegator, address indexed validator, uint256 amount)'
];
// Connect to the Stable network
const provider = new ethers.JsonRpcProvider('https://rpc.testnet.stable.xyz');
const stableSystem = new ethers.Contract(
STABLE_SYSTEM_ADDRESS,
STABLE_SYSTEM_ABI,
provider
);
// Subscribe to all unbonding completions
stableSystem.on('UnbondingCompleted', (delegator, validator, amount, event) => {
console.log('Unbonding completed!');
console.log('Delegator:', delegator);
console.log('Validator:', validator);
console.log('Amount:', ethers.formatEther(amount), 'tokens');
console.log('Block:', event.log.blockNumber);
console.log('Tx Hash:', event.log.transactionHash);
});
```
This listener fires every time any user's unbonding completes. For a production dApp, filter events for specific users as shown below.
#### Filtering events for specific users
To only receive events for a particular delegator address, use the indexed event parameters to create a filter:
```javascript
// Only watch unbondings for a specific user
const userAddress = '0xabcd...';
const filter = stableSystem.filters.UnbondingCompleted(userAddress);
stableSystem.on(filter, (delegator, validator, amount, event) => {
// This only fires for the specified user's unbondings
showNotification(`Your unbonding of ${ethers.formatEther(amount)} tokens completed!`);
refreshUserBalance(userAddress);
});
```
You can also filter by validator if you're building a validator-specific dashboard:
```javascript
// Watch all unbondings from a specific validator
const validatorAddress = '0x1234...';
const validatorFilter = stableSystem.filters.UnbondingCompleted(null, validatorAddress);
stableSystem.on(validatorFilter, (delegator, validator, amount) => {
updateValidatorStats(validator, amount);
});
```
#### Querying historical events
If your dApp needs to show a history of past unbonding completions, you can query historical events using event filters with block ranges:
```javascript
// Get all unbondings for a user in the last 1000 blocks
const currentBlock = await provider.getBlockNumber();
const filter = stableSystem.filters.UnbondingCompleted(userAddress);
const events = await stableSystem.queryFilter(
filter,
currentBlock - 1000,
currentBlock
);
const unbondingHistory = events.map(event => ({
delegator: event.args.delegator,
validator: event.args.validator,
amount: ethers.formatEther(event.args.amount),
blockNumber: event.blockNumber,
txHash: event.transactionHash
}));
console.log('Recent unbondings:', unbondingHistory);
```
### Integration guide
#### Step 1: Add the Stable System contract interface
First, add the StableSystem precompile interface to your project. If you're using Foundry or Hardhat, create a new interface file:
```solidity
interface IStableSystem {
event UnbondingCompleted(
address indexed delegator,
address indexed validator,
uint256 amount
);
}
```
If you're building a pure frontend dApp without Solidity contracts, you just need the ABI fragment for the event:
```javascript
const STABLE_SYSTEM_ABI = [
'event UnbondingCompleted(address indexed delegator, address indexed validator, uint256 amount)'
];
```
#### Step 2: Set up event listeners
Initialize your ethers.js provider and create a contract instance pointing to the StableSystem precompile address. The precompile is always deployed at `0x00000000000....0000009999` on both Stable Testnet and Stable Mainnet.
*Note: The precompile is not deployed on Stable Mainnet yet, it will be provided after v1.2.0 upgrade.*
```javascript
const provider = new ethers.JsonRpcProvider(RPC_URL);
const stableSystem = new ethers.Contract(
'0x0000000000000000000000000000000000009999',
STABLE_SYSTEM_ABI,
provider
);
```
#### Step 3: Handle events in your application logic
Subscribe to events and update your application state accordingly. Common patterns include:
* **Balance Updates**: When an unbonding completes, refresh the user's token balance
* **Notification System**: Show toast notifications when the user's unbondings complete
* **Dashboard Statistics**: Update staking metrics and charts in real-time
* **Transaction History**: Add completed unbondings to the user's activity feed
#### Step 4: Handle connection issues
Since event subscriptions rely on persistent websocket connections, implement reconnection logic for production dApps:
```javascript
let reconnectAttempts = 0;
const MAX_RECONNECT_ATTEMPTS = 5;
function setupEventListener() {
const provider = new ethers.WebSocketProvider('wss://rpc.testnet.stable.xyz');
provider.on('error', (error) => {
console.error('Provider error:', error);
if (reconnectAttempts < MAX_RECONNECT_ATTEMPTS) {
reconnectAttempts++;
setTimeout(() => setupEventListener(), 5000);
}
});
const stableSystem = new ethers.Contract(
'0x0000000000000000000000000000000000009999',
STABLE_SYSTEM_ABI,
provider
);
stableSystem.on('UnbondingCompleted', handleUnbonding);
}
```
### Why this approach?
#### Compared to custom indexers
Previously, Stable SDK required you to run custom indexers that watch for SDK events and store them in a database. This adds operational overhead and introduces potential points of failure.
With system transactions, there's no need for separate indexer infrastructure. Events are natively available through the EVM's log system, which every RPC node already indexes and serves. Any standard web3 library can subscribe to these events without additional tooling.
#### Compared to polling SDK endpoints
Without system transactions, EVM dApps would need to periodically call Stable SDK REST endpoints to check if unbonding periods have completed. This creates several problems:
* **Increased latency**: Polling intervals of 5-10 seconds mean users might wait that long before seeing updates
* **Higher load**: Every dApp instance polling endpoints increases load on RPC infrastructure
* **Complexity**: dApps need to handle both web3 providers (for EVM interactions) and Stable SDK REST clients (for SDK queries)
* **No real-time updates**: Polling inherently can't provide instant notifications
System transactions provide real-time event notifications through the same websocket connections dApps already use for EVM interactions. This simplifies the developer experience and reduces infrastructure costs.
### Security guarantees
#### Trustless event emission
System transactions are created during the `PrepareProposal` ABCI phase, which only validators can execute. User-submitted transactions cannot spoof the system sender address (`0x8888888888888888888888888888888888888888`). The EVM's state transition logic enforces that only transactions to the StableSystem precompile address can skip signature verification.
This means:
* Users cannot forge unbonding completion events
* Users cannot call `notifyUnbondingCompletions` from their own transactions
* The only way to emit an `UnbondingCompleted` event is for an actual unbonding to complete in the Stable SDK staking module
#### No additional trust assumptions
System transactions don't introduce new security assumptions beyond what's already required for blockchain consensus. If you trust that validators are correctly executing blocks, you can trust that system transaction events accurately reflect Stable SDK state changes.
The event emission process is deterministic: given the same SDK events in `EndBlock`, all honest validators will produce identical system transactions during `PrepareProposal`. The consensus mechanism ensures validators agree on which system transactions to include.
#### Block finality
The Stable blockchain uses fast finality through StableBFT's consensus mechanism. Once a block is committed, it's immediately final and cannot be reorganized. This means that once you receive an `UnbondingCompleted` event, you can trust it's permanent.
There's no need to wait for multiple confirmations like on probabilistic finality chains. dApps can update user balances and display notifications immediately upon receiving the event.
### Performance & limitations
#### Batch size constraints
Each block processes at most 100 unbonding completions through system transactions. This limit exists to prevent unbounded block sizes during periods of high unbonding activity.
In practice, 100 completions per block provides throughput of \~9000 completions per minute assuming the average block time of 0.7 seconds. Normal staking activity rarely reaches this limit. During exceptional circumstances, completions might queue for several blocks before fully processing.
#### Gas consumption
System transactions consume gas during execution, which is accounted for in the block's gas limit. The gas cost scales linearly with the number of completions being processed:
* Base function call: \~21,000 gas
* Per-event emission: \~3,000 gas
* Reading state: \~2,000 gas per completion
A full batch of 100 completions consumes approximately 521,000 gas. As Stable’s block gas limit is 100,000,000, this represents less than 0.6% of available block space.
#### Notification latency
When an unbonding period completes during block N:
1. The Stable module's `EndBlock` queues the completion in block N's state
2. Block N+1's `PrepareProposal` creates a system transaction
3. The system transaction executes during block N+1, emitting the event
This means there's a one-block delay (approximately 0.7 seconds) between the unbonding completing and the EVM event being emitted. For most use cases, this latency is acceptable since the unbonding period itself is 7 days.
#### High load scenarios
If unbonding completions arrive faster than 100 per block, they accumulate in the queue. The queue is processed in FIFO order, so the oldest completions are always notified first.
During sustained high load, the queue could grow temporarily. However, once the spike subsides, subsequent blocks with fewer completions will gradually drain the queue. The system is designed to handle bursts without dropping events.
### Future extensions
The system transaction mechanism provides a general pattern for bridging any Stable SDK operation into the EVM event space. While currently used only for unbonding completions, the architecture can be extended to cover additional use cases:
#### Staking operations
Beyond unbonding, other staking events could emit EVM notifications:
* Commission rate changes by validators
* Validator jailing and unjailing
#### Governance execution
When governance proposals pass and execute, system transactions could emit events with proposal IDs and execution results. This would allow dApps to react to parameter changes or upgrades without polling the governance module.
#### Generic event bridge
The pattern could be generalized into a configurable event bridge where each module registers which SDK events should be mirrored to the EVM. This would provide comprehensive visibility into all Stable SDK operations without requiring per-module custom logic. The key architectural principle is that system transactions remain a protocol-level feature, created only by validators during block proposal.
## Ecosystem
In this document, you can find the information for bridge (LayerZero) and USDT0.
### LayerZero on Stable Testnet
| Name | Value |
| ----------------- | ------------------------------------------ |
| eid | 40374 |
| chainKey | stable-testnet |
| stage | testnet |
| endpointV2View | 0x6Ac7bdc07A0583A362F1497252872AE6c0A5F5B8 |
| endpointV2 | 0x3aCAAf60502791D199a5a5F0B173D78229eBFe32 |
| sendUln302 | 0x9eCf72299027e8AeFee5DC5351D6d92294F46d2b |
| receiveUln302 | 0xB0487596a0B62D1A71D0C33294bd6eB635Fc6B09 |
| blockedMessageLib | 0xa229b65cc2191bf60bc24efcda3487d7b5c0c9f0 |
| executor | 0x701f3927871EfcEa1235dB722f9E608aE120d243 |
| deadDVN | 0xC1868e054425D378095A003EcbA3823a5D0135C9 |
### USDT0 on Stable Testnet
| Name | Value |
| ----------- | ------------------------------------------ |
| wrapper | 0xB8CE59FC3717ada4C02eaDF9682A9e934F625ebb |
| composer | 0xe7cd86e13AC4309349F30B3435a9d337750fC82D |
| OFT | 0x779Ded0c9e1022225f8E0630b35a9b54bE713736 |
| USDT0 impl | 0x3f9E27457ac494fC729beB50e6af04Ec34e3828E |
| USDT0 proxy | 0x78Cf24370174180738C5B8E352B6D14c83a6c9A9 |
### Sepolia OFT contract and USDT0 contract (for reference)
| Name | Value |
| ------------ | ---------------------------------------------------------------------------------------------------------------------------------------------------------------------------------------------- |
| Sepolia OFT | [https://sepolia.etherscan.io/address/0xc099cd946d5efcc35a99d64e808c1430cef08126](https://sepolia.etherscan.io/address/0xc099cd946d5efcc35a99d64e808c1430cef08126) |
| Sepolia USDT | [https://sepolia.etherscan.io/address/0xc4DCC311c028e341fd8602D8eB89c5de94625927#writeContract](https://sepolia.etherscan.io/address/0xc4DCC311c028e341fd8602D8eB89c5de94625927#writeContract) |
## Testnet information
Everything you need to know to access the Stable Testnet.
### Network overview
| Configuration | Value |
| ---------------- | -------------- |
| **Network Name** | Stable Testnet |
| **Chain ID** | `2201` |
| **Gas Token** | USDT0 |
| **Gov Token** | STABLE |
| **Block Time** | \~0.7 seconds |
### Block explorers
| Explorer | URL |
| -------------- | ---------------------------------------------------------------- |
| **Stablescan** | [https://testnet.stablescan.xyz](https://testnet.stablescan.xyz) |
### RPC endpoints
#### Primary endpoints
| Type | Endpoint | Purpose |
| ---------------- | ---------------------------------------------------------------- | ----------------- |
| **EVM JSON-RPC** | [https://rpc.testnet.stable.xyz](https://rpc.testnet.stable.xyz) | EVM transactions |
| **WebSocket** | wss\://rpc.testnet.stable.xyz | Real-time updates |
:::note
The public RPC endpoint is rate-limited to **1,000 requests per 10 seconds per IP**. Requests over the limit return `HTTP 429`. For higher throughput, use a [third-party RPC provider](/en/reference/rpc-providers).
:::
### Chain information
| Parameter | EVM |
| ------------------ | ------- |
| **Chain ID** | `2201` |
| **Address Format** | `0x...` |
| **Gas Token** | `USDT0` |
| **Decimals** | 18 |
### Faucet & tools
| Tool | URL | Description |
| ------------- | --------------------------------------------------------- | --------------- |
| **Faucet** | [https://faucet.stable.xyz](https://faucet.stable.xyz) | Get test tokens |
| **Snapshots** | See [Node Operators Guide](/en/how-to/use-node-snapshots) | Chain snapshots |
## Version history
Complete version history and related documentation for the Stable Testnet.
### Current version information
* **Current Version**: `v1.3.1-rc0`
* **Next Upgrade**: `TBD`
* **Upgrade Height**: `TBD`
* **Expected Time**: `TBD`
### Version history
#### Current & previous versions
| Version | Commit | Upgrade Height | Binary | Status |
| -------------- | ---------- | -------------- | --------------------------------------------------------------------------------------------------------------------------------------------------------------------------------------------------------------------------------------------------- | ----------------------------- |
| **v1.3.1-rc0** | `75bb546` | - | [AMD64](https://stable-data-dist.s3.us-east-1.amazonaws.com/testnet/binary/stabled-1.3.1-rc0-linux-amd64-testnet.tar.gz) / [ARM64](https://stable-data-dist.s3.us-east-1.amazonaws.com/testnet/binary/stabled-1.3.1-rc0-linux-arm64-testnet.tar.gz) | Current |
| **v1.3.0-rc1** | `25b5e47` | 53,265,500 | [AMD64](https://stable-data-dist.s3.us-east-1.amazonaws.com/testnet/binary/stabled-1.3.0-rc1-linux-amd64-testnet.tar.gz) / [ARM64](https://stable-data-dist.s3.us-east-1.amazonaws.com/testnet/binary/stabled-1.3.0-rc1-linux-arm64-testnet.tar.gz) | |
| **v1.3.0-rc0** | `864d54c` | 49,855,000 | [AMD64](https://stable-data-dist.s3.us-east-1.amazonaws.com/testnet/binary/stabled-1.3.0-rc0-linux-amd64-testnet.tar.gz) / [ARM64](https://stable-data-dist.s3.us-east-1.amazonaws.com/testnet/binary/stabled-1.3.0-rc0-linux-arm64-testnet.tar.gz) | |
| **v1.2.2-rc0** | `8bd5d5e` | - | [AMD64](https://stable-data-dist.s3.us-east-1.amazonaws.com/testnet/binary/stabled-1.2.2-rc0-linux-amd64-testnet.tar.gz) / [ARM64](https://stable-data-dist.s3.us-east-1.amazonaws.com/testnet/binary/stabled-1.2.2-rc0-linux-arm64-testnet.tar.gz) | |
| **v1.2.1-rc1** | `7ff9a8a` | - | [AMD64](https://stable-data-dist.s3.us-east-1.amazonaws.com/testnet/binary/stabled-1.2.1-rc1-linux-amd64-testnet.tar.gz) / [ARM64](https://stable-data-dist.s3.us-east-1.amazonaws.com/testnet/binary/stabled-1.2.1-rc1-linux-arm64-testnet.tar.gz) | |
| **v1.2.0-rc1** | `263c033` | 41,306,450 | [AMD64](https://stable-data-dist.s3.us-east-1.amazonaws.com/testnet/binary/stabled-1.2.0-rc1-linux-amd64-testnet.tar.gz) / [ARM64](https://stable-data-dist.s3.us-east-1.amazonaws.com/testnet/binary/stabled-1.2.0-rc1-linux-arm64-testnet.tar.gz) | |
| **v1.2.0** | `ee8ca35` | 40,392,500 | [AMD64](https://stable-data-dist.s3.us-east-1.amazonaws.com/testnet/binary/stabled-1.2.0-linux-amd64-testnet.tar.gz) / [ARM64](https://stable-data-dist.s3.us-east-1.amazonaws.com/testnet/binary/stabled-1.2.0-linux-arm64-testnet.tar.gz) | |
| **v1.1.2** | `3d83aa3` | 34,649,300 | [AMD64](https://stable-data-dist.s3.us-east-1.amazonaws.com/testnet/binary/stabled-1.1.2-linux-amd64-testnet.tar.gz) / [ARM64](https://stable-data-dist.s3.us-east-1.amazonaws.com/testnet/binary/stabled-1.1.2-linux-arm64-testnet.tar.gz) | |
| **v1.1.1** | `8becd6b` | 33,152,000 | [AMD64](https://stable-data-dist.s3.us-east-1.amazonaws.com/testnet/binary/stabled-1.1.1-linux-amd64-testnet.tar.gz) / [ARM64](https://stable-data-dist.s3.us-east-1.amazonaws.com/testnet/binary/stabled-1.1.1-linux-arm64-testnet.tar.gz) | |
| **v1.1.0** | `17ceaa7` | 32,309,700 | [AMD64](https://stable-data-dist.s3.us-east-1.amazonaws.com/testnet/binary/stabled-1.1.0-linux-amd64-testnet.tar.gz) / [ARM64](https://stable-data-dist.s3.us-east-1.amazonaws.com/testnet/binary/stabled-1.1.0-linux-arm64-testnet.tar.gz) | |
| **v0.8.1** | `1eb65d5` | 30,770,000 | [AMD64](https://stable-data-dist.s3.us-east-1.amazonaws.com/testnet/binary/stabled-0.8.1-linux-amd64-testnet.tar.gz) / [ARM64](https://stable-data-dist.s3.us-east-1.amazonaws.com/testnet/binary/stabled-0.8.1-linux-arm64-testnet.tar.gz) | |
| **v0.8.0** | `e55efb6` | 29,410,999 | [AMD64](https://stable-data-dist.s3.us-east-1.amazonaws.com/testnet/binary/stabled-0.8.0-linux-amd64-testnet.tar.gz) / [ARM64](https://stable-data-dist.s3.us-east-1.amazonaws.com/testnet/binary/stabled-0.8.0-linux-arm64-testnet.tar.gz) | Bank precompile enhancements |
| **v0.7.2** | `3c53e14` | 27,258,000 | [AMD64](https://stable-data-dist.s3.us-east-1.amazonaws.com/testnet/binary/stabled-0.7.2-linux-amd64-testnet.tar.gz) / [ARM64](https://stable-data-dist.s3.us-east-1.amazonaws.com/testnet/binary/stabled-0.7.2-linux-arm64-testnet.tar.gz) | StableBFT integration |
| **v0.6.0** | `5cc1ad6` | 19,587,000 | [AMD64](https://stable-data-dist.s3.us-east-1.amazonaws.com/testnet/binary/stabled-0.6.0-linux-amd64-testnet.tar.gz) | Minor fixes |
| **v0.5.0** | `919281d` | 18,719,000 | [AMD64](https://stable-data-dist.s3.us-east-1.amazonaws.com/testnet/binary/stabled-0.5.0-linux-amd64-testnet.tar.gz) | Minor fixes |
| **v0.4.0** | `c6240c0` | 18,666,150 | [AMD64](https://stable-data-dist.s3.us-east-1.amazonaws.com/testnet/binary/stabled-0.4.0-linux-amd64-testnet.tar.gz) | Stable SDK v0.53.4 |
| **v0.3.0** | `a4f5ac5` | 9,166,131 | [AMD64](https://stable-data-dist.s3.us-east-1.amazonaws.com/testnet/binary/stabled-0.3.0-linux-amd64-testnet.tar.gz) | EVM value transfer allow list |
| **v0.2.1** | `53e6e073` | - | [AMD64](https://stable-data-dist.s3.us-east-1.amazonaws.com/testnet/binary/stabled-0.2.1-linux-amd64-testnet.tar.gz) | Non-breaking update |
| **v0.2.0** | `8bdd771` | 8,956,584 | [AMD64](https://stable-data-dist.s3.us-east-1.amazonaws.com/testnet/binary/stabled-0.2.0-linux-amd64-testnet.tar.gz) | Feature update |
| **v0.1.0** | `10dfg542` | Genesis | [AMD64](https://stable-data-dist.s3.us-east-1.amazonaws.com/testnet/binary/stabled-0.1.0-linux-amd64-testnet.tar.gz) | Genesis (2025-04-07) |
### Related documentation
* [Upgrade Guide](/en/how-to/upgrade-node) - Step-by-step upgrade procedures
* [Testnet Information](/en/reference/testnet-information) - Current network details
## Tokenomics
STABLE is the governance token of the Stable Mainnet. It secures the network through delegated Proof-of-Stake, governs protocol upgrades, and entitles stakers to a share of USDT0 gas revenue distributed by validators.
### Overview
| Item | Details |
| :--------------- | :----------------------------- |
| **Symbol** | STABLE |
| **Total supply** | 100,000,000,000 tokens |
| **Standard** | ERC-20 (on Stable Mainnet EVM) |
| **Decimals** | 18 |
STABLE is the governance token of the Stable Mainnet and Ecosystem, designed to support long-term economic alignment across validators, developers, and users.
***
### Token allocation
**Total supply:** 100,000,000,000 STABLE tokens
| Category | Allocation | Amount of STABLE |
| :------------------------ | :--------- | :--------------- |
| **Investors & advisors** | 25% | 25,000,000,000 |
| **Team** | 25% | 25,000,000,000 |
| **Ecosystem & community** | 40% | 40,000,000,000 |
| **Genesis distribution** | 10% | 10,000,000,000 |
| **Total** | 100% | 100,000,000,000 |
***
### Emission model & supply schedule
* Total supply is fixed at 100,000,000,000 STABLE tokens.
* Only a portion of supply enters circulation at launch of the Stable Mainnet.
* Team and Investors & advisors allocations follow a 4-year linear vesting model, with a 1-year cliff, to ensure long-term commitment.
***
### Allocations
#### Genesis distribution - 10% of total token supply
* Designed to bootstrap usage, provide liquidity to market, conduct airdrop events, reward early supporters and campaigns with exchanges and ecosystem partners.
**Vesting schedule**
* 100% unlocked at the Stable Mainnet launch
#### Ecosystem & community - 40% of total token supply
Supports long-term ecosystem and community growth:
* Support the development of the Stable software and ecosystem
* Developer grants
* User onboarding incentives
* Payment partner integrations
* On-chain activity rewards
* Hackathons, ambassador programs
* Infrastructure grants
**Vesting schedule**
* **Initial unlock:** 8% of total supply unlocked at the Stable Mainnet launch. These tokens fund incentives for strategic launch partners, liquidity needs, and early ecosystem growth campaigns.
* **Total vesting period:** 3-year linear vesting thereafter for the 32% of total supply
#### Team - 25% of total token supply
* Allocated to founding team members, engineers, researchers, and contributors
* Designed to ensure long-term alignment between the team and the Stable ecosystem.
**Vesting schedule**
* **1-year cliff:** No tokens are unlocked in the first 12 months
* **Total vesting period:** 48 months linear vesting from the Stable Mainnet launch
#### Investors & advisors - 25% of total token supply
* Allocated for fundraising rounds and advisory support.
**Vesting schedule**
* **1-year cliff:** No tokens are unlocked in the first 12 months
* **Total vesting period:** 48 months linear vesting from the Stable Mainnet launch
***
### Emissions chart
***
### Economic design principles
Stable's token economics were designed around three foundational goals:
#### 1. Power a payments-optimized Layer 1
The STABLE token incentivizes high-throughput, low-latency infrastructure, supporting sub-second block confirmations and enterprise settlement guarantees.
#### 2. Support sustainable ecosystem growth
40% of total token supply is dedicated to long-term growth, focusing on key development and growth areas.
* Developer grants
* Partner integrations
* New ecosystem applications
#### 3. Align long-term contributors via vesting
The team allocation uses a 4-year linear vesting model, with a 1-year cliff, ensuring long-term alignment and continued contributions toward network development.
***
### Utility of the STABLE token
The STABLE Token is an ERC-20 governance token on the Stable Mainnet. It can be used for:
* Electing validators
* Voting on protocol upgrades
* Handling governance proposals
* Serving as a credential to receive gas fee distribution from validators
On the Stable network, all transactions use USDT0 as the native gas token. These USDT0 gas fees are collected into a treasury managed by smart contracts. When token holders stake their STABLE tokens to validators, validators may choose to distribute gas fees from the treasury proportionally to stakers.
## Wallets
### Wallets overview table
| **Provider** | **Category** | **Security Method** | **Docs / Get Started** | **Notes** |
| :----------------------------------------------------------------- | :---------------------------------------- | :------------------------------------------------------ | :----------------------------------------------------------------------------------------------------------------------------------------------------------------------------------------- | :----------------------------------------------------------------------------------------------------------------------------------------------------- |
| Stable Pay | User Wallet | TSS-MPC-based self-custody | [https://blog.stable.xyz/introducing-stable-pay-the-stablecoin-payment-wallet-on-stablechain](https://blog.stable.xyz/introducing-stable-pay-the-stablecoin-payment-wallet-on-stablechain) | USDT-native payment wallet built on Stable; optimized for instant transfers |
| [Wallet Development Kit by Tether (WDK)](https://wallet.tether.io) | Wallet SDK | Self-custody | [https://docs.wallet.tether.io](https://docs.wallet.tether.io) | Tether's open-source SDK for building self-custodial wallets across multi-chain |
| [Binance Wallet](https://www.binance.com/en/web3wallet) | User Wallet | MPC-based self-custody / semi-custody wallet | [https://developers.binance.com/docs/binance-spot-api-docs/README](https://developers.binance.com/docs/binance-spot-api-docs/README) | Multi-chain wallet, supports Stable USDT |
| [Reown](https://reown.com/) (formerly WalletConnect / WalletKit) | Connectivity / Wallet Infra | Protocol-level signing & secure relay | [https://docs.reown.com/appkit/overview](https://docs.reown.com/appkit/overview) | Supports 600+ wallets, multi-chain, SDK-based integration, ideal for embedded wallet flows |
| [Bitget Wallet](https://web3.bitget.com/en) | User Wallet | Non-custodial wallet (private keys managed by user) | [https://web3.bitget.com/en/docs/](https://web3.bitget.com/en/docs/) | Built-in dApp browser; multi-asset & multi-chain support |
| [Gate Wallet](https://www.gate.com/) (Gate Onchain) | User Wallet | Exchange-linked wallet | [https://www.gate.com/](https://www.gate.com/) | Exchange-linked wallet; suitable for CEX ↔ wallet flows |
| [OKX Wallet](https://web3.okx.com/) (OKX Onchain) | User Wallet | Non-custodial / MPC for recovery | [https://www.okx.com/earn/onchain-earn](https://www.okx.com/earn/onchain-earn) | Multi-chain wallet with exchange integration |
| [Anchorage](https://www.anchorage.com/) | Custodial / Institutional Wallet | Bank-grade regulated custody (federally chartered bank) | [https://www.anchorage.com/who-we-serve](https://www.anchorage.com/who-we-serve) | Institutional-grade custody for stable assets |
| [Dynamic](https://www.dynamic.xyz/) | Embedded / In-App Wallet Infra | Managed-key / custody-infra via SDK or backend | [https://www.dynamic.xyz/docs/introduction/welcome](https://www.dynamic.xyz/docs/introduction/welcome) | Enables apps to embed wallet flows without external wallets |
| [Alchemy](https://www.alchemy.com/) | Smart Wallets & Account Abstraction Infra | Bundler + Paymaster infrastructure (ERC-4337) | [https://docs.alchemy.com](https://docs.alchemy.com) | Powers AA wallets; supports sponsored gas, smart accounts |
| [Atomic Wallet](https://atomicwallet.io/) | User Wallet | Non-custodial (keys stored on user device) | [https://atomicwallet.io/assets-status](https://atomicwallet.io/assets-status) | Multi-asset mobile, desktop, and browser-extension wallet; buy USDT on Stable via the built-in [Simplex](/en/reference/ramps#simplex-by-nuvei) on-ramp |
### Category guide
* **User Wallets:** These are traditional consumer-facing wallets such as mobile apps, browser extensions, or exchange-linked wallets. They allow users to hold USDT, make transfers, connect to dApps, and interact directly with Stable.
* **Wallet SDK:** A software development kit that provides developers with prebuilt tools, APIs, and infrastructure to integrate wallet creation, key management, transaction signing, and blockchain interactions directly into their applications.
* **Custodial / Institutional Wallets:** Platforms providing regulated, enterprise-grade asset custody for institutions. These solutions focus on compliance, governance controls, secure key management, and treasury operations rather than end-user flows.
* **Embedded / In-App Wallets:** Wallets generated inside applications through SDKs or backend systems. These enable seamless onboarding for mainstream users without requiring them to install or understand external crypto wallets.
* **Smart Wallets / Account Abstraction:** Programmable wallets that support custom logic such as gasless transactions, bundled operations, or automated execution. These extend basic wallet functionality with developer-defined behaviors.
* **MPC Wallet Providers:** Key-management systems using multi-party computation (MPC) to distribute private key control across multiple parties or devices. Ideal for apps or enterprises needing high-security custody without traditional seed phrases.
* **Connectivity Providers:** Protocols such as WalletConnect (Reown) that connect wallets and dApps. They don't store assets or act as wallets themselves; instead, they provide secure communication channels for transaction signing and interaction.
### 1. User wallets
These are end-user wallets offered by major global exchanges. They allow users to hold USDT, transfer funds, and connect to applications on Stable.
#### Stable Pay
A non-custodial payment wallet built on Stable, designed for fast, stablecoin-native transactions. Stable Pay delivers instant USDT payments, predictable fees, and a simple user experience optimized for everyday transfers and commerce.
**Capabilities**
* Non-custodial wallet for Stable
* Instant USDT payments
* Predictable and consistent transaction costs
* Built directly on Stable’s USDT-native settlement layer
* Consumer-friendly UI designed for payments and commerce
#### Binance Wallet
A widely used multi-chain wallet integrated with the world’s largest exchange by volume.
**Capabilities**
* Supports Stable USDT
* Direct integration with Binance ecosystem
* Mobile and extension wallet options
#### Bitget Wallet
A multi-asset wallet connected to the Bitget exchange ecosystem, supporting crypto, stocks, and ETFs.
**Capabilities**
* Supports Stable USDT
* Built-in dApp browser
* Seamless integration with Bitget trading accounts
#### Gate Wallet (Gate Onchain)
A wallet product backed by one of the largest spot exchanges globally.
**Capabilities**
* Supports Stable USDT
* Easy transfers between Gate exchange and wallet
* dApp and web-app connectivity
#### OKX Wallet (OKX Onchain)
A powerful, multi-chain wallet used globally.
**Capabilities**
* Supports Stable USDT
* Deep OKX ecosystem integration
* Web, mobile, and extension wallet options
#### Atomic Wallet
A non-custodial multi-asset wallet available on desktop, mobile, and as a browser extension. Atomic Wallet integrates the [Simplex by Nuvei](/en/reference/ramps#simplex-by-nuvei) on-ramp, so users can buy USDT on Stable directly inside the app with cards, Apple Pay, Google Pay, or bank transfer.
**Capabilities**
* Holds, sends, and receives USDT on Stable
* Private keys stored locally on the user device
* In-app buy flow for USDT on Stable via Simplex
* Available on Windows, macOS, Linux, iOS, Android, and Chrome
**Get started**: Download Atomic Wallet from [atomicwallet.io](https://atomicwallet.io/downloads), add Stable as a network, and use the in-app Buy flow to purchase USDT on Stable through Simplex.
### 2. Wallet SDK
#### Development Kit by Tether (WDK)
An open-source SDK from Tether for building self-custodial wallets across any platform and blockchain.
**Capabilities**
* Multi-Chain Support: Bitcoin, Ethereum, TON, TRON, Solana, Spark, and more
* Agentic Wallets: Native support for AI agent wallets and x402 payments on Stable
* DeFi Integration: Plug-in support for swaps, bridges, and lending protocols
* Extensible Design: Add custom modules for new blockchains or protocols
**Get started**: Install [`@tetherto/wdk`](https://www.npmjs.com/package/@tetherto/wdk) and [`@tetherto/wdk-wallet-evm`](https://www.npmjs.com/package/@tetherto/wdk-wallet-evm), then follow the [WDK documentation](https://docs.wallet.tether.io) to configure Stable as your target chain.
### 3. Custodial & institutional wallets
#### Anchorage
A federally chartered national bank providing institutional-grade custody for digital assets.
**Capabilities**
* Secure custody for Stable USDT
* Full compliance and regulatory oversight
* Enterprise-grade key management and access controls
### 4. Embedded / in-app wallets
Wallets embedded directly into applications via SDKs, enabling seamless user onboarding and payment flows.
#### Dynamic
Enterprise-grade wallet infrastructure serving thousands of applications and over 40M users.
**Capabilities**
* Wallet creation and authentication
* Embedded wallet flows
* User onboarding for apps and fintechs
**Get started**: Follow the [Dynamic SDK setup docs](https://docs.dynamic.xyz/introduction/welcome) to install the SDK and configure Stable as a supported network in your app.
#### Reown (formerly WalletConnect)
A widely adopted standard for connecting wallets to applications.
**Capabilities**
* Secure wallet-to-dApp connections
* Supports mobile, desktop, and extension wallets
* Broad ecosystem compatibility
**Reown SDK for wallet onboarding**
Stable supports integrations with the **Reown SDK** to help developers deliver seamless wallet and onboarding experiences for users.
Reown provides an open-source, all-in-one SDK that serves as the official gateway to the WalletConnect Network. It enables smooth wallet connections, transactions, logins, embedded wallets (email and social login), on-chain payments, in-app swaps, and more within your application.
**Get Started**
* Visit Reown's documentation: [https://docs.reown.com/overview](https://docs.reown.com/overview)
### 5. Smart wallets & account abstraction
Infrastructure enabling programmable wallets, gasless transactions, spending rules, and advanced UX.
#### Overview table
| **Provider** | **Category** | **Security Method** | **Docs / Get Started** | **Notes** |
| :------------------------------------------ | :------------------------------------ | :------------------------------------- | :------------------------------------------------------------------------------------- | :------------------------------------ |
| [**Holdstation**](https://holdstation.com/) | Smart Wallet (AA) | Smart contract wallet + biometric auth | [https://docs.holdstation.com/holdstation/](https://docs.holdstation.com/holdstation/) | Gasless flows, DeFi-native wallet |
| [**Daimo**](https://pay.daimo.com/) | AA Payments Wallet | Smart account, no seed phrase | [https://paydocs.daimo.com/](https://paydocs.daimo.com/) | One-click payments, stablecoin-first |
| [**Alchemy**](https://alchemy.com) | AA Infrastructure (Bundler/Paymaster) | Bundler + paymaster infra (ERC-4337) | [https://docs.alchemy.com](https://docs.alchemy.com) | Enables AA wallets to build on Stable |
#### Alchemy
Alchemy provides the core AA infrastructure and APIs needed to deploy smart accounts, sponsor gas, and build consumer-grade wallets.
**Capabilities**
* Smart account SDK & APIs
* Paymaster support for gasless actions
* Gas abstraction tooling
* Scalable infra for smart wallet developers
**Get started**: Use the [Alchemy smart account SDK](https://docs.alchemy.com) to deploy ERC-4337 smart accounts and configure a paymaster for sponsored gas on Stable.
**Docs**\
[https://docs.alchemy.com](https://docs.alchemy.com)
#### Holdstation
A smart contract wallet offering account abstraction and biometric-secured interactions.\
**Capabilities**
* Full AA-enabled smart wallet
* Gasless transactions and sponsored fees
* Biometric authorization and session keys
* Integrated trading and DeFi execution layer
**Get started**: Explore the [Holdstation developer docs](https://docs.holdstation.com/holdstation/) to integrate smart wallet flows and sponsored transactions into your application.
#### Daimo
A consumer-grade, account-abstraction wallet designed for instant stablecoin spending and payments.\
**Capabilities**
* AA-based UX with smart wallet execution
* One-click payments across any chain
* No seed phrases; secure key recovery
* Ideal for payments apps and stablecoin utilities
**Get started**: Visit the [Daimo Pay documentation](https://paydocs.daimo.com/) to add one-click stablecoin payment flows to your application on Stable.
### Stable network setup
#### Adding Stable to your wallet
**Network parameters :**
* **Network Name:** Stable
* **Chain ID:** 988
* **Currency:** USDT0
* **RPC URL:** [https://rpc.stable.xyz](https://rpc.stable.xyz)
* **Block Explorer:** [https://stablescan.xyz](https://stablescan.xyz)
#### Building wallet integrations
You can add Stable support by:
* Enabling signing and gas estimation via Stable RPC
* Supporting USDT-native transfers
* Integrating WalletConnect for dApps
* Adding Stable to chain lists or metadata registries
### Have a wallet integrating Stable?
You can reach the team at [bizdev@stable.xyz](mailto\:bizdev@stable.xyz) to be listed in this section.
## Account abstraction with EIP-7702
This guide walks through applying EIP-7702 to an EOA and using the delegation for three patterns: batch payments, spending limits, and session keys. The EOA keeps its address and private key throughout.
:::note
**Concept:** For what EIP-7702 enables on Stable and the security considerations, see [EIP-7702](/en/explanation/eip-7702).
:::
### Prerequisites
* Understanding of EOA vs. smart contract accounts (EOAs have no code by default).
* Familiarity with EVM transaction types ([EIP-2718](https://eips.ethereum.org/EIPS/eip-2718)).
### Overview
EIP-7702 introduces a new transaction type (`0x04`) that carries an `authorizationList`. Each authorization designates a smart contract whose code the EOA will execute for that transaction. The flow is:
1. **Choose or deploy a delegate contract**: a standard Solidity contract implementing the logic you want EOAs to use. You can use a deployed contract or deploy your own. Use an audited contract whenever possible.
2. **Sign an authorization**: the EOA owner signs a message authorizing the delegate contract.
3. **Submit an EIP-7702 transaction**: the transaction includes the authorization, and the EOA runs the delegate's code during execution.
### Use case: batch transactions
The steps below walk through this flow using `Multicall3` as the delegate contract. `Multicall3` is a widely deployed utility contract that aggregates multiple calls into a single transaction. By designating `Multicall3` as the EIP-7702 delegate, an EOA can batch arbitrary contract interactions (token transfers, approvals, contract reads, or any combination) into one atomic transaction. Batch payments are one example: instead of sending ten separate transactions for a payroll run, the EOA executes them all at once.
#### Step 1: Use Multicall3 as a delegate contract
`Multicall3` is deployed at `0xcA11bde05977b3631167028862bE2a173976CA11` on Stable. Since it's already deployed and widely used, you don't need to deploy your own delegate. Signing an EIP-7702 authorization grants the delegate full execution authority over your EOA.
```solidity
// Multicall3 interface (relevant functions only)
interface IMulticall3 {
struct Call3 {
address target;
bool allowFailure;
bytes callData;
}
struct Result {
bool success;
bytes returnData;
}
/// @notice Aggregate calls, allowing each to succeed or fail independently
function aggregate3(Call3[] calldata calls)
external payable returns (Result[] memory returnData);
}
```
#### Step 2: Sign an authorization
The EOA owner signs an authorization that designates the delegate contract. This authorization is included in the EIP-7702 transaction.
```javascript
// config.ts
import { ethers } from "ethers";
export const STABLE_TESTNET_RPC = "https://rpc.testnet.stable.xyz";
export const STABLE_TESTNET_CHAIN_ID = 2201;
export const USDT0_ADDRESS = "0x78Cf24370174180738C5B8E352B6D14c83a6c9A9";
export const DELEGATE_ADDRESS = "0xcA11bde05977b3631167028862bE2a173976CA11";
export const provider = new ethers.JsonRpcProvider(STABLE_TESTNET_RPC);
export const wallet = new ethers.Wallet(process.env.PRIVATE_KEY, provider);
```
```javascript
// signAuthorization.ts
import { ethers } from "ethers";
import { DELEGATE_ADDRESS, STABLE_TESTNET_CHAIN_ID, provider, wallet } from "./config";
export async function signAuthorization() {
const authorization = {
chainId: STABLE_TESTNET_CHAIN_ID,
address: DELEGATE_ADDRESS,
nonce: await provider.getTransactionCount(wallet.address),
};
return wallet.signAuthorization(authorization);
}
```
#### Step 3: Submit an EIP-7702 transaction
Combine the authorization with a call to `Multicall3.aggregate3`. This example batches three USDT0 transfers in a single transaction.
```javascript
import { ethers } from "ethers";
import { wallet, USDT0_ADDRESS } from "./config";
import { signAuthorization } from "./signAuthorization";
const usdt0Interface = new ethers.Interface([
"function transfer(address to, uint256 amount)",
]);
const batchInterface = new ethers.Interface([
"function aggregate3((address target, bool allowFailure, bytes callData)[] calls) returns ((bool success, bytes returnData)[])",
]);
async function main() {
const recipients = [
{ to: "0xAlice...", amount: ethers.parseUnits("100", 6) },
{ to: "0xBob...", amount: ethers.parseUnits("200", 6) },
{ to: "0xCarol...", amount: ethers.parseUnits("150", 6) },
];
const batchData = batchInterface.encodeFunctionData("aggregate3", [
recipients.map(({ to, amount }) => ({
target: USDT0_ADDRESS,
allowFailure: false,
callData: usdt0Interface.encodeFunctionData("transfer", [to, amount]),
})),
]);
const signedAuth = await signAuthorization();
const tx = await wallet.sendTransaction({
type: 4, // EIP-7702 transaction type
to: wallet.address, // call is directed at the EOA itself
data: batchData, // aggregate3 call to execute
authorizationList: [signedAuth],
maxPriorityFeePerGas: 0n,
});
const receipt = await tx.wait(1);
console.log("Batch transactions executed in tx:", receipt.hash);
}
```
```text
Batch transactions executed in tx: 0x...
```
The EOA executes all three calls in a single atomic transaction via `Multicall3.aggregate3`. The delegation persists until explicitly changed or cleared. While this example shows batch payments, the same pattern works for any combination of contract calls.
### Use case: spending limits
A delegate contract can enforce per-transaction or daily caps on an EOA without account migration.
```solidity
// SPDX-License-Identifier: MIT
pragma solidity ^0.8.24;
/// @title SpendingLimitExecutor
/// @notice Delegate contract that enforces daily spending caps
contract SpendingLimitExecutor {
mapping(address => uint256) public dailyLimit;
mapping(address => uint256) public spentToday;
mapping(address => uint256) public lastResetDay;
function setDailyLimit(uint256 limit) external {
dailyLimit[msg.sender] = limit;
}
function executeWithLimit(
address target,
uint256 value,
bytes calldata data
) external payable {
uint256 today = block.timestamp / 1 days;
if (today > lastResetDay[msg.sender]) {
spentToday[msg.sender] = 0;
lastResetDay[msg.sender] = today;
}
spentToday[msg.sender] += value;
require(
spentToday[msg.sender] <= dailyLimit[msg.sender],
"daily limit exceeded"
);
(bool success,) = target.call{value: value}(data);
require(success, "call failed");
}
}
```
### Use case: session keys
Session keys allow a dApp to execute transactions on behalf of an EOA within scoped permissions: a time window and an allowed set of target contracts. This is useful for dApps where frequent on-chain interactions would otherwise require repeated wallet approvals.
```solidity
// SPDX-License-Identifier: MIT
pragma solidity ^0.8.24;
/// @title SessionKeyExecutor
/// @notice Delegate contract that grants scoped, time-limited access to a session key
contract SessionKeyExecutor {
struct Session {
address key;
uint256 validUntil;
uint256 spendingLimit;
uint256 spent;
}
mapping(address => Session) public sessions;
mapping(address => mapping(address => bool)) public allowedTargets;
/// @notice Register a session key with scoped permissions
function startSession(
address key,
uint256 validUntil,
uint256 spendingLimit,
address[] calldata targets
) external {
sessions[msg.sender] = Session({
key: key,
validUntil: validUntil,
spendingLimit: spendingLimit,
spent: 0
});
for (uint256 i = 0; i < targets.length; i++) {
allowedTargets[msg.sender][targets[i]] = true;
}
}
/// @notice Execute a call using the session key
function executeAsSessionKey(
address owner,
address target,
uint256 value,
bytes calldata data
) external {
Session storage session = sessions[owner];
require(msg.sender == session.key, "not session key");
require(block.timestamp <= session.validUntil, "session expired");
require(allowedTargets[owner][target], "target not allowed");
uint256 beforeBalance = owner.balance;
(bool success,) = target.call{value: value}(data);
require(success, "call failed");
session.spent += owner.balance - beforeBalance;
require(session.spent <= session.spendingLimit, "budget exceeded");
}
/// @notice Revoke the active session
function revokeSession() external {
delete sessions[msg.sender];
}
}
```
### Important considerations
* **Persistent delegation**: the delegation persists until the EOA explicitly changes or clears it. It is not limited to a single transaction.
* **Gas costs**: EIP-7702 transactions have slightly higher base gas due to authorization processing, offset when the delegate batches multiple calls.
* **Use audited delegates**: a malicious delegate contract can drain the EOA's assets. Only delegate to contracts that have been audited.
### Key takeaways
* EIP-7702 lets EOAs execute smart contract logic without migrating to a new account type.
* On Stable, EIP-7702 enables batch payments, spending limits, and scoped session keys on existing EOAs.
* The delegation persists until explicitly changed. Always use an audited delegate contract.
### Next recommended
* [**Subscribe and collect**](/en/how-to/subscribe-and-collect) — Apply EIP-7702 to recurring subscription payments with a SubscriptionManager.
* [**EIP-7702 concept**](/en/explanation/eip-7702) — Understand the delegation model before you ship it.
* [**EIP-7702 reference**](/en/reference/eip-7702-api) — Look up the `0x04` transaction format and authorization fields.
## Build an MPP endpoint on Stable
This guide walks through writing a custom [MPP](/en/explanation/mpp) payment method for USDT0 on Stable and serving an MPP-gated endpoint. The buyer signs an [ERC-3009](/en/explanation/erc-3009) `transferWithAuthorization`, the server validates it through `mppx`'s `verify()` hook, and settlement happens in a separate step you control.
:::note
**Concept:** For what MPP is and how it relates to x402, see [Machine Payments Protocol (MPP)](/en/explanation/mpp). For the x402 equivalent, see [Build a pay-per-call API](/en/how-to/build-pay-per-call).
:::
:::note
The example uses Stable mainnet. Use small amounts when testing.
:::
### What you'll build
An HTTP endpoint that returns `402 Payment Required` with an MPP `WWW-Authenticate` challenge, accepts a signed credential in the `Authorization` header, verifies it, settles `transferWithAuthorization` on USDT0, and returns the response with a `Payment-Receipt` header.
```text
step 1. Client: GET /weather (no Authorization header)
Server: 402 Payment Required
WWW-Authenticate: Payment realm="...", challenges="[...usdt0-stable charge for $0.001...]"
step 2. Client signs an ERC-3009 authorization with their viem account
step 3. Client: GET /weather + Authorization header containing the serialized credential
Server: verify() validates the EIP-712 signature
Server: settle() submits transferWithAuthorization on Stable
(~700ms block confirmation)
Server: 200 OK { weather: "sunny" }
Payment-Receipt: reference="0x8f3a...", status="success"
step 4. Verify settlement on Stablescan
https://stablescan.xyz/tx/0x8f3a...
```
### Prerequisites
* A funded USDT0 wallet on Stable. See [Use the faucet](/en/how-to/use-faucet) or [Move USDT0](/en/tutorial/send-usdt0).
* Node 20+ with `mppx`, `viem`, and `zod` installed.
* A seller account (an EOA) on Stable. For the default settlement path, the seller pays gas in USDT0; the [Gas Waiver](#alternative-settle-through-the-gas-waiver) section shows the zero-gas variant.
```bash
npm install mppx viem zod express
```
### 1. Define the shared schema
`Method.from()` declares the intent and the schemas for the request (Challenge) and the credential payload. Both client and server import this definition.
```typescript
// src/method.ts
import { Method } from "mppx";
import { z } from "zod";
import { parseUnits } from "viem";
export const USDT0_STABLE = "0x779Ded0c9e1022225f8E0630b35a9b54bE713736";
export const CHAIN_ID = 988;
// Request: the Challenge payload the server sends to the client.
const zRequest = z.pipe(
z.object({
chainId: z.literal(CHAIN_ID),
asset: z.literal(USDT0_STABLE),
amount: z.string(), // human-readable, e.g. "0.001"
decimals: z.literal(6),
payTo: z.string().regex(/^0x[a-fA-F0-9]{40}$/),
validAfter: z.number().int().nonnegative(),
validBefore: z.number().int().positive(),
nonce: z.string().regex(/^0x[a-fA-F0-9]{64}$/),
}),
z.transform(({ amount, decimals, ...rest }) => ({
...rest,
amount: parseUnits(amount, decimals).toString(), // atomic units
})),
);
// Credential payload: what the client returns after signing.
const zPayload = z.object({
from: z.string().regex(/^0x[a-fA-F0-9]{40}$/),
signature: z.string().regex(/^0x[a-fA-F0-9]{130}$/), // 65-byte hex
});
export const usdt0Stable = Method.from({
intent: "charge",
name: "usdt0-stable",
schema: { request: zRequest, credential: { payload: zPayload } },
});
// EIP-712 domain + type, used by both client and server.
export const EIP712_DOMAIN = {
name: "USDT0",
version: "1",
chainId: CHAIN_ID,
verifyingContract: USDT0_STABLE,
} as const;
export const TRANSFER_WITH_AUTHORIZATION_TYPES = {
TransferWithAuthorization: [
{ name: "from", type: "address" },
{ name: "to", type: "address" },
{ name: "value", type: "uint256" },
{ name: "validAfter", type: "uint256" },
{ name: "validBefore", type: "uint256" },
{ name: "nonce", type: "bytes32" },
],
} as const;
```
```text
usdt0Stable.name === "usdt0-stable"
usdt0Stable.intent === "charge"
```
### 2. Server: verify the credential
`Method.toServer` wires `verify()` into `mppx`. The function receives the deserialized credential (challenge + payload) and must throw on invalid proofs or return a `Receipt`.
```typescript
// src/server-method.ts
import { Method, Receipt } from "mppx";
import { verifyTypedData } from "viem";
import {
usdt0Stable,
EIP712_DOMAIN,
TRANSFER_WITH_AUTHORIZATION_TYPES,
} from "./method";
export const usdt0StableServer = Method.toServer(usdt0Stable, {
async verify({ credential }) {
const { request } = credential.challenge;
const { from, signature } = credential.payload;
const valid = await verifyTypedData({
address: from as `0x${string}`,
domain: EIP712_DOMAIN,
types: TRANSFER_WITH_AUTHORIZATION_TYPES,
primaryType: "TransferWithAuthorization",
message: {
from: from as `0x${string}`,
to: request.payTo as `0x${string}`,
value: BigInt(request.amount),
validAfter: BigInt(request.validAfter),
validBefore: BigInt(request.validBefore),
nonce: request.nonce as `0x${string}`,
},
signature: signature as `0x${string}`,
});
if (!valid) throw new Error("Invalid ERC-3009 signature");
// The Receipt's reference is filled in with the tx hash after settle().
return Receipt.from({
method: usdt0Stable.name,
reference: "pending",
status: "success",
timestamp: new Date().toISOString(),
});
},
});
```
```text
{
method: "usdt0-stable",
reference: "pending",
status: "success",
timestamp: "2026-06-01T12:34:56.000Z"
}
```
:::warning
`verify()` checks the signature but does not check nonce uniqueness or whether the authorization has already been spent. The chain enforces both at submission time: `transferWithAuthorization` reverts on a used nonce. The settle step turns those reverts into errors the server can surface to the client.
:::
### 3. Settle: submit `transferWithAuthorization`
Settlement is intentionally separate from `verify()`. After `verify()` returns, you submit the authorization on-chain through whichever path fits your operational model. Three options, in order of recommendation.
#### Default: server submits directly
The seller's EOA submits `transferWithAuthorization` to USDT0 with the signed authorization. The seller pays gas in USDT0 (Stable's native gas token), so there is no separate gas-token balance to manage.
```typescript
// src/settle.ts
import { createWalletClient, http, parseSignature } from "viem";
import { privateKeyToAccount } from "viem/accounts";
import { stable } from "viem/chains";
import { USDT0_STABLE } from "./method";
const USDT0_ABI = [
{
name: "transferWithAuthorization",
type: "function",
stateMutability: "nonpayable",
inputs: [
{ name: "from", type: "address" },
{ name: "to", type: "address" },
{ name: "value", type: "uint256" },
{ name: "validAfter", type: "uint256" },
{ name: "validBefore", type: "uint256" },
{ name: "nonce", type: "bytes32" },
{ name: "v", type: "uint8" },
{ name: "r", type: "bytes32" },
{ name: "s", type: "bytes32" },
],
outputs: [],
},
] as const;
const seller = privateKeyToAccount(process.env.SELLER_KEY as `0x${string}`);
const wallet = createWalletClient({
account: seller,
chain: stable,
transport: http("https://rpc.stable.xyz"),
});
export async function settleDirect(credential: {
challenge: { request: any };
payload: { from: string; signature: string };
}): Promise<{ txHash: `0x${string}` }> {
const { request } = credential.challenge;
const { v, r, s } = parseSignature(credential.payload.signature as `0x${string}`);
const txHash = await wallet.writeContract({
address: USDT0_STABLE,
abi: USDT0_ABI,
functionName: "transferWithAuthorization",
args: [
credential.payload.from as `0x${string}`,
request.payTo as `0x${string}`,
BigInt(request.amount),
BigInt(request.validAfter),
BigInt(request.validBefore),
request.nonce as `0x${string}`,
Number(v),
r as `0x${string}`,
s as `0x${string}`,
],
});
return { txHash };
}
```
```text
{ txHash: "0x8f3a1b2c..." }
```
#### Alternative: settle through the Gas Waiver
Use Stable's [Gas Waiver](/en/how-to/integrate-gas-waiver) to submit the inner transaction at `gasPrice = 0`. The seller still signs the wrapping transaction, but pays no gas. Requires a Waiver Server API key.
```typescript
// src/settle-waiver.ts
import { encodeFunctionData } from "viem";
import { USDT0_STABLE } from "./method";
import { USDT0_ABI } from "./settle";
const WAIVER_SERVER = "https://waiver.stable.xyz"; // mainnet endpoint
export async function settleViaWaiver(
credential: { challenge: { request: any }; payload: { from: string; signature: string } },
signedInnerTxHex: `0x${string}`,
): Promise<{ txHash: `0x${string}` }> {
const res = await fetch(`${WAIVER_SERVER}/v1/submit`, {
method: "POST",
headers: {
"Content-Type": "application/json",
Authorization: `Bearer ${process.env.WAIVER_API_KEY}`,
},
body: JSON.stringify({ transactions: [signedInnerTxHex] }),
});
const lines = (await res.text()).trim().split("\n");
const result = JSON.parse(lines[0]);
if (!result.success) throw new Error(`Settle failed: ${result.error?.message}`);
return { txHash: result.txHash };
}
```
```text
{ txHash: "0x8f3a1b2c..." }
```
See [Gas waiver protocol](/en/reference/gas-waiver-api) for how to build the signed inner transaction (`gasPrice: 0`, encoded `transferWithAuthorization` call) before posting.
#### Alternative: hand off to an x402 facilitator
If you already operate an x402 facilitator integration ([Semantic Pay](https://docs.semanticpay.io) or [Heurist](https://docs.heurist.ai/x402-products/facilitator)), you can reuse it as a settlement target. POST a `paymentPayload` to `/settle`; the facilitator submits the on-chain call.
The exact `paymentPayload` shape is x402-middleware-internal and not specified at the wire level. The simplest path is to use the facilitator's own SDK to build the payload, or stick with the direct-submission path above. The facilitator does not need to speak MPP; it sees only the `transferWithAuthorization` fields.
### 4. Client: sign a credential
`Method.toClient` wires `createCredential()` into `mppx`. The client reads the Challenge, signs the EIP-712 authorization with the agent's viem account, and serializes the credential.
```typescript
// src/client-method.ts
import { Credential, Method } from "mppx";
import { hexToSignature, parseSignature } from "viem";
import { privateKeyToAccount } from "viem/accounts";
import {
usdt0Stable,
EIP712_DOMAIN,
TRANSFER_WITH_AUTHORIZATION_TYPES,
} from "./method";
export function createUsdt0StableClient(privateKey: `0x${string}`) {
const account = privateKeyToAccount(privateKey);
return Method.toClient(usdt0Stable, {
async createCredential({ challenge }) {
const { request } = challenge;
const signature = await account.signTypedData({
domain: EIP712_DOMAIN,
types: TRANSFER_WITH_AUTHORIZATION_TYPES,
primaryType: "TransferWithAuthorization",
message: {
from: account.address,
to: request.payTo as `0x${string}`,
value: BigInt(request.amount),
validAfter: BigInt(request.validAfter),
validBefore: BigInt(request.validBefore),
nonce: request.nonce as `0x${string}`,
},
});
return Credential.serialize({
challenge,
payload: { from: account.address, signature },
});
},
});
}
```
```text
"eyJjaGFsbGVuZ2UiOnsi..." // base64-serialized credential, ~600 bytes
```
### 5. Wire the server together
Use `mppx`'s Express middleware to issue Challenges, parse incoming `Authorization` headers, run `verify()`, call your settle function, and emit the `Payment-Receipt` header.
```typescript
// src/server.ts
import express from "express";
import { Mppx } from "mppx/express";
import { randomBytes } from "node:crypto";
import { usdt0StableServer } from "./server-method";
import { settleDirect } from "./settle";
const PAY_TO = process.env.PAY_TO_ADDRESS as `0x${string}`;
const PORT = Number(process.env.PORT ?? 4022);
const mppx = Mppx.create({
secretKey: process.env.MPP_SECRET_KEY!,
methods: [usdt0StableServer],
onVerified: async ({ credential, receipt }) => {
const { txHash } = await settleDirect(credential);
return { ...receipt, reference: txHash };
},
});
const app = express();
app.get(
"/weather",
mppx.charge({
amount: "0.001",
method: "usdt0-stable",
request: {
chainId: 988,
asset: "0x779Ded0c9e1022225f8E0630b35a9b54bE713736",
decimals: 6,
payTo: PAY_TO,
validAfter: 0,
validBefore: Math.floor(Date.now() / 1000) + 300,
nonce: `0x${randomBytes(32).toString("hex")}`,
},
})((_req, res) => {
res.json({ weather: "sunny", temperature: 70 });
}),
);
app.listen(PORT, () => {
console.log(`MPP server listening on http://localhost:${PORT}`);
});
```
```text
MPP server listening on http://localhost:4022
```
### 6. Run the flow end to end
Start the server, confirm the Challenge, run a client, and confirm settlement.
:::warning
The next step settles a real USDT0 payment on Stable mainnet. Use a dedicated wallet and small amounts.
:::
#### Confirm the Challenge
```bash
curl -i http://localhost:4022/weather
```
```text
HTTP/1.1 402 Payment Required
WWW-Authenticate: Payment realm="...", challenges="[{\"method\":\"usdt0-stable\",\"request\":{...}}]"
Content-Type: application/json
{"error":"Payment required"}
```
#### Send a paid request
```typescript
// src/client.ts
import { Mppx } from "mppx/client";
import { createUsdt0StableClient } from "./client-method";
const client = Mppx.create({
methods: [createUsdt0StableClient(process.env.BUYER_KEY as `0x${string}`)],
});
const res = await fetch("http://localhost:4022/weather", {
// mppx wraps fetch with the 402 retry loop:
...client.fetchOptions(),
});
console.log(res.status, await res.json());
console.log("Payment-Receipt:", res.headers.get("Payment-Receipt"));
```
```bash
npx tsx src/client.ts
```
```text
200 { weather: "sunny", temperature: 70 }
Payment-Receipt: reference="0x8f3a1b2c...", status="success", timestamp="2026-06-01T12:34:56.000Z"
```
#### Verify on Stablescan
Open `https://stablescan.xyz/tx/0x8f3a1b2c...` and confirm the `transferWithAuthorization` settled to your `PAY_TO` address.
### What you just did
* Paid in USDT0, denominated in dollars, with no gas-token balance to manage on the buyer side.
* Used MPP's `WWW-Authenticate` / `Authorization` / `Payment-Receipt` wire format on the client-server hop.
* Settled with `transferWithAuthorization` on Stable in the same HTTP request lifecycle (\~700 ms block time).
### Next recommended
* [**MPP concept**](/en/explanation/mpp) — Read how MPP relates to x402 and what the other intents look like.
* [**MPP sessions**](/en/explanation/mpp-sessions) — Stream micropayments with off-chain vouchers when per-request settlement is too expensive.
* [**Facilitators**](/en/reference/agentic-facilitators) — Use Semantic Pay or Heurist as the settlement target instead of submitting directly.
## Learn P2P payments
This guide walks through building a P2P payment application on Stable. The app handles the full payment lifecycle: the sender transfers USDT0 directly, the receiver detects the incoming payment in real time, and both can query their own transaction history. Same architecture as any wallet or payment interface, whether a mobile app, web checkout, or backend service.
No middleware, no intermediary. For the conceptual overview, see [P2P payments](/en/reference/p2p-payments). To skip the ABI work and reach a working `transfer` in a few lines, use the [Stable SDK](/en/explanation/sdk-overview).
### What you'll build
Five scripts forming a minimal payment app:
* `wallet.ts` — create or restore a wallet.
* `getBalance.ts` — query the current USDT0 balance.
* `send.ts` — send USDT0 to another address.
* `receive.ts` — watch for incoming payments in real time.
* `history.ts` — query past Transfer events for an address.
#### Demo
```text
step 1. Alice creates wallet → address: 0xAlice...
step 2. Alice's balance: 0.01 USDT0
step 3. Alice sends 0.001 USDT0 to Bob
tx: 0x8f3a...2d41
gas fee: 0.000021 USDT0
Alice balance: 0.008979 USDT0
step 4. Bob receives payment (real-time event)
from: 0xAlice...
amount: 0.001 USDT0
tx: 0x8f3a...2d41
```
### Prerequisites
* Node.js 20 or later.
* A private key with testnet USDT0 (see [Quick start](/en/tutorial/quick-start) to fund a wallet).
### Project setup
```bash
mkdir stable-p2p && cd stable-p2p
npm init -y && npm install ethers dotenv
```
```text
added 2 packages, audited 3 packages in 1s
```
Create `config.ts` shared by every script:
```typescript
// config.ts
import { ethers } from "ethers";
import "dotenv/config";
export const STABLE_RPC = "https://rpc.testnet.stable.xyz";
export const STABLE_WS = "wss://rpc.testnet.stable.xyz";
export const USDT0_ADDRESS = "0x78Cf24370174180738C5B8E352B6D14c83a6c9A9";
export const provider = new ethers.JsonRpcProvider(STABLE_RPC);
```
### 1. Create or restore a wallet
A wallet is a key pair derived from a seed phrase. Generate one for a new user and return the phrase so they can back it up. A returning user restores their wallet from the same phrase.
```typescript
// wallet.ts
import { ethers } from "ethers";
import { provider } from "./config";
/** Create a new wallet for a new user. */
export function createWallet() {
const wallet = ethers.Wallet.createRandom(provider);
return {
wallet,
address: wallet.address,
seedPhrase: wallet.mnemonic!.phrase, // display to user for backup
};
}
/** Restore a wallet from a seed phrase (returning user). */
export function restoreWallet(seedPhrase: string) {
const wallet = ethers.Wallet.fromPhrase(seedPhrase, provider);
return { wallet, address: wallet.address };
}
if (import.meta.url === `file://${process.argv[1]}`) {
const { address, seedPhrase } = createWallet();
console.log("Address: ", address);
console.log("Seed phrase:", seedPhrase);
}
```
```bash
npx tsx wallet.ts
```
```text
Address: 0xAlice...1234
Seed phrase: liberty shoot ... (12 words)
```
### 2. Check the balance
USDT0 is the native asset on Stable, so balance queries work exactly like ETH on Ethereum. Native balance is 18 decimals, use `formatEther` for display.
```typescript
// getBalance.ts
import { ethers } from "ethers";
import { provider } from "./config";
export async function getBalance(address: string) {
const balance = await provider.getBalance(address);
return ethers.formatEther(balance); // 18 decimals
}
if (import.meta.url === `file://${process.argv[1]}`) {
const address = process.argv[2];
const balance = await getBalance(address);
console.log("Balance:", balance, "USDT0");
}
```
```bash
npx tsx getBalance.ts 0xAlice...1234
```
```text
Balance: 0.01 USDT0
```
### 3. Send a payment
The sender signs and submits a transfer directly. On Stable, USDT0 is the native asset, so a simple value transfer is the cheapest path (21,000 gas). This is the same code path as "Send" in any payment app.
```typescript
// send.ts
import { ethers } from "ethers";
import { provider } from "./config";
export async function sendPayment(
senderKey: string,
recipient: string,
amount: string // e.g. "0.001" for 0.001 USDT0
) {
const wallet = new ethers.Wallet(senderKey, provider);
const block = await provider.getBlock("latest");
const baseFee = block!.baseFeePerGas!;
const tx = await wallet.sendTransaction({
to: recipient,
value: ethers.parseEther(amount),
maxFeePerGas: baseFee * 2n,
maxPriorityFeePerGas: 0n, // always 0 on Stable
});
console.log("Payment sent:", tx.hash);
const receipt = await tx.wait(1);
if (receipt!.status === 1) console.log("Payment settled");
return tx.hash;
}
if (import.meta.url === `file://${process.argv[1]}`) {
const [, , recipient, amount] = process.argv;
await sendPayment(process.env.PRIVATE_KEY!, recipient, amount);
}
```
```bash
npx tsx send.ts 0xBob...5678 0.001
```
```text
Payment sent: 0x8f3a...2d41
Payment settled
```
### 4. Receive payments in real time
The receiver listens for incoming `Transfer` events. This is equivalent to push notifications in a traditional payment app. On Stable, single-slot finality means the receiver sees a payment almost instantly.
```typescript
// receive.ts
import { ethers } from "ethers";
import { STABLE_WS, USDT0_ADDRESS } from "./config";
const wsProvider = new ethers.WebSocketProvider(STABLE_WS);
const usdt0 = new ethers.Contract(
USDT0_ADDRESS,
["event Transfer(address indexed from, address indexed to, uint256 value)"],
wsProvider
);
export function watchIncomingPayments(address: string) {
const filter = usdt0.filters.Transfer(null, address);
usdt0.on(filter, (from: string, to: string, value: bigint, event: any) => {
console.log("Payment received:");
console.log(" from: ", from);
console.log(" amount:", ethers.formatUnits(value, 6), "USDT0");
console.log(" tx: ", event.log.transactionHash);
});
console.log("Watching for incoming payments to", address);
}
if (import.meta.url === `file://${process.argv[1]}`) {
watchIncomingPayments(process.argv[2]);
}
```
```bash
npx tsx receive.ts 0xBob...5678
```
```text
Watching for incoming payments to 0xBob...5678
Payment received:
from: 0xAlice...1234
amount: 0.001 USDT0
tx: 0x8f3a...2d41
```
:::note
Native transfers (value transfers) also emit a `Transfer` event on the USDT0 ERC-20 contract because USDT0 is both the native asset and an ERC-20 token on Stable. A single event listener covers both transfer methods.
:::
### 5. Query transaction history
Query past `Transfer` events to build a transaction history view, like a bank statement or transaction list in any payment app.
```typescript
// history.ts
import { ethers } from "ethers";
import { provider, USDT0_ADDRESS } from "./config";
const usdt0 = new ethers.Contract(
USDT0_ADDRESS,
["event Transfer(address indexed from, address indexed to, uint256 value)"],
provider
);
export async function getTransactionHistory(address: string, fromBlock?: number) {
if (fromBlock === undefined) {
const latest = await provider.getBlockNumber();
fromBlock = Math.max(0, latest - 10_000);
}
const [sentEvents, receivedEvents] = await Promise.all([
usdt0.queryFilter(usdt0.filters.Transfer(address, null), fromBlock),
usdt0.queryFilter(usdt0.filters.Transfer(null, address), fromBlock),
]);
return [
...sentEvents.map((e: any) => ({
type: "sent" as const,
counterparty: e.args[1],
amount: ethers.formatUnits(e.args[2], 6),
txHash: e.transactionHash,
block: e.blockNumber,
})),
...receivedEvents.map((e: any) => ({
type: "received" as const,
counterparty: e.args[0],
amount: ethers.formatUnits(e.args[2], 6),
txHash: e.transactionHash,
block: e.blockNumber,
})),
].sort((a, b) => b.block - a.block);
}
if (import.meta.url === `file://${process.argv[1]}`) {
const history = await getTransactionHistory(process.argv[2]);
for (const tx of history) {
console.log(`${tx.type} ${tx.amount} USDT0 ${tx.counterparty} ${tx.txHash}`);
}
}
```
```bash
npx tsx history.ts 0xAlice...1234
```
```text
sent 0.001 USDT0 0xBob...5678 0x8f3a...2d41
received 0.01 USDT0 0xFaucet... 0x22b1...3f09
```
:::warning
Scanning wide block ranges (millions of blocks) can time out and exceed RPC rate limits. For production, use the [Stablescan Etherscan-compatible API](https://stablescan.xyz) for paginated history queries — every transaction is already indexed.
:::
### Next recommended
* [**Subscribe and collect**](/en/how-to/subscribe-and-collect) — Pull-based recurring subscriptions with EIP-7702 delegation.
* [**Paying with invoice**](/en/how-to/pay-with-invoice) — Settle invoices with ERC-3009 and deterministic nonces.
* [**Send your first USDT0**](/en/tutorial/send-usdt0) — Reference the basic native vs. ERC-20 transfer flow.
## Build a pay-per-call API
This guide walks through monetizing an API endpoint with x402. The server adds a payment handler, the client pays per request, and settlement happens within the HTTP lifecycle.
:::note
**Concept:** For the x402 protocol and why it fits Stable, see [x402](/en/explanation/x402). For the high-level use case model, see [Pay-per-call APIs](/en/reference/pay-per-call).
:::
:::note
The Semantic facilitator currently operates on mainnet only. The examples in this guide use Stable mainnet. Use small amounts when testing.
:::
### What you'll build
A paid HTTP API where the server responds with `402 Payment Required`, the client pays per request, and the facilitator settles USDT0 on-chain within the HTTP lifecycle.
#### Demo
```text
step 1. Client: GET /weather (no payment)
Server: 402 Payment Required
PAYMENT-REQUIRED: { amount: "1000", asset: USDT0, network: eip155:988 }
step 2. Client signs ERC-3009 authorization
step 3. Client: GET /weather + PAYMENT-SIGNATURE header
Server: forwards to facilitator → transferWithAuthorization settles on-chain
(~700ms block confirmation)
Server: 200 OK { weather: "sunny", temperature: 70 }
PAYMENT-SETTLE-RESPONSE: { txHash: "0x8f3a...", paid: "0.001 USDT0" }
step 4. Verify settlement on Stablescan
https://stablescan.xyz/tx/0x8f3a...
```
### Overview
**Seller (server):**
```typescript
// --- Server ---
app.use(paymentMiddleware({
"GET /weather": {
price: { amount: "1000", asset: USDT0 },
payTo: sellerAddress,
},
"POST /inference": {
price: { amount: "50000", asset: USDT0 },
payTo: sellerAddress,
},
}, resourceServer));
// Routes not listed in the config are not gated.
```
**Buyer (client):**
```typescript
// --- Client ---
account = new WalletAccountEvm(seedPhrase, { provider: RPC });
client = new x402Client();
fetchWithPayment = wrapFetchWithPayment(fetch, client);
weatherResponse = fetchWithPayment("https://api.example.com/weather");
inferenceResponse = fetchWithPayment("https://api.example.com/inference", {
method: "POST",
headers: { "Content-Type": "application/json" },
body: JSON.stringify({ prompt: "Hello" }),
});
// For each paid request:
// 1. Initial request returns 402 with PAYMENT-REQUIRED header
// 2. Client signs ERC-3009 authorization with wallet
// 3. Client retries with PAYMENT-SIGNATURE header
// 4. Facilitator settles on-chain, server returns the response
```
### Seller: set up paid endpoints
The seller adds x402 middleware to define which routes require payment. When a request arrives without payment, the middleware responds with `402 Payment Required` and the payment terms. When a valid payment header is present, the middleware forwards it to a facilitator that verifies the signature and settles the payment on-chain. The seller only configures the price and the receiving address; the facilitator handles verification and settlement.
```bash
npm install express @x402/express @x402/evm @x402/core
```
#### Pricing
Each route specifies the payment amount in USDT0 base units (6 decimals), the network, and the address to receive funds. For example, `"1000"` equals `$0.001` and `"50000"` equals `$0.05`.
```typescript
price: {
amount: "1000", // base units (6 decimals)
asset: USDT0_STABLE, // USDT0 contract address
extra: { name: "USDT0", version: "1", decimals: 6 }, // EIP-712 domain info
}
```
The `extra` fields (`name`, `version`, `decimals`) are used by the buyer's client for EIP-712 signature construction and must match the on-chain USDT0 contract.
#### Route configuration
Routes are mapped using the `METHOD /path` format. Each route specifies the accepted payment scheme, network, price, and the address to receive funds (`payTo`). The `description` and `mimeType` fields help buyers and AI agents discover what the endpoint provides. Routes not listed in the config are not gated and behave like normal Express routes.
```typescript
// server.ts
import express from "express";
import { paymentMiddleware, x402ResourceServer } from "@x402/express";
import { ExactEvmScheme } from "@x402/evm/exact/server";
import { HTTPFacilitatorClient } from "@x402/core/server";
const PAY_TO = process.env.PAY_TO_ADDRESS as `0x${string}`;
const FACILITATOR_URL = "https://x402.semanticpay.io/";
const STABLE_NETWORK = "eip155:988"; // Stable Mainnet CAIP-2 ID
const USDT0_STABLE = "0x779Ded0c9e1022225f8E0630b35a9b54bE713736";
const facilitatorClient = new HTTPFacilitatorClient({ url: FACILITATOR_URL });
const resourceServer = new x402ResourceServer(facilitatorClient)
.register(STABLE_NETWORK, new ExactEvmScheme());
const app = express();
app.use(
paymentMiddleware(
{
// Example 1: Configure a paid GET route
"GET /weather": {
accepts: [
{
scheme: "exact",
network: STABLE_NETWORK,
price: {
amount: "1000", // $0.001
asset: USDT0_STABLE,
extra: { name: "USDT0", version: "1", decimals: 6 },
},
payTo: PAY_TO,
},
],
description: "Weather data",
mimeType: "application/json",
},
// Example 2: Configure a paid POST route
"POST /inference": {
accepts: [
{
scheme: "exact",
network: STABLE_NETWORK,
price: {
amount: "50000", // $0.05
asset: USDT0_STABLE,
extra: { name: "USDT0", version: "1", decimals: 6 },
},
payTo: PAY_TO,
},
],
description: "AI inference endpoint",
mimeType: "application/json",
},
},
resourceServer,
),
);
app.get("/weather", (req, res) => {
res.json({ weather: "sunny", temperature: 70 });
});
app.post("/inference", (req, res) => {
const { prompt } = req.body;
res.json({ result: `Inference result for: ${prompt}` });
});
// Not listed in the config, so no payment required.
app.get("/health", (req, res) => {
res.json({ status: "ok", payTo: PAY_TO });
});
const PORT = process.env.PORT || 4021;
app.listen(PORT, () => {
console.log(`Server listening at http://localhost:${PORT}`);
console.log(`GET /health - free`);
console.log(`GET /weather - $0.001 per request`);
console.log(`POST /inference - $0.05 per request`);
});
```
:::note
x402 also provides middleware for Hono (`@x402/hono`) and Next.js (`@x402/next`). The pattern is the same: create a facilitator client, register the EVM scheme, and apply middleware.
:::
### Buyer: make paid requests
The buyer accesses paid endpoints without going through manual payment flows. The buyer does not pay gas. The facilitator settles on-chain, and the buyer only pays the exact amount specified in the payment requirements.
```bash
npm install @x402/fetch @x402/evm @tetherto/wdk-wallet-evm
```
#### Create a wallet and check balance
```typescript
// client.ts
import WalletManagerEvm from "@tetherto/wdk-wallet-evm";
const account = await new WalletManagerEvm(process.env.SEED_PHRASE!, {
provider: "https://rpc.stable.xyz",
}).getAccount(0);
console.log("Buyer address:", account.address);
// USDT0 uses 6 decimals. A balance of 1000000 equals 1.00 USDT0.
const USDT0_STABLE = "0x779Ded0c9e1022225f8E0630b35a9b54bE713736";
const balance = await account.getTokenBalance(USDT0_STABLE);
console.log("USDT0 balance:", Number(balance) / 1e6, "USDT0");
```
#### Connect to x402 and make a paid request
`WalletAccountEvm` satisfies the signer interface that x402 expects, so it can be registered directly as the signer for the x402 client. Once registered, requests sent through the x402-enabled client handle 402 payment flows automatically.
```typescript
import { x402Client, wrapFetchWithPayment } from "@x402/fetch";
import { registerExactEvmScheme } from "@x402/evm/exact/client";
const client = new x402Client();
registerExactEvmScheme(client, { signer: account });
const fetchWithPayment = wrapFetchWithPayment(fetch, client);
const response = await fetchWithPayment("http://localhost:4021/weather");
const data = await response.json();
console.log("Response:", data);
```
Under the hood, `fetchWithPayment` intercepts the 402 response, parses the payment requirements (amount, token, network, recipient), signs an ERC-3009 `transferWithAuthorization` with the WDK wallet, and retries the request with the `PAYMENT-SIGNATURE` header.
:::note
If you prefer Axios, use `@x402/axios` with `wrapAxiosWithPayment` for the same automatic payment handling.
:::
### Test the payment flow
Start the server and verify both the paid and free routes.
:::warning
This test flow runs on Stable mainnet. Each successful paid request settles a real USDT0 payment through the hosted facilitator. Use a dedicated wallet and small amounts only.
:::
#### 1. Confirm the 402 response
```bash
curl -i http://localhost:4021/weather
```
The response should be `402 Payment Required` with a `PAYMENT-REQUIRED` header containing the price, asset, and network.
#### 2. Run the client
```bash
npx tsx client.ts
```
The client handles the full cycle: receives the 402, signs the authorization, retries with payment, and prints the response.
#### 3. Read the receipt
After a successful paid request, the buyer can read the `PAYMENT-SETTLE-RESPONSE` header from the server response and parse the settlement receipt.
```typescript
// (continued) client.ts
import { x402HTTPClient } from "@x402/fetch";
const httpClient = new x402HTTPClient(client);
const receipt = httpClient.getPaymentSettleResponse(
(name) => response.headers.get(name),
);
console.log("Payment receipt:", JSON.stringify(receipt, null, 2));
```
### Test without the live facilitator
Because the Semantic facilitator is mainnet-only, you can't point your server at a testnet facilitator today. To iterate on server logic, route handlers, and middleware behavior without settling real payments, stub the facilitator client.
```typescript
// server.test.ts
import { x402ResourceServer } from "@x402/express";
import { ExactEvmScheme } from "@x402/evm/exact/server";
// Stub facilitator: accepts any signature, returns a fake settlement.
const stubFacilitatorClient = {
verify: async () => ({ isValid: true, payer: "0xMockPayer" }),
settle: async () => ({
success: true,
txHash: "0xMOCK000000000000000000000000000000000000000000000000000000000001",
networkId: "eip155:988",
}),
};
export const testResourceServer = new x402ResourceServer(stubFacilitatorClient as any)
.register("eip155:988", new ExactEvmScheme());
```
Run unit tests against the stub to validate:
* 402 responses include the correct `PAYMENT-REQUIRED` payload.
* Requests with a valid `PAYMENT-SIGNATURE` header reach the handler.
* Requests with a missing or malformed header get rejected before the handler runs.
When you're ready to exercise real settlement, swap back to `HTTPFacilitatorClient` and run on mainnet with small amounts.
:::warning
Stubbed settlement only verifies middleware behavior. It doesn't prove your route handler is idempotent under real network latency or concurrent payments. Always finish with a live mainnet test against small amounts before shipping.
:::
### Advanced: lifecycle hooks
x402 provides hooks to intercept and customize payment processing at key points in the flow. For example, the server can run logic before verification (e.g., checking API keys or subscriber status) to bypass payment for authorized requests, and the client can enforce spending limits before signing.
For the full hook reference and examples, see [x402 Lifecycle Hooks](https://x402.semanticpay.io/docs/hooks).
### Next recommended
* [**x402 concept**](/en/explanation/x402) — Understand the protocol and where it fits.
* [**ERC-3009**](/en/explanation/erc-3009) — Review the settlement standard x402 uses.
* [**Paying with MCP server**](/en/how-to/pay-with-mcp) — Wrap this API as an MCP tool so AI clients can call it through prompts.
## Create a wallet
A Stable wallet is an Ethereum-standard key pair. Any wallet library that produces an EVM account works on Stable without modification. This guide shows two paths: ethers.js for most applications, and Tether's [WDK (Wallet Development Kit)](https://github.com/tetherto/wdk) for integrations that want a turnkey self-custody layer for agents and payments.
:::note
No registration, no Stable-specific account setup. A wallet can immediately receive USDT0 from the [testnet faucet](/en/how-to/use-faucet) or a mainnet transfer.
:::
### Prerequisites
* Node.js 20 or later.
### Option 1: ethers.js
Install the library and generate a key pair.
```bash
npm install ethers
```
```typescript
// wallet.ts
import { ethers } from "ethers";
const provider = new ethers.JsonRpcProvider("https://rpc.testnet.stable.xyz");
/** Create a new wallet for a new user. */
export function createWallet() {
const wallet = ethers.Wallet.createRandom(provider);
return {
wallet,
address: wallet.address,
seedPhrase: wallet.mnemonic!.phrase, // show to the user once for backup
};
}
/** Restore a wallet from a seed phrase (returning user). */
export function restoreWallet(seedPhrase: string) {
const wallet = ethers.Wallet.fromPhrase(seedPhrase, provider);
return { wallet, address: wallet.address };
}
if (import.meta.url === `file://${process.argv[1]}`) {
const { address, seedPhrase } = createWallet();
console.log("Address: ", address);
console.log("Seed phrase:", seedPhrase);
}
```
```bash
npx tsx wallet.ts
```
```text
Address: 0xAlice...1234
Seed phrase: liberty shoot ... (12 words)
```
:::warning
Never log or store the seed phrase in plain text in production. Encrypt it at rest, or use a secrets manager. `ethers.Wallet.createRandom` returns the phrase once per call — if you lose it, funds are unrecoverable.
:::
### Option 2: Tether WDK
The WDK wraps key derivation, signing, and transaction submission into a single interface. It's the right choice when you want self-custody without re-implementing common account flows, and it integrates directly with [x402](/en/how-to/build-pay-per-call) for agent payments.
```bash
npm install @tetherto/wdk @tetherto/wdk-wallet-evm
```
```typescript
// wallet-wdk.ts
import WDK from "@tetherto/wdk";
import WalletManagerEvm from "@tetherto/wdk-wallet-evm";
function initWdk(seedPhrase: string) {
return new WDK(seedPhrase)
.registerWallet("stable", WalletManagerEvm, {
provider: "https://rpc.testnet.stable.xyz",
});
}
/** Create a new wallet for a new user. */
export async function createWallet() {
const seedPhrase = WDK.getRandomSeedPhrase();
const wdk = initWdk(seedPhrase);
const account = await wdk.getAccount("stable", 0);
return {
account,
address: await account.getAddress(),
seedPhrase, // show to the user once for backup
};
}
/** Restore a wallet from a seed phrase (returning user). */
export async function restoreWallet(seedPhrase: string) {
const wdk = initWdk(seedPhrase);
const account = await wdk.getAccount("stable", 0);
return { account, address: await account.getAddress() };
}
```
```bash
npx tsx wallet-wdk.ts
```
```text
Address: 0xAlice...1234
Seed phrase: liberty shoot ... (12 words)
```
### Fund the wallet
Before the wallet can transact, it needs USDT0 for gas. On testnet, request from the faucet:
```bash
open https://faucet.stable.xyz
```
Paste the address and select the button to receive 1 testnet USDT0 (enough for thousands of native transfers). For mainnet, send USDT0 from any supported exchange or bridge; see [Bridging to Stable](/en/explanation/usdt0-bridging).
### Check the balance
Native USDT0 uses 18 decimals. The native balance is the one gas is paid from.
```typescript
// balance.ts
import { ethers } from "ethers";
const provider = new ethers.JsonRpcProvider("https://rpc.testnet.stable.xyz");
const balance = await provider.getBalance("0xYourAddress");
console.log("Balance:", ethers.formatEther(balance), "USDT0");
```
```bash
npx tsx balance.ts
```
```text
Balance: 1.0 USDT0
```
### Next recommended
* [**Delegate with EIP-7702**](/en/how-to/account-abstraction) — Add batch payments, spending limits, and session keys to this wallet.
* [**Send your first USDT0**](/en/tutorial/send-usdt0) — Native and ERC-20 transfers on the same balance.
* [**Fund a testnet wallet**](/en/how-to/use-faucet) — Faucet and Sepolia bridge options for larger test balances.
Stable provides MCP servers, agent skills, and plain-text documentation files so AI editors and coding agents can work with Stable directly. This page covers how to wire each piece into your workflow, a copy-pasteable context block for non-MCP AI tools, and starter prompts for common tasks.
### MCP servers
Stable runs two MCP servers. **Docs MCP** searches this docs site for concepts, guides, code snippets, and contract references. **Runtime MCP** interacts with the Stable chain for balance queries, transaction simulation, and execution.
Both servers can be added to any MCP-compatible client.
#### Cursor
Open your MCP configuration file and add:
```json
{
"mcpServers": {
"stable-docs": {
"url": "https://docs.stable.xyz/mcp"
},
"stable-runtime": {
"url": "https://runtime.stable.xyz/mcp"
}
}
}
```
Restart Cursor. Verify by asking: "How do I send USDT0 on Stable?"
#### Claude Code
```bash
claude mcp add stable-docs https://docs.stable.xyz/mcp
claude mcp add stable-runtime https://runtime.stable.xyz/mcp
```
Verify by asking: "Search Stable docs for Gas Waiver integration steps."
### Agent skills
Agent skills are predefined workflows that combine Docs MCP and Runtime MCP. When you ask an AI to perform a task like "send 100 USDT0 to three addresses," the skill handles the full sequence: look up the relevant docs, resolve addresses and parameters, check balances, simulate the transaction, and execute after approval.
Skills are available as a Claude Code plugin.
#### Install
```bash
claude plugin add stable-xyz/agent-skills
```
Or install from the Claude Code marketplace.
For the full skill definitions and source, see the [agent-skills repository](https://github.com/stable-xyz/agent-skills).
### Plain-text docs
For AI tools that do not support MCP, Stable documentation is available as static text files.
| **File** | **URL** | **Content** |
| :-------------- | :----------------------------------------------------------------------------- | :-------------------------------------- |
| `llms.txt` | [https://docs.stable.xyz/llms.txt](https://docs.stable.xyz/llms.txt) | Page index with titles and descriptions |
| `llms-full.txt` | [https://docs.stable.xyz/llms-full.txt](https://docs.stable.xyz/llms-full.txt) | Full documentation in a single file |
These files are static snapshots. For the most current content, use Docs MCP.
#### Cursor
1. Go to **Settings > Features > Docs**.
2. Select **Add** and enter `https://docs.stable.xyz/llms-full.txt`.
3. Reference in chat with `@Stable`.
#### Other tools
Download `llms-full.txt` and include it in your project context or system prompt.
### Stable context block
Paste this at the top of any AI chat or system prompt. It gives the model everything it needs to generate correct Stable code on the first attempt.
```markdown
# Stable chain context
Stable is a Layer 1 where USDT0 is the native gas token. Fully EVM-compatible.
All standard EVM tools (Hardhat, Foundry, ethers.js, viem) work unchanged once
you adjust three gas fields (see Behavioral differences below).
## Network
| Field | Mainnet | Testnet |
| :-------------- | :--------------------------------------- | :----------------------------------------- |
| Chain ID | 988 | 2201 |
| RPC | https://rpc.stable.xyz | https://rpc.testnet.stable.xyz |
| Explorer | https://stablescan.xyz | https://testnet.stablescan.xyz |
| Currency symbol | USDT0 | USDT0 |
## USDT0 contract addresses
- Mainnet: 0x779ded0c9e1022225f8e0630b35a9b54be713736
- Testnet: 0x78cf24370174180738c5b8e352b6d14c83a6c9a9
## Behavioral differences from Ethereum
1. **Gas token is USDT0, not ETH.** The `value` field in native transfers
carries USDT0. Fees are denominated in USDT0.
2. **`maxPriorityFeePerGas` is always 0.** No tip-based ordering. Set it
explicitly to `0n` or validators will reject or ignore tip components.
3. **USDT0 has a dual role**: native asset (18 decimals) AND ERC-20 (6 decimals)
on the same balance. `address(x).balance` reports 18-decimal wei;
`USDT0.balanceOf(x)` reports 6-decimal units. Values may differ by up to
0.000001 USDT0 due to fractional reconciliation. Never mirror native
balance in an internal variable; always query at payout time.
4. **Transfer events are emitted for native transfers too.** A single Transfer
event listener on the USDT0 ERC-20 contract covers both transfer paths.
5. **Single-slot finality (~700ms).** Once a block is committed, it cannot
be reorged. No need to wait multiple confirmations.
6. **Gas Waiver** lets applications cover gas: user signs with `gasPrice = 0`,
a governance-registered waiver wraps and submits. Contracts must be on
the waiver's AllowedTarget policy.
7. **EIP-7702** is supported for delegating an EOA to a contract (type-4 tx).
8. **Precompile addresses**: Bank `0x...1003`, Distribution `0x...0801`,
Staking `0x...0800`, StableSystem `0x...9999`.
## Common mistakes to avoid
- Copying Ethereum priority-fee constants (2 gwei tips, etc.) — has no effect
on Stable and can be rejected by wallets.
- Using `ethers.parseUnits(x, 18)` for ERC-20 USDT0 amounts. ERC-20 uses 6
decimals; native transfers use 18.
- Mirroring native balance in a `uint256 deposited` variable — USDT0
allowance-based operations (transferFrom, permit) can reduce a contract's
native balance without invoking its code.
- Sending native or ERC-20 USDT0 to `address(0)` — both revert on Stable.
- Assuming `EXTCODEHASH == 0` means an address is unused. On Stable,
permit-based approvals can change state without incrementing nonce.
- Writing `value: ethers.parseEther(amount, "ether")` and expecting ETH
semantics. That transfer sends USDT0.
```
### Starter prompts
Copy any of these into your AI editor after loading the context block above.
#### Deploy a contract
```text
Use Foundry to scaffold a project called `stable-escrow`. Write a minimal
Escrow contract in Solidity ^0.8.24 with deposit() and withdraw(amount)
functions that transfer USDT0 natively. Use address(this).balance for
solvency checks (never mirror the balance in a uint256). Reject
address(0) recipients. Then produce a deployment command using
`forge create` pointed at Stable testnet (RPC https://rpc.testnet.stable.xyz,
chain ID 2201).
```
#### Send USDT0
```text
Write a TypeScript script using ethers v6 that sends 0.001 USDT0 natively
from the wallet loaded from PRIVATE_KEY. Use base-fee-only EIP-1559 gas
(maxPriorityFeePerGas = 0n, maxFeePerGas = 2 * baseFeePerGas). Target
Stable testnet. Log the tx hash and a Stablescan explorer URL.
```
#### Set up EIP-7702 delegation
```text
Write a TypeScript script using ethers v6 that:
1. Signs an EIP-7702 authorization delegating my EOA to Multicall3 at
0xcA11bde05977b3631167028862bE2a173976CA11 on Stable testnet
(chain ID 2201).
2. Sends a type-4 transaction with authorizationList: [signedAuth],
to: wallet.address (self-call), and data that invokes aggregate3()
to batch three USDT0 transfers (100, 200, 150 USDT0 with 6 decimals).
3. Use maxPriorityFeePerGas: 0n.
```
#### Build a subscription contract
```text
Write a SubscriptionManager Solidity contract for EIP-7702 delegation on
Stable. It runs on a subscriber's EOA. Expose:
- subscribe(bytes32 subId, address provider, uint256 amount, uint256 interval)
callable only when msg.sender == address(this) (subscriber on their own EOA).
- collect(bytes32 subId) callable only by the registered provider, only
when block.timestamp >= nextChargeAt; advances nextChargeAt by interval
and transfers USDT0 to the provider. Use IERC20 USDT0 at the testnet
address 0x78cf24370174180738c5b8e352b6d14c83a6c9a9.
- cancelSubscription(bytes32 subId) callable only by the subscriber.
Emit events for SubscriptionCreated, SubscriptionCollected, SubscriptionCancelled.
```
#### Build an x402 pay-per-call API
```text
Write an Express server in TypeScript that exposes GET /weather priced
at $0.001 USDT0 (amount: "1000", 6 decimals) using @x402/express,
@x402/evm/exact/server, and HTTPFacilitatorClient pointed at
https://x402.semanticpay.io/. Use Stable mainnet (CAIP-2 eip155:988,
USDT0 at 0x779Ded0c9e1022225f8E0630b35a9b54bE713736). The handler should
return { weather: "sunny", temperature: 70 }. Read PAY_TO_ADDRESS from
env. Print the configured routes on startup.
```
### Next recommended
* [**Paying with MCP server**](/en/how-to/pay-with-mcp) — Wrap a paid API as an MCP tool so AI clients can call and pay for it.
* [**Quick start**](/en/tutorial/quick-start) — Pair the AI context with a first-transaction run in five minutes.
* [**Difference from Ethereum**](/en/explanation/ethereum-comparison) — Deep-dive on the gas and USDT0 semantics in the context block.
## Index contract events
Indexing turns on-chain events into data your application can react to: balance updates, transaction history, UI notifications. This guide shows how to subscribe to events from a deployed Stable contract using ethers.js and how to backfill historical events so you don't miss any emitted while your service was offline.
### Prerequisites
* A deployed contract on Stable testnet or mainnet. If you need one, see [Deploy](/en/tutorial/smart-contract) and [Verify](/en/how-to/verify-contract).
* Node.js 20 or later.
* The contract address and the ABI of the events you want to index.
### 1. Install and configure
```bash
npm install ethers
```
```typescript
// config.ts
import { ethers } from "ethers";
export const STABLE_TESTNET_RPC = "https://rpc.testnet.stable.xyz";
export const STABLE_TESTNET_WS = "wss://rpc.testnet.stable.xyz";
export const CONTRACT_ADDRESS = "0xDeployedContractAddress";
// Minimal ABI: only the events you want to index.
export const CONTRACT_ABI = [
"event NumberUpdated(address indexed caller, uint256 oldValue, uint256 newValue)",
];
```
### 2. Subscribe to live events
Use a WebSocket provider so you receive events as soon as validators finalize each block. WebSocket avoids polling overhead and keeps notification latency close to block time (\~0.7 seconds on Stable).
```typescript
// watchLive.ts
import { ethers } from "ethers";
import { STABLE_TESTNET_WS, CONTRACT_ADDRESS, CONTRACT_ABI } from "./config";
const provider = new ethers.WebSocketProvider(STABLE_TESTNET_WS);
const contract = new ethers.Contract(CONTRACT_ADDRESS, CONTRACT_ABI, provider);
contract.on("NumberUpdated", (caller, oldValue, newValue, event) => {
console.log("NumberUpdated:");
console.log(" caller: ", caller);
console.log(" oldValue: ", oldValue.toString());
console.log(" newValue: ", newValue.toString());
console.log(" tx: ", event.log.transactionHash);
console.log(" block: ", event.log.blockNumber);
});
console.log("Listening for NumberUpdated events...");
```
```bash
npx tsx watchLive.ts
```
```text
Listening for NumberUpdated events...
NumberUpdated:
caller: 0x1234...abcd
oldValue: 0
newValue: 42
tx: 0x8f3a...2d41
block: 1284371
```
Events arrive in real time as callers invoke your contract.
### 3. Backfill historical events
When a service starts, you usually need to catch up on events emitted while it was offline. Use `queryFilter` with a block range.
```typescript
// backfill.ts
import { ethers } from "ethers";
import { STABLE_TESTNET_RPC, CONTRACT_ADDRESS, CONTRACT_ABI } from "./config";
const provider = new ethers.JsonRpcProvider(STABLE_TESTNET_RPC);
const contract = new ethers.Contract(CONTRACT_ADDRESS, CONTRACT_ABI, provider);
const latest = await provider.getBlockNumber();
const fromBlock = Math.max(0, latest - 10_000); // last ~10k blocks
const events = await contract.queryFilter(
contract.filters.NumberUpdated(),
fromBlock,
latest
);
for (const event of events) {
console.log(
`[block ${event.blockNumber}]`,
event.args.caller,
"set number to",
event.args.newValue.toString()
);
}
console.log(`Backfilled ${events.length} events from block ${fromBlock} to ${latest}`);
```
```bash
npx tsx backfill.ts
```
```text
[block 1282351] 0x1234...abcd set number to 10
[block 1283092] 0xef01...2345 set number to 25
[block 1284371] 0x1234...abcd set number to 42
Backfilled 3 events from block 1282351 to 1284371
```
:::warning
Wide block ranges (millions of blocks) can exceed RPC rate limits and time out. For production indexers, paginate by 10k-block windows or use [Stablescan's Etherscan-compatible API](/en/how-to/build-p2p-payments#transaction-history) for indexed historical queries.
:::
### 4. Filter events by indexed arguments
Events with `indexed` parameters (like `caller` above) can be filtered server-side. Pass the filter value instead of reading every event and filtering in your app.
```typescript
// watchUser.ts
import { ethers } from "ethers";
import { STABLE_TESTNET_WS, CONTRACT_ADDRESS, CONTRACT_ABI } from "./config";
const provider = new ethers.WebSocketProvider(STABLE_TESTNET_WS);
const contract = new ethers.Contract(CONTRACT_ADDRESS, CONTRACT_ABI, provider);
const userAddress = "0x1234...abcd";
const filter = contract.filters.NumberUpdated(userAddress);
contract.on(filter, (caller, oldValue, newValue, event) => {
console.log(`${caller} set number to ${newValue.toString()}`);
});
console.log(`Watching NumberUpdated for ${userAddress}...`);
```
```bash
npx tsx watchUser.ts
```
```text
Watching NumberUpdated for 0x1234...abcd...
0x1234...abcd set number to 42
```
### Handle connection drops
WebSocket connections can drop. For production indexers, implement reconnection logic so you don't miss events.
```typescript
// resilientWatch.ts
import { ethers } from "ethers";
import { STABLE_TESTNET_WS, CONTRACT_ADDRESS, CONTRACT_ABI } from "./config";
let reconnectAttempts = 0;
const MAX_RECONNECT = 5;
function setupWatcher() {
const provider = new ethers.WebSocketProvider(STABLE_TESTNET_WS);
const contract = new ethers.Contract(CONTRACT_ADDRESS, CONTRACT_ABI, provider);
contract.on("NumberUpdated", (caller, oldValue, newValue) => {
console.log(`${caller} set number to ${newValue.toString()}`);
});
provider.websocket.onerror = (err: any) => {
console.error("Provider error:", err);
if (reconnectAttempts < MAX_RECONNECT) {
reconnectAttempts++;
setTimeout(setupWatcher, 5000);
}
};
}
setupWatcher();
```
### Next recommended
* [**Track unbonding completions**](/en/how-to/track-unbonding) — Index system transaction events (unbonding completions) emitted by the protocol.
* [**Build a P2P payment app**](/en/how-to/build-p2p-payments) — Apply indexing to USDT0 Transfer events and build a payment history view.
* [**JSON-RPC reference**](/en/reference/json-rpc-api) — See which `eth_getLogs` and related methods Stable supports.
## Index validator data
Validator data lives on-chain and is readable over standard EVM JSON-RPC. You query current state through the staking, slashing, and governance precompiles, and you reconstruct history from their event logs. This means an indexer or analytics platform reads everything it needs through `eth_call` and `eth_getLogs`, with no access to a node's `stabled` CLI or Cosmos REST.
:::note
**Concept:** For what the staking module tracks and how delegation works, see [Staking module](/en/explanation/staking-module). For per-method inputs and outputs, see the [Staking precompile reference](/en/reference/staking-module-api).
:::
### Where each data point comes from
| **Data point** | **Source** | **How to read it** |
| :-------------------------------- | :-------------------------------------- | :---------------------------------------------------------------- |
| Validator name, identity, website | Staking precompile `validators()` | `description.moniker` and related fields |
| Stake (bonded tokens) | Staking precompile `validators()` | `tokens` field |
| Commission | Staking precompile `validators()` | `commission` field |
| Stake changes over time | Staking precompile events | `Delegate`, `Unbond`, `Redelegate` logs |
| Join date | Staking precompile event | `CreateValidator` log → block timestamp |
| Uptime | Slashing precompile `getSigningInfos()` | `(signedBlocksWindow − missedBlocksCounter) / signedBlocksWindow` |
| Voting history (aggregate) | Gov precompile `getTallyResult()` | Per-proposal tally |
| Voting history (per validator) | Gov precompile events | `Vote`, `VoteWeighted` logs, voter = operator address |
### Precompile addresses
| **Module** | **Address** | **Use for** |
| :----------- | :------------------------------------------- | :-------------------------------------------------- |
| Staking | `0x0000000000000000000000000000000000000800` | Validator set, stake, commission, delegation events |
| Distribution | `0x0000000000000000000000000000000000000801` | Rewards and commission withdrawals |
| Gov | `0x0000000000000000000000000000000000000805` | Proposals, tallies, and vote logs |
| Slashing | `0x0000000000000000000000000000000000000806` | Signing info and uptime |
Connect to Mainnet (Chain ID `988`) at `https://rpc.stable.xyz`. See [Mainnet information](/en/reference/mainnet-information) for endpoints and limits.
### Validator name, stake, and commission
Call `validators()` on the staking precompile to read the current validator set. Pass a bond status to filter (for example `BOND_STATUS_BONDED`). Each entry exposes the validator's `description` (including `moniker`), `tokens` (bonded stake), and `commission`.
```typescript
// validators.ts
import { createPublicClient, http } from "viem";
const STAKING_PRECOMPILE = "0x0000000000000000000000000000000000000800";
const client = createPublicClient({
transport: http("https://rpc.stable.xyz"),
});
// See the staking precompile reference for the full validators() ABI and structs.
const validators = await client.readContract({
address: STAKING_PRECOMPILE,
abi: stakingAbi,
functionName: "validators",
args: ["BOND_STATUS_BONDED", { key: "0x", offset: 0n, limit: 100n, countTotal: true, reverse: false }],
});
for (const v of validators[0]) {
console.log(v.description.moniker, v.tokens.toString(), v.commission.toString());
}
```
```text
StableNode-01 4500000000000000000000000 50000000000000000
StableNode-02 3900000000000000000000000 100000000000000000
```
The `tokens` and `commission` values are scaled to 18 decimals. Divide `commission` by 1e18 to get the rate as a fraction (for example `0.05` for 5%). For the complete `Validator` struct and the `BOND_STATUS_*` values, see the [Staking precompile reference](/en/reference/staking-module-api#validators).
### Stake changes over time
`validators()` returns a snapshot. To track how stake moved, index the staking precompile's delegation events. `Delegate`, `Unbond`, and `Redelegate` carry the indexed `validatorAddr` and the `amount`, so you can attribute every stake change to a validator and block.
```typescript
// stakeChanges.ts
import { parseAbiItem } from "viem";
const logs = await client.getLogs({
address: STAKING_PRECOMPILE,
event: parseAbiItem(
"event Delegate(address indexed delegatorAddr, string indexed validatorAddr, uint256 amount, uint256 newShares)"
),
fromBlock: 0n,
toBlock: "latest",
});
console.log(`${logs.length} delegations indexed`);
```
```text
1842 delegations indexed
```
`Unbond` and `Redelegate` follow the same shape and additionally carry a `completionTime`. See the [Events section](/en/reference/staking-module-api#events) of the staking reference for exact signatures.
### Join date
A validator's join date is the block timestamp of its `CreateValidator` event. The event is indexed by validator address, so you filter for a single validator or sweep the full set, then resolve each log's `blockNumber` to a timestamp with `eth_getBlockByNumber`.
```typescript
// joinDate.ts
import { parseAbiItem } from "viem";
const logs = await client.getLogs({
address: STAKING_PRECOMPILE,
event: parseAbiItem("event CreateValidator(address indexed valiAddr, uint256 value)"),
fromBlock: 0n,
toBlock: "latest",
});
for (const log of logs) {
const block = await client.getBlock({ blockNumber: log.blockNumber });
console.log(log.args.valiAddr, new Date(Number(block.timestamp) * 1000).toISOString());
}
```
```text
0xAbc...123 2025-11-04T09:12:44.000Z
0xDef...456 2025-12-18T17:03:01.000Z
```
:::warning
Genesis validators have no `CreateValidator` event. They were created in the genesis block, not by a transaction, so no log exists. Treat their join date as the chain genesis: **2025-10-29**. Index `CreateValidator` for everyone who joined after genesis, and backfill the genesis set from the genesis validator list.
:::
### Uptime
Read signing information from the slashing precompile (`0x...806`) using `getSigningInfos()`. Each record reports `signedBlocksWindow` (the size of the sliding window) and `missedBlocksCounter` (blocks missed within it). Compute uptime as:
```text
uptime = (signedBlocksWindow − missedBlocksCounter) / signedBlocksWindow
```
A validator with a `signedBlocksWindow` of `10000` and a `missedBlocksCounter` of `25` has 99.75% uptime over the window. This is a rolling figure, not lifetime uptime. To track uptime history, snapshot the counters on a fixed interval and store each reading.
:::note
The slashing precompile follows the Cosmos EVM `x/slashing` interface. Its address is listed in the [system modules precompile table](/en/how-to/use-system-modules#whats-exposed). Generate the exact method ABI from the chain's precompile interface.
:::
### Voting history
Governance data has two layers. For the aggregate outcome of a proposal, call `getTallyResult()` on the gov precompile (`0x...805`). For who voted what, index the `Vote` and `VoteWeighted` event logs. The voter address in these logs is the validator's operator address, so you can join votes to validators directly.
```typescript
// votes.ts
import { parseAbiItem } from "viem";
const GOV_PRECOMPILE = "0x0000000000000000000000000000000000000805";
const logs = await client.getLogs({
address: GOV_PRECOMPILE,
event: parseAbiItem(
"event Vote(uint64 indexed proposalId, address indexed voter, uint8 option, uint256 weight)"
),
fromBlock: 0n,
toBlock: "latest",
});
console.log(`${logs.length} votes indexed across all proposals`);
```
```text
38 votes indexed across all proposals
```
Live vote logs are confirmed for every proposal to date (proposals #1 through #7). Use `getTallyResult()` when you only need the final counts per proposal, and the event logs when you need per-validator records.
:::note
The gov precompile follows the Cosmos EVM `x/gov` interface. Its address is listed in the [system modules precompile table](/en/how-to/use-system-modules#whats-exposed). Generate the exact method ABI and the `VoteOption` enum from the chain's precompile interface.
:::
### Next recommended
* [**Staking precompile reference**](/en/reference/staking-module-api) — Look up the full validators(), delegation methods, and event signatures.
* [**Create a validator**](/en/how-to/run-validator) — Register a synced node as a validator so it appears in the data above.
* [**Indexers and analytics**](/en/reference/indexers) — Browse indexing providers that already serve normalized Stable data.
* [**Mainnet information**](/en/reference/mainnet-information) — Get Chain ID, RPC endpoints, and rate limits before you start indexing.
This guide provides detailed instructions for installing and setting up a Stable node on various platforms.
### Prerequisites
Before starting the installation, ensure you have:
* Met all [System Requirements](/en/reference/node-system-requirements)
* Root or sudo access to your server
* Basic knowledge of Linux command line
### Installation method
Use the pre-compiled binaries for your platform. Stable does not currently support building from source.
#### Mainnet
##### Linux AMD64
```bash
# Download the latest binary for AMD64 architecture
wget https://stable-data-dist.s3.us-east-1.amazonaws.com/mainnet/binary/stabled-latest-linux-amd64-mainnet.tar.gz
# Extract the archive
tar -xvzf stabled-latest-linux-amd64-mainnet.tar.gz
# Move binary to system path
sudo mv stabled /usr/bin/
# Verify installation
stabled version
```
##### Linux ARM64
```bash
# Download the binary for ARM64 architecture
wget https://stable-data-dist.s3.us-east-1.amazonaws.com/mainnet/binary/stabled-latest-linux-arm64-mainnet.tar.gz
# Extract and install
tar -xvzf stabled-latest-linux-arm64-mainnet.tar.gz
sudo mv stabled /usr/bin/
# Verify installation
stabled version
```
#### Testnet
##### Linux AMD64
```bash
# Download the latest binary for AMD64 architecture
wget https://stable-data-dist.s3.us-east-1.amazonaws.com/testnet/binary/stabled-latest-linux-amd64-testnet.tar.gz
# Extract the archive
tar -xvzf stabled-latest-linux-amd64-testnet.tar.gz
# Move binary to system path
sudo mv stabled /usr/bin/
# Verify installation
stabled version
```
##### Linux ARM64
```bash
# Download the binary for ARM64 architecture
wget https://stable-data-dist.s3.us-east-1.amazonaws.com/testnet/binary/stabled-latest-linux-arm64-testnet.tar.gz
# Extract and install
tar -xvzf stabled-latest-linux-arm64-testnet.tar.gz
sudo mv stabled /usr/bin/
# Verify installation
stabled version
```
### Node initialization
After installing the binary, initialize your node:
#### Step 1: set node name
```bash
# Set your node's moniker (choose a unique name)
export MONIKER="your-node-name"
```
#### Step 2: initialize the node
#### Mainnet
```bash
# Initialize with the mainnet chain ID
stabled init $MONIKER --chain-id stable_988-1
# This creates the configuration directory at ~/.stabled/
```
> **Note**: For current network parameters including chain ID, see [Mainnet Information](/en/reference/mainnet-information)
#### Testnet
```bash
# Initialize with the testnet chain ID
stabled init $MONIKER --chain-id stabletestnet_2201-1
# This creates the configuration directory at ~/.stabled/
```
> **Note**: For current network parameters including chain ID, see [Testnet Information](/en/reference/testnet-information)
#### Step 3: download genesis file
:::code-group
```bash [Mainnet]
# Create backup of default genesis
mv ~/.stabled/config/genesis.json ~/.stabled/config/genesis.json.backup
# Download mainnet genesis
wget https://stable-data-dist.s3.us-east-1.amazonaws.com/mainnet/configuration/genesis.zip
unzip genesis.zip
# Move genesis to config directory
cp genesis.json ~/.stabled/config/genesis.json
# Verify genesis checksum
sha256sum ~/.stabled/config/genesis.json
# Expected: e1ceda79a3cc48a1028ca8646a2e9e2d156f610637cfb8b428ca8354277921f1
```
```bash [Testnet]
# Create backup of default genesis
mv ~/.stabled/config/genesis.json ~/.stabled/config/genesis.json.backup
# Download testnet genesis
wget https://stable-data-dist.s3.us-east-1.amazonaws.com/testnet/configuration/genesis.zip
unzip genesis.zip
# Move genesis to config directory
cp genesis.json ~/.stabled/config/genesis.json
# Verify genesis checksum
sha256sum ~/.stabled/config/genesis.json
# Expected: 66afbb6e57e6faf019b3021de299125cddab61d433f28894db751252f5b8eaf2
```
:::
#### Step 4: configure node
##### Download configuration files
:::code-group
```bash [Mainnet]
# Download optimized configuration (choose one based on your node type)
# For RPC/Full nodes:
wget https://stable-data-dist.s3.us-east-1.amazonaws.com/mainnet/configuration/rpc_node_config.zip
unzip rpc_node_config.zip
# For Archive nodes:
# wget https://stable-data-dist.s3.us-east-1.amazonaws.com/mainnet/configuration/archive_node_config.zip
# unzip archive_node_config.zip
# Backup original config
cp ~/.stabled/config/config.toml ~/.stabled/config/config.toml.backup
# Apply new configuration
cp config.toml ~/.stabled/config/config.toml
# Update moniker in config
sed -i "s/^moniker = \".*\"/moniker = \"$MONIKER\"/" ~/.stabled/config/config.toml
```
```bash [Testnet]
# Download optimized configuration
wget https://stable-data-dist.s3.us-east-1.amazonaws.com/testnet/configuration/rpc_node_config.zip
unzip rpc_node_config.zip
# Backup original config
cp ~/.stabled/config/config.toml ~/.stabled/config/config.toml.backup
# Apply new configuration
cp config.toml ~/.stabled/config/config.toml
# Update moniker in config
sed -i "s/^moniker = \".*\"/moniker = \"$MONIKER\"/" ~/.stabled/config/config.toml
```
:::
##### Essential configuration updates
Edit `~/.stabled/config/app.toml`:
```toml
# Enable JSON-RPC for EVM compatibility
[json-rpc]
enable = true
address = "0.0.0.0:8545"
ws-address = "0.0.0.0:8546"
allow-unprotected-txs = true
```
Edit `~/.stabled/config/config.toml`:
:::code-group
```toml [Mainnet]
# P2P Configuration
[p2p]
# Maximum number of peers
max_num_inbound_peers = 50
max_num_outbound_peers = 30
# Seed nodes
seeds = "9aa181b20248e948567cb47a15eae35d58cd549d@seed1.stable.xyz:46656"
# Persistent peers (mainnet seed nodes)
persistent_peers = "b896f6f8ca5a4d1cc40de09407df0c96e76df950@peer1.stable.xyz:26656"
# Enable peer exchange
pex = true
# RPC Configuration
[rpc]
# Listen address
laddr = "tcp://0.0.0.0:26657"
# Maximum number of simultaneous connections
max_open_connections = 900
# CORS settings (adjust for production)
cors_allowed_origins = ["*"]
```
```toml [Testnet]
# P2P Configuration
[p2p]
# Maximum number of peers
max_num_inbound_peers = 50
max_num_outbound_peers = 30
# Seed nodes
seeds = "6f3195823f7e5ee6f911a0a0ceb9ea689e0dc5bd@seed1.testnet.stable.xyz:56656"
# Persistent peers (testnet seed nodes)
persistent_peers = "128accd3e8ee379bfdf54560c21345451c7048c7@peer1.testnet.stable.xyz:26656"
# Enable peer exchange
pex = true
# RPC Configuration
[rpc]
# Listen address
laddr = "tcp://0.0.0.0:26657"
# Maximum number of simultaneous connections
max_open_connections = 900
# CORS settings (adjust for production)
cors_allowed_origins = ["*"]
```
:::
### Systemd service setup
Create a systemd service for automatic management:
#### Step 1: create service file
:::code-group
```bash [Mainnet]
sudo tee /etc/systemd/system/stabled.service > /dev/null < /dev/null <> ~/.bashrc
echo "export DAEMON_NAME=stabled" >> ~/.bashrc
echo "export DAEMON_HOME=$HOME/.stabled" >> ~/.bashrc
echo "export DAEMON_ALLOW_DOWNLOAD_BINARIES=true" >> ~/.bashrc
echo "export DAEMON_RESTART_AFTER_UPGRADE=true" >> ~/.bashrc
echo "export DAEMON_LOG_BUFFER_SIZE=512" >> ~/.bashrc
echo "export UNSAFE_SKIP_BACKUP=true" >> ~/.bashrc
# Load variables
source ~/.bashrc
```
#### Step 3: setup Cosmovisor directory structure
```bash
# Create cosmovisor directory structure
mkdir -p ~/.stabled/cosmovisor/genesis/bin
mkdir -p ~/.stabled/cosmovisor/upgrades
# Copy current binary to genesis
cp /usr/bin/stabled ~/.stabled/cosmovisor/genesis/bin/
# Create current symlink
ln -s ~/.stabled/cosmovisor/genesis ~/.stabled/cosmovisor/current
# Verify setup
ls -la ~/.stabled/cosmovisor/
cosmovisor run version
```
#### Step 4: set environment variable
```bash
# Set service name (default: stable)
export SERVICE_NAME=stable
```
#### Step 5: create service file
:::code-group
```bash [Mainnet]
sudo tee /etc/systemd/system/${SERVICE_NAME}.service > /dev/null < /dev/null < /dev/null < /dev/null <`
### Overview
The integration flow has three steps:
1. **Build an InnerTx**: the user signs a transaction with `gasPrice = 0`.
2. **Submit to Waiver Server**: submit the signed transaction to the Waiver Server API.
3. **Handle the response**: the waiver server wraps and broadcasts the transaction. Process the streamed results and surface the transaction hash to the user.
### Step 1: create the user's InnerTx
The user signs a standard transaction with `gasPrice = 0`. The `to` address and method selector must be permitted by the waiver's `AllowedTarget` policy.
```typescript
// config.ts
export const CONFIG = {
RPC_URL: "https://rpc.testnet.stable.xyz",
CHAIN_ID: 2201, // 988 for mainnet
WAIVER_SERVER: "https://waiver.testnet.stable.xyz",
USDT0_ADDRESS: "0x78Cf24370174180738C5B8E352B6D14c83a6c9A9",
};
```
```typescript
import { ethers } from "ethers";
import { CONFIG } from "./config";
const provider = new ethers.JsonRpcProvider(CONFIG.RPC_URL);
const usdt0 = new ethers.Contract(CONFIG.USDT0_ADDRESS, [
"function transfer(address to, uint256 amount) returns (bool)"
], provider);
const callData = usdt0.interface.encodeFunctionData("transfer", [
recipientAddress,
ethers.parseUnits("0.01", 18)
]);
const gasEstimate = await provider.estimateGas({
from: userWallet.address,
to: CONFIG.USDT0_ADDRESS,
data: callData,
});
const nonce = await provider.getTransactionCount(userWallet.address);
const innerTx = {
to: CONFIG.USDT0_ADDRESS,
data: callData,
value: 0,
gasPrice: 0,
gasLimit: gasEstimate,
nonce: nonce,
chainId: CONFIG.CHAIN_ID,
};
const signedInnerTx = await userWallet.signTransaction(innerTx);
```
:::warning
`gasPrice` must be `0`. If it is non-zero, the waiver server rejects the transaction.
:::
### Step 2: submit to the Waiver Server
```typescript
import { CONFIG } from "./config";
const API_KEY = process.env.WAIVER_API_KEY;
const response = await fetch(`${CONFIG.WAIVER_SERVER}/v1/submit`, {
method: "POST",
headers: {
"Content-Type": "application/json",
"Authorization": `Bearer ${API_KEY}`,
},
body: JSON.stringify({
transactions: [signedInnerTx],
}),
});
```
#### Batch submissions
You can submit multiple signed transactions in a single request:
```typescript
body: JSON.stringify({
transactions: [signedTx1, signedTx2, signedTx3],
})
```
Each result line includes an `index` field corresponding to the transaction's position in the array.
### Step 3: handle the response
The response is streamed as NDJSON (newline-delimited JSON). Each line corresponds to one submitted transaction.
```typescript
const reader = response.body.getReader();
const decoder = new TextDecoder();
while (true) {
const { done, value } = await reader.read();
if (done) break;
const lines = decoder.decode(value).trim().split("\n");
for (const line of lines) {
const result = JSON.parse(line);
if (result.success) {
console.log(`tx ${result.index} confirmed: ${result.txHash}`);
} else {
console.error(`tx ${result.index} failed: ${result.error.message}`);
}
}
}
```
**Success response:**
```json
{"index": 0, "id": "abc123", "success": true, "txHash": "0x..."}
```
**Failure response:**
```json
{"index": 1, "id": "def456", "success": false, "error": {"code": "VALIDATION_FAILED", "message": "invalid signature"}}
```
### Error codes
| **Code** | **Description** |
| :-------------------- | :------------------------------------------------------------------------- |
| `PARSE_ERROR` | Failed to parse transaction |
| `INVALID_REQUEST` | Malformed request body |
| `BATCH_SIZE_EXCEEDED` | Batch size exceeds allowed maximum |
| `VALIDATION_FAILED` | Transaction validation failed (e.g., invalid signature, disallowed target) |
| `BROADCAST_FAILED` | Failed to broadcast to chain |
| `RATE_LIMITED` | Rate limit exceeded |
| `QUEUE_FULL` | Server queue at capacity |
| `TIMEOUT` | Request timed out |
### API reference
#### GET `/v1/health`
Health check endpoint. Authentication: none.
#### POST `/v1/submit`
Submit a batch of signed inner transactions. Authentication: required (Bearer).
**Request body:**
```json
{
"transactions": ["0x", "0x"]
}
```
Response is streamed as NDJSON. Each line corresponds to a submitted transaction index.
#### GET `/v1/submit`
WebSocket interface for streaming submissions. Authentication: required (Bearer).
### Key takeaways
* Gas Waiver is a server-side integration: your backend submits signed user transactions to the Waiver Server. Users never interact with the Waiver Server directly.
* The user always signs the InnerTx, preserving signature integrity. The waiver cannot modify the user's transaction.
* The target contract must be on the waiver's `AllowedTarget` list.
### Next recommended
* [**Zero gas transactions**](/en/how-to/zero-gas-transactions) — See the demo-focused flow and how to verify zero gas on a receipt.
* [**Self-hosted Gas Waiver**](/en/how-to/self-hosted-gas-waiver) — Run your own waiver without the hosted API.
* [**Gas waiver protocol**](/en/reference/gas-waiver-api) — Full wrapper transaction spec and governance model.
* [**Stable SDK**](/en/explanation/sdk-overview) — Use the typed client to sign user transactions you then submit to the Waiver Server.
Comprehensive guide for monitoring Stable nodes and performing routine maintenance tasks.
### Monitoring stack overview
#### Recommended stack
* **Prometheus**: Metrics collection
* **Grafana**: Visualization and dashboards
* **AlertManager**: Alert routing and management
* **Node Exporter**: System metrics
* **Loki**: Log aggregation (optional)
### Quick monitoring setup
#### Step 1: enable Prometheus metrics
```toml
# Edit ~/.stabled/config/config.toml
[instrumentation]
prometheus = true
prometheus_listen_addr = ":26660"
namespace = "stablebft"
```
Restart node:
```bash
sudo systemctl restart ${SERVICE_NAME}
```
#### Step 2: install Prometheus
```bash
# Download Prometheus
wget https://github.com/prometheus/prometheus/releases/download/v2.45.0/prometheus-2.45.0.linux-amd64.tar.gz
tar xvf prometheus-2.45.0.linux-amd64.tar.gz
sudo mv prometheus-2.45.0.linux-amd64 /opt/prometheus
# Create config
sudo tee /opt/prometheus/prometheus.yml > /dev/null < /dev/null < 3 |
| `stablebft_consensus_block_interval` | Block time | > 10s |
| `stablebft_p2p_peers` | Connected peers | \< 3 |
| `stablebft_mempool_size` | Mempool size | > 1500 |
| `stablebft_mempool_failed_txs` | Failed transactions | > 100/min |
#### System metrics
| Metric | Description | Alert Threshold |
| ---------------------------------- | ---------------- | ---------------- |
| `node_cpu_seconds_total` | CPU usage | > 80% for 5m |
| `node_memory_MemAvailable_bytes` | Available memory | \< 10% |
| `node_filesystem_avail_bytes` | Available disk | \< 10% |
| `node_network_receive_bytes_total` | Network RX | > 100MB/s |
| `node_disk_io_time_seconds_total` | Disk I/O | > 80% |
| `node_load15` | System load | > CPU cores \* 2 |
### Grafana dashboard setup
#### Import Stable dashboard
```json
{
"dashboard": {
"title": "Stable Node Monitoring",
"panels": [
{
"title": "Block Height",
"targets": [
{
"expr": "stablebft_consensus_height{chain_id=\"stabletestnet_2201-1\"}"
}
]
},
{
"title": "Peers",
"targets": [
{
"expr": "stablebft_p2p_peers"
}
]
},
{
"title": "Block Time",
"targets": [
{
"expr": "rate(stablebft_consensus_height[1m]) * 60"
}
]
},
{
"title": "Mempool Size",
"targets": [
{
"expr": "stablebft_mempool_size"
}
]
}
]
}
}
```
#### Custom dashboard import
Import dashboards via Grafana UI:
```bash
# Navigate to Dashboards > Import > Upload JSON file
# Or use Dashboard ID in Grafana's dashboard library
```
### AlertManager configuration
#### Install AlertManager
```bash
# Download AlertManager
wget https://github.com/prometheus/alertmanager/releases/download/v0.26.0/alertmanager-0.26.0.linux-amd64.tar.gz
tar xvf alertmanager-0.26.0.linux-amd64.tar.gz
sudo mv alertmanager-0.26.0.linux-amd64 /opt/alertmanager
# Configure
sudo tee /opt/alertmanager/alertmanager.yml > /dev/null < 1500
for: 10m
labels:
severity: warning
annotations:
summary: "High mempool size: {{ $value }}"
- alert: DiskSpaceLow
expr: node_filesystem_avail_bytes{mountpoint="/"} / node_filesystem_size_bytes{mountpoint="/"} < 0.1
for: 5m
labels:
severity: critical
annotations:
summary: "Low disk space: {{ $value | humanizePercentage }}"
- alert: HighCPUUsage
expr: 100 - (avg by(instance) (irate(node_cpu_seconds_total{mode="idle"}[5m])) * 100) > 80
for: 10m
labels:
severity: warning
annotations:
summary: "High CPU usage: {{ $value }}%"
```
### Log monitoring
#### Systemd logs
```bash
# View recent logs
sudo journalctl -u ${SERVICE_NAME} -n 100
# Follow logs
sudo journalctl -u ${SERVICE_NAME} -f
# Filter by time
sudo journalctl -u ${SERVICE_NAME} --since "1 hour ago"
# Export logs
sudo journalctl -u ${SERVICE_NAME} --since today > stable-logs-$(date +%Y%m%d).log
```
#### Log analysis scripts
```bash
#!/bin/bash
# analyze-logs.sh
# Count errors in last hour
echo "Errors in last hour:"
sudo journalctl -u ${SERVICE_NAME} --since "1 hour ago" | grep -c ERROR
# Show peer connections
echo "Peer connections:"
sudo journalctl -u ${SERVICE_NAME} --since "10 minutes ago" | grep "Peer connection" | tail -10
# Check for consensus issues
echo "Consensus rounds:"
sudo journalctl -u ${SERVICE_NAME} --since "30 minutes ago" | grep -E "enterNewRound|Timeout" | tail -20
# Memory usage patterns
echo "Memory warnings:"
sudo journalctl -u ${SERVICE_NAME} --since "1 day ago" | grep -i memory
```
#### Loki setup (optional)
```bash
# Install Loki
wget https://github.com/grafana/loki/releases/download/v2.9.0/loki-linux-amd64.zip
unzip loki-linux-amd64.zip
sudo mv loki-linux-amd64 /usr/local/bin/loki
# Install Promtail
wget https://github.com/grafana/loki/releases/download/v2.9.0/promtail-linux-amd64.zip
unzip promtail-linux-amd64.zip
sudo mv promtail-linux-amd64 /usr/local/bin/promtail
# Configure Promtail
sudo tee /etc/promtail-config.yml > /dev/null < ~/reports/daily_$(date +%Y%m%d).log
curl -s localhost:26657/status | jq >> ~/reports/daily_$(date +%Y%m%d).log
```
#### Weekly maintenance
```bash
#!/bin/bash
# weekly-maintenance.sh
# Prune old data
stabled prune
# Compact database
stabled compact
# Update peer list
wget https://raw.githubusercontent.com/stable-chain/networks/main/testnet/peers.txt
cat peers.txt >> ~/.stabled/config/config.toml
# Create snapshot (optional)
./create-snapshot.sh
# System updates
sudo apt update
sudo apt upgrade -y
# Restart node (during low activity)
sudo systemctl restart ${SERVICE_NAME}
```
#### Database maintenance
```bash
# Check database size
du -sh ~/.stabled/data/
# Analyze database
stabled debug db stats ~/.stabled/data
```
### Performance monitoring
#### Resource usage tracking
```bash
#!/bin/bash
# track-resources.sh
while true; do
TIMESTAMP=$(date '+%Y-%m-%d %H:%M:%S')
CPU=$(top -bn1 | grep "stabled" | awk '{print $9}')
MEM=$(top -bn1 | grep "stabled" | awk '{print $10}')
IO=$(iostat -x 1 2 | tail -n2 | awk '{print $14}')
echo "$TIMESTAMP,CPU:$CPU,MEM:$MEM,IO:$IO" >> ~/metrics/resources.csv
sleep 60
done
```
#### Query performance
```bash
# Monitor RPC response times
while true; do
START=$(date +%s%N)
curl -s http://localhost:26657/status > /dev/null
END=$(date +%s%N)
DIFF=$((($END - $START) / 1000000))
echo "RPC response time: ${DIFF}ms"
sleep 5
done
```
### Monitoring best practices
1. **Set up redundant monitoring**
* Use external monitoring services
* Implement cross-node monitoring
* Set up dead man's switch alerts
2. **Alert fatigue prevention**
* Tune alert thresholds based on baseline
* Use alert grouping and inhibition
* Implement escalation policies
3. **Data retention**
* Keep metrics for 30 days minimum
* Archive important logs
* Regular backup of monitoring configs
4. **Security**
* Secure Grafana with strong passwords
* Use HTTPS for all endpoints
* Restrict prometheus access
5. **Documentation**
* Document all custom metrics
* Maintain runbooks for alerts
* Keep dashboard descriptions updated
### Next steps
* [Review Troubleshooting Guide](/en/how-to/troubleshoot-node) for issue resolution
* [Configure Upgrades](/en/how-to/upgrade-node) with monitoring
* Set up custom alerts based on your requirements
## Paying with invoice
This guide walks through settling an invoice on-chain using [ERC-3009](/en/explanation/erc-3009) with a deterministic nonce derived from invoice metadata. The nonce links each payment to its invoice and prevents double payment.
:::note
**Concept:** For the invoice settlement model and comparison to traditional B2B invoicing, see [Invoice settlement](/en/reference/invoices).
:::
### What you'll build
A full invoice lifecycle: the buyer signs an ERC-3009 authorization off-chain, the vendor submits it on-chain, and reconciliation matches the resulting `AuthorizationUsed` event back to the invoice by deterministic nonce.
#### Demo
```text
step 1. Invoice issued
number: INV-2026-001234
amount: 5000 USDT0
dueDate: 2026-04-30
step 2. Buyer signs authorization (off-chain, no gas)
nonce: 0xa1b2...c3d4 (from invoice metadata)
signature: 0xf0e9...1234
step 3. Vendor submits transferWithAuthorization
tx: 0x8f3a...2d41
amount: 5000 USDT0 transferred to vendor
step 4. Reconciliation
AuthorizationUsed(nonce=0xa1b2...) → invoice INV-2026-001234
Transfer event verified for correct amount and parties
ERP: marked PAID at block 1284371
```
### Overview
**Buyer:**
```
─── Buyer ───────────────────────────────────────────
nonce = getInvoiceNonce(invoice)
authorization = { from: buyer, to: vendor, value: amount, nonce, ... }
signature = signTypedData(authorization)
// Option A: Buyer submits the transaction directly.
usdt0.transferWithAuthorization(authorization, signature)
// Option B: Buyer sends {authorization, signature} to the vendor.
// The vendor (or a facilitator) submits on the buyer's behalf.
```
**Vendor:**
```
─── Vendor ──────────────────────────────────────────
// If Option B: submit transferWithAuthorization using the buyer's signature
// Reconcile via AuthorizationUsed event
on AuthorizationUsed(authorizer, nonce):
invoice = nonceToInvoice.get(nonce)
transferLog = receipt.logs.find(Transfer matching invoice.buyer, invoice.vendor, invoice.amount)
if transferLog:
erpSystem.markPaid(invoice.id, txHash, settledAt)
```
### Configuration
```typescript
// config.ts
import { ethers } from "ethers";
export const STABLE_TESTNET_RPC = "https://rpc.testnet.stable.xyz";
export const CHAIN_ID = 2201;
export const USDT0_ADDRESS = "0x78Cf24370174180738C5B8E352B6D14c83a6c9A9";
export const provider = new ethers.JsonRpcProvider(STABLE_TESTNET_RPC);
export const EIP712_DOMAIN = {
name: "USDT0",
version: "1",
chainId: CHAIN_ID,
verifyingContract: USDT0_ADDRESS,
};
export const TRANSFER_WITH_AUTHORIZATION_TYPE = {
TransferWithAuthorization: [
{ name: "from", type: "address" },
{ name: "to", type: "address" },
{ name: "value", type: "uint256" },
{ name: "validAfter", type: "uint256" },
{ name: "validBefore", type: "uint256" },
{ name: "nonce", type: "bytes32" },
],
};
export interface Invoice {
number: string; // e.g. "INV-2026-001234"
vendor: string; // vendor wallet address
buyer: string; // buyer wallet address
amount: bigint; // amount in USDT0 atomic units (6 decimals)
dueDate: number; // Unix timestamp
}
```
### Step 1: Generate a deterministic nonce
Both the buyer and the vendor can independently compute the same nonce from invoice metadata. No external registry is needed.
```typescript
// nonce.ts
import { ethers } from "ethers";
import { Invoice } from "./config";
export function getInvoiceNonce(invoice: Invoice): string {
return ethers.solidityPackedKeccak256(
["string", "address", "address", "uint256", "uint256"],
[
invoice.number,
invoice.vendor,
invoice.buyer,
invoice.amount,
invoice.dueDate,
]
);
}
// Example
const invoice: Invoice = {
number: "INV-2026-001234",
vendor: "0xVendorAddress",
buyer: "0xBuyerAddress",
amount: ethers.parseUnits("5000", 6), // 5,000 USDT0
dueDate: Math.floor(new Date("2026-04-30").getTime() / 1000),
};
const nonce = getInvoiceNonce(invoice);
// Same input always produces the same nonce.
// This nonce is consumed on-chain upon payment, preventing double payment.
```
### Step 2: Sign the authorization (buyer)
The buyer signs an ERC-3009 `transferWithAuthorization` using the deterministic nonce from Step 1.
```typescript
// sign-invoice.ts
import { ethers } from "ethers";
import {
provider,
EIP712_DOMAIN,
TRANSFER_WITH_AUTHORIZATION_TYPE,
Invoice,
} from "./config";
import { getInvoiceNonce } from "./nonce";
const buyerWallet = new ethers.Wallet(process.env.BUYER_KEY!, provider);
async function signInvoiceAuthorization(invoice: Invoice) {
const nonce = getInvoiceNonce(invoice);
const gracePeriod = 30 * 24 * 60 * 60; // 30 days after due date
const authorization = {
from: invoice.buyer,
to: invoice.vendor,
value: invoice.amount,
validAfter: 0,
validBefore: invoice.dueDate + gracePeriod,
nonce,
};
const signature = await buyerWallet.signTypedData(
EIP712_DOMAIN,
TRANSFER_WITH_AUTHORIZATION_TYPE,
authorization
);
return { authorization, signature };
}
```
### Step 3: Submit the transaction
Two options depending on who submits.
#### Option A: Buyer submits
The buyer submits the `transferWithAuthorization` transaction directly and pays gas. Use this when the buyer controls when and how the payment is executed, for example when the buyer's accounting system needs the tx hash tied to an internal approval flow.
```typescript
// pay.ts
import { ethers } from "ethers";
import { provider, USDT0_ADDRESS } from "./config";
const buyerWallet = new ethers.Wallet(process.env.BUYER_KEY!, provider);
const usdt0 = new ethers.Contract(
USDT0_ADDRESS,
[
"function transferWithAuthorization(address from, address to, uint256 value, uint256 validAfter, uint256 validBefore, bytes32 nonce, uint8 v, bytes32 r, bytes32 s)",
],
buyerWallet,
);
async function payInvoice(
authorization: { from: string; to: string; value: bigint; validAfter: number; validBefore: number; nonce: string },
signature: string,
) {
const { v, r, s } = ethers.Signature.from(signature);
const tx = await usdt0.transferWithAuthorization(
authorization.from,
authorization.to,
authorization.value,
authorization.validAfter,
authorization.validBefore,
authorization.nonce,
v, r, s,
);
const receipt = await tx.wait(1);
console.log("Invoice paid, tx:", receipt.hash);
// The nonce is now consumed; the same invoice cannot be paid twice.
return { txHash: receipt.hash, blockNumber: receipt.blockNumber };
}
```
#### Option B: Vendor submits
The buyer sends `{authorization, signature}` to the vendor through API, email, or any channel. The vendor (or a facilitator) submits the transaction on the buyer's behalf, so the buyer does not need to manage gas. Use this when the vendor needs synchronous confirmation within the same request flow.
```typescript
// settle.ts
import { ethers } from "ethers";
import { provider, USDT0_ADDRESS } from "./config";
const vendorWallet = new ethers.Wallet(process.env.VENDOR_KEY!, provider);
const usdt0 = new ethers.Contract(
USDT0_ADDRESS,
[
"function transferWithAuthorization(address from, address to, uint256 value, uint256 validAfter, uint256 validBefore, bytes32 nonce, uint8 v, bytes32 r, bytes32 s)",
],
vendorWallet,
);
async function settleInvoice(
authorization: { from: string; to: string; value: bigint; validAfter: number; validBefore: number; nonce: string },
signature: string,
) {
const { v, r, s } = ethers.Signature.from(signature);
const tx = await usdt0.transferWithAuthorization(
authorization.from,
authorization.to,
authorization.value,
authorization.validAfter,
authorization.validBefore,
authorization.nonce,
v, r, s,
);
const receipt = await tx.wait(1);
console.log("Invoice settled, tx:", receipt.hash);
return { txHash: receipt.hash, blockNumber: receipt.blockNumber };
}
```
### Step 4: Reconcile via on-chain events (vendor)
Regardless of who submitted the transaction, every invoice payment emits an `AuthorizationUsed` event carrying the deterministic nonce. The vendor listens for this event and matches it to a pending invoice by nonce. Because the nonce is derived from invoice metadata, matching is exact.
:::note
Matching by nonce identifies which invoice was paid, but the vendor should also verify the `Transfer` event in the same transaction to confirm that the correct amount was sent to the correct recipient. The code below includes this verification.
:::
```typescript
// reconcile.ts
import { ethers } from "ethers";
import { provider, USDT0_ADDRESS, Invoice } from "./config";
import { getInvoiceNonce } from "./nonce";
const usdt0 = new ethers.Contract(
USDT0_ADDRESS,
[
"event AuthorizationUsed(address indexed authorizer, bytes32 indexed nonce)",
"event Transfer(address indexed from, address indexed to, uint256 value)",
],
provider,
);
// Build a lookup map: nonce -> invoice.
// In production, this comes from your invoice database.
const invoices: Invoice[] = [
{
number: "INV-2026-001234",
vendor: "0xVendorAddress",
buyer: "0xBuyerAddress",
amount: ethers.parseUnits("5000", 6),
dueDate: Math.floor(new Date("2026-04-30").getTime() / 1000),
},
];
const nonceToInvoice = new Map();
for (const inv of invoices) {
nonceToInvoice.set(getInvoiceNonce(inv), inv);
}
usdt0.on("AuthorizationUsed", async (authorizer: string, nonce: string, event: any) => {
const invoice = nonceToInvoice.get(nonce);
if (!invoice) return; // not one of our invoices
const receipt = await event.getTransactionReceipt();
const transferLog = receipt.logs
.map((log: any) => {
try { return usdt0.interface.parseLog(log); } catch { return null; }
})
.find(
(parsed: any) =>
parsed?.name === "Transfer" &&
parsed.args[0].toLowerCase() === invoice.buyer.toLowerCase() &&
parsed.args[1].toLowerCase() === invoice.vendor.toLowerCase() &&
parsed.args[2] === invoice.amount
);
if (!transferLog) {
console.error("No matching Transfer event for invoice:", invoice.number);
return;
}
// All checks passed
console.log(`Invoice ${invoice.number} PAID`);
console.log(" tx:", receipt.hash);
console.log(" settled at block:", receipt.blockNumber);
// In production: update your ERP/accounting system here
// erpSystem.markPaid(invoice.number, receipt.hash, receipt.blockNumber);
});
console.log("Listening for invoice settlements...");
```
```bash
npx tsx reconcile.ts
```
```text
Listening for invoice settlements...
Invoice INV-2026-001234 PAID
tx: 0x8f3a...2d41
settled at block: 1284371
```
### Handle failed payments
A submitted `transferWithAuthorization` can revert for several reasons. Detect and surface each one to the vendor or buyer so the invoice can be retried or closed.
| **Revert reason** | **Cause** | **Recovery** |
| :----------------------------------------------- | :------------------------------------------------------------------------ | :------------------------------------------------------------------ |
| `FiatTokenV2: invalid signature` | Signature doesn't match the authorization fields. | Ask buyer to re-sign with unchanged invoice data. |
| `FiatTokenV2: authorization is used or canceled` | Nonce was already consumed (double-submission) or the buyer cancelled it. | Mark the invoice as already-paid; look up the original tx by nonce. |
| `FiatTokenV2: authorization is not yet valid` | Submitted before `validAfter`. | Wait until `validAfter` or issue a new authorization. |
| `FiatTokenV2: authorization is expired` | Submitted after `validBefore`. | Issue a new authorization with an extended window. |
| `FiatTokenV2: transfer amount exceeds balance` | Buyer's USDT0 balance is insufficient. | Notify buyer to fund their wallet, then retry the same signature. |
Catch reverts and classify them before retrying.
```typescript
// retry.ts
import { ethers } from "ethers";
async function submitWithRetry(
submit: () => Promise,
): Promise {
try {
const tx = await submit();
const receipt = await tx.wait(1);
return receipt!.hash;
} catch (err: any) {
const reason = err?.info?.error?.message || err?.reason || err?.message || "";
if (reason.includes("authorization is used or canceled")) {
// Lookup the original tx by AuthorizationUsed event; mark invoice paid.
throw new Error("ALREADY_PAID");
}
if (reason.includes("authorization is expired")) {
throw new Error("AUTHORIZATION_EXPIRED");
}
if (reason.includes("invalid signature")) {
throw new Error("INVALID_SIGNATURE");
}
if (reason.includes("transfer amount exceeds balance")) {
throw new Error("INSUFFICIENT_BALANCE");
}
throw err;
}
}
```
:::warning
Never retry a failed submission without classifying the error. Blind retries on a reverted transferWithAuthorization can pass validation after the buyer tops up their balance, which may not match the buyer's latest intent.
:::
### Next recommended
* [**Invoice settlement concept**](/en/reference/invoices) — Understand the deterministic-nonce reconciliation model.
* [**ERC-3009**](/en/explanation/erc-3009) — Review the signed-authorization standard behind this flow.
* [**Enable gas-free transactions**](/en/how-to/integrate-gas-waiver) — Combine with Gas Waiver to eliminate gas from the settlement path.
## Paying with MCP server
This guide shows how to bridge x402-enabled APIs to [MCP](https://modelcontextprotocol.io) tools so AI clients can call and pay for them through natural-language prompts. It builds on the server from [Build a pay-per-call API](/en/how-to/build-pay-per-call).
### What you'll build
An MCP server that wraps x402-paid endpoints as tools. The AI client types a natural-language prompt, each tool call triggers a paid x402 request, and settlement is visible on Stablescan. The user never sees a wallet prompt.
#### Demo
```text
step 1. User in Claude: "Pull financials for ACME Corp and assess credit risk."
step 2. Client calls get_company_financials("ACME")
→ MCP handler: fetchWithPayment("/financials?ticker=ACME")
→ 402 Payment Required → sign ERC-3009 → retry
→ Facilitator settles $0.01 USDT0 on-chain
→ tx: 0x8f3a...aaaa
→ 200 OK { revenue, debt_ratio, cash_flow }
step 3. Client calls assess_credit_risk(financials)
→ MCP handler: fetchWithPayment("/credit-risk", POST)
→ Facilitator settles $0.05 USDT0 on-chain
→ tx: 0x9bc4...bbbb
→ 200 OK { score: 72, rating: "moderate" }
step 4. Claude responds:
"ACME Corp has a credit risk score of 72 (moderate). Revenue is stable
but debt-to-equity ratio is elevated at 1.8x..."
```
Both `tx` values are visible on [https://stablescan.xyz](https://stablescan.xyz).
:::note
**Agent wallet funding**: The MCP server signs payments with a seed phrase you control. Fund that wallet with USDT0 on mainnet before starting the server. A balance of at least `$0.10` covers several paid calls; `$1.00` is plenty for extended testing. Top up as needed using a standard USDT0 transfer to the wallet's address.
:::
### Overview
**MCP Server:**
```typescript
// --- MCP Server ---
// Bridge x402-enabled APIs to MCP tools
tools = {
"get_company_financials": {
handler: (ticker) =>
fetchWithPayment("https://api.example.com/financials?ticker=" + ticker),
},
"assess_credit_risk": {
handler: (financials) =>
fetchWithPayment("https://api.example.com/credit-risk", {
method: "POST",
body: JSON.stringify({ financials }),
}),
},
}
```
**User (via AI client):**
```
─── AI Client ───────────────────────────────────────
User: "Pull financials for ACME Corp and assess their credit risk."
Client calls get_company_financials tool
→ MCP server sends x402 paid request
→ Facilitator settles USDT0 on-chain
→ API returns financial data
Client calls assess_credit_risk tool with the result
→ MCP server sends x402 paid request
→ Facilitator settles USDT0 on-chain
→ API returns risk assessment
→ Client responds with the combined result
```
### Prerequisites
* A running x402 server (see [Build a pay-per-call API](/en/how-to/build-pay-per-call)).
* An MCP-compatible AI client (Claude Desktop, Claude Code, etc.).
### Step 1: Create the MCP server
The MCP server acts as a bridge between AI clients and x402-enabled APIs. Each tool makes a paid request using the x402 client SDK and returns the result.
```bash
npm install @modelcontextprotocol/sdk @x402/fetch @x402/evm @tetherto/wdk-wallet-evm
```
```typescript
// mcp-server.ts
import { McpServer } from "@modelcontextprotocol/sdk/server/mcp.js";
import { StdioServerTransport } from "@modelcontextprotocol/sdk/server/stdio.js";
import WalletManagerEvm from "@tetherto/wdk-wallet-evm";
import { x402Client, wrapFetchWithPayment } from "@x402/fetch";
import { registerExactEvmScheme } from "@x402/evm/exact/client";
import { z } from "zod";
// --- Wallet and x402 client ---
const account = await new WalletManagerEvm(process.env.SEED_PHRASE!, {
provider: "https://rpc.stable.xyz",
}).getAccount(0);
const client = new x402Client();
registerExactEvmScheme(client, { signer: account });
const fetchWithPayment = wrapFetchWithPayment(fetch, client);
// --- x402 API base URL ---
const API_BASE = process.env.API_BASE || "http://localhost:4021";
// --- MCP server ---
const server = new McpServer({
name: "x402-payments",
version: "1.0.0",
});
server.tool(
"get_company_financials",
"Get company financial data by ticker (paid endpoint, $0.01 per call)",
{ ticker: z.string().describe("Company ticker symbol (e.g. ACME)") },
async ({ ticker }) => {
const response = await fetchWithPayment(`${API_BASE}/financials?ticker=${ticker}`);
const data = await response.json();
return { content: [{ type: "text", text: JSON.stringify(data) }] };
},
);
server.tool(
"assess_credit_risk",
"Assess credit risk from financial data (paid endpoint, $0.05 per call)",
{ financials: z.string().describe("JSON string of company financial data") },
async ({ financials }) => {
const response = await fetchWithPayment(`${API_BASE}/credit-risk`, {
method: "POST",
headers: { "Content-Type": "application/json" },
body: financials,
});
const data = await response.json();
return { content: [{ type: "text", text: JSON.stringify(data) }] };
},
);
server.tool(
"check_balance",
"Check the USDT0 balance of the payment wallet",
{},
async () => {
const USDT0_STABLE = "0x779Ded0c9e1022225f8E0630b35a9b54bE713736";
const balance = await account.getTokenBalance(USDT0_STABLE);
const formatted = (Number(balance) / 1e6).toFixed(2);
return {
content: [{ type: "text", text: `Wallet balance: ${formatted} USDT0` }],
};
},
);
// --- Start ---
const transport = new StdioServerTransport();
await server.connect(transport);
```
Each tool handler calls `fetchWithPayment`, which handles the full x402 payment cycle automatically. The AI client only sees the tool name, description, and parameters.
### Step 2: Configure your AI client
Add the MCP server to your AI client's configuration.
**Claude Desktop** (`claude_desktop_config.json`):
```json
{
"mcpServers": {
"x402-payments": {
"command": "npx",
"args": ["tsx", "/path/to/mcp-server.ts"],
"env": {
"SEED_PHRASE": "your seed phrase here",
"API_BASE": "https://api.example.com"
}
}
}
}
```
**Claude Code:**
```bash
claude mcp add x402-payments -- npx tsx /path/to/mcp-server.ts
```
After configuration, restart your AI client. The tools should appear in the available tool list.
:::warning
The seed phrase in the MCP configuration controls real funds. Store it securely using your OS keychain or a secrets manager rather than in plain-text config files.
:::
### Step 3: Type the prompt and use it
Once configured, the AI client can call paid APIs through the user's prompt:
**User:** "Pull financials for ACME Corp and assess their credit risk."
1. Client calls `get_company_financials("ACME")`: $0.01 paid via x402. Returns revenue, debt ratio, cash flow, etc.
2. Client calls `assess_credit_risk(financials)`: $0.05 paid via x402. Returns risk score, rating, key factors.
3. Client responds: "ACME Corp has a credit risk score of 72 (moderate). Revenue is stable but debt-to-equity ratio is elevated at 1.8x..."
Individual tools also work on their own:
* "Pull financials for ACME Corp" calls `get_company_financials` ($0.01).
* "Assess credit risk for this data" calls `assess_credit_risk` ($0.05).
* "How much USDT0 do I have left?" calls `check_balance`.
The user does not interact with wallets, signatures, or payment flows. The MCP server handles payment for each tool call transparently.
### Spending controls
To prevent unexpected spending, consider adding controls to the MCP server.
```typescript
const MAX_PER_CALL = 100_000; // $0.10 in base units
const MAX_PER_SESSION = 5_000_000; // $5.00 in base units
let sessionSpent = 0n;
function checkSpendingLimit(amount: bigint) {
if (amount > BigInt(MAX_PER_CALL)) {
throw new Error(`Amount exceeds per-call limit of $${MAX_PER_CALL / 1e6}`);
}
if (sessionSpent + amount > BigInt(MAX_PER_SESSION)) {
throw new Error(`Session spending limit of $${MAX_PER_SESSION / 1e6} reached`);
}
sessionSpent += amount;
}
```
These limits run server-side. The AI client cannot modify or bypass them.
### Next recommended
* [**Build a pay-per-call API**](/en/how-to/build-pay-per-call) — Set up the x402 server this MCP server bridges.
* [**x402 concept**](/en/explanation/x402) — Review the settlement protocol behind these payments.
* [**Develop with AI**](/en/how-to/develop-with-ai) — Wire Stable's Docs and Runtime MCP servers into the same AI client.
## Production readiness
Work through each section below before switching from testnet to mainnet.
### Before you launch
* **Network targets.** Your application reads mainnet values, not testnet: chain ID `988`, RPC `https://rpc.stable.xyz`, explorer `https://stablescan.xyz`. Full configuration is in [Connect](/en/reference/connect).
* **Contracts verified.** Deployed contracts are verified on [stablescan.xyz](https://stablescan.xyz) so users and partners can inspect them.
* **Mainnet funding path.** You have a documented way for production wallets to acquire USDT0: direct, bridge via LayerZero, or custodian. Faucets are testnet-only.
* **Environment isolation.** Keys, RPC credentials, and signing paths are separated between testnet and mainnet.
### Security checks
USDT0's dual-role behavior breaks a handful of assumptions ported from Ethereum. Each item below should be validated. The full list is in the [migration checklist](/en/explanation/usdt0-behavior).
**Solvency checks read real native balance, not a mirror.**
:::warning
Tracking deposited native value in an internal variable is unsafe. An external `USDT0.transferFrom` call can drain the contract's native balance without invoking any contract code.
:::
```solidity
// SAFE — checks real balance at the moment of transfer
function withdraw() external {
uint256 amount = credit[msg.sender];
credit[msg.sender] = 0;
require(address(this).balance >= amount, "insufficient balance");
payable(msg.sender).call{value: amount}("");
}
```
**Allowance-based drain paths are covered by tests.** Every `approve` / `transferFrom` / `permit` path has a test that attempts to drain the contract's native balance.
**Zero-address transfers are rejected before the call.**
:::warning
Both native and ERC-20 transfers to `address(0)` revert on Stable. Validate recipients explicitly, or your transaction will fail.
:::
```solidity
require(recipient != address(0), "zero address recipient");
payable(recipient).call{value: amount}("");
```
**Address-reuse detection does not rely on `EXTCODEHASH`.** Permit-based approvals change native balance without a nonce increment, so `EXTCODEHASH` can oscillate between zero hash and empty hash. Use explicit tracking instead.
### Performance and reliability
* **RPC redundancy.** Production traffic has a failover plan. Third-party providers are listed in [RPC providers](/en/reference/rpc-providers).
* **Gas estimation.** Transactions set `maxPriorityFeePerGas` to `0` and compute `maxFeePerGas` from the current base fee. See [Gas pricing](/en/reference/gas-pricing-api).
* **Block time.** Blocks are produced roughly every 0.7 seconds with single-slot finality. Poll intervals and confirmation thresholds are tuned to this cadence.
* **Retries.** Transient RPC errors are retried idempotently. For financially sensitive flows, inclusion is verified via receipts or logs before downstream state changes.
### Operational ownership
* **Monitoring.** If you run your own nodes, alerts watch block production, peer health, and RPC latency; see [Monitoring](/en/how-to/monitor-node). If you use a third-party RPC, track provider SLAs and failover telemetry.
* **Upgrades.** Protocol releases are tracked so node operators can schedule upgrades; see [Mainnet version history](/en/reference/mainnet-version-history).
* **Runbooks.** Rollback procedures exist for contract pauses, key rotation, and RPC provider switches.
### Support and escalation
* [Developer assistance](/en/reference/developer-assistance): FAQ and reference pointers.
* [Discord](https://discord.gg/stablexyz): community support and protocol updates.
* `bizdev@stable.xyz`: partnership and integration conversations.
### Next recommended
* [**USDT0 behavior**](/en/explanation/usdt0-behavior) — Read the full migration checklist and contract design requirements.
* [**Mainnet information**](/en/reference/mainnet-information) — Check mainnet chain parameters and version history.
* [**RPC providers**](/en/reference/rpc-providers) — Pick third-party RPC providers for redundancy.
* [**Monitoring**](/en/how-to/monitor-node) — Wire metrics and alerts for block production and RPC health.
A validator is a synced full node that has registered on-chain and bonded stake. You install and sync the node first, then register it by calling `createValidator` on the staking precompile (`0x0000000000000000000000000000000000000800`). This page covers the registration step. For the node itself, see [Install a node](/en/how-to/install-node) and [Node configuration](/en/reference/node-configuration).
:::warning
Register only after your node is fully synced. A validator that signs before it has caught up can double-sign and be permanently removed from the set (tombstoned). Set `double_sign_check_height = 2` or higher in `config.toml` before you start (see [Node configuration](/en/reference/node-configuration#consensus-configuration)). Setting it to `1` performs no check.
:::
### Prerequisites
* A fully synced full node on Mainnet (Chain ID `988`). See [Install a node](/en/how-to/install-node).
* `double_sign_check_height` set to `2` or higher in `~/.stabled/config/config.toml`.
* [Foundry](https://book.getfoundry.sh/) installed for `cast`, used to call the precompile.
* The staking amount funded on your validator's EVM address, in USDT0.
Confirm the node has caught up before going further. `catching_up` must be `false`.
```bash
curl -s localhost:26657/status | jq '.result.sync_info.catching_up'
```
```text
false
```
### Step 1: prepare validator keys
Create the operator account, then read the two values `createValidator` needs: the consensus public key (base64) and the validator's EVM address.
```bash
# Create the validator operator account
stabled keys add validator
# Consensus public key (base64) — save this
stabled comet show-validator | jq .key
# Derive the validator's EVM address (0x form)
stabled keys parse $(stabled keys show validator -a)
```
```text
"AbCd...base64PubKey...=="
# ...
# then, evm address is 0xCAEA59C7476C87D0FF6BE6F04DA207601D5BE7D0
```
:::warning
Back up `~/.stabled/config/priv_validator_key.json` offline and never run two nodes with the same key. Two instances signing with one key is double-signing and results in a permanent slash.
:::
### Step 2: set up environment
```bash
# Staking precompile contract address
export STAKING_ADDRESS="0x0000000000000000000000000000000000000800"
# Mainnet EVM RPC
export RPC_URL="https://rpc.stable.xyz"
# Your operator private key and validator EVM address
export PRIVATE_KEY="your_private_key_here"
export VALIDATOR_ADDRESS="0xYourValidatorAddress"
# Consensus pubkey from Step 1
export PUBKEY="AbCd...base64PubKey...=="
# Self-delegation amount in wei (18 decimals). 1000000000000000000 = 1 token
export AMOUNT="1000000000000000000"
```
### Step 3: create the validator
Call `createValidator` on the staking precompile. The function takes a `description` tuple, a `commissionRates` tuple, the minimum self-delegation, the validator address, the consensus pubkey, and the bonded amount. Encode and send it with `cast`.
```bash
# createValidator(
# (moniker, identity, website, securityContact, details),
# (rate, maxRate, maxChangeRate),
# minSelfDelegation, validatorAddress, pubkey, value
# )
cast send "$STAKING_ADDRESS" \
"createValidator((string,string,string,string,string),(uint256,uint256,uint256),uint256,address,string,uint256)" \
"(\"My Validator\",\"keybase-id\",\"https://example.com\",\"security@example.com\",\"My validator description\")" \
"(100000000000000000,200000000000000000,10000000000000000)" \
"1000000000000000000" \
"$VALIDATOR_ADDRESS" \
"$PUBKEY" \
"$AMOUNT" \
--rpc-url "$RPC_URL" \
--private-key "$PRIVATE_KEY"
```
```text
transactionHash 0x4f...c2
status 1 (success)
```
The commission tuple is `(rate, maxRate, maxChangeRate)`, each scaled to 18 decimals. The example sets a 10% rate (`100000000000000000`), a 20% ceiling, and a 1% maximum daily change. `maxRate` and `maxChangeRate` are fixed at creation and cannot be edited later. A successful call emits a `CreateValidator` event. See the [staking precompile reference](/en/reference/staking-module-api#createvalidator) for every field.
### Step 4: verify
Confirm the validator is registered and bonded by reading it back from the staking precompile, then check it is signing blocks.
```bash
# Read your validator's on-chain record
cast call "$STAKING_ADDRESS" \
"validator(address)" "$VALIDATOR_ADDRESS" \
--rpc-url "$RPC_URL"
# Confirm the node reports validator info
curl -s localhost:26657/status | jq '.result.validator_info'
```
```text
# validator() returns the moniker, tokens, commission, and a bonded status (3)
# validator_info shows your consensus address with non-zero voting power
```
### Add self-delegation
To bond more stake to your own validator after creation, call `delegate` on the same precompile.
```bash
cast send "$STAKING_ADDRESS" \
"delegate(address,address,uint256)" \
"$VALIDATOR_ADDRESS" "$VALIDATOR_ADDRESS" "$AMOUNT" \
--rpc-url "$RPC_URL" \
--private-key "$PRIVATE_KEY"
```
```text
status 1 (success)
```
### After registration
Keep the validator healthy and ready for network upgrades:
* **Monitor signing and missed blocks** with the Prometheus and Grafana stack in [Monitor a node](/en/how-to/monitor-node).
* **Automate upgrades** so you don't miss an upgrade height. See the Cosmovisor setup in [Install a node](/en/how-to/install-node#cosmovisor-setup-recommended-for-automatic-upgrades) and [Upgrade a node](/en/how-to/upgrade-node).
* **Diagnose problems** (not syncing, not signing) with [Troubleshoot a node](/en/how-to/troubleshoot-node).
### Next recommended
* [**Staking precompile reference**](/en/reference/staking-module-api) — Look up the full createValidator, delegate, and editValidator signatures and structs.
* [**Node configuration**](/en/reference/node-configuration) — Set double\_sign\_check\_height and other validator-critical config before you register.
* [**Monitor a node**](/en/how-to/monitor-node) — Track signing, missed blocks, and resource usage so you catch problems before a slash.
* [**Index validator data**](/en/how-to/index-validator-data) — Read your validator's stake, uptime, and voting history on-chain once it is live.
## Use the SDK with viem
`@stablechain/sdk` is built on viem. `createStable` accepts three signing modes, and you pick one based on where the code runs: server-side with a private key, browser-side with the user's wallet, or with a `WalletClient` you've already constructed (for example, in a wagmi app).
This guide shows each mode end-to-end.
### Server-side: private-key `Account`
Use `privateKeyToAccount` from viem to sign with a private key held by your backend.
```ts
import "dotenv/config";
import { createStable, Network } from "@stablechain/sdk";
import { privateKeyToAccount } from "viem/accounts";
const account = privateKeyToAccount(process.env.PRIVATE_KEY as `0x${string}`);
const stable = createStable({
network: Network.Mainnet,
account,
});
const { txHash } = await stable.transfer({
from: account.address,
to: "0xRecipient",
amount: 5,
});
console.log(txHash);
```
```text
0x8f3a...2d41
```
### Browser-side: `Transport` from a wallet
Pass `custom(window.ethereum)` (or any EIP-1193 provider) as `transport`. The SDK builds the `WalletClient` and reads the signer address from the provider.
```ts
import { createStable, Network } from "@stablechain/sdk";
import { custom } from "viem";
const stable = createStable({
network: Network.Mainnet,
transport: custom(window.ethereum),
});
const [from] = await window.ethereum.request({ method: "eth_requestAccounts" });
const { txHash } = await stable.transfer({
from,
to: "0xRecipient",
amount: 5,
});
```
```text
0x8f3a...2d41
```
:::warning
`transfer`, `bridge`, and `swap` call `switchChain` to put the wallet on the right network. If the user rejects, the SDK throws `StableTransactionError` with `phase: "switch_chain"`. Catch it and surface a retry to the user.
:::
### Bring your own `WalletClient`
When you already have a `WalletClient` (for example, from wagmi or a custom signer), pass it directly. It takes precedence over `account` and `transport`.
```ts
import { createStable, Network } from "@stablechain/sdk";
import { createWalletClient, custom } from "viem";
import { stable as stableChain } from "viem/chains";
const walletClient = createWalletClient({
chain: stableChain,
transport: custom(window.ethereum),
});
const [from] = await walletClient.requestAddresses();
const stable = createStable({
network: Network.Mainnet,
walletClient,
});
const { txHash } = await stable.transfer({ from, to: "0xRecipient", amount: 5 });
```
```text
0x8f3a...2d41
```
### Pick a mode
| **Mode** | **Use when** |
| :------------- | :---------------------------------------------------------------------------- |
| `account` | Backend services, scripts, agents — anywhere you hold the key. |
| `transport` | Browser apps where the user signs with MetaMask or a wagmi-less custom flow. |
| `walletClient` | You already have a configured `WalletClient` (wagmi, RainbowKit, ConnectKit). |
### Next recommended
* [**Use with wagmi**](/en/how-to/sdk-with-wagmi) — Wire the SDK into a React app through wagmi hooks.
* [**SDK reference**](/en/reference/sdk) — Every config field, method, enum, and error class.
* [**SDK quickstart**](/en/tutorial/sdk-quickstart) — Run your first transfer, bridge, and swap on testnet.
## Use the SDK with wagmi
`createStable` accepts a viem `WalletClient`, which is exactly what wagmi's `useWalletClient` returns. You connect the wallet through wagmi as you normally would, then memoize a `StableClient` whenever the wallet client changes.
This guide assumes wagmi v2 and `@tanstack/react-query`.
### 1. Configure wagmi
Add Stable to the wagmi config. viem ships chain definitions for both networks.
```ts
import { http, createConfig } from "wagmi";
import { stable as stableMainnet, stableTestnet } from "viem/chains";
import { injected } from "wagmi/connectors";
export const wagmiConfig = createConfig({
chains: [stableMainnet, stableTestnet],
connectors: [injected()],
transports: {
[stableMainnet.id]: http(),
[stableTestnet.id]: http(),
},
});
```
```text
WagmiConfig { chains: [988, 2201], connectors: [injected] }
```
### 2. Build a hook that returns a `StableClient`
Memoize a `StableClient` against the current `WalletClient`. Recreate it when the wallet client identity changes.
```tsx
import { useMemo } from "react";
import { useWalletClient } from "wagmi";
import { createStable, Network, type StableClient } from "@stablechain/sdk";
export function useStable(network: Network = Network.Mainnet): StableClient | null {
const { data: walletClient } = useWalletClient();
return useMemo(() => {
if (!walletClient) return null;
return createStable({ network, walletClient });
}, [walletClient, network]);
}
```
:::warning
`useWalletClient()` returns `undefined` before the user connects. Always guard before calling SDK methods, or the destructured `walletClient` will be falsy and `createStable` will not have a signer.
:::
### 3. Use it in a component
```tsx
import { useAccount, useChainId } from "wagmi";
import { Network } from "@stablechain/sdk";
import { useStable } from "./useStable";
export function PayButton() {
const { address } = useAccount();
const chainId = useChainId();
const stable = useStable(Network.Mainnet);
async function onClick() {
if (!stable || !address) return;
const { txHash } = await stable.transfer({
from: address,
to: "0xRecipient",
amount: 1,
});
console.log("Sent:", txHash);
}
return (
);
}
```
```text
Sent: 0x8f3a...2d41
```
### 4. Bridge and swap from React
The same `stable` instance handles bridge and swap. Fetch the quote in an effect or a `useQuery`, then execute on click.
```tsx
const stable = useStable(Network.Mainnet);
const onSwap = async () => {
if (!stable) return;
const quote = await stable.quoteSwap({
fromToken: "0x8a2B28364102Bea189D99A475C494330Ef2bDD0B",
toToken: "0x779Ded0c9e1022225f8E0630b35a9b54bE713736",
amount: 100,
fromDecimals: 6,
});
const { txHash, toAmount } = await stable.swap({
fromToken: quote.fromToken,
toToken: "0x779Ded0c9e1022225f8E0630b35a9b54bE713736",
amount: 100,
fromDecimals: 6,
quote,
});
console.log({ txHash, toAmount });
};
```
```text
{ txHash: "0xabcd...", toAmount: 99.81 }
```
:::note
Caching quotes with `useQuery` works well: pass `quoteSwap` / `quoteBridge` as the query function and forward the cached `quote` into `swap` / `bridge`. The SDK skips its internal quote call when one is provided.
:::
### Next recommended
* [**SDK reference**](/en/reference/sdk) — Every method, config field, and error class.
* [**Use with viem**](/en/how-to/sdk-with-viem) — Compare the three signing modes side-by-side.
* [**SDK quickstart**](/en/tutorial/sdk-quickstart) — Run your first transfer, bridge, and swap on testnet.
## Self-hosted gas waiver
Self-hosted Gas Waiver lets you operate your own waiver infrastructure instead of using the hosted Waiver Server API. You register a waiver address through on-chain governance, then broadcast wrapper transactions directly to the network.
This guide covers registering a waiver address, collecting signed user transactions, constructing wrapper transactions, and broadcasting them.
:::note
**Concept:** For what Gas Waiver is and why it exists, see [Gas waiver](/en/explanation/gas-waiver). For the full protocol specification (wrapper transaction mechanism, authorization, policy checks, execution semantics, security model), see [Gas waiver protocol](/en/reference/gas-waiver-api).
:::
For the hosted Waiver Server API integration path, see [Enable gas-free transactions](/en/how-to/integrate-gas-waiver).
### Prerequisites
* A waiver address registered on-chain via validator governance.
* `AllowedTarget` policy configured for your target contracts.
### Overview
The self-hosted flow:
1. **Collect a signed InnerTx** from the user with `gasPrice = 0`.
2. **Construct a WrapperTx**: RLP-encode the InnerTx and wrap it in a transaction sent to the marker address.
3. **Broadcast** the WrapperTx via `eth_sendRawTransaction`.
### Step 1: Collect the user's InnerTx
The user signs a transaction with `gasPrice = 0`. The `to` address and method selector must match your waiver's `AllowedTarget` policy.
```typescript
// config.ts
export const CONFIG = {
RPC_URL: "https://rpc.testnet.stable.xyz",
CHAIN_ID: 2201, // 988 for mainnet
MARKER_ADDRESS: "0x000000000000000000000000000000000000f333",
USDT0_ADDRESS: "0x78Cf24370174180738C5B8E352B6D14c83a6c9A9",
};
```
```typescript
// collectInnerTx.ts
import { ethers } from "ethers";
import { CONFIG } from "./config";
const provider = new ethers.JsonRpcProvider(CONFIG.RPC_URL);
const usdt0 = new ethers.Contract(CONFIG.USDT0_ADDRESS, [
"function transfer(address to, uint256 amount) returns (bool)"
], provider);
const callData = usdt0.interface.encodeFunctionData("transfer", [
recipientAddress,
ethers.parseUnits("0.01", 18)
]);
const gasEstimate = await provider.estimateGas({
from: userWallet.address,
to: CONFIG.USDT0_ADDRESS,
data: callData,
});
const nonce = await provider.getTransactionCount(userWallet.address);
const innerTx = {
to: CONFIG.USDT0_ADDRESS,
data: callData,
value: 0,
gasPrice: 0,
gasLimit: gasEstimate,
nonce: nonce,
chainId: CONFIG.CHAIN_ID,
};
const signedInnerTx = await userWallet.signTransaction(innerTx);
```
### Step 2: Construct the WrapperTx
RLP-encode the signed InnerTx and wrap it in a transaction to the marker address. The `gasLimit` must cover both the inner execution and the wrapping overhead.
```typescript
// constructWrapper.ts
import { ethers } from "ethers";
import { CONFIG } from "./config";
const innerTxBytes = ethers.decodeRlp(signedInnerTx);
const rlpEncoded = ethers.encodeRlp(innerTxBytes);
const waiverNonce = await provider.getTransactionCount(waiverWallet.address);
const wrapperTx = {
to: CONFIG.MARKER_ADDRESS,
data: rlpEncoded,
value: 0,
gasPrice: 0,
gasLimit: (gasEstimate * 12n / 10n) * 2n, // ~2x inner gas for overhead
nonce: waiverNonce,
chainId: CONFIG.CHAIN_ID,
};
const signedWrapperTx = await waiverWallet.signTransaction(wrapperTx);
```
:::warning
Both `InnerTx.gasPrice` and `WrapperTx.gasPrice` must be `0`. `WrapperTx.value` must also be `0`. If any of these conditions are not met, validators will reject the transaction.
:::
### Step 3: Broadcast
Submit the signed WrapperTx via standard JSON-RPC.
```typescript
// broadcast.ts
const txHash = await provider.send("eth_sendRawTransaction", [signedWrapperTx]);
console.log("Wrapper tx broadcast:", txHash);
const receipt = await provider.waitForTransaction(txHash);
console.log("Confirmed:", receipt.status === 1);
```
```text
Wrapper tx broadcast: 0x...
Confirmed: true
```
### Key takeaways
* Self-hosted waiver requires a waiver address registered through on-chain validator governance.
* The WrapperTx is sent to the marker address (`0x...f333`) with the RLP-encoded InnerTx as data.
* Both InnerTx and WrapperTx must have `gasPrice = 0` and `value = 0`.
### Next recommended
* [**Gas waiver concept**](/en/explanation/gas-waiver) — Understand the mechanism before you run your own.
* [**Gas waiver protocol**](/en/reference/gas-waiver-api) — Reference the full protocol spec for marker routing, authorization, and execution semantics.
* [**Enable gas-free transactions**](/en/how-to/integrate-gas-waiver) — Use the hosted Waiver Server API instead of self-hosting.
## Subscribe and collect
This guide walks through building a subscription payment system where the subscriber authorizes once and the service provider collects each billing cycle automatically via EIP-7702 account abstraction.
:::note
**Concept:** For the subscription model, trade-offs, and comparison to card-on-file billing, see [Subscription billing](/en/reference/subscriptions).
:::
### What you'll build
A full subscription lifecycle: the subscriber delegates and subscribes once, the provider collects on schedule (second cycle shown to prove repeat behavior), and the subscriber cancels.
#### Demo
```text
step 1. Subscriber delegates EOA to SubscriptionManager (EIP-7702)
tx: 0x7702...aaaa
step 2. Subscriber registers subscription (10 USDT0 / 30 days)
subscriptionId: 0xabc...
nextChargeAt: 2026-05-23T12:00:00Z
step 3. Provider calls collect() on day 30
collected: 10 USDT0
gas cost: ~0.000050 USDT0
nextChargeAt: 2026-06-22T12:00:00Z
step 4. Provider calls collect() on day 60
collected: 10 USDT0
gas cost: ~0.000050 USDT0
nextChargeAt: 2026-07-22T12:00:00Z
step 5. Subscriber cancels
subscription: inactive
```
### Overview
**Subscriber:**
```
─── Subscriber ───────────────────────────────────────
// One-time setup: delegate EOA to the subscription contract
signAuthorization(delegateContract)
sendTransaction({ type: 4, authorizationList: [signedAuth] })
// Subscribe: set billing terms on own EOA
sendTransaction({ to: self, data: subscribe(subscriptionId, provider, amount, interval) })
// Cancel: revoke billing access at any time
sendTransaction({ to: self, data: cancelSubscription(subscriptionId) })
```
**Service provider:**
```
─── Service Provider ────────────────────────────────
// Each billing cycle: collect payment from subscriber's EOA
// The delegate contract verifies caller, billing schedule, and amount
sendTransaction({ to: subscriberEOA, data: collect(subscriptionId) })
// Automate with a cron job matching the billing interval
// The contract reverts if called before the interval has elapsed
```
### Delegate contract
Subscription billing works by delegating the subscriber's EOA to a contract that enforces billing terms. Through EIP-7702, the subscriber's account temporarily gains contract logic, allowing a service provider to collect payments at each billing cycle without requiring the subscriber to sign every time.
You can use an existing deployed contract or deploy your own. The example below is a minimal `SubscriptionManager` contract that supports three operations:
* `subscribe`: register billing terms for a `subscriptionId`.
* `collect`: provider pulls the next scheduled payment for that `subscriptionId`.
* `cancelSubscription`: subscriber revokes a specific subscription.
```solidity
// SPDX-License-Identifier: MIT
pragma solidity ^0.8.24;
import "@openzeppelin/contracts/token/ERC20/IERC20.sol";
/// @title SubscriptionManager (example)
/// @notice Delegate contract for EIP-7702 subscription billing.
/// Runs on the subscriber's EOA via delegation.
contract SubscriptionManager {
struct Subscription {
address provider;
uint256 amount;
uint256 interval;
uint256 nextChargeAt;
bool active;
}
// Keyed by subscriptionId.
// Storage is already per subscriber EOA under delegation.
mapping(bytes32 => Subscription) public subscriptions;
IERC20 public immutable usdt0;
event SubscriptionCreated(
bytes32 indexed subscriptionId,
address indexed provider,
uint256 amount,
uint256 interval,
uint256 nextChargeAt
);
event SubscriptionCollected(
bytes32 indexed subscriptionId,
address indexed provider,
uint256 amount,
uint256 collectedAt
);
event SubscriptionCancelled(bytes32 indexed subscriptionId);
constructor(address _usdt0) {
usdt0 = IERC20(_usdt0);
}
/// @notice Register a subscription. Called by the subscriber on their own EOA.
function subscribe(
bytes32 subscriptionId,
address provider,
uint256 amount,
uint256 interval
) external {
require(msg.sender == address(this), "subscriber only");
require(provider != address(0), "invalid provider");
require(amount > 0, "invalid amount");
require(interval > 0, "invalid interval");
require(!subscriptions[subscriptionId].active, "already exists");
uint256 nextChargeAt = block.timestamp + interval;
subscriptions[subscriptionId] = Subscription({
provider: provider,
amount: amount,
interval: interval,
nextChargeAt: nextChargeAt,
active: true
});
emit SubscriptionCreated(subscriptionId, provider, amount, interval, nextChargeAt);
}
/// @notice Collect a payment for a specific subscription. Called by the service provider.
function collect(bytes32 subscriptionId) external {
Subscription storage sub = subscriptions[subscriptionId];
require(sub.active, "not active");
require(msg.sender == sub.provider, "not provider");
require(block.timestamp >= sub.nextChargeAt, "too early");
sub.nextChargeAt += sub.interval;
require(usdt0.transfer(sub.provider, sub.amount), "transfer failed");
emit SubscriptionCollected(subscriptionId, sub.provider, sub.amount, block.timestamp);
}
/// @notice Cancel a specific subscription. Called by the subscriber.
function cancelSubscription(bytes32 subscriptionId) external {
require(msg.sender == address(this), "subscriber only");
require(subscriptions[subscriptionId].active, "not active");
delete subscriptions[subscriptionId];
emit SubscriptionCancelled(subscriptionId);
}
}
```
:::note
This contract is provided as a reference implementation for testing purposes. A delegate contract has full execution authority over the subscriber's EOA, so in production, use an audited and verified contract. For more context on EIP-7702 delegation and security, see [EIP-7702](/en/explanation/eip-7702).
:::
### Configuration
```typescript
// config.ts
import { ethers } from "ethers";
export const STABLE_TESTNET_RPC = "https://rpc.testnet.stable.xyz";
export const CHAIN_ID = 2201;
export const USDT0_ADDRESS = "0x78Cf24370174180738C5B8E352B6D14c83a6c9A9";
export const SUBSCRIPTION_MANAGER = "0xYourDeployedSubscriptionManager";
export const provider = new ethers.JsonRpcProvider(STABLE_TESTNET_RPC);
export const subscriberWallet = new ethers.Wallet(process.env.SUBSCRIBER_KEY!, provider);
```
### Step 1: Delegate the subscriber's EOA (EIP-7702)
The subscriber signs an EIP-7702 authorization to delegate their EOA to the `SubscriptionManager`. After this, the subscriber's EOA executes the delegate contract's logic.
```typescript
// delegate.ts
import { subscriberWallet, provider, CHAIN_ID, SUBSCRIPTION_MANAGER } from "./config";
const authorization = {
chainId: CHAIN_ID,
address: SUBSCRIPTION_MANAGER,
nonce: await provider.getTransactionCount(subscriberWallet.address),
};
const signedAuth = await subscriberWallet.signAuthorization(authorization);
const tx = await subscriberWallet.sendTransaction({
type: 4,
to: subscriberWallet.address,
authorizationList: [signedAuth],
maxPriorityFeePerGas: 0n,
});
const receipt = await tx.wait(1);
console.log("Delegation tx:", receipt.hash);
```
```bash
npx tsx delegate.ts
```
```text
Delegation tx: 0x7702...aaaa
```
### Step 2: Register a subscription (subscriber)
The subscriber calls `subscribe()` on their own EOA. Since the EOA is delegated, this executes `SubscriptionManager.subscribe`.
```typescript
// subscribe.ts
import { ethers } from "ethers";
import { subscriberWallet } from "./config";
const subscriptionManager = new ethers.Interface([
"function subscribe(bytes32 subscriptionId, address provider, uint256 amount, uint256 interval)",
]);
const serviceProvider = "0xServiceProviderAddress";
const monthlyAmount = ethers.parseUnits("10", 6); // 10 USDT0
const interval = 30 * 24 * 60 * 60; // 30 days in seconds
// Derive a unique subscriptionId from provider + plan name + local nonce
const subscriptionId = ethers.solidityPackedKeccak256(
["address", "string", "uint256"],
[serviceProvider, "pro-monthly", 1]
);
const tx = await subscriberWallet.sendTransaction({
to: subscriberWallet.address, // call self (delegate code executes)
data: subscriptionManager.encodeFunctionData("subscribe", [
subscriptionId,
serviceProvider,
monthlyAmount,
interval,
]),
maxPriorityFeePerGas: 0n,
});
const receipt = await tx.wait(1);
console.log("Subscription registered, tx:", receipt.hash);
console.log("Subscription ID:", subscriptionId);
```
```bash
npx tsx subscribe.ts
```
```text
Subscription registered, tx: 0xabcd...1234
Subscription ID: 0xfedc...9876
```
### Step 3: Collect a payment (service provider)
Each billing cycle, the service provider calls `collect(subscriptionId)` on the subscriber's EOA. The delegate logic verifies the caller, billing schedule, and amount before transferring USDT0.
```typescript
// collect.ts
import { ethers } from "ethers";
const provider = new ethers.JsonRpcProvider("https://rpc.testnet.stable.xyz");
const providerWallet = new ethers.Wallet(process.env.PROVIDER_KEY!, provider);
const subscriptionManager = new ethers.Interface([
"function collect(bytes32 subscriptionId)",
]);
const subscriberEOA = "0xSubscriberEOAAddress";
const subscriptionId = "0xYourSubscriptionId";
const tx = await providerWallet.sendTransaction({
to: subscriberEOA, // subscriber's EOA (runs delegate code)
data: subscriptionManager.encodeFunctionData("collect", [subscriptionId]),
maxPriorityFeePerGas: 0n,
});
const receipt = await tx.wait(1);
console.log("Payment collected, tx:", receipt.hash);
console.log("Gas used:", receipt.gasUsed.toString());
// In production, run this on a cron schedule matching the billing interval.
// The delegate contract will revert if called before the interval has elapsed.
```
```bash
npx tsx collect.ts
```
```text
Payment collected, tx: 0x8f3a...2d41
Gas used: 52000
```
A `collect()` call costs roughly **50k-55k gas** on Stable (21k base + 7702 delegation overhead + ERC-20 `transfer`). At a 1 gwei base fee, that's approximately `0.000050 USDT0` per billing cycle paid by the provider.
### Step 4: Cancel a subscription (subscriber)
The subscriber calls `cancelSubscription(subscriptionId)` on their own EOA to revoke billing access for that specific subscription.
```typescript
// cancel.ts
import { ethers } from "ethers";
import { subscriberWallet } from "./config";
const subscriptionManager = new ethers.Interface([
"function cancelSubscription(bytes32 subscriptionId)",
]);
const subscriptionId = "0xYourSubscriptionId";
const tx = await subscriberWallet.sendTransaction({
to: subscriberWallet.address,
data: subscriptionManager.encodeFunctionData("cancelSubscription", [subscriptionId]),
maxPriorityFeePerGas: 0n,
});
const receipt = await tx.wait(1);
console.log("Subscription cancelled, tx:", receipt.hash);
```
```bash
npx tsx cancel.ts
```
```text
Subscription cancelled, tx: 0xdef0...5678
```
### Security model
The subscriber is authorizing the delegate contract to pull funds from their EOA. Understand exactly what that authorization covers and how to limit exposure.
**What the subscriber is authorizing.** By delegating to `SubscriptionManager`, the subscriber grants the contract's logic full execution authority over their EOA. The delegate can only transfer funds under the conditions coded into it: caller is the registered provider, the interval has elapsed, the amount matches the stored subscription. It cannot transfer to other addresses or bypass the interval check, because the contract code doesn't allow those actions.
**Failure modes to mitigate.**
* **Malicious delegate upgrade**: if the `SubscriptionManager` is a proxy whose implementation can be changed by an admin, the authorization effectively trusts that admin. Delegate only to immutable contracts or proxies with transparent, time-locked upgrades.
* **Provider compromise**: if the provider's key leaks, an attacker can collect early payments up to the per-cycle amount. Subscribers should set a `spendingLimit` per subscription and monitor for unauthorized `SubscriptionCollected` events.
* **Delegation replacement**: subscribing again with a different delegate wipes the subscription state. Use a modular delegate that supports multiple functions (subscription, batch payments, spending limits) under a single delegation, rather than one delegate per feature.
* **Replayable signatures**: all signatures use EIP-7702 nonces tied to the subscriber's EOA, so they can't replay across chains or across delegations.
**Recommended guardrails.**
* Audit the delegate contract before production use.
* Keep per-subscription amounts small relative to the subscriber's balance.
* Monitor `SubscriptionCreated` / `SubscriptionCollected` events and surface them to the subscriber.
* Offer the subscriber a clear "cancel" UI that calls `cancelSubscription(subscriptionId)` on their own EOA.
### Important considerations
* **Persistent delegation**: the EIP-7702 delegation persists until the subscriber explicitly changes or clears it. No re-delegation needed each billing cycle.
* **Single delegation per EOA**: if the subscriber later delegates to a different contract, the subscription delegate logic is replaced and collection fails. Use a modular delegate contract that supports multiple functions (subscriptions, batch payments, spending limits, session keys) under a single delegation.
* **Schedule behavior**: this example advances `nextChargeAt` by one interval on each successful collection. If more than one billing period has elapsed, repeated `collect()` calls can catch up one period at a time. Extend the logic if your product requires a different policy.
* **Use audited delegates**: only delegate to contracts that have been audited.
### Next recommended
* [**Subscription billing concept**](/en/reference/subscriptions) — Understand the pull-based billing model.
* [**Account abstraction**](/en/how-to/account-abstraction) — See how batch payments, spending limits, and session keys combine under one delegation.
* [**EIP-7702 concept**](/en/explanation/eip-7702) — Review the delegation model that makes this possible.
## Tracking unbonding completions
When an unbonding period completes, the protocol emits an `UnbondingCompleted` event through the `StableSystem` precompile (`0x0000000000000000000000000000000000009999`) via a system transaction. This lets dApps notify users and update balances in real time without running custom indexers or polling REST endpoints.
:::note
**Concept:** For how system transactions bridge SDK-layer events to the EVM and why it matters, see [System transactions](/en/explanation/system-transactions).
:::
### Prerequisites
* Understanding of [System transactions](/en/explanation/system-transactions).
* Familiarity with [Staking](/en/explanation/staking-module), specifically `undelegate` and the unbonding process.
* Experience with contract event subscription and filtering using a standard web3 library (e.g. [ethers.js](https://docs.ethers.org/) v6).
### Overview
* **Set up the contract instance**: create a contract instance for the StableSystem precompile.
* **Handle events in your application**: subscribe to real-time events or query historical data depending on your application logic.
* **Handle connection issues**: implement reconnection logic for persistent WebSocket subscriptions.
### Step 1: Set up the contract instance
Create a contract instance for the `StableSystem` precompile using the `UnbondingCompleted` event ABI.
```typescript
// config.ts
import { ethers } from "ethers";
export const STABLE_SYSTEM_ADDRESS =
"0x0000000000000000000000000000000000009999";
export const STABLE_SYSTEM_ABI = [
"event UnbondingCompleted(address indexed delegator, address indexed validator, uint256 amount)",
];
export const provider = new ethers.JsonRpcProvider("https://rpc.testnet.stable.xyz");
export const stableSystem = new ethers.Contract(
STABLE_SYSTEM_ADDRESS,
STABLE_SYSTEM_ABI,
provider
);
```
### Step 2: Handle events in your application
Subscribe to real-time events, query historical data, or both depending on your application logic.
#### Real-time subscription
Subscribe to `UnbondingCompleted` events for real-time notifications when any unbonding completes. Useful for triggering balance updates, sending notifications, or refreshing dashboard statistics.
```typescript
// subscribeBasic.ts
import { stableSystem } from "./config";
stableSystem.on("UnbondingCompleted", (delegator, validator, amount, event) => {
console.log("Unbonding completed:");
console.log(" Delegator:", delegator);
console.log(" Validator:", validator);
console.log(" Amount:", ethers.formatEther(amount), "tokens");
console.log(" Block:", event.log.blockNumber);
console.log(" Tx Hash:", event.log.transactionHash);
});
```
#### Filter by user
To only receive events for a particular delegator address, use the indexed event parameters to create a filter.
```typescript
// subscribeByUser.ts
import { ethers } from "ethers";
import { stableSystem } from "./config";
const userAddress = "0xabcd...";
const filter = stableSystem.filters.UnbondingCompleted(userAddress);
stableSystem.on(filter, (delegator, validator, amount, event) => {
refreshUserBalance(userAddress);
showNotification(
`Your unbonding of ${ethers.formatEther(amount)} tokens completed!`
);
});
```
#### Filter by validator
```typescript
// subscribeByValidator.ts
import { stableSystem } from "./config";
const validatorAddress = "0x1234...";
const validatorFilter = stableSystem.filters.UnbondingCompleted(
null,
validatorAddress
);
stableSystem.on(validatorFilter, (delegator, validator, amount) => {
updateValidatorStats(validator, amount);
});
```
#### Historical query
If your dApp needs to show a history of past unbonding completions, query historical events using event filters with block ranges.
```typescript
// queryHistory.ts
import { ethers } from "ethers";
import { provider, stableSystem } from "./config";
async function getUnbondingHistory(
userAddress: string,
fromBlock: number,
toBlock: number
) {
const filter = stableSystem.filters.UnbondingCompleted(userAddress);
const events = await stableSystem.queryFilter(filter, fromBlock, toBlock);
return events.map((event) => ({
delegator: event.args.delegator,
validator: event.args.validator,
amount: ethers.formatEther(event.args.amount),
blockNumber: event.blockNumber,
txHash: event.transactionHash,
}));
}
const currentBlock = await provider.getBlockNumber();
const history = await getUnbondingHistory(
"0xabcd...",
currentBlock - 1000,
currentBlock
);
```
### Step 3: Handle connection issues
Event subscriptions rely on persistent WebSocket connections. Implement reconnection logic for production dApps.
```typescript
// subscribeWithReconnection.ts
import { ethers } from "ethers";
import { STABLE_SYSTEM_ADDRESS, STABLE_SYSTEM_ABI } from "./config";
let reconnectAttempts = 0;
const MAX_RECONNECT_ATTEMPTS = 5;
function handleUnbonding(delegator: string, validator: string, amount: bigint) {
console.log("Unbonding completed:", { delegator, validator, amount });
}
function setupEventListener() {
const wsProvider = new ethers.WebSocketProvider("wss://rpc.testnet.stable.xyz");
wsProvider.on("error", (error) => {
console.error("Provider error:", error);
if (reconnectAttempts < MAX_RECONNECT_ATTEMPTS) {
reconnectAttempts++;
setTimeout(() => setupEventListener(), 5000);
}
});
const stableSystem = new ethers.Contract(
STABLE_SYSTEM_ADDRESS,
STABLE_SYSTEM_ABI,
wsProvider
);
stableSystem.on("UnbondingCompleted", handleUnbonding);
}
setupEventListener();
```
### Next recommended
* [**System transactions concept**](/en/explanation/system-transactions) — Understand how protocol-level events reach the EVM.
* [**Staking module concept**](/en/explanation/staking-module) — Review the delegation and unbonding flow.
* [**Staking precompile reference**](/en/reference/staking-module-api) — Look up the methods that trigger the events tracked here.
This comprehensive guide helps diagnose and resolve common issues with Stable nodes.
### Quick diagnostics
#### Node health check script
```bash
#!/bin/bash
# quick-diagnosis.sh
# Set service name (default: stable)
export SERVICE_NAME=stable
echo "=== Stable Node Diagnostics ==="
echo "Timestamp: $(date)"
echo ""
# 1. Service Status
echo "1. SERVICE STATUS:"
systemctl status ${SERVICE_NAME} --no-pager | head -10
# 2. Sync Status
echo -e "\n2. SYNC STATUS:"
curl -s localhost:26657/status | jq '.result.sync_info' 2>/dev/null || echo "RPC not responding"
# 3. Peer Connections
echo -e "\n3. PEER COUNT:"
curl -s localhost:26657/net_info | jq '.result.n_peers' 2>/dev/null || echo "Cannot get peer info"
# 4. Recent Errors
echo -e "\n4. RECENT ERRORS (last 20):"
sudo journalctl -u ${SERVICE_NAME} --since "1 hour ago" | grep -i error | tail -20
# 5. System Resources
echo -e "\n5. SYSTEM RESOURCES:"
df -h / | grep -v Filesystem
free -h | grep Mem
top -bn1 | grep "load average"
# 6. Port Status
echo -e "\n6. PORT STATUS:"
ss -tulpn | grep ${SERVICE_NAME} || echo "No ${SERVICE_NAME} ports found"
echo -e "\n=== Diagnostics Complete ==="
```
### Common issues and solutions
#### Node won't start
##### Issue: binary not found
**Error message:**
```
stabled: command not found
```
**Solution:**
```bash
# Check if binary exists
ls -la /usr/bin/stabled
# If missing, reinstall (use arm64 if needed)
wget https://stable-data-dist.s3.us-east-1.amazonaws.com/testnet/binary/stabled-0.7.2-linux-amd64-testnet.tar.gz
tar -xvzf stabled-0.7.2-linux-amd64-testnet.tar.gz
sudo mv stabled /usr/bin/
sudo chmod +x /usr/bin/stabled
```
##### Issue: permission denied
**Error message:**
```
Error: open /home/user/.stabled/config/config.toml: permission denied
```
**Solution:**
```bash
# Fix ownership
sudo chown -R $USER:$USER ~/.stabled/
# Fix permissions
chmod 700 ~/.stabled/
chmod 600 ~/.stabled/config/*.json
chmod 644 ~/.stabled/config/*.toml
```
##### Issue: address already in use
**Error message:**
```
Error: listen tcp 0.0.0.0:26657: bind: address already in use
```
**Solution:**
```bash
# Find process using port
sudo lsof -i :26657
# Kill the process
sudo kill -9
# Or change port in config
sed -i 's/laddr = "tcp:\/\/0.0.0.0:26657"/laddr = "tcp:\/\/0.0.0.0:26658"/' ~/.stabled/config/config.toml
```
#### Sync issues
##### Issue: node stuck at certain height
**Symptoms:**
* Block height not increasing
* No new blocks for > 1 minute
**Solution:**
```bash
# 1. Check peers
curl localhost:26657/net_info | jq '.result.n_peers'
# If no peers, add persistent peers
echo "persistent_peers = \"5ed0f977a26ccf290e184e364fb04e268ef16430@37.187.147.27:26656,128accd3e8ee379bfdf54560c21345451c7048c7@37.187.147.22:26656\"" >> ~/.stabled/config/config.toml
# 2. Reset and resync
sudo systemctl stop ${SERVICE_NAME}
stabled comet unsafe-reset-all --keep-addr-book
sudo systemctl start ${SERVICE_NAME}
# 3. Use snapshot (see Snapshots guide)
```
##### Issue: "wrong Block.Header.AppHash" error
**Error message:**
```
panic: Wrong Block.Header.AppHash. Expected XXXX, got YYYY
```
**Solution:**
```bash
# This indicates state corruption - rollback to previous block
sudo systemctl stop ${SERVICE_NAME}
# Rollback one block
stabled rollback
# Restart node
sudo systemctl start ${SERVICE_NAME}
# If rollback doesn't work, restore from snapshot
# Backup important files
cp ~/.stabled/config/priv_validator_key.json ~/backup/
cp ~/.stabled/config/node_key.json ~/backup/
# Reset state
stabled comet unsafe-reset-all
# Restore from snapshot
wget https://stable-data-dist.s3.us-east-1.amazonaws.com/testnet/snapshots/snapshot.tar.lz4
tar -I lz4 -xf snapshot.tar.lz4 -C ~/.stabled/
sudo systemctl start ${SERVICE_NAME}
```
##### Issue: slow sync speed
**Symptoms:**
* Less than 100 blocks/minute
* High CPU/disk usage
**Solution:**
```bash
# 1. Check disk I/O
iostat -x 1 5
# 2. Optimize configuration
cat >> ~/.stabled/config/config.toml <> ~/.stabled/config/config.toml < db_dump.txt
# 4. If repair fails, resync
rm -rf ~/.stabled/data
# Restore from snapshot
# 5. Start node
sudo systemctl start ${SERVICE_NAME}
```
##### Issue: "too many open files"
**Error message:**
```
accept: too many open files
```
**Solution:**
```bash
# 1. Check current limits
ulimit -n
# 2. Increase limits
echo "* soft nofile 65535" | sudo tee -a /etc/security/limits.conf
echo "* hard nofile 65535" | sudo tee -a /etc/security/limits.conf
# 3. Update systemd service
sudo sed -i '/\[Service\]/a LimitNOFILE=65535' /etc/systemd/system/stabled.service
# 4. Reload and restart
sudo systemctl daemon-reload
sudo systemctl restart ${SERVICE_NAME}
```
#### Memory issues
##### Issue: out of memory (OOM) kills
**Symptoms:**
```
stabled.service: Main process exited, code=killed, status=9/KILL
```
**Solution:**
```bash
# 1. Check memory usage
free -h
dmesg | grep -i "killed process"
# 2. Add swap space
sudo fallocate -l 8G /swapfile
sudo chmod 600 /swapfile
sudo mkswap /swapfile
sudo swapon /swapfile
echo '/swapfile none swap sw 0 0' | sudo tee -a /etc/fstab
# 3. Optimize memory usage
cat >> ~/.stabled/config/app.toml < $OUTPUT_DIR/system.txt
df -h >> $OUTPUT_DIR/system.txt
free -h >> $OUTPUT_DIR/system.txt
# Service status
systemctl status ${SERVICE_NAME} --no-pager > $OUTPUT_DIR/service-status.txt
# Recent logs
sudo journalctl -u ${SERVICE_NAME} --since "1 hour ago" > $OUTPUT_DIR/recent-logs.txt
# Config files (remove sensitive data)
grep -v "priv" ~/.stabled/config/config.toml > $OUTPUT_DIR/config.toml
grep -v "priv" ~/.stabled/config/app.toml > $OUTPUT_DIR/app.toml
# Node status
curl -s localhost:26657/status > $OUTPUT_DIR/node-status.json 2>/dev/null
# Create archive
tar -czf $OUTPUT_DIR.tar.gz $OUTPUT_DIR/
echo "Debug info collected: $OUTPUT_DIR.tar.gz"
echo "Share this file when requesting support"
```
### Next steps
* Review [Monitoring Setup](/en/how-to/monitor-node) to prevent issues
* Check [Upgrade Guide](/en/how-to/upgrade-node) for version-specific issues
This guide covers the upgrade process for Stable nodes, including upgrade procedures and rollback strategies.
> For complete version history and upgrade details, see [Version History](/en/reference/testnet-version-history).
### Upgrade types
#### Soft upgrades (non-breaking)
* Can be performed at any time
* Backward compatible
#### Hard upgrades (breaking)
* Requires upgrade at specific height
* Not backward compatible
#### Emergency upgrades
* Critical security fixes
* Immediate action required
* May require chain halt
### Standard upgrade procedure
#### Step 1: preparation
```bash
# Check current version
stabled version --long
# Backup critical data
cp -r ~/.stabled/config ~/stable-backup-$(date +%Y%m%d)/
# For validators only: Backup validator state
cp ~/.stabled/data/priv_validator_state.json ~/stable-backup-$(date +%Y%m%d)/
# Check disk space (need 2x current data size)
df -h ~/.stabled
```
#### Step 2: download new binary
```bash
# For v1.2.0-rc1 upgrade (January 22, 2026)
# Choose your architecture:
# Linux AMD64
BINARY_URL="https://stable-data-dist.s3.us-east-1.amazonaws.com/testnet/binary/stabled-1.2.0-rc1-linux-amd64-testnet.tar.gz"
# OR Linux ARM64
BINARY_URL="https://stable-data-dist.s3.us-east-1.amazonaws.com/testnet/binary/stabled-1.2.0-rc1-linux-arm64-testnet.tar.gz"
# Download new binary
wget $BINARY_URL
# Extract to temporary location
tar -xvzf stabled-1.2.0-rc1-linux-*.tar.gz -C /tmp/
# Verify new version
/tmp/stabled version --long
```
#### Step 3: perform upgrade
##### For soft upgrades
```bash
# Stop node
sudo systemctl stop ${SERVICE_NAME}
# Backup current binary
sudo mv /usr/bin/stabled /usr/bin/stabled.backup
# Install new binary
sudo mv /tmp/stabled /usr/bin/stabled
sudo chmod +x /usr/bin/stabled
# Verify installation
stabled version --long
# Start node
sudo systemctl start ${SERVICE_NAME}
# Monitor logs
sudo journalctl -u ${SERVICE_NAME} -f
```
##### For hard upgrades
```bash
# Monitor for upgrade height
while true; do
HEIGHT=$(curl -s localhost:26657/status | jq -r '.result.sync_info.latest_block_height')
echo "Current height: $HEIGHT"
if [ $HEIGHT -ge $UPGRADE_HEIGHT ]; then
break
fi
sleep 10
done
# Node will halt automatically at upgrade height
# Wait for halt message in logs
sudo journalctl -u ${SERVICE_NAME} -f | grep "UPGRADE"
# Once halted, perform upgrade
sudo systemctl stop ${SERVICE_NAME}
sudo mv /usr/bin/stabled /usr/bin/stabled.backup
sudo mv /tmp/stabled /usr/bin/stabled
# Start with new binary
sudo systemctl start ${SERVICE_NAME}
```
#### Step 4: post-upgrade verification
```bash
# Check node status
curl -s localhost:26657/status | jq '.result'
# Verify version
curl -s localhost:26657/status | jq '.result.node_info.version'
# Check peers
curl -s localhost:26657/net_info | jq '.result.n_peers'
# Monitor sync status
watch -n 2 'curl -s localhost:26657/status | jq ".result.sync_info"'
# Check for errors
sudo journalctl -u ${SERVICE_NAME} --since "10 minutes ago" | grep -i error
```
### Cosmovisor setup (automated upgrades)
Cosmovisor automates the upgrade process for coordinated upgrades.
#### Installation
```bash
# Install cosmovisor
go install cosmossdk.io/tools/cosmovisor/cmd/cosmovisor@latest
# Or download binary
wget https://github.com/cosmos/cosmos-sdk/releases/download/cosmovisor%2Fv1.7.0/cosmovisor-v1.7.0-linux-amd64.tar.gz
tar -xzf cosmovisor-v1.7.0-linux-amd64.tar.gz
sudo mv cosmovisor /usr/bin/
```
#### Configuration
```bash
# Set environment variables
cat >> ~/.bashrc < /dev/null < > export.json
# 3. Wait for coordinated restart instructions
```
### Next steps
* [Version History](/en/reference/testnet-version-history) - Complete upgrade history and release notes
* [Monitor your node](/en/how-to/monitor-node) after upgrades
* Review [Troubleshooting](/en/how-to/troubleshoot-node) for common issues
## Get testnet USDT0
Stable uses USDT0 as the gas token, so you need USDT0 in your wallet to submit transactions. There are two ways to fund a testnet wallet: the faucet for small amounts, or bridging from Ethereum Sepolia for larger amounts.
### Faucet
The faucet is the fastest way to get testnet USDT0 for basic development and testing.
1. Visit [https://faucet.stable.xyz](https://faucet.stable.xyz).
2. Connect your browser wallet or paste a wallet address.
3. Select the button to receive testnet USDT0.
The faucet sends 1 USDT0 per request, which is enough to deploy and interact with several contracts.
#### Verify your balance
Confirm the funds arrived:
```bash
cast balance YOUR_ADDRESS --rpc-url https://rpc.testnet.stable.xyz
```
You should see a non-zero value. If the balance is still `0`, wait a few seconds and re-run. Stable produces a new block roughly every 0.7 seconds, so funds settle quickly.
### Bridge from Sepolia (larger amounts)
If you need more USDT0 than the faucet provides, you can bridge Test USDT from Ethereum Sepolia to the Stable Testnet.
#### 1. Mint Test USDT on Sepolia
Call the `mint` function on the [Ethereum Sepolia Test USDT contract](https://sepolia.etherscan.io/token/0xc4DCC311c028e341fd8602D8eB89c5de94625927#writeContract) to get the desired amount.
#### 2. Bridge to Stable Testnet
Send a cross-chain transfer to the LayerZero bridge contract on Ethereum Sepolia to bridge Test USDT to the Stable Testnet.
For the full bridge script and contract addresses, see [Bridge USDT0 to Stable](/en/tutorial/bridge-usdt0).
This guide covers various methods to synchronize your Stable node quickly using snapshots and state sync.
### Sync methods overview
| Method | Sync Time | Storage Required | Use Case |
| -------------------- | --------- | ---------------- | ------------------------------ |
| **Pruned Snapshot** | \~10 min | \< 5 GiB | Regular full nodes |
| **Archive Snapshot** | \~1 hours | \~500 GB | Archive nodes, block explorers |
### Official snapshots
Stable provides official snapshots updated daily (00:00 UTC).
#### Snapshot information
#### Mainnet
| Type | Compression | Size | URL | Update Frequency |
| ----------- | ----------- | -------- | -------------------------------------------------------------------------------------------------------- | ---------------- |
| **Pruned** | LZ4 | \< 5 GiB | [Download](https://stable-data-dist.s3.us-east-1.amazonaws.com/mainnet/snapshots/snapshot.tar.lz4) | Daily |
| **Archive** | ZSTD | \~300 GB | [Download](https://stable-data-dist.s3.us-east-1.amazonaws.com/mainnet/snapshots/stable_archive.tar.zst) | Weekly |
#### Testnet
| Type | Compression | Size | URL | Update Frequency |
| ----------- | ----------- | -------- | -------------------------------------------------------------------------------------------------------- | ---------------- |
| **Pruned** | LZ4 | \< 5 GiB | [Download](https://stable-data-dist.s3.us-east-1.amazonaws.com/testnet/snapshots/snapshot.tar.lz4) | Daily |
| **Archive** | ZSTD | \~800 GB | [Download](https://stable-data-dist.s3.us-east-1.amazonaws.com/testnet/snapshots/stable_archive.tar.zst) | Weekly |
### Using pruned snapshots
Pruned snapshots contain recent blockchain state (last 100-1000 blocks).
#### Step 1: set environment variable
```bash
# Set service name (default: stable)
export SERVICE_NAME=stable
```
#### Step 2: stop node service
```bash
# Stop the running node
sudo systemctl stop ${SERVICE_NAME}
# Verify it's stopped
sudo systemctl status ${SERVICE_NAME}
```
#### Step 3: backup current data (optional)
```bash
# Create backup directory
mkdir -p ~/stable-backup
# Backup current state (optional, requires significant space)
cp -r ~/.stabled/data ~/stable-backup/
```
#### Step 4: download and extract pruned snapshot
:::code-group
```bash [Mainnet]
# Install dependencies
sudo apt install -y wget zstd pv
# Create snapshot directory
mkdir -p ~/snapshot
cd ~/snapshot
# Download pruned snapshot with progress
wget -c https://stable-data-dist.s3.us-east-1.amazonaws.com/mainnet/snapshots/snapshot.tar.lz4
# Remove old data
rm -rf ~/.stabled/data/*
# Extract snapshot with progress indicator
pv stable_pruned.tar.zst | zstd -d -c | tar -xf - -C ~/.stabled/
# Alternative extraction without pv
zstd -d stable_pruned.tar.zst -c | tar -xvf - -C ~/.stabled/
# Clean up
rm stable_pruned.tar.zst
```
```bash [Testnet]
# Install dependencies
sudo apt install -y wget lz4 pv
# Create snapshot directory
mkdir -p ~/snapshot
cd ~/snapshot
# Download pruned snapshot with progress
wget -c https://stable-data-dist.s3.us-east-1.amazonaws.com/testnet/snapshots/snapshot.tar.lz4
# Alternative: Download with resume support
curl -C - -o snapshot.tar.lz4 https://stable-data-dist.s3.us-east-1.amazonaws.com/testnet/snapshots/snapshot.tar.lz4
# Remove old data
rm -rf ~/.stabled/data/*
# Extract snapshot with progress indicator
pv snapshot.tar.lz4 | tar -I lz4 -xf - -C ~/.stabled/
# Alternative extraction without pv
tar -I lz4 -xvf snapshot.tar.lz4 -C ~/.stabled/
# Clean up
rm snapshot.tar.lz4
```
:::
#### Step 5: restart node
```bash
# Start the node
sudo systemctl start ${SERVICE_NAME}
# Check status
sudo systemctl status ${SERVICE_NAME}
# Monitor logs
sudo journalctl -u stabled -f
```
### Using archive snapshots
Archive snapshots contain complete blockchain history.
#### Step 1: prepare system
```bash
# Stop node
sudo systemctl stop ${SERVICE_NAME}
# Install dependencies
sudo apt install -y wget zstd pv
# Check available disk space (need 2x snapshot size)
df -h ~/.stabled
```
#### Step 2: download and extract archive snapshot
:::code-group
```bash [Mainnet]
# Create working directory
mkdir -p ~/snapshot
cd ~/snapshot
# Download archive snapshot
wget -c https://stable-data-dist.s3.us-east-1.amazonaws.com/mainnet/snapshots/stable_archive.tar.zst
# Clear old data
rm -rf ~/.stabled/data/*
# Extract with high memory for better performance
pv stable_archive.tar.zst | zstd -d --long=31 --memory=2048MB -c - | tar -xf - -C ~/.stabled/
# Alternative: Standard extraction
zstd -d --long=31 stable_archive.tar.zst -c | tar -xvf - -C ~/.stabled/
# Clean up
rm stable_archive.tar.zst
```
```bash [Testnet]
# Create working directory
mkdir -p ~/snapshot
cd ~/snapshot
# Download archive snapshot
wget -c https://stable-data-dist.s3.us-east-1.amazonaws.com/testnet/snapshots/stable_archive.tar.zst
# Clear old data
rm -rf ~/.stabled/data/*
# Extract with high memory for better performance
pv archive.tar.zst | zstd -d --long=31 --memory=2048MB -c - | tar -xf - -C ~/.stabled/
# Alternative: Standard extraction
zstd -d --long=31 archive.tar.zst -c | tar -xvf - -C ~/.stabled/
# Clean up
rm archive.tar.zst
```
:::
#### Step 3: start node
```bash
# Start service
sudo systemctl start ${SERVICE_NAME}
# Verify sync status
curl -s localhost:26657/status | jq '.result.sync_info'
```
### Creating your own snapshots
#### Manual snapshot creation
```bash
# Stop node
sudo systemctl stop ${SERVICE_NAME}
# Create snapshot archive
cd ~/.stabled
tar -cf - data/ | lz4 -9 > ~/stable-snapshot-$(date +%Y%m%d).tar.lz4
# Create checksum
sha256sum ~/stable-snapshot-*.tar.lz4 > checksums.txt
# Restart node
sudo systemctl start ${SERVICE_NAME}
```
#### Automated snapshot script
```bash
#!/bin/bash
# snapshot.sh - Automated snapshot creation
# Configuration
SNAPSHOT_DIR="/var/snapshots"
STABLED_HOME="$HOME/.stabled"
KEEP_DAYS=7
# Create snapshot directory
mkdir -p $SNAPSHOT_DIR
# Stop node
sudo systemctl stop ${SERVICE_NAME}
# Create snapshot
SNAPSHOT_NAME="stable-snapshot-$(date +%Y%m%d-%H%M%S).tar.lz4"
tar -cf - -C $STABLED_HOME data/ | lz4 -9 > $SNAPSHOT_DIR/$SNAPSHOT_NAME
# Generate metadata
cat > $SNAPSHOT_DIR/latest.json < {
console.log("Unbonding completed for:", delegator);
console.log("Amount:", ethers.formatEther(amount), "STABLE");
console.log("Tx:", event.log.transactionHash);
});
console.log("Listening for UnbondingCompleted events...");
```
```bash
npx tsx watchUnbonding.ts
```
```text
Listening for UnbondingCompleted events...
Unbonding completed for: 0xabcd...
Amount: 100.0 STABLE
Tx: 0x12ab...
```
For the full system-transaction mechanism and the filter-by-user / historical-query patterns, see [Track unbonding completions](/en/how-to/track-unbonding).
### Per-module references
Each precompile's full method list, events, and authorization rules live in its reference page.
* [Bank precompile](/en/reference/bank-module-api): STABLE token transfers and supply queries.
* [Distribution precompile](/en/reference/distribution-module-api): reward claims and commission.
* [Staking precompile](/en/reference/staking-module-api): delegate, undelegate, redelegate, validator queries.
* [System transactions](/en/reference/system-transactions-api): StableSystem event format and authorization.
### Next recommended
* [**Track unbonding completions**](/en/how-to/track-unbonding) — Subscribe to the UnbondingCompleted event emitted via the StableSystem precompile.
* [**System modules reference**](/en/reference/system-modules-api-overview) — Jump to the per-module ABI, method signatures, and event schemas.
* [**System modules concept**](/en/explanation/system-modules-overview) — Understand why Stable exposes SDK modules through precompiles.
## Verify a smart contract
Verification uploads your contract's source code to the block explorer and proves it compiles to the deployed bytecode. Once verified, users can read state, call functions, and audit the source on Stablescan without re-hosting your code. This guide walks through verifying a Foundry-deployed contract on Stable.
### Prerequisites
* A contract already deployed on Stable testnet or mainnet. If you haven't deployed yet, see [Deploy a smart contract](/en/tutorial/smart-contract).
* Foundry installed (`forge` available in your PATH).
* The deployed contract address from your `forge create` output.
### 1. Confirm the deployed address
Make sure you have the `Deployed to` address from your earlier deployment. From the [Deploy a smart contract](/en/tutorial/smart-contract) flow, this was the value printed after `forge create`.
```bash
cast code 0xDeployedContractAddress --rpc-url https://rpc.testnet.stable.xyz | head -c 20
```
```text
0x6080604052600436...
```
A non-empty bytecode confirms the contract is deployed at that address.
### 2. Run forge verify-contract
Foundry's verification flow submits your source to the Stablescan verifier.
```bash
forge verify-contract \
0xDeployedContractAddress \
src/Counter.sol:Counter \
--chain-id 2201 \
--verifier blockscout \
--verifier-url https://testnet.stablescan.xyz/api \
--watch
```
```text
Start verifying contract `0xDeployedContractAddress` deployed on 2201
Submitting verification of contract: Counter
Submitted contract for verification:
Response: `OK`
GUID: `abc123...`
URL: https://testnet.stablescan.xyz/address/0xDeployedContractAddress
Contract verification status:
Response: `OK`
Details: `Pass - Verified`
Contract successfully verified
```
`--watch` blocks until verification finishes so you don't have to poll. On mainnet, swap the chain ID to `988` and the verifier URL to `https://stablescan.xyz/api`.
:::note
**Constructor arguments**: If your contract takes constructor arguments, add `--constructor-args $(cast abi-encode "constructor(uint256,address)" 42 0xSomeAddress)` to the command. Without this flag, verification fails for any contract with a non-empty constructor.
:::
### 3. Confirm verification on Stablescan
Open the contract page on the explorer.
```text
https://testnet.stablescan.xyz/address/0xDeployedContractAddress
```
The **Contract** tab should now show source code, a green "Verified" badge, and the full ABI. Users can read state under **Read Contract** and send transactions under **Write Contract**.
### Troubleshooting
* **"Bytecode does not match"**: your source compiles to different bytecode than what's deployed. Most often caused by mismatched Solidity version or optimizer settings. Pass `--compiler-version` and `--optimizer-runs` explicitly to match your `foundry.toml`.
* **"GUID not found"**: the verifier hasn't registered your submission yet. Re-run with `--watch` or manually check the URL printed in the response.
* **Contract uses libraries**: add `--libraries src/Lib.sol:Lib:0xDeployedLibAddress` for each linked library.
### Next recommended
* [**Index contract events**](/en/how-to/index-contract) — Subscribe to on-chain events with ethers.js and build a live event stream.
* [**Deploy a smart contract**](/en/tutorial/smart-contract) — Scaffold a fresh Foundry project and deploy to Stable testnet.
* [**JSON-RPC reference**](/en/reference/json-rpc-api) — See which `eth_*` methods Stable supports for on-chain interactions.
## Work with USDT0 as gas
On Stable, USDT0 is both the chain's native asset and an ERC-20 token. The gas token is USDT0, not a separate native asset. Standard Ethereum gas estimation works once you adjust three things: `maxPriorityFeePerGas` is always `0`, `baseFee` is denominated in USDT0, and the `value` field in a native transfer carries USDT0 (not ETH).
This guide shows how to construct transactions correctly on Stable and what to change when porting Ethereum code.
### What changes vs. Ethereum
| **Field** | **Ethereum** | **Stable** |
| :-------------------------------- | :----------------- | :------------------- |
| Gas token | ETH | USDT0 |
| `maxPriorityFeePerGas` | Used for ordering | Ignored (set to `0`) |
| `baseFeePerGas` | Denominated in ETH | Denominated in USDT0 |
| `value` (native transfer) | Transfers ETH | Transfers USDT0 |
| EIP-1559 transaction format | Supported | Supported |
| `eth_estimateGas`, `eth_gasPrice` | Supported | Supported |
| `eth_maxPriorityFeePerGas` | Returns a tip | Returns `0` |
Because the transaction format is unchanged, existing ethers.js, viem, Hardhat, and Foundry code runs on Stable without changes. The differences are in how you *compute* gas fields, not how you encode them.
### Construct a transaction
Fetch the base fee, set `maxPriorityFeePerGas` to `0`, and double the base fee as a safety margin.
```typescript
// sendNative.ts
import { ethers } from "ethers";
import "dotenv/config";
const provider = new ethers.JsonRpcProvider("https://rpc.testnet.stable.xyz");
const wallet = new ethers.Wallet(process.env.PRIVATE_KEY!, provider);
const block = await provider.getBlock("latest");
const baseFee = block!.baseFeePerGas!;
const maxPriorityFeePerGas = 0n; // always 0 on Stable
const maxFeePerGas = baseFee * 2n + maxPriorityFeePerGas; // 2x headroom
const tx = await wallet.sendTransaction({
to: "0xRecipientAddress",
value: ethers.parseEther("0.001"), // 0.001 USDT0, 18 decimals
maxFeePerGas,
maxPriorityFeePerGas,
});
const receipt = await tx.wait(1);
console.log("Tx:", receipt!.hash);
console.log("Gas used:", receipt!.gasUsed.toString());
console.log("Effective gas price:", receipt!.gasPrice.toString(), "(USDT0 wei-equivalent)");
```
```bash
npx tsx sendNative.ts
```
```text
Tx: 0x8f3a...2d41
Gas used: 21000
Effective gas price: 1000000000 (USDT0 wei-equivalent)
```
The effective gas price is a USDT0-denominated value. At `1 gwei`, a 21,000-gas native transfer costs approximately `0.000021` USDT0.
### Estimate gas cost in USDT0
`eth_estimateGas` and `eth_gasPrice` behave identically to Ethereum. The result is already in USDT0 because that is the gas token.
```typescript
// estimate.ts
import { ethers } from "ethers";
const provider = new ethers.JsonRpcProvider("https://rpc.testnet.stable.xyz");
const gasPrice = await provider.send("eth_gasPrice", []);
const gasEstimate = await provider.estimateGas({
to: "0xContractAddress",
data: "0x...",
});
const feeInUSDT0 = BigInt(gasPrice) * gasEstimate;
console.log("Estimated fee:", ethers.formatEther(feeInUSDT0), "USDT0");
```
```bash
npx tsx estimate.ts
```
```text
Estimated fee: 0.000021 USDT0
```
:::warning
`eth_maxPriorityFeePerGas` always returns `0` on Stable. If your wallet or SDK adds the RPC-returned priority fee on top of the base fee, it still works, but fee UIs that display a separate tip will show `0` and should be hidden.
:::
### Tooling configuration
* **Hardhat / Foundry**: no special configuration needed. Standard EVM settings work. If your config explicitly sets a priority fee, set it to `0`.
* **Wallets**: hide or disable the priority tip input field. Displaying it is misleading because the value has no effect on ordering or inclusion.
* **Monitoring**: fee analytics dashboards should not chart priority fees. They are always zero on Stable.
### Common mistakes when porting from Ethereum
* **Applying an ETH-denominated tip**: copying a priority-fee constant from Ethereum doesn't produce faster inclusion. Stable orders transactions by base fee only.
* **Treating `value` as ETH**: a native transfer's `value` is USDT0. Don't convert it through ETH/USD prices.
* **Hard-coding a fee cap**: set `maxFeePerGas` from the live `baseFeePerGas` (e.g., `baseFee * 2`) rather than a fixed value, so transactions don't stall when the base fee rises.
### Next recommended
* [**Gas pricing reference**](/en/reference/gas-pricing-api) — Full base-fee model, EIP-1559 format, and `eth_*` method behavior.
* [**Zero gas transactions**](/en/how-to/zero-gas-transactions) — Let an application cover gas via the Gas Waiver.
* [**USDT0 behavior on Stable**](/en/explanation/usdt0-behavior) — Balance reconciliation and contract design with USDT0's dual role.
## Zero gas transactions
Gas Waiver lets an application cover gas on behalf of a user. The user signs a transaction with `gasPrice = 0`, a governance-registered waiver wraps it, and validators execute the call at zero cost to the user. This guide walks through a qualifying transfer, shows how to verify gas was waived, and explains what the waiver does and doesn't cover.
:::note
**Concept**: For the wrapper transaction mechanism, authorization model, and security guarantees, see [Gas waiver](/en/explanation/gas-waiver) and the [Gas waiver protocol reference](/en/reference/gas-waiver-api).
:::
### What you'll build
A two-script flow that submits a USDT0 transfer through the hosted Waiver Server, fetches the receipt, and confirms `gasPrice = 0`.
#### Demo
```text
step 1. Connect wallet, balance displayed as 0.01 USDT0
step 2. Send transaction via Gas Waiver → [Run]
step 3. Result
tx: 0x8f3a...2d41
Gas fee paid by you: 0.000000 USDT0
Balance after: 0.01 USDT0
```
### When the waiver applies
A transaction qualifies when all of these hold:
* The user signs the inner transaction with `gasPrice = 0`.
* The submitter is a governance-registered waiver address.
* The target `to` address and method selector are on the waiver's `AllowedTarget` policy.
* The wrapper is sent to the marker address `0x000000000000000000000000000000000000f333` with `value = 0` and `gasPrice = 0`.
If any of these fails, validators reject the wrapper without executing the inner call. Contract calls not listed in `AllowedTarget` are not covered. Arbitrary self-serve waivers are not possible; every waiver must be registered through validator governance.
### Prerequisites
* An API key for the Waiver Server, issued by the Stable team.
* The target contract address and method selector registered on the waiver's `AllowedTarget` policy.
* A user wallet on testnet with no USDT0 required for gas.
### Step 1: sign a qualifying InnerTx
The user signs a standard transaction with `gasPrice = 0`. In this example the call is a USDT0 `transfer`, which is a common `AllowedTarget` for application-covered gas flows.
```typescript
// config.ts
import { ethers } from "ethers";
import "dotenv/config";
export const CONFIG = {
RPC_URL: "https://rpc.testnet.stable.xyz",
CHAIN_ID: 2201, // 988 for mainnet
WAIVER_SERVER: "https://waiver.testnet.stable.xyz",
USDT0_ADDRESS: "0x78Cf24370174180738C5B8E352B6D14c83a6c9A9",
};
export const provider = new ethers.JsonRpcProvider(CONFIG.RPC_URL);
export const userWallet = new ethers.Wallet(process.env.USER_PRIVATE_KEY!, provider);
```
```typescript
// signInner.ts
import { ethers } from "ethers";
import { CONFIG, provider, userWallet } from "./config";
const usdt0 = new ethers.Contract(CONFIG.USDT0_ADDRESS, [
"function transfer(address to, uint256 amount) returns (bool)"
], provider);
const callData = usdt0.interface.encodeFunctionData("transfer", [
"0xRecipientAddress",
ethers.parseUnits("0.001", 18),
]);
const gasLimit = await provider.estimateGas({
from: userWallet.address,
to: CONFIG.USDT0_ADDRESS,
data: callData,
});
const nonce = await provider.getTransactionCount(userWallet.address);
const innerTx = {
to: CONFIG.USDT0_ADDRESS,
data: callData,
value: 0,
gasPrice: 0,
gasLimit,
nonce,
chainId: CONFIG.CHAIN_ID,
};
export const signedInnerTx = await userWallet.signTransaction(innerTx);
console.log("Signed InnerTx:", signedInnerTx);
```
```bash
npx tsx signInner.ts
```
```text
Signed InnerTx: 0xf8a8...c1
```
:::warning
`gasPrice` must be `0`. A non-zero value causes the waiver server to reject the submission and validators to reject the wrapper.
:::
### Step 2: submit through the Waiver Server
The Waiver Server wraps the signed inner transaction and broadcasts it. You need a server-issued API key.
```typescript
// submit.ts
import { CONFIG } from "./config";
import { signedInnerTx } from "./signInner";
const response = await fetch(`${CONFIG.WAIVER_SERVER}/v1/submit`, {
method: "POST",
headers: {
"Content-Type": "application/json",
Authorization: `Bearer ${process.env.WAIVER_API_KEY}`,
},
body: JSON.stringify({ transactions: [signedInnerTx] }),
});
const reader = response.body!.getReader();
const decoder = new TextDecoder();
let txHash = "";
while (true) {
const { done, value } = await reader.read();
if (done) break;
for (const line of decoder.decode(value).trim().split("\n")) {
const result = JSON.parse(line);
if (result.success) {
txHash = result.txHash;
console.log(`tx confirmed: ${txHash}`);
} else {
console.error(`tx failed: ${result.error.message}`);
}
}
}
export { txHash };
```
```bash
npx tsx submit.ts
```
```text
tx confirmed: 0x8f3a...2d41
```
### Step 3: verify the receipt shows zero gas
Fetch the receipt and confirm `effectiveGasPrice` is 0. That is the cryptographic proof that the user paid no gas.
```typescript
// verify.ts
import { provider } from "./config";
import { txHash } from "./submit";
const receipt = await provider.getTransactionReceipt(txHash);
const gasUsed = receipt!.gasUsed;
const effectiveGasPrice = receipt!.gasPrice;
const totalFee = gasUsed * effectiveGasPrice;
console.log("Gas used: ", gasUsed.toString());
console.log("Effective gas price:", effectiveGasPrice.toString());
console.log("Gas fee paid: ", `${totalFee.toString()} USDT0 (wei-equivalent)`);
```
```bash
npx tsx verify.ts
```
```text
Gas used: 21000
Effective gas price: 0
Gas fee paid: 0 USDT0 (wei-equivalent)
```
An `effectiveGasPrice` of `0` confirms the transaction executed under a registered waiver and the user was not charged.
### What Gas Waiver doesn't cover
* **Contracts outside `AllowedTarget`**: arbitrary contract calls aren't covered. Every target is scoped per waiver through governance.
* **User-submitted wrappers**: if the user submits directly to `0x...f333`, it fails. Only registered waiver addresses can wrap.
* **Fee extraction**: validators don't accept a non-zero `gasPrice` on either the inner or wrapper transaction.
For the full policy model and per-waiver scope rules, see [Gas waiver protocol](/en/reference/gas-waiver-api).
### Next recommended
* [**Integrate the Waiver Server**](/en/how-to/integrate-gas-waiver) — Full API reference, batch submissions, error codes, and NDJSON streaming.
* [**Self-hosted Gas Waiver**](/en/how-to/self-hosted-gas-waiver) — Register your own waiver address and broadcast wrappers without the hosted API.
* [**Gas waiver protocol**](/en/reference/gas-waiver-api) — Read the full spec: marker routing, wrapper format, governance controls.
## Accounts guides
Every guide, concept, and reference under the Accounts tab, grouped by what you're trying to do.
### Set up a wallet
* [**Create a wallet**](/en/how-to/create-wallet) — Generate a new key pair or restore from a seed phrase using ethers.js or the Tether WDK.
* [**Agent wallets**](/en/reference/agentic-wallets) — Self-custodied wallets for AI agents — how they differ from user wallets.
### Delegate the account (EIP-7702)
* [**EIP-7702 concept**](/en/explanation/eip-7702) — What EIP-7702 enables on Stable and the security model.
* [**Account abstraction how-to**](/en/how-to/account-abstraction) — Apply EIP-7702 to batch payments, spending limits, and session keys.
### Reference
* [**EIP-7702 API**](/en/reference/eip-7702-api) — Type-4 transaction format and the authorization list.
* [**Subscribe and collect**](/en/how-to/subscribe-and-collect) — Apply an EIP-7702 delegate to a subscription payment flow (cross-listed).
## Accounts on Stable
An account on Stable is a standard Ethereum EOA that can optionally execute smart contract logic through [EIP-7702 delegation](/en/explanation/eip-7702). Users keep one address and one private key across wallets, batch payments, recurring subscriptions, and session keys. Agents run the same account model without any custodial middleware.
### What you can build
* **Wallets** from a seed phrase, with native USDT0 balance queries and signed transactions.
* **Batched payments**: execute multiple transfers in one atomic transaction via a delegated EOA.
* **Spending limits**: enforce per-transaction or per-day caps on the EOA itself through delegate logic.
* **Session keys**: grant a scoped, time-bound, budget-bound key to a dApp so users don't re-sign every action.
* **Agent wallets**: fund an AI agent with a self-custodied key and let it pay for x402 services autonomously. See [Agentic wallets](/en/reference/agentic-wallets) for providers and integration patterns.
### How Stable differs
* **One address for everything.** No account migration to unlock smart contract features. EIP-7702 delegates code *onto* the existing EOA.
* **USDT0-only gas.** Users don't need a separate native token. A new account funds with USDT0 and can transact immediately.
* **Multi-function delegate pattern.** A single delegate can combine batch, spending limits, session keys, and subscriptions so one delegation covers every feature you ship.
### Start here
* [**Create a wallet**](/en/how-to/create-wallet) — Generate or restore a wallet with ethers.js or the Tether WDK.
* [**Delegate with EIP-7702**](/en/how-to/account-abstraction) — Apply batch payments, spending limits, and session keys to an existing EOA.
* [**Stable SDK**](/en/explanation/sdk-overview) — Use the typed client to sign and send transactions from any account.
### Next recommended
* [**Accounts guide index**](/en/explanation/accounts-index) — Jump to the full list of account guides and references.
* [**EIP-7702 concept**](/en/explanation/eip-7702) — Why delegation works without account migration.
* [**Subscribe and collect**](/en/how-to/subscribe-and-collect) — Apply the Accounts model to a recurring payment flow.
## Agent settlement
Agent settlement is Stable's rail for machine payments. An agent holds a USDT0 balance, pays for a resource over HTTP, and the payment settles on-chain in the same request cycle. The agent spends down from one balance for both the payment and the network fee. There is no separate gas token, no sign-up, and no API key rotation.
### Why this matters for agents
Agents transact differently from humans. They run continuously, make many small payments, and cannot complete sign-up flows or rotate API keys. Settlement on Stable matches that workload:
* **USDT0 is the gas token and the payment token.** An agent wallet holds a single asset and spends it down for both fees and payments.
* **Sub-cent, predictable fees.** Fees are denominated in dollars, so agents can budget cost per action without converting from a volatile gas asset.
* **Sub-second finality.** A paid HTTP call settles inside the request lifecycle (\~700 ms block time), which makes high-frequency machine traffic viable.
* **USDT distribution.** USDT is the most widely held stablecoin; Stable is the venue purpose-built for it.
### How the layers fit
Two layers do different jobs and are complementary, not alternatives:
* **x402** is the *payment standard*. It is an HTTP-native protocol where a server responds with `402 Payment Required`, a client signs an authorization, and a facilitator submits it.
* **MPP (Machine Payments Protocol)** is the IETF-track standard that supersedes x402 with broader intents and multi-rail support; x402 is the backward-compatible subset Stable supports today. See [MPP](/en/explanation/mpp).
* **Stable** is the *settlement layer*. It is where the on-chain transfer of USDT0 actually happens.
A **facilitator** sits between the two: it verifies the signed payment and submits the on-chain call so the developer does not run settlement infrastructure. See [Facilitators](/en/reference/agentic-facilitators) for the providers that support Stable today.
```text
agent (client) ──HTTP──▶ resource server ──signed payment──▶ facilitator ──tx──▶ Stable
(returns 402) (verify + submit) (USDT0 settles)
```
### What you can build
* **Pay-per-call APIs** priced per request in USDT0, settled via x402 or MPP.
* **Agent-to-agent commerce** where one agent pays another for a service over HTTP.
* **Paid MCP tools** that wrap x402 endpoints so an AI client calls and pays for them through prompts.
* **Autonomous procurement** against a budgeted USDT0 balance.
* **Usage-based billing** that settles per request instead of per invoice.
* **Agent wallets** funded with USDT0 only, no custodial middleware.
### Start here
* [**Build a pay-per-call API**](/en/how-to/build-pay-per-call) — Stand up an x402-gated endpoint and settle a real USDT0 payment in the request.
* [**Build an MPP endpoint on Stable**](/en/how-to/build-mpp-endpoint) — Write the three MPP custom-method hooks for USDT0 and settle on Stable.
* [**Develop with AI**](/en/how-to/develop-with-ai) — Wire Docs MCP and Runtime MCP into your AI editor and paste the Stable context block.
* [**Pay with an MCP server**](/en/how-to/pay-with-mcp) — Expose x402-paid APIs as MCP tools an agent can call through natural-language prompts.
### Next recommended
* [**x402 in depth**](/en/explanation/x402) — Read how the HTTP payment protocol works end to end on Stable.
* [**MPP**](/en/explanation/mpp) — The broader IETF-track standard that x402 belongs to.
* [**Facilitators**](/en/reference/agentic-facilitators) — See which facilitators already settle USDT0 payments on Stable.
## AI and agents guides
Every guide, concept, and reference under the AI/Agents tab, grouped by what you're trying to do.
### Equip an AI editor
* [**Develop with AI**](/en/how-to/develop-with-ai) — Install Docs MCP, Runtime MCP, agent skills, and paste the Stable context block.
* [**Create an agent wallet**](/en/how-to/create-wallet) — Self-custodied key via WDK — the foundation for agent payments.
### Monetise and consume services
* [**Build a pay-per-call API**](/en/how-to/build-pay-per-call) — Price any HTTP endpoint per request in USDT0 with x402 middleware.
* [**Pay with an MCP server**](/en/how-to/pay-with-mcp) — Wrap x402-paid APIs as MCP tools so an AI client calls and pays for them.
### Reference
* [**Agentic facilitators**](/en/reference/agentic-facilitators) — Settlement services for agent-to-agent commerce on Stable.
* [**Agent wallets**](/en/reference/agentic-wallets) — Wallet specs for autonomous agent use.
### Foundation concepts
* [**x402 (HTTP-native payments)**](/en/explanation/x402) — The HTTP protocol agents use to pay per request.
* [**MPP**](/en/explanation/mpp) — The broader IETF-track standard that x402 belongs to, with sessions and multi-rail support.
* [**ERC-3009**](/en/explanation/erc-3009) — The signed-authorization standard x402 settles through.
## Autobahn
### Tradeoffs in BFT: latency vs. robustness
Modern Byzantine Fault Tolerant (BFT) consensus protocols typically operate under the partial synchrony model. This model assumes that the network eventually stabilizes and message delays remain bounded. While practical for protocol design, real-world deployments rarely enjoy long periods of uninterrupted stability. Instead, systems frequently experience periods of synchrony followed by short disruptions such as latency spikes, node outages, or adversarial conditions. These transient disruptions are referred to as **“blips”**.
Under such conditions, existing consensus protocols are forced to **choose between low latency in stable network conditions and robustness in the presence of faults.**
* **Traditional view-based BFT protocols**, such as PBFT and HotStuff, are optimized for responsiveness during good intervals when the network is stable. However, they suffer from degraded performance when a blip occurs. This degradation, known as a hangover, can persist even after the network has recovered, as backlogged requests accumulate and delay subsequent transactions.
* **DAG-based BFT protocols**, such as [Narwhal & Tusk](https://arxiv.org/pdf/2105.11827)/[Bullshark](https://arxiv.org/pdf/2201.05677), decouple data dissemination (DAG) from consensus (BFT) and propagate transactions asynchronously across replicas. This design enables high throughput and allows the system to continue making progress during network disruptions. However, these protocols tend to incur high latency even during good intervals due to the complexity of their asynchronous ordering mechanisms.
[**Autobahn**](https://arxiv.org/pdf/2401.10369) introduces a new approach that bridges these two design philosophies. It combines the high throughput and blip tolerance of DAG-based protocols with the low latency performance of traditional view-based consensus. At the core of Autobahn is a highly parallel data dissemination layer that continuously propagates proposals at network speed, regardless of consensus progress. On top of this layer, Autobahn runs a low-latency, partially synchronous consensus protocol that commits proposals by referencing lightweight snapshots of the data layer.
A defining feature of Autobahn is its ability to recover from blips without performance degradation. This property, referred to as **seamlessness**, ensures that the system resumes full throughput and low latency immediately after the network stabilizes. No costly reprocessing of backlogged transactions is required. By cleanly separating data availability from ordering and avoiding protocol-induced synchronization delays, Autobahn offers a robust yet responsive foundation for blockchain consensus in real-world conditions.
### Autobahn architecture overview
Autobahn is architected around a clear separation of responsibilities between its two core layers: a **data dissemination layer** and a **consensus layer**. This decoupling is inspired by the design of DAG-based systems like Narwhal, but Autobahn enhances this structure to support seamlessness and lower latency.
The data dissemination layer is responsible for broadcasting client transactions in a scalable, asynchronous manner. It allows each replica to maintain its own lane of transaction batches, which can be propagated and certified independently of the consensus state. These lanes grow continuously, even when the consensus process stalls, ensuring that the system remains responsive to clients at all times.
On top of this, Autobahn runs a partially synchronous consensus layer based on a PBFT-style protocol. However, instead of reaching agreement on individual batches of transactions, consensus is reached on "tip cuts,” which are compact summaries of the latest state of all data lanes. This design allows Autobahn to commit arbitrarily large amounts of data in a single step, minimizing the impact of blips.
HotStuff tightly couples data and consensus, causing stalls when a leader fails. Bullshark incurs high commit latencies due to DAG traversal and data synchronization. Autobahn provides a smoother and faster consensus experience, inheriting the parallelism of DAGs while avoiding their latency pitfalls.
### Data dissemination layer: lanes and cars

*Autobahn: Seamless high speed BFT*
In Autobahn, each replica proposes transactions in its own independently advancing chain called a **lane**. Each data proposal in a lane is bundled with a set of acknowledgments from other replicas, forming what the authors call a "**car**" (short for Certification of Available Request). These cars act as proof of availability (PoA), ensuring that at least one correct replica holds the data and can retransmit it if needed.
Cars are chained together by including a reference to the previous car in each new proposal. This structure guarantees that validating the tip of a lane implies the availability of the entire lane history. This transitive proof of availability is key to Autobahn's instant referencing. The consensus layer can refer to a tip cut (a vector of current lane heads) and know that all prior data is retrievable without performing DAG traversal or additional synchronization.
Unlike typical DAG protocols, Autobahn avoids the costly reliable broadcast steps that enforce global availability and non-equivocation. Instead, it uses minimal coordination and trusts that at least one honest replica per PoA holds the data. This enables high throughput and low tail latency even under varying load or partial failures. The data layer continues progressing independently of consensus, ensuring responsiveness during blips.
### Consensus layer: low-latency agreement

*Autobahn: Seamless high speed BFT*
The consensus layer in Autobahn builds upon classic PBFT principles but introduces key optimizations to reduce latency and support seamless recovery. Each consensus slot targets the commitment of a "**tip cut**" that captures the latest certified proposal from every replica's lane. The consensus leader proposes this cut using a two-phase commit process: Prepare and Confirm.
During the Prepare phase, replicas vote on the proposed tip cut. If the leader receives enough votes quickly (a full quorum), it can enter the Fast Path and commit immediately with only 3 message delays. If not, it proceeds to the Confirm phase, collecting another quorum of acknowledgments before finalizing the commit in 6 message delays.
A key innovation is the decoupling of data synchronization from consensus voting. Replicas are allowed to vote based on the certified tips alone, even if they haven’t received the full proposal data yet. This is safe because the PoA ensures retrievability. Synchronization happens in parallel and finishes before the execution stage, avoiding protocol stalls. In the event of leader failure or timeout, view changes are triggered using timeout certificates, and new leaders can resume progress efficiently.
### Key properties of Autobahn
Autobahn satisfies the standard **safety** and **liveness** guarantees expected from BFT protocols. Safety ensures that no two correct replicas commit different blocks for the same slot. Liveness guarantees progress after global stabilization time (GST) as long as a correct leader is eventually selected.
More importantly, Autobahn achieves **seamlessness**. It avoids protocol-induced hangovers by allowing the consensus layer to commit arbitrarily large data backlogs in constant time. Even after a blip, as soon as synchrony returns, all data proposals that were successfully disseminated can be committed immediately. This enables Autobahn to operate smoothly in environments with intermittent faults, outperforming traditional BFT protocols in both recovery time and system responsiveness.
In addition, the protocol **scales horizontally**. Each replica contributes to the system's throughput via its own lane, and consensus cuts grow naturally with the number of participants. This makes Autobahn suitable for large-scale deployments requiring both high performance and robustness.
### Low latency meets high resilience
Autobahn was evaluated against leading BFT protocols, particularly Bullshark and HotStuff, under both ideal and fault-injected conditions. The results demonstrate that Autobahn achieves the best of both worlds: it matches Bullshark’s throughput, processing over 230,000 transactions per second, while reducing its latency by more than 50%.
Under good network conditions, Autobahn commits transactions with just 3 to 6 message delays, compared to Bullshark’s 12. This translates to commit latencies as low as 280ms in practice, versus over 590ms for Bullshark. Unlike HotStuff, which suffers from long hangovers after blips due to backlog processing delays, Autobahn commits its entire backlog in a single step as soon as the network stabilizes.
In scenarios involving leader failures or partial network partitions, Autobahn demonstrates seamless recovery. It continues disseminating data during faults and quickly commits accumulated proposals once consensus resumes. These performance advantages make Autobahn a compelling choice for blockchain platforms seeking to combine low-latency responsiveness with high throughput and fault tolerance.
### Further reading
For more technical deep-dives and details, refer to:
* [Autobahn: Seamless high speed BFT](https://arxiv.org/pdf/2401.10369)
### Next recommended
* [**Consensus**](/en/explanation/consensus) — Return to StableBFT, the consensus implementation that Autobahn evolves.
* [**Finality**](/en/explanation/finality) — Use Stable's single-slot finality when building against the RPC.
## Bank module
The `x/bank` module in Stable's SDK handles token balances, transfers, and supply. Its EVM surface (the **bank precompile**) wraps this module and adds ERC-20 semantics plus an authorization layer for privileged mint/burn operations. Contracts that need to move tokens on Stable call the precompile directly without deploying their own token implementation.
### What it exposes
The bank precompile provides standard ERC-20 methods:
* `transfer`, `balanceOf`, `totalSupply`
* `approve`, `transferFrom`, `allowance`, `revoke`
These work from any caller. No registration required.
It also provides privileged methods:
* `mint`: mints new tokens and transfers them to an account.
* `burn`: destroys tokens held by an account.
* `multiTransfer`: moves tokens from one sender to many recipients in a single call.
Mint and burn require the caller contract to be registered on the `x/precompile` allowlist via a governance proposal. Governance-token minting is blocked outright. This keeps supply inflation gated to authorized contracts only.
### When to use it
* A DeFi contract needs to move STABLE or USDT0 on behalf of users: call `transfer` or `transferFrom` directly on the precompile.
* A protocol contract mints or burns tokens based on business logic: register through governance first, then call `mint` / `burn`.
* A payments contract needs one-to-many disbursement: call `multiTransfer` in a single transaction instead of looping transfers.
### Where to find the ABI
The full method signatures, event payloads, and authorization flow are in the [Bank precompile reference](/en/reference/bank-module-api).
### Next recommended
* [**Bank precompile reference**](/en/reference/bank-module-api) — Call `transfer`, `approve`, `mint`, `burn`, and read events.
* [**System modules overview**](/en/explanation/system-modules-overview) — Return to the full list of precompile-exposed modules.
* [**USDT as gas**](/en/explanation/usdt-as-gas-token) — Understand the dual-role asset model the bank module manages.
## Bridge security and DVNs
A LayerZero bridge is only as secure as the verification layer that confirms a message sent on one chain happened on another. That layer is a Decentralized Verifier Network (DVN). This page explains what DVNs do, how Stable configures them on its bridges, and why a compromise of any single DVN does not put Stable at risk.
### How DVNs work
When a LayerZero message moves from chain A to chain B, the destination contract does not execute it until a configured set of DVNs independently attests that the message is real. Each application picks its own configuration:
* **Required DVNs.** Every required DVN must sign before the message is accepted.
* **Optional DVNs with an N-of-M threshold.** An optional pool can be added on top of the required set, with a threshold like 2-of-5 that must be met in addition to required signatures.
* **Block confirmation depth.** The number of source-chain confirmations DVNs wait for before signing.
The safety of a bridge is entirely a function of this configuration. A 1/1 setup with a single DVN as the sole verifier means any compromise of that one DVN's signing key allows an attacker to forge cross-chain messages. A 3/3 across three independent operators requires all three to be compromised simultaneously. The difference is the difference between losing a bridge to a single stolen key and surviving a targeted attack on one operator.
### Stable's configuration
Stable's bridges run a **3/3 required DVN** configuration with three independent operators: **LayerZero Labs**, **Canary**, and **Horizen**. All three must sign every cross-chain message before the destination contract will execute it. There is no optional pool with a threshold; the required set is the entire verification surface.
A single compromised signing key, including LayerZero's own, does nothing against this posture. Forging a message would require simultaneous compromise of all three independent operators.
For DVN contract addresses, see [Bridges: Stable's DVN operators](/en/reference/bridges#stable-s-dvn-operators).
### STABLE OFT architecture
The STABLE token bridges to other chains using LayerZero's Omnichain Fungible Token (OFT) standard. Two contract types are deployed:
* **`StableOFTAdapter`** on Stable. The adapter locks STABLE on the home chain and emits a LayerZero message when STABLE is sent cross-chain.
* **`StableOFTUpgradeable`** on each remote chain. This contract mints STABLE on the destination when the message is verified by the configured DVNs, and burns it on the return path so the home-chain supply remains canonical.
For deployed addresses on each chain, see [Bridges: STABLE OFT contracts](/en/reference/bridges#stable-oft-contracts).
### Operational dependencies
Stable's own bridge security is independent of upstream protocols, but cross-chain flow through Stable can still pause when partner protocols pause their own bridges. For example, when USDT0 pauses cross-chain mint and burn, USDT0 cannot move to or from Stable until USDT0 resumes. Funds within Stable continue to move freely; only the specific cross-chain action is unavailable.
Application surfaces routing through partner bridges should communicate this clearly so users understand the distinction: their funds are not at risk, only that a particular cross-chain path is temporarily unavailable.
### Next recommended
* [**Bridging USDT0 to Stable**](/en/explanation/usdt0-bridging) — See how USDT0 reaches Stable through the OFT Mesh and Legacy Mesh.
* [**Bridge providers and addresses**](/en/reference/bridges) — Reference contract addresses, DVN operators, and supported bridge providers.
* [**LayerZero DVN documentation**](https://docs.layerzero.network/v2/concepts/protocol/security-stack-dvns) — Read LayerZero's spec for required and optional DVN verification.
## Overview
New to Stable? Run the [Quick start](/en/tutorial/quick-start) first. It takes five minutes and sends a testnet transaction so the rest of the tab has something to plug into.
### Explore
* [**Accounts**](/en/explanation/accounts-overview) — Create wallets, delegate EOAs with EIP-7702, and scope session keys for users and agents.
* [**Payments**](/en/explanation/payments-overview) — Send USDT0, build P2P and subscription flows, settle invoices with ERC-3009, and price APIs with x402.
* [**Contracts**](/en/explanation/contracts-overview) — Deploy, verify, and index Solidity contracts, and call Bank / Distribution / Staking precompiles.
* [**AI and agents**](/en/explanation/agent-settlement) — Wire MCP servers into AI clients and expose x402-paid tools agents can call through prompts.
### Start here
* [**Quick start**](/en/tutorial/quick-start) — Connect to testnet, fund a wallet, and send your first USDT0 transaction.
* [**Send your first USDT0**](/en/tutorial/send-usdt0) — Native and ERC-20 transfers on the same balance, with TypeScript examples.
* [**Deploy a smart contract**](/en/tutorial/smart-contract) — Scaffold Foundry, configure Stable, and deploy the Counter contract.
* [**Stable SDK**](/en/explanation/sdk-overview) — Use the typed TypeScript client for transfer, bridge, and swap on Stable.
## Confidential transfer
**Confidential Transfer** is a privacy layer on Stable that shields the **amount** of a USDT0 transfer while keeping sender and recipient addresses publicly visible. The shielded amount is readable only by the transacting parties and authorized regulatory auditors, using zero-knowledge (ZK) cryptography to prove validity without revealing the value. The feature is under development; this page describes the target model.
### The problem it solves
Standard on-chain transfers are fully transparent; anyone can read the sender, recipient, and amount. For business payments, that transparency is a data-leakage problem:
* A retailer paying suppliers on-chain exposes order volumes and wholesale pricing to any observer.
* A treasury moving funds between accounts advertises its position sizes.
* A payroll run publishes salary data to the entire network.
Full opacity (Monero-style) would solve this but breaks compliance: regulators and auditors can't verify the transaction. Selective confidentiality (amounts hidden, parties auditable) is the model Stable targets.
### What stays visible, what doesn't
| Field | Visible on-chain | Shielded |
| :----------------- | :--------------- | :------- |
| Sender address | ✓ | |
| Recipient address | ✓ | |
| Transfer amount | | ✓ |
| Auxiliary metadata | | ✓ |
The shielded amount is encrypted. Valid proofs attest that the transfer is balance-consistent (no inflation, no negative amounts) without revealing the value itself. Only the sender, recipient, and authorized regulatory auditors can decrypt the shielded value.
### How it fits the compliance model
Two properties make the design auditable:
* **Deterministic auditor access.** Regulatory auditors hold keys that decrypt shielded amounts for transactions in their jurisdiction. Business privacy is preserved against random observers; compliance scrutiny is not.
* **Standard address transparency.** AML/KYC tooling that operates on address-level flows (sanction checks, source-of-funds analysis) works against the same public address graph as any transparent chain.
### When to use it
Confidential Transfer fits any flow where the amount is commercially sensitive but the counterparties are appropriately public:
* Supplier and invoice payments where order sizes reveal pricing.
* Treasury operations where position sizes reveal strategy.
* Payroll where individual salaries shouldn't be indexable by competitors.
* Large OTC settlements where price discovery against orderbook tape is a risk.
For flows that need address-level privacy as well (e.g. whistleblower donations), Confidential Transfer alone isn't sufficient. Those use cases need additional address-obscuring primitives that Stable doesn't provide.
### Status
Confidential Transfer is in development. See [Roadmap](/en/explanation/technical-roadmap) for timing. The mechanism will ship as a dedicated transfer path alongside standard USDT0 transfers; existing applications that don't opt in are unaffected.
### Next recommended
* [**USDT as gas**](/en/explanation/usdt-as-gas-token) — Understand the asset model confidential transfers shield.
* [**Flow of funds**](/en/explanation/flow-of-funds) — See where confidentiality fits in the end-to-end payment lifecycle.
* [**Roadmap**](/en/explanation/technical-roadmap) — Track when confidential transfer ships.
## Consensus
### PoS consensus with StableBFT
Stable Blockchain leverages **StableBFT**, a customized PoS consensus protocol built on CometBFT, to deliver high throughput, low latency, and strong reliability. StableBFT provides deterministic finality (blocks are final on inclusion, without forks) and Byzantine fault tolerance up to 1/3 of validators failing or acting maliciously.
To further optimize consensus performance, Stable plans to implement the following improvements in the near future:
* **Decoupled Transaction and Consensus Gossiping**: Separating the transaction gossiping layer from the consensus gossiping layer prevents network congestion on the transaction side from interfering with consensus communications.
* **Direct Transaction Broadcasting to the Block Proposer**: In the current model, transactions propagate through peer-to-peer gossiping among nodes, creating high gossip traffic across the network. Stable aims to improve efficiency by enabling transactions to broadcast directly to the block proposer.
### Future roadmap: DAG-based consensus
To significantly accelerate consensus, Stable intends to upgrade its protocol to a DAG-based design capable of delivering up to 5x speed improvements.
Traditional view-based BFT protocols like PBFT and HotStuff are optimized for low latency under stable network conditions. However, they degrade significantly during disruptions, often experiencing long recovery delays after temporary faults.
First-generation DAG-based engines like Narwhal and Tusk demonstrate that decoupling data dissemination from consensus ordering can eliminate single-proposer bottlenecks and also improve robustness under network instability. However, their architecture is not directly compatible with systems like CometBFT, as they diverge from conventional height-based block semantics and mempool designs.
[Autobahn](/en/explanation/autobahn) offers a PBFT-on-DAG architecture that integrates more naturally with Stable’s consensus layer, while delivering low latency under normal conditions and fast recovery in the face of network faults. The Stable team maintains a close relationship with the authors of the Autobahn paper and will leverage Autobahn’s architecture to maximize the performance of StableBFT.
StableBFT, built atop Autobahn, will enable:
* Parallel proposal processing by eliminating the single-leader limitation.
* Faster finality by separating data propagation from final ordering.
* Enhanced resilience against network adversities through robust BFT mechanisms.
This advanced consensus design supports much higher throughput based on the internal proof-of-concept, which has demonstrated over 200,000 TPS (Consensus only) in controlled environments.
### Next recommended
* [**Autobahn**](/en/explanation/autobahn) — Read the protocol paper that underpins StableBFT's DAG-based upgrade path.
* [**Execution**](/en/explanation/execution) — See how blocks move from consensus into parallel execution.
* [**Finality**](/en/explanation/finality) — Apply Stable's single-slot finality when building against the RPC.
## Contracts guides
Every guide, concept, and reference under the Contracts tab, grouped by what you're trying to do.
### Build and ship a contract
* [**Deploy**](/en/tutorial/smart-contract) — Scaffold a Foundry project and deploy Counter to Stable testnet.
* [**Verify**](/en/how-to/verify-contract) — Upload source to Stablescan so users can read and call your contract.
* [**Index events**](/en/how-to/index-contract) — Build a live event stream with ethers.js, plus historical backfill.
### Call system modules
* [**Use system modules**](/en/how-to/use-system-modules) — Call Bank, Distribution, and Staking precompiles from Solidity or ethers.js.
* [**Track unbonding completions**](/en/how-to/track-unbonding) — Subscribe to the UnbondingCompleted event emitted via the StableSystem precompile.
### Reference
* [**System modules reference**](/en/reference/system-modules-api-overview) — Precompile addresses and per-module ABI pointers.
* [**JSON-RPC API**](/en/reference/json-rpc-api) — Supported `eth_*`, `net_*`, `web3_*`, and `debug_*` methods.
### Foundation concepts
* [**USDT0 behavior on Stable**](/en/explanation/usdt0-behavior) — Dual-role balance, reconciliation events, and contract design rules.
* [**Difference from Ethereum**](/en/explanation/ethereum-comparison) — Gas token, finality, priority tips, and EVM compatibility.
## Contracts on Stable
Stable is fully EVM-compatible. Solidity, Vyper, Hardhat, Foundry, ethers.js, and viem work unchanged. Existing contracts deploy as-is once you point tooling at Stable's RPC. On top of the standard EVM, Stable exposes protocol-level modules (Bank, Distribution, Staking) as precompiled contracts at fixed addresses, so your Solidity can call into staking and reward distribution without re-implementing them.
### What you can build
* **Standard application contracts** (ERC-20, ERC-721, escrows, AMMs) with any EVM toolchain.
* **Verified, indexed contracts** on Stablescan with live event streams through ethers.js.
* **Protocol-integrated contracts** that call Bank / Distribution / Staking precompiles from Solidity.
* **System-transaction listeners** that watch for protocol-emitted events (for example, unbonding completions) through standard `eth_getLogs`.
### How Stable differs
* **USDT0 is the gas token.** `maxPriorityFeePerGas` must be `0`. The `value` field in native transfers carries USDT0, not ETH. See [Work with USDT0 as gas](/en/how-to/work-with-usdt-gas).
* **USDT0 has a dual role.** Contracts that hold native USDT0 can have their balance changed by ERC-20 `transferFrom` or `permit` — never mirror native balance in a `uint256`. See [USDT0 behavior on Stable](/en/explanation/usdt0-behavior).
* **Precompile addresses are fixed across testnet and mainnet.** Burn them into your contract as constants.
### Start here
* [**Deploy**](/en/tutorial/smart-contract) — Scaffold Foundry, configure Stable, and deploy Counter.
* [**Verify**](/en/how-to/verify-contract) — Upload source to Stablescan with forge verify-contract.
* [**Index**](/en/how-to/index-contract) — Subscribe to events with ethers.js and backfill historical logs.
### Next recommended
* [**Contracts guide index**](/en/explanation/contracts-index) — Full list of contract guides, precompile references, and system module ABIs.
* [**Use system modules**](/en/how-to/use-system-modules) — Call Bank / Distribution / Staking from Solidity and ethers.js.
* [**JSON-RPC reference**](/en/reference/json-rpc-api) — Which `eth_*` and `debug_*` methods Stable supports.
## Core concepts
Four concepts are enough to start building. Each section defines the concept, shows it, and links to the full reference.
### USDT0 as gas
You pay transaction fees in USDT0, the same asset you're already holding and transacting in. There's no second token to fund or manage.
USDT0 is both the native gas asset (18 decimals, read via `address(x).balance`) and an ERC-20 token (6 decimals, read via `USDT0.balanceOf(x)`). Both interfaces operate on the same underlying balance, and the protocol reconciles the 12-digit precision gap automatically.
```solidity
// Both read the same balance:
uint256 native = address(user).balance; // 18 decimals
uint256 erc20 = IERC20(USDT0).balanceOf(user); // 6 decimals
```
:::warning
Balance reconciliation emits extra `Transfer` events at the reserve address `0x6D11e1A6BdCC974ebE1cA73CC2c1Ea3fDE624370`. Indexers that replay `Transfer` events must filter transfers to and from this address, or they will silently double-count balances.
:::
Read more: [USDT0 as gas](/en/explanation/usdt-as-gas-token) · [USDT0 behavior on Stable](/en/explanation/usdt0-behavior).
### Guaranteed blockspace
Stable reserves a portion of each block's capacity for pre-allocated enterprise workloads. Reserved traffic settles with predictable latency and cost even when general traffic is congested; it doesn't compete in the fee market.
This behavior is transparent at the caller level. You submit transactions the normal way; allocations are applied at the protocol level for enrolled accounts.
Read more: [Guaranteed blockspace](/en/explanation/guaranteed-blockspace).
### USDT transfer aggregator
High-volume USDT0 transfers are batched and verified in parallel using a MapReduce-inspired pipeline. Per-account failures are isolated, so one bad transfer doesn't abort the batch.
The caller-side transfer API is unchanged. You submit transfers the normal way and gain throughput without code changes.
Read more: [USDT transfer aggregator](/en/explanation/usdt-transfer-aggregator).
### EVM compatibility
Standard EVM tooling works unchanged. At the EVM level, three behaviors differ from Ethereum (USDT0 as gas, covered above, is the fourth).
**Single-slot finality.** A transaction is final once included in a block. Blocks are produced roughly every 0.7 seconds.
**No priority tips.** `maxPriorityFeePerGas` is always ignored. The effective gas price is the base fee set by the protocol.
```typescript
import { ethers } from "ethers";
const block = await provider.getBlock("latest");
const baseFee = block.baseFeePerGas;
const tx = await wallet.sendTransaction({
to: "0xRecipientAddress",
value: ethers.parseEther("0.1"),
maxFeePerGas: baseFee * 2n, // 2x base fee as safety margin
maxPriorityFeePerGas: 0n, // always 0 on Stable
});
await tx.wait();
console.log("Included at gas price:", tx.gasPrice?.toString());
```
```text
Included at gas price: 1000000000
```
**Dual-role USDT0, porting risks.** Contracts ported from Ethereum should not mirror native balance, should reject `address(0)` transfers, and should not rely on `EXTCODEHASH` for address-reuse detection.
:::warning
Porting a contract that mirrors native balance in an internal variable is unsafe on Stable. An external `USDT0.transferFrom` call can drain the contract's native balance without invoking any contract code. Always solvency-check with `address(this).balance` at the moment of transfer.
:::
Read more: [Differences from Ethereum](/en/explanation/ethereum-comparison) · [Contracts on Stable](/en/explanation/contracts-overview) · [USDT0 migration checklist](/en/explanation/usdt0-behavior).
### Confidential transfer (planned)
Stable has a planned feature for zero-knowledge transfers that hide amounts while staying auditable for authorized parties. It is not yet live.
Read more: [Confidential transfer](/en/explanation/confidential-transfer).
### Next recommended
* [**Quick start**](/en/tutorial/quick-start) — Connect to testnet and send a first transaction.
* [**USDT0 behavior**](/en/explanation/usdt0-behavior) — Port a contract to Stable without hitting dual-role gotchas.
* [**Gas pricing**](/en/reference/gas-pricing-api) — Construct transactions correctly on Stable's fee model.
* [**Production readiness**](/en/how-to/production-readiness) — Validate an integration before shipping to mainnet.
## Overview
### Full stack core optimization
The lifecycle of a blockchain transaction, from submission to finalized result, passes through multiple tightly connected stages. A transaction is first submitted through the **RPC** interface, added to the **mempool**, packaged into a block, validated through **consensus**, executed by the **state machine**, and finally written to persistent storage in the **database**. Only after completing this full pipeline does the user receive a confirmed result.
Improving just one stage in isolation is not enough. Any inefficiency in the pipeline can impact the overall performance of the system. This is why Stable focuses on optimizing the blockchain stack from top to bottom.
The following pages describe how Stable upgrades each layer of its architecture (Consensus, Execution, Database, and RPC) to ensure reliable and high-performance transaction processing.
### Next recommended
* [**Consensus**](/en/explanation/consensus) — Learn how StableBFT extends CometBFT for high throughput and low latency.
* [**Execution**](/en/explanation/execution) — See how Stable EVM runs transactions in parallel with Block-STM and Optimistic Block Processing.
* [**Storage (StableDB)**](/en/explanation/stable-db) — Understand how decoupled state commitment and memory-mapped storage remove the disk I/O bottleneck.
* [**High performance RPC**](/en/explanation/high-performance-rpc) — Understand the split-path RPC architecture separating reads from writes.
## Distribution module
The `x/distribution` module handles staking-reward accrual and withdrawal for delegators and validators. Its precompile bridges this behavior into the EVM so a Solidity contract can claim rewards, set withdraw addresses, and query outstanding rewards without interacting with the Cosmos SDK directly.
### What it exposes
* **Set withdraw address**: a delegator designates which address receives their rewards. By default, rewards go to the delegator's own address; setting a withdraw address routes them elsewhere (useful for contract-managed staking).
* **Withdraw delegator rewards**: claims all outstanding rewards from a single validator in one call.
* **Withdraw validator commission**: a validator claims their accumulated commission from delegators' rewards.
* **Query methods**: read reward balances, commission rates, and community-pool state without a transaction.
### Authorization semantics
The precompile checks that the caller is the delegator (or validator) whose state is being modified. You cannot claim someone else's rewards or change their withdraw address.
### When to use it
* A vault or staking aggregator claims rewards on a schedule: call `withdrawDelegatorRewards` directly.
* A DAO routes staking rewards to a treasury address: set a withdraw address once, then rewards flow automatically.
* A front-end displays current reward balances: use the query methods (no transaction needed).
### Where to find the ABI
Full method signatures, input/output types, and emitted events are in the [Distribution precompile reference](/en/reference/distribution-module-api).
### Next recommended
* [**Distribution precompile reference**](/en/reference/distribution-module-api) — Call `withdrawDelegatorRewards`, set withdraw addresses, and read reward balances.
* [**Staking module**](/en/explanation/staking-module) — See how delegation (the source of these rewards) works.
* [**System transactions**](/en/explanation/system-transactions) — Learn how unbonding completions reach the EVM as events.
## EIP-7702
Stable supports **EIP-7702**, which allows an EOA to **set its account code to an existing smart contract**. The EOA executes that contract's logic while keeping its original address and private key. The delegation is persistent until the EOA explicitly changes or clears it.
For a full specification, see [EIP-7702](https://eips.ethereum.org/EIPS/eip-7702).
### What EIP-7702 enables on Stable
EIP-7702 lets existing EOAs execute smart contract logic without account migration. In Stable's USDT-centric payment environment, this supports patterns such as:
* **Batch payments**: multiple calls (e.g., paying several recipients in a payroll run) execute in a single atomic transaction.
* **Spending limits**: a delegate contract enforces daily caps or per-transaction limits on the EOA.
* **Session keys**: an EOA grants a dApp scoped, time-limited transaction permissions without exposing the owner's private key.
:::note
**Ready to implement?** See the [Account Abstraction (EIP-7702) implementation guide](/en/reference/eip-7702-api) for contract templates, authorization signing, and transaction submission.
:::
### How it works
EIP-7702 introduces a new transaction type (`0x04`) that carries an `authorizationList`. Each authorization designates a smart contract whose code the EOA will execute for that transaction. The flow is:
1. **Choose or deploy a delegate contract**: a standard Solidity contract that implements the logic you want the EOA to run. You can use an existing deployed contract or deploy your own. Use an audited contract whenever possible.
2. **Sign an authorization**: the EOA owner signs a message designating the delegate contract.
3. **Submit an EIP-7702 transaction**: the transaction includes the authorization, and the EOA runs the delegate's code during execution.
After submission, the EOA's account code is set to the delegate. Subsequent transactions to the EOA execute the delegate's logic until the owner clears or replaces the delegation.
### What doesn't change
* **No new account needed**: users keep their existing EOA address and private key. There is no migration step.
* **Existing keys still sign**: the EOA's private key signs the authorization and any follow-on transactions. EIP-7702 does not introduce a new signing scheme.
* **Standard EVM execution**: the delegate runs as regular contract code. Tooling that debugs or traces contract execution works unchanged.
### Security considerations
* **Delegate access is total.** The delegate contract has full execution authority over the EOA for the duration of the delegation. Treat delegate selection as a trust decision: a malicious delegate can drain assets.
* **Delegation persists.** It does not expire at the end of a single transaction. The owner must explicitly clear or replace the delegation when they no longer want it.
* **Gas costs are slightly higher** due to authorization processing, but this is offset when the delegate batches multiple calls. On Stable, where the base fee is 1 gwei and gas is denominated in USDT0, the additional authorization overhead stays well under a cent, comparable to a standard ERC-20 transfer in cost.
### Next recommended
* [**Account Abstraction (EIP-7702)**](/en/reference/eip-7702-api) — Implement batch payments, spending limits, and session keys against a delegate contract.
* [**USDT as gas**](/en/explanation/usdt-as-gas-token) — Understand the gas model that EIP-7702 transactions run on.
* [**Gas waiver**](/en/explanation/gas-waiver) — Compare delegation to gas-waived flows where an application pays the user's gas instead.
## Settle with signed authorizations
ERC-3009 lets a token holder authorize a transfer by signing a message. Anyone can then submit that signed authorization to execute the transfer on-chain. The sender never needs to call the contract directly.
This is the settlement mechanism behind [x402](/en/explanation/x402) payments on Stable.
### What problem does it solve?
#### The allowance problem
The traditional ERC-20 pattern for third-party transfers is `approve` + `transferFrom`. The sender first calls `approve` to grant a spending allowance, then the third party calls `transferFrom` to move funds. This has well-known issues:
* **Two transactions required**: The sender must send an on-chain `approve` transaction before any transfer can happen. This costs gas and adds latency.
* **Infinite allowance risk**: To avoid repeated approval transactions, many applications request unlimited spending permission, creating a significant security risk.
ERC-3009 takes a different approach. Instead of granting an allowance, the sender signs a one-time authorization for a specific transfer. No separate approval step, no lingering spending permissions.
#### The sequential nonce problem
ERC-2612 (`permit`) also enables signed authorizations, but it uses sequential nonces. Multiple permits carry ordering dependencies: if nonce 5 is not consumed, nonce 6 can never execute.
ERC-3009 solves this with **unique nonces**. Each authorization uses a 32-byte value instead of a sequential counter. Multiple authorizations can be created and submitted independently, in any order, without depending on each other.
#### Comparison
| **Property** | **ERC-20** (`approve`) | **ERC-2612** (`permit`) | **ERC-3009** |
| :------------------------ | :----------------------------- | :-------------------------------- | :------------------------------ |
| On-chain steps | 2 (`approve` + `transferFrom`) | 1 (`transferFrom`) | 1 (`transferWithAuthorization`) |
| Uses allowance model | Required (on-chain tx) | Yes (sets allowance via `permit`) | Not required (signature) |
| Nonce model | Sequential | Sequential | Unique |
| Concurrent authorizations | No | No | Yes |
### How it works
#### transferWithAuthorization
The sender signs an EIP-712 typed data message containing the transfer details. Anyone can then call `transferWithAuthorization` on the token contract with that signed message. The contract verifies the signature, checks the validity window, executes the transfer, and marks the nonce as used.
The signed authorization contains:
* `from`: address of the sender (the signer)
* `to`: address of the recipient
* `value`: transfer amount
* `validAfter`: earliest time this authorization can be executed (Unix timestamp)
* `validBefore`: latest time this authorization can be executed (Unix timestamp)
* `nonce`: 32-byte value ensuring uniqueness
The time window (`validAfter`/`validBefore`) gives the sender precise control over when the transfer can happen. An authorization can be scheduled for the future, given a deadline, or both. If the window expires before submission, the authorization becomes invalid and the funds stay with the sender.
#### receiveWithAuthorization
This function works identically to `transferWithAuthorization`, with one additional check: **the caller must be the recipient**. This prevents front-running attacks where a third party observes a pending authorization and submits it first to manipulate transaction ordering.
This is useful in payment scenarios where the recipient (a merchant or service provider) should be the one to initiate settlement.
#### cancelAuthorization
The sender can revoke an unused authorization before it is executed. The sender signs an EIP-712 cancellation message, and the contract marks the nonce as used without executing the transfer. The original authorization can no longer be submitted.
### Built-in safety properties
* **One-time use**: Each unique nonce can only be used once. Resubmitting the same signed authorization reverts.
* **Time-bound**: The `validAfter`/`validBefore` window ensures authorizations do not remain valid indefinitely.
* **Self-contained**: One signature authorizes one specific transfer to one specific recipient for one specific amount. No lingering permissions.
* **Non-custodial**: The submitter never holds the sender's funds. The transfer moves directly from sender to recipient within the contract.
### ERC-3009 on Stable
USDT0 on Stable natively implements ERC-3009. Any application can use `transferWithAuthorization` without deploying additional contracts or relay infrastructure.
#### Single-asset settlement
On Ethereum, even with ERC-3009, the submitter needs ETH to pay gas for calling `transferWithAuthorization`. The transfer itself is in USDT, but execution depends on a separate native asset.
On Stable, USDT0 serves as both the payment token and the gas token. The entire payment lifecycle, from authorization to on-chain settlement, runs on a single stablecoin. No separate native asset is needed at any step.
This property is what makes ERC-3009 on Stable a strong foundation for higher-level payment protocols. [x402](/en/explanation/x402) leverages this directly, using ERC-3009 as its on-chain settlement mechanism within standard HTTP communication.
### Key takeaways
* ERC-3009 lets a token holder authorize a transfer by signing a message. Anyone can submit that signed authorization to execute the transfer.
* It replaces the ERC-20 allowance model with one-time-use, self-contained authorizations. No `approve` step, no lingering permissions, no double-spend risk.
* Unique nonces allow multiple authorizations to be created and submitted concurrently, in any order.
* USDT0 on Stable natively supports ERC-3009, and because settlement can be completed using USDT0 alone, it provides a practical foundation for x402.
**See also:**
* [USDT as Gas](/en/explanation/usdt-as-gas-token)
* [USDT0 Behavior on Stable](/en/explanation/usdt0-behavior)
* [x402 (HTTP-Native Payments)](/en/explanation/x402)
## Ethereum comparison
Stable is fully EVM-compatible, so most Ethereum tools, libraries, and contract patterns work without modification. The sections below walk through what stays the same and what changes when you move from Ethereum to Stable.
### What stays the same
Stable maintains full compatibility with the Ethereum development ecosystem:
| **Area** | **Compatibility** |
| :---------------- | :------------------------------------------------------------------------------------------------------------------------------------------------------------------------------------------------- |
| Languages | Solidity, Vyper |
| Tooling | Hardhat, Foundry |
| Libraries | ethers.js, web3.js |
| Contract patterns | All standard EVM conventions (ERC-20, ERC-721, ERC-1155, proxies, etc.) |
| RPC interface | Most `eth_*` methods supported (`eth_call`, `eth_sendRawTransaction`, `eth_getBalance`, `eth_getLogs`, `eth_estimateGas`, etc.). For the full list, see [JSON-RPC API](/en/reference/json-rpc-api) |
Existing smart contracts, deployment scripts, and frontend integrations target Stable by changing the RPC endpoint and chain ID.
### What is different
Four behaviors differ from Ethereum.
#### 1. Single-slot finality
Ethereum requires multiple block confirmations before a transaction is considered final. Stable provides single-slot finality: a transaction is final once included in a block.
For developers, this means:
* Once a transaction appears in a confirmed block, its state changes are final and irreversible.
* Applications can safely rely on block inclusion as confirmation of settlement.
Even with deterministic finality, applications handling financially sensitive flows should:
* Verify transaction success via RPC or emitted events before proceeding with dependent actions (e.g., unlocks, redemptions).
* Implement retry and reconciliation logic for automation and batch operations to handle transient submission or RPC errors.
#### 2. Gas token: USDT0
On Stable, transaction fees are paid in USDT0, not a volatile native token. This provides USDT-denominated, predictable low gas costs.
* Users need USDT0 in their wallet to submit transactions.
* The `value` field in transactions still works for sending USDT0, similar to how ETH is sent on Ethereum.
* See [USDT as gas](/en/explanation/usdt-as-gas-token) for details.
#### 3. No priority tips
Stable uses a single-component gas model. There is no tip-based transaction ordering.
* `maxPriorityFeePerGas` is ignored (always 0).
* Transaction ordering is not influenced by fee bidding.
* Wallets should hide or disable the priority tip input field.
* See [Gas pricing](/en/explanation/gas-pricing) for details.
#### 4. USDT0 dual-role behavior
USDT0 functions as both the native gas token and an ERC-20 token. This introduces behavioral differences around balance semantics, allowance safety, and certain opcode assumptions. For the full details, see [USDT0 behavior on Stable](/en/explanation/usdt0-behavior).
### Quick comparison
| **Parameter** | **Stable** | **Ethereum** |
| :------------------------------------ | :----------------- | :------------------------ |
| Gas token | USDT0 | ETH |
| Finality | Single-slot | Multi-block confirmations |
| Block time | \~0.7 seconds | \~12 seconds |
| Priority tip (`maxPriorityFeePerGas`) | Ignored (always 0) | Used for ordering |
| EIP-1559 transaction format | Supported | Supported |
| EVM compatibility | Full | N/A |
### Next recommended
* [**USDT as gas**](/en/explanation/usdt-as-gas-token) — Understand the asset model that replaces ETH for gas.
* [**Gas pricing**](/en/explanation/gas-pricing) — Review the single-component fee model in detail.
* [**USDT0 behavior on Stable**](/en/explanation/usdt0-behavior) — Audit contracts for dual-role asset semantics, allowance safety, and `EXTCODEHASH` behavior.
## Compatibility with the Ethereum ecosystem
Stable is fully compatible with the Ethereum Virtual Machine (EVM), allowing developers to use familiar tools, libraries, and contract patterns without modification.
This ensures seamless migration of existing applications and straightforward onboarding for teams already building in the Ethereum ecosystem.
**Key compatibility features**
* **Languages**: Supports Solidity and Vyper for smart contract development.
* **Tooling**: Works out of the box with standard frameworks such as Hardhat and Foundry.
* **Libraries**: Fully compatible with ethers.js, web3.js, and other common JSON-RPC clients.
* **Contract patterns**: Adheres to standard EVM conventions, including ERC-20 approvals, event emission, and access-control mechanisms.
* **RPC interface**: Exposes the same JSON-RPC methods used by Ethereum networks, so your existing integrations and indexers function without code changes.
## Execution
### Stable EVM
**Stable EVM** is Stable's Ethereum-compatible execution layer. Existing Ethereum tools and wallets like MetaMask interact with Stable unchanged. Stable EVM combines the EVM's developer experience with the modular infrastructure of the Stable SDK.
To bridge the gap between the Stable EVM and the Stable SDK, Stable EVM introduces a set of **precompiles**. These precompiles expose native Stable SDK module functionality to EVM smart contracts, enabling them to call into the core chain logic securely and atomically. Smart contracts can then perform privileged operations such as token transfers, staking, or governance participation.
### Future roadmap 1: Optimistic parallel execution
Historically, blockchain systems have relied on sequential execution, where each transaction is processed one after another to ensure deterministic state across all nodes. While this design guarantees consistency, it severely limits throughput and scalability, especially as modern blockchains aim to support tens of thousands of transactions per second.
To overcome this constraint, Stable is adopting **Block-STM**, a proven parallel execution engine that enables **Optimistic Parallel Execution (OPE)**. This allows transactions to be executed in parallel while preserving determinism, significantly enhancing performance.
#### How Block-STM works
Block-STM uses an optimistic concurrency control mechanism: transactions are first executed in parallel under the assumption that they won’t conflict. Then, during a validation phase, any conflicts are detected and handled through re-execution. The process relies on the following five key techniques:
**1. Multi-version memory structure**
Block-STM stores multiple versions of each memory key:
* Each transaction reads the latest version committed by prior transactions.
* During execution, both reads and writes are versioned.
* Later, during validation, these versions are checked for consistency to detect conflicts.
**2. Read-Set / Write-Set based validation**
* During execution, each transaction logs the keys and versions it reads in a Read-Set.
* At the end of execution, it records its Write-Set into the multi-version memory.
* During validation, if another transaction has modified any key in the Read-Set, the transaction is marked as conflicting. It is then aborted and re-executed with an incremented incarnation number.
**3. Fast conflict detection with ESTIMATE markers**
* When a transaction fails, its Write-Set is marked with an ESTIMATE flag.
* If another transaction reads an ESTIMATE-marked value, it immediately halts and waits for re-execution (triggered by a `READ_ERROR`).
* This helps reduce overhead by quickly identifying dependencies without re-executing the full transaction set.
**4. Preset transaction order**
* All transactions within a block are executed according to a preset, deterministic order.
* Validation and commit stages also follow this same order.
* This ensures that even with parallel execution, all nodes reach the same final state.
**5. Collaborative scheduler**
* A Collaborative Scheduler distributes tasks between execution and validation workers in a thread-safe manner.
* It prioritizes lower-index transactions to accelerate early commits and minimize re-execution.
* The scheduler manages transaction incarnations for repeated attempts until they commit successfully.
#### Key benefits of Block-STM
* **Parallelism Without Locks**: By leveraging MVCC (Multi-Version Concurrency Control), Block-STM allows multiple transactions to read and write concurrently without the need for mutex locks. Conflicts are only checked after execution, allowing maximum throughput during the initial processing phase.
* **Minimal Overhead via ESTIMATE Markers**: Failed transactions flag their Write-Sets with ESTIMATE markers, signaling dependent transactions to pause early, avoiding wasted execution. This results in faster convergence on valid execution paths.
* **Efficient Scheduling and Prioritized Commits**: Using the Collaborative Scheduler, the system minimizes retries by committing lower-index transactions first. This improves overall throughput and shortens execution cycles.
* **Determinism and Consensus Compatibility**: Because every transaction adheres to a fixed order, even re-executed transactions ultimately commit in the same sequence. This ensures safe and deterministic state agreement across all nodes, preserving consensus integrity even in a parallelized environment.
#### OPE on Stable
Stable will incorporate **Optimistic Parallel Execution (OPE)** as a core feature of its execution layer, in conjunction with **Optimistic Block Processing (OBP)**. Please note that OPE and OBP are complementary but fundamentally different strategies.
#### About OBP
* OBP is not about parallelism, but about execution timing.
* During the `ProcessProposal` stage, Stable pre-executes blocks while they are being gossiped to other nodes.
* The resulting state is cached in memory and reused during `FinalizeBlock`, saving time and reducing duplicate computation.
By combining OPE and OBP, Stable can minimize both execution latency and resource contention, delivering superior performance under high transaction load.
#### Expected performance gains
Internal benchmarks suggest that with **Block-STM-based OPE** and **StableDB** integration, Stable can achieve **at least 2x throughput improvements** in end-to-end transaction processing.
### Future roadmap 2: StableVM++
While efforts like Optimistic Parallel Execution (OPE) and Optimistic Block Processing (OBP) focus on optimizing *how multiple transactions are executed concurrently*, there’s another vital performance lever: **how efficiently each individual transaction is processed**.
Stable is currently exploring alternative EVM implementations to boost execution speed. Among the candidates, **EVMONE**, a high-performance EVM written in C++, stands out as a strong contender to replace the existing Go-based EVM. This switch is projected to deliver up to a **6x increase in EVM execution performance** based on theoretical benchmarks.
### Next recommended
* [**Storage (StableDB)**](/en/explanation/stable-db) — See how decoupled state commitment feeds execution without blocking on disk I/O.
* [**High performance RPC**](/en/explanation/high-performance-rpc) — Understand the split-path RPC that surfaces execution results to clients.
* [**Ethereum compatibility**](/en/explanation/ethereum-compatibility) — Port existing contracts using standard EVM tooling against Stable.
## Finality rules & compatibility guarantees
Stable processes transactions within an EVM-based execution environment. When a block includes a transaction, the chain applies its effects to state and makes them immediately visible to applications, contracts, and indexers.
#### Execution confirmation
A transaction is considered **confirmed** once:
* It is successfully included in a produced block
* State changes (balances, storage, events) can be observed through RPC
During the public testnet phase:
* Treat confirmed state as valid for application logic
* Use monitoring systems to track block continuity
#### Settlement considerations
Stable provides single-slot finality, meaning transactions are finalized as soon as they are included in a valid block.
**For developers, this ensures:**
* Once a transaction appears in a confirmed block, its state changes are final and irreversible.
* Applications can safely rely on block inclusion as confirmation of settlement.
**Even with deterministic finality, applications handling financially sensitive flows should:**
* Verify transaction success via RPC or emitted events before proceeding with dependent actions (e.g., unlocks, redemptions).
* Implement retry and reconciliation logic for automation and batch operations to handle transient submission or RPC errors.
#### Compatibility commitments
Stable intends to maintain a consistent execution surface for developers throughout testnet growth phases.
**Current commitments:**
* Stable will maintain published system module interfaces and execution behavior unless explicitly noted
* Any potentially disruptive changes will be:
* Announced in advance
* Documented in the Release & Change Log
* Accompanied by migration instructions when necessary
Future updates will introduce:
* A formal compatibility policy
* Change-level classification for developer-facing features
* Clear handling guidance for version transitions
## Flow of Funds
Stable is the first blockchain purpose-built for stablecoin payments. The network is optimized for high-throughput, low-latency stablecoin transactions, delivering P2P payments and merchant acceptance with immediate settlement in USDT. Application-layer gas sponsorship and waivers allow providers to offer a zero-fee experience for end users, providing the feel of a mainstream payments network while abstracting away the complexity of blockchain systems.
This page describes the complete lifecycle of funds on Stable: how USDT enters the network, moves between participants, and exits back to fiat rails.
### 1. Customer deposit (on-ramp)
A user brings money into the network through one of three primary channels:
* **Crypto transfer**: Any major cryptocurrency is bridged or converted to USDT0 on Stable. USDT0 is the omnichain standard for USDT and the primary form factor on the network.
* **Fiat on-ramp**: Card, ACH, or local payment method converts fiat to USDT0, delivered directly into the user's wallet.
* **CEX withdrawal**: The user withdraws USDT from a supporting centralized exchange, selecting Stable as the destination network. The exchange settles directly into the user's wallet.
In all cases the end state is the same: the user's wallet holds USDT (as USDT0) directly on Stable.
### 2. P2P / merchant transfer (on-chain pay-in)
Once funds are on Stable, the customer sends USDT directly to another user or merchant. Key properties of on-chain transfers:
* **Instant settlement**: transfers settle on-chain immediately.
* **Non-custodial**: in the case of a non-custodial wallet, no PSP or intermediary ever touches user balances between source and destination.
* **Single asset**: because USDT is both the gas and settlement asset, there are no extra tokens in the flow and no hidden spreads.
* **Zero-gas option**: gas waivers allow end users to move funds without needing to manage blockchain fees. See [Gas Waiver](/en/reference/gas-waiver-api) for details.
### 3. User / merchant balance
Merchants receive USDT in their Stable wallet under their own direct control. Funds are held on-chain under the user or merchant's custody. These wallets can be created and managed by a payments provider on behalf of the user.
### 4. Merchant withdrawal (off-ramp / payout)
When a merchant or user requests off-chain fiat settlement:
1. The provider initiates a conversion (USDT → fiat) via banking or payout rails.
2. Funds are credited to the merchant's chosen account.
The provider re-enters the flow only to cash merchants out, not during intra-ecosystem transfers. Day-to-day P2P flows require no intermediation; providers participate only at deposit (USDT transfer to a merchant's account) or withdrawal (USDT → fiat).
### Cross-asset trades
Stable also supports scenarios where the payer holds a non-USDT cryptocurrency.
#### User trades into another cryptocurrency
A user may hold or trade into another cryptocurrency (e.g., BTC or ETH) through an integrated exchange, broker, or on-chain DEX. At the point of payment the system automatically converts the selected cryptocurrency into USDT, which is then transmitted to the merchant's Stable wallet. All on-chain settlement continues to occur in USDT regardless of the user's preferred asset.
#### Merchant acceptance of cryptocurrency payments
Merchants do not need to accept or manage multiple cryptocurrencies directly. They are always credited with USDT in their Stable wallet, preserving a single settlement currency across the network. This design minimizes FX exposure for merchants and simplifies reconciliation and reporting.
#### Provider's role in conversion
The conversion logic (e.g., BTC → USDT) may be handled by an exchange partner, liquidity provider, or the payments provider's own treasury. The merchant remains insulated from volatility or liquidity risks; they only ever receive USDT.
### Next recommended
* [**USDT as gas**](/en/explanation/usdt-as-gas-token) — Understand how USDT0 serves as both native gas and ERC-20 balance on Stable.
* [**Bridging to Stable**](/en/explanation/usdt0-bridging) — See how USDT0 moves onto Stable from other chains via OFT Mesh or Legacy Mesh.
* [**Send your first USDT0**](/en/tutorial/send-usdt0) — Submit a USDT0 transfer on testnet using standard EVM tooling.
## Gas pricing
Stable uses a simplified, single-component gas fee model designed to remove fee volatility and deliver predictable, low transaction costs. Transaction ordering is not influenced by tip bidding. The effective gas price is determined solely by the protocol's base fee.
### Why this model
Three properties fall out of the single-component design:
* **Predictable costs**: fees are based purely on base execution cost. Tip auctions don't introduce variance.
* **USDT-denominated pricing**: gas is priced in USDT0, so a developer or user reasoning about cost in dollar terms doesn't have to account for native-token price fluctuations.
* **Extremely low fees**: at a base fee of 1 gwei, a native USDT0 transfer (21,000 gas) costs approximately **0.0000021 USDT0**. Even complex contract interactions stay well under a cent.
### How it compares to Ethereum
| **Parameter** | **Stable** | **Ethereum** |
| :------------------------------------ | :----------------- | :---------------- |
| Gas token | USDT0 | ETH |
| Base fee | Yes | Yes |
| Priority tip (`maxPriorityFeePerGas`) | Ignored (always 0) | Used for ordering |
| EIP-1559 transaction format | Supported | Supported |
Stable accepts EIP-1559 (Type 2) transactions, but `maxPriorityFeePerGas` is always ignored. Transaction ordering is not influenced by tip bidding.
### Implications
* **Wallets** should hide or disable priority-tip input fields. Displaying them may confuse users since the value has no effect.
* **Analytics dashboards** should not track priority fees. They will always be zero.
* **Transaction-construction tooling** should set `maxPriorityFeePerGas` to `0` explicitly, then compute `maxFeePerGas` from the latest block's base fee with a safety margin.
### Next recommended
* [**Gas pricing reference**](/en/reference/gas-pricing-api) — Construct transactions, estimate gas, and configure tooling against Stable's fee model.
* [**USDT as gas**](/en/explanation/usdt-as-gas-token) — See how USDT0 serves as both native gas and ERC-20 balance.
* [**Ethereum comparison**](/en/explanation/ethereum-comparison) — Review every behavior difference you'll encounter porting from Ethereum.
## Gas waiver
Governance-approved addresses (called **waivers**) submit a wrapper transaction that carries the user's signed payload and executes it at `gasPrice = 0`. The user holds no USDT0 and pays no gas. Stable operates one such waiver as a hosted service; partners can also register their own waiver addresses through validator governance.
### How it works
Gas Waiver uses a wrapper-transaction pattern:
1. **The user signs an `InnerTx`** with `gasPrice = 0`. The user's signature is preserved end-to-end; the waiver cannot modify the payload without invalidating it.
2. **A waiver wraps the `InnerTx` into a `WrapperTx`** sent to a protocol marker address (`0x000000000000000000000000000000000000f333`) with `value = 0`, `gasPrice = 0`, and the signed `InnerTx` as its data payload.
3. **Validators detect the marker**, check the waiver's authorization and policy constraints, and execute the inner transaction under the user's identity (`from`, `nonce`, call semantics).
Gas accounting is handled inside the waiver mechanism. The user pays nothing; the wrapper pays nothing; validators absorb the cost against the per-waiver policy.
### Authorization and policy
Waivers are controlled by validator governance, not application logic. Governance provides:
* **Reviewable registration**: every waiver address is registered on-chain and visible in state.
* **Revocation**: validators can remove a misbehaving waiver at any time.
* **Scoped access via `AllowedTarget`**: each waiver is bound to a specific set of target contracts and method selectors. The protocol rejects any wrapper whose inner `to` address and method selector fall outside that scope.
A valid wrapper transaction satisfies all of the following:
* `WrapperTx.to == 0x000000000000000000000000000000000000f333` (the marker address).
* `WrapperTx.from` is a waiver registered on-chain via governance.
* `WrapperTx.gasPrice == 0` and `InnerTx.gasPrice == 0`.
* `WrapperTx.value == 0`.
* `InnerTx.to` and the extracted method selector are permitted by the waiver's `AllowedTarget` policy.
If any condition fails, validators reject the wrapper without executing the inner transaction.
### Security model
* **User signature integrity**: the user signs the `InnerTx`. The waiver cannot mutate the payload without invalidating the signature. Partners are still responsible for ensuring the user signs only the intended payload.
* **On-chain authorization**: authorization lives on-chain. Only governance-registered waiver addresses can produce a valid wrapper submission, regardless of where the request originates.
* **Service-availability boundary**: when partners route through Stable's hosted Waiver Server, submission availability depends on the service. The protocol-level authorization guarantees are unaffected.
### When to use Gas Waiver
Gas Waiver fits any flow where the end user shouldn't have to hold USDT0 for gas:
* Consumer apps onboarding users who have no stablecoin balance yet.
* Agent-driven flows where the agent's wallet funds the gas.
* Enterprise payment rails where the operator absorbs network costs.
For flows where the user does hold USDT0 but wants to bundle multiple calls into one signed transaction, see [EIP-7702 delegation](/en/reference/eip-7702-api) instead.
### Next recommended
* [**Enable gas-free transactions**](/en/how-to/integrate-gas-waiver) — Integrate the hosted Waiver Server API with API-key submission and NDJSON responses.
* [**Gas waiver protocol**](/en/reference/gas-waiver-api) — Read the full protocol spec: marker routing, wrapper format, governance controls.
* [**USDT as gas**](/en/explanation/usdt-as-gas-token) — Understand the gas token that the waiver covers.
## Guaranteed blockspace
**Guaranteed Blockspace** is a dedicated blockspace-allocation model that reserves a fixed share of every block's capacity for enrolled enterprise partners, regardless of broader network conditions. Transactions routed through the guaranteed path execute with predictable latency and cost. Payroll, settlement, and supplier payments don't compete with public mempool traffic.
:::note
**Planned.** Guaranteed Blockspace is a forward-looking roadmap item. See [Roadmap](/en/explanation/technical-roadmap) for timing.
:::
### Why this matters
General-purpose chains weren't designed for fee predictability under load:
* **Ethereum**: on May 1, 2022, the Yuga Labs "Otherside" NFT mint pushed peak gas above 8,000 gwei and burned over $200M in fees, breaking any workload that required deterministic cost.
* **Low-fee networks** like Solana and Base attract MEV and arbitrage spam, so legitimate transactions compete with bot traffic for inclusion.

*Source: MEV and the Limits of Scaling by Flashbots and Robert Miller*
Enterprise payment flows can't tolerate this variance. Guaranteed Blockspace addresses it directly.
### How the guarantee works
The guarantee is enforced at three layers:
* **Guaranteed mempool**: validators pull guaranteed transactions from a dedicated mempool, isolated from public traffic.
* **Validator-level reservation**: each validator reserves a predefined portion of every block's gas capacity for the guaranteed lane. Deterministic inclusion falls out of this.
* **Dedicated RPC nodes**: the Guaranteed Blockspace API routes transactions through isolated RPC endpoints, so submission latency doesn't spike with public RPC load.
The result, for an enrolled partner:
* **Exclusive routing path**: submissions don't compete with public mempool traffic.
* **Guaranteed inclusion**: capacity is reserved in every block regardless of network congestion.
* **No decentralization trade-off**: validator openness and network participation are preserved; the guarantee lives alongside the public lane, not above it.
* **Reliable on-chain performance** for business-critical operations, even under load.
### Next recommended
* [**Guaranteed settlement**](/en/explanation/upcoming-use-cases) — See the payment pattern that depends on guaranteed blockspace: timed DvP settlement cycles with deterministic inclusion.
* [**USDT as gas**](/en/explanation/usdt-as-gas-token) — Understand the asset that flows through guaranteed blockspace.
* [**Tokenomics**](/en/reference/tokenomics) — Review how STABLE staking underpins validator blockspace guarantees.
## High performance RPC
In the pursuit of a high-performance blockchain, it's not enough to only optimize consensus or block production. The RPC layer is a critical component of the end-to-end user experience because it is the interface between the blockchain and its users. Stable proposes a new RPC-dedicated architecture to overcome the limitations of traditional RPC design.
### Why high-performance RPC matters
#### The user's gateway to the blockchain
The **Remote Procedure Call (RPC)** interface is the primary way users interact with the blockchain:
* Wallets use RPC to broadcast transactions.
* dApps query state via RPC to render UI with on-chain data, to prepare and simulate transactions, fetch logs and events, etc.
* Explorers, indexers, and bots all rely on RPC for real-time data.
Even if the blockchain can process transactions at lightning speed and produce blocks rapidly, none of it matters if users experience latency and delays due to a slow RPC. In practice, RPC is often the bottleneck in the overall user experience.
Stable’s roadmap toward a high-performance chain explicitly includes **RPC optimization** as a first-class priority.
### The problem with traditional RPC architecture
#### Monolithic design and resource contention
Traditionally, an RPC node is simply a repurposed full node with additional RPC endpoints exposed. This means:
* Syncing the chain and serving RPC requests occur on the same instance.
* To scale RPC, teams must spin up entire new full nodes, triggering resource-heavy operations like state sync and consensus setup.
* Consensus, execution, and RPC all share the same CPU, memory, and disk. During periods of high transaction load, a busy component **starves the others**, degrading RPC performance.
In addition, traditional RPC architecture treats read-heavy and write-heavy operations identically. Even though read queries (e.g., `eth_getBalance`) vastly outnumber write transactions, there is no differentiation in how they are handled. This design is inherently inefficient and non-scalable.
### The Stable RPC architecture
Stable introduces a split-path RPC architecture that separates reads from writes and optimizes each independently.
#### Core principles
* Separate the RPC into efficient lightweight RPC nodes based on functionality.
* Use lightweight RPCs as edge nodes to enhance scalability.
* Optimize the data path of function-specific RPCs to reduce latency, offering more direct access or management through more efficient data structures
#### Performance gains
Internal benchmarks of the new read RPC path demonstrate:
* Supports throughput of over 10,000 RPS, with end-to-end latency under 100ms in the same environment.
* Linear scalability of edge nodes, with no need for full state sync or consensus overhead.
Stable’s new RPC architecture results in a significantly smoother and faster user experience, even during high traffic events.
### Future work
#### Optimizing EVM view calls
One exciting area of ongoing research is dedicated support for EVM view operations (`eth_call`):
* These do not require transaction commitment or state updates.
* Execution can happen on lightweight stateless environments using only the current state snapshot.
* A specialized RPC node could be designed specifically for these operations, delivering even faster response times and reducing load on primary full nodes.
#### Integration of indexer directly to the node
By integrating an indexer directly into the node, it becomes possible to serve the fastest possible data to dApps.
* Typical architectures: Node → RPC → Indexer (e.g., The Graph) → Storage → dApp
* Proposed Architecture: Node with Indexer → DB → dApp
* This architecture enables much faster data delivery as the indexer is natively integrated into the node, removing the network communication steps.
### Next recommended
* [**JSON-RPC API**](/en/reference/json-rpc-api) — Use the `eth_*` methods Stable exposes for contract reads, transaction submission, and log filtering.
* [**Execution**](/en/explanation/execution) — See how execution feeds state to the RPC layer.
* [**Storage (StableDB)**](/en/explanation/stable-db) — Review the storage layer the RPC reads query.
## Overview
Stable is an EVM-compatible Layer 1 where USDT0 is the native gas token. Most Ethereum tools, libraries, and contract patterns work without modification. You connect by pointing your RPC to Stable and switching the chain ID.
### Connect and fund
* [**Connect**](/en/reference/connect) — Mainnet and testnet chain IDs, RPC endpoints, block explorers.
* [**Fund your testnet wallet**](/en/how-to/use-faucet) — Get testnet USDT0 via the faucet or bridge from Sepolia.
* [**Stable SDK**](/en/explanation/sdk-overview) — Use the typed TypeScript client for transfer, bridge, and swap.
### Build with USDT0
* [**Send your first USDT0**](/en/tutorial/send-usdt0) — Native and ERC-20 transfers with TypeScript examples.
* [**USDT0 behavior on Stable**](/en/explanation/usdt0-behavior) — Dual-role balance reconciliation, contract design requirements, migration checklist.
* [**Differences from Ethereum**](/en/explanation/ethereum-comparison) — Single-slot finality, USDT0 gas, no priority tips.
* [**Zero-gas transactions**](/en/how-to/integrate-gas-waiver) — Gas Waiver integration via the Waiver Server API.
### Payments
* [**ERC-3009**](/en/explanation/erc-3009) — Transfer With Authorization: the on-chain settlement primitive.
* [**x402**](/en/explanation/x402) — HTTP-native payments with no accounts or API keys.
* [**P2P payments**](/en/reference/p2p-payments) — Native and ERC-3009 delegated transfers.
### Ecosystem
Providers and infrastructure already live on Stable: bridges, [the canonical Uniswap v3 deployment](/en/reference/dexes), oracles, RPCs, wallets, custody, and more. Browse the [Ecosystem](/en/reference/bridges) section for the full list.
## Key features
Stable is a delegated Proof-of-Stake Layer 1 with single-slot finality, full EVM compatibility, and USDT0 as the native gas token. The features below are the ones that shape day-to-day integration. Each links to the page that covers it in depth.
### Protocol-level features
| Feature | What it means |
| :------------------------- | :--------------------------------------------------------------------------------------------------- |
| **Single-slot finality** | A transaction is final once it's in a block. No multi-block confirmation wait. |
| **Full EVM compatibility** | Solidity, Vyper, Foundry, Hardhat, ethers, viem, and `eth_*` RPC methods work unchanged. |
| **USDT0 as gas** | One asset serves as both native balance and ERC-20. No separate gas token to hold. |
| **Cross-chain bridging** | USDT0 moves onto Stable from Ethereum, Arbitrum, HyperEVM, Tron, and other chains via LayerZero OFT. |
### USDT-specific features
* [**USDT as gas**](/en/explanation/usdt-as-gas-token) — USDT0 serves as both the native gas token and an ERC-20 token on the same balance.
* [**Gas waiver**](/en/explanation/gas-waiver) — Governance-authorized waivers submit wrapper transactions that execute at zero gas price on the user's behalf.
* [**Guaranteed blockspace**](/en/explanation/guaranteed-blockspace) — Enterprise partners secure reserved capacity in every block for payment flows.
* [**USDT transfer aggregator**](/en/explanation/usdt-transfer-aggregator) — High-volume USDT0 transfers batch into parallelized, fault-tolerant settlement bundles.
* [**Confidential transfer**](/en/explanation/confidential-transfer) — Zero-knowledge cryptography shields transfer amounts while keeping parties auditable.
For which upgrades are live today and which are on the roadmap, see [Roadmap](/en/explanation/technical-roadmap).
### Next recommended
* [**Ethereum comparison**](/en/explanation/ethereum-comparison) — Identify what stays the same and what changes when you port from Ethereum to Stable.
* [**Flow of funds**](/en/explanation/flow-of-funds) — Trace USDT from on-ramp through on-chain transfer to off-ramp settlement.
* [**Architecture overview**](/en/explanation/core-optimization-overview) — Walk through the consensus, execution, database, and RPC layers that deliver these features.
## Learn
### Foundation
* [**Overview**](/en/explanation/overview) — What Stable is and how to read this documentation.
* [**Key features**](/en/explanation/key-features) — Headline specs: single-slot finality, USDT0 as gas, full EVM compatibility.
* [**Difference from Ethereum**](/en/explanation/ethereum-comparison) — What stays the same and what changes when you port from Ethereum.
* [**Core concepts**](/en/explanation/core-concepts) — USDT0 dual role, guaranteed blockspace, transfer aggregator, finality.
### USDT0 behavior
* [**USDT0 behavior on Stable**](/en/explanation/usdt0-behavior) — Dual-role balance, reconciliation events, and contract design rules.
* [**USDT as gas**](/en/explanation/usdt-as-gas-token) — Why Stable uses USDT0 to pay for gas and what that means for fees.
* [**Flow of funds**](/en/explanation/flow-of-funds) — How USDT moves end-to-end across Stable.
* [**USDT0 features**](/en/explanation/usdt-features-overview) — Every USDT0-specific feature with links to each.
### Architecture
* [**Technical overview**](/en/explanation/tech-overview) — Consensus, execution, database, and RPC layers in one page.
* [**Core optimizations**](/en/explanation/core-optimization-overview) — The performance work behind sub-second finality.
* [**Finality**](/en/explanation/finality) — Single-slot finality, reorg behavior, and what "confirmed" means.
* [**Gas pricing**](/en/explanation/gas-pricing) — Base-fee-only model priced in USDT0.
### Use case narratives
* [**Payments**](/en/explanation/use-case-payments) — Why Stable fits P2P, subscriptions, invoices, and pay-per-call.
* [**Payroll**](/en/explanation/use-case-payroll) — Batched and scheduled payroll runs on Stable.
* [**Sponsored transactions**](/en/explanation/use-case-sponsored) — Letting applications cover gas for their users.
* [**Private transfers**](/en/explanation/use-case-private) — Upcoming confidential payment flows.
## MPP sessions
A session is an MPP payment intent that batches many small payments into a single on-chain settlement. The client deposits funds into an escrow once, then signs cheap off-chain vouchers for each request. Only the net amount settles on-chain, which makes sub-cent per-request economics viable for streaming workloads.
### How a session works
1. **Deposit.** The client transfers a budget into a session-escrow contract on the settlement layer. The escrow holds the funds and exposes a settlement function that pays the seller and refunds the remainder.
2. **Voucher per request.** For each paid request, the client signs an off-chain voucher carrying `(sessionId, cumulativeAmount, nonce, expiry)`. The server checks that the cumulative amount is monotonically increasing and within the deposited balance. No on-chain action is needed at this step.
3. **Settle.** At the end of the session or on a configured cadence, a facilitator submits the latest voucher to the escrow. The escrow pays the seller the cumulative amount and returns the remaining balance to the client. Only this transaction touches the chain.
A session is finalized when the latest voucher is settled or when the voucher expiry passes.
### When to use sessions vs. charge
| **Workload** | **Best intent** |
| :---------------------------------------------------------------------------------------------------------------- | :-------------- |
| Pay-per-token LLM inference, pay-per-frame video, real-time data streams. Many small payments to the same seller. | Session |
| One-off paid API calls, single-purchase resources, agent-to-agent commerce where each transaction stands alone. | Charge |
The break-even point depends on how expensive the per-request on-chain settlement is relative to the request price. As soon as you are paying more in gas than in payment, sessions are the right pattern.
### Agent use cases
* **Token-priced LLM inference.** A client streams completions and signs a voucher per token batch; the inference server settles at session end.
* **Frame-priced video.** An agent consuming a generated video signs vouchers per N frames; the renderer settles when the stream closes.
* **Real-time data feeds.** A subscriber pays per tick of an oracle or market-data stream, settling once per session window.
### Status on Stable
Sessions require two pieces that Stable does not currently provide:
1. A session-aware escrow contract for USDT0 that holds the deposit and exposes a `settleVouchers` (or equivalent) function.
2. A facilitator that issues vouchers on the seller side and verifies them on the buyer side, batching submissions to the escrow.
Until both ship, MPP sessions are not usable on Stable. For high-frequency agent payments today, the lowest-overhead pattern is the **charge** intent submitted through Stable's [Gas Waiver](/en/how-to/integrate-gas-waiver), which removes per-transaction gas cost on the seller's side and keeps the buyer's USDT0 balance as the only asset to manage. See [Build an MPP endpoint on Stable](/en/how-to/build-mpp-endpoint) for the per-request charge pattern.
### Next recommended
* [**MPP concept**](/en/explanation/mpp) — Read the broader standard, including charge and subscription intents.
* [**Agent settlement**](/en/explanation/agent-settlement) — See where MPP sessions would sit in the agent-payment rail on Stable.
* [**Build an MPP endpoint on Stable**](/en/how-to/build-mpp-endpoint) — Use the charge intent today while sessions are forthcoming.
## Machine Payments Protocol (MPP)
MPP (Machine Payments Protocol) is an open standard for paying for HTTP resources in the same request that asks for them. It extends [x402](/en/explanation/x402) with new payment intents (charge, subscription, session), multi-rail support (stablecoins, cards, Lightning), production features (idempotency, body-digest binding, expiration), and additional transports (MCP, WebSocket). The protocol is on the IETF standards track.
### MPP and x402
MPP clients are backward compatible: an MPP client can call an existing x402 server without changes. Where the two protocols differ:
| **Aspect** | **x402** | **MPP** |
| :------------------------ | :------------------------------------------------------------ | :------------------------------------------------------- |
| Payment intents | Per-request charge | Charge, subscription, session |
| Rails | Blockchain only | Stablecoins, cards, Lightning, custom |
| Production features | Limited | Idempotency, body-digest binding, expiration |
| Transports | HTTP | HTTP, MCP/JSON-RPC, WebSocket |
| Headers (client ↔ server) | `PAYMENT-REQUIRED` / `PAYMENT-SIGNATURE` / `PAYMENT-RESPONSE` | `WWW-Authenticate` / `Authorization` / `Payment-Receipt` |
| Governance | Community protocol | IETF standards track |
| Method authorship | Foundation-controlled | Permissionless |
### Challenge, credential, receipt
MPP wraps every paid request in a three-step exchange between the client and the resource server:
1. **Challenge.** The server responds with `402 Payment Required` and a `WWW-Authenticate` header that names the supported methods, the amount, and an expiration.
2. **Credential.** The client picks a method, signs a proof of payment, and resubmits the request with an `Authorization` header carrying the serialized credential.
3. **Receipt.** The server verifies the credential, settles the payment, and returns the response with a `Payment-Receipt` header containing the settlement reference.
A challenge can be cryptographically bound to the request body via a body digest, so a credential signed for one request cannot be reused on a different one.
### Payment intents
**Charge.** A one-time payment for a single resource. The credential authorizes one transfer of an exact amount.
**Subscription.** Recurring payments under a single scoped credential. The credential authorizes repeated charges across a billing period, with the rail enforcing renewal cadence.
**Session.** Pay-as-you-go with off-chain vouchers. The client deposits funds into an escrow once, then signs cheap off-chain vouchers for each request. Only the net amount settles on-chain. See [MPP sessions](/en/explanation/mpp-sessions) for details.
### Transports
MPP defines the same challenge / credential / receipt exchange over multiple transports:
* **HTTP.** The default. Headers as listed above.
* **MCP / JSON-RPC.** Lets an MCP server monetize individual tool calls. An AI client signs a credential before invoking the tool.
* **WebSocket.** Persistent connections with in-band voucher top-ups, designed for streaming sessions.
### MPP on Stable
MPP does not ship a Stable payment method. The `mppx` SDK ([wevm/mppx](https://github.com/wevm/mppx)) includes methods for Tempo and Stripe, and `mpp.dev` lists Tempo, Stripe, Lightning, Solana, Stellar, Monad, and RedotPay. Stable is not on either list today.
The standard is permissionless, so you can author your own method. For USDT0 on Stable, the `verify()` hook is signature validation against ERC-3009, and settlement is delegated to an existing settlement service: an x402 facilitator like [Semantic Pay](https://docs.semanticpay.io) or [Heurist](https://docs.heurist.ai/x402-products/facilitator), or Stable's own [Gas Waiver](/en/how-to/integrate-gas-waiver). See [Build an MPP endpoint on Stable](/en/how-to/build-mpp-endpoint) for the full walkthrough.
### Next recommended
* [**Build an MPP endpoint on Stable**](/en/how-to/build-mpp-endpoint) — Write the three MPP custom-method hooks for USDT0 and settle a real payment.
* [**MPP sessions**](/en/explanation/mpp-sessions) — Stream micropayments with off-chain vouchers and one net settlement.
* [**x402**](/en/explanation/x402) — Read the original HTTP-402 protocol that MPP generalizes.
## Overview
Stable is a Layer 1 where USDT0 is the native gas token, and standard EVM tooling (Solidity, Foundry, Hardhat, ethers, viem, and the `eth_*` JSON-RPC methods) works unchanged.
Point your RPC at Stable and confirm the chain ID:
```text
988
```
make sure you have [foundry](https://www.getfoundry.sh/) installed to test the following command:
```bash
cast chain-id --rpc-url https://rpc.stable.xyz
```
For the full list of endpoints (mainnet and testnet), see [Connect](/en/reference/connect).
### What to read next
If you haven't sent a transaction on Stable yet, start with [Quick start](/en/tutorial/quick-start) for a quick walkthrough on testnet. Then pick the path that matches what you're building:
* Wallets, delegation, and agent accounts → [Accounts](/en/explanation/accounts-overview).
* Moving USDT0 or building payment flows → [Payments](/en/explanation/payments-overview).
* Deploying smart contracts → [Contracts](/en/explanation/contracts-overview).
* Wiring AI editors or building agent-paid services → [Agent settlement](/en/explanation/agent-settlement).
* Running a full or archive node, ecosystem providers, or covering gas → [Infrastructure](/en/explanation/integrate-overview).
Before you ship, [Core concepts](/en/explanation/core-concepts) covers four behaviors that differ from Ethereum (USDT0 dual role, guaranteed blockspace, transfer aggregator, EVM finality). [Production readiness](/en/how-to/production-readiness) is the mainnet-readiness checklist.
## Use cases overview
Stable supports multiple payment patterns, from simple wallet-to-wallet transfers to agent-driven service payments. The use cases below cover the patterns that are production-ready today. For patterns on the horizon (guaranteed settlement, confidential payments, agent-to-agent commerce), see [Upcoming use cases](/en/explanation/upcoming-use-cases).
### Live use cases
* [**P2P payments**](/en/reference/p2p-payments) — Wallet-to-wallet USDT0 transfers. Sub-second settlement, zero gas via Gas Waiver.
* [**Subscription billing**](/en/reference/subscriptions) — Pull-based recurring billing via EIP-7702. Subscriber authorizes once, provider collects each cycle.
* [**Invoice settlement**](/en/reference/invoices) — B2B invoice payment with deterministic nonces. On-chain settlement links automatically to the invoice.
* [**Pay-per-call APIs**](/en/reference/pay-per-call) — Per-request HTTP payments via x402 middleware. No accounts, no API keys, no billing cycles.
### Shared foundations
Most patterns build on the same two protocols:
* **[ERC-3009](/en/explanation/erc-3009)**: signed authorizations for delegated settlement. Used by invoices, pay-per-call, and P2P application-initiated transfers.
* **[x402](/en/explanation/x402)**: HTTP-native payments over standard headers. Used by pay-per-call APIs and MCP-driven payment flows.
* **[EIP-7702](/en/explanation/eip-7702)**: EOA delegation for recurring authorization. Used by subscription billing.
### Next recommended
* [**ERC-3009**](/en/explanation/erc-3009) — Start with the core settlement standard.
* [**Upcoming use cases**](/en/explanation/upcoming-use-cases) — Preview agent-to-agent commerce, guaranteed settlement, and confidential payments.
## Payments guides
Every guide, concept, and reference under the Payments tab, grouped by what you're trying to do.
### Send and transfer
* [**Send your first USDT0**](/en/tutorial/send-usdt0) — Native and ERC-20 transfers on the same balance.
* [**Zero gas transactions**](/en/how-to/zero-gas-transactions) — Transfer USDT0 with the fee covered by a Gas Waiver.
* [**Work with USDT0 as gas**](/en/how-to/work-with-usdt-gas) — Construct transactions correctly: priority tip 0, `value` in USDT0.
* [**Bridge USDT0 to Stable**](/en/tutorial/bridge-usdt0) — Bridge from Ethereum Sepolia using LayerZero OFT.
### Build a payment flow
* [**Learn P2P payments**](/en/how-to/build-p2p-payments) — Wallet + send + receive + history in one app.
* [**Subscribe and collect**](/en/how-to/subscribe-and-collect) — Pull-based recurring billing via EIP-7702.
* [**Paying with invoice**](/en/how-to/pay-with-invoice) — ERC-3009 with deterministic nonces for invoice settlement.
* [**Build a pay-per-call API**](/en/how-to/build-pay-per-call) — Monetise HTTP endpoints with x402 middleware.
### Protocols and references
* [**ERC-3009**](/en/explanation/erc-3009) — Transfer With Authorization: the signed-settlement primitive.
* [**x402 (HTTP-native payments)**](/en/explanation/x402) — Server responds 402, client signs, facilitator settles on-chain.
* [**P2P payments reference**](/en/reference/p2p-payments) — Model overview and comparison to traditional rails.
* [**Subscriptions reference**](/en/reference/subscriptions) — Pull-based billing model and trade-offs.
* [**Invoices reference**](/en/reference/invoices) — Deterministic-nonce settlement model.
* [**Pay-per-call reference**](/en/reference/pay-per-call) — x402 pricing and endpoint discovery model.
* [**Upcoming use cases**](/en/explanation/upcoming-use-cases) — Guaranteed settlement, confidential payments, agent-to-agent.
## Payments on Stable
Stable is built around payments. USDT0 is the native asset and the gas token, so settlement and fees share one balance. Single-slot finality means a transfer clears in under a second. ERC-3009, EIP-7702, and x402 are native primitives, not workarounds — you can settle with a signature, pull from a delegated account, or charge per HTTP request without running a billing stack.
### What you can build
* **P2P transfers** — native USDT0 sends with 21k gas and sub-second finality.
* **Subscriptions** — pull-based recurring billing with EIP-7702 delegation.
* **Invoice settlement** — ERC-3009 `transferWithAuthorization` with deterministic nonces for exact reconciliation.
* **Pay-per-call APIs** — x402 middleware for per-request USDT0 payments; no API keys, no sign-ups.
* **Zero-gas UX** — application-sponsored transactions via the Gas Waiver service.
* **Cross-chain USDT0** — LayerZero OFT bridging from Ethereum and other networks.
### How Stable differs
* **One asset for everything**: the sender doesn't hold a separate gas token.
* **Native ERC-3009**: USDT0 implements `transferWithAuthorization` directly, so payments settle with a signature and no approve step.
* **Deterministic finality**: a block is final the moment it's committed. No confirmation waits.
* **Native x402**: the facilitator pays no gas through the Gas Waiver, so per-request settlement costs stay below a cent.
### Start here
* [**Send your first USDT0**](/en/tutorial/send-usdt0) — Native and ERC-20 transfers on the same balance.
* [**Zero gas transactions**](/en/how-to/zero-gas-transactions) — Transfer USDT0 with the fee covered by a Gas Waiver.
* [**Learn P2P payments**](/en/how-to/build-p2p-payments) — Build a wallet + send + receive + history app from scratch.
* [**Build a pay-per-call API**](/en/how-to/build-pay-per-call) — Price HTTP endpoints per request with x402.
* [**Stable SDK**](/en/explanation/sdk-overview) — Use the typed client for transfer, bridge, and swap in a few lines.
### Payment primitives
* [**ERC-3009**](/en/explanation/erc-3009) — Transfer With Authorization: the settlement standard behind invoices and x402.
* [**x402 (HTTP-native payments)**](/en/explanation/x402) — Server responds 402, client signs ERC-3009, facilitator settles on-chain.
### Next recommended
* [**Payments guide index**](/en/explanation/payments-index) — Every guide, concept, and reference under the Payments tab.
* [**Subscribe and collect**](/en/how-to/subscribe-and-collect) — Pull-based recurring billing via EIP-7702.
* [**Paying with invoice**](/en/how-to/pay-with-invoice) — ERC-3009 with deterministic nonces for exact reconciliation.
## Stable SDK
`@stablechain/sdk` is the official TypeScript client for Stable. It wraps viem with a small, typed API for the operations you reach for most: transfer USDT0, bridge between chains, and swap tokens on Stable. Routing, approvals, decimals, and chain switching are handled for you.
```ts
import { createStable, Network } from "@stablechain/sdk";
import { privateKeyToAccount } from "viem/accounts";
const stable = createStable({
network: Network.Mainnet,
account: privateKeyToAccount("0x..."),
});
const { txHash } = await stable.transfer({
from: "0xYourAddress",
to: "0xRecipient",
amount: 10,
});
```
```text
txHash: 0x8f3a...2d41
```
### What the SDK does
* **`transfer`** — send native USDT0 or any ERC-20 on Stable. Gas is paid in USDT0 automatically.
* **`quoteBridge` / `bridge`** — cross-chain transfers. LayerZero for USDT0 → USDT0, LI.FI for everything else. Route is picked for you.
* **`quoteSwap` / `swap`** — same-chain token swaps via LI.FI, with ERC-20 approval handled internally.
The SDK is published on npm as [`@stablechain/sdk`](https://www.npmjs.com/package/@stablechain/sdk) and requires `viem >= 2.0.0` as a peer dependency.
### When to use it (and when not to)
Use the SDK when you want a typed, opinionated client that hides routing and approval boilerplate. Drop down to raw viem or ethers when you need direct control over transaction construction, custom gas strategies, or contract calls outside transfer / bridge / swap.
:::note
The SDK signs with any viem-compatible signer: a private-key `Account`, a browser `Transport` like `custom(window.ethereum)`, or a pre-built `WalletClient` (for example, the one returned by wagmi's `useWalletClient`).
:::
### Start here
* [**Quickstart**](/en/tutorial/sdk-quickstart) — Install the SDK and run your first transfer, bridge, and swap on testnet.
* [**SDK reference**](/en/reference/sdk) — Every method, config option, enum, and error class.
* [**Use with viem**](/en/how-to/sdk-with-viem) — Server-side accounts, browser wallets, and bring-your-own `WalletClient`.
* [**Use with wagmi**](/en/how-to/sdk-with-wagmi) — Wire the SDK into a React app with `useWalletClient` and hooks.
### Next recommended
* [**Install from npm**](https://www.npmjs.com/package/@stablechain/sdk) — View the package on npmjs.com and check the latest version.
* [**Connect to Stable**](/en/reference/connect) — Chain IDs, RPC endpoints, and explorers for mainnet and testnet.
* [**Fund a testnet wallet**](/en/how-to/use-faucet) — Get testnet USDT0 from the faucet before running the quickstart.
## Storage (StableDB)
One of the main bottlenecks in end-to-end blockchain performance is **Disk I/O**. Specifically, committing and storing state data after block execution creates the key bottleneck. Stable tackles this problem with architectural innovations such as `MemDB`, `VersionDB`, and memory-mapped storage (`mmap`) to dramatically improve throughput.
### Why disk I/O is a bottleneck
#### State transition and persistence
Every time a block of transactions is executed, the blockchain transitions from one state to the next. This process has two fundamental stages:
1. **State Commitment**: The new application state is committed after transaction execution.
2. **State Storage**: The committed state is persisted to disk for long-term access and historical verification.
In conventional architectures, state storage is **tightly coupled** with state commitment. This means that:
* The node must wait for the new state to be fully stored on disk before proceeding with the next block's execution.
* The state data is written in random disk locations that are not mapped to fixed addresses. This leads to high latency when retrieving state data during execution of subsequent transactions.
Even if consensus and execution layers are heavily optimized, this serialized dependency on slow disk operations caps the achievable performance of the entire system.
### Optimizing DB operations for higher throughput
To overcome these limitations, Stable proposes a two-fold architectural enhancement focused on **decoupling state operations** and **introducing memory-mapped DB optimizations**.
#### 1. Decoupling state commitment and storage
The first step is to decouple the state commitment from its storage:
* After committing a new state, the node immediately proceeds to execute the next block.
* The actual persistence of state to disk occurs asynchronously in the background.
This separation allows execution to happen instantly and leapfrog the latency of slow disk writes, thereby eliminating blocking dependencies and eventually improving end-to-end performance.
#### 2. Introducing `MemDB` and `VersionDB` via `mmap`
Stable enhances this with a dual-database model powered by `mmap` (memory-mapped file access):
* **MemDB (Memory DB)**:
* Stores recent and active states that are frequently accessed.
* Uses fixed address mapping via `mmap`, enabling fast and deterministic lookups.
* Ideal for most transaction workloads which target recently modified state.
* **VersionDB (Historical DB)**:
* Stores older, historical states on disk.
* Optimized for archival and long-range queries, not for high-frequency access.
This design ensures that **hot data is served from fast, memory-resident structures**, while cold data is offloaded to slower, persistent storage. By combining `mmap` access with smart state tiering, Stable can significantly reduce the DB read/write latency during block execution.
### Expected gains and precedents
This architectural optimization is not just theoretical. It is already being implemented by high-performance blockchains such as Sei and Cronos. Both have adopted similar decoupled architectures with memory-mapped DBs and have observed **up to 2x increases in overall TPS**.
Stable also anticipates comparable gains, as the architecture will no longer be bottlenecked by the storage layer. Instead, consensus and execution performance can scale without being throttled by disk operations.
### Further reading
For more technical deep-dives and implementation details, refer to:
* [ADR-065: Cosmos Store V2 Architecture](https://docs.cosmos.network/main/build/architecture/adr-065-store-v2)
* [MemIAVL: A Practical Guide](https://hackmd.io/@yihuang/rkeCvy5xh)
* [Cronos MemIAVL Node Configuration](https://docs.cronos.org/for-node-hosts/running-nodes/memiavl)
* [Sei’s DB Design Approach](https://4pillars.io/ko/articles/sei-db)
### Next recommended
* [**High performance RPC**](/en/explanation/high-performance-rpc) — See how the RPC layer exposes state reads without contending with writes.
* [**Execution**](/en/explanation/execution) — Understand how execution writes into the storage layer covered here.
* [**Consensus**](/en/explanation/consensus) — Review the consensus layer that orders blocks before they reach storage.
## Staking module
The `x/staking` module controls validator participation and delegation on Stable. Its precompile makes these operations callable from Solidity, so a contract can delegate STABLE, undelegate after the unbonding period, redelegate between validators, or query validator state without leaving the EVM.
### What it exposes
* **Create validator**: register a new validator with description, commission rate, and initial self-delegation.
* **Edit validator**: update validator metadata and commission parameters.
* **Delegate**: stake STABLE with a validator.
* **Undelegate**: begin unbonding from a validator (the tokens become available after the unbonding period).
* **Redelegate**: move stake between validators without unbonding.
* **Cancel unbonding delegation**: reverse an in-progress unbonding before the period completes.
* **Query methods**: read validator sets, delegation records, unbonding records, and parameters.
### Authorization semantics
The precompile performs two checks:
1. The bond denom (staking token) must be registered at chain initialization. On Stable this is the STABLE token.
2. The caller must match the validator or delegator whose state is being modified. You cannot delegate on someone else's behalf by calling the precompile directly.
### Unbonding completions
When an unbonding period finishes, the tokens become liquid, but the SDK handles this quietly and the EVM doesn't see a direct event. Stable's [system transaction](/en/explanation/system-transactions) mechanism bridges this: the protocol emits an `UnbondingCompleted` event through the `StableSystem` precompile once the unbonding clears, so dApps can subscribe via standard EVM logs.
### When to use it
* A staking protocol manages delegation from a vault contract: call `delegate` and `undelegate` as users deposit and withdraw.
* A governance dashboard needs a live validator set: use the query methods.
* A restaking or liquid-staking product tracks unbonding completions: subscribe to the `UnbondingCompleted` event (see [Tracking unbonding completions](/en/how-to/track-unbonding) once that guide ships).
### Where to find the ABI
Full method signatures, struct definitions, and emitted events are in the [Staking precompile reference](/en/reference/staking-module-api).
### Next recommended
* [**Staking precompile reference**](/en/reference/staking-module-api) — Call `delegate`, `undelegate`, `redelegate`, and read validator state.
* [**System transactions**](/en/explanation/system-transactions) — Learn how unbonding completions reach the EVM as events.
* [**Distribution module**](/en/explanation/distribution-module) — Withdraw rewards earned from the delegations managed here.
## System modules
Stable's core protocol behavior lives in SDK modules: `x/bank`, `x/distribution`, `x/staking`. To make this behavior accessible from the EVM, Stable exposes each module as a **precompiled contract** at a fixed address. Contracts written in Solidity call the precompile directly, and the EVM routes the call into the native SDK handler. Precompiles are implemented at the protocol level, making them significantly more gas-efficient than an equivalent Solidity re-implementation.
### The three modules
| Module | Precompile address | Purpose |
| :--------------------------------------------------------- | :--------------------- | :--------------------------------------------------------------------------------------------- |
| [Bank](/en/explanation/bank-module) | `0x0000…1003` (STABLE) | Token transfers, balance accounting, allowance management, mint/burn for authorized contracts. |
| [Distribution](/en/explanation/distribution-module) | `0x0000…0801` | Staking-reward claims, reward queries, withdraw-address management. |
| [Staking](/en/explanation/staking-module) | `0x0000…0800` | Delegation, undelegation, redelegation, validator queries. |
| [System transactions](/en/explanation/system-transactions) | `0x0000…9999` | Protocol-emitted EVM events for SDK-layer operations (e.g. unbonding completions). |
Each page above explains what the module does, when to use it, and where to find its ABI.
### Why precompiles, not Solidity
Two reasons:
* **Gas efficiency.** A precompile runs in the protocol's native execution path. An equivalent Solidity contract would re-implement the same logic with significantly higher gas cost.
* **Single source of truth.** Staking, distribution, and token supply are protocol-level state. Exposing them through precompiles avoids maintaining a duplicate Solidity implementation that could drift from the SDK.
### Authorization
Some precompile methods (`mint`, `burn`, protocol-level staking operations) require caller authorization. The `x/precompile` module maintains an on-chain whitelist, and calls from unregistered contracts revert. This keeps privileged operations governance-gated without blocking general EVM use of read/transfer methods.
### Next recommended
* [**Bank module**](/en/explanation/bank-module) — Understand token transfers, allowances, and the mint/burn authorization model.
* [**Staking module**](/en/explanation/staking-module) — See how delegation and validator management reach the EVM.
* [**System transactions**](/en/explanation/system-transactions) — Learn how protocol-level events like unbonding completions surface as EVM logs.
## System transactions
EVM applications subscribe to on-chain activity through standard interfaces like `eth_getLogs`. But some of the most important operations on Stable (staking unbonding completions, for example) happen inside SDK modules that don't naturally emit EVM events. **System transactions** close this visibility gap: the protocol itself submits EVM transactions that emit events for SDK-layer operations, making them indexable through the same log stream dApps already use.
### Why this matters
Consider tracking when a user's tokens finish unbonding. Without system transactions, a dApp would need to either:
* Run a separate indexer that watches for SDK events and stores them in its own database. Operational overhead plus a new failure point.
* Poll a REST endpoint periodically. 5–10 second latency, higher RPC load, two client stacks (web3 + REST) to maintain.
System transactions give dApps real-time event notifications through the same WebSocket connections they already use for EVM logs. No separate indexer. No REST polling.
### How the flow works
```
1. Protocol event: An SDK-layer operation completes (e.g. staking unbonding).
2. Detection: The x/stable EndBlocker detects the event and queues it in state.
3. System TX: In the next block's PrepareProposal, the protocol generates a
system transaction calling the StableSystem precompile.
4. EVM emission: The precompile processes the queued entries and emits standard
EVM events — dApps see them through eth_getLogs and subscriptions.
```
The system transaction is created by validators during block proposal, not by users. It lands at the front of the block, before any user transactions.
### The StableSystem precompile
Events flow through the `StableSystem` precompile at `0x0000000000000000000000000000000000009999`. Today it emits one event (`UnbondingCompleted`) for staking unbondings. The protocol is designed to extend this to other SDK operations (validator commission changes, governance execution) under the same pattern.
### Security model
Two properties keep the event stream trustworthy:
* **Protocol-only sender.** System transactions use `0x8888888888888888888888888888888888888888` as their sender. The EVM state-transition rules only allow transactions to the `StableSystem` precompile from this address to skip signature verification. Users cannot forge events or call restricted precompile functions from their own transactions.
* **Deterministic emission.** Every honest validator produces the same system transaction for the same protocol events. There's no additional trust assumption beyond standard consensus.
### Batch processing
To bound block size, each block processes at most 100 unbonding completions. At Stable's \~700 ms block time, that's roughly 9,000 completions per minute, well above typical staking activity. If a burst exceeds the per-block limit, completions queue in FIFO order and drain over subsequent blocks.
There's a one-block (\~700 ms) delay between the SDK event and the EVM emission, which is negligible relative to the 7-day unbonding period itself.
### Where to find the ABI
The `StableSystem` interface, event signatures, and sender-authorization rules are in the [System transactions reference](/en/reference/system-transactions-api).
### Next recommended
* [**System transactions reference**](/en/reference/system-transactions-api) — Review the `IStableSystem` interface, gas accounting, and authorization rules.
* [**Staking module**](/en/explanation/staking-module) — See the SDK operations that surface as system-transaction events.
* [**System modules overview**](/en/explanation/system-modules-overview) — Return to the precompile-exposed module list.
## Tech overview
:::note
**What's live today:** StableBFT consensus, Stable EVM (full EVM compatibility), and the split-path RPC layer are all production-ready. StableDB ships in the v1.4.0 upgrade. Autobahn (DAG-based consensus) and StableVM++ (optimistic parallel execution) are roadmap items. See the [Roadmap](/en/explanation/technical-roadmap) for timelines.
:::
You can deploy Solidity or Vyper contracts on Stable today using Hardhat, Foundry, or any standard EVM tooling, and your contracts work without modification. What changes: gas is paid in USDT0, transactions reach single-slot finality, and every layer of the stack is tuned for stablecoin throughput.
### StableBFT
**Status: Live**
Stable Blockchain leverages **StableBFT**, a customized PoS consensus protocol built on CometBFT, for high throughput, low latency, and strong reliability across the network.
:::note
**Planned:** DAG-based **Autobahn** consensus with decoupled data dissemination. See the [Roadmap](/en/explanation/technical-roadmap#phase-3-full-stack-optimized-layer-for-usdt).
:::
### Stable EVM
**Status: Live**
**Stable EVM** is Stable's Ethereum-compatible execution layer. Standard Ethereum tools and wallets interact with the chain unchanged. A set of **precompiles** bridges Stable EVM to the Stable SDK, letting EVM smart contracts call into core chain logic atomically.
:::note
**Planned:** **StableVM++** with optimistic parallel execution (Block-STM). See the [Roadmap](/en/explanation/technical-roadmap#phase-3-full-stack-optimized-layer-for-usdt).
:::
### StableDB
**Status: Ships in v1.4.0**
Stable fixes a major blockchain bottleneck: slow disk storage after each block. It separates state commitment from storage so blocks process without delay. `MemDB` and `VersionDB`, powered by `mmap`, keep recent data in memory while older data is stored efficiently, boosting overall throughput.
### High performance RPC
**Status: Live**
A slow RPC layer ruins the user experience even on a fast chain. Stable addresses this with a **split-path architecture** that separates operations by function, deploying lightweight, specialized RPC nodes for faster response times.
:::note
**Planned:** RPC nodes optimized for EVM view calls, plus a node-integrated indexer. See the [Roadmap](/en/explanation/technical-roadmap#phase-3-full-stack-optimized-layer-for-usdt).
:::
## Roadmap
Stable optimizes every layer of the transaction pipeline (consensus, execution, storage, RPC, and USDT-specific flows) across three phases. This page marks what's shipped, what's in progress, and what's still ahead.
### Phase 1: Foundational layer for USDT
Status: **Live on mainnet.**
#### StableBFT: Live
A customized PoS consensus protocol built on CometBFT. Delivers deterministic finality and Byzantine fault tolerance up to one-third of validators. See [Consensus](/en/explanation/consensus) for the current implementation.
#### USDT as native gas: Live
USDT0 is the native asset for gas payment and value transfer, and simultaneously supports the ERC-20 surface (`approve`, `transfer`, `transferFrom`, `permit`). See [USDT as gas](/en/explanation/usdt-as-gas-token).
#### Stable Pay & Stable Name: In progress
Stable Pay is a Web2.5 UX wallet experience designed to simplify onboarding for new users while remaining compatible with existing Web3 wallets. Stable Name is a user-friendly aliasing system that replaces raw EVM addresses with human-readable identifiers for sending and receiving tokens.
### Phase 2: Experience layer for USDT
Status: **In development.** State DB optimization ships in the v1.4.0 upgrade. The remaining items are still in development.
#### State DB optimization: Ships in v1.4.0
Stable decouples state commitment from state storage. Validators commit the latest state in memory while historical state is deferred to disk. `MemDB` and `VersionDB` powered by `mmap` handle real-time commitment without blocking on disk I/O. See [Storage (StableDB)](/en/explanation/stable-db).
#### Optimistic parallel execution: Planned
Real-world telemetry shows 60–80% of transactions interact with disjoint state and can safely execute in parallel. Stable will execute transactions optimistically under the no-conflict assumption, with rollback and sequential re-execution on detected conflicts. This preserves correctness while improving throughput.
#### USDT Transfer Aggregator: Planned
Aggregating mechanism that groups USDT0 transfers and processes them collectively, reducing per-transaction overhead and improving overall throughput. See [USDT transfer aggregator](/en/explanation/usdt-transfer-aggregator).
#### Guaranteed blockspace: Planned
Reserved block capacity for enterprise partners, enforced through validator-level reservations and dedicated RPC endpoints. Delivers predictable latency for mission-critical payment flows even under network congestion. See [Guaranteed blockspace](/en/explanation/guaranteed-blockspace).
### Phase 3: Full-stack optimized layer for USDT
Status: **Planned.**
#### StableBFT on Autobahn
DAG-based BFT consensus that integrates naturally with Stable's CometBFT-based consensus layer. See [StableBFT](/en/explanation/consensus) for the current protocol and [Autobahn](/en/explanation/autobahn) for the target architecture. Internal proof-of-concept has demonstrated over 200,000 TPS (consensus only) in controlled environments.
#### StableVM++
High-performance execution engine that replaces the Go-based EVM with a C++ implementation. Projected to deliver up to a 6x improvement in EVM execution speed.
#### High performance RPC
A full RPC stack covering node-level enhancements (real-time chain state processing), node-integrated indexing (low-latency application APIs), scalable pub/sub over WebSocket, and a hybrid load balancer that routes by operation type. See [High performance RPC](/en/explanation/high-performance-rpc) for the current split-path architecture.
### Next recommended
* [**Architecture overview**](/en/explanation/core-optimization-overview) — Walk through the current state of the stack the roadmap evolves.
* [**Tokenomics**](/en/reference/tokenomics) — Review the economic model that funds validator incentives across the roadmap.
* [**Tech overview**](/en/explanation/tech-overview) — Return to the architecture summary.
## Upcoming use cases
Stable is building toward payment patterns that go beyond simple transfers and API billing. The cases below cover time-guaranteed settlement, privacy-preserving payments, and autonomous agent commerce. Some are functional today in early form; others depend on Stable features currently in development.
### Guaranteed settlement
Reliable payment settlement backed by reserved block capacity, ensuring transaction inclusion regardless of network conditions.
#### Concept
Some payments are part of a timed settlement cycle, not a standalone transfer. In these flows, settlement must complete before the cycle closes so the next state transition can proceed as scheduled. If the required payments are delayed past that window, the cycle may fail, roll to the next window, or require manual recovery.
Stable's [Guaranteed Blockspace](/en/explanation/guaranteed-blockspace) addresses this by reserving execution capacity for qualifying payment flows. The goal is not simply faster settlement, but operationally reliable completion within exact timing constraints.
#### Expected scenario
A tokenized asset platform runs scheduled DvP (Delivery versus Payment) settlement every few minutes. Cash legs are submitted as a batch, and securities are released only if the full payment batch is included before the current settlement cycle closes. Under normal conditions, this clears immediately. During burst traffic, partial inclusion would create a failed or rolled settlement cycle. With Guaranteed Settlement, the platform reserves capacity for the payment batch so the cycle can close deterministically.
#### What enables it
Guaranteed blockspace turns on-chain payment into a schedulable operation. Settlement cycles can be designed with hard timing assumptions, batch payments can be committed atomically within a single window, and upstream systems can treat block inclusion as a dependency rather than a hope.
### Confidential payments
Privacy-preserving USDT0 transfers where selected transaction details are shielded from public observers while remaining verifiable by the transacting parties and authorized auditors.
#### Concept
Standard on-chain transfers are fully transparent; anyone can see the sender, recipient, and amount. For business payments, this transparency can expose commercially sensitive information to anyone monitoring the chain.
Stable is developing [Confidential Transfer](/en/explanation/confidential-transfer), a privacy layer using zero-knowledge cryptography that enables selective confidentiality for on-chain transactions. The shielded values are accessible only to the involved parties and authorized regulatory auditors.
#### Expected scenario
A large retailer settles inventory procurement with multiple suppliers on-chain. On a transparent chain, competitors can monitor these transactions to reverse-engineer supplier relationships, order volumes, and wholesale pricing. With confidential transfers, the commercially sensitive details are shielded while the on-chain record still serves as a verifiable settlement receipt for both parties and authorized auditors.
### Agent-to-agent payment
Payments initiated and settled between AI agents autonomously, without human approval or intervention in the transaction loop.
#### Concept
As AI agents take on more operational tasks, they will need to procure services from other agents. In current workflows, this requires a human in the loop to approve each purchase, select a vendor, or verify that the counterparty is trustworthy. Agent-to-agent payment removes that bottleneck by letting agents find, evaluate, and pay for services autonomously within a single transaction loop.
This pattern depends on several emerging protocols working together: agent discovery and trust ([ERC-8004](https://eips.ethereum.org/EIPS/eip-8004)), secure communication ([XMTP](https://xmtp.org)), and a payment rail that can settle in real time ([x402](/en/explanation/x402)).
#### Expected flow
1. **Discover**: the buyer agent queries an ERC-8004 Identity Registry to find agents that offer the required capability (e.g., image generation). The registry returns matching agent identities with associated metadata.
2. **Verify**: the buyer checks the ERC-8004 registries for each candidate. Identity, reputation scores, and validation proofs determine which providers are trustworthy enough to transact with.
3. **Negotiate**: the buyer sends task parameters to the selected provider over XMTP. The two agents agree on price, deadline, and deliverable format through encrypted messaging.
4. **Pay**: the buyer calls the provider's HTTP endpoint. The provider responds with 402. The buyer signs an ERC-3009 authorization and retries with the payment header. The facilitator settles the payment on Stable, and the provider returns the result.
5. **Rate**: after delivery, the buyer posts feedback to the ERC-8004 Reputation Registry, updating the provider's score for future interactions.
#### What enables it
Agent-to-agent payment turns service procurement into a fully programmable loop. Agents can compare providers, switch vendors, and settle payments in real time without human scheduling or approval queues. This makes it possible to build autonomous supply chains where agents continuously source, pay for, and deliver services at machine speed, scaling commerce beyond what manual coordination can support.
### Next recommended
* [**Guaranteed blockspace**](/en/explanation/guaranteed-blockspace) — Review the protocol-level mechanism behind guaranteed settlement.
* [**Confidential transfer**](/en/explanation/confidential-transfer) — See the privacy model Stable is building.
* [**x402**](/en/explanation/x402) — Understand the settlement protocol behind agent-to-agent flows.
## USDT as gas
**You pay fees in USDT0. No second token, no wrapping, no ETH-equivalent to keep topped up.** USDT0 serves as both the native gas token and an ERC-20 token on the same balance. The same asset that moves as payment also pays for the transaction that moves it. Fees are denominated in dollars, not a volatile native token.
This design comes with behavioral differences from Ethereum that affect balance semantics, allowance safety, and certain opcode assumptions. If you're porting a contract from Ethereum, see [USDT0 behavior on Stable](/en/explanation/usdt0-behavior) for the migration checklist before deploying.
### Abstract
Stable is an EVM-compatible blockchain that uses USDT0 as its native gas token. USDT0 simultaneously functions as the native asset for gas payment and value transfer, and as an ERC-20 token supporting `approve`, `transfer`, `transferFrom`, and `permit`.
This document specifies Stable's USDT0 gas mechanism, describes the resulting behavioral differences, and defines required and recommended development patterns for smart contracts deployed on Stable.
### Version note
With Stable v1.2.0, USDT0 becomes the native gas token on Stable, replacing gUSDT. As part of this transition:
* gUSDT is being sunset.
* Existing gUSDT balances are automatically converted to USDT0.
* Users and applications no longer need wrapping and unwrapping flows to pay fees or move value.
After v1.2.0, USDT0 serves as both:
* the network fee asset (gas), and
* a standard ERC20 token with `approve`, `permit`, `transfer`, and `transferFrom`.
### Network addresses
USDT0 token contract addresses:
* Testnet: [0x78cf24370174180738c5b8e352b6d14c83a6c9a9](https://testnet.stablescan.xyz/token/0x78cf24370174180738c5b8e352b6d14c83a6c9a9)
* Mainnet: [0x779ded0c9e1022225f8e0630b35a9b54be713736](https://stablescan.xyz/token/0x779ded0c9e1022225f8e0630b35a9b54be713736)
### Terminology
* **Stable**: An EVM-compatible blockchain where USDT0 is the native gas token.
* **USDT0**: An omnichain version of USDT that functions both as:
* the native asset used for gas and value transfers, and
* an ERC20 token with allowance and permit semantics.
* **Native balance**: The balance returned by `address(x).balance`, denominated in USDT0.
* **Gas fee**: The transaction fee paid in USDT0, calculated under an EIP-1559-style fee market.
### What is USDT0?
USDT0 is an omnichain representation of USDT using LayerZero’s Omnichain Fungible Token (OFT) standard. USDT0 is pegged 1:1 with USDT and is designed to move across multiple blockchains without requiring traditional bridge workflows or wrapped representations.
When transferring USDT0 across chains, the token is locked on some source chains (depending on the chain’s native USDT support) or burned. It is then minted on the destination chain via LayerZero’s cross-chain messaging. This preserves a 1:1 peg while consolidating liquidity into a single interoperable asset rather than fragmented chain-local pools.
For users, this enables faster onboarding, reduced operational complexity, and improved liquidity mobility.
### USDT0 and Stable
USDT0 is the core asset that powers Stable’s onchain economics and day-to-day usage. Because the same asset is used for both paying fees and transferring value, Stable reduces friction for:
* **Everyday users**: Simpler onboarding and fewer token concepts
* **Developers**: Simpler fee and value flows
* **Enterprises**: Simplified accounting and treasury operations
Stable can also access deep USDT liquidity from day one by enabling users to onboard USDT0 from other networks via LayerZero.
### Assumptions and prerequisites
For the content below, you are expected to understand:
* Solidity execution semantics and native value transfers
* ERC20 allowance mechanics and permit flows
* Standard smart contract security patterns, including Checks-Effects-Interactions
### 1. Gas and fee model
#### 1.1 Overview
Stable denominates all transaction fees in USDT0. Gas pricing follows an EIP-1559-style model with a dynamically adjusting base fee.
The transaction fee is defined as:
```
fee = gasUsed × baseFee
```
Transactions may specify `maxFeePerGas` using standard EIP-1559 parameters.
*Note: Stable does not support priority tips. Do not set `maxPriorityFeePerGas`, or the tip amount will be lost.*
#### 1.2 Transaction submission
Clients should fetch the latest base fee from the most recent block and include a safety margin when computing `maxFeePerGas`.
Example (illustrative):
```javascript
const block = await provider.getBlock("latest");
const baseFee = block.baseFeePerGas;
const maxPriorityFeePerGas = 1n;
const maxFeePerGas = baseFee * 2n + maxPriorityFeePerGas;
```
#### 1.3 Acquiring USDT0
Accounts obtain USDT0 by:
* Bridging USDT0 from other supported chains
* Receiving transfers from other accounts on Stable
### 2. How Stable enables USDT0 as the gas token
Stable charges gas in USDT0 using a pre-charge and refund settlement model.
#### Example transaction
Alice sends 100 USDT0 to Bob.
#### 2.1 Ante-handler phase
During transaction validation in `MonoEVMAnteHandler`:
1. Alice’s USDT0 balance is read.
2. The protocol verifies Alice can cover:
* the transaction value (100 USDT0), and
* the maximum possible gas fee (`gasWanted × fee`).
3. The maximum gas fee is transferred upfront:
* `alice → fee_collector` in USDT0.
#### 2.2 Execution phase
During `ApplyTransaction`:
1. The EVM executes the transaction.
2. Actual gas consumption is recorded.
3. The value transfer is applied:
* `alice → bob` transfers 100 USDT0.
#### 2.3 Settlement phase
After execution:
1. The protocol computes the unused portion of the pre-charged fee:
```
refund = (gasWanted − gasUsed) × baseFee
```
2. The unused fee is refunded:
* `fee_collector → alice` in USDT0.
### 3. Balance semantics and behavioral differences
#### 3.1 Native balance mutability
On Ethereum, a contract’s native balance typically changes only as a result of contract execution.
On Stable, a contract’s native USDT0 balance may also change due to ERC20 allowance-based operations, including `transferFrom` and `permit`. These operations can reduce a contract’s native balance without invoking any contract code.
As a result, the following assumption is invalid on Stable:
* A contract’s native balance can only decrease if the contract is called.
### 4. Contract design requirements
#### 4.1 Prohibited pattern: mirrored balance accounting
Contracts must not rely on internal variables to mirror native balance.
Example of an unsafe pattern:
```solidity
uint256 public deposited;
function deposit() external payable {
deposited += msg.value;
}
```
Such variables can diverge from the actual native balance if USDT0 is drained through allowance-based transfers.
#### 4.2 Required pattern: real-balance solvency checks
All native value transfers must verify solvency using `address(this).balance` immediately before transfer.
Example:
```solidity
require(address(this).balance >= amount, "insufficient balance");
```
Withdrawals must follow Checks-Effects-Interactions ordering:
```solidity
uint256 amount = credit[msg.sender];
credit[msg.sender] = 0;
require(address(this).balance >= amount);
payable(msg.sender).call{value: amount}("");
```
#### 4.3 State progression must be balance-independent
Protocol logic that depends on progression, milestones, or completion conditions must track these explicitly using non-balance state variables, such as counters or epochs.
Native balances must be used only for solvency verification at the moment of payout.
#### 4.4 Allowance exposure
Contracts that custody user funds should not grant USDT0 allowances to external addresses.
If allowances are unavoidable, contracts should:
* Approve only exact amounts
* Reset allowances immediately after use
* Treat residual drain risk as a known limitation
### 5. Address state assumptions
#### 5.1 EXTCODEHASH
Contracts must not rely on `EXTCODEHASH(addr) == 0x0` to infer that an address has never been used.
Any notion of address usage must be tracked explicitly within contract state.
Example:
```solidity
mapping(address => bool) public used;
```
### 6. Zero address handling
On Stable:
* Native USDT0 transfers to `address(0)` revert.
* ERC20 USDT0 transfers to `address(0)` also revert.
There is no supported mechanism for burning USDT0 by transferring to the zero address.
Contracts must:
* Explicitly reject `address(0)` as a recipient
* Redesign any logic that assumes zero-address burns
* Use explicit sink contracts if irreversible loss semantics are required
### 7. Testing requirements
Test suites for Stable deployments should include:
* Allowance-based drain scenarios (`approve` + `transferFrom`)
* Solvency enforcement using real native balance
* Address usage logic without reliance on `EXTCODEHASH`
* Explicit failure cases for zero-address transfers
### 8. Migration checklist
When porting contracts from Ethereum to Stable:
* Remove internal native balance mirrors
* Replace all solvency checks with `address(this).balance`
* Remove all native or ERC20 transfers to `address(0)`
* Audit all USDT0 approvals
* Add tests covering permit and allowance-based flows
### 9. Summary
Stable’s use of USDT0 as a gas token provides predictable fees and unified value accounting while changing core assumptions about native balance behavior.
Correct contract design on Stable requires:
* Treating USDT0 as a dual-role asset
* Enforcing solvency against real balances
* Avoiding allowance-based drain paths
* Eliminating reliance on Ethereum-specific balance and address assumptions
### FAQ
**We’re using USDT0 as the wrapped native token today. After this upgrade, which token should be treated as the wrapped native?**
USDT0 becomes both the native token and an ERC-20 token after the upgrade. You should use USDT0 directly, and wrapping or unwrapping is no longer required.
**What happens to the original USDT0 contract address (`0x779Ded0c9e1022225f8E0630b35a9b54bE713736`)?**
Nothing changes. The same address remains valid and continues to represent USDT0.
**After the upgrade, is the native token address `0x779Ded0c9e1022225f8E0630b35a9b54bE713736` (instead of `0x0000000000000000000000000000000000001000`)?**
Yes. After the upgrade, the native token identifier/address is `0x779Ded0c9e1022225f8E0630b35a9b54bE713736`.
**What about `0x0000000000000000000000000000000000001000`? Is it still used as the token address for gUSDT, and should we keep it on our side?**
No. You can remove it. It will not be used after the upgrade.
**For DEX calldata, will protocols stop using `0x0000000000000000000000000000000000001000` as the “native token” identifier and use `0x779Ded0c9e1022225f8E0630b35a9b54bE713736` instead?**
Correct. After the upgrade, DEXs should use `0x779Ded0c9e1022225f8E0630b35a9b54bE713736` as the native token identifier.
### Next recommended
* [**Send your first USDT0**](/en/tutorial/send-usdt0) — Submit a USDT0 transfer on testnet using standard EVM tooling.
* [**Gas pricing**](/en/reference/gas-pricing-api) — Build transactions against Stable's single-component fee model.
* [**USDT0 behavior on Stable**](/en/explanation/usdt0-behavior) — Audit contracts for dual-role asset semantics, balance reconciliation, and `EXTCODEHASH` behavior.
## Overview
Stable's USDT-specific features aren't a menu of independent options. They compose. Each one removes a specific friction that shows up when stablecoin payments move from demos to production. This page explains why the five features exist together.
### The friction stack
Most stablecoin payment architecture on general-purpose chains runs into the same stack of problems:
1. **Users have to hold a second token** (ETH, SOL) to pay gas for a transaction that moves stablecoins. An onboarding step that bleeds conversion.
2. **Even with a second token, the user has to cover gas.** This breaks the "send a dollar for a dollar" mental model that merchants and payment apps need.
3. **Transaction costs fluctuate** with network activity. Payroll, treasury ops, and batch settlements can't plan cost or inclusion.
4. **Per-transaction limits cap throughput.** High-volume USDT flows hit chain-wide contention and degrade alongside unrelated activity.
5. **Every transaction is publicly observable.** Supplier payments, salary runs, and treasury moves leak commercially sensitive data.
### How the features compose
Stable addresses each friction with a dedicated mechanism:
| Friction | Mechanism | Page |
| :-------------------------- | :-------------------------------------------- | :------------------------------------------------------------------- |
| Separate gas token | USDT0 is the native gas token | [USDT as gas](/en/explanation/usdt-as-gas-token) |
| User pays gas at all | Governance-authorized waivers cover gas | [Gas waiver](/en/explanation/gas-waiver) |
| Cost and inclusion variance | Reserved block capacity for enrolled partners | [Guaranteed blockspace](/en/explanation/guaranteed-blockspace) |
| Throughput ceiling | Parallelized USDT0 transfer batching | [USDT transfer aggregator](/en/explanation/usdt-transfer-aggregator) |
| Public amount visibility | Selective privacy via ZK cryptography | [Confidential transfer](/en/explanation/confidential-transfer) |
Any one of these helps. Taken together, they make Stable a chain where a payments team can model cost, latency, and privacy the same way they would on a traditional card network, with the settlement finality of a blockchain.
For the full set of Stable's differences from a general-purpose EVM chain, see [Ethereum comparison](/en/explanation/ethereum-comparison). For a worked example of USDT moving end-to-end through these features, see [Flow of funds](/en/explanation/flow-of-funds).
### Next recommended
* [**USDT as gas**](/en/explanation/usdt-as-gas-token) — Understand the asset that replaces ETH for gas and payment at once.
* [**Flow of funds**](/en/explanation/flow-of-funds) — Trace USDT from on-ramp through on-chain transfer to off-ramp settlement.
* [**Bridging to Stable**](/en/explanation/usdt0-bridging) — See how USDT0 moves onto Stable from other chains.
## USDT transfer aggregator
The **USDT Transfer Aggregator** bundles USDT0 transfers into parallelized, fault-tolerant batches instead of processing each transfer sequentially. It isolates USDT0 throughput from the rest of the execution pipeline so high-volume stablecoin activity doesn't crowd out other transactions.
:::note
**Planned.** The aggregator is a forward-looking roadmap item. The content below describes the target design. See [Roadmap](/en/explanation/technical-roadmap) for timing.
:::
### Why it exists
Two constraints pull against each other:
* Traditional ERC-20 transfers are processed sequentially. Under high load, that's a bottleneck.
* Simply giving USDT0 priority would crowd out other transactions and degrade general chain performance.
The aggregator resolves this by pulling USDT0 transfers into a dedicated parallel pipeline, leaving the main execution path untouched for everything else.
### Parallel aggregation and verification
At the heart of the transfer aggregation system is a parallelizable aggregation and verification pipeline, inspired by the `MapReduce` computational model. Instead of processing each transfer in order, the system performs bundle-level computation, aggregating inputs and outputs across accounts before executing balance updates.
#### Key steps
1. **Aggregate Account Diffs**
* Each transfer is mapped to a sender and recipient.
* A diff journal is generated for each account representing the net token movement:
* Negative values for total debits (send).
* Positive values for total credits (receive).
2. **Balance Verification**
* The system ensures global balance invariants: total input equals total output.
* Each account's net change is verified independently in parallel to confirm sufficient funds.
* Accounts without sufficient balance are flagged without halting the bundle.
3. **MapReduce Model for Parallelism**
* **Map Phase**: Compute the net delta for each account based on all incoming/outgoing transfers.
* **Reduce Phase**: Aggregate these deltas to determine the final state update.
### Technical highlights
#### Parallel computation model
* Leverages parallelism in precompiled contracts to check balances and compute diffs concurrently.
* Greatly reduces execution time compared to traditional, sequential ERC20 processing.
#### Dependency analysis
* Identifies overlapping transfers (e.g., multiple sends from the same account).
* Pre-flags high-risk transfers (e.g., likely insufficient funds) to minimize cascading failures.
#### Modular failure handling
* Transfers are isolated at the account level, so only problematic accounts are affected.
* Non-conflicting transfers execute and finalize normally.
#### Selective failure handling
Traditional transfer handling is all-or-nothing within a block. Stable’s aggregation model introduces granular, per-account failure isolation:
* If an account’s `current balance + net diff < 0`, the system marks only that account’s transfers as failed.
* Transfers involving other accounts proceed as normal.
* This selective rollback mechanism ensures that invalid or malicious transfers do not compromise the integrity of an entire bundle.
### Proposer-driven or reputation-based sorting
To further optimize execution and avoid state conflicts, Stable incorporates pre-processing ordering mechanisms for aggregated transfers:
* **Reputation-Based Sorting**: Senders with strong histories or proven reliability are prioritized, reducing risk of failures and reordering.
* **Proposer-Based Ordering**: Transactions may be sorted by a trusted proposer node that structures the bundle to minimize conflicts and maximize throughput.
* **Bundled Transfer Prioritization**: Aggregated USDT transfers are prioritized before general transactions, reducing dependency collisions and unlocking cleaner execution windows.
Stable's USDT Transfer Aggregator is a targeted optimization that maximizes throughput for USDT0 transfers without degrading general transaction processing. By combining parallel execution, modular failure handling, and smart ordering strategies, Stable offers a scalable foundation for stablecoin-driven economies. Fast, frequent, and frictionless token transfers are the norm.
### Next recommended
* [**Payments use cases**](/en/explanation/payment-use-cases-overview) — See the payment patterns that benefit most from aggregated throughput: P2P, subscriptions, pay-per-call.
* [**Execution**](/en/explanation/execution) — See the parallel execution engine the aggregator builds on.
* [**USDT as gas**](/en/explanation/usdt-as-gas-token) — Understand the asset model the aggregator moves.
## USDT0 behavior on Stable
**If you're porting a contract from Ethereum, read this page before deploying.** USDT0 on Stable is both the native gas token and an ERC-20 token on the same balance. Four Ethereum-assumed behaviors break as a result: a contract's native balance can change without a call into the contract, `EXTCODEHASH` can oscillate between zero and empty hash, zero-address transfers revert, and a single logical transfer can emit multiple `Transfer` events from fractional-balance reconciliation.
This page walks through each case and gives safe contract patterns. If you only read one section, read the [Migration checklist](#migration-checklist). It's the port-your-Ethereum-contract-here summary.
### Dual-role overview
USDT0 on Stable is both the native gas token and an ERC-20 token. This dual-role model affects balance behavior, contract design, and event handling. The sections below walk through every case where the dual role changes expected behavior.
For background on why USDT0 operates this way, see [USDT as gas](/en/explanation/usdt-as-gas-token). To experience the behavior through real transfers, see [Send your first USDT0](/en/tutorial/send-usdt0).
### Balance reconciliation
USDT0 uses 18 decimals as the native asset and 6 decimals as an ERC-20 token. Native transfers and ERC-20 transfers operate on the same underlying balance, but the 12-digit precision gap means the system must reconcile fractional amounts when a transfer involves sub-integer precision.
```
before
0.000001 USDT0 (ERC-20) + 0.000000000000000000 USDT0 (internal)
// address(account).balance = 0.000001000000000000
// USDT0.balanceOf(account) = 0.000001
if transfer 0.0000001 USDT0 to another account
after
0.000000 USDT0 (ERC-20) + 0.000000900000000000 USDT0 (internal)
// address(account).balance = 0.000000900000000000
// USDT0.balanceOf(account) = 0.000000
```
This can cause `address(account).balance` and `USDT0.balanceOf(account)` to differ by up to 0.000001 USDT0.
### Event handling
Each reconciliation transfer emits an additional `Transfer` event. A single logical USDT0 transfer can produce up to two extra `Transfer` events depending on how the sender's and receiver's fractional balances are affected:
* **Sender adjustment**: If the sender's fractional balance is insufficient, 0.000001 USDT0 is moved from the sender to the reserve address. This emits an extra `Transfer` event.
* **Receiver adjustment**: If the receiver's fractional balance overflows, 0.000001 USDT0 is moved from the reserve address to the receiver. This emits an extra `Transfer` event.
* **Both adjustments**: If both conditions occur in the same transfer, the reserve is bypassed. The sender transfers 0.000001 USDT0 directly to the receiver as part of the main transfer. No extra event is emitted.
These auxiliary events involve the reserve address `0x6D11e1A6BdCC974ebE1cA73CC2c1Ea3fDE624370`. Indexers and off-chain services that track USDT0 balances by replaying `Transfer` events must filter or account for transfers to and from this address.
### Contract design requirements
#### Native balance mutability
On Ethereum, a contract's native balance typically changes only as a result of contract execution. On Stable, a contract's native USDT0 balance may also change due to ERC-20 allowance-based operations, including `transferFrom` and `permit`. These operations can reduce a contract's native balance without invoking any contract code.
As a result, the following assumption is invalid on Stable:
> A contract's native balance can only decrease if the contract is called.
#### Do not mirror native balance
On Ethereum, it is common to track deposits with an internal variable. On Stable, this is unsafe because ERC-20 `transferFrom` can drain the native balance externally.
```solidity
// UNSAFE on Stable
uint256 public deposited;
function deposit() external payable {
deposited += msg.value;
}
```
#### Always check real balance before transfers
All native value transfers must verify solvency using `address(this).balance` just before transfer, not internal accounting variables:
```solidity
// SAFE
function withdraw() external {
uint256 amount = credit[msg.sender];
credit[msg.sender] = 0;
require(address(this).balance >= amount, "insufficient balance");
payable(msg.sender).call{value: amount}("");
}
```
#### State progression must be balance-independent
Protocol logic that depends on progression, milestones, or completion conditions must track these explicitly using non-balance state variables, such as counters or epochs. Native balances should be used only for solvency verification at the moment of payout.
#### No zero-address transfers
On Stable, both native and ERC-20 transfers to `address(0)` revert.
```solidity
// REVERT on Stable
payable(address(0)).call{value: amount}("")
USDT0.transfer(address(0), amount);
```
Any contract logic that sends native USDT0 should validate the recipient and explicitly reject `address(0)` before the transfer call:
```solidity
// SAFE
require(recipient != address(0), "zero address recipient");
payable(recipient).call{value: amount}("");
```
If a contract uses zero-address transfers as a burn mechanism, it must be redesigned. Use explicit sink contracts if irreversible loss semantics are required.
#### EXTCODEHASH behavior
On Ethereum, the `EXTCODEHASH` opcode returns:
* **Zero hash** (`0x0000...`): if an address has never been used (nonce=0, balance=0, no code).
* **Empty hash** (`0xc5d2…a470`, the Keccak-256 hash of empty code): if an address exists but has no code.
On Ethereum, once an address transitions from zero hash to empty hash, it cannot return to zero hash. On Stable, because USDT0 supports `permit()`-based approvals, an address can create approvals without sending a transaction. Combined with `transferFrom()`, this allows native balance changes without nonce increment, potentially allowing `EXTCODEHASH` to oscillate between zero hash and empty hash.
```solidity
// UNSAFE on Stable
function isUnusedAddress(address addr) public view returns (bool) {
bytes32 codeHash;
assembly {
codeHash := extcodehash(addr)
}
return codeHash == bytes32(0);
}
```
Use explicit tracking instead:
```solidity
// SAFE
contract SafeAddressTracker {
mapping(address => bool) public hasBeenUsed;
function markAsUsed(address addr) internal {
hasBeenUsed[addr] = true;
}
function isUnused(address addr) public view returns (bool) {
return !hasBeenUsed[addr];
}
}
```
### Testing requirements
Test suites for Stable deployments should include:
* Allowance-based drain scenarios (`approve` + `transferFrom`)
* Solvency enforcement using real native balance
* Address usage logic without reliance on `EXTCODEHASH`
* Explicit failure cases for zero-address transfers
### Migration checklist
When porting contracts from Ethereum to Stable:
* Remove internal native balance mirrors
* Replace all solvency checks with `address(this).balance`
* Remove all native or ERC-20 transfers to `address(0)`
* Audit all USDT0 approvals
* Add tests covering `permit` and allowance-based flows
* Verify off-chain indexers handle auxiliary `Transfer` events from fractional balance reconciliation
### Key takeaways
Correct contract design on Stable requires:
* Treating USDT0 as a dual-role asset
* Enforcing solvency against real balances
* Avoiding allowance-based drain paths
* Eliminating reliance on Ethereum-specific balance and address assumptions
Off-chain services and indexers should:
* Account for auxiliary `Transfer` events from fractional balance reconciliation
* Use direct balance queries instead of event-based balance reconstruction
### Next recommended
* [**USDT as gas**](/en/explanation/usdt-as-gas-token) — Understand why USDT0 operates as both the native asset and an ERC-20 token.
* [**Send your first USDT0**](/en/tutorial/send-usdt0) — Submit a USDT0 transfer on testnet via native and ERC-20 paths.
* [**Ethereum comparison**](/en/explanation/ethereum-comparison) — Review every behavior difference when porting from Ethereum.
## Bridging to Stable
USDT reaches Stable via one of two bridge paths, depending on what form it takes on the source chain. Both paths deliver USDT0 into the user's wallet on Stable.
:::note
**Two paths, one outcome:**
* **OFT Mesh**: source chain already has USDT0. Burn on source, mint on Stable. 1:1 across chains. Examples: Arbitrum, Ethereum, Optimism, Polygon, Unichain, Ink, Bera, Mantle, Hyperliquid, MegaETH (21 chains total).
* **Legacy Mesh**: source chain has native USDT only. Routes through Arbitrum as hub. 0.03% fee on the transferred amount. Examples: Tron, TON.
:::
The sections below describe each path in detail.
### USDT0 OFT Mesh vs Legacy Mesh
Stable participates in two complementary cross-chain transfer networks.
#### OFT Mesh
Any chain that supports USDT0 can participate in the OFT Mesh. Within the OFT Mesh, USDT0 cross-chain transfers maintain a 1:1 value ratio. When a transfer occurs, the USDT0 tokens on the source chain are burned and an equivalent amount is minted on the destination chain. Current OFT Mesh participants include Arbitrum, Bera, Conflux, Ethereum, Flare, Hedera, Hyperliquid, Ink, Mantle, MegaETH, Monad, Morph, MP1, Optimism, Plasma, Polygon, Rootstock, Sei, Stable, Tempo, Unichain, and X Layer.
#### Legacy Mesh
Any chain with native USDT (rather than USDT0) can route through the Legacy Mesh. The Legacy Mesh follows a hub-and-spoke architecture with Arbitrum serving as the central hub for USDT0. This model leverages a USDT0 liquidity pool on Arbitrum. The USDT0 team charges a 0.03% fee on the transferred amount. Current Legacy Mesh participants include Tron and TON.
Ethereum and Arbitrum participate in both meshes: users on these chains can bridge via the OFT path (burn/mint USDT0) or the Legacy path (lock native USDT through the Arbitrum hub).
***
### Path 1: Bridging USDT0 to Stable (OFT-supported chains)
This path applies when the user already holds USDT0 on an OFT-supported source chain such as Arbitrum or Ink.
#### Actors
| Name | On-chain? | Responsible party |
| --------------------- | --------- | --------------------------- |
| User | N/A | User |
| USDT0 OUpgradable | ✅ | Smart contract by USDT0 |
| LayerZero Endpoint V2 | ✅ | Smart contract by LayerZero |
| MessageLib Registry | ✅ | Smart contract by LayerZero |
| Executor | ❌ | LayerZero Labs |
| USDT0 DVN | ❌ | USDT0 |
| Canary DVN | ❌ | Canary |
| LayerZero DVN | ❌ | LayerZero Labs |
#### Flow diagram
 #### Detailed steps
##### 1. Initiate transfer (on-chain, source chain)
The user calls the `lzSend` method on the **USDT0 OUpgradable** contract on the source chain. The transaction includes the message payload, destination LayerZero endpoint and contract address, and configuration parameters such as gas limits and fees.
##### 2. Packet creation (on-chain, source chain)
The source LayerZero Endpoint packages the OApp's message, encodes it using the designated source MessageLib contract, and emits it to the Security Stack (DVNs) and Executor, completing the send transaction.
##### 3. Message verification (off-chain, DVNs)
Decentralized Verifier Networks (DVNs) independently verify the message before the destination contract will execute it. Only DVNs authorized by the OApp can perform verification. USDT0 bridging requires three DVNs to sign every message: LayerZero Labs, Canary, and USDT0. For the canonical configuration on any pathway, see [USDT0's OApp on LayerZeroScan](https://layerzeroscan.com/).
##### 4. Mark as verifiable (on-chain, Stable)
Once all required DVNs verify the message, the destination MessageLib contract marks it as verifiable.
##### 5. Verification commitment (off-chain, Executor)
The Executor commits the verified message to the destination LayerZero Endpoint, preparing it for execution.
##### 6. Packet validation (on-chain, Stable)
The destination LayerZero Endpoint confirms that the Executor-delivered packet matches the one verified by the DVNs.
##### 7. Message execution (off-chain, Executor)
The Executor invokes `lzReceive` on the destination chain, triggering message processing by the USDT0 OUpgradable contract on Stable.
##### 8. Completion (on-chain, Stable)
The USDT0 OUpgradable contract on Stable processes the verified message, completing the cross-chain transfer. USDT0 is minted to the user's address.
***
### Path 2: Bridging native USDT to Stable (Legacy Mesh)
This path applies when the user holds native USDT on a Legacy Mesh chain such as Tron. The transfer routes through Arbitrum as an intermediary hub before arriving on Stable.
#### Actors
| Name | On-chain? | Responsible party |
| -------------------------- | --------- | --------------------------- |
| User | N/A | User |
| USDT Pool | ✅ | Smart contract by USDT0 |
| USDT0 Pool | ✅ | Smart contract by USDT0 |
| MultiHopComposer | ✅ | Smart contract by LayerZero |
| USDT0 OUpgradable | ✅ | Smart contract by USDT0 |
| LayerZero Endpoint | ✅ | Smart contract by LayerZero |
| MessageLib Registry | ✅ | Smart contract by LayerZero |
| USDT0 Legacy Mesh Operator | ❌ | USDT0 |
| Executor | ❌ | LayerZero Labs |
| USDT0 DVN | ❌ | USDT0 |
| Canary DVN | ❌ | Canary |
| LayerZero DVN | ❌ | LayerZero Labs |
#### Flow diagram
#### Detailed steps
##### 1. Initiate transfer (on-chain, source chain)
The user calls the `lzSend` method on the **USDT0 OUpgradable** contract on the source chain. The transaction includes the message payload, destination LayerZero endpoint and contract address, and configuration parameters such as gas limits and fees.
##### 2. Packet creation (on-chain, source chain)
The source LayerZero Endpoint packages the OApp's message, encodes it using the designated source MessageLib contract, and emits it to the Security Stack (DVNs) and Executor, completing the send transaction.
##### 3. Message verification (off-chain, DVNs)
Decentralized Verifier Networks (DVNs) independently verify the message before the destination contract will execute it. Only DVNs authorized by the OApp can perform verification. USDT0 bridging requires three DVNs to sign every message: LayerZero Labs, Canary, and USDT0. For the canonical configuration on any pathway, see [USDT0's OApp on LayerZeroScan](https://layerzeroscan.com/).
##### 4. Mark as verifiable (on-chain, Stable)
Once all required DVNs verify the message, the destination MessageLib contract marks it as verifiable.
##### 5. Verification commitment (off-chain, Executor)
The Executor commits the verified message to the destination LayerZero Endpoint, preparing it for execution.
##### 6. Packet validation (on-chain, Stable)
The destination LayerZero Endpoint confirms that the Executor-delivered packet matches the one verified by the DVNs.
##### 7. Message execution (off-chain, Executor)
The Executor invokes `lzReceive` on the destination chain, triggering message processing by the USDT0 OUpgradable contract on Stable.
##### 8. Completion (on-chain, Stable)
The USDT0 OUpgradable contract on Stable processes the verified message, completing the cross-chain transfer. USDT0 is minted to the user's address.
***
### Path 2: Bridging native USDT to Stable (Legacy Mesh)
This path applies when the user holds native USDT on a Legacy Mesh chain such as Tron. The transfer routes through Arbitrum as an intermediary hub before arriving on Stable.
#### Actors
| Name | On-chain? | Responsible party |
| -------------------------- | --------- | --------------------------- |
| User | N/A | User |
| USDT Pool | ✅ | Smart contract by USDT0 |
| USDT0 Pool | ✅ | Smart contract by USDT0 |
| MultiHopComposer | ✅ | Smart contract by LayerZero |
| USDT0 OUpgradable | ✅ | Smart contract by USDT0 |
| LayerZero Endpoint | ✅ | Smart contract by LayerZero |
| MessageLib Registry | ✅ | Smart contract by LayerZero |
| USDT0 Legacy Mesh Operator | ❌ | USDT0 |
| Executor | ❌ | LayerZero Labs |
| USDT0 DVN | ❌ | USDT0 |
| Canary DVN | ❌ | Canary |
| LayerZero DVN | ❌ | LayerZero Labs |
#### Flow diagram
 #### Detailed steps
##### 1. Initiate transfer (on-chain, Tron)
The user initiates the bridge transaction and sends native USDT to the **USDT Pool** contract on Tron. The USDT is locked in the pool. The USDT Pool contract then sends a message to the LayerZero Endpoint contract on Tron.
##### 2. Send message to the Legacy Mesh (off-chain)
The LayerZero Endpoint contract emits the message to the **USDT0 Legacy Mesh Operator**, which verifies the message.
##### 3. Initiate MultiHop transfer (on-chain, Arbitrum)
The USDT0 Legacy Mesh Operator calls the `lzCompose()` method on the LayerZero **MultiHopComposer** contract on Arbitrum. Without additional user interaction, the MultiHopComposer contract carries out the USDT0 mint-and-burn bridge transfer from Arbitrum to Stable.
:::note
The MultiHopComposer contract is completely permissionless and has no `owner()` to ensure immutability.
:::
##### 4. Transfer USDT0 to Stable (on-chain and off-chain)
The remaining steps follow the exact same path as [bridging USDT0 to Stable](#path-1--bridging-usdt0-to-stable-oft-supported-chains) (steps 1–8 above). The USDT0 OUpgradable contract on Arbitrum sends via LayerZero, DVNs verify, and USDT0 is minted on Stable.
#### Things to note
* USDT0 liquidity on Arbitrum is managed by the USDT0 team.
* The Legacy Mesh incurs a 0.03% fee on the transferred amount.
* The user does not need to interact with Arbitrum directly; the MultiHop flow is automatic.
### Next recommended
* [**Flow of funds**](/en/explanation/flow-of-funds) — See the end-to-end lifecycle of USDT from on-ramp through settlement.
* [**Bridge tutorial**](/en/tutorial/bridge-usdt0) — Bridge Test USDT from Sepolia to Stable testnet using the LayerZero OFT Adapter.
* [**USDT as gas**](/en/explanation/usdt-as-gas-token) — Understand what the asset does once it lands on Stable.
## Payments & transfers
P2P payments and merchant settlement built around one asset that moves the money and pays for the transaction.
### The problem
On general-purpose chains, users must hold a separate gas token (ETH, SOL) just to move stablecoins. That breaks the "send a dollar, receive a dollar" mental model and bleeds conversion at onboarding, where a payer who only has USDT can't even submit the transfer.
### How Stable addresses it
* **USDT0 is both the gas token and the payment asset.** A user only ever needs one asset to send or receive. See [USDT as gas](/en/explanation/usdt-as-gas-token).
* **Gas waiver lets applications cover gas on behalf of users**, enabling a zero-fee UX without the user touching a second token. See [Gas waiver](/en/explanation/gas-waiver).
* **Single-slot finality means settlement is immediate.** Once a transfer is in a block, it's final. See [Ethereum comparison](/en/explanation/ethereum-comparison).
### Next recommended
* [**USDT as gas**](/en/explanation/usdt-as-gas-token) — Understand the asset that replaces ETH for gas and payment at once.
* [**Gas waiver**](/en/explanation/gas-waiver) — See how applications cover user gas through governance-approved waiver addresses.
* [**Ethereum comparison**](/en/explanation/ethereum-comparison) — Review what changes (finality, gas token, priority tips) when moving from Ethereum.
## Payroll & mass payouts
Paying employees, contractors, and suppliers at scale, with predictable throughput, predictable cost, and privacy for sensitive amounts.
### The problem
High-volume stablecoin disbursements hit per-transaction throughput limits on shared chains. Costs fluctuate with network congestion, so a payroll run that cleared cheaply yesterday can spike today. On top of that, salary and supplier amounts are publicly visible to anyone watching the chain, which leaks commercially sensitive data.
### How Stable addresses it
* **The USDT transfer aggregator batches high-volume transfers into parallelized settlement bundles**, so a single run isn't bottlenecked by per-transaction overhead. See [USDT transfer aggregator](/en/explanation/usdt-transfer-aggregator).
* **Guaranteed blockspace gives enrolled partners reserved capacity in every block**, so inclusion and cost stay predictable regardless of what else the network is doing. See [Guaranteed blockspace](/en/explanation/guaranteed-blockspace).
* **Confidential transfer shields amounts using zero-knowledge cryptography**, so payroll and supplier runs don't publish sensitive numbers on-chain. See [Confidential transfer](/en/explanation/confidential-transfer).
### Next recommended
* [**USDT transfer aggregator**](/en/explanation/usdt-transfer-aggregator) — Understand how high-volume USDT0 transfers batch into parallelized settlement bundles.
* [**Guaranteed blockspace**](/en/explanation/guaranteed-blockspace) — See how enrolled partners secure reserved capacity in every block.
* [**Confidential transfer**](/en/explanation/confidential-transfer) — Review how ZK cryptography shields transfer amounts while keeping parties auditable.
## Private transfers
Treasury operations, supplier payments, and salary runs where the amount is commercially sensitive and shouldn't be published to the world.
### The problem
All standard EVM transfers are publicly observable. A payroll run or supplier settlement leaks business-critical data on-chain: who paid whom, how much, and how often. Competitors, counterparties, and anyone scraping the network can reconstruct payroll bands, vendor pricing, and treasury moves without asking.
### How Stable addresses it
* **Confidential transfer uses zero-knowledge cryptography to shield transfer amounts** while keeping the parties auditable for compliance, so sensitive numbers stay private without sacrificing the audit trail. See [Confidential transfer](/en/explanation/confidential-transfer).
* **Flow of funds shows where confidential transfer sits** in the full USDT lifecycle from on-ramp to off-ramp. See [Flow of funds](/en/explanation/flow-of-funds).
### Next recommended
* [**Confidential transfer**](/en/explanation/confidential-transfer) — Review how ZK cryptography shields transfer amounts while keeping parties auditable.
* [**Flow of funds**](/en/explanation/flow-of-funds) — Trace USDT from on-ramp through on-chain transfer to off-ramp settlement.
## Sponsored and gasless experiences
Apps that want to remove gas from the user experience entirely, so a first-time user can sign in and transact without acquiring a second asset first.
### The problem
Requiring users to acquire a gas token before using an app creates an onboarding cliff that kills conversion for consumer-facing products. A new user who shows up with only USDT (or nothing at all) can't submit a transaction, and pushing them to a separate exchange to buy gas is where most of them drop off.
### How Stable addresses it
* **Gas waiver: governance-approved waiver addresses submit wrapper transactions that execute at zero gas price on the user's behalf**, so the app covers gas end-to-end and the user sees a free action. See [Gas waiver](/en/explanation/gas-waiver).
* **EIP-7702 session keys let a dApp hold scoped, time-limited permissions**, so it can submit transactions on the user's behalf without the user signing each one. See [EIP-7702](/en/explanation/eip-7702).
### Next recommended
* [**Gas waiver**](/en/explanation/gas-waiver) — See how governance-approved waivers submit wrapper transactions at zero gas price.
* [**EIP-7702**](/en/explanation/eip-7702) — Understand how EOAs can delegate scoped, time-limited permissions to a dApp.
## Monetize HTTP endpoints
x402 is a payment protocol built on HTTP. A server responds with `402 Payment Required` and payment details, a client signs an [ERC-3009](/en/explanation/erc-3009) authorization, and a facilitator settles it on-chain. The entire exchange happens over standard HTTP headers. The client only needs a wallet: no sign-up, no API keys, no card registration.
This applies to any scenario where a client pays a server for a resource or service: API access, digital content, merchant checkout, or agent-to-agent payments.
### x402 and MPP
x402 is the original HTTP-402 payment protocol. The [Machine Payments Protocol (MPP)](/en/explanation/mpp) is a broader, IETF-track successor that adds payment intents (sessions, subscriptions), multi-rail support (cards, Lightning), and production features (body-digest binding, idempotency). MPP clients are backward compatible: they can call x402 servers without changes.
On Stable today, the most direct path is x402 via Semantic Pay or Heurist. To use MPP's wire format on the same USDT0 rail, see [Build an MPP endpoint on Stable](/en/how-to/build-mpp-endpoint).
### What problem does it solve?
Paying for a service on the internet today requires user intervention at every step: sign up for an account, sign in, register a payment method. This model does not scale to:
* Services too small to justify the infrastructure cost
* Transactions too cheap for card network fees
* Autonomous agents (AI, bots, IoT devices) that cannot perform sign-up flows
With x402, a client only needs a wallet to pay.
| **Aspect** | **Traditional billing** | **With x402** |
| :-------------------- | :------------------------------ | :--------------------- |
| Account required | Yes | No |
| API key required | Yes | No |
| Minimum viable price | \~$0.30 (card processing floor) | \~$0.001 (on-chain) |
| Settlement time | Days (card networks) | Sub-second (on Stable) |
| PCI compliance needed | Yes | No |
### How it works
#### The three roles
**Client** is whoever needs the resource: a web app, a backend service, a CLI tool, or an AI agent. The client only needs a wallet (a private key that can sign ERC-3009 authorizations).
**Server** is whoever provides the resource. The server defines what costs how much by attaching x402 middleware to its endpoints.
**Facilitator** is the settlement service. It receives the signed payment from the server, verifies it, submits the on-chain transaction, and returns the result. The facilitator never holds the client's funds. The transfer moves directly from client to server within the token contract.
On Stable, [Semantic Pay](https://x402.semanticpay.io) operates a public facilitator.
#### The payment flow
1. **Client requests a resource.** The client sends a normal HTTP request (GET, POST, etc.) to the server.
2. **Server responds with 402.** The server returns HTTP `402 Payment Required` along with a `PAYMENT-REQUIRED` header containing all the information the client needs: how much to pay, which token, which network, and where to send the funds.
3. **Client signs and resubmits.** The client reads the payment requirements, signs an ERC-3009 authorization for the specified amount, and resubmits the original request with a `PAYMENT-SIGNATURE` header containing the signed authorization.
4. **Facilitator verifies and settles.** The server forwards the signed payment to its facilitator. The facilitator validates the signature, submits the `transferWithAuthorization` call on-chain, and once confirmed, the server returns the requested resource along with a `PAYMENT-RESPONSE` header containing the settlement receipt.
#### The three headers
All payment information travels through standard HTTP headers, encoded in Base64:
| **Header** | **Direction** | **Contents** |
| :------------------ | :--------------- | :--------------------------------------------------------------------------- |
| `PAYMENT-REQUIRED` | Server to client | Payment scheme, token address, amount, recipient address, network identifier |
| `PAYMENT-SIGNATURE` | Client to server | Signed ERC-3009 authorization proving the client has authorized the transfer |
| `PAYMENT-RESPONSE` | Server to client | Settlement result including transaction hash and confirmation status |
This design works with any HTTP client, any programming language, and any infrastructure that supports custom headers.
### x402 on Stable
The x402 protocol defines how payment works over HTTP. Stable provides the settlement environment that makes it practical for production use.
#### Sub-second finality
Stable's consensus provides sub-second block finality (\~700 milliseconds), allowing x402 facilitators to verify and settle transactions in real time. This is critical for high-frequency automated interactions where AI agents or IoT devices may execute many small payments in rapid succession.
#### Single-asset settlement
On Stable, USDT0 is both the native gas token and the payment token. The entire x402 payment lifecycle runs on USDT0 alone. The client holds only USDT0, and the facilitator submits transactions using the same token it settles. For AI agents using x402, this means an agent wallet needs to manage only one asset.
#### Micro-pricing
Prices are denominated in USDT0 atomic units (6 decimals): a cost parameter of `"1000"` translates to exactly $0.001. This precision allows x402 servers to set prices at fractions of a cent.
#### Gas waiver integration
The [Gas Waiver](/en/how-to/integrate-gas-waiver) eliminates transaction costs entirely. The x402 facilitator can use the Gas Waiver infrastructure to submit `transferWithAuthorization` calls without charging gas to either the buyer or the seller. This means x402 micropayments on Stable carry no overhead beyond the payment amount itself.
### Infrastructure
#### Semantic Pay
[Semantic Pay](https://x402.semanticpay.io) provides a public x402 facilitator for Stable. It handles signature verification, on-chain submission, and confirmation tracking. Developers integrating x402 on Stable can point their middleware to this endpoint without running their own settlement infrastructure.
**Facilitator endpoint:** `https://x402.semanticpay.io`
#### WDK (Wallet Development Kit)
For AI agents to participate in x402 autonomously, they need wallets they can control programmatically. Tether's open-source WDK provides this:
* **Self-custody**: WDK enables AI agents to generate and store private keys locally without relying on centralized API infrastructure.
* **x402 compatibility**: The WDK's `WalletAccountEvm` instance natively satisfies the client signer interface required by the x402 SDK, allowing agents to automatically intercept 402 HTTP responses, sign ERC-3009 authorizations, and resubmit requests.
**See also:**
* [ERC-3009 (Transfer With Authorization)](/en/explanation/erc-3009): the on-chain settlement standard that x402 uses
* [Payment use cases](/en/explanation/payment-use-cases-overview): P2P, subscriptions, invoices, and API billing patterns
* [Gas Waiver](/en/how-to/integrate-gas-waiver): zero-cost transaction submission
## 欢迎来到 Stable
欢迎阅读 **Stable** 的官方文档。
USDT 在全球流通超过 1500 亿美元,拥有超过 3.5 亿用户,引领着稳定币市场,为中心化交易所、去中心化金融(DeFi)和国际支付提供动力。然而,现有的基础设施难以满足日益增长的对更低成本、更高速度和更高可靠性的需求。
Stable 正是为满足这些需求而生,提供一个可扩展、安全且用户友好的区块链,专为 USDT 的实际应用而量身定制。无论是服务于新兴市场的零售用户,还是处理大额交易的金融机构,Stable 都能提供理想的环境,为 并让交易更快、更便宜、显著提升效率。
Stable 实现这一目标的方式,是通过其拥有高吞吐量、亚秒级交易最终性的一层区块链,为 USDT 提供发行和结算层。主要特性包括:
* **为 USDT 优化**:Stable 提供专为 USDT 设计的功能,包括免 为大规模转账优化,以及高效的稳定币发行与结算能力。
* **为日常使用而建**:交易在一秒内完成且成本极低。Stable 的钱包简化了发送、接收和资产管理,并轻松支持借记卡与信用卡集成。
* **为企业量身打造的功能**:Stable 提供专为机构需求设计的高级功能,包括保证的区块空间分配、高效的 USDT 交易处理、高吞吐量的聚合转账功能,以及全面的安全措施。平台还提供企业级的保密转账功能,在隐私与监管合规之间实现平衡。
### 快速开始
本指南适用于所有人 —— 无论是普通用户、开发者还是机构 —— 我们都为你准备好了。
* [**为什么选择 Stable**](/cn/introduction/why-stable) — 使用 USDT 作为原生 gas 的高性能稳定币区块链
* [**Stable 为用户而生**](/cn/introduction/stable-for-users) — 了解 Stable 如何提升你的日常生活
* [**技术路线图**](/cn/introduction/technical-roadmap) — 深入了解 Stable 的技术路线图
* [**常见问题**](/cn/introduction/faq) — 关于 Stable 的常见问题解答
### 关于 Stable 技术
深入了解 Stable 的技术架构及核心特性。
* [**技术概览**](/cn/architecture/tech-overview) — 探索 Stable 的前沿技术
* [**关键特性**](/cn/architecture/key-features) — 发现 Stable 的核心能力
* [**核心优化**](/cn/architecture/core-optimization/overview) — 让 Stable 实现高性能的核心优化
* [**USDT 专属功能**](/cn/architecture/usdt-specific-features/overview) — 专为 USDT 交易设计的功能
## Brand Kit
您可以在下方找到 Stable 的Brand Kit,其中包含标志的多种格式版本和配色方案。本工具包旨在帮助您在项目或传播中使用 Stable 品牌时保持一致性。
[前往 Stable 品牌资源库](https://www.stable.xyz/brand-kit)
## 官方链接
* 网站: [https://stable.xyz](https://stable.xyz)
* X(Twitter): [https://x.com/stable](https://x.com/stable)
* Discord: [https://discord.gg/stablexyz](https://discord.gg/stablexyz)
## 常见问题
### 常规问题
**什么是 Stable?**
Stable 是一个高性能区块链,致力于成为 USDT 的专属区块链,重新定义 USDT 在全球范围内的流通方式。
**Stable 与其他区块链有何不同?**
Stable 专为 USDT 打造的高性能网络,具备多种 USDT 专属功能,包括使用 USDT 作为原生 gas、为企业级应用预留专属区块空间和聚合转账功能,所有这些都建立在高度可扩展的架构之上。
### 技术特性
**Stable 采用什么方法来提升可扩展性?**
Stable 采用全栈式优化方案,从状态数据库、执行层、共识机制到 针对 USDT 的特定优化,对区块链上的交易的生命周期的每个阶段都进行了优化。
**Stable 是否可以通过未来的共识升级至 DAG 共识机制?**
可以。与 Narwhal 和 Tusk 不同,它们无法与 StableBFT 直接兼容,而 Autobahn 提供了 PBFT-on-DAG 架构,可以与 Stable 的共识层更自然地集成。
**Stable 是否兼容 EVM?其他 EVM 生态的 dApp 能否迁移到Stable?**
Stable 完全兼容 EVM,用户和开发者可以无缝使用现有的以太坊合约、工具和钱包与Stable进行交互。
### USDT 特性
**如何在 Stable 上获取 USDT0?**
得益于 USDT0 的 OFT 标准,用户可以通过 LayerZero 轻松地将其他网络的 USDT0 跨链转移到 Stable。
**Stable 还有哪些 USDT 专属的独特功能?**
即将上线的功能包括:
* **企业专用区块空间**:允许机构用户在网络拥堵时依然获得可预测的延迟和成本。
* **USDT 转账聚合器**:可高效地打包多个 USDT0 转账交易,提高吞吐量并降低成本。
* **保密转账**:在符合监管要求的前提下保护交易金额隐私的功能。
**什么是 Stable Pay?**
Stable Pay为用户提供简洁、友好的使用体验,并具备 DeFi 的强大能力。它既适合初学者,也适合有经验的加密用户。新用户可通过社交登录轻松上手,而现有传统区块链钱包的用户也可使用原有方式使用Stable。Stable Pay支持网页与移动端使用,确保用户随时随地安全访问其数字资产。
## Stable 为用户而生
Stable 提供强大、可靠且具成本效益的稳定币区块链解决方案,专为 USDT 优化。通过为机构、普通用户和开发者量身打造的全面功能,Stable 提升金融效率,推动卓越运营表现。
### 面向企业 —— 高可靠性的定制功能
随着稳定币在全球范围的快速普及,USDT 目前处于市场领先地位,Stable 也因此具备战略优势,有望把握住巨大的增长机会。预计到 2030 年,稳定币市场将达到 2.8 万亿美元,机构扩张与市场融合潜力巨大。
Stable 专为优化 USDT 交易而设计,为机构提供高效、安全且具成本效益的支付与结算解决方案。面向企业的功能包括:
* **企业专用区块空间(即将推出):** 使用区块链基础设施的企业需要确保交易延迟的一致性。Stable 为企业提供区块空间的专属分配,即使在网络拥堵时也能保持交易性能的可靠性。
* **专为 USDT 交易打造:** Stable 提升 USDT 的发行、结算和日常交易,能快速且安全地处理高频次的大规模 USDT 活动。
* **高交易吞吐量:** Stable 支持快速交易处理,使机构能在快速结算大额交易,并通过 USDT 转账聚合功能实现大规模转账。
* **安全性与可靠性:** Stable 拥有强大的安全机制,全面保护交易和资产。其安全架构为高价值结算和关键金融操作提供了可信基础。
* **隐私转账(即将推出):** Stable 提供企业级的保密隐私转账能力,使机构在执行交易的同时保护隐私,并完全遵守监管要求。通过先进的加密技术,敏感交易数据不会公开展示,但可由授权方进行审计。这使企业在满足 AML/KYC 和财务审计等法规时,也能保障必要的隐私,从而在合规金融环境中建立信任与运营信心。
#### **机构的实际应用场景**
Stable 提供直观的应用,专为简化机构运营而设计,包括:
* **稳定币支付解决方案:** 通过使用稳定币的借记卡和信用卡实现轻松交易。
* **企业支付终端:** 商户可在无需中介或额外费用的情况下接受 USDT,即使在网络拥堵时也能保持费用高度可预测性。
### 面向普通用户 —— 便宜直观的使用体验
Stable 专为让日常 USDT 交易更简单、更快速、更实惠而打造,是频繁使用 USDT 进行转账、支付和结算的理想平台。以下是 Stable 如何提升日常金融体验:
* **快速可靠的交易体验:** 优化的基础设施使 Stable 能在一秒内完成交易终局。
* **顺畅的用户体验:** Stable 钱包界面直观,发送、接收和管理资产变得简单便捷。
* **便捷的支付解决方案:** Stable 与主流支付网络直接集成,支持借记卡和信用卡,实现轻松消费。
* **跨链 USDT 转账:** USDT0 支持通过 LayerZero 实现无缝的跨链 USDT 转账。
Stable 致力于为全球用户提供可触达的金融解决方案,即使在银行服务不足的地区也能无障碍使用 USDT。使用 Stable,你可以轻松完成跨境交易与日常支付,成本极低,为每个人带来极大的金融灵活性与便利性。
Stable 专注于日常 USDT 交易,让你的金融活动更快捷、更简单、更高效。
### 面向开发者 —— 高度优化的 EVM 一层区块链
Stable 是一条专注于稳定币的区块链,拥有亚秒级出块时间与交易最终性,专为 USDT 的大规模发行、结算和管理而优化。为满足稳定币交易对性能、安全性和可用性的严格要求,Stable 为开发者构建去中心化应用(dApps)和基础设施提供理想基础,全面释放 USDT 的潜能。以下是 Stable 的技术特性:
* **亚秒级交易最终性:** 快速完成交易结算,支持实时结算。
* **委托权益证明(dPoS):** 采用 StableBFT 强健且安全的共识机制,未来计划引入 DAG 共识以增强可扩展性。
* **100% EVM 兼容:** 基于 Stable EVM 构建,可原生运行以太坊智能合约,支持 Etherscan 和 MetaMask 等开发工具无缝接入。
#### **开发工具与资源**
Stable 提供完整工具包,简化 dApp 开发与生态集成:
* **Stable EVM:** Stable 的以太坊兼容执行层,支持使用现有的以太坊工具与钱包无缝交互。同时 Stable EVM 引入一系列 **预编译合约**,允许 EVM 智能合约安全且原子性地调用Stable底层接口。
* **增强型智能合约能力:** 预编译合约接口支持 EVM 合约与 Stable SDK 模块之间的无缝交互,简化复杂的跨模块交易。
* **Stable Pay:** 提供完整的区块链功能 —— 包括跨链、代币转账、质押、治理与 DeFi 工具 —— 集于一个钱包中,带来类似 web2.5 的顺滑体验。
#### **技术路线图与未来发展**
Stable 将通过多阶段推出确保构建出健壮、可扩展、高性能的基础设施:
* **高性能的一层区块链:** 全面研究并优化区块链的各个环节,从状态数据库、共识机制到执行层。
* **现实世界的应用:** 推出基于 Stable 独特优势的支付、商业交易与消费级金融服务等实际应用。
## 技术路线图
### Stable 针对稳定币的全栈优化路径
从用户提交交易到最终结果确认,交易生命周期要经历多个阶段:交易首先通过 RPC 广播,然后进入内存池(mempool),然后被打包进区块,经过共识验证、执行,最终将结果状态写入数据库。只有完成这些步骤,用户才能获得最终的交易结果。
这个过程中任何一个环节存在瓶颈,都会影响整体系统性能。Stable 致力于优化交易路径中的每一步,以最大化提升性能并减少延迟。
Stable 的核心技术将分阶段推出,每一阶段都旨在提升每秒交易数(TPS),同时不牺牲交易的终局性。计划中的优化包括状态数据库处理、执行层、共识机制以及 USDT 特定流程的优化。
下文将概述当前区块链架构中的常见性能瓶颈,以及 Stable 的优化方案。
### 第 1 阶段
#### StableBFT
Stable 区块链最初将采用 StableBFT,这是一种基于 CometBFT 的定制化 PoS 协议,提供高吞吐、低延迟与强可靠性。该协议具备终局性,能容忍三分之一的节点故障。未来,Stable 将升级为基于 DAG 的共识机制,实现 5 倍的共识速度提升。
#### USDT 作为原生 Gas
在 Stable 上,USDT0 作为其原生 Gas 代币。USDT0 同时作为用于支付 Gas 和进行价值转移的原生资产,并作为支持 `approve`、`transfer`、`transferFrom` 和 `permit` 的 ERC20 代币。
#### Stable Pay与 Stable Name
Stable Pay使用直观设计和社交登录等功能,而已有用户则可直接连接现有钱包,无需迁移。Stable 钱包将提供网页版钱包和原生的手机钱包,保障用户在任何设备上都能安全访问数字资产。
与钱包配套的是 Stable Name:这是一套友好的别名系统,用于替代繁琐且容易出错的 EVM 地址格式,采用唯一且可读性强的标识符。用户只需通过 Stable Name 即可完成收发代币,免去管理十六进制字符串的烦恼。该系统大大减少了交易出错的几率,提升了与加密资产交互的整体体验,使 Stable 成为进入区块链生态的便捷入口。
### 第 2 阶段
#### **并行执行**
60–80% 的交易之间并不冲突,可以安全地并行执行。但大多数区块链系统仍采用顺序执行,造成不必要的延迟。
Stable 将采用Optimistic并行执行模型以提高吞吐量。交易在假设无冲突的前提下并行执行,若检测到冲突,则将相关交易回滚并按顺序重新执行。此模型在确保正确性的同时带来显著的性能提升。
#### **状态数据库优化**
区块链性能的主要瓶颈之一是磁盘 I/O 慢。在执行完区块后,状态需被提交(commit)和存储。传统模式中,验证节点需等待状态完全存储完毕后才能继续执行下一区块。
Stable 通过拆解状态提交与状态存储来优化该流程。验证节点可在内存中提交最新状态,从而继续下一轮区块执行,同时允许历史状态延迟写入磁盘。这显著降低了执行延迟。
此外,Stable 计划采用 `mmap`(内存映射文件)机制,将文件放置到内存中,加速存储性能。在内存中实时提交状态,同时将归档状态写入磁盘,大幅减少磁盘 I/O 延迟,并提升读写吞吐量。
#### **USDT 转账聚合器**
为支持大规模 USDT0 转账,Stable 将实现转账聚合机制。USDT0 的转账交易将被批量打包处理,从而降低每笔交易的系统开销,提高整体吞吐量。
#### **企业专用区块空间**
企业在使用区块链基础设施时,通常需要可预测的交易延迟,而在网络拥堵时,这种可预测性可能下降。
Stable 通过专用区块空间模型解决该问题,为企业客户保证固定比例的区块容量。该保障机制包括:
* 验证节点级定制:验证节点为企业客户预留空间。
* 专属 RPC 节点:企业交易通过独立的内存池和 API 接口优先处理。
该模式确保关键企业在不同网络条件下也能保持稳定性能。
### 第 3 阶段
#### **基于 Autobahn 的高级共识(StableBFT)**
第一代基于 DAG 的 BFT 引擎(如 Narwhal 和 Tusk)表明,通过将数据传播与共识排序解耦拆解,可消除单个 proposer 的瓶颈。然而,直接将这类系统引入 CometBFT 环境会与高度依赖区块高度的开发习惯及传统内存池设计发生冲突。
Autobahn 提供了一种 PBFT-on-DAG 架构,更自然地与 Stable 的共识层集成。基于 Autobahn 构建的 StableBFT 将实现:
* 消除单领导者限制,支持并行交易处理;
* 通过分离数据传播与最终排序,加快交易确认速度;
* 通过强健的 BFT 机制提升对网络攻击的抵抗性。
根据内部测试结果,该共识协议已在可控环境下实现超过 200,000 TPS(仅共识层)的处理能力。
#### **StableVM++**
StableVM++ 是高性能执行引擎,将用 C++ 实现替代当前基于 Go 的 EVM。此更替预计将带来最高 6 倍的执行速度提升,极大增强链上处理能力。
#### **高性能 RPC**
高吞吐量的去中心化应用依赖于快速准确的 RPC 与索引服务。Stable 的高性能 RPC 架构将包括:
* **节点级优化**:实时链状态处理,提升 RPC 响应速度;
* **集成式索引器**:低延迟索引服务,在保证一致性的情况下提升应用层 API 效率 ;
* **强健的 Pub/Sub 系统**:可扩展的 WebSocket 架构,提供可靠的推送和事件通知机制;
* **混合负载均衡器**:基于操作类型智能分配流量,最大化利用资源并减少瓶颈。
这些优化将使 Stable 能为 dApp 和企业用户提供稳定且可扩展的访问接口。
## 代币经济学
Stable 是一个高性能的第一层区块链,专为稳定币结算、企业级支付和以 USDT 为中心的基础设施而优化。
本代币经济学页面概述了 STABLE 代币的供应、分配和经济设计。
***
### 概览
| 项目 | 详情 |
| :------- | :-------------------- |
| **代币符号** | STABLE |
| **总供应量** | 100,000,000,000 代币 |
| **标准** | ERC-20(Stable 主网 EVM) |
| **小数位** | 18 |
STABLE 是 Stable 主网和生态系统的治理代币,旨在支持验证者、开发者和用户之间的长期经济协调。
***
### 代币分配
**总供应量:** 100,000,000,000 STABLE 代币
| 类别 | 分配 | STABLE 数量 |
| :---------- | :--- | :-------------- |
| **投资者与顾问** | 25% | 25,000,000,000 |
| **团队** | 25% | 25,000,000,000 |
| **生态系统与社区** | 40% | 40,000,000,000 |
| **创世分配** | 10% | 10,000,000,000 |
| **总计** | 100% | 100,000,000,000 |
***
### 发行模型与供应时间表
* 总供应量固定为 100,000,000,000 STABLE 代币。
* 仅有一部分供应量在 Stable 主网启动时进入流通。
* 团队和投资者与顾问分配需遵守 1 年锁定期的 4 年线性解锁模型,以确保长期承诺。
***
### 分配详情
#### 创世分配 - 总代币供应量的 10%
旨在引导使用、为市场提供流动性、进行空投活动、奖励早期支持者以及与交易所和生态系统合作伙伴开展活动。
**解锁时间表**
* Stable 主网启动时 100% 解锁
#### 生态系统与社区 - 总代币供应量的 40%
支持长期生态系统和社区增长:
* 支持 Stable 软件和生态系统的开发
* 开发者资助
* 用户引导激励
* 支付合作伙伴集成
* 链上活动奖励
* 黑客松、大使计划
* 基础设施资助
**解锁时间表**
* **初始解锁:** 在 Stable 主网启动时解锁总供应量的 8%,用于为战略启动合作伙伴提供激励、满足流动性需求以及实施早期生态系统增长活动。
* **总解锁期:** 此后对总供应量的 32% 进行 3 年线性解锁
#### 团队 - 总代币供应量的 25%
* 分配给创始团队成员、工程师、研究人员和贡献者
* 旨在确保团队与 Stable 生态系统之间的长期协调。
**解锁时间表**
* **1 年锁定期:** 前 12 个月不解锁任何代币
* **总解锁期:** 从 Stable 主网启动起 48 个月线性解锁
#### 投资者与顾问 - 总代币供应量的 25%
分配用于募资轮次和顾问支持。
**解锁时间表**
* **1 年锁定期:** 前 12 个月不解锁任何代币
* **总解锁期:** 从 Stable 主网启动起 48 个月线性解锁
***
### 发行图表
***
### 经济设计原则
Stable 的代币经济学围绕三个基本目标设计:
#### 1. 为支付优化的第一层提供动力
STABLE 代币激励高吞吐量、低延迟的基础设施,支持亚秒级区块确认和企业级结算保证。
#### 2. 支持可持续的生态系统增长
总代币供应量的 40% 用于长期增长,专注于关键开发和增长领域
* 开发者资助
* 合作伙伴集成
* 新生态系统应用
#### 3. 通过解锁机制协调长期贡献者
团队分配采用 1 年锁定期的 4 年线性解锁模型,确保长期协调和对网络开发的持续贡献。
***
### STABLE 代币的实用性
STABLE 代币是 Stable 主网上的 ERC-20 治理代币。可用于:
* 选举验证者
* 对协议升级进行投票
* 处理治理提案
* 作为从验证者接收 Gas 费用分配的凭证
在 Stable 网络上,所有交易都使用 USDT0 作为原生 Gas 代币。这些 USDT0 Gas 费用被收集到由智能合约管理的金库中。当代币持有者将其 STABLE 代币质押给验证者时,验证者可以选择将金库中的 Gas 费用按比例分配给质押者。
## 为什么选择 Stable
### 在 Stable 出现之前
随着数字金融加速发展,稳定币——尤其是 USDT——已成为链上活动的核心组成部分。然而,大多数区块链基础设施并未针对稳定币操作进行优化,导致一系列关键问题:
* **费用高且不可预测:** 交易成本波动大,使频繁的小额交易变得昂贵且不现实。
* **企业受限:** 企业面临交易速度不稳定、难以将区块链技术集成进现有系统,以及缺乏满足监管合规的隐私解决方案。
* **复杂的用户体验:** 用户必须管理多种代币,包括用于 gas 的波动性资产。
* **金融接入受限:** 在许多服务不足的地区,获取以稳定币计价的金融工具的渠道有限。高昂的汇款成本进一步排斥了这些用户参与数字金融。
* **开发者面临障碍:** 缺乏专为稳定币打造的基础设施,使应用开发变得更加复杂。
Stable 正是为了解决这些问题而设计的,提供一条专为 USDT 优化的专属区块链基础设施。
### 有了 Stable 之后
#### 一个专为 USDT 打造的生态系统
Stable 是一条专为 USDT 功能最大化而精心设计的一层区块链,针对用户、企业和开发者所面临的每一个痛点进行了解决。其主要优势包括:
* **高吞吐量:** 高效处理每秒数千笔交易,即便在网络高峰期间也能保持强劲性能。
* **超低费用与即时结算:** 交易在几秒内确认,手续费始终保持在极低水平,适用于微支付和大额结算。
* **USDT 作为原生 Gas:** 用户直接使用 USDT 支付交易手续费,无需持有额外的具有价格波动性的代币。
#### 企业级功能
Stable 提供专为企业量身定制的解决方案:
* **增强的安全性:** 采用经过验证的权益证明(PoS)共识机制,并兼容完整的以太坊开发工具,为开发者和企业提供安全且熟悉的区块链开发环境。
* **企业专属区块空间(即将上线):** 企业将获得预留区块空间容量,无论网络多拥堵,都能保持稳定的交易表现。
* **保密转账(即将上线):** 支持合规且隐私保护的交易方式,满足企业对敏感金融操作的需求。
#### 完整的开发支持
Stable 为开发者提供一整套开发工具,帮助加速并简化应用构建流程:
* **兼容 EVM:** 完全兼容以太坊虚拟机,开发者可以轻松移植现有应用,并继续使用熟悉的以太坊开发工具。
* **专用 SDK:** 提供专为稳定币 dApp 设计的简洁接口,大幅降低开发成本与复杂度。
* **集成工具:** 强大的 API 和集成工具,帮助企业系统无缝对接 Stable 基础设施。
#### 拓展稳定币生态系统
Stable 促进一个多元的稳定币生态,提升稳定币在各类应用场景中的实用性:
* **跨链互操作性:** 实现 Stable 与其他区块链之间的资产流通与集成,增强流动性与可用性。
* **金融服务集成:** 支持各类基于 USDT 的金融服务应用。
* **合规工具支持:** 提供内置的合规解决方案,简化监管对接流程,助力机构采用。
#### 拓展现实世界应用场景
Stable 将 USDT 的实际用途从传统交易与 DeFi 平台拓展到更广阔的应用领域:
* **消费者支付解决方案:** 集成与 USDT 绑定的借记卡和信用卡,使日常消费中的稳定币使用更加简便。
* **商户支付工具:** 商家可直接接收 USDT,绕过高昂的第三方支付处理成本,显著降低费用。
* **Stable Pay:** 一个为日常使用优化的用户友好型钱包,深度集成 Stable 生态,确保流畅直观的使用体验。
Stable 正在从零开始构建一个全新的稳定币生态,提供专属的基础设施,提升运营可靠性、用户参与度与全球金融包容性。
## 开发者支持
#### 常见问题(FAQ)
* 如何连接 Stable 网络?
* 使用标准 JSON-RPC 即可,与常见 EVM 工具兼容。
* 交易费用使用哪种货币?
* 所有交易费用以 USDT0 支付。
* Stable 是否支持账户抽象?
* 支持。EIP-7702 允许 EOA 临时具备智能账户行为。
* 如何查看交易结果?
* 通过余额查询、合约状态或事件日志。
* 如何为 Stable 编写智能合约?
* 使用标准 EVM 工具(如 Solidity + JSON-RPC 库)。
完整 FAQ 请见文档。
### 支持渠道
开发者可直接与 Stable 团队联系以获取技术支持。
* Discord(开发者频道): [https://discord.gg/stablexyz](https://discord.gg/stablexyz)
* 问题反馈: 将会在github repo开放后提供
技术支持联系方式将在社区平台上线后持续更新。
## 在 Stable 上部署你的第一个智能合约
在本教程中,你将向 Stable 测试网部署一个简单的智能合约,并从链上读取其状态。在此过程中,你将了解 Stable 网络的配置方式、USDT0 作为 gas 代币的工作原理,以及如何将标准 EVM 工具指向 Stable。
本教程假设你具备基本的 Solidity 知识和 Unix 终端使用经验,无需任何 Stable 使用经验。
### 前提条件
* 已安装 [Foundry](https://book.getfoundry.sh/getting-started/installation)(`forge`、`cast` 和 `anvil` 在 PATH 中可用)
* 一个你拥有私钥的钱包(全新的测试密钥即可——切勿使用持有真实资金的密钥进行测试)
* 能够连接到测试网 RPC 和水龙头的网络
***
### 1. 创建新的 Foundry 项目
运行以下命令创建一个新项目:
```bash
forge init stable-hello && cd stable-hello
```
Foundry 会在 `src/` 目录中创建一个示例 `Counter.sol` 合约及对应的测试文件。你将直接部署该合约——目标是将真实内容上链,而不是编写新的 Solidity 代码。
### 2. 查看待部署的合约
打开 [src/Counter.sol](src/Counter.sol),它包含两个函数:
```solidity
// SPDX-License-Identifier: UNLICENSED
pragma solidity ^0.8.13;
contract Counter {
uint256 public number;
function setNumber(uint256 newNumber) public {
number = newNumber;
}
function increment() public {
number++;
}
}
```
`number` 是存储在链上的公共状态变量。`increment()` 和 `setNumber()` 是修改它的两种方式。读取 `number` 不消耗 gas——这是一次免费的 `eth_call`。
### 3. 配置 Stable 测试网
在项目根目录创建名为 [.env](.env) 的文件以存储网络凭据:
```bash
touch .env
```
添加以下内容,将占位符替换为你的实际私钥:
```bash
PRIVATE_KEY=0xYOUR_PRIVATE_KEY_HERE
```
接下来,打开 [foundry.toml](foundry.toml),将 Stable 测试网添加为命名网络配置。在现有 `[profile.default]` 部分下方追加以下内容:
```toml
[rpc_endpoints]
stable_testnet = "https://rpc.testnet.stable.xyz"
```
这告诉 Foundry 在使用 `stable_testnet` 时将交易发送到哪里。Stable 兼容 EVM,无需其他配置。
***
**检查点:** 确认 RPC 端点可达:
```bash
cast chain-id --rpc-url https://rpc.testnet.stable.xyz
```
预期输出:
```
2201
```
Chain ID `2201` 是 Stable 测试网。如果看到此数字,说明你的机器可以访问该网络。
***
### 4. 获取钱包地址
从私钥派生部署者地址,以便知道要充值哪个账户:
```bash
source .env
cast wallet address $PRIVATE_KEY
```
复制打印出的地址,下一步需要用到它。
### 5. 为钱包充值 USDT0
Stable 使用 **USDT0** 作为 gas 代币——你用于支付商品和服务的同一资产,直接用于支付计算费用。没有其他原生代币。
访问测试网水龙头并申请资金:
```
https://faucet.stable.xyz
```
粘贴上一步的地址。水龙头会向你的钱包发送 1 USDT0,足够部署和与多个合约交互。
***
**检查点:** 确认余额已到账:
```bash
cast balance $PRIVATE_KEY --rpc-url https://rpc.testnet.stable.xyz
```
你应该看到一个非零值。如果余额仍为 `0`,等待几秒后重试——Stable 大约每 0.7 秒产生一个新区块,资金到账很快。
***
### 6. 部署合约
使用 `forge create` 进行部署:
```bash
source .env
forge create src/Counter.sol:Counter \
--rpc-url https://rpc.testnet.stable.xyz \
--private-key $PRIVATE_KEY \
--broadcast
```
Foundry 会编译合约、广播部署交易并等待回执。由于出块时间约为 0.7 秒,这只需片刻。
***
**检查点:** 输出应如下所示:
```
[⠒] Compiling...
No files changed, compilation skipped
Deployer: 0xYourAddress
Deployed to: 0xSomeContractAddress
Transaction hash: 0xSomeTxHash
```
复制 `Deployed to` 地址,接下来两步需要用到它。
***
### 7. 调用写入函数
现在调用 `setNumber()` 将一个值存储到链上:
```bash
cast send 0xSomeContractAddress "setNumber(uint256)" 42 \
--rpc-url https://rpc.testnet.stable.xyz \
--private-key $PRIVATE_KEY
```
这会发送一笔交易。你需要支付少量 USDT0 费用来完成状态更改。值 `42` 现已存储在 Stable 测试网的 `number` 变量中。
### 8. 从链上读取状态
调用 `number()` 读取该值。这是免费读取——无需交易,无需 gas:
```bash
cast call 0xSomeContractAddress "number()(uint256)" \
--rpc-url https://rpc.testnet.stable.xyz
```
预期输出:
```
42
```
你已成功向 Stable 测试网写入并读取数据。部署、写入、读取的完整流程是 EVM 开发的核心循环,在这里与任何其他 EVM 链完全相同。
### 9. 在 Stablescan 上查看你的部署
打开 Stable 测试网区块浏览器并粘贴你的合约地址:
```
https://testnet.stablescan.xyz
```
你将看到部署交易和你发起的 `setNumber` 调用。Stablescan 是检查链上状态、验证合约源代码以及查阅 Stable 上交易历史的权威工具。
***
### 你学到了什么
你部署了一个合约、发送了一笔状态更改交易,并读取了链上状态——全部在 Stable 测试网上完成。现在你知道如何:
* 配置 Foundry(或任何 EVM 工具链)通过标准 RPC 端点指向 Stable
* 使用 USDT0 水龙头为钱包充值
* 使用 USDT0 作为 gas 代币支付交易费用
* 在 Stablescan 上查看你的工作
**后续步骤:**
* [JSON-RPC API](/cn/developers/core-mechanics/json-rpc-api) — 查看 Stable 支持哪些 `eth_` 方法及与以太坊主网的差异
* [Gas 与定价](/cn/developers/core-mechanics/gas-pricing) — 了解 USDT0 计价的手续费计算方式
* [测试网信息](/cn/developers/testnet/testnet-information) — 完整的网络参数、合约地址和跨链桥详情
## 生态系统
在本文档中,您可以找到桥接(LayerZero)和 USDT0 的信息。
### Stable 测试网上的 LayerZero
| 名称 | 值 |
| ----------------- | ------------------------------------------ |
| eid | 40374 |
| chainKey | stable-testnet |
| stage | testnet |
| endpointV2View | 0x6Ac7bdc07A0583A362F1497252872AE6c0A5F5B8 |
| endpointV2 | 0x3aCAAf60502791D199a5a5F0B173D78229eBFe32 |
| sendUln302 | 0x9eCf72299027e8AeFee5DC5351D6d92294F46d2b |
| receiveUln302 | 0xB0487596a0B62D1A71D0C33294bd6eB635Fc6B09 |
| blockedMessageLib | 0xa229b65cc2191bf60bc24efcda3487d7b5c0c9f0 |
| executor | 0x701f3927871EfcEa1235dB722f9E608aE120d243 |
| deadDVN | 0xC1868e054425D378095A003EcbA3823a5D0135C9 |
### Stable 测试网上的 USDT0
| 名称 | 值 |
| ----------- | ------------------------------------------ |
| wrapper | 0xB8CE59FC3717ada4C02eaDF9682A9e934F625ebb |
| composer | 0xe7cd86e13AC4309349F30B3435a9d337750fC82D |
| OFT | 0x779Ded0c9e1022225f8E0630b35a9b54bE713736 |
| USDT0 impl | 0x3f9E27457ac494fC729beB50e6af04Ec34e3828E |
| USDT0 proxy | 0x78Cf24370174180738C5B8E352B6D14c83a6c9A9 |
### Sepolia OFT 合约和 USDT0 合约(供参考)
| 名称 | 值 |
| ------------ | ---------------------------------------------------------------------------------------------------------------------------------------------------------------------------------------------- |
| Sepolia OFT | [https://sepolia.etherscan.io/address/0xc099cd946d5efcc35a99d64e808c1430cef08126](https://sepolia.etherscan.io/address/0xc099cd946d5efcc35a99d64e808c1430cef08126) |
| Sepolia USDT | [https://sepolia.etherscan.io/address/0xc4DCC311c028e341fd8602D8eB89c5de94625927#writeContract](https://sepolia.etherscan.io/address/0xc4DCC311c028e341fd8602D8eB89c5de94625927#writeContract) |
## 如何为您的 Stable 测试网钱包充值
Stable 使用 USDT0作为燃料代币,因此您需要在钱包中有 USDT0 才能与链进行交互。首先,您需要使用水龙头为您的账户充值 USDT0。
1. 访问 [https://faucet.stable.xyz](https://faucet.stable.xyz)
2. 点击"Get USDT0"按钮,1 USDT0 将被投放到您的钱包中。
如果您想要更多 USDT0,您可以从以太坊 Sepolia 将测试 USDT 桥接到 Stable 测试网。
1. 访问 [https://sepolia.etherscan.io/token/0xc4DCC311c028e341fd8602D8eB89c5de94625927#writeContract,通过调用](https://sepolia.etherscan.io/token/0xc4DCC311c028e341fd8602D8eB89c5de94625927#writeContract,通过调用) `_mint` 函数将所需数量的测试 Tether USD 铸造到您的账户中。
2. 向以太坊 Sepolia 上的 LayerZero 桥接合约发送以下交易,将测试 USDT 桥接到 Stable 测试网:
```jsx
export function addrTo32Bytes(addr: string): Buffer {
const hex20 = ethers.utils.getAddress(addr).slice(2);
const padded = hex20.padStart(64, "0"); // 32 bytes ⇒ 64 hex
return Buffer.from(padded, "hex"); // length === 32
}
async function main() {
const [owner] = await ethers.getSigners();
const SEPOLIA_USDT0 = "0xc4DCC311c028e341fd8602D8eB89c5de94625927";
const SEPOLIA_USDT0_OAPP = "0xc099cD946d5efCC35A99D64E808c1430cEf08126"
const RECEIVER_EID = 40374;
const usdt0 = await ethers.getContractAt("ERC20", SEPOLIA_USDT0);
await usdt0.approve(SEPOLIA_USDT0_OAPP, ethers.utils.parseEther("1"));
const options = Options.newOptions().addExecutorLzReceiveOption(0, 0).toBytes();
const amount = ethers.utils.parseEther("1"); // 将此更改为您所需的数量
const OFTAdapter = await ethers.getContractAt("OFTAdapter", SEPOLIA_USDT0_OAPP);
const sendParams = {
dstEid: RECEIVER_EID,
to: addrTo32Bytes(owner.address),
amountLD: amount,
minAmountLD: amount,
extraOptions: options,
composeMsg: Buffer.from(""),
oftCmd: Buffer.from(""),
};
const fee = await OFTAdapter.quoteSend(sendParams, false);
await OFTAdapter.send(
sendParams,
fee,
owner.address,
{
value: fee.nativeFee,
}
)
}
```
## 测试网信息
您访问 Stable 测试网所需了解的一切信息。
### 网络概览
| 配置 | 值 |
| -------- | -------------- |
| **网络名称** | Stable Testnet |
| **链 ID** | `2201` |
| **燃料代币** | USDT0 |
| **治理代币** | STABLE |
| **出块时间** | \~0.7 秒 |
### 区块浏览器
| 浏览器 | URL |
| -------------- | ---------------------------------------------------------------- |
| **Stablescan** | [https://testnet.stablescan.xyz](https://testnet.stablescan.xyz) |
### RPC 端点
#### 主要端点
| 类型 | 端点 | 用途 |
| ---------------- | ---------------------------------------------------------------- | ------ |
| **EVM JSON-RPC** | [https://rpc.testnet.stable.xyz](https://rpc.testnet.stable.xyz) | EVM 交易 |
| **WebSocket** | wss\://rpc.testnet.stable.xyz | 实时更新 |
### 链信息
| 参数 | EVM |
| -------- | ------- |
| **链 ID** | `2201` |
| **地址格式** | `0x...` |
| **燃料代币** | `USDT0` |
| **小数位数** | 18 |
### 水龙头和工具
| 工具 | URL | 描述 |
| ------- | ------------------------------------------------------ | ------ |
| **水龙头** | [https://faucet.stable.xyz](https://faucet.stable.xyz) | 获取测试代币 |
| **快照** | 参见 [节点运营指南](../node-operations/snapshots) | 链快照 |
## 版本历史
Stable 测试网的完整版本历史和相关文档。
### 当前版本信息
* **当前版本**: `v1.3.1-rc0`
* **下次升级**: `TBD`
* **升级高度**: `TBD`
* **预期时间**: `TBD`
### 版本历史
#### 当前和以前的版本
| 版本 | 提交 | 升级高度 | 二进制文件 | 状态 |
| -------------- | ---------- | ---------- | --------------------------------------------------------------------------------------------------------------------------------------------------------------------------------------------------------------------------------------------------- | ------------------ |
| **v1.3.1-rc0** | `75bb546` | - | [AMD64](https://stable-data-dist.s3.us-east-1.amazonaws.com/testnet/binary/stabled-1.3.1-rc0-linux-amd64-testnet.tar.gz) / [ARM64](https://stable-data-dist.s3.us-east-1.amazonaws.com/testnet/binary/stabled-1.3.1-rc0-linux-arm64-testnet.tar.gz) | 当前 |
| **v1.3.0-rc1** | `25b5e47` | 53,265,500 | [AMD64](https://stable-data-dist.s3.us-east-1.amazonaws.com/testnet/binary/stabled-1.3.0-rc1-linux-amd64-testnet.tar.gz) / [ARM64](https://stable-data-dist.s3.us-east-1.amazonaws.com/testnet/binary/stabled-1.3.0-rc1-linux-arm64-testnet.tar.gz) | |
| **v1.3.0-rc0** | `864d54c` | 49,855,000 | [AMD64](https://stable-data-dist.s3.us-east-1.amazonaws.com/testnet/binary/stabled-1.3.0-rc0-linux-amd64-testnet.tar.gz) / [ARM64](https://stable-data-dist.s3.us-east-1.amazonaws.com/testnet/binary/stabled-1.3.0-rc0-linux-arm64-testnet.tar.gz) | |
| **v1.2.2-rc0** | `8bd5d5e` | - | [AMD64](https://stable-data-dist.s3.us-east-1.amazonaws.com/testnet/binary/stabled-1.2.2-rc0-linux-amd64-testnet.tar.gz) / [ARM64](https://stable-data-dist.s3.us-east-1.amazonaws.com/testnet/binary/stabled-1.2.2-rc0-linux-arm64-testnet.tar.gz) | |
| **v1.2.1-rc1** | `7ff9a8a` | - | [AMD64](https://stable-data-dist.s3.us-east-1.amazonaws.com/testnet/binary/stabled-1.2.1-rc1-linux-amd64-testnet.tar.gz) / [ARM64](https://stable-data-dist.s3.us-east-1.amazonaws.com/testnet/binary/stabled-1.2.1-rc1-linux-arm64-testnet.tar.gz) | |
| **v1.2.0-rc1** | `263c033` | 41,306,450 | [AMD64](https://stable-data-dist.s3.us-east-1.amazonaws.com/testnet/binary/stabled-1.2.0-rc1-linux-amd64-testnet.tar.gz) / [ARM64](https://stable-data-dist.s3.us-east-1.amazonaws.com/testnet/binary/stabled-1.2.0-rc1-linux-arm64-testnet.tar.gz) | |
| **v1.2.0** | `ee8ca35` | 40,392,500 | [AMD64](https://stable-data-dist.s3.us-east-1.amazonaws.com/testnet/binary/stabled-1.2.0-linux-amd64-testnet.tar.gz) / [ARM64](https://stable-data-dist.s3.us-east-1.amazonaws.com/testnet/binary/stabled-1.2.0-linux-arm64-testnet.tar.gz) | |
| **v1.1.2** | `3d83aa3` | 34,649,300 | [AMD64](https://stable-data-dist.s3.us-east-1.amazonaws.com/testnet/binary/stabled-1.1.2-linux-amd64-testnet.tar.gz) / [ARM64](https://stable-data-dist.s3.us-east-1.amazonaws.com/testnet/binary/stabled-1.1.2-linux-arm64-testnet.tar.gz) | |
| **v1.1.1** | `8becd6b` | 33,152,000 | [AMD64](https://stable-data-dist.s3.us-east-1.amazonaws.com/testnet/binary/stabled-1.1.1-linux-amd64-testnet.tar.gz) / [ARM64](https://stable-data-dist.s3.us-east-1.amazonaws.com/testnet/binary/stabled-1.1.1-linux-arm64-testnet.tar.gz) | |
| **v1.1.0** | `17ceaa7` | 32,309,700 | [AMD64](https://stable-data-dist.s3.us-east-1.amazonaws.com/testnet/binary/stabled-1.1.0-linux-amd64-testnet.tar.gz) / [ARM64](https://stable-data-dist.s3.us-east-1.amazonaws.com/testnet/binary/stabled-1.1.0-linux-arm64-testnet.tar.gz) | |
| **v0.8.1** | `1eb65d5` | 30,770,000 | [AMD64](https://stable-data-dist.s3.us-east-1.amazonaws.com/testnet/binary/stabled-0.8.1-linux-amd64-testnet.tar.gz) / [ARM64](https://stable-data-dist.s3.us-east-1.amazonaws.com/testnet/binary/stabled-0.8.1-linux-arm64-testnet.tar.gz) | |
| **v0.8.0** | `e55efb6` | 29,410,999 | [AMD64](https://stable-data-dist.s3.us-east-1.amazonaws.com/testnet/binary/stabled-0.8.0-linux-amd64-testnet.tar.gz) / [ARM64](https://stable-data-dist.s3.us-east-1.amazonaws.com/testnet/binary/stabled-0.8.0-linux-arm64-testnet.tar.gz) | 银行预编译增强 |
| **v0.7.2** | `3c53e14` | 27,258,000 | [AMD64](https://stable-data-dist.s3.us-east-1.amazonaws.com/testnet/binary/stabled-0.7.2-linux-amd64-testnet.tar.gz) / [ARM64](https://stable-data-dist.s3.us-east-1.amazonaws.com/testnet/binary/stabled-0.7.2-linux-arm64-testnet.tar.gz) | StableBFT 集成 |
| **v0.6.0** | `5cc1ad6` | 19,587,000 | [AMD64](https://stable-data-dist.s3.us-east-1.amazonaws.com/testnet/binary/stabled-0.6.0-linux-amd64-testnet.tar.gz) | 小修复 |
| **v0.5.0** | `919281d` | 18,719,000 | [AMD64](https://stable-data-dist.s3.us-east-1.amazonaws.com/testnet/binary/stabled-0.5.0-linux-amd64-testnet.tar.gz) | 小修复 |
| **v0.4.0** | `c6240c0` | 18,666,150 | [AMD64](https://stable-data-dist.s3.us-east-1.amazonaws.com/testnet/binary/stabled-0.4.0-linux-amd64-testnet.tar.gz) | Stable SDK v0.53.4 |
| **v0.3.0** | `a4f5ac5` | 9,166,131 | [AMD64](https://stable-data-dist.s3.us-east-1.amazonaws.com/testnet/binary/stabled-0.3.0-linux-amd64-testnet.tar.gz) | EVM 价值转移允许列表 |
| **v0.2.1** | `53e6e073` | - | [AMD64](https://stable-data-dist.s3.us-east-1.amazonaws.com/testnet/binary/stabled-0.2.1-linux-amd64-testnet.tar.gz) | 非破坏性更新 |
| **v0.2.0** | `8bdd771` | 8,956,584 | [AMD64](https://stable-data-dist.s3.us-east-1.amazonaws.com/testnet/binary/stabled-0.2.0-linux-amd64-testnet.tar.gz) | 功能更新 |
| **v0.1.0** | `10dfg542` | 创世 | [AMD64](https://stable-data-dist.s3.us-east-1.amazonaws.com/testnet/binary/stabled-0.1.0-linux-amd64-testnet.tar.gz) | 创世 (2025-04-07) |
### 相关文档
* [升级指南](/cn/developers/node-operations/upgrades) - 分步升级程序
* [测试网信息](/cn/developers/testnet/testnet-information) - 当前网络详细信息
This guide covers all configuration options for Stable nodes, including optimization for different use cases.
### Configuration Files Overview
Stable nodes use two main configuration files:
* **`config.toml`**: Core StableBFT configuration
* **`app.toml`**: Application-specific configuration
Both files are located in `~/.stabled/config/`
### Core Configuration (config.toml)
#### Basic Settings
:::code-group
```toml [Mainnet]
# The ID of the chain to join
chain_id = "stable_988-1"
# A custom human-readable name for this node
moniker = "your-node-name"
# Database backend: goleveldb | cleveldb | boltdb | rocksdb | badgerdb
db_backend = "goleveldb"
```
```toml [Testnet]
# The ID of the chain to join
chain_id = "stabletestnet_2201-1"
# A custom human-readable name for this node
moniker = "your-node-name"
# Database backend: goleveldb | cleveldb | boltdb | rocksdb | badgerdb
db_backend = "goleveldb"
```
:::
#### P2P Configuration
:::code-group
```toml [Mainnet]
[p2p]
# Address to listen for incoming connections
laddr = "tcp://0.0.0.0:26656"
# Address to advertise to peers for them to dial
external_address = "YOUR_PUBLIC_IP:26656"
# Comma separated list of seed nodes
seeds = "17a539fda42863a99755547e1c9b3ec4c38a4439@seed1.stable.xyz:26656"
# Comma separated list of persistent peers
persistent_peers = "b896f6f8ca5a4d1cc40de09407df0c96e76df950@peer1.stable.xyz:26656"
```
```toml [Testnet]
[p2p]
# Address to listen for incoming connections
laddr = "tcp://0.0.0.0:26656"
# Address to advertise to peers for them to dial
external_address = "YOUR_PUBLIC_IP:26656"
# Comma separated list of seed nodes
seeds = "39e061b167162f6621ddadcf1be21d6fa585a468@seed1.testnet.stable.xyz:26656"
# Comma separated list of persistent peers
persistent_peers = "5ed0f977a26ccf290e184e364fb04e268ef16430@peer1.testnet.stable.xyz:26656"
```
:::
Additional P2P settings (same for both networks):
```toml
# Maximum number of inbound peers
max_num_inbound_peers = 50
# Maximum number of outbound peers
max_num_outbound_peers = 30
# Toggle to disable guard against peers connecting from the same ip
allow_duplicate_ip = false
# Peer connection configuration
handshake_timeout = "20s"
dial_timeout = "3s"
# Time to wait before flushing messages out on the connection
flush_throttle_timeout = "100ms"
# Maximum size of a message packet payload
max_packet_msg_payload_size = 1024
# Rate limiting
send_rate = 5120000 # 5 MB/s
recv_rate = 5120000 # 5 MB/s
# Seed mode (for seed nodes only)
seed_mode = false
# Enable peer exchange reactor
pex = true
```
#### RPC Server Configuration
```toml
[rpc]
# TCP or UNIX socket address for the RPC server
laddr = "tcp://127.0.0.1:26657"
# A list of origins a cross-domain request can be executed from
cors_allowed_origins = ["*"]
# A list of methods the client is allowed to use with cross-domain requests
cors_allowed_methods = ["HEAD", "GET", "POST"]
# A list of non simple headers the client is allowed to use with cross-domain requests
cors_allowed_headers = ["Origin", "Accept", "Content-Type", "X-Requested-With", "X-Server-Time"]
# TCP or UNIX socket address for the gRPC server
grpc_laddr = "tcp://127.0.0.1:9090"
# Maximum number of simultaneous connections
grpc_max_open_connections = 900
# Activate unsafe RPC commands like /dial_seeds and /unsafe_flush_mempool
unsafe = false
# Maximum number of simultaneous connections (including WebSocket)
max_open_connections = 900
# Maximum number of unique clientIDs that can connect
max_subscription_clients = 100
# Maximum number of unique queries a given client can subscribe to
max_subscriptions_per_client = 5
# How long to wait for a tx to be committed
timeout_broadcast_tx_commit = "10s"
# Maximum size of request body
max_body_bytes = 1000000
# Maximum size of request header
max_header_bytes = 1048576
```
#### Mempool Configuration
```toml
[mempool]
# Mempool version to use
version = "v1"
# Recheck enabled
recheck = true
# Broadcast enabled
broadcast = true
# Maximum number of transactions in the mempool
size = 3000
# Limit the total size of all txs in the mempool
max_txs_bytes = 1073741824 # 1GB
# Size of the cache
cache_size = 10000
# Do not remove invalid transactions from the cache
keep-invalid-txs-in-cache = false
# Maximum size of a single transaction
max_tx_bytes = 1048576 # 1MB
# Maximum size of a batch of transactions to send to a peer
max_batch_bytes = 0
```
#### Consensus Configuration
```toml
[consensus]
# How long we wait for a proposal block before prevoting nil
timeout_propose = "5s"
# How much timeout_propose increases with each round
timeout_propose_delta = "10ms"
# How long we wait after receiving +2/3 prevotes
timeout_prevote = "150ms"
# How much the timeout_prevote increases with each round
timeout_prevote_delta = "10ms"
# How long we wait after receiving +2/3 precommits
timeout_precommit = "150s"
# How much the timeout_precommit increases with each round
timeout_precommit_delta = "10ms"
# Make progress as soon as we have all the precommits
skip_timeout_commit = false
# Enable/disable double sign check
double_sign_check_height = 2
# EmptyBlocks mode
create_empty_blocks = true
create_empty_blocks_interval = "0s"
# Reactor sleep duration
peer_gossip_sleep_duration = "100ms"
peer_query_maj23_sleep_duration = "2s"
```
### Application Configuration (app.toml)
#### Basic Application Settings
```toml
# Pruning strategy
pruning = "default"
# HaltHeight contains a non-zero block height at which a node will halt
halt-height = 0
# HaltTime contains a non-zero time at which a node will halt
halt-time = 0
# MinRetainBlocks defines the number of blocks for which a node will retain
min-retain-blocks = 0
# InterBlockCache enables inter-block caching
inter-block-cache = true
# IndexEvents defines the set of events in the form {eventType}.{attributeKey}
index-events = []
# IavlCacheSize set the size of the iavl tree cache
iavl-cache-size = 781250
```
#### API Configuration
```toml
[api]
# Enable defines if the API server should be enabled
enable = true
# Swagger defines if swagger documentation should automatically be registered
swagger = true
# Address defines the API server to listen on
address = "tcp://0.0.0.0:1317"
# MaxOpenConnections defines the number of maximum open connections
max-open-connections = 1000
# EnabledUnsafeCORS defines if CORS should be enabled
enabled-unsafe-cors = true
```
#### gRPC Configuration
```toml
[grpc]
# Enable defines if the gRPC server should be enabled
enable = true
# Address defines the gRPC server address to bind to
address = "0.0.0.0:9090"
```
#### EVM JSON-RPC Configuration
```toml
[json-rpc]
# Enable the JSON-RPC server
enable = true
# Address to bind the JSON-RPC server
address = "0.0.0.0:8545"
# Address to bind the WebSocket server
ws-address = "0.0.0.0:8546"
# APIs to enable
api = "eth,net,web3,txpool,personal,debug"
# Gas cap for eth_call/estimateGas
gas-cap = 25000000
# EVM timeout for eth_call/estimateGas
evm-timeout = "5s"
# Tx fee cap for transactions
txfee-cap = 1
# Filter cap for eth_getLogs
filter-cap = 200
# FeeHistory cap
feehistory-cap = 100
# Block range cap for eth_getLogs
logs-cap = 10000
# Block range cap
block-range-cap = 10000
# HTTP timeout
http-timeout = "30s"
# HTTP idle timeout
http-idle-timeout = "120s"
# Allow unprotected transactions
allow-unprotected-txs = true
# Maximum number of transactions in the pool
max-tx-in-pool = 3000
# Enable indexer
enable-indexer = false
# Enable metrics
metrics = true
```
### Configuration Profiles
#### Full Node (Default)
Balanced configuration for full nodes:
```bash
# config.toml adjustments
sed -i 's/^indexer = ".*"/indexer = "kv"/' ~/.stabled/config/config.toml
sed -i 's/^max_num_inbound_peers = .*/max_num_inbound_peers = 50/' ~/.stabled/config/config.toml
sed -i 's/^max_num_outbound_peers = .*/max_num_outbound_peers = 30/' ~/.stabled/config/config.toml
# app.toml adjustments
sed -i 's/^pruning = ".*"/pruning = "default"/' ~/.stabled/config/app.toml
sed -i 's/^snapshot-interval = .*/snapshot-interval = 1000/' ~/.stabled/config/app.toml
```
#### Archive Node
No pruning, full history:
```bash
# config.toml adjustments
sed -i 's/^indexer = ".*"/indexer = "kv"/' ~/.stabled/config/config.toml
# app.toml adjustments
sed -i 's/^pruning = ".*"/pruning = "nothing"/' ~/.stabled/config/app.toml
```
#### RPC Node
Public RPC endpoint configuration:
```bash
# config.toml adjustments
sed -i 's/^max_num_inbound_peers = .*/max_num_inbound_peers = 30/' ~/.stabled/config/config.toml
sed -i 's/^max_open_connections = .*/max_open_connections = 30/' ~/.stabled/config/config.toml
sed -i 's/^cors_allowed_origins = .*/cors_allowed_origins = ["*"]/' ~/.stabled/config/config.toml
# app.toml adjustments
sed -i 's/^enable = .*/enable = true/' ~/.stabled/config/app.toml
sed -i 's/^swagger = .*/swagger = true/' ~/.stabled/config/app.toml
sed -i 's/^enabled-unsafe-cors = .*/enabled-unsafe-cors = true/' ~/.stabled/config/app.toml
```
### Monitoring Configuration
#### Prometheus Metrics
```toml
# config.toml
[instrumentation]
# Enable Prometheus metrics
prometheus = true
# Metrics listen address
prometheus_listen_addr = ":26660"
# Namespace for metrics
namespace = "stablebft"
```
#### Logging
```toml
# config.toml
[log]
# Log level (trace|debug|info|warn|error|fatal|panic)
level = "info"
# Log format (plain|json)
format = "plain"
```
### Applying Configuration Changes
After making configuration changes:
```bash
# Restart the node
sudo systemctl restart ${SERVICE_NAME}
# Check logs for errors
sudo journalctl -u ${SERVICE_NAME} -f
# Verify configuration loaded
curl localhost:26657/status | jq '.result.node_info'
```
### Next Steps
* [Set up Monitoring](./monitoring) for your node
* Review [Troubleshooting Guide](./troubleshooting) for common issues
This guide provides detailed instructions for installing and setting up a Stable node on various platforms.
### Prerequisites
Before starting the installation, ensure you have:
* Met all [System Requirements](./system-requirements)
* Root or sudo access to your server
* Basic knowledge of Linux command line
### Installation Method
Use the pre-compiled binaries for your platform. Building from source is not currently supported.
#### Mainnet
##### Linux AMD64
```bash
# Download the latest binary for AMD64 architecture
wget https://stable-data-dist.s3.us-east-1.amazonaws.com/mainnet/binary/stabled-latest-linux-amd64-mainnet.tar.gz
# Extract the archive
tar -xvzf stabled-latest-linux-amd64-mainnet.tar.gz
# Move binary to system path
sudo mv stabled /usr/bin/
# Verify installation
stabled version
```
##### Linux ARM64
```bash
# Download the binary for ARM64 architecture
wget https://stable-data-dist.s3.us-east-1.amazonaws.com/mainnet/binary/stabled-latest-linux-arm64-mainnet.tar.gz
# Extract and install
tar -xvzf stabled-latest-linux-arm64-mainnet.tar.gz
sudo mv stabled /usr/bin/
# Verify installation
stabled version
```
#### Testnet
##### Linux AMD64
```bash
# Download the latest binary for AMD64 architecture
wget https://stable-data-dist.s3.us-east-1.amazonaws.com/testnet/binary/stabled-latest-linux-amd64-testnet.tar.gz
# Extract the archive
tar -xvzf stabled-latest-linux-amd64-testnet.tar.gz
# Move binary to system path
sudo mv stabled /usr/bin/
# Verify installation
stabled version
```
##### Linux ARM64
```bash
# Download the binary for ARM64 architecture
wget https://stable-data-dist.s3.us-east-1.amazonaws.com/testnet/binary/stabled-latest-linux-arm64-testnet.tar.gz
# Extract and install
tar -xvzf stabled-latest-linux-arm64-testnet.tar.gz
sudo mv stabled /usr/bin/
# Verify installation
stabled version
```
### Node Initialization
After installing the binary, initialize your node:
#### Step 1: Set Node Name
```bash
# Set your node's moniker (choose a unique name)
export MONIKER="your-node-name"
```
#### Step 2: Initialize the Node
#### Mainnet
```bash
# Initialize with the mainnet chain ID
stabled init $MONIKER --chain-id stable_988-1
# This creates the configuration directory at ~/.stabled/
```
> **Note**: For current network parameters including chain ID, see [Mainnet Information](#TODO)
#### Testnet
```bash
# Initialize with the testnet chain ID
stabled init $MONIKER --chain-id stabletestnet_2201-1
# This creates the configuration directory at ~/.stabled/
```
> **Note**: For current network parameters including chain ID, see [Testnet Information](#TODO)
#### Step 3: Download Genesis File
:::code-group
```bash [Mainnet]
# Create backup of default genesis
mv ~/.stabled/config/genesis.json ~/.stabled/config/genesis.json.backup
# Download mainnet genesis
wget https://stable-data-dist.s3.us-east-1.amazonaws.com/mainnet/configuration/genesis.zip
unzip genesis.zip
# Move genesis to config directory
cp genesis.json ~/.stabled/config/genesis.json
# Verify genesis checksum
sha256sum ~/.stabled/config/genesis.json
# Expected: e1ceda79a3cc48a1028ca8646a2e9e2d156f610637cfb8b428ca8354277921f1
```
```bash [Testnet]
# Create backup of default genesis
mv ~/.stabled/config/genesis.json ~/.stabled/config/genesis.json.backup
# Download testnet genesis
wget https://stable-data-dist.s3.us-east-1.amazonaws.com/testnet/configuration/genesis.zip
unzip genesis.zip
# Move genesis to config directory
cp genesis.json ~/.stabled/config/genesis.json
# Verify genesis checksum
sha256sum ~/.stabled/config/genesis.json
# Expected: 66afbb6e57e6faf019b3021de299125cddab61d433f28894db751252f5b8eaf2
```
:::
#### Step 4: Configure Node
##### Download Configuration Files
:::code-group
```bash [Mainnet]
# Download optimized configuration (choose one based on your node type)
# For RPC/Full nodes:
wget https://stable-data-dist.s3.us-east-1.amazonaws.com/mainnet/configuration/rpc_node_config.zip
unzip rpc_node_config.zip
# For Archive nodes:
# wget https://stable-data-dist.s3.us-east-1.amazonaws.com/mainnet/configuration/archive_node_config.zip
# unzip archive_node_config.zip
# Backup original config
cp ~/.stabled/config/config.toml ~/.stabled/config/config.toml.backup
# Apply new configuration
cp config.toml ~/.stabled/config/config.toml
# Update moniker in config
sed -i "s/^moniker = \".*\"/moniker = \"$MONIKER\"/" ~/.stabled/config/config.toml
```
```bash [Testnet]
# Download optimized configuration
wget https://stable-data-dist.s3.us-east-1.amazonaws.com/testnet/configuration/rpc_node_config.zip
unzip rpc_node_config.zip
# Backup original config
cp ~/.stabled/config/config.toml ~/.stabled/config/config.toml.backup
# Apply new configuration
cp config.toml ~/.stabled/config/config.toml
# Update moniker in config
sed -i "s/^moniker = \".*\"/moniker = \"$MONIKER\"/" ~/.stabled/config/config.toml
```
:::
##### Essential Configuration Updates
Edit `~/.stabled/config/app.toml`:
```toml
# Enable JSON-RPC for EVM compatibility
[json-rpc]
enable = true
address = "0.0.0.0:8545"
ws-address = "0.0.0.0:8546"
allow-unprotected-txs = true
```
Edit `~/.stabled/config/config.toml`:
:::code-group
```toml [Mainnet]
# P2P Configuration
[p2p]
# Maximum number of peers
max_num_inbound_peers = 50
max_num_outbound_peers = 30
# Seed nodes
seeds = "9aa181b20248e948567cb47a15eae35d58cd549d@seed1.stable.xyz:46656"
# Persistent peers (mainnet seed nodes)
persistent_peers = "b896f6f8ca5a4d1cc40de09407df0c96e76df950@peer1.stable.xyz:26656"
# Enable peer exchange
pex = true
# RPC Configuration
[rpc]
# Listen address
laddr = "tcp://0.0.0.0:26657"
# Maximum number of simultaneous connections
max_open_connections = 900
# CORS settings (adjust for production)
cors_allowed_origins = ["*"]
```
```toml [Testnet]
# P2P Configuration
[p2p]
# Maximum number of peers
max_num_inbound_peers = 50
max_num_outbound_peers = 30
# Seed nodes
seeds = "6f3195823f7e5ee6f911a0a0ceb9ea689e0dc5bd@seed1.testnet.stable.xyz:56656"
# Persistent peers (testnet seed nodes)
persistent_peers = "128accd3e8ee379bfdf54560c21345451c7048c7@peer1.testnet.stable.xyz:26656"
# Enable peer exchange
pex = true
# RPC Configuration
[rpc]
# Listen address
laddr = "tcp://0.0.0.0:26657"
# Maximum number of simultaneous connections
max_open_connections = 900
# CORS settings (adjust for production)
cors_allowed_origins = ["*"]
```
:::
### Systemd Service Setup
Create a systemd service for automatic management:
#### Step 1: Create Service File
:::code-group
```bash [Mainnet]
sudo tee /etc/systemd/system/stabled.service > /dev/null < /dev/null <> ~/.bashrc
echo "export DAEMON_NAME=stabled" >> ~/.bashrc
echo "export DAEMON_HOME=$HOME/.stabled" >> ~/.bashrc
echo "export DAEMON_ALLOW_DOWNLOAD_BINARIES=true" >> ~/.bashrc
echo "export DAEMON_RESTART_AFTER_UPGRADE=true" >> ~/.bashrc
echo "export DAEMON_LOG_BUFFER_SIZE=512" >> ~/.bashrc
echo "export UNSAFE_SKIP_BACKUP=true" >> ~/.bashrc
# Load variables
source ~/.bashrc
```
#### Step 3: Setup Cosmovisor Directory Structure
```bash
# Create cosmovisor directory structure
mkdir -p ~/.stabled/cosmovisor/genesis/bin
mkdir -p ~/.stabled/cosmovisor/upgrades
# Copy current binary to genesis
cp /usr/bin/stabled ~/.stabled/cosmovisor/genesis/bin/
# Create current symlink
ln -s ~/.stabled/cosmovisor/genesis ~/.stabled/cosmovisor/current
# Verify setup
ls -la ~/.stabled/cosmovisor/
cosmovisor run version
```
#### Step 4: Set Environment Variable
```bash
# Set service name (default: stable)
export SERVICE_NAME=stable
```
#### Step 5: Create Service File
:::code-group
```bash [Mainnet]
sudo tee /etc/systemd/system/${SERVICE_NAME}.service > /dev/null < /dev/null < /dev/null < /dev/null < /dev/null < /dev/null < 3 |
| `stablebft_consensus_block_interval` | 区块时间 | > 10 秒 |
| `stablebft_p2p_peers` | 连接的对等节点 | \< 3 |
| `stablebft_mempool_size` | 内存池大小 | > 1500 |
| `stablebft_mempool_failed_txs` | 失败的交易 | > 100/分钟 |
#### 系统指标
| 指标 | 描述 | 告警阈值 |
| ---------------------------------- | ------- | -------------- |
| `node_cpu_seconds_total` | CPU 使用率 | > 80% 持续 5 分钟 |
| `node_memory_MemAvailable_bytes` | 可用内存 | \< 10% |
| `node_filesystem_avail_bytes` | 可用磁盘 | \< 10% |
| `node_network_receive_bytes_total` | 网络接收 | > 100MB/s |
| `node_disk_io_time_seconds_total` | 磁盘 I/O | > 80% |
| `node_load15` | 系统负载 | > CPU 核心数 \* 2 |
### Grafana 仪表板设置
#### 导入 Stable 仪表板
```json
{
"dashboard": {
"title": "Stable 节点监控",
"panels": [
{
"title": "区块高度",
"targets": [
{
"expr": "stablebft_consensus_height{chain_id=\"stabletestnet_2201-1\"}"
}
]
},
{
"title": "对等节点",
"targets": [
{
"expr": "stablebft_p2p_peers"
}
]
},
{
"title": "区块时间",
"targets": [
{
"expr": "rate(stablebft_consensus_height[1m]) * 60"
}
]
},
{
"title": "内存池大小",
"targets": [
{
"expr": "stablebft_mempool_size"
}
]
}
]
}
}
```
### AlertManager 配置
#### 安装 AlertManager
```bash
# 下载 AlertManager
wget https://github.com/prometheus/alertmanager/releases/download/v0.26.0/alertmanager-0.26.0.linux-amd64.tar.gz
tar xvf alertmanager-0.26.0.linux-amd64.tar.gz
sudo mv alertmanager-0.26.0.linux-amd64 /opt/alertmanager
# 配置
sudo tee /opt/alertmanager/alertmanager.yml > /dev/null < 1500
for: 10m
labels:
severity: warning
annotations:
summary: "内存池大小过高:{{ $value }}"
```
### 健康检查脚本
```bash
#!/bin/bash
# health-check.sh
set -e
# 颜色输出
RED='\033[0;31m'
GREEN='\033[0;32m'
YELLOW='\033[1;33m'
NC='\033[0m'
export SERVICE_NAME="stable"
echo "=== Stable 节点健康检查 ==="
echo
# 检查服务是否运行
if systemctl is-active --quiet ${SERVICE_NAME}; then
echo -e "${GREEN}✓${NC} 服务正在运行"
else
echo -e "${RED}✗${NC} 服务未运行"
exit 1
fi
# 检查节点同步状态
SYNC_STATUS=$(curl -s localhost:26657/status | jq -r '.result.sync_info.catching_up')
if [ "$SYNC_STATUS" = "false" ]; then
echo -e "${GREEN}✓${NC} 节点已同步"
else
echo -e "${YELLOW}⚠${NC} 节点正在同步"
fi
# 检查对等节点数量
PEERS=$(curl -s localhost:26657/net_info | jq -r '.result.n_peers')
if [ "$PEERS" -ge 3 ]; then
echo -e "${GREEN}✓${NC} 连接的对等节点:$PEERS"
else
echo -e "${YELLOW}⚠${NC} 对等节点数量过低:$PEERS"
fi
# 检查磁盘空间
DISK_USAGE=$(df -h / | awk 'NR==2 {print $5}' | sed 's/%//')
if [ "$DISK_USAGE" -lt 80 ]; then
echo -e "${GREEN}✓${NC} 磁盘使用率:${DISK_USAGE}%"
else
echo -e "${YELLOW}⚠${NC} 磁盘使用率过高:${DISK_USAGE}%"
fi
echo
echo "=== 健康检查完成 ==="
```
### 维护任务
#### 日常维护
```bash
#!/bin/bash
# daily-maintenance.sh
# 轮换日志
sudo journalctl --rotate
sudo journalctl --vacuum-time=7d
# 清理缓存
sync && echo 3 | sudo tee /proc/sys/vm/drop_caches
# 检查更新
echo "检查更新..."
curl -s https://api.github.com/repos/stable-chain/stable/releases/latest | jq -r '.tag_name'
# 备份重要配置文件
cp ~/.stabled/config/node_key.json ~/backups/node_key_$(date +%Y%m%d).json
```
### 监控最佳实践
1. **设置冗余监控**
* 使用外部监控服务
* 实现跨节点监控
* 设置死人开关告警
2. **防止告警疲劳**
* 基于基线调整告警阈值
* 使用告警分组和抑制
* 实现升级策略
3. **数据保留**
* 至少保留 30 天指标
* 归档重要日志
* 定期备份监控配置
### 下一步
* [查看故障排除指南](./troubleshooting)以解决问题
* [配置升级](./upgrades)并监控
* 根据您的要求设置自定义告警
## Overview
This comprehensive guide covers everything you need to know about running and maintaining Stable nodes.
### Quick Links
* **[System Requirements](./system-requirements)** - Hardware and software requirements for different node types
* **[Installation Guide](./installation)** - Step-by-step installation instructions for various platforms
* **[Configuration](./configuration)** - Detailed configuration options and best practices
* **[Snapshots & Sync](./snapshots)** - Fast sync options using snapshots
* **[Upgrade Guide](./upgrades)** - Node upgrade procedures and version history
* **[Monitoring](./monitoring)** - Tools and metrics for node monitoring
* **[Troubleshooting](./troubleshooting)** - Common issues and solutions
### Node Types
#### Full Node
A full node maintains a complete copy of the blockchain and validates all transactions and blocks. Full nodes:
* Verify all transactions and blocks
* Maintain the entire blockchain history
* Can serve data to other nodes
* Support the network's decentralization
#### Archive Node
An archive node stores the complete history of all states and can serve historical queries. Archive nodes:
* Store all historical states
* Support historical queries at any block height
* Require significantly more storage
* Essential for block explorers and analytics
### Network Information
For complete network details including RPC endpoints, block explorers, and chain parameters, see:
* **[Mainnet](#TODO)** - Mainnet details
* **[Testnet](#TODO)** - Testnet details
### Support and Community
* **Discord**: [Join our Discord](https://discord.gg/stablexyz)
### Quick Start
For experienced operators who want to get started quickly:
1. Check [System Requirements](./system-requirements)
2. Follow the [Installation Guide](./installation)
3. Configure your node using [Configuration Guide](./configuration)
4. Speed up sync with [Snapshots](./snapshots)
5. Monitor your node with [Monitoring Guide](./monitoring)
For network parameters and RPC endpoints, see [Mainnet Information](#TODO) or [Testnet Information](#TODO).
This guide covers various methods to synchronize your Stable node quickly using snapshots and state sync.
### Sync Methods Overview
| Method | Sync Time | Storage Required | Use Case |
| -------------------- | --------- | ---------------- | ------------------------------ |
| **Pruned Snapshot** | \~10 min | \< 5 GiB | Regular full nodes |
| **Archive Snapshot** | \~1 hours | \~500 GB | Archive nodes, block explorers |
### Official Snapshots
Stable provides official snapshots updated daily (00:00 UTC).
#### Snapshot Information
#### Mainnet
| Type | Compression | Size | URL | Update Frequency |
| ----------- | ----------- | -------- | -------------------------------------------------------------------------------------------------------- | ---------------- |
| **Pruned** | LZ4 | \< 5 GiB | [Download](https://stable-data-dist.s3.us-east-1.amazonaws.com/mainnet/snapshots/snapshot.tar.lz4) | Daily |
| **Archive** | ZSTD | \~300 GB | [Download](https://stable-data-dist.s3.us-east-1.amazonaws.com/mainnet/snapshots/stable_archive.tar.zst) | Weekly |
#### Testnet
| Type | Compression | Size | URL | Update Frequency |
| ----------- | ----------- | -------- | -------------------------------------------------------------------------------------------------------- | ---------------- |
| **Pruned** | LZ4 | \< 5 GiB | [Download](https://stable-data-dist.s3.us-east-1.amazonaws.com/testnet/snapshots/snapshot.tar.lz4) | Daily |
| **Archive** | ZSTD | \~800 GB | [Download](https://stable-data-dist.s3.us-east-1.amazonaws.com/testnet/snapshots/stable_archive.tar.zst) | Weekly |
### Using Pruned Snapshots
Pruned snapshots contain recent blockchain state (last 100-1000 blocks).
#### Step 1: Set Environment Variable
```bash
# Set service name (default: stable)
export SERVICE_NAME=stable
```
#### Step 2: Stop Node Service
```bash
# Stop the running node
sudo systemctl stop ${SERVICE_NAME}
# Verify it's stopped
sudo systemctl status ${SERVICE_NAME}
```
#### Step 2: Backup Current Data (Optional)
```bash
# Create backup directory
mkdir -p ~/stable-backup
# Backup current state (optional, requires significant space)
cp -r ~/.stabled/data ~/stable-backup/
```
#### Step 3: Download and Extract Pruned Snapshot
:::code-group
```bash [Mainnet]
# Install dependencies
sudo apt install -y wget zstd pv
# Create snapshot directory
mkdir -p ~/snapshot
cd ~/snapshot
# Download pruned snapshot with progress
wget -c https://stable-data-dist.s3.us-east-1.amazonaws.com/mainnet/snapshots/snapshot.tar.lz4
# Remove old data
rm -rf ~/.stabled/data/*
# Extract snapshot with progress indicator
pv stable_pruned.tar.zst | zstd -d -c | tar -xf - -C ~/.stabled/
# Alternative extraction without pv
zstd -d stable_pruned.tar.zst -c | tar -xvf - -C ~/.stabled/
# Clean up
rm stable_pruned.tar.zst
```
```bash [Testnet]
# Install dependencies
sudo apt install -y wget lz4 pv
# Create snapshot directory
mkdir -p ~/snapshot
cd ~/snapshot
# Download pruned snapshot with progress
wget -c https://stable-data-dist.s3.us-east-1.amazonaws.com/testnet/snapshots/snapshot.tar.lz4
# Alternative: Download with resume support
curl -C - -o snapshot.tar.lz4 https://stable-data-dist.s3.us-east-1.amazonaws.com/testnet/snapshots/snapshot.tar.lz4
# Remove old data
rm -rf ~/.stabled/data/*
# Extract snapshot with progress indicator
pv snapshot.tar.lz4 | tar -I lz4 -xf - -C ~/.stabled/
# Alternative extraction without pv
tar -I lz4 -xvf snapshot.tar.lz4 -C ~/.stabled/
# Clean up
rm snapshot.tar.lz4
```
:::
#### Step 4: Restart Node
```bash
# Start the node
sudo systemctl start ${SERVICE_NAME}
# Check status
sudo systemctl status ${SERVICE_NAME}
# Monitor logs
sudo journalctl -u stabled -f
```
### Using Archive Snapshots
Archive snapshots contain complete blockchain history.
#### Step 1: Prepare System
```bash
# Stop node
sudo systemctl stop ${SERVICE_NAME}
# Install dependencies
sudo apt install -y wget zstd pv
# Check available disk space (need 2x snapshot size)
df -h ~/.stabled
```
#### Step 2: Download and Extract Archive Snapshot
:::code-group
```bash [Mainnet]
# Create working directory
mkdir -p ~/snapshot
cd ~/snapshot
# Download archive snapshot
wget -c https://stable-data-dist.s3.us-east-1.amazonaws.com/mainnet/snapshots/stable_archive.tar.zst
# Clear old data
rm -rf ~/.stabled/data/*
# Extract with high memory for better performance
pv stable_archive.tar.zst | zstd -d --long=31 --memory=2048MB -c - | tar -xf - -C ~/.stabled/
# Alternative: Standard extraction
zstd -d --long=31 stable_archive.tar.zst -c | tar -xvf - -C ~/.stabled/
# Clean up
rm stable_archive.tar.zst
```
```bash [Testnet]
# Create working directory
mkdir -p ~/snapshot
cd ~/snapshot
# Download archive snapshot
wget -c https://stable-data-dist.s3.us-east-1.amazonaws.com/testnet/snapshots/stable_archive.tar.zst
# Clear old data
rm -rf ~/.stabled/data/*
# Extract with high memory for better performance
pv archive.tar.zst | zstd -d --long=31 --memory=2048MB -c - | tar -xf - -C ~/.stabled/
# Alternative: Standard extraction
zstd -d --long=31 archive.tar.zst -c | tar -xvf - -C ~/.stabled/
# Clean up
rm archive.tar.zst
```
:::
#### Step 3: Start Node
```bash
# Start service
sudo systemctl start ${SERVICE_NAME}
# Verify sync status
curl -s localhost:26657/status | jq '.result.sync_info'
```
### Creating Your Own Snapshots
#### Manual Snapshot Creation
```bash
# Stop node
sudo systemctl stop ${SERVICE_NAME}
# Create snapshot archive
cd ~/.stabled
tar -cf - data/ | lz4 -9 > ~/stable-snapshot-$(date +%Y%m%d).tar.lz4
# Create checksum
sha256sum ~/stable-snapshot-*.tar.lz4 > checksums.txt
# Restart node
sudo systemctl start ${SERVICE_NAME}
```
#### Automated Snapshot Script
```bash
#!/bin/bash
# snapshot.sh - Automated snapshot creation
# Configuration
SNAPSHOT_DIR="/var/snapshots"
STABLED_HOME="$HOME/.stabled"
KEEP_DAYS=7
# Create snapshot directory
mkdir -p $SNAPSHOT_DIR
# Stop node
sudo systemctl stop ${SERVICE_NAME}
# Create snapshot
SNAPSHOT_NAME="stable-snapshot-$(date +%Y%m%d-%H%M%S).tar.lz4"
tar -cf - -C $STABLED_HOME data/ | lz4 -9 > $SNAPSHOT_DIR/$SNAPSHOT_NAME
# Generate metadata
cat > $SNAPSHOT_DIR/latest.json < 1000 MiBps |
| **网络** | 100 Mbps | 稳定、低延迟连接 |
| **操作系统** | Ubuntu 22.04/24.04, Debian 12 | 需要 64 位 Linux |
#### 全节点(推荐配置)
| 组件 | 要求 | 说明 |
| -------- | ------------ | ------------------------------- |
| **CPU** | 8 核心 | AMD Ryzen 7 / Intel Core i7 或更佳 |
| **RAM** | 16 GB | 32 GB 可获得最佳性能 |
| **存储** | 1 TB NVMe | 写入吞吐量 > 2000 MiBps |
| **网络** | 1 Gbps | 首选专用连接 |
| **操作系统** | Ubuntu 24.04 | 建议最新 LTS |
#### 存档节点
| 组件 | 要求 | 说明 |
| -------- | ------------ | --------------------------------- |
| **CPU** | 16 核心 | AMD Ryzen 9 / Intel Core i9 或同等产品 |
| **RAM** | 32 GB | 建议 64 GB |
| **存储** | 4 TB NVMe | 快速增长,需规划扩容 |
| **网络** | 1 Gbps | 需要不计量连接 |
| **操作系统** | Ubuntu 24.04 | 建议最新 LTS |
### 软件要求
#### 操作系统
##### 支持的发行版
* **Ubuntu 24.04 LTS**(推荐)
* **Ubuntu 22.04 LTS**
* **Debian 12 (Bookworm)**
##### 系统依赖
```bash
# 更新系统包
sudo apt update && sudo apt upgrade -y
# 安装基本工具
sudo apt install -y \
build-essential \
git \
wget \
curl \
jq \
lz4 \
zstd \
htop \
net-tools \
ufw
```
### 网络要求
#### 带宽使用情况
| 节点类型 | 下载 | 上传 | 月流量 |
| ---- | ------------- | ------------ | ------- |
| 全节点 | \~50 Mbps 平均 | \~25 Mbps 平均 | \~15 TB |
| 存档节点 | \~100 Mbps 平均 | \~50 Mbps 平均 | \~30 TB |
### 云服务提供商推荐
#### AWS
* **全节点**:t3.xlarge 或 c5.xlarge
* **存档节点**:m5.2xlarge 或 c5.2xlarge
* **存储**:gp3 配置 IOPS
#### Google Cloud
* **全节点**:n2-standard-4
* **存档节点**:n2-standard-8
* **存储**:pd-ssd 或 pd-extreme
#### Azure
* **全节点**:Standard\_D4s\_v5
* **存档节点**:Standard\_D8s\_v5
* **存储**:Premium SSD v2
#### DigitalOcean
* **全节点**:General Purpose 8GB
* **存档节点**:CPU-Optimized 16GB
* **存储**:Volume Block Storage
### 监控要求
对于生产环境部署,请确保您拥有:
* **Prometheus**:用于指标收集
* **Grafana**:用于可视化
* **AlertManager**:用于告警
* **Node Exporter**:用于系统指标
* **日志聚合**:建议使用 ELK 或 Loki
### 安全考虑
#### 系统加固
* 保持操作系统和软件包更新
* 配置自动安全更新
* 仅使用 SSH 密钥(禁用密码认证)
* 配置 fail2ban
* 启用防火墙(UFW/iptables)
* 定期安全审计
### 安装前检查清单
在进行安装之前,请验证:
* [ ] 硬件满足最低要求
* [ ] 操作系统受支持且已更新
* [ ] 存储具有足够的 IOPS
* [ ] 网络带宽充足
* [ ] 防火墙规则已配置
* [ ] 系统监控已设置
* [ ] 备份策略已定义
* [ ] 安全措施已到位
本综合指南帮助诊断和解决 Stable 节点的常见问题。
### 快速诊断
#### 节点健康检查脚本
```bash
#!/bin/bash
# quick-diagnosis.sh
# 设置服务名称(默认:stable)
export SERVICE_NAME=stable
echo "=== Stable 节点诊断 ==="
echo "时间戳:$(date)"
echo ""
# 1. 服务状态
echo "1. 服务状态:"
systemctl status ${SERVICE_NAME} --no-pager | head -10
# 2. 同步状态
echo -e "\n2. 同步状态:"
curl -s localhost:26657/status | jq '.result.sync_info' 2>/dev/null || echo "RPC 无响应"
# 3. 对等节点连接
echo -e "\n3. 对等节点数量:"
curl -s localhost:26657/net_info | jq '.result.n_peers' 2>/dev/null || echo "无法获取对等节点信息"
# 4. 最近错误
echo -e "\n4. 最近错误(最后 20 条):"
sudo journalctl -u ${SERVICE_NAME} --since "1 hour ago" | grep -i error | tail -20
# 5. 系统资源
echo -e "\n5. 系统资源:"
df -h / | grep -v Filesystem
free -h | grep Mem
top -bn1 | grep "load average"
# 6. 端口状态
echo -e "\n6. 端口状态:"
ss -tulpn | grep ${SERVICE_NAME} || echo "未找到 ${SERVICE_NAME} 端口"
echo -e "\n=== 诊断完成 ==="
```
### 常见问题和解决方案
#### 节点无法启动
##### 问题:找不到二进制文件
**错误信息:**
```
stabled: command not found
```
**解决方案:**
```bash
# 检查二进制文件是否存在
ls -la /usr/bin/stabled
# 如果缺失,重新安装(如需要使用 arm64)
wget https://stable-data-dist.s3.us-east-1.amazonaws.com/testnet/binary/stabled-0.7.2-linux-amd64-testnet.tar.gz
tar -xvzf stabled-0.7.2-linux-amd64-testnet.tar.gz
sudo mv stabled /usr/bin/
sudo chmod +x /usr/bin/stabled
```
##### 问题:权限拒绝
**错误信息:**
```
Error: open /home/user/.stabled/config/config.toml: permission denied
```
**解决方案:**
```bash
# 修复所有权
sudo chown -R $USER:$USER ~/.stabled/
# 修复权限
chmod 700 ~/.stabled/
chmod 600 ~/.stabled/config/*.json
chmod 644 ~/.stabled/config/*.toml
```
##### 问题:地址已被使用
**错误信息:**
```
Error: listen tcp 0.0.0.0:26657: bind: address already in use
```
**解决方案:**
```bash
# 查找使用端口的进程
sudo lsof -i :26657
# 杀死进程
sudo kill -9
# 或更改配置中的端口
sed -i 's/laddr = "tcp:\/\/0.0.0.0:26657"/laddr = "tcp:\/\/0.0.0.0:26658"/' ~/.stabled/config/config.toml
```
#### 同步问题
##### 问题:节点在特定高度卡住
**症状:**
* 区块高度不增长
* 超过 1 分钟无新区块
**解决方案:**
```bash
# 1. 检查对等节点
curl localhost:26657/net_info | jq '.result.n_peers'
# 如果没有对等节点,添加持久对等节点
echo "persistent_peers = \"5ed0f977a26ccf290e184e364fb04e268ef16430@37.187.147.27:26656,128accd3e8ee379bfdf54560c21345451c7048c7@37.187.147.22:26656\"" >> ~/.stabled/config/config.toml
# 2. 重置并重新同步
sudo systemctl stop ${SERVICE_NAME}
stabled comet unsafe-reset-all --keep-addr-book
sudo systemctl start ${SERVICE_NAME}
# 3. 使用快照(参见快照指南)
```
##### 问题:"wrong Block.Header.AppHash" 错误
**错误信息:**
```
panic: Wrong Block.Header.AppHash. Expected XXXX, got YYYY
```
**解决方案:**
```bash
# 这表示状态损坏 - 回滚到上一个区块
sudo systemctl stop ${SERVICE_NAME}
# 回滚一个区块
stabled rollback
# 重启节点
sudo systemctl start ${SERVICE_NAME}
# 如果回滚无效,从快照恢复
# 备份重要文件
cp ~/.stabled/config/priv_validator_key.json ~/backup/
cp ~/.stabled/config/node_key.json ~/backup/
# 重置状态
stabled comet unsafe-reset-all
# 从快照恢复
wget https://stable-data-dist.s3.us-east-1.amazonaws.com/testnet/snapshots/snapshot.tar.lz4
tar -I lz4 -xf snapshot.tar.lz4 -C ~/.stabled/
sudo systemctl start ${SERVICE_NAME}
```
#### 对等节点连接问题
##### 问题:无对等节点连接
**症状:**
```
"n_peers": 0
```
**解决方案:**
```bash
# 1. 检查防火墙
sudo ufw status
sudo ufw allow 26656/tcp
# 2. 检查外部 IP
curl ifconfig.me
# 3. 更新外部地址
sed -i "s/external_address = .*/external_address = \"$(curl -s ifconfig.me):26656\"/" ~/.stabled/config/config.toml
# 4. 添加种子节点
cat >> ~/.stabled/config/config.toml < db_dump.txt
# 4. 如果修复失败,重新同步
rm -rf ~/.stabled/data
# 从快照恢复
# 5. 启动节点
sudo systemctl start ${SERVICE_NAME}
```
#### 内存问题
##### 问题:内存不足(OOM)杀死进程
**症状:**
```
stabled.service: Main process exited, code=killed, status=9/KILL
```
**解决方案:**
```bash
# 1. 检查内存使用情况
free -h
dmesg | grep -i "killed process"
# 2. 添加交换空间
sudo fallocate -l 8G /swapfile
sudo chmod 600 /swapfile
sudo mkswap /swapfile
sudo swapon /swapfile
echo '/swapfile none swap sw 0 0' | sudo tee -a /etc/fstab
# 3. 优化内存使用
cat >> ~/.stabled/config/app.toml < $OUTPUT_DIR/system.txt
df -h >> $OUTPUT_DIR/system.txt
free -h >> $OUTPUT_DIR/system.txt
# 服务状态
systemctl status ${SERVICE_NAME} --no-pager > $OUTPUT_DIR/service-status.txt
# 最近日志
sudo journalctl -u ${SERVICE_NAME} --since "1 hour ago" > $OUTPUT_DIR/recent-logs.txt
# 配置文件(删除敏感数据)
grep -v "priv" ~/.stabled/config/config.toml > $OUTPUT_DIR/config.toml
grep -v "priv" ~/.stabled/config/app.toml > $OUTPUT_DIR/app.toml
# 节点状态
curl -s localhost:26657/status > $OUTPUT_DIR/node-status.json 2>/dev/null
# 创建归档
tar -czf $OUTPUT_DIR.tar.gz $OUTPUT_DIR/
echo "调试信息已收集:$OUTPUT_DIR.tar.gz"
echo "请求支持时分享此文件"
```
### 下一步
* 查看[监控设置](./monitoring)以防止问题
* 检查[升级指南](./upgrades)了解版本特定问题
本指南涵盖 Stable 节点的升级流程,包括升级程序和回滚策略。
> 有关完整的版本历史和升级详情,请参阅[版本历史](/cn/developers/testnet/version-history)。
### 升级类型
#### 软升级(非破坏性)
* 可随时执行
* 向后兼容
#### 硬升级(破坏性)
* 需要在特定高度升级
* 不向后兼容
#### 紧急升级
* 关键安全修复
* 需要立即行动
* 可能需要链停止
### 标准升级程序
#### 步骤 1:准备工作
```bash
# 检查当前版本
stabled version --long
# 备份关键数据
cp -r ~/.stabled/config ~/stable-backup-$(date +%Y%m%d)/
# 仅限验证者:备份验证者状态
cp ~/.stabled/data/priv_validator_state.json ~/stable-backup-$(date +%Y%m%d)/
# 检查磁盘空间(需要当前数据大小的 2 倍)
df -h ~/.stabled
```
#### 步骤 2:下载新二进制文件
```bash
# 对于 v1.2.0-rc1 升级(2026年1月22日)
# 选择您的架构:
# Linux AMD64
BINARY_URL="https://stable-data-dist.s3.us-east-1.amazonaws.com/testnet/binary/stabled-1.2.0-rc1-linux-amd64-testnet.tar.gz"
# 或 Linux ARM64
BINARY_URL="https://stable-data-dist.s3.us-east-1.amazonaws.com/testnet/binary/stabled-1.2.0-rc1-linux-arm64-testnet.tar.gz"
# 下载新二进制文件
wget $BINARY_URL
# 解压到临时位置
tar -xvzf stabled-1.2.0-rc1-linux-*.tar.gz -C /tmp/
# 验证新版本
/tmp/stabled version --long
```
#### 步骤 3:执行升级
##### 对于软升级
```bash
# 停止节点
sudo systemctl stop ${SERVICE_NAME}
# 备份当前二进制文件
sudo mv /usr/bin/stabled /usr/bin/stabled.backup
# 安装新二进制文件
sudo mv /tmp/stabled /usr/bin/stabled
sudo chmod +x /usr/bin/stabled
# 验证安装
stabled version --long
# 启动节点
sudo systemctl start ${SERVICE_NAME}
# 监控日志
sudo journalctl -u ${SERVICE_NAME} -f
```
##### 对于硬升级
```bash
# 监控升级高度
while true; do
HEIGHT=$(curl -s localhost:26657/status | jq -r '.result.sync_info.latest_block_height')
echo "当前高度:$HEIGHT"
if [ $HEIGHT -ge $UPGRADE_HEIGHT ]; then
break
fi
sleep 10
done
# 节点将在升级高度自动停止
# 等待日志中的停止消息
sudo journalctl -u ${SERVICE_NAME} -f | grep "UPGRADE"
# 一旦停止,执行升级
sudo systemctl stop ${SERVICE_NAME}
sudo mv /usr/bin/stabled /usr/bin/stabled.backup
sudo mv /tmp/stabled /usr/bin/stabled
# 使用新二进制文件启动
sudo systemctl start ${SERVICE_NAME}
```
#### 步骤 4:升级后验证
```bash
# 检查节点状态
curl -s localhost:26657/status | jq '.result'
# 验证版本
curl -s localhost:26657/status | jq '.result.node_info.version'
# 检查对等节点
curl -s localhost:26657/net_info | jq '.result.n_peers'
# 监控同步状态
watch -n 2 'curl -s localhost:26657/status | jq ".result.sync_info"'
# 检查错误
sudo journalctl -u ${SERVICE_NAME} --since "10 minutes ago" | grep -i error
```
### Cosmovisor 设置(自动升级)
Cosmovisor 自动化协调升级的升级流程。
#### 安装
```bash
# 安装 cosmovisor
go install cosmossdk.io/tools/cosmovisor/cmd/cosmovisor@latest
# 或下载二进制文件
wget https://github.com/cosmos/cosmos-sdk/releases/download/cosmovisor%2Fv1.7.0/cosmovisor-v1.7.0-linux-amd64.tar.gz
tar -xzf cosmovisor-v1.7.0-linux-amd64.tar.gz
sudo mv cosmovisor /usr/bin/
```
#### 配置
```bash
# 设置环境变量
cat >> ~/.bashrc < /dev/null < > export.json
# 3. 等待协调重启说明
```
### 下一步
* [版本历史](/cn/developers/testnet/version-history) - 完整升级历史和发布说明
* 升级后[监控您的节点](./monitoring)
* 查看[故障排除](./troubleshooting)了解常见问题
## 主网信息
您访问 Stable 主网所需了解的一切信息。
### 网络概览
| 配置 | 值 |
| -------- | -------------- |
| **网络名称** | Stable Mainnet |
| **链 ID** | `988` |
| **燃料代币** | USDT0 |
| **治理代币** | STABLE |
| **出块时间** | \~0.7 秒 |
### 区块浏览器
| 浏览器 | URL |
| -------------- | ------------------------------------------------ |
| **Stablescan** | [https://stablescan.xyz](https://stablescan.xyz) |
### RPC 端点
#### 主要端点
| 类型 | 端点 | 用途 |
| ---------------- | ------------------------------------------------ | ------ |
| **EVM JSON-RPC** | [https://rpc.stable.xyz](https://rpc.stable.xyz) | EVM 交易 |
| **WebSocket** | wss\://rpc.stable.xyz | 实时更新 |
### 链信息
| 参数 | EVM |
| -------- | ------- |
| **链 ID** | `988` |
| **燃料代币** | `USDT0` |
| **小数位数** | 18 |
### 工具
| 工具 | URL | 描述 |
| ------ | ----------------------------------------- | --- |
| **快照** | 参见 [节点运营指南](../node-operations/snapshots) | 链快照 |
## 版本历史
Stable 主网的完整版本历史和相关文档。
### 当前版本信息
* **当前版本**: `v1.3.1`
* **下次升级**: `TBD`
* **升级高度**: `TBD`
* **预期时间**: `TBD`
### 版本历史
#### 当前和以前的版本
| 版本 | 提交 | 升级高度 | 二进制文件 | 状态 |
| ---------- | --------- | ---------- | ------------------------------------------------------------------------------------------------------------------------------------------------------------------------------------------------------------------------------------------- | -- |
| **v1.3.1** | `f85d155` | - | [AMD64](https://stable-data-dist.s3.us-east-1.amazonaws.com/mainnet/binary/stabled-1.3.1-linux-amd64-mainnet.tar.gz) / [ARM64](https://stable-data-dist.s3.us-east-1.amazonaws.com/mainnet/binary/stabled-1.3.1-linux-arm64-mainnet.tar.gz) | 当前 |
| **v1.3.0** | `dd103ec` | 24,077,500 | [AMD64](https://stable-data-dist.s3.us-east-1.amazonaws.com/mainnet/binary/stabled-1.3.0-linux-amd64-mainnet.tar.gz) / [ARM64](https://stable-data-dist.s3.us-east-1.amazonaws.com/mainnet/binary/stabled-1.3.0-linux-arm64-mainnet.tar.gz) | |
| **v1.2.2** | `76da1da` | - | [AMD64](https://stable-data-dist.s3.us-east-1.amazonaws.com/mainnet/binary/stabled-1.2.2-linux-amd64-mainnet.tar.gz) / [ARM64](https://stable-data-dist.s3.us-east-1.amazonaws.com/mainnet/binary/stabled-1.2.2-linux-arm64-mainnet.tar.gz) | |
| **v1.2.1** | `7955bb7` | - | [AMD64](https://stable-data-dist.s3.us-east-1.amazonaws.com/mainnet/binary/stabled-1.2.1-linux-amd64-mainnet.tar.gz) / [ARM64](https://stable-data-dist.s3.us-east-1.amazonaws.com/mainnet/binary/stabled-1.2.1-linux-arm64-mainnet.tar.gz) | |
| **v1.2.0** | `47e355b` | 12,004,000 | [AMD64](https://stable-data-dist.s3.us-east-1.amazonaws.com/mainnet/binary/stabled-1.2.0-linux-amd64-mainnet.tar.gz) / [ARM64](https://stable-data-dist.s3.us-east-1.amazonaws.com/mainnet/binary/stabled-1.2.0-linux-arm64-mainnet.tar.gz) | |
| **v1.1.4** | `c795773` | - | [AMD64](https://stable-data-dist.s3.us-east-1.amazonaws.com/mainnet/binary/stabled-1.1.4-linux-amd64-mainnet.tar.gz) / [ARM64](https://stable-data-dist.s3.us-east-1.amazonaws.com/mainnet/binary/stabled-1.1.4-linux-arm64-mainnet.tar.gz) | |
| **v1.1.2** | `3d83aa3` | 3,263,600 | [AMD64](https://stable-data-dist.s3.us-east-1.amazonaws.com/mainnet/binary/stabled-1.1.2-linux-amd64-mainnet.tar.gz) / [ARM64](https://stable-data-dist.s3.us-east-1.amazonaws.com/mainnet/binary/stabled-1.1.2-linux-arm64-mainnet.tar.gz) | |
| **v1.1.0** | `17ceaa7` | 1,694,000 | [AMD64](https://stable-data-dist.s3.us-east-1.amazonaws.com/mainnet/binary/stabled-1.1.0-linux-amd64-mainnet.tar.gz) / [ARM64](https://stable-data-dist.s3.us-east-1.amazonaws.com/mainnet/binary/stabled-1.1.0-linux-arm64-mainnet.tar.gz) | |
| **v1.0.0** | `d996084` | 创世 | [AMD64](https://stable-data-dist.s3.us-east-1.amazonaws.com/mainnet/binary/stabled-1.0.0-linux-amd64-mainnet.tar.gz) / [ARM64](https://stable-data-dist.s3.us-east-1.amazonaws.com/mainnet/binary/stabled-1.0.0-linux-arm64-mainnet.tar.gz) | 创世 |
### 相关文档
* [升级指南](/cn/developers/node-operations/upgrades) - 分步升级程序
* [主网信息](/cn/developers/mainnet/mainnet-information) - 当前网络详细信息
## EIP-7702
Stable 支持 EIP-7702,引入了统一账户模型,使外部账户(EOA)可临时以智能账户方式运行。
关键特性:
* 用户可继续使用原有的私钥签名交易
* 执行时可临时具备智能合约逻辑,无需永久升级账户
* 实现安全的支付与托管授权流程
* 改善钱包与商户使用 USDT 时的体验
开发者:
* 用户无需部署新合约即可获得合约级功能,降低接入门槛,简化托管逻辑。
## 与以太坊生态的兼容性
Stable 完全兼容 EVM,使开发者可直接使用以太坊工具、库和智能合约模块,无需进行任何修改。
**兼容特性:**
* 语言: 支持 Solidity 与 Vyper。
* 工具链: 原生兼容 Hardhat、Foundry。
* 库: 兼容 ethers.js、web3.js 等常见客户端。
* 合约模块: 遵循 ERC-20、事件机制、访问控制等标准规范。
* RPC 接口: 提供与以太坊相同的 JSON-RPC 方法,支持无缝迁移。
## 终局性规则与兼容性保证
Stable 的交易在 EVM 执行环境中处理。当交易被打包入区块后,其状态变更立即生效。
#### 确认规则:
* 交易被区块打包即视为确认
* 状态的变更(余额、存储、事件)可通过 RPC 查询
#### 结算特性:
* Stable 实现单槽终局性(single-slot finality):
* 交易一旦被有效区块打包即不可逆。
* 开发者可直接将区块打包视为结算完成。
#### 兼容性:
* 系统模块接口与执行行为在测试网期间保持稳定
* 任何潜在的破坏性变更将提前公告并记录于变更日志
* 发布时附带迁移指引
* 后续版本将引入正式的兼容性政策与变更分类机制
## Gas 定价机制
Stable 采用单一组成部分的 Gas 费模型:
* **不支持优先费用( 禁用maxPriorityFeePerGas)**
* 费用仅基于基础的执行成本
* 以 **USDT0** 支付
设计理由:
* 消除 Gas 波动,保证支付可预测性
* 简化用户体验,避免通过支付额外报酬使验证节点优先处理交易
开发者注意:
* 不支持指定优先费用以加速交易
* 钱包应隐藏或禁用优先费用的设置
* Gas 预估需基于 Stable RPC 的定价预测
## Gas 豁免人
### 摘要
Gas 豁免人(免 Gas 费)功能通过允许一小部分经过治理批准的地址("豁免人")提交 `gasPrice = 0` 的交易,实现 Stable 链上终端用户的无 Gas 费交易。Stable 目前运营一个豁免人服务("豁免人服务器"),合作伙伴可以集成该服务,无需实现特定协议的封包逻辑即可提供无 Gas 费用户体验。
本文档规定了 Gas 豁免人 机制、交易格式、治理控制以及面向合作伙伴的豁免人服务器 API。
### 范围
本规范涵盖:
* 免 Gas 费交易的协议级规则
* 封包交易机制和标记地址
* 治理控制的授权和允许的目标
* 用于提交已签名用户交易的豁免人服务器接口
### 定义
* **Waiver(豁免人)**:通过验证者治理在链上注册的以太坊地址,授权提交免 Gas 费交易。
* **InnerTx(内部交易)**:终端用户签名的交易,`gasPrice = 0`。
* **WrapperTx(封包交易)**:由豁免人签名的交易,将用户的 `InnerTx` 传输到链上并授权执行。
* **Marker address(标记地址)**:用于识别豁免人封包交易的哨兵地址:`0x000000000000000000000000000000000000f333`。
* **AllowedTarget(允许的目标)**:一种策略,将豁免人限制在特定的合约地址和方法选择器。
### 概述
Gas 豁免人 使用封包交易模式:
1. 用户使用 `gasPrice = 0` 签署 `InnerTx`。
2. 豁免人将 `InnerTx` 封包成 `WrapperTx` 并广播。
3. 验证者检测到标记交易,验证豁免人授权和策略约束,然后执行嵌入的 `InnerTx`。
Stable 运营一个豁免人服务(豁免人服务器),该服务在链上注册为授权豁免人。合作伙伴通过豁免人服务器 API 集成,提交已签名的 `InnerTx` 负载。
### 协议规范
#### 标记地址路由
当且仅当满足以下条件时,交易被视为豁免人封包交易:
* `to == 0x000000000000000000000000000000000000f333`。
协议将交易的 `data` 字段解释为编码的内部交易负载,并使用以下豁免人验证规则进行处理。
#### 授权和策略检查
对于每个候选封包交易,验证者必须执行:
1. **豁免人授权**
* `WrapperTx.from` 必须是通过治理在链上注册的豁免人地址。
2. **Gas 豁免**
* `WrapperTx.gasPrice` 必须等于 `0`。
* `InnerTx.gasPrice` 必须等于 `0`。
3. **目标白名单**
* `InnerTx.to` 和从 `InnerTx.data` 提取的方法选择器必须被豁免人的 `AllowedTarget` 策略允许。
4. **Value 限制**
* `WrapperTx.value` 必须等于 `0`。
若以上任何一条未通过,则封包交易将被拒绝,封包内部的交易也无法执行。
#### 执行语义
如果所有检查通过:
1. 协议以用户身份执行 `InnerTx`,保留用户的 `from`、`nonce` 和调用语义。
2. Gas 计费由豁免人机制处理:用户不支付 Gas 费,豁免人交易根据功能定义使用 `gasPrice = 0`。
3. 封包交易必须提供足够的 `gasLimit` 以覆盖 `InnerTx` 的执行(包括解包和验证的开销)。
### 交易格式
#### WrapperTx
封包交易由豁免人签署并发送到标记地址。
```javascript
WrapperTx {
from: waiver_address,
to: 0x000000000000000000000000000000000000f333,
value: 0, // 必须为零
data: RLP(InnerTx), // RLP 编码的内部交易
gasPrice: 0, // 必须为零
gasLimit: sufficient_for_inner, // 必须覆盖内部执行 + 开销
nonce: waiver_nonce
}
```
#### InnerTx
内部交易由终端用户签署。
```javascript
InnerTx {
from: user_address,
to: target_contract,
value: value,
data: call_data,
gasPrice: 0, // 必须为零
gasLimit: execution_gas,
nonce: user_nonce
}
```
### 治理控制的访问
豁免人授权由验证者治理在链上管理。
治理控制提供:
* 可审查的豁免人地址授权
* 豁免人注册和更新的链上透明度
* 撤销能力
* 通过 `AllowedTarget` 进行每个豁免人的范围界定
### 安全模型
#### 终端用户签名完整性
用户签署 `InnerTx`。豁免人不允许修改内部交易负载而不使签名失效。合作伙伴仍必须确保用户仅签署预期的交易负载。
#### 信任边界
如果合作伙伴通过豁免人服务器路由提交,Gas 豁免人 引入了服务依赖性:
* 服务的可用性影响提交无 Gas 费交易的能力。
* 授权保留在链上;只有注册的豁免人地址才能产生有效的封包提交。
### 合作伙伴集成
合作伙伴通过以下方式集成:
1. 从用户收集已签名的 `InnerTx`(`gasPrice = 0`)。
2. 将已签名的内部交易提交到豁免人服务器 API。
3. 处理流式结果并向终端用户显示交易哈希。
### 豁免人服务器
#### 概述
豁免人服务器将已签名的用户 `InnerTx` 负载封包并广播为豁免人授权的封包交易。合作伙伴无需构造封包交易或操作豁免人地址。
#### 端点和基础 URL
基础 URL:
* 主网:待定
* 测试网:`https://waiver.testnet.stable.xyz`
#### 身份验证
除健康检查外,所有端点都需要 Bearer Token 身份验证:
```
Authorization: Bearer
```
#### API
##### GET `/v1/health`
健康检查端点。
身份验证:无。
##### POST `/v1/submit`
提交一批已签名的内部交易。
身份验证:必需(`Bearer`)。
请求正文:
```json
{
"transactions": ["0x", "0x"]
}
```
响应以 NDJSON(换行符分隔的 JSON)流式传输。每行对应一个提交的交易索引。
示例:
```json
{"index":0,"id":"abc123","success":true,"txHash":"0x..."}
{"index":1,"id":"def456","success":false,"error":{"code":"VALIDATION_FAILED","message":"invalid signature"}}
```
##### GET `/v1/submit`
用于流式提交的 WebSocket 接口。
身份验证:必需(`Bearer`)。
#### 集成示例
```javascript
const WAIVER_SERVER = "https://waiver.testnet.stable.xyz";
async function submitGaslessTransaction(signedInnerTxHex, apiKey) {
const response = await fetch(`${WAIVER_SERVER}/v1/submit`, {
method: "POST",
headers: {
"Content-Type": "application/json",
"Authorization": `Bearer ${apiKey}`,
},
body: JSON.stringify({
transactions: [signedInnerTxHex],
}),
});
const reader = response.body.getReader();
const decoder = new TextDecoder();
while (true) {
const { done, value } = await reader.read();
if (done) break;
const lines = decoder.decode(value).trim().split("\n");
for (const line of lines) {
const result = JSON.parse(line);
console.log(result);
}
}
}
```
#### 创建用户 InnerTx
合作伙伴负责构造 `gasPrice = 0` 的 `InnerTx`,然后收集用户签名。
示例:
```javascript
import { ethers } from "ethers";
async function createInnerTx(userWallet, contractAddress, callData, nonce) {
const innerTx = {
to: contractAddress,
data: callData,
value: value,
gasPrice: 0, // 豁免人必须为 0
gasLimit: 100000,
nonce: nonce,
chainId: 2201, // 主网为 988,测试网为 2201
};
return await userWallet.signTransaction(innerTx);
}
```
#### 错误代码
* `PARSE_ERROR`:解析交易失败
* `INVALID_REQUEST`:请求正文格式错误
* `BATCH_SIZE_EXCEEDED`:批处理大小超过允许的最大值
* `VALIDATION_FAILED`:交易验证失败
* `BROADCAST_FAILED`:广播到链失败
* `RATE_LIMITED`:超过速率限制
* `QUEUE_FULL`:服务器队列已满
* `TIMEOUT`:请求超时
## JSON-RPC API
### eth\_namespace
| API | support |
| ------------------------------------------- | ------- |
| eth\_syncing | ✅ |
| eth\_gasPrice | ✅ |
| eth\_maxPriorityFeePerGas | ✅ |
| eth\_feeHistory | ✅ |
| eth\_blobBaseFee | ❌ |
| eth\_chainId | ✅ |
| eth\_blockNumber | ✅ |
| eth\_getBalance | ✅ |
| eth\_getProof | ✅ |
| eth\_getHeaderByNumber | ❌ |
| eth\_getHeaderByHash | ❌ |
| eth\_getBlockByNumber | ✅ |
| eth\_getBlockByHash | ✅ |
| eth\_getUncleByBlockNumberAndIndex | ❌ |
| eth\_getUncleByBlockHashAndIndex | ❌ |
| eth\_getUncleCountByBlockNumber | ❌ |
| eth\_getUncleCountByBlockHash | ❌ |
| eth\_getCode | ✅ |
| eth\_getStorageAt | ✅ |
| eth\_getBlockReceipts | ❌ |
| eth\_call | ✅ |
| eth\_simulateV1 | ❌ |
| eth\_estimateGas | ✅ |
| eth\_createAccessList | ❌ |
| eth\_getBlockTransactionCountByNumber | ✅ |
| eth\_getBlockTransactionCountByHash | ✅ |
| eth\_getTransactionByBlockNumberAndIndex | ✅ |
| eth\_getTransactionByBlockHashAndIndex | ✅ |
| eth\_getRawTransactionByBlockNumberAndIndex | ❌ |
| eth\_getRawTransactionByBlockHashAndIndex | ❌ |
| eth\_getTransactionCount | ✅ |
| eth\_getTransactionByHash | ✅ |
| eth\_getRawTransactionByHash | ❌ |
| eth\_getTransactionReceipt | ✅ |
| eth\_sendTransaction | ✅ |
| eth\_fillTransaction | ❌ |
| eth\_sendRawTransaction | ✅ |
| eth\_sign | ✅ |
| eth\_signTransaction | ❌ |
| eth\_pendingTransactions | ✅ |
| eth\_resend | ✅ |
| eth\_accounts | ✅ |
| eth\_subscribe | ✅ |
| eth\_unsubscribe | ✅ |
| eth\_getTransactionLogs | ✅ |
| eth\_signTypedData | ✅ |
| eth\_newPendingTransactionFilter | ✅ |
| eth\_newBlockFilter | ✅ |
| eth\_newFilter | ✅ |
| eth\_getFilterChanges | ✅ |
| eth\_getFilterLogs | ✅ |
| eth\_uninstallFilter | ✅ |
| eth\_getLogs | ✅ |
### debug\_namespace
| API | support |
| ---------------------------------- | ------- |
| debug\_accountRange | ❌ |
| debug\_backtraceAt | ❌ |
| debug\_blockProfile | ✅ |
| debug\_chaindbCompact | ❌ |
| debug\_chaindbProperty | ❌ |
| debug\_cpuProfile | ✅ |
| debug\_dbAncient | ❌ |
| debug\_dbAncients | ❌ |
| debug\_dbGet | ❌ |
| debug\_dumpBlock | ❌ |
| debug\_freeOSMemory | ✅ |
| debug\_freezeClient | ❌ |
| debug\_gcStats | ✅ |
| debug\_getAccessibleState | ❌ |
| debug\_getBadBlocks | ❌ |
| debug\_getRawBlock | ❌ |
| debug\_getRawHeader | ❌ |
| debug\_getRawTransaction | ❌ |
| debug\_getModifiedAccountsByHash | ❌ |
| debug\_getModifiedAccountsByNumber | ❌ |
| debug\_getRawReceipts | ❌ |
| debug\_goTrace | ✅ |
| debug\_intermediateRoots | ✅ |
| debug\_memStats | ✅ |
| debug\_mutexProfile | ✅ |
| debug\_preimage | ❌ |
| debug\_printBlock | ✅ |
| debug\_setBlockProfileRate | ✅ |
| debug\_setGCPercent | ✅ |
| debug\_setHead | ❌ |
| debug\_setMutexProfileFraction | ✅ |
| debug\_setTrieFlushInterval | ❌ |
| debug\_stacks | ✅ |
| debug\_standardTraceBlockToFile | ❌ |
| debug\_standardTraceBadBlockToFile | ❌ |
| debug\_startCPUProfile | ✅ |
| debug\_startGoTrace | ✅ |
| debug\_stopCPUProfile | ✅ |
| debug\_stopGoTrace | ✅ |
| debug\_storageRangeAt | ❌ |
| debug\_traceBadBlock | ❌ |
| debug\_traceBlock | ❌ |
| debug\_traceBlockByNumber | ✅ |
| debug\_traceBlockByHash | ✅ |
| debug\_traceBlockFromFile | ❌ |
| debug\_traceCall | ❌ |
| debug\_traceChain | ❌ |
| debug\_traceTransaction | ✅ |
| debug\_verbosity | ❌ |
| debug\_vmodule | ❌ |
| debug\_writeBlockProfile | ✅ |
| debug\_writeMemProfile | ✅ |
| debug\_writeMutexProfile | ✅ |
## 概览
了解更多关于 Stable 如何处理交易、费用和协议级 USDT 行为的信息。
### 核心机制介绍
Stable 是一个高性能的区块链,与以太坊虚拟机(EVM)保持完全兼容,允许开发者使用熟悉的工具和库来构建应用程序。Stable 的核心机制由几个关键领域组成,旨在提供一个强大、高效且对开发者友好的平台。
#### 系统架构
Stable 构建在以下核心组件之上:
* **执行层**:EVM 兼容的智能合约执行环境
* **共识层**:快速且安全的交易确定性共识机制
* **状态管理**:高效的区块链状态存储和管理
* **网络层**:P2P 通信和数据传播
#### 费用模型
Stable 提供可预测的费用结构:
* **单组件燃气模型**:仅基础执行成本,无优先级小费
* **以 USDT0 支付费用**:稳定且可预测的交易成本
* **消除费用波动性**:一致的价格结构,改善用户体验
#### 性能和可扩展性
* **高吞吐量**:每秒能够处理数千笔交易
* **低延迟**:快速的交易确认时间
* **高效资源利用**:优化的执行环境
### 开发者核心功能
#### 开发工具兼容性
Stable 与现有以太坊开发生态系统保持完全兼容:
**支持的编程语言:**
* Solidity
**开发框架:**
* Hardhat
* Foundry
* Truffle
**客户端库:**
* ethers.js
* web3.js
* 其他 JSON-RPC 兼容库
#### JSON-RPC API
对标准以太坊 JSON-RPC 方法的支持使现有工具和基础设施能够无缝工作:
* 完全支持 `eth_*` 方法
* 与现有索引器和监控工具兼容
* 标准交易格式支持
#### 智能合约模式
* 支持标准代币规范:ERC-20、ERC-721、ERC-1155
* 代理模式和可升级合约
* 多重签名和访问控制机制
* 事件记录和状态管理
### USDT 集成
#### 原生 USDT 支持
Stable 的独特特性之一是 USDT 的原生集成:
* **USDT 作为燃气代币**:可直接使用 USDT 支付交易费用
* **跨链兼容性**:与其他链之间无缝的 USDT 移动
#### USDT 专用功能
* **保障块空间**:USDT 交易的优先处理
* **转账聚合器**:高效的批量转账处理
* **机密转账**:增强的隐私保护
### 系统模块
Stable 由以下核心系统模块组成:
#### Bank 模块
* 账户余额管理
* 代币转账和托管
* 多资产支持
#### Staking 模块
* 验证者管理
* 委托和奖励分配
* 惩罚机制
#### Distribution 模块
* 区块奖励分配
* 费用再分配
* 激励管理
### 安全性和确定性
#### 即时确定性
* 包含在区块中的交易立即确定
* 消除重组(reorg)风险
* 高度的交易确定性
#### 安全模型
* 使用经过验证的加密原语
* 多层安全架构
* 定期安全审计
### 后续步骤
要更深入地了解 Stable 的核心机制,请参考以下文档:
* [以太坊兼容性](/cn/developers/core-mechanics/ethereum-compatibility):EVM 兼容性的详细信息
* [燃气定价](/cn/developers/core-mechanics/gas-pricing):费用模型解释
* [JSON-RPC API](/cn/developers/core-mechanics/json-rpc-api):API 参考文档
* [确定性](/cn/developers/core-mechanics/finality):交易确认机制
* [EIP-7702](/cn/developers/core-mechanics/eip-7702):账户抽象支持
要开始开发,请查看[快速入门指南](/cn/developers/quick-start)。
## 银行模块
### 概述
Stable SDK 中的 `x/bank` 模块仅提供基本的代币管理功能。
每个代币都可以无限制地转移到任何账户,用户无法委托其他账户代为转移其代币到其他账户。
因此,`bank` 预编译合约在 Stable SDK 现有的 `x/bank` 模块基础上提供了额外的授权和委托功能。
### 目录
1. **[概念](#concepts)**
2. **[配置](#configuration)**
3. **[方法](#methods)**
4. **[事件](#events)**
### 概念
该预编译合约提供 ERC20 标准方法 - 如用于转账的 `transfer` 和 `balanceOf`,以及用于委托的 `transferFrom`、`approve` 和 `allowance`。这些方法可以直接调用,无需注册合约地址。
然而,`mint` 和 `burn` 方法需要合约地址被列入白名单,通过 `x/precompile` 模块注册。
```go
func (p *Precompile) mint(
ctx sdk.Context,
contract *vm.Contract,
denom string,
method *abi.Method,
stateDB vm.StateDB,
args []interface{},
) ([]byte, error) {
// ...
// mint method is only allowed for the registered caller contract
if _, err := precompilecommon.CheckPermissions(ctx, p.precompileKeeper, contract.CallerAddress, CallerPermissions); err != nil {
return nil, err
}
```
额外的验证过程可以保证调用此预编译合约的代币合约是经过授权的。
需要通过治理提案来注册代币合约地址及其denomination到 `x/precompile` 模块的白名单中。
### 配置
合约地址和gas费用已预定义。
#### 合约地址
* `0x0000000000000000000000000000000000001003` STABLE (用于治理代币)
### 方法
#### `mint`
铸造请求数量的新代币并转移到账户。
要铸造的代币数量必须大于零。
当代币成功铸造并转移到账户时,会发出 `PrecompiledBankMint` 事件。
注意:
* 禁止铸造治理代币。
* 调用铸造方法的合约必须在 x/precompile 模块中注册。
##### 输入参数
| 名称 | 类型 | 描述 |
| ------ | ------- | --------- |
| to | address | 接收铸造代币的地址 |
| amount | uint256 | 要铸造的代币数量 |
##### 输出参数
| 名称 | 类型 | 描述 |
| ------- | ---- | --------------------- |
| success | bool | 如果代币成功铸造并转移到账户,则为true |
#### `burn`
从账户中销毁请求数量的代币。
要销毁的代币数量必须大于零。
当代币成功销毁时,会发出 `PrecompiledBankBurn` 事件。
注意:
* 禁止销毁治理代币。
* 调用铸造方法的合约必须在 x/precompile 模块中注册。
##### 输入参数
| 名称 | 类型 | 描述 |
| ------ | ------- | -------- |
| from | address | 销毁代币的地址 |
| amount | uint256 | 要销毁的代币数量 |
##### 输出参数
| 名称 | 类型 | 描述 |
| ------- | ---- | --------------- |
| success | bool | 如果代币成功销毁,则为true |
#### `transfer`
将请求数量的代币从发送者转移给接收者。
代币必须设置为可发送。要转移的代币数量必须大于零。
当代币成功转移时,会发出 `PrecompiledBankTransfer` 事件。
##### 输入参数
| 名称 | 类型 | 描述 |
| ------ | ------- | -------- |
| to | address | 接收代币的地址 |
| amount | uint256 | 要转移的代币数量 |
##### 输出参数
| 名称 | 类型 | 描述 |
| ------- | ---- | --------------- |
| success | bool | 如果代币成功转移,则为true |
#### `transferFrom`
由授权的支出者在允许额度范围内将请求数量的代币从所有者转移给接收者。
代币必须设置为可发送。
要转移的代币数量必须大于零并且小于或等于当前允许额度。
当代币成功转移时,会发出 `PrecompiledBankTransfer` 事件。
##### 输入参数
| 名称 | 类型 | 描述 |
| ------ | ------- | -------- |
| from | address | 转出代币的地址 |
| to | address | 接收代币的地址 |
| amount | uint256 | 要转移的代币数量 |
##### 输出参数
| 名称 | 类型 | 描述 |
| ------- | ---- | --------------- |
| success | bool | 如果代币成功转移,则为true |
#### `multiTransfer`
将代币从单个账户转移到多个账户。
代币必须设置为可发送。
转移给每个接收者的代币数量必须大于零。
当代币成功转移时,每个接收者都会发出 `PrecompiledBankTransfer` 事件。
##### 输入参数
| 名称 | 类型 | 描述 |
| ------ | ---------- | ------------- |
| to | address\[] | 接收转移代币的地址数组 |
| amount | uint256\[] | 转移给每个接收者的代币数量 |
##### 输出参数
| 名称 | 类型 | 描述 |
| ------- | ---- | --------------------- |
| success | bool | 如果代币成功转移给每个接收者,则为true |
#### `approve`
授权支出者从所有者账户转移代币。
要授权的代币数量必须大于零。
当授权成功设置时,会发出 `PrecompiledBankApproval` 事件。
##### 输入参数
| 名称 | 类型 | 描述 |
| ------- | ------- | -------- |
| spender | address | 要授权的地址 |
| value | uint256 | 要授权的代币数量 |
##### 输出参数
| 名称 | 类型 | 描述 |
| ------- | ---- | --------------- |
| success | bool | 如果授权成功设置,则为true |
#### `revoke`
撤销支出者从所有者转移代币的授权。
当授权成功撤销时,会发出 `PrecompiledBankRevoke` 事件。
##### 输入参数
| 名称 | 类型 | 描述 |
| ------- | ------- | ------ |
| spender | address | 要撤销的地址 |
##### 输出参数
| 名称 | 类型 | 描述 |
| ------- | ---- | --------------- |
| success | bool | 如果授权成功撤销,则为true |
#### `balanceOf`
返回账户的代币余额。
##### 输入参数
| 名称 | 类型 | 描述 |
| ------- | ------- | ---------- |
| account | address | 要获取代币余额的地址 |
##### 输出参数
| 名称 | 类型 | 描述 |
| ------- | ------- | -------- |
| balance | uint256 | 账户中的代币数量 |
#### `totalSupply`
返回代币的总供应量。
##### 输入参数
无
##### 输出参数
| 名称 | 类型 | 描述 |
| ----------- | ------- | ------ |
| totalSupply | uint256 | 代币的总数量 |
#### `allowance`
返回支出者仍可从所有者提取的金额。
##### 输入参数
| 名称 | 类型 | 描述 |
| ------- | ------- | ------ |
| owner | address | 所有者的地址 |
| spender | address | 支出者的地址 |
##### 输出参数
| 名称 | 类型 | 描述 |
| ------ | ------- | ------- |
| amount | uint256 | 授权的代币数量 |
### 事件
所有从此预编译合约发出的事件都以 `PrecompiledBank` 为前缀。
为了避免歧义,调用此预编译合约的代币合约应避免使用相同前缀的事件名称。
#### PrecompiledBankMint
| 名称 | 类型 | 索引 | 描述 |
| ------ | ------- | -- | --------- |
| from | address | Y | 铸造代币的地址 |
| to | address | Y | 接收铸造代币的地址 |
| amount | uint256 | N | 铸造的代币数量 |
#### PrecompiledBankBurn
| 名称 | 类型 | 索引 | 描述 |
| ------ | ------- | -- | ------- |
| from | address | Y | 销毁代币的地址 |
| to | address | Y | 此方法中未使用 |
| amount | uint256 | N | 销毁的代币数量 |
#### PrecompiledBankTransfer
| 名称 | 类型 | 索引 | 描述 |
| ------ | ------- | -- | --------- |
| from | address | Y | 转移代币的地址 |
| to | address | Y | 接收转移代币的地址 |
| amount | uint256 | N | 转移的代币数量 |
#### PrecompiledBankApproval
| 名称 | 类型 | 索引 | 描述 |
| ------- | ------- | -- | ------- |
| owner | address | Y | 授权代币的地址 |
| spender | address | Y | 被授权的地址 |
| value | uint256 | N | 授权的代币数量 |
#### PrecompiledBankRevoke
| 名称 | 类型 | 索引 | 描述 |
| ------- | ------- | -- | --------- |
| owner | address | Y | 撤销代币授权的地址 |
| spender | address | Y | 被撤销的地址 |
| value | uint256 | N | 授权的代币数量 |
## 分配模块
### 概述
`distribution` 预编译合约作为桥梁,使 Stable SDK 的 `x/distribution` 模块功能能在 EVM 环境中使用。
### 目录
1. **[概念](#concepts)**
2. **[配置](#configuration)**
3. **[方法](#methods)**
4. **[事件](#events)**
### 概念
在 `distribution` 预编译合约中,会进行额外检查以确保委托者或存款者是调用者。
### 配置
合约地址和gas费用已预定义。
#### 合约地址
* `0x0000000000000000000000000000000000000801`
### 方法
#### `setWithdrawAddress`
设置用于接收委托者向验证者委托代币奖励的地址。
有时,当委托者是自我委托时,验证者地址被用作委托者。
当提取者地址成功设置时,会发出 `SetWithdrawAddress` 事件。
##### 输入参数
| 名称 | 类型 | 描述 |
| ----------------- | ------- | --------- |
| delegatorAddress | address | 委托者的地址 |
| withdrawerAddress | address | 接收委托奖励的地址 |
##### 输出参数
| 名称 | 类型 | 描述 |
| ------- | ---- | ------------------ |
| success | bool | 如果提取者地址成功设置,则为true |
#### `withdrawDelegatorRewards`
提取委托者从验证者那里应得的奖励。
验证者奖励给委托者的所有类型的代币都在单次交易中提取。
当奖励成功提取时,会发出 `WithdrawDelegatorRewards` 事件。
##### 输入参数
| 名称 | 类型 | 描述 |
| ---------------- | ------- | ------ |
| delegatorAddress | address | 委托者的地址 |
| validatorAddress | address | 验证者的地址 |
##### 输出参数
| 名称 | 类型 | 描述 |
| ------ | ------- | ------------- |
| amount | Coin\[] | 委托者将获得的各种代币奖励 |
`Coin` 是一个包含以下字段的结构:
| 名称 | 类型 | 描述 |
| ------ | ------- | --------------- |
| denom | string | 奖励的denomination |
| amount | uint256 | 奖励的数量 |
#### `withdrawValidatorCommission`
提取验证者的佣金。
验证者作为佣金获得的所有类型的代币都在单次交易中提取。
当佣金成功提取时,会发出 `WithdrawValidatorCommission` 事件。
##### 输入参数
| 名称 | 类型 | 描述 |
| ---------------- | ------- | ------ |
| validatorAddress | address | 验证者的地址 |
##### 输出参数
| 名称 | 类型 | 描述 |
| ------ | ------- | ------------- |
| amount | Coin\[] | 验证者将获得的各种代币佣金 |
#### `validatorDistributionInfo`
返回代表验证者将获得奖励的分配信息。验证者可以在自己的地址上向自己委托代币,这被称为自绑定。
##### 输入参数
| 名称 | 类型 | 描述 |
| ---------------- | ------- | ------ |
| validatorAddress | address | 验证者的地址 |
##### 输出参数
| 名称 | 类型 | 描述 |
| ---------------- | ------------------------- | -------- |
| distributionInfo | ValidatorDistributionInfo | 验证者的分配信息 |
`ValidatorDistributionInfo` 是一个包含以下字段的结构:
| 名称 | 类型 | 描述 |
| --------------- | ---------- | --------- |
| operatorAddress | address | 验证者操作员的地址 |
| selfBondRewards | DecCoin\[] | 验证者的自绑定金额 |
| commission | DecCoin\[] | 验证者的佣金 |
`DecCoin` 是一个包含以下字段的结构:
| 名称 | 类型 | 描述 |
| --------- | ------- | --------------- |
| denom | string | 奖励的denomination |
| amount | uint256 | 奖励的数量 |
| precision | uint8 | 奖励的精度 |
#### `validatorOutstandingRewards`
返回验证者的未结算奖励。未结算奖励表示由验证者的佣金和自绑定奖励以及委托者的总奖励组成的奖励总额。如果有验证者A,委托者B、C和D委托给A,那么验证者的未结算奖励是A的佣金和自绑定奖励 + B、C和D的奖励的总和。
##### 输入参数
| 名称 | 类型 | 描述 |
| ---------------- | ------- | ------ |
| validatorAddress | address | 验证者的地址 |
##### 输出参数
| 名称 | 类型 | 描述 |
| ------- | ---------- | --------- |
| rewards | DecCoin\[] | 验证者的未结算奖励 |
#### `validatorCommission`
返回验证者的佣金。此方法用于在调用 `withdrawValidatorCommission` 方法之前检索验证者的佣金。
##### 输入参数
| 名称 | 类型 | 描述 |
| ---------------- | ------- | ------ |
| validatorAddress | address | 验证者的地址 |
##### 输出参数
| 名称 | 类型 | 描述 |
| ---------- | ---------- | ------ |
| commission | DecCoin\[] | 验证者的佣金 |
#### `validatorSlashes`
返回验证者在起始高度和结束高度之间的削减历史。削减是当验证者恶意行为或违反网络规则(如双重签名、不当行为或不遵循链规则)时施加的罚款。
##### 输入参数
| 名称 | 类型 | 描述 |
| ---------------- | ------- | ------ |
| validatorAddress | address | 验证者的地址 |
| startingHeight | uint64 | 起始高度 |
| endingHeight | uint64 | 结束高度 |
| pageRequest | PageReq | 分页请求 |
`PageReq` 是一个包含以下字段的结构:
| 名称 | 类型 | 描述 |
| ---------- | ------ | ------- |
| key | bytes | 分页的键 |
| offset | uint64 | 分页的偏移量 |
| limit | uint64 | 分页的限制 |
| countTotal | bool | 是否计算总页数 |
| reverse | bool | 是否反转分页 |
##### 输出参数
| 名称 | 类型 | 描述 |
| ---------- | ---------------------- | ------ |
| slashes | ValidatorSlashEvent\[] | 验证者的削减 |
| pagination | PageResp | 分页响应 |
`ValidatorSlashEvent` 是一个包含以下字段的结构:
| 名称 | 类型 | 描述 |
| --------------- | ------ | ------ |
| validatorPeriod | uint64 | 验证者的期间 |
| fraction | Dec | 削减的分数 |
`Dec` 是一个包含以下字段的结构:
| 名称 | 类型 | 描述 |
| --------- | ------ | ------ |
| value | uint64 | Dec的值 |
| precision | uint8 | Dec的精度 |
`PageResp` 是一个包含以下字段的结构:
| 名称 | 类型 | 描述 |
| ------- | ------ | ------- |
| nextKey | bytes | 分页的下一个键 |
| total | uint64 | 总页数 |
#### `delegationRewards`
返回委托者从验证者那里获得的奖励。
##### 输入参数
| 名称 | 类型 | 描述 |
| ---------------- | ------- | ---------- |
| delegatorAddress | address | 委托者的十六进制地址 |
| validatorAddress | address | 验证者的地址 |
##### 输出参数
| 名称 | 类型 | 描述 |
| ------- | ---------- | -------------- |
| rewards | DecCoin\[] | 委托者从验证者那里获得的奖励 |
#### `delegationTotalRewards`
返回委托者从所有验证者那里获得的总奖励。
##### 输入参数
| 名称 | 类型 | 描述 |
| ---------------- | ------- | ---------- |
| delegatorAddress | address | 委托者的十六进制地址 |
##### 输出参数
| 名称 | 类型 | 描述 |
| ------- | ---------------------------- | ----------------- |
| rewards | DelegationDelegatorReward\[] | 委托者从所有验证者那里获得的总奖励 |
| total | DecCoin\[] | 奖励的总额 |
`DelegationDelegatorReward` 是一个包含以下字段的结构:
| 名称 | 类型 | 描述 |
| ---------------- | ---------- | -------------- |
| validatorAddress | address | 验证者的地址 |
| reward | DecCoin\[] | 委托者从验证者那里获得的奖励 |
#### `delegatorValidators`
返回委托者绑定的验证者。
##### 输入参数
| 名称 | 类型 | 描述 |
| ---------------- | ------- | ---------- |
| delegatorAddress | address | 委托者的十六进制地址 |
##### 输出参数
| 名称 | 类型 | 描述 |
| ---------- | --------- | --------- |
| validators | string\[] | 委托者绑定的验证者 |
#### `delegatorWithdrawAddress`
返回通过 `setWithdrawAddress` 方法设置的接收委托奖励的地址。
##### 输入参数
| 名称 | 类型 | 描述 |
| ---------------- | ------- | ---------- |
| delegatorAddress | address | 委托者的十六进制地址 |
##### 输出参数
| 名称 | 类型 | 描述 |
| --------------- | ------- | --------- |
| withdrawAddress | address | 接收委托奖励的地址 |
### 事件
#### SetWithdrawAddress
| 名称 | 类型 | 索引 | 描述 |
| --------------- | ------- | -- | ----------- |
| caller | address | Y | 调用者(委托者)的地址 |
| withdrawAddress | address | N | 接收委托奖励的地址 |
#### WithdrawDelegatorRewards
| 名称 | 类型 | 索引 | 描述 |
| ---------------- | ------- | -- | ------ |
| delegatorAddress | address | Y | 委托者的地址 |
| validatorAddress | address | Y | 验证者的地址 |
| amount | uint256 | N | 奖励的数量 |
#### WithdrawValidatorCommission
| 名称 | 类型 | 索引 | 描述 |
| ---------------- | ------- | -- | ------ |
| validatorAddress | address | Y | 验证者的地址 |
| commission | uint256 | N | 佣金的总数量 |
## 概览
Stable 通过**系统模块**暴露核心结算行为,以**预编译合约**的形式实现,确保gas效率和可预测的控制。
**主要模块:**
* [银行模块](./bank)
* 处理 USDT 转账、余额记账和托管流程
* [分发模块](./distribution)
* 网络参与者的费用分发和奖励逻辑
* [质押模块](./staking)
* 控制验证者参与和质押(将在主网推出)
**DApps 可以利用内置模块,而不需要重新实现代币或结算逻辑。**
## 质押模块
### 概述
`staking` 预编译合约作为桥梁,使 Stable SDK 的 `x/staking` 模块功能能在 EVM 环境中使用。
### 目录
1. **[概念](#concepts)**
2. **[配置](#configuration)**
3. **[方法](#methods)**
4. **[事件](#events)**
### 概念
在 Stable SDK 的 `x/staking` 模块中,必须在链初始化时注册绑定denomination以进行质押。
验证者和委托者只能使用绑定denomination质押代币。
在 `staking` 预编译合约中,会进行额外检查以确保验证者或委托者是调用者。
### 配置
合约地址和gas费用已预定义。
#### 合约地址
* `0x0000000000000000000000000000000000000800`
### 方法
#### `createValidator`
创建一个验证者。
验证者必须以来自操作员的初始委托创建。
对于潜在的委托者,验证者应提供他们的信息和佣金率计划。
委托者可以通过公开信息和市场机制的自然调节来选择验证者委托他们自己的代币。
当验证者成功注册时,会发出 `CreateValidator` 事件。
##### 输入参数
| 名称 | 类型 | 描述 |
| ----------------- | --------------- | ---------------- |
| description | Description | 验证者的信息 |
| commissionRates | CommissionRates | 验证者奖励质押代币的佣金率 |
| minSelfDelegation | uint256 | 验证者的最小自委托金额 |
| validatorAddress | address | 验证者的地址 |
| pubkey | string | 验证者的公钥 |
| value | uint256 | 最初自委托给验证者的质押代币数量 |
`Description` 是一个包含以下字段的结构:
| 名称 | 类型 | 描述 |
| --------------- | ------ | --------- |
| moniker | string | 验证者的名称 |
| identity | string | 验证者的身份 |
| website | string | 验证者网站的URL |
| securityContact | string | 安全联系信息 |
| details | string | 验证者的额外描述 |
`CommissionRates` 是一个包含以下字段的结构:
| 名称 | 类型 | 描述 |
| ------------- | ------- | ---------------- |
| rate | uint256 | 验证者获得的当前佣金率 |
| maxRate | uint256 | 最大佣金率(不能设置得比这更高) |
| maxChangeRate | uint256 | 验证者一天内可以更改的最大佣金率 |
`rate` 应设置为市场可接受的适当值。
* 如果验证者的佣金率较高,委托者的利润就较低。
* 如果验证者的佣金率较低,验证者的利润就较低,这使得运营变得困难。
由于高 `maxRate` 会让委托者担心验证者意外设置高佣金率,因此应小心设置 `maxRate`。`maxChangeRate` 在初始化后不可更改。
##### 输出参数
| 名称 | 类型 | 描述 |
| ------- | ---- | ---------------- |
| success | bool | 如果验证者成功注册,则为true |
#### `editValidator`
验证者更新其信息。
验证者只能更新除了 `CommissionRates` 结构中不可更改字段(如 `maxRate` 和 `maxChangeRate`)之外的信息。
当验证者成功更新时,会发出 `EditValidator` 事件。
##### 输入参数
| 名称 | 类型 | 描述 |
| ----------------- | ----------- | ------------- |
| description | Description | 验证者的信息 |
| validatorAddress | address | 验证者的地址 |
| commissionRate | int256 | 验证者奖励质押代币的佣金率 |
| minSelfDelegation | int256 | 验证者的最小自委托金额 |
##### 输出参数
| 名称 | 类型 | 描述 |
| ------- | ---- | ---------------- |
| success | bool | 如果验证者成功更新,则为true |
#### `delegate`
委托者设置要委托给验证者的代币数量。
当委托成功完成时,会发出 `Delegate` 事件。
##### 输入参数
| 名称 | 类型 | 描述 |
| ---------------- | ------- | ------------- |
| delegatorAddress | address | 委托者的地址 |
| validatorAddress | address | 验证者的地址 |
| amount | uint256 | 委托给验证者的质押代币数量 |
##### 输出参数
| 名称 | 类型 | 描述 |
| ------- | ---- | --------------- |
| success | bool | 如果委托成功完成,则为true |
##### 事件
`newShares` 表示委托者的所有权比例。
即使委托相同数量的代币,计算出的份额也可能因时间而异。
#### `undelegate`
委托者提取委托给验证者的代币数量。
当取消委托成功完成时,会发出 `Unbond` 事件。
##### 输入参数
| 名称 | 类型 | 描述 |
| ---------------- | ------- | ------------------- |
| delegatorAddress | address | 委托者的地址 |
| validatorAddress | address | 验证者的地址 |
| amount | uint256 | 愿意从验证者那里取消委托的质押代币数量 |
##### 输出参数
| 名称 | 类型 | 描述 |
| ------- | ---- | ----------------- |
| success | bool | 如果取消委托成功完成,则为true |
#### `redelegate`
委托者将委托给验证者的代币数量重新委托给另一个验证者。
当重新委托成功完成时,会发出 `Redelegate` 事件。
##### 输入参数
| 名称 | 类型 | 描述 |
| ---------------- | ------- | ----------- |
| delegatorAddress | address | 委托者的地址 |
| validatorSrc | string | 源验证者的地址 |
| validatorDst | string | 目标验证者的地址 |
| amount | uint256 | 重新委托的质押代币数量 |
##### 输出参数
| 名称 | 类型 | 描述 |
| ------- | ---- | ----------------- |
| success | bool | 如果重新委托成功完成,则为true |
#### `delegation`
返回委托者和验证者之间的委托信息。
如果未找到委托,`shares` 和 `balance` 将为 `0`。
##### 输入参数
| 名称 | 类型 | 描述 |
| ---------------- | ------- | ------ |
| delegatorAddress | address | 委托者的地址 |
| validatorAddress | address | 验证者的地址 |
##### 输出参数
| 名称 | 类型 | 描述 |
| ------- | ------- | -------------------- |
| shares | uint256 | 委托的份额 |
| balance | Coin | 委托代币的数量和denomination |
`Coin` 是一个包含以下字段的结构:
| 名称 | 类型 | 描述 |
| ------ | ------- | --------------- |
| denom | string | 奖励的denomination |
| amount | uint256 | 奖励的数量 |
#### `unbondingDelegation`
返回委托者和验证者之间的解绑委托信息。
如果未找到解绑委托,将返回空的 `UnbondingDelegationOutput`。
##### 输入参数
| 名称 | 类型 | 描述 |
| ---------------- | ------- | ------ |
| delegatorAddress | address | 委托者的地址 |
| validatorAddress | address | 验证者的地址 |
##### 输出参数
| 名称 | 类型 | 描述 |
| ------------------- | ------------------------- | ------- |
| unbondingDelegation | UnbondingDelegationOutput | 解绑委托的信息 |
`UnbondingDelegationOutput` 是一个包含以下字段的结构:
| 名称 | 类型 | 描述 |
| ---------------- | --------------------------- | ------- |
| validatorAddress | address | 验证者的地址 |
| delegatorAddress | address | 委托者的地址 |
| entries | UnbondingDelegationEntry\[] | 解绑委托的条目 |
`UnbondingDelegationEntry` 是一个包含以下字段的结构:
| 名称 | 类型 | 描述 |
| -------------- | ------ | ------- |
| creationHeight | uint64 | 条目的创建高度 |
| completionTime | uint64 | 条目的完成时间 |
| initialBalance | Coin | 条目的初始余额 |
| balance | Coin | 条目的余额 |
#### `validator`
返回验证者信息。
如果未找到验证者,将返回空的 `ValidatorOutput`。
##### 输入参数
| 名称 | 类型 | 描述 |
| ---------------- | ------- | ------ |
| validatorAddress | address | 验证者的地址 |
##### 输出参数
| 名称 | 类型 | 描述 |
| --------- | --------- | ------ |
| validator | Validator | 验证者的信息 |
`Validator` 是一个包含以下字段的结构:
| 名称 | 类型 | 描述 |
| ----------------- | ------- | ------------- |
| operatorAddress | address | 验证者的地址 |
| consensusPubkey | string | 验证者的公钥 |
| jailed | bool | 验证者是否被监禁 |
| status | int32 | 验证者的状态 |
| tokens | uint256 | 委托给验证者的质押代币数量 |
| delegatorShares | uint256 | 委托份额的数量 |
| description | string | 验证者的描述 |
| unbondingHeight | int64 | 验证者解绑的高度 |
| unbondingTime | int64 | 验证者解绑的时间 |
| commission | uint256 | 验证者奖励质押代币的佣金率 |
| minSelfDelegation | uint256 | 验证者的最小自委托金额 |
#### `validators`
返回所有与状态匹配的验证者。
如果未找到验证者,将返回空的 `ValidatorsOutput`。
状态在 `x/staking` 模块中声明,可以是以下之一:
* 0 : "BOND\_STATUS\_UNSPECIFIED", 未指定状态
* 1 : "BOND\_STATUS\_UNBONDING", 验证者正在解绑
* 2 : "BOND\_STATUS\_UNBONDED", 验证者已解绑
* 3 : "BOND\_STATUS\_BONDED", 验证者已绑定
##### 输入参数
| 名称 | 类型 | 描述 |
| ----------- | ------- | ------ |
| status | string | 验证者的状态 |
| pageRequest | PageReq | 分页请求 |
`PageReq` 是一个包含以下字段的结构:
| 名称 | 类型 | 描述 |
| ---------- | ----- | -------- |
| key | bytes | 页面的键 |
| offset | int64 | 页面的偏移量 |
| limit | int64 | 页面的限制 |
| countTotal | bool | 是否计算结果总数 |
| reverse | bool | 是否反转结果 |
##### 输出参数
| 名称 | 类型 | 描述 |
| ------------ | ------------ | ----- |
| validators | Validator\[] | 验证者数组 |
| pageResponse | PageResp | 分页响应 |
`PageResp` 是一个包含以下字段的结构:
| 名称 | 类型 | 描述 |
| ------- | ------ | ------- |
| nextKey | bytes | 页面的下一个键 |
| total | uint64 | 结果的总数 |
#### `redelegation`
返回委托者、源验证者和目标验证者的重新委托信息。
如果未找到重新委托,将返回空的 `RedelegationOutput`。
##### 输入参数
| 名称 | 类型 | 描述 |
| ------------------- | ------- | -------- |
| delegatorAddress | address | 委托者的地址 |
| srcValidatorAddress | address | 源验证者的地址 |
| dstValidatorAddress | address | 目标验证者的地址 |
##### 输出参数
| 名称 | 类型 | 描述 |
| ------------ | ------------------ | ------- |
| redelegation | RedelegationOutput | 重新委托的信息 |
`RedelegationOutput` 是一个包含以下字段的结构:
| 名称 | 类型 | 描述 |
| ------------------- | -------------------- | -------- |
| delegatorAddress | address | 委托者的地址 |
| validatorSrcAddress | address | 源验证者的地址 |
| validatorDstAddress | address | 目标验证者的地址 |
| entries | RedelegationEntry\[] | 重新委托的条目 |
`RedelegationEntry` 是一个包含以下字段的结构:
| 名称 | 类型 | 描述 |
| -------------- | ------ | ------- |
| creationHeight | uint64 | 条目的创建高度 |
| completionTime | uint64 | 条目的完成时间 |
| initialBalance | Coin | 条目的初始余额 |
| balance | Coin | 条目的余额 |
#### `redelegations`
返回委托者、源验证者和目标验证者的所有重新委托。
如果未找到重新委托,将返回空的 `RedelegationResponse` 和 `PageResp`。
##### 输入参数
| 名称 | 类型 | 描述 |
| ------------------- | ------- | -------- |
| delegatorAddress | address | 委托者的地址 |
| srcValidatorAddress | address | 源验证者的地址 |
| dstValidatorAddress | address | 目标验证者的地址 |
| pageRequest | PageReq | 分页请求 |
##### 输出参数
| 名称 | 类型 | 描述 |
| ------------ | ----------------------- | ------- |
| response | RedelegationResponse\[] | 重新委托的信息 |
| pageResponse | PageResp | 分页响应 |
### 事件
#### CreateValidator
| 名称 | 类型 | 索引 | 描述 |
| -------- | ------- | -- | ---------------- |
| valiAddr | address | Y | 验证者的地址 |
| value | uint256 | N | 最初自委托给验证者的质押代币数量 |
#### EditValidator
| 名称 | 类型 | 索引 | 描述 |
| ----------------- | ------- | -- | --------------- |
| valiAddr | address | Y | 验证者的地址 |
| commissionRate | int256 | N | 验证者奖励质押代币的更新佣金率 |
| minSelfDelegation | int256 | N | 验证者的更新最小自委托金额 |
#### Delegate
| 名称 | 类型 | 索引 | 描述 |
| ------------- | ------- | -- | ------------- |
| delegatorAddr | address | Y | 委托者的地址 |
| validatorAddr | string | Y | 验证者的地址 |
| amount | uint256 | N | 委托给验证者的质押代币数量 |
| newShares | uint256 | N | 委托后的委托份额数量 |
#### Unbond
| 名称 | 类型 | 索引 | 描述 |
| -------------- | ------- | -- | --------------- |
| delegatorAddr | address | Y | 委托者的地址 |
| validatorAddr | string | Y | 验证者的地址 |
| amount | uint256 | N | 从验证者取消委托的质押代币数量 |
| completionTime | uint256 | N | 取消委托的完成时间 |
#### Redelegate
| 名称 | 类型 | 索引 | 描述 |
| ------------------- | ------- | -- | ----------- |
| delegatorAddr | address | Y | 委托者的地址 |
| validatorSrcAddress | address | Y | 源验证者的地址 |
| validatorDstAddress | address | Y | 目标验证者的地址 |
| amount | uint256 | N | 重新委托的质押代币数量 |
| completionTime | uint256 | N | 重新委托的完成时间 |
## System Transactions
### 摘要
系统交易为 Stable 协议提供了一种为 Stable SDK 操作发出 EVM 事件的方式。当质押事件(如解绑完成)在 SDK 层发生时,协议会自动生成发出相应事件的 EVM 交易,使这些操作对 EVM 工具和应用程序完全可见。
### 动机
Stable 上的 EVM 用户和应用程序期望通过标准 EVM 接口(如 `eth_getLogs`)监控区块链事件。但关键操作发生在 Stable SDK 模块中,这些模块不会自然地发出 EVM 事件。这造成了可见性差距:EVM dapps 无法轻松跟踪用户的代币何时完成解绑。
系统交易弥合了这一差距。当质押模块完成解绑操作时,Stable 的 x/stable 模块会检测到该事件并生成一个调用 StableSystem 预编译合约(`0x0000000000000000000000000000000000009999`)的系统交易。然后,预编译合约会发出任何 dapp 都可以订阅的适当 EVM 事件。系统交易使用特殊的发送者地址(`0x8888888888888888888888888888888888888888`)运行,只有协议才能使用该地址。这可以防止任何人伪造协议事件,同时保持事件发出在链上的无需信任和可验证性。
### 规范
系统交易通过三个主要组件工作:x/stable 模块的 EndBlocker、PrepareProposal 处理程序和 StableSystem 预编译合约。
#### 架构概述
#### StableSystem 预编译合约
StableSystem 预编译合约位于 `0x0000000000000000000000000000000000009999`,处理需要发出 EVM 事件的协议级操作。目前它支持解绑完成通知。
```solidity
interface IStableSystem {
/// @notice 处理排队的解绑完成并发出 EVM 事件
/// @param blockHeight 处理完成的区块高度
/// @dev 只能由系统交易调用(from = 0x8888888888888888888888888888888888888888)
/// @dev 每次调用最多处理 100 个完成
/// @dev 自动从队列中删除已处理的完成
function notifyUnbondingCompletions(int64 blockHeight) external;
/// @notice 当解绑操作完成时发出
/// @param delegator 委托代币的地址
/// @param validator 代币委托给的验证者地址
/// @param amount 完成解绑的代币数量(以 uusdc 为单位)
event UnbondingCompleted(
address indexed delegator,
address indexed validator,
uint256 amount
);
/// @notice 调用者未授权(不是系统交易发送者)
error Unauthorized();
}
```
#### 系统交易发送者
系统交易使用 `0x8888888888888888888888888888888888888888` 作为发送者地址。该地址:
* 不需要签名验证
* 只能由 PrepareProposal 中创建的交易使用
* 用户或合约无法伪造
* 通过 SystemTxDecorator ante 处理程序跳过费用扣除
EVM 通过检查 `msg.sender == 0x8888888888888888888888888888888888888888` 来识别系统交易。预编译合约可以使用此功能来限制仅协议操作。
#### 事件驱动流程
当用户的解绑期完成时,会发生以下情况:
1. **Stable SDK 层:** 质押模块的 EndBlocker 完成解绑并发出 EventTypeCompleteUnbonding,包含委托者地址、验证者地址和金额。
2. **检测:** x/stable 模块的 EndBlocker 在质押之后运行,并扫描区块事件日志中的解绑事件。每当有代币完成解绑,该模块都将在队列中添加一条记录,包含委托者地址、验证者地址、金额和区块高度。
3. **系统交易生成**:在下一个区块的 PrepareProposal 中,应用程序查询所有排队的完成。如果存在任何完成,它会创建一个调用 StableSystem.notifyUnbondingCompletions(blockHeight) 的系统交易,使用当前区块高度。此交易放在区块前面,在任何用户交易之前。
4. **执行:** 在区块执行期间,系统交易首先运行。预编译合约查询该区块高度排队的完成状态,为每个完成发出一个 UnbondingCompleted 事件(最多 100 个),并从队列中删除它们。
5. **EVM 可见性:** 事件出现在交易收据和日志中,对 eth\_getLogs 查询、区块浏览器和任何监控 StableSystem 预编译合约的应用程序可见。
#### 批处理
为防止区块变得过大,系统每个区块最多处理 100 个解绑完成。如果队列中存在 150 条记录:
* 区块 N:创建处理完成 0-99 的系统交易
* 区块 N+1:创建处理完成 100-149 的系统交易
预编译合约直接查询状态,而不是在 calldata 中接收完成数据。这使交易大小可预测,并将数据从昂贵的 calldata 移动到更便宜的状态读取。
### 使用示例
最常见的用例是需要在解绑期完成时通知用户的质押仪表板。以下是如何设置解绑完成监听器。
```javascript
import { ethers } from 'ethers';
// StableSystem 预编译合约地址
const STABLE_SYSTEM_ADDRESS = '0x0000000000000000000000000000000000009999';
// UnbondingCompleted 事件的 ABI
const STABLE_SYSTEM_ABI = [
'event UnbondingCompleted(address indexed delegator, address indexed validator, uint256 amount)'
];
// 连接到 Stable 网络
const provider = new ethers.JsonRpcProvider('https://rpc.testnet.stable.xyz');
const stableSystem = new ethers.Contract(
STABLE_SYSTEM_ADDRESS,
STABLE_SYSTEM_ABI,
provider
);
// 订阅所有解绑完成
stableSystem.on('UnbondingCompleted', (delegator, validator, amount, event) => {
console.log('解绑完成!');
console.log('委托者:', delegator);
console.log('验证者:', validator);
console.log('金额:', ethers.formatEther(amount), '代币');
console.log('区块:', event.log.blockNumber);
console.log('交易哈希:', event.log.transactionHash);
});
```
此监听器将在任何用户的解绑完成时触发。在生产环境中部署 dApp 时需要过滤特定用户的事件。
#### 过滤特定用户的事件
要仅接收特定委托者地址的事件,请使用索引事件参数创建过滤器:
```javascript
// 仅监视特定用户的解绑
const userAddress = '0xabcd...';
const filter = stableSystem.filters.UnbondingCompleted(userAddress);
stableSystem.on(filter, (delegator, validator, amount, event) => {
// 这仅针对指定用户的解绑触发
showNotification(`您的 ${ethers.formatEther(amount)} 代币解绑完成!`);
refreshUserBalance(userAddress);
});
```
如果您正在构建特定于验证者的仪表板,您还可以按验证者过滤:
```javascript
// 监视来自特定验证者的所有解绑
const validatorAddress = '0x1234...';
const validatorFilter = stableSystem.filters.UnbondingCompleted(null, validatorAddress);
stableSystem.on(validatorFilter, (delegator, validator, amount) => {
updateValidatorStats(validator, amount);
});
```
#### 查询历史事件
如果您的 dApp 需要显示过去解绑完成的历史记录,您可以使用带有区块范围的事件过滤器查询历史事件:
```javascript
// 获取用户在最近 1000 个区块中的所有解绑
const currentBlock = await provider.getBlockNumber();
const filter = stableSystem.filters.UnbondingCompleted(userAddress);
const events = await stableSystem.queryFilter(
filter,
currentBlock - 1000,
currentBlock
);
const unbondingHistory = events.map(event => ({
delegator: event.args.delegator,
validator: event.args.validator,
amount: ethers.formatEther(event.args.amount),
blockNumber: event.blockNumber,
txHash: event.transactionHash
}));
console.log('最近的解绑:', unbondingHistory);
```
### 集成指南
#### 步骤 1:添加 Stable System 合约接口
首先,将 StableSystem 预编译合约接口添加到您的项目中。如果您使用 Foundry 或 Hardhat,请创建一个新的接口文件:
```solidity
interface IStableSystem {
event UnbondingCompleted(
address indexed delegator,
address indexed validator,
uint256 amount
);
}
```
如果您正在构建一个没有 Solidity 合约的纯前端 dApp,您只需要事件的 ABI 片段:
```javascript
const STABLE_SYSTEM_ABI = [
'event UnbondingCompleted(address indexed delegator, address indexed validator, uint256 amount)'
];
```
#### 步骤 2:设置事件监听器
初始化您的 ethers.js provider 并创建指向 StableSystem 预编译合约地址的合约实例。预编译合约始终部署在 Stable 测试网和主网的 `0x00000000000....0000009999`。
*注意:预编译合约尚未部署在 Stable 主网上,将在 v1.2.0 升级后提供。*
```javascript
const provider = new ethers.JsonRpcProvider(RPC_URL);
const stableSystem = new ethers.Contract(
'0x0000000000000000000000000000000000009999',
STABLE_SYSTEM_ABI,
provider
);
```
#### 步骤 3:在应用程序逻辑中处理事件
订阅事件并相应地更新应用程序状态。常见模式包括:
* **余额更新**:当解绑完成时,刷新用户的代币余额
* **通知系统**:在用户的解绑完成时显示 toast 通知
* **仪表板统计**:实时更新质押指标和图表
* **交易历史**:将已完成的解绑添加到用户的活动源
#### 步骤 4:处理连接问题
由于事件订阅依赖于持久的 websocket 连接,因此为生产 dApp 实现重新连接逻辑:
```javascript
let reconnectAttempts = 0;
const MAX_RECONNECT_ATTEMPTS = 5;
function setupEventListener() {
const provider = new ethers.WebSocketProvider('wss://rpc.testnet.stable.xyz');
provider.on('error', (error) => {
console.error('Provider 错误:', error);
if (reconnectAttempts < MAX_RECONNECT_ATTEMPTS) {
reconnectAttempts++;
setTimeout(() => setupEventListener(), 5000);
}
});
const stableSystem = new ethers.Contract(
'0x0000000000000000000000000000000000009999',
STABLE_SYSTEM_ABI,
provider
);
stableSystem.on('UnbondingCompleted', handleUnbonding);
}
```
### 为什么采用这种方法?
#### 与自定义索引器相比
以前,Stable SDK 要求 dApp 开发人员运行自定义索引器,监视 SDK 事件并将它们存储在数据库中。这增加了操作开销并引入了潜在的故障点。
使用系统交易,无需单独的索引器基础设施。EVM 的日志系统原生支持这类事件,每个 RPC 节点都已经索引和提供。任何标准 web3 库都可以订阅这些事件,无需额外工具。
#### 与轮询 SDK 端点相比
没有系统交易,EVM dApps 需要定期调用 Stable SDK REST 端点来检查解绑期是否已完成。这会产生几个问题:
* **延迟增加**:5-10 秒的轮询间隔意味着用户可能需要等待那么长时间才能看到更新
* **更高的负载**:每个 dApp 实例轮询端点都会增加 RPC 基础设施的负载
* **复杂性**:dApps 需要同时处理 web3 提供程序(用于 EVM 交互)和 Stable SDK REST 客户端(用于 SDK 查询)
* **无实时更新**:轮询本质上无法提供即时通知
系统交易通过 dApps 已经用于 EVM 交互的相同 websocket 连接提供实时事件通知。这简化了开发人员体验并降低了基础设施成本。
### 安全保证
#### 无需信任的事件发出
系统交易在 `PrepareProposal` ABCI 阶段创建,只有验证者才能执行。用户提交的交易无法伪造系统发送者地址(`0x8888888888888888888888888888888888888888`),因为 EVM 的状态转换逻辑强制只有到 StableSystem 预编译合约地址的交易才能跳过签名验证。
这意味着:
* 用户无法伪造解绑完成事件
* 用户无法从自己的交易中调用 `notifyUnbondingCompletions`
* 发出 `UnbondingCompleted` 事件的唯一方法是在 Stable SDK 质押模块中实际完成解绑
#### 无额外信任假设
系统交易不会引入超出区块链共识已经需要的新安全假设。如果您相信验证者正确执行区块,您就可以相信系统交易事件准确反映了 Stable SDK 状态变化。
事件发出过程是确定性的:给定 `EndBlock` 中相同的 SDK 事件,所有诚实的验证者将在 `PrepareProposal` 期间产生相同的系统交易。共识机制确保验证者就包含哪些系统交易达成一致。
#### 区块最终性
Stable 区块链通过 StableBFT 的共识机制使用快速最终性。一旦提交了一个区块,它就会立即最终化,无法重组。这意味着一旦您收到 `UnbondingCompleted` 事件,您就可以相信它是永久的。
不需要像在概率最终性链上那样等待多个确认。dApps 可以在收到事件后立即更新用户余额并显示通知。
### 性能和限制
#### 批处理大小约束
每个区块通过系统交易最多处理 100 个解绑完成。此限制存在是为了防止在解绑活动高峰期间区块大小无限制。
在实践中,假设平均区块时间为 0.7 秒,每个区块 100 个完成提供了约 9000 个完成/分钟的吞吐量。正常的质押活动很少达到此限制。在特殊情况下,完成可能会在完全处理之前排队几个区块。
#### Gas 消耗
系统交易在执行期间消耗 gas,这在区块的 gas 限制中计算。gas 成本与正在处理的完成数量成线性比例:
* 基本函数调用:约 21,000 gas
* 每个事件发出:约 3,000 gas
* 读取状态:每个完成约 2,000 gas
100 个完成的完整批次消耗大约 521,000 gas。由于 Stable 的区块 gas 限制为 100,000,000,这代表不到 0.6% 的可用区块空间。
#### 通知延迟
当解绑期在区块 N 期间完成时:
1. Stable 模块的 `EndBlock` 在区块 N 的状态中排队完成
2. 区块 N+1 的 `PrepareProposal` 创建系统交易
3. 系统交易在区块 N+1 期间执行,发出事件
这意味着解绑完成和发出 EVM 事件之间存在一个区块的延迟(大约 0.7 秒)。对于大多数用例,此延迟是可以接受的,因为解绑期本身为 7 天。
#### 高负载场景
如果解绑完成的到达速度快于每个区块 100 个,它们会在队列中累积。队列按 FIFO 顺序处理,因此最旧的完成始终首先通知。
在持续的高负载期间,队列可能会暂时增长。但是,一旦高峰消退,完成较少的后续区块将逐渐排空队列。该系统旨在处理突发而不丢失事件。
### 未来扩展
系统交易机制为将任何 Stable SDK 操作桥接到 EVM 事件空间提供了通用模式。虽然目前仅用于解绑完成,但该架构可以扩展以涵盖其他用例:
#### 质押操作
除了解绑之外,其他质押事件可以发出 EVM 通知:
* 验证者的佣金率变化
* 验证者入狱和出狱
#### 治理执行
当治理提案通过并执行时,系统交易可以发出带有提案 ID 和执行结果的事件。这将允许 dApps 对参数变化或升级做出反应,而无需轮询治理模块。
#### 通用事件桥
该模式可以推广为可配置的事件桥,其中每个模块注册哪些 SDK 事件应该镜像到 EVM。这将提供对所有 Stable SDK 操作的全面可见性,而无需每个模块的自定义逻辑。关键架构原则是系统交易仍然是协议级功能,仅由验证者在区块提案期间创建。
## 核心功能
Stable 是一条高性能区块链,专为支持 USDT 相关活动而设计。基于 **委托权益证明(dPoS)** 机制构建,Stable 实现了 **完全兼容 EVM**,并达成 **亚秒级出块时间**,确保交易快速可靠地达成最终性。作为一个 **专注于 USDT 的网络**,Stable 提供了一系列优化用户体验的 USDT 专属功能。
主要功能包括:
* **亚秒级交易最终性**:实现亚秒级出块和单轮次最终确认
* **100% EVM 兼容性**:支持所有 Ethereum 工具和智能合约
* **USDT 作为 Gas 代币**:USDT0 作为其原生 Gas 代币。USDT0 同时作为用于支付 Gas 和进行价值转移的原生资产,并作为支持 `approve`、`transfer`、`transferFrom` 和 `permit` 的 ERC20 代币。
* **USDT0 跨链转移**:支持从包括 Ethereum、Arbitrum、HyperEVM 等 EVM 区块链,以及 Tron 等其他区块链通过跨链桥转移 USDT0
* **Stable Pay 提供 Web2.5 用户体验**:通过 Stable Pay 实现无缝的链上交互体验
未来,Stable 还将推出更多功能,以进一步提升 USDT 的可用性和网络效率。其中包括 **USDT Transfer Aggregator(USDT 转账聚合器)**,可将多个 USDT 转账打包为单一交易以提升处理效率;以及 **企业专用区块空间 Enterprise Blockspace**,为机构用户提供可预测、稳定的 USDT 使用环境。
## 技术概览
从状态数据库、执行引擎、共识机制,到针对 USDT 的特定优化,Stable 的设计始终聚焦于性能、可扩展性与可靠性。技术栈中的每一层组件都经过专门优化,以支持高吞吐的工作负载和无缝的 USDT 原生操作。
### StableBFT
Stable 区块链最初采用 **StableBFT** —— 基于 CometBFT 构建的定制化 PoS 共识协议,确保网络具备高吞吐、低延迟和强健的可靠性。为了进一步优化共识性能,Stable 计划拆解数据传播与共识流程,并实现面向区块提议者的交易直接广播机制。
Stable 还计划将协议升级为基于有向无环图(DAG)的 **Autobahn** 架构。在 Autobahn 上构建的 StableBFT 将带来:
* 消除单领导瓶颈,实现提议过程的并行化;
* 通过将数据传播与排序拆解,加快最终性的达成速度;
* 借助增强的 BFT 机制提升对网络异常的鲁棒性。
### Stable EVM
**Stable EVM** 是 Stable 的以太坊智能合约的兼容执行层,支持用户通过现有的以太坊工具和钱包(如 MetaMask)与链进行交互。为打通 Stable EVM 与 StableSDK 的能力边界,同时 Stable EVM 引入一系列 预编译合约,允许 EVM 智能合约安全且原子性地调用Stable底层接口。
Stable 计划通过引入 **StableVM++** 来进一步提升 EVM 执行性能,该模块集成了如 EVMONE 等替代 EVM 实现,以及基于 Block-STM 的 **Optimistic并行执行引擎(OPE)**。
### StableDB
**状态:v1.4.0 升级时上线**
Stable 通过解决区块执行后低效的磁盘存储这一主要瓶颈,显著提升了处理速度。它将状态提交与存储操作进行拆解,使得新区块能在无需等待数据存储的情况下迅速处理。同时,结合 `MemDB` 与 `VersionDB`,并使用 `mmap`(内存映射)技术,实现近期数据驻留内存、历史数据高效存储,大幅提升整体吞吐量。
### 高性能 RPC
即使底层区块链再快,如果 RPC 反应速度缓慢,用户体验仍会大打折扣。Stable 通过彻底重构传统 RPC 架构来解决这一问题。传统的单一 RPC 模式存在资源竞争严重、扩展性差等问题,而 Stable 引入了 **路径分离架构(split-path architecture)**,根据不同功能将操作分离,部署轻量化、专业化的 RPC 节点以实现更快速响应。
未来计划包括为 EVM `view` 调用优化的专用 RPC 节点,以及原生集成索引器(indexer)以进一步加速 dApp 数据访问。
## 隐私转账(Confidential Transfer
随着区块链在企业中的应用不断加速,尤其是在稳定币领域,**对交易隐私的需求日益增长**。许多企业在处理财务操作时需要保持隐私性,以保护如付款金额等敏感信息。为满足这一需求,Stable 正在开发**隐私转账(Confidential Transfer)功能**,以在隐私保护与监管合规之间实现平衡。
Stable 利用零知识加密(Zero-Knowledge Cryptography, 简称 ZK)技术,构建了一个**隐私转账层(Confidential Transfer Layer)**,使交易双方可以在不公开链上交易金额的前提下完成代币转账。在此机制下:
* **交易金额将被加密隐藏**,而非直接记录在链上。
* **发送方和接收方地址依然公开可见**,以便于遵守金融监管和审计要求。
这种设计保证了:**交易金额仅对交易参与方和授权的监管审计方可见**,在保护用户隐私的同时,也不牺牲法律合规性。
在当前业界的实现中,Solana 的 Confidential Transfer 模型被认为是该功能的有力候选方案之一。然而,Stable 仍在积极探索其他架构,力求找到最具可行性和可扩展性的解决方案。
最终选定的方案将必须契合 Stable 的核心使命:**为企业提供安全、合规且具备企业级可靠性的区块链基础设施**。
## 保证区块空间(Guaranteed Blockspace)
### 企业需要稳定的支付基础设施
随着稳定币的持续发展,越来越多的企业将其纳入财务操作中,例如支付、资金调拨和跨境结算。这一趋势在那些获取稳定法币受限的地区尤为明显。在非洲、拉丁美洲等通货膨胀严重、货币管控严格的市场,稳定币正逐渐成为这些地区企业持续运营的关键工具。
当前,大部分稳定币交易发生在通用型公链上,例如 Ethereum、Solana 和 Tron。这些网络虽提供了高可组合性和智能合约支持,但它们并未针对**费用可预测性**或**执行确定性**进行专门设计。
* **Ethereum**:2022 年 5 月 1 日,Yuga Labs 的 “Otherside” NFT 铸造事件在 Ethereum 上燃烧了超过 2 亿美元的 Gas 费,峰值 Gas 价格超过 8,000 gwei,造成整个网络交易费用剧烈波动,缺乏可预测性。
* **其他区块链网络**:在 Solana 和 Base 等低费用网络中,由于存在 MEV 和套利机会,激励机制导致大量交易垃圾(spam)泛滥。自动化机器人频繁向链上提交交易以从中捕获价值,从而造成网络拥堵,影响真实用户的正常使用。

*来源:Flashbots 与 Robert Miller 联合发布的《MEV 与扩容的极限》报告*
若企业要大规模采用稳定币进行支付,其底层基础设施必须具备**支付可靠性**。这意味着必须在任何网络条件下都能提供可预测的交易速度与稳定的交易费用。否则,基于通用区块链的稳定币支付将难以满足企业级应用的要求。
### 保证区块空间(Guaranteed Blockspace)
为保障企业支付操作的稳定性与可靠性,Stable 将推出 **保证区块空间(Guaranteed Blockspace)** 支持。
保证区块空间(Guaranteed Blockspace) 是一种**专属的区块容量分配机制**,旨在为企业客户预留固定比例的区块空间,无论网络整体负载如何。关键性的交易(如工资发放、结算清算、供应商支付)都可在可预测的交易时间与成本下完成执行。
该机制通过以下方式实现:
* **专属内存池(Guaranteed Mempool)**:验证节点会从独立的企业交易内存池中提取优先级高的交易,避免与一般交易争夺资源。
* **验证节点级别的处理流程**:每个验证节点为企业用户预留固定比例的区块空间,确保这类交易能以高确定性地被包含进块中。
* **专属 RPC 服务**:企业级 API 会通过独立的 RPC 服务器发送交易,减少资源争抢,提升吞吐稳定性。
保证区块空间为商业用户带来以下优势:
* **专属交易通道**:通过独立的交易传输路径,确保交易享有优先访问专属区块空间的权限。
* **交易执行保障**:即使在高负载网络条件下,每个区块内都能确保企业交易的优先执行权。
* **保持网络去中心化特性**:不影响验证节点的开放性或网络参与者的操作自由。
* **关键操作的链上性能保障**:即使网络拥堵,企业的关键链上交易依旧可以保持可靠、高效运行。
## 概览
### USDT 专属功能
Stable 是一条专为 USDT 打造的 Layer 1 区块链网络。协议的每一个组件都围绕 USDT 的无摩擦转账进行优化,致力于为全球最广泛使用的稳定币提供一个高性能、简洁流畅的运行环境。
除了核心基础设施外,Stable 还提供一系列 USDT 专属功能,进一步提升整体用户体验:
* **USDT 作为 Gas Token**:USDT0 作为其原生 Gas 代币。USDT0 同时作为用于支付 Gas 和进行价值转移的原生资产,并作为支持 `approve`、`transfer`、`transferFrom` 和 `permit` 的 ERC20 代币。
* **保证区块空间(Guaranteed Blockspace)**:保证区块空间是一种专为企业客户设计的区块容量分配模型,可保证其在任何网络条件下都拥有固定份额的区块资源,实现确定性延迟与费用。
* **USDT0 转账聚合器(Transfer Aggregator)**:通过隔离并聚合 USDT0 转账交易,实现极致吞吐量的同时,确保公平性且不影响其他交易类型。
* **隐私转账(Confidential Transfer)**:Stable 计划采用零知识加密(ZK Cryptography)实现加密的 USDT 转账。交易金额将在链上隐藏,同时保留发送方与接收方地址公开,以满足合规审计需求。
## USDT as Gas
Stable 是围绕 USDT 稳定币构建的。USDT0 是 USDT 的原生跨链版本,是支撑 Stable 生态系统的核心资产。
### 摘要
Stable 是一个使用 USDT0 作为原生 Gas 代币的 EVM 兼容区块链。USDT0 同时作为 Gas 支付和价值转移的原生资产,以及支持 `approve`、`transfer`、`transferFrom` 和 `permit` 的 ERC20 代币。
这种设计让交易成本可预测并以美元计价,简化了用户体验。然而,它引入了与以太坊不同的行为差异,影响余额语义、授权安全性和某些操作码假设。
本文档指定了 Stable 的 USDT0 Gas 机制,描述了由此产生的行为差异,并定义了在 Stable 上部署的智能合约所需和推荐的开发模式。
### 版本说明
随着 Stable v1.2.0,USDT0 成为 Stable 上的原生 Gas 代币,取代了 gUSDT。作为此过渡的一部分:
* gUSDT 即将下线。
* 现有的 gUSDT 余额会自动转换为 USDT0。
* 用户和应用程序不再需要封包和解包代币来支付费用或转移价值。
在 v1.2.0 之后,USDT0 同时作为:
* 网络费用资产(gas),以及
* 具有 `approve`、`permit`、`transfer` 和 `transferFrom` 的标准 ERC20 代币。
### 网络地址
USDT0 代币合约地址:
* 测试网:[0x78cf24370174180738c5b8e352b6d14c83a6c9a9](https://testnet.stablescan.xyz/token/0x78cf24370174180738c5b8e352b6d14c83a6c9a9)
* 主网:[0x779ded0c9e1022225f8e0630b35a9b54be713736](https://stablescan.xyz/token/0x779ded0c9e1022225f8e0630b35a9b54be713736)
### 术语
* **Stable**:一个 EVM 兼容的区块链,其中 USDT0 是原生 Gas 代币。
* **USDT0**:USDT 的原生跨链版本,同时作为:
* 用于 Gas 和价值转移的原生资产,以及
* 具有授权和许可语义的 ERC20 代币。
* **原生余额**:由 `address(x).balance` 返回的余额,以 USDT0 计价。
* **Gas 费**:在 EIP-1559 式费用市场下计算的以 USDT0 支付的交易费用。
### 什么是 USDT0?
USDT0 是使用 LayerZero 的全链可替代代币 (OFT) 标准的 USDT 的原生跨链版本。USDT0 与 USDT 1:1 锚定,旨在跨多个区块链移动,而无需传统的桥接工作流程或封包表示。
在跨链转移 USDT0 时,代币在某些源链上被锁定(取决于链的原生 USDT 支持)或销毁,然后通过 LayerZero 的跨链消息在目标链上铸造。这保持了 1:1 锚定,同时将流动性整合到单个可互操作的资产中,而不是分散的链本地池。
对于用户,这可以实现更快的入门、降低的操作复杂性和改进的流动性流动性。
### USDT0 和 Stable
USDT0 是支撑 Stable 链上经济和日常使用的核心资产。由于同一资产用于支付费用和转移价值,Stable 减少了以下方面的摩擦:
* **普通用户**:更简单的入门和更少的代币概念
* **开发人员**:更简单的费用和价值流
* **企业**:简化的会计和财务运营
Stable 还可以通过允许用户通过 LayerZero 从其他网络入门 USDT0 来从第一天开始访问深度 USDT 流动性。
### 假设和先决条件
对于以下内容,读者应该理解:
* Solidity 执行语义和原生价值转移
* ERC20 授权机制和许可流程
* 标准智能合约安全模式,包括 Checks-Effects-Interactions
### 1. Gas 和费用模型
#### 1.1 概述
Stable 以 USDT0 计价所有交易费用。Gas 定价遵循 EIP-1559 式模型,具有动态调整的基础费用。
交易费用定义为:
```
fee = gasUsed × baseFee
```
交易可以使用标准 EIP-1559 参数指定 `maxFeePerGas`。
*注意:Stable 不支持优先小费。不要设置 `maxPriorityFeePerGas`,否则小费金额将丢失。*
#### 1.2 交易提交
客户端应从最近的区块获取最新的基础费用,并在计算 `maxFeePerGas` 时包含安全边际。
示例(说明性):
```javascript
const block = await provider.getBlock("latest");
const baseFee = block.baseFeePerGas;
const maxPriorityFeePerGas = 1n;
const maxFeePerGas = baseFee * 2n + maxPriorityFeePerGas;
```
#### 1.3 获取 USDT0
账户通过以下方式获取 USDT0:
* 从其他支持的链桥接 USDT0
* 从 Stable 上的其他账户接收转账
### 2. Stable 如何启用 USDT0 作为 Gas 代币
Stable 使用预扣费和退款结算模型在 USDT0 中收取 Gas 费。
#### 示例交易
Alice 向 Bob 发送 100 USDT0。
#### 2.1 Ante-handler 阶段
在 `MonoEVMAnteHandler` 中的交易验证期间:
1. 读取 Alice 的 USDT0 余额。
2. 协议验证 Alice 可以覆盖:
* 交易价值(100 USDT0),以及
* 最大可能的 Gas 费(`gasWanted × fee`)。
3. 预先转移最大 Gas 费:
* `alice → fee_collector` 以 USDT0。
#### 2.2 执行阶段
在 `ApplyTransaction` 期间:
1. EVM 执行交易。
2. 记录实际 Gas 消耗。
3. 应用价值转移:
* `alice → bob` 转移 100 USDT0。
#### 2.3 结算阶段
执行后:
1. 协议计算预扣费的未使用部分:
```
refund = (gasWanted − gasUsed) × baseFee
```
2. 退还未使用的费用:
* `fee_collector → alice` 以 USDT0。
### 3. 余额语义和行为差异
#### 3.1 原生余额可变性
在以太坊上,合约的原生余额通常仅因合约执行而改变。
在 Stable 上,合约的原生 USDT0 余额也可能由于基于 ERC20 授权的操作而改变,包括 `transferFrom` 和 `permit`。这些操作可以在不调用任何合约代码的情况下减少合约的原生余额。
因此,以下假设在 Stable 上无效:
* 合约的原生余额只能在合约被调用时减少。
### 4. 合约设计要求
#### 4.1 禁止模式:镜像余额会计
合约不得依赖内部变量来镜像原生余额。
不安全模式的示例:
```solidity
uint256 public deposited;
function deposit() external payable {
deposited += msg.value;
}
```
如果通过基于授权的转移耗尽 USDT0,此类变量可能与实际原生余额不同。
#### 4.2 必需模式:实际余额偿付能力检查
所有原生价值转移必须在转移之前立即使用 `address(this).balance` 验证偿付能力。
示例:
```solidity
require(address(this).balance >= amount, "insufficient balance");
```
提款必须遵循 Checks-Effects-Interactions 顺序:
```solidity
uint256 amount = credit[msg.sender];
credit[msg.sender] = 0;
require(address(this).balance >= amount);
payable(msg.sender).call{value: amount}("");
```
#### 4.3 状态进展必须独立于余额
依赖进展、里程碑或完成条件的协议逻辑必须使用非余额状态变量(如计数器或纪元)显式跟踪这些内容。
原生余额只能在支付时用于偿付能力验证。
#### 4.4 授权暴露
托管用户资金的合约不应向外部地址授予 USDT0 授权。
如果无法避免授权,合约应:
* 仅批准确切金额
* 使用后立即重置授权
* 将余额排空风险视为已知限制
### 5. 地址状态假设
#### 5.1 EXTCODEHASH
合约不得依赖 `EXTCODEHASH(addr) == 0x0` 来推断地址从未被使用过。
任何地址使用的概念都必须在合约状态中显式跟踪。
示例:
```solidity
mapping(address => bool) public used;
```
### 6. 零地址处理
在 Stable 上:
* 向 `address(0)` 的原生 USDT0 转移会回滚。
* 向 `address(0)` 的 ERC20 USDT0 转移也会回滚。
没有通过转移到零地址来销毁 USDT0 的支持机制。
合约必须:
* 明确拒绝 `address(0)` 作为接收者
* 重新设计任何假设零地址销毁的逻辑
* 如果需要不可逆丢失语义,请使用显式接收合约
### 7. 测试要求
Stable 部署的测试套件应包括:
* 基于授权的排空场景(`approve` + `transferFrom`)
* 使用实际原生余额的偿付能力执行
* 不依赖 `EXTCODEHASH` 的地址使用逻辑
* 零地址转移的显式失败情况
### 8. 迁移检查清单
将合约从以太坊移植到 Stable 时:
* 删除内部原生余额镜像
* 用 `address(this).balance` 替换所有偿付能力检查
* 删除所有到 `address(0)` 的原生或 ERC20 转移
* 审计所有 USDT0 批准
* 添加涵盖许可和基于授权流程的测试
### 9. 总结
Stable 使用 USDT0 作为 Gas 代币提供了可预测的费用和统一的价值会计,同时改变了关于原生余额行为的核心假设。
Stable 上的正确合约设计需要:
* 将 USDT0 视为双重角色资产
* 针对实际余额执行偿付能力
* 避免基于授权的余额排空
* 消除对以太坊特有的余额及地址假设的依赖
### 常见问题
**我们现在使用 USDT0 作为封包的原生代币。升级后,哪个代币应该被视为封包的原生代币?**
升级后,USDT0 既是原生代币又是 ERC-20 代币。您应该直接使用 USDT0,不再需要封包或解包。
**原始的 USDT0 合约地址(`0x779Ded0c9e1022225f8E0630b35a9b54bE713736`)会发生什么变化?**
没有任何变化。相同的地址仍然有效并继续代表 USDT0。
**升级后,原生代币地址是 `0x779Ded0c9e1022225f8E0630b35a9b54bE713736`(而不是 `0x0000000000000000000000000000000000001000`)吗?**
是的。升级后,原生代币标识符/地址是 `0x779Ded0c9e1022225f8E0630b35a9b54bE713736`。
**那么 `0x0000000000000000000000000000000000001000` 呢?它还会作为 gUSDT 的代币地址使用吗,我们应该保留它吗?**
不会。您可以删除它。升级后将不再使用它。
**对于 DEX calldata,协议是否会停止使用 `0x0000000000000000000000000000000000001000` 作为"原生代币"标识符,而改用 `0x779Ded0c9e1022225f8E0630b35a9b54bE713736`?**
正确。升级后,DEX 应使用 `0x779Ded0c9e1022225f8E0630b35a9b54bE713736` 作为原生代币标识符。
## USDT 转账聚合器
作为一条专为 USDT 交易优化的区块链,Stable 被设计用于处理极高频次的代币转账,同时保持系统的整体响应。为了在优化 USDT 特定性能的同时兼顾一般交易的多样性,Stable 引入了 USDT 转账聚合器机制。这是一种高效、可扩展的解决方案,可对 USDT0 转账进行高度并行化和容错处理。
### 为什么需要 USDT 转账聚合器?
支持大规模 USDT 使用的挑战在于如何同时优化吞吐量和保持不同交易处理的公平性:
* 传统的 ERC20 代币转账按顺序处理,在高交易负载下成为性能瓶颈。
* 如果仅优先考虑 USDT 的吞吐量,可能会排挤其他交易,导致整条链的性能下降。
USDT 转账聚合器通过将 USDT 转账隔离优化,避免影响执行流程中的其他部分,从而解决了这一矛盾。
### 并行聚合与验证
> *以下内容基于当前战略规划,属于前瞻性设计。随着经验积累和优先级调整,路线图可能会有所更新。*
聚合系统的核心是一个可并行化的聚合与验证管道,灵感来自 `MapReduce` 计算模型。系统不再按顺序处理每一笔转账,而是以批次为单位,聚合所有账户的输入输出后,再统一进行余额更新。
#### 关键流程
1. **账户差异聚合(Aggregate Account Diffs)**
* 每笔转账都映射到发送方与接收方。
* 为每个账户生成一个差异日志(diff journal),代表该账户的净变化:
* 发送总额为负值。
* 接收总额为正值。
2. **余额验证**
* 系统确保全局余额守恒:总输入等于总输出。
* 每个账户的净变动通过并行方式独立验证资金是否充足。
* 资金不足的账户将被标记,但不会影响该批次执行。
3. **MapReduce 并行模型**
* **Map 阶段**:根据所有收支转账计算每个账户的净变化值。
* **Reduce 阶段**:聚合这些变化以确定最终状态更新。
### 技术亮点
#### 并行计算模型
* 利用预编译合约实现余额校验与差异计算的并行处理。
* 相比传统的串行 ERC20 执行,大幅减少执行时间。
#### 依赖关系分析
* 识别转账之间的依赖关系(如多个发送来自同一账户)。
* 预先标记高风险转账(如可能余额不足),以减少级联失败。
#### 模块化故障处理
* 转账在账户级别上被隔离,只有出现问题的账户会被影响。
* 无冲突的转账将正常执行与确认,不受影响。
#### 选择性失败处理
传统的转账处理在一个区块中通常是“要么全部成功,要么全部失败”。Stable 的聚合模型引入了更精细的账户级失败隔离机制:
* 若某账户的 `当前余额 + 净变化 < 0`,系统只标记该账户的转账失败。
* 涉及其他账户的转账将正常继续执行。
* 此选择性回滚机制确保无效或恶意转账不会破坏整个批次的完整性。
### 提议者驱动或声誉排序机制
为进一步优化执行并避免状态冲突,Stable 对聚合转账引入预处理排序机制:
* **基于声誉的排序**:拥有良好交易历史或信誉的账户优先执行,降低失败率与重新排序成本。
* **提议者排序**:可信提议者节点可根据依赖关系排序交易,减少冲突并提高吞吐。
* **聚合转账优先执行**:聚合后的 USDT 转账优先于一般交易执行,减少依赖冲突,释放执行空间。
Stable 的 USDT 转账聚合器机制是一项针对性优化,能够在不影响通用交易处理性能的前提下,最大化 USDT0 转账的吞吐量。通过结合并行执行、模块化失败处理与智能排序策略,Stable 为以稳定币驱动的经济体提供了高扩展性的基础架构,使快速、频繁、无摩擦的代币转账成为常态。
## Consensus
### StableBFT 共识机制
在初始阶段,Stable 区块链采用 **StableBFT**,这是一个基于 CometBFT 定制的权益证明(PoS)共识协议,旨在确保网络具备高吞吐量、低延迟和高鲁棒性。其主要优势包括高确定的最终确定性以及强大的容错能力(即便有 1/3 验证者失效或作恶,网络仍可保持安全)。
为进一步提升共识性能,Stable 计划在不久的将来对共识相关的两层机制进行优化:
* **交易传播与共识传播拆解**:通过将交易 gossip 层与共识 gossip 层分离,防止交易层的网络拥塞影响到共识通信,提升系统稳定性。
* **交易直接广播至区块提议者**:当前模型中,交易在节点间通过点对点 gossip 传播,造成区块链网络中有大量的交易相关流量传输。Stable 计划引入直接广播机制优化这个机制,使交易可直接发送给区块提议者,从而提高交易传播效率。
### 未来规划:基于 DAG 的共识机制
为大幅提升共识效率,Stable 计划将其协议升级为基于 DAG(有向无环图)的设计,预期带来 5 倍的性能提升。
传统的基于视图的 BFT 协议(如 PBFT 和 HotStuff)在网络稳定时可实现低延迟,但在发生网络中断时性能急剧下降,恢复时间较长。
第一代 DAG 引擎如 Narwhal 和 Tusk 表明将数据传播与共识排序拆解可以消除单一提议者瓶颈,并在网络不稳定时提升鲁棒性。然而,这类架构与 CometBFT 系统不直接兼容,因为它们偏离了传统的基于区块高度的开发习惯和内存池(mempool)设计。
[Autobahn](/cn/architecture/core-optimization/appendix/autobahn) 提供了一种 PBFT-on-DAG 架构,能更好与 Stable 的共识层集成,既能在正常网络条件下实现低延迟,也能在网络故障时快速恢复。Stable 团队与 Autobahn 论文作者保持紧密合作,并将利用 Autobahn 架构提升 StableBFT 的性能。
基于 Autobahn 架构构建的 StableBFT 将带来以下能力:
* 消除单一领导者限制,实现并行处理。
* 将数据传播与最终排序分离,实现更快的最终确定性。
* 借助强大的 BFT 机制,在网络异常条件下增强系统的处理弹性。
这一先进的共识设计已通过内部原型验证,在受控环境下实现超过 **200,000 TPS(仅共识层)** 的高吞吐表现。
## 执行层
### Stable EVM
**Stable EVM** 是 Stable 区块链的以太坊虚拟机兼容执行层,使用户能够通过现有的以太坊工具和钱包(如 MetaMask)无缝与链进行交互。Stable EVM 结合了 EVM 的开发体验与 StableSDK 的模块化、高性能基础设施。
Stable 的以太坊兼容执行层,支持使用现有的以太坊工具与钱包无缝交互。同时 Stable EVM 引入一系列 预编译合约,允许 EVM 智能合约安全且原子性地调用Stable底层接口。通过这种设计,智能合约可执行包括代币转账、质押、参与治理等特权操作。
### 未来路线图一:Optimistic并行执行(OPE)
传统区块链系统依赖顺序执行机制,逐个处理交易以确保所有节点的一致状态。虽然这种方式保证了确定性,但极大限制了吞吐量和可扩展性,尤其在现代区块链需要支持每秒成千上万笔交易时更为突出。
为突破此瓶颈,Stable 将采用 **Block-STM**,一种已验证的并行执行引擎,支持 **Optimistic并行执行(Optimistic Parallel Execution,简称 OPE)**,允许在保证确定性的前提下并行处理交易,显著提升性能。
#### Block-STM 的工作原理
Block-STM 使用Optimistic并发控制机制:首先假设交易之间不会冲突并进行并行执行,随后进入验证阶段检查冲突并处理重执行。核心依赖以下五项关键技术:
**1. 多版本内存结构**
Block-STM 为每个内存键(memory key)存储多个版本:
* 每个交易读取先前交易已提交的最新版本;
* 执行过程中,读取和写入都会进行版本标记;
* 验证阶段会检查这些版本以确认是否存在冲突。
**2. 基于读取集(Read-Set)/写入集(Write-Set)的验证机制**
* 执行时,交易会记录其读取的键及其版本(Read-Set);
* 执行结束后,其写入操作记录为 Write-Set;
* 验证阶段,若任意 Read-Set 中的键在执行期间被其他交易修改,则该交易判定为冲突,程序中止然后进行重试并增加尝试编号(incarnation)。
**3. 通过 ESTIMATE 标记实现快速冲突检测**
* 失败的交易会将其 Write-Set 标记为 ESTIMATE;
* 若其他交易读取到 ESTIMATE 标记的值,会立即停止并等待该交易重试(触发 `READ_ERROR`);
* 该机制可快速识别依赖关系,减少不必要的执行负担。
**4. 预设交易顺序**
* 区块内的所有交易按照预设的确定顺序执行;
* 验证与提交阶段也遵循上述相同顺序;
* 即便并行执行,这能确保所有节点最终状态仍一致。
**5. 任务调度器(Collaborative Scheduler)**
* 任务调度器以线程安全的方式为执行和验证分配任务;
* 优先处理索引较早的交易,加速处理早期提交的任务、减少重试;
* 调度器管理已多次尝试的任务,直到成功提交。
#### Block-STM 的核心优势
* **无锁并行**:基于 MVCC(多版本并发控制),允许多个交易同时读取/写入,无需加锁。在执行后才进行冲突检查,最大限度提升吞吐量。
* **ESTIMATE 标记机制**:失败交易通过 ESTIMATE 标记提前通知依赖交易暂停,避免资源浪费。
* **高效调度与优先提交机制**:通过任务调度器优先提交索引较早的交易,提高整体吞吐并缩短执行周期。
* **确定性与共识兼容性**:即使某些交易需要重试,也将在相同顺序下提交,确保所有节点达成相同的最终一致性。
#### Stable 上的 OPE
Stablechain 将把 **Optimistic并行执行(OPE)** 作为其执行层的核心功能,并结合 **Optimistic区块处理(Optimistic Block Processing,简称 OBP)**。需要注意的是,OPE 与 OBP 是互补但本质不同的两种优化策略。
#### 关于 OBP
* OBP 并不涉及并行,而是优化执行时机;
* 在 `ProcessProposal` 阶段,Stable 会在交易 gossip 的同时预先执行区块;
* 执行结果缓存在内存中,在 `FinalizeBlock` 阶段复用,节省时间并避免重复计算。
通过结合 OPE 与 OBP,Stable 能在高交易负载下最大限度降低执行延迟与资源争用,带来卓越性能表现。
#### 性能预期
内部基准测试表明,结合 **基于 Block-STM 的 OPE** 与 **StableDB**,Stable 的交易处理吞吐量有望提升 **至少 2 倍**。
### 未来路线图二:StableVM++
虽然 OPE 与 OBP 聚焦于优化「并行执行多笔交易」,但另一个关键的提升性能手段是:「如何更高效地处理每一笔交易」。
Stable 正在探索替代的 EVM 实现方式以加速交易执行。在当前选项中,**EVMONE**(一个高性能 C++ 编写的 EVM)是最具潜力的替代现有 Go 实现的EVM。理论基准测试表明,这一更换预计将带来高达 **6 倍的 EVM 执行性能提升**。
## 高性能 RPC
在构建高性能区块链的过程中,仅仅优化共识机制或出块速度是不够的。**RPC 层** 是区块链与用户之间的接口,是实现端到端用户体验的关键组成部分。Stable 提出一种高性能 RPC 架构,旨在突破传统 RPC 的性能瓶颈。
### 为什么高性能 RPC 至关重要
#### 用户连接区块链的入口
**RPC** 是用户与区块链交互的主要方式:
* 钱包通过 RPC 广播交易;
* DApps 借助 RPC 查询链上状态来渲染界面、准备交易、进行模拟、获取事件和日志等;
* 区块浏览器、索引服务和交易机器人程序都依赖 RPC 实时获取数据。
即使底层区块链处理交易的速度极快、出块迅速,如果 RPC 响应缓慢、延迟高,用户的整体体验仍将受到影响。事实上,在现实使用中,RPC 常常成为链上体验的性能瓶颈。
因此,Stable 的高性能区块链路线图中将 **优化RPC架构** 明确作为优先任务。
### 传统 RPC 架构的弊端
#### 单一的架构设计与资源争用
传统上,RPC 节点通常是功能扩展的全节点,它们同时负责:
* 在同一时间处理区块链的同步与RPC请求;
* 若要扩展 RPC 能力,只能新增完整节点,导致必须重复执行状态同步、共识配置等繁重流程;
* 共识、执行与 RPC 服务共用同一 CPU、内存与磁盘资源。一旦某一部分高负载,**将会拖慢其他模块的性能**,例如在交易高峰期,RPC 延迟大幅上升。
此外,传统架构通常并不区分读取与写入请求的处理方式。即使读取请求(如 `eth_getBalance`)在调用量上远超写入交易,两者仍在同一逻辑结构中混合处理,造成系统整体效率低下、可扩展性差。
### Stable 的 RPC 架构
Stable 提出了 **路径分离(Split-Path)RPC 架构**,将读取与写入操作分离,并分别进行独立优化。
#### 核心原则
* 将 RPC 按功能拆分为多个轻量高效的节点;
* 使用轻量级 RPC 边缘节点进行扩展,以提升系统可扩展性;
* 根据不同功能优化路径,通过更高效的数据结构来减少请求延迟,实现更直接的链上数据访问或管理。
#### 性能提升
在读取路径下,Stable 的内部测试结果显示:
* 单节点吞吐量超 **10,000 次/秒(RPS)**;
* 同一环境下,端到端延迟 **低于 100ms**;
* 边缘节点支持线性扩展,**无需状态同步或共识负担**。
Stable 的新型 RPC 架构在高流量场景下仍可维持流畅、迅捷的用户交互体验。
### 未来工作方向
#### 优化 EVM View 查询
一个备受关注的研究方向是:**为 `eth_call` 等 EVM 只读操作提供专有支持**:
* 此类调用不涉及状态更新或交易确认;
* 可在轻量、无状态的运行环境中执行,只需当前状态快照;
* 未来可设计专门针对 `eth_call` 的 RPC 节点,进一步降低响应时间,同时减轻主节点负担。
#### 全节点原生集成 Indexer
通过将索引器(Indexer)原生集成至全节点,可以显著加快向 DApps 提供数据的速度:
* 当前架构:Node → RPC → Indexer(如 The Graph)→ 存储 → DApp;
* 提议架构:集成 Indexer 的 Node → 数据库 → DApp;
* 由于省略了额外的网络通信步骤,索引数据可被原生调用,大幅提升查询效率与实时性。
## 概览
### 全流程核心优化
一笔区块链交易从提交到最终确认,需要经历多个紧密相连的阶段。交易首先通过 **RPC** 提交,进入 **内存池(mempool)**,被打包进区块后通过 **共识机制** 验证,再由 **状态机(state machine)** 执行,最终写入 **数据库** 进行持久化。只有在完成整个流程后,用户才能收到确认结果。
仅优化某一个阶段是远远不够的。任何环节的低效都会影响系统整体性能。因此,Stable 致力于从上到下全面优化。
请查看以下页面,了解 Stable 如何从共识层、执行层、数据库层到 RPC 层,对各个架构模块进行系统性升级优化,以确保交易能稳定地以高性能处理。
## StableDB
区块链端到端性能的主要瓶颈之一是 **磁盘 I/O(Disk I/O)**。尤其是在区块执行后提交和存储状态数据的操作,是性能的关键瓶颈。Stable 通过架构创新,使用如 `MemDB`、`VersionDB` 以及文件内存映射存储(`mmap`),显著提升系统吞吐量。
### 为什么磁盘 I/O 是性能瓶颈
#### 状态转换与持久化
每当执行一批交易并产出区块时,区块链系统都会从一个状态转变为下一个状态。这个过程分为两个基本阶段:
1. **状态提交(State Commitment)**:在交易执行完成后,提交新的状态。
2. **状态存储(State Storage)**:已提交的状态被持久化到磁盘,用于长期访问和历史验证。
在传统架构中,状态存储与状态提交是**紧密耦合**的,这意味着:
* 节点在继续执行下一个区块之前,必须等待新状态完全写入磁盘。
* 状态数据被写入磁盘中随机的位置,这导致在后续交易执行中读取状态时出现高延迟。
即使共识层和执行层做了大量优化,这种对低效的串行磁盘操作的依赖仍然限制了整个系统的性能上限。
### 针对高吞吐量的数据库优化
为了解决这些限制,Stable 提出了两项核心架构优化:**解耦状态操作** 和 **引入内存映射数据库优化(mmap)**。
#### 1. 拆解状态提交与存储
第一步是将状态提交与其存储过程拆解:
* 在提交新状态后,节点可以立即执行下一个区块。
* 状态的持久化操作在后台异步进行。
这种分离让执行可以得到立即的处理,绕过磁盘写入带来的延迟,从而消除阻塞依赖,大幅提升端到端性能。
#### 2. 基于 `mmap` 的 `MemDB` 和 `VersionDB`
进一步通过 `mmap`(内存映射文件)实现双数据库模型:
* **MemDB(内存数据库)**:
* 存储近期频繁访问的活跃状态。
* 使用固定地址映射(通过 `mmap`),支持快速的数据查找。
* 适用于大多数以近期状态为目标的交易场景。
* **VersionDB(历史数据库)**:
* 存储更早期的历史状态。
* 优化用于归档和长周期查询,针对低频访问设计。
这种设计确保**热点数据通过内存驻留结构快速响应**,而冷数据则由较慢的持久化存储承担。通过结合 `mmap` 访问与状态智能分层,Stable 能够显著降低区块执行过程中的数据库读写延迟。
### 预期收益与已有实践
这种架构优化并非理论设想,已有 Sei 和 Cronos 等高性能区块链采用类似的解耦式内存映射数据库架构,实测可带来 \*\* 高达 2 倍的整体 TPS 性能提升\*\*。
Stable 也预期将获得类似的性能提升,因为该架构不再受限于存储层瓶颈,系统的共识与执行性能可以按需扩展,而不会被磁盘操作拖慢。
### 延伸阅读
如需深入了解相关技术与实现细节,请参阅:
* [ADR-065:Cosmos Store V2 架构](https://docs.cosmos.network/main/build/architecture/adr-065-store-v2)
* [MemIAVL:实用指南](https://hackmd.io/@yihuang/rkeCvy5xh)
* [Cronos MemIAVL 节点配置](https://docs.cronos.org/for-node-hosts/running-nodes/memiavl)
* [Sei 的数据库设计方案](https://4pillars.io/ko/articles/sei-db)
## Autobahn
### BFT 协议的权衡:低延迟 vs. 高鲁棒性
现代拜占庭容错(BFT)共识协议通常运行在部分同步模型下,该模型假设在某个不确定的时间点后,网络最终会变得稳定,消息传递延迟会有上限。虽然这个模型在协议设计上是实用的,但现实部署中很少能享受长时间的持续稳定。相反,系统经常经历同步阶段后出现短暂中断,如延迟激增、节点宕机或恶意攻击。这些短暂中断被称为 **“突变(blips)”**。
在这种情况下,现有的共识协议通常被迫在 **网络稳定时的低延迟** 与 **故障状态下的高鲁棒性** 之间做出取舍:
* **传统的基于视图(view-based)的 BFT 协议**(如 PBFT 和 HotStuff)在网络良好时响应迅速,但一旦发生突变,其性能会迅速恶化。这种性能衰退称为“宿醉效应(hangover)”,即使网络恢复后仍会持续,因为积压的请求会延迟后续交易处理。
* **基于 DAG 的 BFT 协议**(如 [Narwhal & Tusk](https://arxiv.org/pdf/2105.11827)/[Bullshark](https://arxiv.org/pdf/2201.05677))将数据传播(DAG)与共识(BFT)解耦,允许交易异步传播至各副本。这种设计支持高吞吐量,并可在网络中断时继续推进。然而,这些协议即使在网络良好时也会因异步排序机制的复杂性而导致高延迟。
[**Autobahn**](https://arxiv.org/pdf/2401.10369) 引入了一种全新方法,融合了这两种设计理念的优势。它结合了 DAG 协议的高吞吐与对突变的容忍性,以及传统共识协议的低延迟性能。Autobahn 的核心是一个高度并行的数据传播层,无论共识进展如何,始终以网络速度传播提案。在此之上,Autobahn 运行一个低延迟的部分同步共识协议,通过引用数据层的轻量级快照来提交提案。
Autobahn 的一个显著特点是其在突变后无性能退化的恢复能力,称为 **“无缝性(seamlessness)”**。这意味着系统在网络稳定后可立即恢复全速和低延迟运行,无需对积压交易进行代价高昂的重复处理。通过将数据可用性与排序清晰分离,并避免协议自身引起的同步延迟,Autobahn 为真实环境下的区块链共识提供了一个既有高鲁棒性又响应迅速的基础。
### Autobahn 架构概览
Autobahn 的架构围绕其两大核心层:**数据传播层** 和 **共识层**,职责分离明确。这种解耦借鉴了 Narwhal 等 DAG 系统的设计,但 Autobahn 对其进行了增强,以支持无缝性和更低延迟。
数据传播层负责以可扩展的异步方式广播客户端交易。每个副本维护一条独立的交易批处理通道,称为“车道(lane)”,这些车道可独立于共识状态进行传播和认证。即使共识过程暂停,车道仍持续增长,保证系统对客户端始终保持响应。
共识层运行一个基于 PBFT 风格的部分同步协议。但与传统共识需就每一批交易达成一致不同,Autobahn 共识协议的处理方式类似“车头快照(tip cut)”,即各条车道当前状态的精简摘要。这种设计允许 Autobahn 一次性提交任意规模的数据,减少突变带来的影响。
相较于 HotStuff(数据与共识紧耦合,领导者失败时易停滞)和 Bullshark(因 DAG 遍历和同步造成高延迟),Autobahn 提供了更平滑、更快速的共识体验。它继承了 DAG 的并行性,却规避了其延迟劣势。
### **数据传播层:车道与车辆**

*Autobahn:无缝高速 BFT*
在 Autobahn 中,每个副本在其独立推进的链中提出交易,称为一条 **车道(lane)**。每个数据提案都包含来自其他副本的确认集合,称为 **“车辆(car)”**(即可用请求认证,Certification of Available Request)。这些车辆作为数据可用性的证明(PoA),确保至少一个诚实副本持有数据,并在需要时可重新传输。
车辆通过在每个新提案中引用前一个车辆构建出链式结构。这种结构保证了只需验证车道的车头即可确认整个车道历史数据的可用性。这种可传递的可用性证明使 Autobahn 能即时引用车头快照,避免了 DAG 遍历操作或额外的同步操作。
与传统 DAG 协议不同,Autobahn 避免了强制全局可用性和防双重广播所需的高成本广播步骤。它使用尽可能少的操作,信任每个 PoA 至少有一个诚实数据副本,从而即使在负载变化或部分故障下也能实现高吞吐与低延迟。数据层独立于共识持续推进,确保在突变期间仍保持响应。
### **共识层:低延迟达成一致**

*Autobahn:无缝高速 BFT*
Autobahn 的共识层在经典 PBFT 原则基础上引入关键优化,降低延迟并支持无缝恢复。每个共识时隙的目标是提交一个 **“车头快照(tip cut)”**,该快照捕捉来自各副本车道的最新认证提案。共识领导者使用两阶段提交流程(Prepare 和 Confirm)提出该快照。
在 Prepare 阶段,副本对提议的快照进行投票。如果领导者迅速收到足够投票(完整法定数),可进入快速路径(Fast Path),仅需 3 次消息延迟即可完成提交。否则,它将进入 Confirm 阶段,收集第二轮投票后在 6 次消息延迟内完成提交。
一大创新在于将数据同步从共识投票中拆解出来。副本可仅依据认证车头进行投票,即便尚未接收完整提案数据。这是安全的,因为 PoA 保证了数据的可检索性。同步操作并行进行,并在执行阶段前完成,避免协议阻塞。如遇领导者故障或超时,系统通过超时证书触发视图变更,由新领导者继续推进。
### Autobahn 的核心特性
Autobahn 满足 BFT 协议标准的 **安全性** 与 **活性** 保证。安全性确保不会有两个正确副本在同一时隙提交不同区块;活性确保在全局稳定时间(GST)后,若最终选出正确领导者,则系统必将前进。
更重要的是,Autobahn 实现了真正的 **无缝性(seamlessness)**。其共识层可在常数时间(Constant Time)内提交任意规模的历史数据,避免因协议机制而导致的“宿醉”。即便经历突变,只要同步恢复,所有已传播的提案可立即被提交。这种能力使 Autobahn 能在间歇性故障环境中流畅运行,其恢复时间与响应速度均优于传统 BFT 协议。
此外,该协议还具备 **横向扩展性**。每个副本通过其车道为系统贡献吞吐量,随着参与者增加,快照提交容量自然增长,使 Autobahn 非常适合需要高性能与高鲁棒性的规模化部署。
### **低延迟遇上高鲁棒性**
Autobahn 在理想和故障注入的测试条件下与主流 BFT 协议(尤其是 Bullshark 和 HotStuff)进行对比测试。结果表明,Autobahn 兼具两者之长:在处理能力上匹敌 Bullshark(每秒处理超过 23 万笔交易),而延迟则降低了 50% 以上。
在网络良好条件下,Autobahn 仅需 3 至 6 次消息延迟即可提交交易,而 Bullshark 需 12 次,这使其实际提交延迟低至 280 毫秒,而 Bullshark 超过 590 毫秒。不同于 HotStuff 在突变后因积压处理而产生的长时间宿醉,Autobahn 能在网络稳定后一次性提交全部积压内容。
在领导者失效或部分网络分叉(partial network partitions)等故障场景下,Autobahn 表现出无缝恢复能力。在故障期间持续传播数据,并在共识恢复后迅速提交已积累提案。这些性能优势使 Autobahn 成为区块链平台在追求低延迟响应与高吞吐容错性方面的理想选择。
### 延伸阅读
欲了解更多技术细节,请参考:
* [Autobahn: Seamless high speed BFT](https://arxiv.org/pdf/2401.10369)
#### Detailed steps
##### 1. Initiate transfer (on-chain, Tron)
The user initiates the bridge transaction and sends native USDT to the **USDT Pool** contract on Tron. The USDT is locked in the pool. The USDT Pool contract then sends a message to the LayerZero Endpoint contract on Tron.
##### 2. Send message to the Legacy Mesh (off-chain)
The LayerZero Endpoint contract emits the message to the **USDT0 Legacy Mesh Operator**, which verifies the message.
##### 3. Initiate MultiHop transfer (on-chain, Arbitrum)
The USDT0 Legacy Mesh Operator calls the `lzCompose()` method on the LayerZero **MultiHopComposer** contract on Arbitrum. Without additional user interaction, the MultiHopComposer contract carries out the USDT0 mint-and-burn bridge transfer from Arbitrum to Stable.
:::note
The MultiHopComposer contract is completely permissionless and has no `owner()` to ensure immutability.
:::
##### 4. Transfer USDT0 to Stable (on-chain and off-chain)
The remaining steps follow the exact same path as [bridging USDT0 to Stable](#path-1--bridging-usdt0-to-stable-oft-supported-chains) (steps 1–8 above). The USDT0 OUpgradable contract on Arbitrum sends via LayerZero, DVNs verify, and USDT0 is minted on Stable.
#### Things to note
* USDT0 liquidity on Arbitrum is managed by the USDT0 team.
* The Legacy Mesh incurs a 0.03% fee on the transferred amount.
* The user does not need to interact with Arbitrum directly; the MultiHop flow is automatic.
### Next recommended
* [**Flow of funds**](/en/explanation/flow-of-funds) — See the end-to-end lifecycle of USDT from on-ramp through settlement.
* [**Bridge tutorial**](/en/tutorial/bridge-usdt0) — Bridge Test USDT from Sepolia to Stable testnet using the LayerZero OFT Adapter.
* [**USDT as gas**](/en/explanation/usdt-as-gas-token) — Understand what the asset does once it lands on Stable.
## Payments & transfers
P2P payments and merchant settlement built around one asset that moves the money and pays for the transaction.
### The problem
On general-purpose chains, users must hold a separate gas token (ETH, SOL) just to move stablecoins. That breaks the "send a dollar, receive a dollar" mental model and bleeds conversion at onboarding, where a payer who only has USDT can't even submit the transfer.
### How Stable addresses it
* **USDT0 is both the gas token and the payment asset.** A user only ever needs one asset to send or receive. See [USDT as gas](/en/explanation/usdt-as-gas-token).
* **Gas waiver lets applications cover gas on behalf of users**, enabling a zero-fee UX without the user touching a second token. See [Gas waiver](/en/explanation/gas-waiver).
* **Single-slot finality means settlement is immediate.** Once a transfer is in a block, it's final. See [Ethereum comparison](/en/explanation/ethereum-comparison).
### Next recommended
* [**USDT as gas**](/en/explanation/usdt-as-gas-token) — Understand the asset that replaces ETH for gas and payment at once.
* [**Gas waiver**](/en/explanation/gas-waiver) — See how applications cover user gas through governance-approved waiver addresses.
* [**Ethereum comparison**](/en/explanation/ethereum-comparison) — Review what changes (finality, gas token, priority tips) when moving from Ethereum.
## Payroll & mass payouts
Paying employees, contractors, and suppliers at scale, with predictable throughput, predictable cost, and privacy for sensitive amounts.
### The problem
High-volume stablecoin disbursements hit per-transaction throughput limits on shared chains. Costs fluctuate with network congestion, so a payroll run that cleared cheaply yesterday can spike today. On top of that, salary and supplier amounts are publicly visible to anyone watching the chain, which leaks commercially sensitive data.
### How Stable addresses it
* **The USDT transfer aggregator batches high-volume transfers into parallelized settlement bundles**, so a single run isn't bottlenecked by per-transaction overhead. See [USDT transfer aggregator](/en/explanation/usdt-transfer-aggregator).
* **Guaranteed blockspace gives enrolled partners reserved capacity in every block**, so inclusion and cost stay predictable regardless of what else the network is doing. See [Guaranteed blockspace](/en/explanation/guaranteed-blockspace).
* **Confidential transfer shields amounts using zero-knowledge cryptography**, so payroll and supplier runs don't publish sensitive numbers on-chain. See [Confidential transfer](/en/explanation/confidential-transfer).
### Next recommended
* [**USDT transfer aggregator**](/en/explanation/usdt-transfer-aggregator) — Understand how high-volume USDT0 transfers batch into parallelized settlement bundles.
* [**Guaranteed blockspace**](/en/explanation/guaranteed-blockspace) — See how enrolled partners secure reserved capacity in every block.
* [**Confidential transfer**](/en/explanation/confidential-transfer) — Review how ZK cryptography shields transfer amounts while keeping parties auditable.
## Private transfers
Treasury operations, supplier payments, and salary runs where the amount is commercially sensitive and shouldn't be published to the world.
### The problem
All standard EVM transfers are publicly observable. A payroll run or supplier settlement leaks business-critical data on-chain: who paid whom, how much, and how often. Competitors, counterparties, and anyone scraping the network can reconstruct payroll bands, vendor pricing, and treasury moves without asking.
### How Stable addresses it
* **Confidential transfer uses zero-knowledge cryptography to shield transfer amounts** while keeping the parties auditable for compliance, so sensitive numbers stay private without sacrificing the audit trail. See [Confidential transfer](/en/explanation/confidential-transfer).
* **Flow of funds shows where confidential transfer sits** in the full USDT lifecycle from on-ramp to off-ramp. See [Flow of funds](/en/explanation/flow-of-funds).
### Next recommended
* [**Confidential transfer**](/en/explanation/confidential-transfer) — Review how ZK cryptography shields transfer amounts while keeping parties auditable.
* [**Flow of funds**](/en/explanation/flow-of-funds) — Trace USDT from on-ramp through on-chain transfer to off-ramp settlement.
## Sponsored and gasless experiences
Apps that want to remove gas from the user experience entirely, so a first-time user can sign in and transact without acquiring a second asset first.
### The problem
Requiring users to acquire a gas token before using an app creates an onboarding cliff that kills conversion for consumer-facing products. A new user who shows up with only USDT (or nothing at all) can't submit a transaction, and pushing them to a separate exchange to buy gas is where most of them drop off.
### How Stable addresses it
* **Gas waiver: governance-approved waiver addresses submit wrapper transactions that execute at zero gas price on the user's behalf**, so the app covers gas end-to-end and the user sees a free action. See [Gas waiver](/en/explanation/gas-waiver).
* **EIP-7702 session keys let a dApp hold scoped, time-limited permissions**, so it can submit transactions on the user's behalf without the user signing each one. See [EIP-7702](/en/explanation/eip-7702).
### Next recommended
* [**Gas waiver**](/en/explanation/gas-waiver) — See how governance-approved waivers submit wrapper transactions at zero gas price.
* [**EIP-7702**](/en/explanation/eip-7702) — Understand how EOAs can delegate scoped, time-limited permissions to a dApp.
## Monetize HTTP endpoints
x402 is a payment protocol built on HTTP. A server responds with `402 Payment Required` and payment details, a client signs an [ERC-3009](/en/explanation/erc-3009) authorization, and a facilitator settles it on-chain. The entire exchange happens over standard HTTP headers. The client only needs a wallet: no sign-up, no API keys, no card registration.
This applies to any scenario where a client pays a server for a resource or service: API access, digital content, merchant checkout, or agent-to-agent payments.
### x402 and MPP
x402 is the original HTTP-402 payment protocol. The [Machine Payments Protocol (MPP)](/en/explanation/mpp) is a broader, IETF-track successor that adds payment intents (sessions, subscriptions), multi-rail support (cards, Lightning), and production features (body-digest binding, idempotency). MPP clients are backward compatible: they can call x402 servers without changes.
On Stable today, the most direct path is x402 via Semantic Pay or Heurist. To use MPP's wire format on the same USDT0 rail, see [Build an MPP endpoint on Stable](/en/how-to/build-mpp-endpoint).
### What problem does it solve?
Paying for a service on the internet today requires user intervention at every step: sign up for an account, sign in, register a payment method. This model does not scale to:
* Services too small to justify the infrastructure cost
* Transactions too cheap for card network fees
* Autonomous agents (AI, bots, IoT devices) that cannot perform sign-up flows
With x402, a client only needs a wallet to pay.
| **Aspect** | **Traditional billing** | **With x402** |
| :-------------------- | :------------------------------ | :--------------------- |
| Account required | Yes | No |
| API key required | Yes | No |
| Minimum viable price | \~$0.30 (card processing floor) | \~$0.001 (on-chain) |
| Settlement time | Days (card networks) | Sub-second (on Stable) |
| PCI compliance needed | Yes | No |
### How it works
#### The three roles
**Client** is whoever needs the resource: a web app, a backend service, a CLI tool, or an AI agent. The client only needs a wallet (a private key that can sign ERC-3009 authorizations).
**Server** is whoever provides the resource. The server defines what costs how much by attaching x402 middleware to its endpoints.
**Facilitator** is the settlement service. It receives the signed payment from the server, verifies it, submits the on-chain transaction, and returns the result. The facilitator never holds the client's funds. The transfer moves directly from client to server within the token contract.
On Stable, [Semantic Pay](https://x402.semanticpay.io) operates a public facilitator.
#### The payment flow
1. **Client requests a resource.** The client sends a normal HTTP request (GET, POST, etc.) to the server.
2. **Server responds with 402.** The server returns HTTP `402 Payment Required` along with a `PAYMENT-REQUIRED` header containing all the information the client needs: how much to pay, which token, which network, and where to send the funds.
3. **Client signs and resubmits.** The client reads the payment requirements, signs an ERC-3009 authorization for the specified amount, and resubmits the original request with a `PAYMENT-SIGNATURE` header containing the signed authorization.
4. **Facilitator verifies and settles.** The server forwards the signed payment to its facilitator. The facilitator validates the signature, submits the `transferWithAuthorization` call on-chain, and once confirmed, the server returns the requested resource along with a `PAYMENT-RESPONSE` header containing the settlement receipt.
#### The three headers
All payment information travels through standard HTTP headers, encoded in Base64:
| **Header** | **Direction** | **Contents** |
| :------------------ | :--------------- | :--------------------------------------------------------------------------- |
| `PAYMENT-REQUIRED` | Server to client | Payment scheme, token address, amount, recipient address, network identifier |
| `PAYMENT-SIGNATURE` | Client to server | Signed ERC-3009 authorization proving the client has authorized the transfer |
| `PAYMENT-RESPONSE` | Server to client | Settlement result including transaction hash and confirmation status |
This design works with any HTTP client, any programming language, and any infrastructure that supports custom headers.
### x402 on Stable
The x402 protocol defines how payment works over HTTP. Stable provides the settlement environment that makes it practical for production use.
#### Sub-second finality
Stable's consensus provides sub-second block finality (\~700 milliseconds), allowing x402 facilitators to verify and settle transactions in real time. This is critical for high-frequency automated interactions where AI agents or IoT devices may execute many small payments in rapid succession.
#### Single-asset settlement
On Stable, USDT0 is both the native gas token and the payment token. The entire x402 payment lifecycle runs on USDT0 alone. The client holds only USDT0, and the facilitator submits transactions using the same token it settles. For AI agents using x402, this means an agent wallet needs to manage only one asset.
#### Micro-pricing
Prices are denominated in USDT0 atomic units (6 decimals): a cost parameter of `"1000"` translates to exactly $0.001. This precision allows x402 servers to set prices at fractions of a cent.
#### Gas waiver integration
The [Gas Waiver](/en/how-to/integrate-gas-waiver) eliminates transaction costs entirely. The x402 facilitator can use the Gas Waiver infrastructure to submit `transferWithAuthorization` calls without charging gas to either the buyer or the seller. This means x402 micropayments on Stable carry no overhead beyond the payment amount itself.
### Infrastructure
#### Semantic Pay
[Semantic Pay](https://x402.semanticpay.io) provides a public x402 facilitator for Stable. It handles signature verification, on-chain submission, and confirmation tracking. Developers integrating x402 on Stable can point their middleware to this endpoint without running their own settlement infrastructure.
**Facilitator endpoint:** `https://x402.semanticpay.io`
#### WDK (Wallet Development Kit)
For AI agents to participate in x402 autonomously, they need wallets they can control programmatically. Tether's open-source WDK provides this:
* **Self-custody**: WDK enables AI agents to generate and store private keys locally without relying on centralized API infrastructure.
* **x402 compatibility**: The WDK's `WalletAccountEvm` instance natively satisfies the client signer interface required by the x402 SDK, allowing agents to automatically intercept 402 HTTP responses, sign ERC-3009 authorizations, and resubmit requests.
**See also:**
* [ERC-3009 (Transfer With Authorization)](/en/explanation/erc-3009): the on-chain settlement standard that x402 uses
* [Payment use cases](/en/explanation/payment-use-cases-overview): P2P, subscriptions, invoices, and API billing patterns
* [Gas Waiver](/en/how-to/integrate-gas-waiver): zero-cost transaction submission
## 欢迎来到 Stable
欢迎阅读 **Stable** 的官方文档。
USDT 在全球流通超过 1500 亿美元,拥有超过 3.5 亿用户,引领着稳定币市场,为中心化交易所、去中心化金融(DeFi)和国际支付提供动力。然而,现有的基础设施难以满足日益增长的对更低成本、更高速度和更高可靠性的需求。
Stable 正是为满足这些需求而生,提供一个可扩展、安全且用户友好的区块链,专为 USDT 的实际应用而量身定制。无论是服务于新兴市场的零售用户,还是处理大额交易的金融机构,Stable 都能提供理想的环境,为 并让交易更快、更便宜、显著提升效率。
Stable 实现这一目标的方式,是通过其拥有高吞吐量、亚秒级交易最终性的一层区块链,为 USDT 提供发行和结算层。主要特性包括:
* **为 USDT 优化**:Stable 提供专为 USDT 设计的功能,包括免 为大规模转账优化,以及高效的稳定币发行与结算能力。
* **为日常使用而建**:交易在一秒内完成且成本极低。Stable 的钱包简化了发送、接收和资产管理,并轻松支持借记卡与信用卡集成。
* **为企业量身打造的功能**:Stable 提供专为机构需求设计的高级功能,包括保证的区块空间分配、高效的 USDT 交易处理、高吞吐量的聚合转账功能,以及全面的安全措施。平台还提供企业级的保密转账功能,在隐私与监管合规之间实现平衡。
### 快速开始
本指南适用于所有人 —— 无论是普通用户、开发者还是机构 —— 我们都为你准备好了。
* [**为什么选择 Stable**](/cn/introduction/why-stable) — 使用 USDT 作为原生 gas 的高性能稳定币区块链
* [**Stable 为用户而生**](/cn/introduction/stable-for-users) — 了解 Stable 如何提升你的日常生活
* [**技术路线图**](/cn/introduction/technical-roadmap) — 深入了解 Stable 的技术路线图
* [**常见问题**](/cn/introduction/faq) — 关于 Stable 的常见问题解答
### 关于 Stable 技术
深入了解 Stable 的技术架构及核心特性。
* [**技术概览**](/cn/architecture/tech-overview) — 探索 Stable 的前沿技术
* [**关键特性**](/cn/architecture/key-features) — 发现 Stable 的核心能力
* [**核心优化**](/cn/architecture/core-optimization/overview) — 让 Stable 实现高性能的核心优化
* [**USDT 专属功能**](/cn/architecture/usdt-specific-features/overview) — 专为 USDT 交易设计的功能
## Brand Kit
您可以在下方找到 Stable 的Brand Kit,其中包含标志的多种格式版本和配色方案。本工具包旨在帮助您在项目或传播中使用 Stable 品牌时保持一致性。
[前往 Stable 品牌资源库](https://www.stable.xyz/brand-kit)
## 官方链接
* 网站: [https://stable.xyz](https://stable.xyz)
* X(Twitter): [https://x.com/stable](https://x.com/stable)
* Discord: [https://discord.gg/stablexyz](https://discord.gg/stablexyz)
## 常见问题
### 常规问题
**什么是 Stable?**
Stable 是一个高性能区块链,致力于成为 USDT 的专属区块链,重新定义 USDT 在全球范围内的流通方式。
**Stable 与其他区块链有何不同?**
Stable 专为 USDT 打造的高性能网络,具备多种 USDT 专属功能,包括使用 USDT 作为原生 gas、为企业级应用预留专属区块空间和聚合转账功能,所有这些都建立在高度可扩展的架构之上。
### 技术特性
**Stable 采用什么方法来提升可扩展性?**
Stable 采用全栈式优化方案,从状态数据库、执行层、共识机制到 针对 USDT 的特定优化,对区块链上的交易的生命周期的每个阶段都进行了优化。
**Stable 是否可以通过未来的共识升级至 DAG 共识机制?**
可以。与 Narwhal 和 Tusk 不同,它们无法与 StableBFT 直接兼容,而 Autobahn 提供了 PBFT-on-DAG 架构,可以与 Stable 的共识层更自然地集成。
**Stable 是否兼容 EVM?其他 EVM 生态的 dApp 能否迁移到Stable?**
Stable 完全兼容 EVM,用户和开发者可以无缝使用现有的以太坊合约、工具和钱包与Stable进行交互。
### USDT 特性
**如何在 Stable 上获取 USDT0?**
得益于 USDT0 的 OFT 标准,用户可以通过 LayerZero 轻松地将其他网络的 USDT0 跨链转移到 Stable。
**Stable 还有哪些 USDT 专属的独特功能?**
即将上线的功能包括:
* **企业专用区块空间**:允许机构用户在网络拥堵时依然获得可预测的延迟和成本。
* **USDT 转账聚合器**:可高效地打包多个 USDT0 转账交易,提高吞吐量并降低成本。
* **保密转账**:在符合监管要求的前提下保护交易金额隐私的功能。
**什么是 Stable Pay?**
Stable Pay为用户提供简洁、友好的使用体验,并具备 DeFi 的强大能力。它既适合初学者,也适合有经验的加密用户。新用户可通过社交登录轻松上手,而现有传统区块链钱包的用户也可使用原有方式使用Stable。Stable Pay支持网页与移动端使用,确保用户随时随地安全访问其数字资产。
## Stable 为用户而生
Stable 提供强大、可靠且具成本效益的稳定币区块链解决方案,专为 USDT 优化。通过为机构、普通用户和开发者量身打造的全面功能,Stable 提升金融效率,推动卓越运营表现。
### 面向企业 —— 高可靠性的定制功能
随着稳定币在全球范围的快速普及,USDT 目前处于市场领先地位,Stable 也因此具备战略优势,有望把握住巨大的增长机会。预计到 2030 年,稳定币市场将达到 2.8 万亿美元,机构扩张与市场融合潜力巨大。
Stable 专为优化 USDT 交易而设计,为机构提供高效、安全且具成本效益的支付与结算解决方案。面向企业的功能包括:
* **企业专用区块空间(即将推出):** 使用区块链基础设施的企业需要确保交易延迟的一致性。Stable 为企业提供区块空间的专属分配,即使在网络拥堵时也能保持交易性能的可靠性。
* **专为 USDT 交易打造:** Stable 提升 USDT 的发行、结算和日常交易,能快速且安全地处理高频次的大规模 USDT 活动。
* **高交易吞吐量:** Stable 支持快速交易处理,使机构能在快速结算大额交易,并通过 USDT 转账聚合功能实现大规模转账。
* **安全性与可靠性:** Stable 拥有强大的安全机制,全面保护交易和资产。其安全架构为高价值结算和关键金融操作提供了可信基础。
* **隐私转账(即将推出):** Stable 提供企业级的保密隐私转账能力,使机构在执行交易的同时保护隐私,并完全遵守监管要求。通过先进的加密技术,敏感交易数据不会公开展示,但可由授权方进行审计。这使企业在满足 AML/KYC 和财务审计等法规时,也能保障必要的隐私,从而在合规金融环境中建立信任与运营信心。
#### **机构的实际应用场景**
Stable 提供直观的应用,专为简化机构运营而设计,包括:
* **稳定币支付解决方案:** 通过使用稳定币的借记卡和信用卡实现轻松交易。
* **企业支付终端:** 商户可在无需中介或额外费用的情况下接受 USDT,即使在网络拥堵时也能保持费用高度可预测性。
### 面向普通用户 —— 便宜直观的使用体验
Stable 专为让日常 USDT 交易更简单、更快速、更实惠而打造,是频繁使用 USDT 进行转账、支付和结算的理想平台。以下是 Stable 如何提升日常金融体验:
* **快速可靠的交易体验:** 优化的基础设施使 Stable 能在一秒内完成交易终局。
* **顺畅的用户体验:** Stable 钱包界面直观,发送、接收和管理资产变得简单便捷。
* **便捷的支付解决方案:** Stable 与主流支付网络直接集成,支持借记卡和信用卡,实现轻松消费。
* **跨链 USDT 转账:** USDT0 支持通过 LayerZero 实现无缝的跨链 USDT 转账。
Stable 致力于为全球用户提供可触达的金融解决方案,即使在银行服务不足的地区也能无障碍使用 USDT。使用 Stable,你可以轻松完成跨境交易与日常支付,成本极低,为每个人带来极大的金融灵活性与便利性。
Stable 专注于日常 USDT 交易,让你的金融活动更快捷、更简单、更高效。
### 面向开发者 —— 高度优化的 EVM 一层区块链
Stable 是一条专注于稳定币的区块链,拥有亚秒级出块时间与交易最终性,专为 USDT 的大规模发行、结算和管理而优化。为满足稳定币交易对性能、安全性和可用性的严格要求,Stable 为开发者构建去中心化应用(dApps)和基础设施提供理想基础,全面释放 USDT 的潜能。以下是 Stable 的技术特性:
* **亚秒级交易最终性:** 快速完成交易结算,支持实时结算。
* **委托权益证明(dPoS):** 采用 StableBFT 强健且安全的共识机制,未来计划引入 DAG 共识以增强可扩展性。
* **100% EVM 兼容:** 基于 Stable EVM 构建,可原生运行以太坊智能合约,支持 Etherscan 和 MetaMask 等开发工具无缝接入。
#### **开发工具与资源**
Stable 提供完整工具包,简化 dApp 开发与生态集成:
* **Stable EVM:** Stable 的以太坊兼容执行层,支持使用现有的以太坊工具与钱包无缝交互。同时 Stable EVM 引入一系列 **预编译合约**,允许 EVM 智能合约安全且原子性地调用Stable底层接口。
* **增强型智能合约能力:** 预编译合约接口支持 EVM 合约与 Stable SDK 模块之间的无缝交互,简化复杂的跨模块交易。
* **Stable Pay:** 提供完整的区块链功能 —— 包括跨链、代币转账、质押、治理与 DeFi 工具 —— 集于一个钱包中,带来类似 web2.5 的顺滑体验。
#### **技术路线图与未来发展**
Stable 将通过多阶段推出确保构建出健壮、可扩展、高性能的基础设施:
* **高性能的一层区块链:** 全面研究并优化区块链的各个环节,从状态数据库、共识机制到执行层。
* **现实世界的应用:** 推出基于 Stable 独特优势的支付、商业交易与消费级金融服务等实际应用。
## 技术路线图
### Stable 针对稳定币的全栈优化路径
从用户提交交易到最终结果确认,交易生命周期要经历多个阶段:交易首先通过 RPC 广播,然后进入内存池(mempool),然后被打包进区块,经过共识验证、执行,最终将结果状态写入数据库。只有完成这些步骤,用户才能获得最终的交易结果。
这个过程中任何一个环节存在瓶颈,都会影响整体系统性能。Stable 致力于优化交易路径中的每一步,以最大化提升性能并减少延迟。
Stable 的核心技术将分阶段推出,每一阶段都旨在提升每秒交易数(TPS),同时不牺牲交易的终局性。计划中的优化包括状态数据库处理、执行层、共识机制以及 USDT 特定流程的优化。
下文将概述当前区块链架构中的常见性能瓶颈,以及 Stable 的优化方案。
### 第 1 阶段
#### StableBFT
Stable 区块链最初将采用 StableBFT,这是一种基于 CometBFT 的定制化 PoS 协议,提供高吞吐、低延迟与强可靠性。该协议具备终局性,能容忍三分之一的节点故障。未来,Stable 将升级为基于 DAG 的共识机制,实现 5 倍的共识速度提升。
#### USDT 作为原生 Gas
在 Stable 上,USDT0 作为其原生 Gas 代币。USDT0 同时作为用于支付 Gas 和进行价值转移的原生资产,并作为支持 `approve`、`transfer`、`transferFrom` 和 `permit` 的 ERC20 代币。
#### Stable Pay与 Stable Name
Stable Pay使用直观设计和社交登录等功能,而已有用户则可直接连接现有钱包,无需迁移。Stable 钱包将提供网页版钱包和原生的手机钱包,保障用户在任何设备上都能安全访问数字资产。
与钱包配套的是 Stable Name:这是一套友好的别名系统,用于替代繁琐且容易出错的 EVM 地址格式,采用唯一且可读性强的标识符。用户只需通过 Stable Name 即可完成收发代币,免去管理十六进制字符串的烦恼。该系统大大减少了交易出错的几率,提升了与加密资产交互的整体体验,使 Stable 成为进入区块链生态的便捷入口。
### 第 2 阶段
#### **并行执行**
60–80% 的交易之间并不冲突,可以安全地并行执行。但大多数区块链系统仍采用顺序执行,造成不必要的延迟。
Stable 将采用Optimistic并行执行模型以提高吞吐量。交易在假设无冲突的前提下并行执行,若检测到冲突,则将相关交易回滚并按顺序重新执行。此模型在确保正确性的同时带来显著的性能提升。
#### **状态数据库优化**
区块链性能的主要瓶颈之一是磁盘 I/O 慢。在执行完区块后,状态需被提交(commit)和存储。传统模式中,验证节点需等待状态完全存储完毕后才能继续执行下一区块。
Stable 通过拆解状态提交与状态存储来优化该流程。验证节点可在内存中提交最新状态,从而继续下一轮区块执行,同时允许历史状态延迟写入磁盘。这显著降低了执行延迟。
此外,Stable 计划采用 `mmap`(内存映射文件)机制,将文件放置到内存中,加速存储性能。在内存中实时提交状态,同时将归档状态写入磁盘,大幅减少磁盘 I/O 延迟,并提升读写吞吐量。
#### **USDT 转账聚合器**
为支持大规模 USDT0 转账,Stable 将实现转账聚合机制。USDT0 的转账交易将被批量打包处理,从而降低每笔交易的系统开销,提高整体吞吐量。
#### **企业专用区块空间**
企业在使用区块链基础设施时,通常需要可预测的交易延迟,而在网络拥堵时,这种可预测性可能下降。
Stable 通过专用区块空间模型解决该问题,为企业客户保证固定比例的区块容量。该保障机制包括:
* 验证节点级定制:验证节点为企业客户预留空间。
* 专属 RPC 节点:企业交易通过独立的内存池和 API 接口优先处理。
该模式确保关键企业在不同网络条件下也能保持稳定性能。
### 第 3 阶段
#### **基于 Autobahn 的高级共识(StableBFT)**
第一代基于 DAG 的 BFT 引擎(如 Narwhal 和 Tusk)表明,通过将数据传播与共识排序解耦拆解,可消除单个 proposer 的瓶颈。然而,直接将这类系统引入 CometBFT 环境会与高度依赖区块高度的开发习惯及传统内存池设计发生冲突。
Autobahn 提供了一种 PBFT-on-DAG 架构,更自然地与 Stable 的共识层集成。基于 Autobahn 构建的 StableBFT 将实现:
* 消除单领导者限制,支持并行交易处理;
* 通过分离数据传播与最终排序,加快交易确认速度;
* 通过强健的 BFT 机制提升对网络攻击的抵抗性。
根据内部测试结果,该共识协议已在可控环境下实现超过 200,000 TPS(仅共识层)的处理能力。
#### **StableVM++**
StableVM++ 是高性能执行引擎,将用 C++ 实现替代当前基于 Go 的 EVM。此更替预计将带来最高 6 倍的执行速度提升,极大增强链上处理能力。
#### **高性能 RPC**
高吞吐量的去中心化应用依赖于快速准确的 RPC 与索引服务。Stable 的高性能 RPC 架构将包括:
* **节点级优化**:实时链状态处理,提升 RPC 响应速度;
* **集成式索引器**:低延迟索引服务,在保证一致性的情况下提升应用层 API 效率 ;
* **强健的 Pub/Sub 系统**:可扩展的 WebSocket 架构,提供可靠的推送和事件通知机制;
* **混合负载均衡器**:基于操作类型智能分配流量,最大化利用资源并减少瓶颈。
这些优化将使 Stable 能为 dApp 和企业用户提供稳定且可扩展的访问接口。
## 代币经济学
Stable 是一个高性能的第一层区块链,专为稳定币结算、企业级支付和以 USDT 为中心的基础设施而优化。
本代币经济学页面概述了 STABLE 代币的供应、分配和经济设计。
***
### 概览
| 项目 | 详情 |
| :------- | :-------------------- |
| **代币符号** | STABLE |
| **总供应量** | 100,000,000,000 代币 |
| **标准** | ERC-20(Stable 主网 EVM) |
| **小数位** | 18 |
STABLE 是 Stable 主网和生态系统的治理代币,旨在支持验证者、开发者和用户之间的长期经济协调。
***
### 代币分配
**总供应量:** 100,000,000,000 STABLE 代币
| 类别 | 分配 | STABLE 数量 |
| :---------- | :--- | :-------------- |
| **投资者与顾问** | 25% | 25,000,000,000 |
| **团队** | 25% | 25,000,000,000 |
| **生态系统与社区** | 40% | 40,000,000,000 |
| **创世分配** | 10% | 10,000,000,000 |
| **总计** | 100% | 100,000,000,000 |
***
### 发行模型与供应时间表
* 总供应量固定为 100,000,000,000 STABLE 代币。
* 仅有一部分供应量在 Stable 主网启动时进入流通。
* 团队和投资者与顾问分配需遵守 1 年锁定期的 4 年线性解锁模型,以确保长期承诺。
***
### 分配详情
#### 创世分配 - 总代币供应量的 10%
旨在引导使用、为市场提供流动性、进行空投活动、奖励早期支持者以及与交易所和生态系统合作伙伴开展活动。
**解锁时间表**
* Stable 主网启动时 100% 解锁
#### 生态系统与社区 - 总代币供应量的 40%
支持长期生态系统和社区增长:
* 支持 Stable 软件和生态系统的开发
* 开发者资助
* 用户引导激励
* 支付合作伙伴集成
* 链上活动奖励
* 黑客松、大使计划
* 基础设施资助
**解锁时间表**
* **初始解锁:** 在 Stable 主网启动时解锁总供应量的 8%,用于为战略启动合作伙伴提供激励、满足流动性需求以及实施早期生态系统增长活动。
* **总解锁期:** 此后对总供应量的 32% 进行 3 年线性解锁
#### 团队 - 总代币供应量的 25%
* 分配给创始团队成员、工程师、研究人员和贡献者
* 旨在确保团队与 Stable 生态系统之间的长期协调。
**解锁时间表**
* **1 年锁定期:** 前 12 个月不解锁任何代币
* **总解锁期:** 从 Stable 主网启动起 48 个月线性解锁
#### 投资者与顾问 - 总代币供应量的 25%
分配用于募资轮次和顾问支持。
**解锁时间表**
* **1 年锁定期:** 前 12 个月不解锁任何代币
* **总解锁期:** 从 Stable 主网启动起 48 个月线性解锁
***
### 发行图表
***
### 经济设计原则
Stable 的代币经济学围绕三个基本目标设计:
#### 1. 为支付优化的第一层提供动力
STABLE 代币激励高吞吐量、低延迟的基础设施,支持亚秒级区块确认和企业级结算保证。
#### 2. 支持可持续的生态系统增长
总代币供应量的 40% 用于长期增长,专注于关键开发和增长领域
* 开发者资助
* 合作伙伴集成
* 新生态系统应用
#### 3. 通过解锁机制协调长期贡献者
团队分配采用 1 年锁定期的 4 年线性解锁模型,确保长期协调和对网络开发的持续贡献。
***
### STABLE 代币的实用性
STABLE 代币是 Stable 主网上的 ERC-20 治理代币。可用于:
* 选举验证者
* 对协议升级进行投票
* 处理治理提案
* 作为从验证者接收 Gas 费用分配的凭证
在 Stable 网络上,所有交易都使用 USDT0 作为原生 Gas 代币。这些 USDT0 Gas 费用被收集到由智能合约管理的金库中。当代币持有者将其 STABLE 代币质押给验证者时,验证者可以选择将金库中的 Gas 费用按比例分配给质押者。
## 为什么选择 Stable
### 在 Stable 出现之前
随着数字金融加速发展,稳定币——尤其是 USDT——已成为链上活动的核心组成部分。然而,大多数区块链基础设施并未针对稳定币操作进行优化,导致一系列关键问题:
* **费用高且不可预测:** 交易成本波动大,使频繁的小额交易变得昂贵且不现实。
* **企业受限:** 企业面临交易速度不稳定、难以将区块链技术集成进现有系统,以及缺乏满足监管合规的隐私解决方案。
* **复杂的用户体验:** 用户必须管理多种代币,包括用于 gas 的波动性资产。
* **金融接入受限:** 在许多服务不足的地区,获取以稳定币计价的金融工具的渠道有限。高昂的汇款成本进一步排斥了这些用户参与数字金融。
* **开发者面临障碍:** 缺乏专为稳定币打造的基础设施,使应用开发变得更加复杂。
Stable 正是为了解决这些问题而设计的,提供一条专为 USDT 优化的专属区块链基础设施。
### 有了 Stable 之后
#### 一个专为 USDT 打造的生态系统
Stable 是一条专为 USDT 功能最大化而精心设计的一层区块链,针对用户、企业和开发者所面临的每一个痛点进行了解决。其主要优势包括:
* **高吞吐量:** 高效处理每秒数千笔交易,即便在网络高峰期间也能保持强劲性能。
* **超低费用与即时结算:** 交易在几秒内确认,手续费始终保持在极低水平,适用于微支付和大额结算。
* **USDT 作为原生 Gas:** 用户直接使用 USDT 支付交易手续费,无需持有额外的具有价格波动性的代币。
#### 企业级功能
Stable 提供专为企业量身定制的解决方案:
* **增强的安全性:** 采用经过验证的权益证明(PoS)共识机制,并兼容完整的以太坊开发工具,为开发者和企业提供安全且熟悉的区块链开发环境。
* **企业专属区块空间(即将上线):** 企业将获得预留区块空间容量,无论网络多拥堵,都能保持稳定的交易表现。
* **保密转账(即将上线):** 支持合规且隐私保护的交易方式,满足企业对敏感金融操作的需求。
#### 完整的开发支持
Stable 为开发者提供一整套开发工具,帮助加速并简化应用构建流程:
* **兼容 EVM:** 完全兼容以太坊虚拟机,开发者可以轻松移植现有应用,并继续使用熟悉的以太坊开发工具。
* **专用 SDK:** 提供专为稳定币 dApp 设计的简洁接口,大幅降低开发成本与复杂度。
* **集成工具:** 强大的 API 和集成工具,帮助企业系统无缝对接 Stable 基础设施。
#### 拓展稳定币生态系统
Stable 促进一个多元的稳定币生态,提升稳定币在各类应用场景中的实用性:
* **跨链互操作性:** 实现 Stable 与其他区块链之间的资产流通与集成,增强流动性与可用性。
* **金融服务集成:** 支持各类基于 USDT 的金融服务应用。
* **合规工具支持:** 提供内置的合规解决方案,简化监管对接流程,助力机构采用。
#### 拓展现实世界应用场景
Stable 将 USDT 的实际用途从传统交易与 DeFi 平台拓展到更广阔的应用领域:
* **消费者支付解决方案:** 集成与 USDT 绑定的借记卡和信用卡,使日常消费中的稳定币使用更加简便。
* **商户支付工具:** 商家可直接接收 USDT,绕过高昂的第三方支付处理成本,显著降低费用。
* **Stable Pay:** 一个为日常使用优化的用户友好型钱包,深度集成 Stable 生态,确保流畅直观的使用体验。
Stable 正在从零开始构建一个全新的稳定币生态,提供专属的基础设施,提升运营可靠性、用户参与度与全球金融包容性。
## 开发者支持
#### 常见问题(FAQ)
* 如何连接 Stable 网络?
* 使用标准 JSON-RPC 即可,与常见 EVM 工具兼容。
* 交易费用使用哪种货币?
* 所有交易费用以 USDT0 支付。
* Stable 是否支持账户抽象?
* 支持。EIP-7702 允许 EOA 临时具备智能账户行为。
* 如何查看交易结果?
* 通过余额查询、合约状态或事件日志。
* 如何为 Stable 编写智能合约?
* 使用标准 EVM 工具(如 Solidity + JSON-RPC 库)。
完整 FAQ 请见文档。
### 支持渠道
开发者可直接与 Stable 团队联系以获取技术支持。
* Discord(开发者频道): [https://discord.gg/stablexyz](https://discord.gg/stablexyz)
* 问题反馈: 将会在github repo开放后提供
技术支持联系方式将在社区平台上线后持续更新。
## 在 Stable 上部署你的第一个智能合约
在本教程中,你将向 Stable 测试网部署一个简单的智能合约,并从链上读取其状态。在此过程中,你将了解 Stable 网络的配置方式、USDT0 作为 gas 代币的工作原理,以及如何将标准 EVM 工具指向 Stable。
本教程假设你具备基本的 Solidity 知识和 Unix 终端使用经验,无需任何 Stable 使用经验。
### 前提条件
* 已安装 [Foundry](https://book.getfoundry.sh/getting-started/installation)(`forge`、`cast` 和 `anvil` 在 PATH 中可用)
* 一个你拥有私钥的钱包(全新的测试密钥即可——切勿使用持有真实资金的密钥进行测试)
* 能够连接到测试网 RPC 和水龙头的网络
***
### 1. 创建新的 Foundry 项目
运行以下命令创建一个新项目:
```bash
forge init stable-hello && cd stable-hello
```
Foundry 会在 `src/` 目录中创建一个示例 `Counter.sol` 合约及对应的测试文件。你将直接部署该合约——目标是将真实内容上链,而不是编写新的 Solidity 代码。
### 2. 查看待部署的合约
打开 [src/Counter.sol](src/Counter.sol),它包含两个函数:
```solidity
// SPDX-License-Identifier: UNLICENSED
pragma solidity ^0.8.13;
contract Counter {
uint256 public number;
function setNumber(uint256 newNumber) public {
number = newNumber;
}
function increment() public {
number++;
}
}
```
`number` 是存储在链上的公共状态变量。`increment()` 和 `setNumber()` 是修改它的两种方式。读取 `number` 不消耗 gas——这是一次免费的 `eth_call`。
### 3. 配置 Stable 测试网
在项目根目录创建名为 [.env](.env) 的文件以存储网络凭据:
```bash
touch .env
```
添加以下内容,将占位符替换为你的实际私钥:
```bash
PRIVATE_KEY=0xYOUR_PRIVATE_KEY_HERE
```
接下来,打开 [foundry.toml](foundry.toml),将 Stable 测试网添加为命名网络配置。在现有 `[profile.default]` 部分下方追加以下内容:
```toml
[rpc_endpoints]
stable_testnet = "https://rpc.testnet.stable.xyz"
```
这告诉 Foundry 在使用 `stable_testnet` 时将交易发送到哪里。Stable 兼容 EVM,无需其他配置。
***
**检查点:** 确认 RPC 端点可达:
```bash
cast chain-id --rpc-url https://rpc.testnet.stable.xyz
```
预期输出:
```
2201
```
Chain ID `2201` 是 Stable 测试网。如果看到此数字,说明你的机器可以访问该网络。
***
### 4. 获取钱包地址
从私钥派生部署者地址,以便知道要充值哪个账户:
```bash
source .env
cast wallet address $PRIVATE_KEY
```
复制打印出的地址,下一步需要用到它。
### 5. 为钱包充值 USDT0
Stable 使用 **USDT0** 作为 gas 代币——你用于支付商品和服务的同一资产,直接用于支付计算费用。没有其他原生代币。
访问测试网水龙头并申请资金:
```
https://faucet.stable.xyz
```
粘贴上一步的地址。水龙头会向你的钱包发送 1 USDT0,足够部署和与多个合约交互。
***
**检查点:** 确认余额已到账:
```bash
cast balance $PRIVATE_KEY --rpc-url https://rpc.testnet.stable.xyz
```
你应该看到一个非零值。如果余额仍为 `0`,等待几秒后重试——Stable 大约每 0.7 秒产生一个新区块,资金到账很快。
***
### 6. 部署合约
使用 `forge create` 进行部署:
```bash
source .env
forge create src/Counter.sol:Counter \
--rpc-url https://rpc.testnet.stable.xyz \
--private-key $PRIVATE_KEY \
--broadcast
```
Foundry 会编译合约、广播部署交易并等待回执。由于出块时间约为 0.7 秒,这只需片刻。
***
**检查点:** 输出应如下所示:
```
[⠒] Compiling...
No files changed, compilation skipped
Deployer: 0xYourAddress
Deployed to: 0xSomeContractAddress
Transaction hash: 0xSomeTxHash
```
复制 `Deployed to` 地址,接下来两步需要用到它。
***
### 7. 调用写入函数
现在调用 `setNumber()` 将一个值存储到链上:
```bash
cast send 0xSomeContractAddress "setNumber(uint256)" 42 \
--rpc-url https://rpc.testnet.stable.xyz \
--private-key $PRIVATE_KEY
```
这会发送一笔交易。你需要支付少量 USDT0 费用来完成状态更改。值 `42` 现已存储在 Stable 测试网的 `number` 变量中。
### 8. 从链上读取状态
调用 `number()` 读取该值。这是免费读取——无需交易,无需 gas:
```bash
cast call 0xSomeContractAddress "number()(uint256)" \
--rpc-url https://rpc.testnet.stable.xyz
```
预期输出:
```
42
```
你已成功向 Stable 测试网写入并读取数据。部署、写入、读取的完整流程是 EVM 开发的核心循环,在这里与任何其他 EVM 链完全相同。
### 9. 在 Stablescan 上查看你的部署
打开 Stable 测试网区块浏览器并粘贴你的合约地址:
```
https://testnet.stablescan.xyz
```
你将看到部署交易和你发起的 `setNumber` 调用。Stablescan 是检查链上状态、验证合约源代码以及查阅 Stable 上交易历史的权威工具。
***
### 你学到了什么
你部署了一个合约、发送了一笔状态更改交易,并读取了链上状态——全部在 Stable 测试网上完成。现在你知道如何:
* 配置 Foundry(或任何 EVM 工具链)通过标准 RPC 端点指向 Stable
* 使用 USDT0 水龙头为钱包充值
* 使用 USDT0 作为 gas 代币支付交易费用
* 在 Stablescan 上查看你的工作
**后续步骤:**
* [JSON-RPC API](/cn/developers/core-mechanics/json-rpc-api) — 查看 Stable 支持哪些 `eth_` 方法及与以太坊主网的差异
* [Gas 与定价](/cn/developers/core-mechanics/gas-pricing) — 了解 USDT0 计价的手续费计算方式
* [测试网信息](/cn/developers/testnet/testnet-information) — 完整的网络参数、合约地址和跨链桥详情
## 生态系统
在本文档中,您可以找到桥接(LayerZero)和 USDT0 的信息。
### Stable 测试网上的 LayerZero
| 名称 | 值 |
| ----------------- | ------------------------------------------ |
| eid | 40374 |
| chainKey | stable-testnet |
| stage | testnet |
| endpointV2View | 0x6Ac7bdc07A0583A362F1497252872AE6c0A5F5B8 |
| endpointV2 | 0x3aCAAf60502791D199a5a5F0B173D78229eBFe32 |
| sendUln302 | 0x9eCf72299027e8AeFee5DC5351D6d92294F46d2b |
| receiveUln302 | 0xB0487596a0B62D1A71D0C33294bd6eB635Fc6B09 |
| blockedMessageLib | 0xa229b65cc2191bf60bc24efcda3487d7b5c0c9f0 |
| executor | 0x701f3927871EfcEa1235dB722f9E608aE120d243 |
| deadDVN | 0xC1868e054425D378095A003EcbA3823a5D0135C9 |
### Stable 测试网上的 USDT0
| 名称 | 值 |
| ----------- | ------------------------------------------ |
| wrapper | 0xB8CE59FC3717ada4C02eaDF9682A9e934F625ebb |
| composer | 0xe7cd86e13AC4309349F30B3435a9d337750fC82D |
| OFT | 0x779Ded0c9e1022225f8E0630b35a9b54bE713736 |
| USDT0 impl | 0x3f9E27457ac494fC729beB50e6af04Ec34e3828E |
| USDT0 proxy | 0x78Cf24370174180738C5B8E352B6D14c83a6c9A9 |
### Sepolia OFT 合约和 USDT0 合约(供参考)
| 名称 | 值 |
| ------------ | ---------------------------------------------------------------------------------------------------------------------------------------------------------------------------------------------- |
| Sepolia OFT | [https://sepolia.etherscan.io/address/0xc099cd946d5efcc35a99d64e808c1430cef08126](https://sepolia.etherscan.io/address/0xc099cd946d5efcc35a99d64e808c1430cef08126) |
| Sepolia USDT | [https://sepolia.etherscan.io/address/0xc4DCC311c028e341fd8602D8eB89c5de94625927#writeContract](https://sepolia.etherscan.io/address/0xc4DCC311c028e341fd8602D8eB89c5de94625927#writeContract) |
## 如何为您的 Stable 测试网钱包充值
Stable 使用 USDT0作为燃料代币,因此您需要在钱包中有 USDT0 才能与链进行交互。首先,您需要使用水龙头为您的账户充值 USDT0。
1. 访问 [https://faucet.stable.xyz](https://faucet.stable.xyz)
2. 点击"Get USDT0"按钮,1 USDT0 将被投放到您的钱包中。
如果您想要更多 USDT0,您可以从以太坊 Sepolia 将测试 USDT 桥接到 Stable 测试网。
1. 访问 [https://sepolia.etherscan.io/token/0xc4DCC311c028e341fd8602D8eB89c5de94625927#writeContract,通过调用](https://sepolia.etherscan.io/token/0xc4DCC311c028e341fd8602D8eB89c5de94625927#writeContract,通过调用) `_mint` 函数将所需数量的测试 Tether USD 铸造到您的账户中。
2. 向以太坊 Sepolia 上的 LayerZero 桥接合约发送以下交易,将测试 USDT 桥接到 Stable 测试网:
```jsx
export function addrTo32Bytes(addr: string): Buffer {
const hex20 = ethers.utils.getAddress(addr).slice(2);
const padded = hex20.padStart(64, "0"); // 32 bytes ⇒ 64 hex
return Buffer.from(padded, "hex"); // length === 32
}
async function main() {
const [owner] = await ethers.getSigners();
const SEPOLIA_USDT0 = "0xc4DCC311c028e341fd8602D8eB89c5de94625927";
const SEPOLIA_USDT0_OAPP = "0xc099cD946d5efCC35A99D64E808c1430cEf08126"
const RECEIVER_EID = 40374;
const usdt0 = await ethers.getContractAt("ERC20", SEPOLIA_USDT0);
await usdt0.approve(SEPOLIA_USDT0_OAPP, ethers.utils.parseEther("1"));
const options = Options.newOptions().addExecutorLzReceiveOption(0, 0).toBytes();
const amount = ethers.utils.parseEther("1"); // 将此更改为您所需的数量
const OFTAdapter = await ethers.getContractAt("OFTAdapter", SEPOLIA_USDT0_OAPP);
const sendParams = {
dstEid: RECEIVER_EID,
to: addrTo32Bytes(owner.address),
amountLD: amount,
minAmountLD: amount,
extraOptions: options,
composeMsg: Buffer.from(""),
oftCmd: Buffer.from(""),
};
const fee = await OFTAdapter.quoteSend(sendParams, false);
await OFTAdapter.send(
sendParams,
fee,
owner.address,
{
value: fee.nativeFee,
}
)
}
```
## 测试网信息
您访问 Stable 测试网所需了解的一切信息。
### 网络概览
| 配置 | 值 |
| -------- | -------------- |
| **网络名称** | Stable Testnet |
| **链 ID** | `2201` |
| **燃料代币** | USDT0 |
| **治理代币** | STABLE |
| **出块时间** | \~0.7 秒 |
### 区块浏览器
| 浏览器 | URL |
| -------------- | ---------------------------------------------------------------- |
| **Stablescan** | [https://testnet.stablescan.xyz](https://testnet.stablescan.xyz) |
### RPC 端点
#### 主要端点
| 类型 | 端点 | 用途 |
| ---------------- | ---------------------------------------------------------------- | ------ |
| **EVM JSON-RPC** | [https://rpc.testnet.stable.xyz](https://rpc.testnet.stable.xyz) | EVM 交易 |
| **WebSocket** | wss\://rpc.testnet.stable.xyz | 实时更新 |
### 链信息
| 参数 | EVM |
| -------- | ------- |
| **链 ID** | `2201` |
| **地址格式** | `0x...` |
| **燃料代币** | `USDT0` |
| **小数位数** | 18 |
### 水龙头和工具
| 工具 | URL | 描述 |
| ------- | ------------------------------------------------------ | ------ |
| **水龙头** | [https://faucet.stable.xyz](https://faucet.stable.xyz) | 获取测试代币 |
| **快照** | 参见 [节点运营指南](../node-operations/snapshots) | 链快照 |
## 版本历史
Stable 测试网的完整版本历史和相关文档。
### 当前版本信息
* **当前版本**: `v1.3.1-rc0`
* **下次升级**: `TBD`
* **升级高度**: `TBD`
* **预期时间**: `TBD`
### 版本历史
#### 当前和以前的版本
| 版本 | 提交 | 升级高度 | 二进制文件 | 状态 |
| -------------- | ---------- | ---------- | --------------------------------------------------------------------------------------------------------------------------------------------------------------------------------------------------------------------------------------------------- | ------------------ |
| **v1.3.1-rc0** | `75bb546` | - | [AMD64](https://stable-data-dist.s3.us-east-1.amazonaws.com/testnet/binary/stabled-1.3.1-rc0-linux-amd64-testnet.tar.gz) / [ARM64](https://stable-data-dist.s3.us-east-1.amazonaws.com/testnet/binary/stabled-1.3.1-rc0-linux-arm64-testnet.tar.gz) | 当前 |
| **v1.3.0-rc1** | `25b5e47` | 53,265,500 | [AMD64](https://stable-data-dist.s3.us-east-1.amazonaws.com/testnet/binary/stabled-1.3.0-rc1-linux-amd64-testnet.tar.gz) / [ARM64](https://stable-data-dist.s3.us-east-1.amazonaws.com/testnet/binary/stabled-1.3.0-rc1-linux-arm64-testnet.tar.gz) | |
| **v1.3.0-rc0** | `864d54c` | 49,855,000 | [AMD64](https://stable-data-dist.s3.us-east-1.amazonaws.com/testnet/binary/stabled-1.3.0-rc0-linux-amd64-testnet.tar.gz) / [ARM64](https://stable-data-dist.s3.us-east-1.amazonaws.com/testnet/binary/stabled-1.3.0-rc0-linux-arm64-testnet.tar.gz) | |
| **v1.2.2-rc0** | `8bd5d5e` | - | [AMD64](https://stable-data-dist.s3.us-east-1.amazonaws.com/testnet/binary/stabled-1.2.2-rc0-linux-amd64-testnet.tar.gz) / [ARM64](https://stable-data-dist.s3.us-east-1.amazonaws.com/testnet/binary/stabled-1.2.2-rc0-linux-arm64-testnet.tar.gz) | |
| **v1.2.1-rc1** | `7ff9a8a` | - | [AMD64](https://stable-data-dist.s3.us-east-1.amazonaws.com/testnet/binary/stabled-1.2.1-rc1-linux-amd64-testnet.tar.gz) / [ARM64](https://stable-data-dist.s3.us-east-1.amazonaws.com/testnet/binary/stabled-1.2.1-rc1-linux-arm64-testnet.tar.gz) | |
| **v1.2.0-rc1** | `263c033` | 41,306,450 | [AMD64](https://stable-data-dist.s3.us-east-1.amazonaws.com/testnet/binary/stabled-1.2.0-rc1-linux-amd64-testnet.tar.gz) / [ARM64](https://stable-data-dist.s3.us-east-1.amazonaws.com/testnet/binary/stabled-1.2.0-rc1-linux-arm64-testnet.tar.gz) | |
| **v1.2.0** | `ee8ca35` | 40,392,500 | [AMD64](https://stable-data-dist.s3.us-east-1.amazonaws.com/testnet/binary/stabled-1.2.0-linux-amd64-testnet.tar.gz) / [ARM64](https://stable-data-dist.s3.us-east-1.amazonaws.com/testnet/binary/stabled-1.2.0-linux-arm64-testnet.tar.gz) | |
| **v1.1.2** | `3d83aa3` | 34,649,300 | [AMD64](https://stable-data-dist.s3.us-east-1.amazonaws.com/testnet/binary/stabled-1.1.2-linux-amd64-testnet.tar.gz) / [ARM64](https://stable-data-dist.s3.us-east-1.amazonaws.com/testnet/binary/stabled-1.1.2-linux-arm64-testnet.tar.gz) | |
| **v1.1.1** | `8becd6b` | 33,152,000 | [AMD64](https://stable-data-dist.s3.us-east-1.amazonaws.com/testnet/binary/stabled-1.1.1-linux-amd64-testnet.tar.gz) / [ARM64](https://stable-data-dist.s3.us-east-1.amazonaws.com/testnet/binary/stabled-1.1.1-linux-arm64-testnet.tar.gz) | |
| **v1.1.0** | `17ceaa7` | 32,309,700 | [AMD64](https://stable-data-dist.s3.us-east-1.amazonaws.com/testnet/binary/stabled-1.1.0-linux-amd64-testnet.tar.gz) / [ARM64](https://stable-data-dist.s3.us-east-1.amazonaws.com/testnet/binary/stabled-1.1.0-linux-arm64-testnet.tar.gz) | |
| **v0.8.1** | `1eb65d5` | 30,770,000 | [AMD64](https://stable-data-dist.s3.us-east-1.amazonaws.com/testnet/binary/stabled-0.8.1-linux-amd64-testnet.tar.gz) / [ARM64](https://stable-data-dist.s3.us-east-1.amazonaws.com/testnet/binary/stabled-0.8.1-linux-arm64-testnet.tar.gz) | |
| **v0.8.0** | `e55efb6` | 29,410,999 | [AMD64](https://stable-data-dist.s3.us-east-1.amazonaws.com/testnet/binary/stabled-0.8.0-linux-amd64-testnet.tar.gz) / [ARM64](https://stable-data-dist.s3.us-east-1.amazonaws.com/testnet/binary/stabled-0.8.0-linux-arm64-testnet.tar.gz) | 银行预编译增强 |
| **v0.7.2** | `3c53e14` | 27,258,000 | [AMD64](https://stable-data-dist.s3.us-east-1.amazonaws.com/testnet/binary/stabled-0.7.2-linux-amd64-testnet.tar.gz) / [ARM64](https://stable-data-dist.s3.us-east-1.amazonaws.com/testnet/binary/stabled-0.7.2-linux-arm64-testnet.tar.gz) | StableBFT 集成 |
| **v0.6.0** | `5cc1ad6` | 19,587,000 | [AMD64](https://stable-data-dist.s3.us-east-1.amazonaws.com/testnet/binary/stabled-0.6.0-linux-amd64-testnet.tar.gz) | 小修复 |
| **v0.5.0** | `919281d` | 18,719,000 | [AMD64](https://stable-data-dist.s3.us-east-1.amazonaws.com/testnet/binary/stabled-0.5.0-linux-amd64-testnet.tar.gz) | 小修复 |
| **v0.4.0** | `c6240c0` | 18,666,150 | [AMD64](https://stable-data-dist.s3.us-east-1.amazonaws.com/testnet/binary/stabled-0.4.0-linux-amd64-testnet.tar.gz) | Stable SDK v0.53.4 |
| **v0.3.0** | `a4f5ac5` | 9,166,131 | [AMD64](https://stable-data-dist.s3.us-east-1.amazonaws.com/testnet/binary/stabled-0.3.0-linux-amd64-testnet.tar.gz) | EVM 价值转移允许列表 |
| **v0.2.1** | `53e6e073` | - | [AMD64](https://stable-data-dist.s3.us-east-1.amazonaws.com/testnet/binary/stabled-0.2.1-linux-amd64-testnet.tar.gz) | 非破坏性更新 |
| **v0.2.0** | `8bdd771` | 8,956,584 | [AMD64](https://stable-data-dist.s3.us-east-1.amazonaws.com/testnet/binary/stabled-0.2.0-linux-amd64-testnet.tar.gz) | 功能更新 |
| **v0.1.0** | `10dfg542` | 创世 | [AMD64](https://stable-data-dist.s3.us-east-1.amazonaws.com/testnet/binary/stabled-0.1.0-linux-amd64-testnet.tar.gz) | 创世 (2025-04-07) |
### 相关文档
* [升级指南](/cn/developers/node-operations/upgrades) - 分步升级程序
* [测试网信息](/cn/developers/testnet/testnet-information) - 当前网络详细信息
This guide covers all configuration options for Stable nodes, including optimization for different use cases.
### Configuration Files Overview
Stable nodes use two main configuration files:
* **`config.toml`**: Core StableBFT configuration
* **`app.toml`**: Application-specific configuration
Both files are located in `~/.stabled/config/`
### Core Configuration (config.toml)
#### Basic Settings
:::code-group
```toml [Mainnet]
# The ID of the chain to join
chain_id = "stable_988-1"
# A custom human-readable name for this node
moniker = "your-node-name"
# Database backend: goleveldb | cleveldb | boltdb | rocksdb | badgerdb
db_backend = "goleveldb"
```
```toml [Testnet]
# The ID of the chain to join
chain_id = "stabletestnet_2201-1"
# A custom human-readable name for this node
moniker = "your-node-name"
# Database backend: goleveldb | cleveldb | boltdb | rocksdb | badgerdb
db_backend = "goleveldb"
```
:::
#### P2P Configuration
:::code-group
```toml [Mainnet]
[p2p]
# Address to listen for incoming connections
laddr = "tcp://0.0.0.0:26656"
# Address to advertise to peers for them to dial
external_address = "YOUR_PUBLIC_IP:26656"
# Comma separated list of seed nodes
seeds = "17a539fda42863a99755547e1c9b3ec4c38a4439@seed1.stable.xyz:26656"
# Comma separated list of persistent peers
persistent_peers = "b896f6f8ca5a4d1cc40de09407df0c96e76df950@peer1.stable.xyz:26656"
```
```toml [Testnet]
[p2p]
# Address to listen for incoming connections
laddr = "tcp://0.0.0.0:26656"
# Address to advertise to peers for them to dial
external_address = "YOUR_PUBLIC_IP:26656"
# Comma separated list of seed nodes
seeds = "39e061b167162f6621ddadcf1be21d6fa585a468@seed1.testnet.stable.xyz:26656"
# Comma separated list of persistent peers
persistent_peers = "5ed0f977a26ccf290e184e364fb04e268ef16430@peer1.testnet.stable.xyz:26656"
```
:::
Additional P2P settings (same for both networks):
```toml
# Maximum number of inbound peers
max_num_inbound_peers = 50
# Maximum number of outbound peers
max_num_outbound_peers = 30
# Toggle to disable guard against peers connecting from the same ip
allow_duplicate_ip = false
# Peer connection configuration
handshake_timeout = "20s"
dial_timeout = "3s"
# Time to wait before flushing messages out on the connection
flush_throttle_timeout = "100ms"
# Maximum size of a message packet payload
max_packet_msg_payload_size = 1024
# Rate limiting
send_rate = 5120000 # 5 MB/s
recv_rate = 5120000 # 5 MB/s
# Seed mode (for seed nodes only)
seed_mode = false
# Enable peer exchange reactor
pex = true
```
#### RPC Server Configuration
```toml
[rpc]
# TCP or UNIX socket address for the RPC server
laddr = "tcp://127.0.0.1:26657"
# A list of origins a cross-domain request can be executed from
cors_allowed_origins = ["*"]
# A list of methods the client is allowed to use with cross-domain requests
cors_allowed_methods = ["HEAD", "GET", "POST"]
# A list of non simple headers the client is allowed to use with cross-domain requests
cors_allowed_headers = ["Origin", "Accept", "Content-Type", "X-Requested-With", "X-Server-Time"]
# TCP or UNIX socket address for the gRPC server
grpc_laddr = "tcp://127.0.0.1:9090"
# Maximum number of simultaneous connections
grpc_max_open_connections = 900
# Activate unsafe RPC commands like /dial_seeds and /unsafe_flush_mempool
unsafe = false
# Maximum number of simultaneous connections (including WebSocket)
max_open_connections = 900
# Maximum number of unique clientIDs that can connect
max_subscription_clients = 100
# Maximum number of unique queries a given client can subscribe to
max_subscriptions_per_client = 5
# How long to wait for a tx to be committed
timeout_broadcast_tx_commit = "10s"
# Maximum size of request body
max_body_bytes = 1000000
# Maximum size of request header
max_header_bytes = 1048576
```
#### Mempool Configuration
```toml
[mempool]
# Mempool version to use
version = "v1"
# Recheck enabled
recheck = true
# Broadcast enabled
broadcast = true
# Maximum number of transactions in the mempool
size = 3000
# Limit the total size of all txs in the mempool
max_txs_bytes = 1073741824 # 1GB
# Size of the cache
cache_size = 10000
# Do not remove invalid transactions from the cache
keep-invalid-txs-in-cache = false
# Maximum size of a single transaction
max_tx_bytes = 1048576 # 1MB
# Maximum size of a batch of transactions to send to a peer
max_batch_bytes = 0
```
#### Consensus Configuration
```toml
[consensus]
# How long we wait for a proposal block before prevoting nil
timeout_propose = "5s"
# How much timeout_propose increases with each round
timeout_propose_delta = "10ms"
# How long we wait after receiving +2/3 prevotes
timeout_prevote = "150ms"
# How much the timeout_prevote increases with each round
timeout_prevote_delta = "10ms"
# How long we wait after receiving +2/3 precommits
timeout_precommit = "150s"
# How much the timeout_precommit increases with each round
timeout_precommit_delta = "10ms"
# Make progress as soon as we have all the precommits
skip_timeout_commit = false
# Enable/disable double sign check
double_sign_check_height = 2
# EmptyBlocks mode
create_empty_blocks = true
create_empty_blocks_interval = "0s"
# Reactor sleep duration
peer_gossip_sleep_duration = "100ms"
peer_query_maj23_sleep_duration = "2s"
```
### Application Configuration (app.toml)
#### Basic Application Settings
```toml
# Pruning strategy
pruning = "default"
# HaltHeight contains a non-zero block height at which a node will halt
halt-height = 0
# HaltTime contains a non-zero time at which a node will halt
halt-time = 0
# MinRetainBlocks defines the number of blocks for which a node will retain
min-retain-blocks = 0
# InterBlockCache enables inter-block caching
inter-block-cache = true
# IndexEvents defines the set of events in the form {eventType}.{attributeKey}
index-events = []
# IavlCacheSize set the size of the iavl tree cache
iavl-cache-size = 781250
```
#### API Configuration
```toml
[api]
# Enable defines if the API server should be enabled
enable = true
# Swagger defines if swagger documentation should automatically be registered
swagger = true
# Address defines the API server to listen on
address = "tcp://0.0.0.0:1317"
# MaxOpenConnections defines the number of maximum open connections
max-open-connections = 1000
# EnabledUnsafeCORS defines if CORS should be enabled
enabled-unsafe-cors = true
```
#### gRPC Configuration
```toml
[grpc]
# Enable defines if the gRPC server should be enabled
enable = true
# Address defines the gRPC server address to bind to
address = "0.0.0.0:9090"
```
#### EVM JSON-RPC Configuration
```toml
[json-rpc]
# Enable the JSON-RPC server
enable = true
# Address to bind the JSON-RPC server
address = "0.0.0.0:8545"
# Address to bind the WebSocket server
ws-address = "0.0.0.0:8546"
# APIs to enable
api = "eth,net,web3,txpool,personal,debug"
# Gas cap for eth_call/estimateGas
gas-cap = 25000000
# EVM timeout for eth_call/estimateGas
evm-timeout = "5s"
# Tx fee cap for transactions
txfee-cap = 1
# Filter cap for eth_getLogs
filter-cap = 200
# FeeHistory cap
feehistory-cap = 100
# Block range cap for eth_getLogs
logs-cap = 10000
# Block range cap
block-range-cap = 10000
# HTTP timeout
http-timeout = "30s"
# HTTP idle timeout
http-idle-timeout = "120s"
# Allow unprotected transactions
allow-unprotected-txs = true
# Maximum number of transactions in the pool
max-tx-in-pool = 3000
# Enable indexer
enable-indexer = false
# Enable metrics
metrics = true
```
### Configuration Profiles
#### Full Node (Default)
Balanced configuration for full nodes:
```bash
# config.toml adjustments
sed -i 's/^indexer = ".*"/indexer = "kv"/' ~/.stabled/config/config.toml
sed -i 's/^max_num_inbound_peers = .*/max_num_inbound_peers = 50/' ~/.stabled/config/config.toml
sed -i 's/^max_num_outbound_peers = .*/max_num_outbound_peers = 30/' ~/.stabled/config/config.toml
# app.toml adjustments
sed -i 's/^pruning = ".*"/pruning = "default"/' ~/.stabled/config/app.toml
sed -i 's/^snapshot-interval = .*/snapshot-interval = 1000/' ~/.stabled/config/app.toml
```
#### Archive Node
No pruning, full history:
```bash
# config.toml adjustments
sed -i 's/^indexer = ".*"/indexer = "kv"/' ~/.stabled/config/config.toml
# app.toml adjustments
sed -i 's/^pruning = ".*"/pruning = "nothing"/' ~/.stabled/config/app.toml
```
#### RPC Node
Public RPC endpoint configuration:
```bash
# config.toml adjustments
sed -i 's/^max_num_inbound_peers = .*/max_num_inbound_peers = 30/' ~/.stabled/config/config.toml
sed -i 's/^max_open_connections = .*/max_open_connections = 30/' ~/.stabled/config/config.toml
sed -i 's/^cors_allowed_origins = .*/cors_allowed_origins = ["*"]/' ~/.stabled/config/config.toml
# app.toml adjustments
sed -i 's/^enable = .*/enable = true/' ~/.stabled/config/app.toml
sed -i 's/^swagger = .*/swagger = true/' ~/.stabled/config/app.toml
sed -i 's/^enabled-unsafe-cors = .*/enabled-unsafe-cors = true/' ~/.stabled/config/app.toml
```
### Monitoring Configuration
#### Prometheus Metrics
```toml
# config.toml
[instrumentation]
# Enable Prometheus metrics
prometheus = true
# Metrics listen address
prometheus_listen_addr = ":26660"
# Namespace for metrics
namespace = "stablebft"
```
#### Logging
```toml
# config.toml
[log]
# Log level (trace|debug|info|warn|error|fatal|panic)
level = "info"
# Log format (plain|json)
format = "plain"
```
### Applying Configuration Changes
After making configuration changes:
```bash
# Restart the node
sudo systemctl restart ${SERVICE_NAME}
# Check logs for errors
sudo journalctl -u ${SERVICE_NAME} -f
# Verify configuration loaded
curl localhost:26657/status | jq '.result.node_info'
```
### Next Steps
* [Set up Monitoring](./monitoring) for your node
* Review [Troubleshooting Guide](./troubleshooting) for common issues
This guide provides detailed instructions for installing and setting up a Stable node on various platforms.
### Prerequisites
Before starting the installation, ensure you have:
* Met all [System Requirements](./system-requirements)
* Root or sudo access to your server
* Basic knowledge of Linux command line
### Installation Method
Use the pre-compiled binaries for your platform. Building from source is not currently supported.
#### Mainnet
##### Linux AMD64
```bash
# Download the latest binary for AMD64 architecture
wget https://stable-data-dist.s3.us-east-1.amazonaws.com/mainnet/binary/stabled-latest-linux-amd64-mainnet.tar.gz
# Extract the archive
tar -xvzf stabled-latest-linux-amd64-mainnet.tar.gz
# Move binary to system path
sudo mv stabled /usr/bin/
# Verify installation
stabled version
```
##### Linux ARM64
```bash
# Download the binary for ARM64 architecture
wget https://stable-data-dist.s3.us-east-1.amazonaws.com/mainnet/binary/stabled-latest-linux-arm64-mainnet.tar.gz
# Extract and install
tar -xvzf stabled-latest-linux-arm64-mainnet.tar.gz
sudo mv stabled /usr/bin/
# Verify installation
stabled version
```
#### Testnet
##### Linux AMD64
```bash
# Download the latest binary for AMD64 architecture
wget https://stable-data-dist.s3.us-east-1.amazonaws.com/testnet/binary/stabled-latest-linux-amd64-testnet.tar.gz
# Extract the archive
tar -xvzf stabled-latest-linux-amd64-testnet.tar.gz
# Move binary to system path
sudo mv stabled /usr/bin/
# Verify installation
stabled version
```
##### Linux ARM64
```bash
# Download the binary for ARM64 architecture
wget https://stable-data-dist.s3.us-east-1.amazonaws.com/testnet/binary/stabled-latest-linux-arm64-testnet.tar.gz
# Extract and install
tar -xvzf stabled-latest-linux-arm64-testnet.tar.gz
sudo mv stabled /usr/bin/
# Verify installation
stabled version
```
### Node Initialization
After installing the binary, initialize your node:
#### Step 1: Set Node Name
```bash
# Set your node's moniker (choose a unique name)
export MONIKER="your-node-name"
```
#### Step 2: Initialize the Node
#### Mainnet
```bash
# Initialize with the mainnet chain ID
stabled init $MONIKER --chain-id stable_988-1
# This creates the configuration directory at ~/.stabled/
```
> **Note**: For current network parameters including chain ID, see [Mainnet Information](#TODO)
#### Testnet
```bash
# Initialize with the testnet chain ID
stabled init $MONIKER --chain-id stabletestnet_2201-1
# This creates the configuration directory at ~/.stabled/
```
> **Note**: For current network parameters including chain ID, see [Testnet Information](#TODO)
#### Step 3: Download Genesis File
:::code-group
```bash [Mainnet]
# Create backup of default genesis
mv ~/.stabled/config/genesis.json ~/.stabled/config/genesis.json.backup
# Download mainnet genesis
wget https://stable-data-dist.s3.us-east-1.amazonaws.com/mainnet/configuration/genesis.zip
unzip genesis.zip
# Move genesis to config directory
cp genesis.json ~/.stabled/config/genesis.json
# Verify genesis checksum
sha256sum ~/.stabled/config/genesis.json
# Expected: e1ceda79a3cc48a1028ca8646a2e9e2d156f610637cfb8b428ca8354277921f1
```
```bash [Testnet]
# Create backup of default genesis
mv ~/.stabled/config/genesis.json ~/.stabled/config/genesis.json.backup
# Download testnet genesis
wget https://stable-data-dist.s3.us-east-1.amazonaws.com/testnet/configuration/genesis.zip
unzip genesis.zip
# Move genesis to config directory
cp genesis.json ~/.stabled/config/genesis.json
# Verify genesis checksum
sha256sum ~/.stabled/config/genesis.json
# Expected: 66afbb6e57e6faf019b3021de299125cddab61d433f28894db751252f5b8eaf2
```
:::
#### Step 4: Configure Node
##### Download Configuration Files
:::code-group
```bash [Mainnet]
# Download optimized configuration (choose one based on your node type)
# For RPC/Full nodes:
wget https://stable-data-dist.s3.us-east-1.amazonaws.com/mainnet/configuration/rpc_node_config.zip
unzip rpc_node_config.zip
# For Archive nodes:
# wget https://stable-data-dist.s3.us-east-1.amazonaws.com/mainnet/configuration/archive_node_config.zip
# unzip archive_node_config.zip
# Backup original config
cp ~/.stabled/config/config.toml ~/.stabled/config/config.toml.backup
# Apply new configuration
cp config.toml ~/.stabled/config/config.toml
# Update moniker in config
sed -i "s/^moniker = \".*\"/moniker = \"$MONIKER\"/" ~/.stabled/config/config.toml
```
```bash [Testnet]
# Download optimized configuration
wget https://stable-data-dist.s3.us-east-1.amazonaws.com/testnet/configuration/rpc_node_config.zip
unzip rpc_node_config.zip
# Backup original config
cp ~/.stabled/config/config.toml ~/.stabled/config/config.toml.backup
# Apply new configuration
cp config.toml ~/.stabled/config/config.toml
# Update moniker in config
sed -i "s/^moniker = \".*\"/moniker = \"$MONIKER\"/" ~/.stabled/config/config.toml
```
:::
##### Essential Configuration Updates
Edit `~/.stabled/config/app.toml`:
```toml
# Enable JSON-RPC for EVM compatibility
[json-rpc]
enable = true
address = "0.0.0.0:8545"
ws-address = "0.0.0.0:8546"
allow-unprotected-txs = true
```
Edit `~/.stabled/config/config.toml`:
:::code-group
```toml [Mainnet]
# P2P Configuration
[p2p]
# Maximum number of peers
max_num_inbound_peers = 50
max_num_outbound_peers = 30
# Seed nodes
seeds = "9aa181b20248e948567cb47a15eae35d58cd549d@seed1.stable.xyz:46656"
# Persistent peers (mainnet seed nodes)
persistent_peers = "b896f6f8ca5a4d1cc40de09407df0c96e76df950@peer1.stable.xyz:26656"
# Enable peer exchange
pex = true
# RPC Configuration
[rpc]
# Listen address
laddr = "tcp://0.0.0.0:26657"
# Maximum number of simultaneous connections
max_open_connections = 900
# CORS settings (adjust for production)
cors_allowed_origins = ["*"]
```
```toml [Testnet]
# P2P Configuration
[p2p]
# Maximum number of peers
max_num_inbound_peers = 50
max_num_outbound_peers = 30
# Seed nodes
seeds = "6f3195823f7e5ee6f911a0a0ceb9ea689e0dc5bd@seed1.testnet.stable.xyz:56656"
# Persistent peers (testnet seed nodes)
persistent_peers = "128accd3e8ee379bfdf54560c21345451c7048c7@peer1.testnet.stable.xyz:26656"
# Enable peer exchange
pex = true
# RPC Configuration
[rpc]
# Listen address
laddr = "tcp://0.0.0.0:26657"
# Maximum number of simultaneous connections
max_open_connections = 900
# CORS settings (adjust for production)
cors_allowed_origins = ["*"]
```
:::
### Systemd Service Setup
Create a systemd service for automatic management:
#### Step 1: Create Service File
:::code-group
```bash [Mainnet]
sudo tee /etc/systemd/system/stabled.service > /dev/null < /dev/null <> ~/.bashrc
echo "export DAEMON_NAME=stabled" >> ~/.bashrc
echo "export DAEMON_HOME=$HOME/.stabled" >> ~/.bashrc
echo "export DAEMON_ALLOW_DOWNLOAD_BINARIES=true" >> ~/.bashrc
echo "export DAEMON_RESTART_AFTER_UPGRADE=true" >> ~/.bashrc
echo "export DAEMON_LOG_BUFFER_SIZE=512" >> ~/.bashrc
echo "export UNSAFE_SKIP_BACKUP=true" >> ~/.bashrc
# Load variables
source ~/.bashrc
```
#### Step 3: Setup Cosmovisor Directory Structure
```bash
# Create cosmovisor directory structure
mkdir -p ~/.stabled/cosmovisor/genesis/bin
mkdir -p ~/.stabled/cosmovisor/upgrades
# Copy current binary to genesis
cp /usr/bin/stabled ~/.stabled/cosmovisor/genesis/bin/
# Create current symlink
ln -s ~/.stabled/cosmovisor/genesis ~/.stabled/cosmovisor/current
# Verify setup
ls -la ~/.stabled/cosmovisor/
cosmovisor run version
```
#### Step 4: Set Environment Variable
```bash
# Set service name (default: stable)
export SERVICE_NAME=stable
```
#### Step 5: Create Service File
:::code-group
```bash [Mainnet]
sudo tee /etc/systemd/system/${SERVICE_NAME}.service > /dev/null < /dev/null < /dev/null < /dev/null < /dev/null < /dev/null < 3 |
| `stablebft_consensus_block_interval` | 区块时间 | > 10 秒 |
| `stablebft_p2p_peers` | 连接的对等节点 | \< 3 |
| `stablebft_mempool_size` | 内存池大小 | > 1500 |
| `stablebft_mempool_failed_txs` | 失败的交易 | > 100/分钟 |
#### 系统指标
| 指标 | 描述 | 告警阈值 |
| ---------------------------------- | ------- | -------------- |
| `node_cpu_seconds_total` | CPU 使用率 | > 80% 持续 5 分钟 |
| `node_memory_MemAvailable_bytes` | 可用内存 | \< 10% |
| `node_filesystem_avail_bytes` | 可用磁盘 | \< 10% |
| `node_network_receive_bytes_total` | 网络接收 | > 100MB/s |
| `node_disk_io_time_seconds_total` | 磁盘 I/O | > 80% |
| `node_load15` | 系统负载 | > CPU 核心数 \* 2 |
### Grafana 仪表板设置
#### 导入 Stable 仪表板
```json
{
"dashboard": {
"title": "Stable 节点监控",
"panels": [
{
"title": "区块高度",
"targets": [
{
"expr": "stablebft_consensus_height{chain_id=\"stabletestnet_2201-1\"}"
}
]
},
{
"title": "对等节点",
"targets": [
{
"expr": "stablebft_p2p_peers"
}
]
},
{
"title": "区块时间",
"targets": [
{
"expr": "rate(stablebft_consensus_height[1m]) * 60"
}
]
},
{
"title": "内存池大小",
"targets": [
{
"expr": "stablebft_mempool_size"
}
]
}
]
}
}
```
### AlertManager 配置
#### 安装 AlertManager
```bash
# 下载 AlertManager
wget https://github.com/prometheus/alertmanager/releases/download/v0.26.0/alertmanager-0.26.0.linux-amd64.tar.gz
tar xvf alertmanager-0.26.0.linux-amd64.tar.gz
sudo mv alertmanager-0.26.0.linux-amd64 /opt/alertmanager
# 配置
sudo tee /opt/alertmanager/alertmanager.yml > /dev/null < 1500
for: 10m
labels:
severity: warning
annotations:
summary: "内存池大小过高:{{ $value }}"
```
### 健康检查脚本
```bash
#!/bin/bash
# health-check.sh
set -e
# 颜色输出
RED='\033[0;31m'
GREEN='\033[0;32m'
YELLOW='\033[1;33m'
NC='\033[0m'
export SERVICE_NAME="stable"
echo "=== Stable 节点健康检查 ==="
echo
# 检查服务是否运行
if systemctl is-active --quiet ${SERVICE_NAME}; then
echo -e "${GREEN}✓${NC} 服务正在运行"
else
echo -e "${RED}✗${NC} 服务未运行"
exit 1
fi
# 检查节点同步状态
SYNC_STATUS=$(curl -s localhost:26657/status | jq -r '.result.sync_info.catching_up')
if [ "$SYNC_STATUS" = "false" ]; then
echo -e "${GREEN}✓${NC} 节点已同步"
else
echo -e "${YELLOW}⚠${NC} 节点正在同步"
fi
# 检查对等节点数量
PEERS=$(curl -s localhost:26657/net_info | jq -r '.result.n_peers')
if [ "$PEERS" -ge 3 ]; then
echo -e "${GREEN}✓${NC} 连接的对等节点:$PEERS"
else
echo -e "${YELLOW}⚠${NC} 对等节点数量过低:$PEERS"
fi
# 检查磁盘空间
DISK_USAGE=$(df -h / | awk 'NR==2 {print $5}' | sed 's/%//')
if [ "$DISK_USAGE" -lt 80 ]; then
echo -e "${GREEN}✓${NC} 磁盘使用率:${DISK_USAGE}%"
else
echo -e "${YELLOW}⚠${NC} 磁盘使用率过高:${DISK_USAGE}%"
fi
echo
echo "=== 健康检查完成 ==="
```
### 维护任务
#### 日常维护
```bash
#!/bin/bash
# daily-maintenance.sh
# 轮换日志
sudo journalctl --rotate
sudo journalctl --vacuum-time=7d
# 清理缓存
sync && echo 3 | sudo tee /proc/sys/vm/drop_caches
# 检查更新
echo "检查更新..."
curl -s https://api.github.com/repos/stable-chain/stable/releases/latest | jq -r '.tag_name'
# 备份重要配置文件
cp ~/.stabled/config/node_key.json ~/backups/node_key_$(date +%Y%m%d).json
```
### 监控最佳实践
1. **设置冗余监控**
* 使用外部监控服务
* 实现跨节点监控
* 设置死人开关告警
2. **防止告警疲劳**
* 基于基线调整告警阈值
* 使用告警分组和抑制
* 实现升级策略
3. **数据保留**
* 至少保留 30 天指标
* 归档重要日志
* 定期备份监控配置
### 下一步
* [查看故障排除指南](./troubleshooting)以解决问题
* [配置升级](./upgrades)并监控
* 根据您的要求设置自定义告警
## Overview
This comprehensive guide covers everything you need to know about running and maintaining Stable nodes.
### Quick Links
* **[System Requirements](./system-requirements)** - Hardware and software requirements for different node types
* **[Installation Guide](./installation)** - Step-by-step installation instructions for various platforms
* **[Configuration](./configuration)** - Detailed configuration options and best practices
* **[Snapshots & Sync](./snapshots)** - Fast sync options using snapshots
* **[Upgrade Guide](./upgrades)** - Node upgrade procedures and version history
* **[Monitoring](./monitoring)** - Tools and metrics for node monitoring
* **[Troubleshooting](./troubleshooting)** - Common issues and solutions
### Node Types
#### Full Node
A full node maintains a complete copy of the blockchain and validates all transactions and blocks. Full nodes:
* Verify all transactions and blocks
* Maintain the entire blockchain history
* Can serve data to other nodes
* Support the network's decentralization
#### Archive Node
An archive node stores the complete history of all states and can serve historical queries. Archive nodes:
* Store all historical states
* Support historical queries at any block height
* Require significantly more storage
* Essential for block explorers and analytics
### Network Information
For complete network details including RPC endpoints, block explorers, and chain parameters, see:
* **[Mainnet](#TODO)** - Mainnet details
* **[Testnet](#TODO)** - Testnet details
### Support and Community
* **Discord**: [Join our Discord](https://discord.gg/stablexyz)
### Quick Start
For experienced operators who want to get started quickly:
1. Check [System Requirements](./system-requirements)
2. Follow the [Installation Guide](./installation)
3. Configure your node using [Configuration Guide](./configuration)
4. Speed up sync with [Snapshots](./snapshots)
5. Monitor your node with [Monitoring Guide](./monitoring)
For network parameters and RPC endpoints, see [Mainnet Information](#TODO) or [Testnet Information](#TODO).
This guide covers various methods to synchronize your Stable node quickly using snapshots and state sync.
### Sync Methods Overview
| Method | Sync Time | Storage Required | Use Case |
| -------------------- | --------- | ---------------- | ------------------------------ |
| **Pruned Snapshot** | \~10 min | \< 5 GiB | Regular full nodes |
| **Archive Snapshot** | \~1 hours | \~500 GB | Archive nodes, block explorers |
### Official Snapshots
Stable provides official snapshots updated daily (00:00 UTC).
#### Snapshot Information
#### Mainnet
| Type | Compression | Size | URL | Update Frequency |
| ----------- | ----------- | -------- | -------------------------------------------------------------------------------------------------------- | ---------------- |
| **Pruned** | LZ4 | \< 5 GiB | [Download](https://stable-data-dist.s3.us-east-1.amazonaws.com/mainnet/snapshots/snapshot.tar.lz4) | Daily |
| **Archive** | ZSTD | \~300 GB | [Download](https://stable-data-dist.s3.us-east-1.amazonaws.com/mainnet/snapshots/stable_archive.tar.zst) | Weekly |
#### Testnet
| Type | Compression | Size | URL | Update Frequency |
| ----------- | ----------- | -------- | -------------------------------------------------------------------------------------------------------- | ---------------- |
| **Pruned** | LZ4 | \< 5 GiB | [Download](https://stable-data-dist.s3.us-east-1.amazonaws.com/testnet/snapshots/snapshot.tar.lz4) | Daily |
| **Archive** | ZSTD | \~800 GB | [Download](https://stable-data-dist.s3.us-east-1.amazonaws.com/testnet/snapshots/stable_archive.tar.zst) | Weekly |
### Using Pruned Snapshots
Pruned snapshots contain recent blockchain state (last 100-1000 blocks).
#### Step 1: Set Environment Variable
```bash
# Set service name (default: stable)
export SERVICE_NAME=stable
```
#### Step 2: Stop Node Service
```bash
# Stop the running node
sudo systemctl stop ${SERVICE_NAME}
# Verify it's stopped
sudo systemctl status ${SERVICE_NAME}
```
#### Step 2: Backup Current Data (Optional)
```bash
# Create backup directory
mkdir -p ~/stable-backup
# Backup current state (optional, requires significant space)
cp -r ~/.stabled/data ~/stable-backup/
```
#### Step 3: Download and Extract Pruned Snapshot
:::code-group
```bash [Mainnet]
# Install dependencies
sudo apt install -y wget zstd pv
# Create snapshot directory
mkdir -p ~/snapshot
cd ~/snapshot
# Download pruned snapshot with progress
wget -c https://stable-data-dist.s3.us-east-1.amazonaws.com/mainnet/snapshots/snapshot.tar.lz4
# Remove old data
rm -rf ~/.stabled/data/*
# Extract snapshot with progress indicator
pv stable_pruned.tar.zst | zstd -d -c | tar -xf - -C ~/.stabled/
# Alternative extraction without pv
zstd -d stable_pruned.tar.zst -c | tar -xvf - -C ~/.stabled/
# Clean up
rm stable_pruned.tar.zst
```
```bash [Testnet]
# Install dependencies
sudo apt install -y wget lz4 pv
# Create snapshot directory
mkdir -p ~/snapshot
cd ~/snapshot
# Download pruned snapshot with progress
wget -c https://stable-data-dist.s3.us-east-1.amazonaws.com/testnet/snapshots/snapshot.tar.lz4
# Alternative: Download with resume support
curl -C - -o snapshot.tar.lz4 https://stable-data-dist.s3.us-east-1.amazonaws.com/testnet/snapshots/snapshot.tar.lz4
# Remove old data
rm -rf ~/.stabled/data/*
# Extract snapshot with progress indicator
pv snapshot.tar.lz4 | tar -I lz4 -xf - -C ~/.stabled/
# Alternative extraction without pv
tar -I lz4 -xvf snapshot.tar.lz4 -C ~/.stabled/
# Clean up
rm snapshot.tar.lz4
```
:::
#### Step 4: Restart Node
```bash
# Start the node
sudo systemctl start ${SERVICE_NAME}
# Check status
sudo systemctl status ${SERVICE_NAME}
# Monitor logs
sudo journalctl -u stabled -f
```
### Using Archive Snapshots
Archive snapshots contain complete blockchain history.
#### Step 1: Prepare System
```bash
# Stop node
sudo systemctl stop ${SERVICE_NAME}
# Install dependencies
sudo apt install -y wget zstd pv
# Check available disk space (need 2x snapshot size)
df -h ~/.stabled
```
#### Step 2: Download and Extract Archive Snapshot
:::code-group
```bash [Mainnet]
# Create working directory
mkdir -p ~/snapshot
cd ~/snapshot
# Download archive snapshot
wget -c https://stable-data-dist.s3.us-east-1.amazonaws.com/mainnet/snapshots/stable_archive.tar.zst
# Clear old data
rm -rf ~/.stabled/data/*
# Extract with high memory for better performance
pv stable_archive.tar.zst | zstd -d --long=31 --memory=2048MB -c - | tar -xf - -C ~/.stabled/
# Alternative: Standard extraction
zstd -d --long=31 stable_archive.tar.zst -c | tar -xvf - -C ~/.stabled/
# Clean up
rm stable_archive.tar.zst
```
```bash [Testnet]
# Create working directory
mkdir -p ~/snapshot
cd ~/snapshot
# Download archive snapshot
wget -c https://stable-data-dist.s3.us-east-1.amazonaws.com/testnet/snapshots/stable_archive.tar.zst
# Clear old data
rm -rf ~/.stabled/data/*
# Extract with high memory for better performance
pv archive.tar.zst | zstd -d --long=31 --memory=2048MB -c - | tar -xf - -C ~/.stabled/
# Alternative: Standard extraction
zstd -d --long=31 archive.tar.zst -c | tar -xvf - -C ~/.stabled/
# Clean up
rm archive.tar.zst
```
:::
#### Step 3: Start Node
```bash
# Start service
sudo systemctl start ${SERVICE_NAME}
# Verify sync status
curl -s localhost:26657/status | jq '.result.sync_info'
```
### Creating Your Own Snapshots
#### Manual Snapshot Creation
```bash
# Stop node
sudo systemctl stop ${SERVICE_NAME}
# Create snapshot archive
cd ~/.stabled
tar -cf - data/ | lz4 -9 > ~/stable-snapshot-$(date +%Y%m%d).tar.lz4
# Create checksum
sha256sum ~/stable-snapshot-*.tar.lz4 > checksums.txt
# Restart node
sudo systemctl start ${SERVICE_NAME}
```
#### Automated Snapshot Script
```bash
#!/bin/bash
# snapshot.sh - Automated snapshot creation
# Configuration
SNAPSHOT_DIR="/var/snapshots"
STABLED_HOME="$HOME/.stabled"
KEEP_DAYS=7
# Create snapshot directory
mkdir -p $SNAPSHOT_DIR
# Stop node
sudo systemctl stop ${SERVICE_NAME}
# Create snapshot
SNAPSHOT_NAME="stable-snapshot-$(date +%Y%m%d-%H%M%S).tar.lz4"
tar -cf - -C $STABLED_HOME data/ | lz4 -9 > $SNAPSHOT_DIR/$SNAPSHOT_NAME
# Generate metadata
cat > $SNAPSHOT_DIR/latest.json < 1000 MiBps |
| **网络** | 100 Mbps | 稳定、低延迟连接 |
| **操作系统** | Ubuntu 22.04/24.04, Debian 12 | 需要 64 位 Linux |
#### 全节点(推荐配置)
| 组件 | 要求 | 说明 |
| -------- | ------------ | ------------------------------- |
| **CPU** | 8 核心 | AMD Ryzen 7 / Intel Core i7 或更佳 |
| **RAM** | 16 GB | 32 GB 可获得最佳性能 |
| **存储** | 1 TB NVMe | 写入吞吐量 > 2000 MiBps |
| **网络** | 1 Gbps | 首选专用连接 |
| **操作系统** | Ubuntu 24.04 | 建议最新 LTS |
#### 存档节点
| 组件 | 要求 | 说明 |
| -------- | ------------ | --------------------------------- |
| **CPU** | 16 核心 | AMD Ryzen 9 / Intel Core i9 或同等产品 |
| **RAM** | 32 GB | 建议 64 GB |
| **存储** | 4 TB NVMe | 快速增长,需规划扩容 |
| **网络** | 1 Gbps | 需要不计量连接 |
| **操作系统** | Ubuntu 24.04 | 建议最新 LTS |
### 软件要求
#### 操作系统
##### 支持的发行版
* **Ubuntu 24.04 LTS**(推荐)
* **Ubuntu 22.04 LTS**
* **Debian 12 (Bookworm)**
##### 系统依赖
```bash
# 更新系统包
sudo apt update && sudo apt upgrade -y
# 安装基本工具
sudo apt install -y \
build-essential \
git \
wget \
curl \
jq \
lz4 \
zstd \
htop \
net-tools \
ufw
```
### 网络要求
#### 带宽使用情况
| 节点类型 | 下载 | 上传 | 月流量 |
| ---- | ------------- | ------------ | ------- |
| 全节点 | \~50 Mbps 平均 | \~25 Mbps 平均 | \~15 TB |
| 存档节点 | \~100 Mbps 平均 | \~50 Mbps 平均 | \~30 TB |
### 云服务提供商推荐
#### AWS
* **全节点**:t3.xlarge 或 c5.xlarge
* **存档节点**:m5.2xlarge 或 c5.2xlarge
* **存储**:gp3 配置 IOPS
#### Google Cloud
* **全节点**:n2-standard-4
* **存档节点**:n2-standard-8
* **存储**:pd-ssd 或 pd-extreme
#### Azure
* **全节点**:Standard\_D4s\_v5
* **存档节点**:Standard\_D8s\_v5
* **存储**:Premium SSD v2
#### DigitalOcean
* **全节点**:General Purpose 8GB
* **存档节点**:CPU-Optimized 16GB
* **存储**:Volume Block Storage
### 监控要求
对于生产环境部署,请确保您拥有:
* **Prometheus**:用于指标收集
* **Grafana**:用于可视化
* **AlertManager**:用于告警
* **Node Exporter**:用于系统指标
* **日志聚合**:建议使用 ELK 或 Loki
### 安全考虑
#### 系统加固
* 保持操作系统和软件包更新
* 配置自动安全更新
* 仅使用 SSH 密钥(禁用密码认证)
* 配置 fail2ban
* 启用防火墙(UFW/iptables)
* 定期安全审计
### 安装前检查清单
在进行安装之前,请验证:
* [ ] 硬件满足最低要求
* [ ] 操作系统受支持且已更新
* [ ] 存储具有足够的 IOPS
* [ ] 网络带宽充足
* [ ] 防火墙规则已配置
* [ ] 系统监控已设置
* [ ] 备份策略已定义
* [ ] 安全措施已到位
本综合指南帮助诊断和解决 Stable 节点的常见问题。
### 快速诊断
#### 节点健康检查脚本
```bash
#!/bin/bash
# quick-diagnosis.sh
# 设置服务名称(默认:stable)
export SERVICE_NAME=stable
echo "=== Stable 节点诊断 ==="
echo "时间戳:$(date)"
echo ""
# 1. 服务状态
echo "1. 服务状态:"
systemctl status ${SERVICE_NAME} --no-pager | head -10
# 2. 同步状态
echo -e "\n2. 同步状态:"
curl -s localhost:26657/status | jq '.result.sync_info' 2>/dev/null || echo "RPC 无响应"
# 3. 对等节点连接
echo -e "\n3. 对等节点数量:"
curl -s localhost:26657/net_info | jq '.result.n_peers' 2>/dev/null || echo "无法获取对等节点信息"
# 4. 最近错误
echo -e "\n4. 最近错误(最后 20 条):"
sudo journalctl -u ${SERVICE_NAME} --since "1 hour ago" | grep -i error | tail -20
# 5. 系统资源
echo -e "\n5. 系统资源:"
df -h / | grep -v Filesystem
free -h | grep Mem
top -bn1 | grep "load average"
# 6. 端口状态
echo -e "\n6. 端口状态:"
ss -tulpn | grep ${SERVICE_NAME} || echo "未找到 ${SERVICE_NAME} 端口"
echo -e "\n=== 诊断完成 ==="
```
### 常见问题和解决方案
#### 节点无法启动
##### 问题:找不到二进制文件
**错误信息:**
```
stabled: command not found
```
**解决方案:**
```bash
# 检查二进制文件是否存在
ls -la /usr/bin/stabled
# 如果缺失,重新安装(如需要使用 arm64)
wget https://stable-data-dist.s3.us-east-1.amazonaws.com/testnet/binary/stabled-0.7.2-linux-amd64-testnet.tar.gz
tar -xvzf stabled-0.7.2-linux-amd64-testnet.tar.gz
sudo mv stabled /usr/bin/
sudo chmod +x /usr/bin/stabled
```
##### 问题:权限拒绝
**错误信息:**
```
Error: open /home/user/.stabled/config/config.toml: permission denied
```
**解决方案:**
```bash
# 修复所有权
sudo chown -R $USER:$USER ~/.stabled/
# 修复权限
chmod 700 ~/.stabled/
chmod 600 ~/.stabled/config/*.json
chmod 644 ~/.stabled/config/*.toml
```
##### 问题:地址已被使用
**错误信息:**
```
Error: listen tcp 0.0.0.0:26657: bind: address already in use
```
**解决方案:**
```bash
# 查找使用端口的进程
sudo lsof -i :26657
# 杀死进程
sudo kill -9
# 或更改配置中的端口
sed -i 's/laddr = "tcp:\/\/0.0.0.0:26657"/laddr = "tcp:\/\/0.0.0.0:26658"/' ~/.stabled/config/config.toml
```
#### 同步问题
##### 问题:节点在特定高度卡住
**症状:**
* 区块高度不增长
* 超过 1 分钟无新区块
**解决方案:**
```bash
# 1. 检查对等节点
curl localhost:26657/net_info | jq '.result.n_peers'
# 如果没有对等节点,添加持久对等节点
echo "persistent_peers = \"5ed0f977a26ccf290e184e364fb04e268ef16430@37.187.147.27:26656,128accd3e8ee379bfdf54560c21345451c7048c7@37.187.147.22:26656\"" >> ~/.stabled/config/config.toml
# 2. 重置并重新同步
sudo systemctl stop ${SERVICE_NAME}
stabled comet unsafe-reset-all --keep-addr-book
sudo systemctl start ${SERVICE_NAME}
# 3. 使用快照(参见快照指南)
```
##### 问题:"wrong Block.Header.AppHash" 错误
**错误信息:**
```
panic: Wrong Block.Header.AppHash. Expected XXXX, got YYYY
```
**解决方案:**
```bash
# 这表示状态损坏 - 回滚到上一个区块
sudo systemctl stop ${SERVICE_NAME}
# 回滚一个区块
stabled rollback
# 重启节点
sudo systemctl start ${SERVICE_NAME}
# 如果回滚无效,从快照恢复
# 备份重要文件
cp ~/.stabled/config/priv_validator_key.json ~/backup/
cp ~/.stabled/config/node_key.json ~/backup/
# 重置状态
stabled comet unsafe-reset-all
# 从快照恢复
wget https://stable-data-dist.s3.us-east-1.amazonaws.com/testnet/snapshots/snapshot.tar.lz4
tar -I lz4 -xf snapshot.tar.lz4 -C ~/.stabled/
sudo systemctl start ${SERVICE_NAME}
```
#### 对等节点连接问题
##### 问题:无对等节点连接
**症状:**
```
"n_peers": 0
```
**解决方案:**
```bash
# 1. 检查防火墙
sudo ufw status
sudo ufw allow 26656/tcp
# 2. 检查外部 IP
curl ifconfig.me
# 3. 更新外部地址
sed -i "s/external_address = .*/external_address = \"$(curl -s ifconfig.me):26656\"/" ~/.stabled/config/config.toml
# 4. 添加种子节点
cat >> ~/.stabled/config/config.toml < db_dump.txt
# 4. 如果修复失败,重新同步
rm -rf ~/.stabled/data
# 从快照恢复
# 5. 启动节点
sudo systemctl start ${SERVICE_NAME}
```
#### 内存问题
##### 问题:内存不足(OOM)杀死进程
**症状:**
```
stabled.service: Main process exited, code=killed, status=9/KILL
```
**解决方案:**
```bash
# 1. 检查内存使用情况
free -h
dmesg | grep -i "killed process"
# 2. 添加交换空间
sudo fallocate -l 8G /swapfile
sudo chmod 600 /swapfile
sudo mkswap /swapfile
sudo swapon /swapfile
echo '/swapfile none swap sw 0 0' | sudo tee -a /etc/fstab
# 3. 优化内存使用
cat >> ~/.stabled/config/app.toml < $OUTPUT_DIR/system.txt
df -h >> $OUTPUT_DIR/system.txt
free -h >> $OUTPUT_DIR/system.txt
# 服务状态
systemctl status ${SERVICE_NAME} --no-pager > $OUTPUT_DIR/service-status.txt
# 最近日志
sudo journalctl -u ${SERVICE_NAME} --since "1 hour ago" > $OUTPUT_DIR/recent-logs.txt
# 配置文件(删除敏感数据)
grep -v "priv" ~/.stabled/config/config.toml > $OUTPUT_DIR/config.toml
grep -v "priv" ~/.stabled/config/app.toml > $OUTPUT_DIR/app.toml
# 节点状态
curl -s localhost:26657/status > $OUTPUT_DIR/node-status.json 2>/dev/null
# 创建归档
tar -czf $OUTPUT_DIR.tar.gz $OUTPUT_DIR/
echo "调试信息已收集:$OUTPUT_DIR.tar.gz"
echo "请求支持时分享此文件"
```
### 下一步
* 查看[监控设置](./monitoring)以防止问题
* 检查[升级指南](./upgrades)了解版本特定问题
本指南涵盖 Stable 节点的升级流程,包括升级程序和回滚策略。
> 有关完整的版本历史和升级详情,请参阅[版本历史](/cn/developers/testnet/version-history)。
### 升级类型
#### 软升级(非破坏性)
* 可随时执行
* 向后兼容
#### 硬升级(破坏性)
* 需要在特定高度升级
* 不向后兼容
#### 紧急升级
* 关键安全修复
* 需要立即行动
* 可能需要链停止
### 标准升级程序
#### 步骤 1:准备工作
```bash
# 检查当前版本
stabled version --long
# 备份关键数据
cp -r ~/.stabled/config ~/stable-backup-$(date +%Y%m%d)/
# 仅限验证者:备份验证者状态
cp ~/.stabled/data/priv_validator_state.json ~/stable-backup-$(date +%Y%m%d)/
# 检查磁盘空间(需要当前数据大小的 2 倍)
df -h ~/.stabled
```
#### 步骤 2:下载新二进制文件
```bash
# 对于 v1.2.0-rc1 升级(2026年1月22日)
# 选择您的架构:
# Linux AMD64
BINARY_URL="https://stable-data-dist.s3.us-east-1.amazonaws.com/testnet/binary/stabled-1.2.0-rc1-linux-amd64-testnet.tar.gz"
# 或 Linux ARM64
BINARY_URL="https://stable-data-dist.s3.us-east-1.amazonaws.com/testnet/binary/stabled-1.2.0-rc1-linux-arm64-testnet.tar.gz"
# 下载新二进制文件
wget $BINARY_URL
# 解压到临时位置
tar -xvzf stabled-1.2.0-rc1-linux-*.tar.gz -C /tmp/
# 验证新版本
/tmp/stabled version --long
```
#### 步骤 3:执行升级
##### 对于软升级
```bash
# 停止节点
sudo systemctl stop ${SERVICE_NAME}
# 备份当前二进制文件
sudo mv /usr/bin/stabled /usr/bin/stabled.backup
# 安装新二进制文件
sudo mv /tmp/stabled /usr/bin/stabled
sudo chmod +x /usr/bin/stabled
# 验证安装
stabled version --long
# 启动节点
sudo systemctl start ${SERVICE_NAME}
# 监控日志
sudo journalctl -u ${SERVICE_NAME} -f
```
##### 对于硬升级
```bash
# 监控升级高度
while true; do
HEIGHT=$(curl -s localhost:26657/status | jq -r '.result.sync_info.latest_block_height')
echo "当前高度:$HEIGHT"
if [ $HEIGHT -ge $UPGRADE_HEIGHT ]; then
break
fi
sleep 10
done
# 节点将在升级高度自动停止
# 等待日志中的停止消息
sudo journalctl -u ${SERVICE_NAME} -f | grep "UPGRADE"
# 一旦停止,执行升级
sudo systemctl stop ${SERVICE_NAME}
sudo mv /usr/bin/stabled /usr/bin/stabled.backup
sudo mv /tmp/stabled /usr/bin/stabled
# 使用新二进制文件启动
sudo systemctl start ${SERVICE_NAME}
```
#### 步骤 4:升级后验证
```bash
# 检查节点状态
curl -s localhost:26657/status | jq '.result'
# 验证版本
curl -s localhost:26657/status | jq '.result.node_info.version'
# 检查对等节点
curl -s localhost:26657/net_info | jq '.result.n_peers'
# 监控同步状态
watch -n 2 'curl -s localhost:26657/status | jq ".result.sync_info"'
# 检查错误
sudo journalctl -u ${SERVICE_NAME} --since "10 minutes ago" | grep -i error
```
### Cosmovisor 设置(自动升级)
Cosmovisor 自动化协调升级的升级流程。
#### 安装
```bash
# 安装 cosmovisor
go install cosmossdk.io/tools/cosmovisor/cmd/cosmovisor@latest
# 或下载二进制文件
wget https://github.com/cosmos/cosmos-sdk/releases/download/cosmovisor%2Fv1.7.0/cosmovisor-v1.7.0-linux-amd64.tar.gz
tar -xzf cosmovisor-v1.7.0-linux-amd64.tar.gz
sudo mv cosmovisor /usr/bin/
```
#### 配置
```bash
# 设置环境变量
cat >> ~/.bashrc < /dev/null < > export.json
# 3. 等待协调重启说明
```
### 下一步
* [版本历史](/cn/developers/testnet/version-history) - 完整升级历史和发布说明
* 升级后[监控您的节点](./monitoring)
* 查看[故障排除](./troubleshooting)了解常见问题
## 主网信息
您访问 Stable 主网所需了解的一切信息。
### 网络概览
| 配置 | 值 |
| -------- | -------------- |
| **网络名称** | Stable Mainnet |
| **链 ID** | `988` |
| **燃料代币** | USDT0 |
| **治理代币** | STABLE |
| **出块时间** | \~0.7 秒 |
### 区块浏览器
| 浏览器 | URL |
| -------------- | ------------------------------------------------ |
| **Stablescan** | [https://stablescan.xyz](https://stablescan.xyz) |
### RPC 端点
#### 主要端点
| 类型 | 端点 | 用途 |
| ---------------- | ------------------------------------------------ | ------ |
| **EVM JSON-RPC** | [https://rpc.stable.xyz](https://rpc.stable.xyz) | EVM 交易 |
| **WebSocket** | wss\://rpc.stable.xyz | 实时更新 |
### 链信息
| 参数 | EVM |
| -------- | ------- |
| **链 ID** | `988` |
| **燃料代币** | `USDT0` |
| **小数位数** | 18 |
### 工具
| 工具 | URL | 描述 |
| ------ | ----------------------------------------- | --- |
| **快照** | 参见 [节点运营指南](../node-operations/snapshots) | 链快照 |
## 版本历史
Stable 主网的完整版本历史和相关文档。
### 当前版本信息
* **当前版本**: `v1.3.1`
* **下次升级**: `TBD`
* **升级高度**: `TBD`
* **预期时间**: `TBD`
### 版本历史
#### 当前和以前的版本
| 版本 | 提交 | 升级高度 | 二进制文件 | 状态 |
| ---------- | --------- | ---------- | ------------------------------------------------------------------------------------------------------------------------------------------------------------------------------------------------------------------------------------------- | -- |
| **v1.3.1** | `f85d155` | - | [AMD64](https://stable-data-dist.s3.us-east-1.amazonaws.com/mainnet/binary/stabled-1.3.1-linux-amd64-mainnet.tar.gz) / [ARM64](https://stable-data-dist.s3.us-east-1.amazonaws.com/mainnet/binary/stabled-1.3.1-linux-arm64-mainnet.tar.gz) | 当前 |
| **v1.3.0** | `dd103ec` | 24,077,500 | [AMD64](https://stable-data-dist.s3.us-east-1.amazonaws.com/mainnet/binary/stabled-1.3.0-linux-amd64-mainnet.tar.gz) / [ARM64](https://stable-data-dist.s3.us-east-1.amazonaws.com/mainnet/binary/stabled-1.3.0-linux-arm64-mainnet.tar.gz) | |
| **v1.2.2** | `76da1da` | - | [AMD64](https://stable-data-dist.s3.us-east-1.amazonaws.com/mainnet/binary/stabled-1.2.2-linux-amd64-mainnet.tar.gz) / [ARM64](https://stable-data-dist.s3.us-east-1.amazonaws.com/mainnet/binary/stabled-1.2.2-linux-arm64-mainnet.tar.gz) | |
| **v1.2.1** | `7955bb7` | - | [AMD64](https://stable-data-dist.s3.us-east-1.amazonaws.com/mainnet/binary/stabled-1.2.1-linux-amd64-mainnet.tar.gz) / [ARM64](https://stable-data-dist.s3.us-east-1.amazonaws.com/mainnet/binary/stabled-1.2.1-linux-arm64-mainnet.tar.gz) | |
| **v1.2.0** | `47e355b` | 12,004,000 | [AMD64](https://stable-data-dist.s3.us-east-1.amazonaws.com/mainnet/binary/stabled-1.2.0-linux-amd64-mainnet.tar.gz) / [ARM64](https://stable-data-dist.s3.us-east-1.amazonaws.com/mainnet/binary/stabled-1.2.0-linux-arm64-mainnet.tar.gz) | |
| **v1.1.4** | `c795773` | - | [AMD64](https://stable-data-dist.s3.us-east-1.amazonaws.com/mainnet/binary/stabled-1.1.4-linux-amd64-mainnet.tar.gz) / [ARM64](https://stable-data-dist.s3.us-east-1.amazonaws.com/mainnet/binary/stabled-1.1.4-linux-arm64-mainnet.tar.gz) | |
| **v1.1.2** | `3d83aa3` | 3,263,600 | [AMD64](https://stable-data-dist.s3.us-east-1.amazonaws.com/mainnet/binary/stabled-1.1.2-linux-amd64-mainnet.tar.gz) / [ARM64](https://stable-data-dist.s3.us-east-1.amazonaws.com/mainnet/binary/stabled-1.1.2-linux-arm64-mainnet.tar.gz) | |
| **v1.1.0** | `17ceaa7` | 1,694,000 | [AMD64](https://stable-data-dist.s3.us-east-1.amazonaws.com/mainnet/binary/stabled-1.1.0-linux-amd64-mainnet.tar.gz) / [ARM64](https://stable-data-dist.s3.us-east-1.amazonaws.com/mainnet/binary/stabled-1.1.0-linux-arm64-mainnet.tar.gz) | |
| **v1.0.0** | `d996084` | 创世 | [AMD64](https://stable-data-dist.s3.us-east-1.amazonaws.com/mainnet/binary/stabled-1.0.0-linux-amd64-mainnet.tar.gz) / [ARM64](https://stable-data-dist.s3.us-east-1.amazonaws.com/mainnet/binary/stabled-1.0.0-linux-arm64-mainnet.tar.gz) | 创世 |
### 相关文档
* [升级指南](/cn/developers/node-operations/upgrades) - 分步升级程序
* [主网信息](/cn/developers/mainnet/mainnet-information) - 当前网络详细信息
## EIP-7702
Stable 支持 EIP-7702,引入了统一账户模型,使外部账户(EOA)可临时以智能账户方式运行。
关键特性:
* 用户可继续使用原有的私钥签名交易
* 执行时可临时具备智能合约逻辑,无需永久升级账户
* 实现安全的支付与托管授权流程
* 改善钱包与商户使用 USDT 时的体验
开发者:
* 用户无需部署新合约即可获得合约级功能,降低接入门槛,简化托管逻辑。
## 与以太坊生态的兼容性
Stable 完全兼容 EVM,使开发者可直接使用以太坊工具、库和智能合约模块,无需进行任何修改。
**兼容特性:**
* 语言: 支持 Solidity 与 Vyper。
* 工具链: 原生兼容 Hardhat、Foundry。
* 库: 兼容 ethers.js、web3.js 等常见客户端。
* 合约模块: 遵循 ERC-20、事件机制、访问控制等标准规范。
* RPC 接口: 提供与以太坊相同的 JSON-RPC 方法,支持无缝迁移。
## 终局性规则与兼容性保证
Stable 的交易在 EVM 执行环境中处理。当交易被打包入区块后,其状态变更立即生效。
#### 确认规则:
* 交易被区块打包即视为确认
* 状态的变更(余额、存储、事件)可通过 RPC 查询
#### 结算特性:
* Stable 实现单槽终局性(single-slot finality):
* 交易一旦被有效区块打包即不可逆。
* 开发者可直接将区块打包视为结算完成。
#### 兼容性:
* 系统模块接口与执行行为在测试网期间保持稳定
* 任何潜在的破坏性变更将提前公告并记录于变更日志
* 发布时附带迁移指引
* 后续版本将引入正式的兼容性政策与变更分类机制
## Gas 定价机制
Stable 采用单一组成部分的 Gas 费模型:
* **不支持优先费用( 禁用maxPriorityFeePerGas)**
* 费用仅基于基础的执行成本
* 以 **USDT0** 支付
设计理由:
* 消除 Gas 波动,保证支付可预测性
* 简化用户体验,避免通过支付额外报酬使验证节点优先处理交易
开发者注意:
* 不支持指定优先费用以加速交易
* 钱包应隐藏或禁用优先费用的设置
* Gas 预估需基于 Stable RPC 的定价预测
## Gas 豁免人
### 摘要
Gas 豁免人(免 Gas 费)功能通过允许一小部分经过治理批准的地址("豁免人")提交 `gasPrice = 0` 的交易,实现 Stable 链上终端用户的无 Gas 费交易。Stable 目前运营一个豁免人服务("豁免人服务器"),合作伙伴可以集成该服务,无需实现特定协议的封包逻辑即可提供无 Gas 费用户体验。
本文档规定了 Gas 豁免人 机制、交易格式、治理控制以及面向合作伙伴的豁免人服务器 API。
### 范围
本规范涵盖:
* 免 Gas 费交易的协议级规则
* 封包交易机制和标记地址
* 治理控制的授权和允许的目标
* 用于提交已签名用户交易的豁免人服务器接口
### 定义
* **Waiver(豁免人)**:通过验证者治理在链上注册的以太坊地址,授权提交免 Gas 费交易。
* **InnerTx(内部交易)**:终端用户签名的交易,`gasPrice = 0`。
* **WrapperTx(封包交易)**:由豁免人签名的交易,将用户的 `InnerTx` 传输到链上并授权执行。
* **Marker address(标记地址)**:用于识别豁免人封包交易的哨兵地址:`0x000000000000000000000000000000000000f333`。
* **AllowedTarget(允许的目标)**:一种策略,将豁免人限制在特定的合约地址和方法选择器。
### 概述
Gas 豁免人 使用封包交易模式:
1. 用户使用 `gasPrice = 0` 签署 `InnerTx`。
2. 豁免人将 `InnerTx` 封包成 `WrapperTx` 并广播。
3. 验证者检测到标记交易,验证豁免人授权和策略约束,然后执行嵌入的 `InnerTx`。
Stable 运营一个豁免人服务(豁免人服务器),该服务在链上注册为授权豁免人。合作伙伴通过豁免人服务器 API 集成,提交已签名的 `InnerTx` 负载。
### 协议规范
#### 标记地址路由
当且仅当满足以下条件时,交易被视为豁免人封包交易:
* `to == 0x000000000000000000000000000000000000f333`。
协议将交易的 `data` 字段解释为编码的内部交易负载,并使用以下豁免人验证规则进行处理。
#### 授权和策略检查
对于每个候选封包交易,验证者必须执行:
1. **豁免人授权**
* `WrapperTx.from` 必须是通过治理在链上注册的豁免人地址。
2. **Gas 豁免**
* `WrapperTx.gasPrice` 必须等于 `0`。
* `InnerTx.gasPrice` 必须等于 `0`。
3. **目标白名单**
* `InnerTx.to` 和从 `InnerTx.data` 提取的方法选择器必须被豁免人的 `AllowedTarget` 策略允许。
4. **Value 限制**
* `WrapperTx.value` 必须等于 `0`。
若以上任何一条未通过,则封包交易将被拒绝,封包内部的交易也无法执行。
#### 执行语义
如果所有检查通过:
1. 协议以用户身份执行 `InnerTx`,保留用户的 `from`、`nonce` 和调用语义。
2. Gas 计费由豁免人机制处理:用户不支付 Gas 费,豁免人交易根据功能定义使用 `gasPrice = 0`。
3. 封包交易必须提供足够的 `gasLimit` 以覆盖 `InnerTx` 的执行(包括解包和验证的开销)。
### 交易格式
#### WrapperTx
封包交易由豁免人签署并发送到标记地址。
```javascript
WrapperTx {
from: waiver_address,
to: 0x000000000000000000000000000000000000f333,
value: 0, // 必须为零
data: RLP(InnerTx), // RLP 编码的内部交易
gasPrice: 0, // 必须为零
gasLimit: sufficient_for_inner, // 必须覆盖内部执行 + 开销
nonce: waiver_nonce
}
```
#### InnerTx
内部交易由终端用户签署。
```javascript
InnerTx {
from: user_address,
to: target_contract,
value: value,
data: call_data,
gasPrice: 0, // 必须为零
gasLimit: execution_gas,
nonce: user_nonce
}
```
### 治理控制的访问
豁免人授权由验证者治理在链上管理。
治理控制提供:
* 可审查的豁免人地址授权
* 豁免人注册和更新的链上透明度
* 撤销能力
* 通过 `AllowedTarget` 进行每个豁免人的范围界定
### 安全模型
#### 终端用户签名完整性
用户签署 `InnerTx`。豁免人不允许修改内部交易负载而不使签名失效。合作伙伴仍必须确保用户仅签署预期的交易负载。
#### 信任边界
如果合作伙伴通过豁免人服务器路由提交,Gas 豁免人 引入了服务依赖性:
* 服务的可用性影响提交无 Gas 费交易的能力。
* 授权保留在链上;只有注册的豁免人地址才能产生有效的封包提交。
### 合作伙伴集成
合作伙伴通过以下方式集成:
1. 从用户收集已签名的 `InnerTx`(`gasPrice = 0`)。
2. 将已签名的内部交易提交到豁免人服务器 API。
3. 处理流式结果并向终端用户显示交易哈希。
### 豁免人服务器
#### 概述
豁免人服务器将已签名的用户 `InnerTx` 负载封包并广播为豁免人授权的封包交易。合作伙伴无需构造封包交易或操作豁免人地址。
#### 端点和基础 URL
基础 URL:
* 主网:待定
* 测试网:`https://waiver.testnet.stable.xyz`
#### 身份验证
除健康检查外,所有端点都需要 Bearer Token 身份验证:
```
Authorization: Bearer
```
#### API
##### GET `/v1/health`
健康检查端点。
身份验证:无。
##### POST `/v1/submit`
提交一批已签名的内部交易。
身份验证:必需(`Bearer`)。
请求正文:
```json
{
"transactions": ["0x", "0x"]
}
```
响应以 NDJSON(换行符分隔的 JSON)流式传输。每行对应一个提交的交易索引。
示例:
```json
{"index":0,"id":"abc123","success":true,"txHash":"0x..."}
{"index":1,"id":"def456","success":false,"error":{"code":"VALIDATION_FAILED","message":"invalid signature"}}
```
##### GET `/v1/submit`
用于流式提交的 WebSocket 接口。
身份验证:必需(`Bearer`)。
#### 集成示例
```javascript
const WAIVER_SERVER = "https://waiver.testnet.stable.xyz";
async function submitGaslessTransaction(signedInnerTxHex, apiKey) {
const response = await fetch(`${WAIVER_SERVER}/v1/submit`, {
method: "POST",
headers: {
"Content-Type": "application/json",
"Authorization": `Bearer ${apiKey}`,
},
body: JSON.stringify({
transactions: [signedInnerTxHex],
}),
});
const reader = response.body.getReader();
const decoder = new TextDecoder();
while (true) {
const { done, value } = await reader.read();
if (done) break;
const lines = decoder.decode(value).trim().split("\n");
for (const line of lines) {
const result = JSON.parse(line);
console.log(result);
}
}
}
```
#### 创建用户 InnerTx
合作伙伴负责构造 `gasPrice = 0` 的 `InnerTx`,然后收集用户签名。
示例:
```javascript
import { ethers } from "ethers";
async function createInnerTx(userWallet, contractAddress, callData, nonce) {
const innerTx = {
to: contractAddress,
data: callData,
value: value,
gasPrice: 0, // 豁免人必须为 0
gasLimit: 100000,
nonce: nonce,
chainId: 2201, // 主网为 988,测试网为 2201
};
return await userWallet.signTransaction(innerTx);
}
```
#### 错误代码
* `PARSE_ERROR`:解析交易失败
* `INVALID_REQUEST`:请求正文格式错误
* `BATCH_SIZE_EXCEEDED`:批处理大小超过允许的最大值
* `VALIDATION_FAILED`:交易验证失败
* `BROADCAST_FAILED`:广播到链失败
* `RATE_LIMITED`:超过速率限制
* `QUEUE_FULL`:服务器队列已满
* `TIMEOUT`:请求超时
## JSON-RPC API
### eth\_namespace
| API | support |
| ------------------------------------------- | ------- |
| eth\_syncing | ✅ |
| eth\_gasPrice | ✅ |
| eth\_maxPriorityFeePerGas | ✅ |
| eth\_feeHistory | ✅ |
| eth\_blobBaseFee | ❌ |
| eth\_chainId | ✅ |
| eth\_blockNumber | ✅ |
| eth\_getBalance | ✅ |
| eth\_getProof | ✅ |
| eth\_getHeaderByNumber | ❌ |
| eth\_getHeaderByHash | ❌ |
| eth\_getBlockByNumber | ✅ |
| eth\_getBlockByHash | ✅ |
| eth\_getUncleByBlockNumberAndIndex | ❌ |
| eth\_getUncleByBlockHashAndIndex | ❌ |
| eth\_getUncleCountByBlockNumber | ❌ |
| eth\_getUncleCountByBlockHash | ❌ |
| eth\_getCode | ✅ |
| eth\_getStorageAt | ✅ |
| eth\_getBlockReceipts | ❌ |
| eth\_call | ✅ |
| eth\_simulateV1 | ❌ |
| eth\_estimateGas | ✅ |
| eth\_createAccessList | ❌ |
| eth\_getBlockTransactionCountByNumber | ✅ |
| eth\_getBlockTransactionCountByHash | ✅ |
| eth\_getTransactionByBlockNumberAndIndex | ✅ |
| eth\_getTransactionByBlockHashAndIndex | ✅ |
| eth\_getRawTransactionByBlockNumberAndIndex | ❌ |
| eth\_getRawTransactionByBlockHashAndIndex | ❌ |
| eth\_getTransactionCount | ✅ |
| eth\_getTransactionByHash | ✅ |
| eth\_getRawTransactionByHash | ❌ |
| eth\_getTransactionReceipt | ✅ |
| eth\_sendTransaction | ✅ |
| eth\_fillTransaction | ❌ |
| eth\_sendRawTransaction | ✅ |
| eth\_sign | ✅ |
| eth\_signTransaction | ❌ |
| eth\_pendingTransactions | ✅ |
| eth\_resend | ✅ |
| eth\_accounts | ✅ |
| eth\_subscribe | ✅ |
| eth\_unsubscribe | ✅ |
| eth\_getTransactionLogs | ✅ |
| eth\_signTypedData | ✅ |
| eth\_newPendingTransactionFilter | ✅ |
| eth\_newBlockFilter | ✅ |
| eth\_newFilter | ✅ |
| eth\_getFilterChanges | ✅ |
| eth\_getFilterLogs | ✅ |
| eth\_uninstallFilter | ✅ |
| eth\_getLogs | ✅ |
### debug\_namespace
| API | support |
| ---------------------------------- | ------- |
| debug\_accountRange | ❌ |
| debug\_backtraceAt | ❌ |
| debug\_blockProfile | ✅ |
| debug\_chaindbCompact | ❌ |
| debug\_chaindbProperty | ❌ |
| debug\_cpuProfile | ✅ |
| debug\_dbAncient | ❌ |
| debug\_dbAncients | ❌ |
| debug\_dbGet | ❌ |
| debug\_dumpBlock | ❌ |
| debug\_freeOSMemory | ✅ |
| debug\_freezeClient | ❌ |
| debug\_gcStats | ✅ |
| debug\_getAccessibleState | ❌ |
| debug\_getBadBlocks | ❌ |
| debug\_getRawBlock | ❌ |
| debug\_getRawHeader | ❌ |
| debug\_getRawTransaction | ❌ |
| debug\_getModifiedAccountsByHash | ❌ |
| debug\_getModifiedAccountsByNumber | ❌ |
| debug\_getRawReceipts | ❌ |
| debug\_goTrace | ✅ |
| debug\_intermediateRoots | ✅ |
| debug\_memStats | ✅ |
| debug\_mutexProfile | ✅ |
| debug\_preimage | ❌ |
| debug\_printBlock | ✅ |
| debug\_setBlockProfileRate | ✅ |
| debug\_setGCPercent | ✅ |
| debug\_setHead | ❌ |
| debug\_setMutexProfileFraction | ✅ |
| debug\_setTrieFlushInterval | ❌ |
| debug\_stacks | ✅ |
| debug\_standardTraceBlockToFile | ❌ |
| debug\_standardTraceBadBlockToFile | ❌ |
| debug\_startCPUProfile | ✅ |
| debug\_startGoTrace | ✅ |
| debug\_stopCPUProfile | ✅ |
| debug\_stopGoTrace | ✅ |
| debug\_storageRangeAt | ❌ |
| debug\_traceBadBlock | ❌ |
| debug\_traceBlock | ❌ |
| debug\_traceBlockByNumber | ✅ |
| debug\_traceBlockByHash | ✅ |
| debug\_traceBlockFromFile | ❌ |
| debug\_traceCall | ❌ |
| debug\_traceChain | ❌ |
| debug\_traceTransaction | ✅ |
| debug\_verbosity | ❌ |
| debug\_vmodule | ❌ |
| debug\_writeBlockProfile | ✅ |
| debug\_writeMemProfile | ✅ |
| debug\_writeMutexProfile | ✅ |
## 概览
了解更多关于 Stable 如何处理交易、费用和协议级 USDT 行为的信息。
### 核心机制介绍
Stable 是一个高性能的区块链,与以太坊虚拟机(EVM)保持完全兼容,允许开发者使用熟悉的工具和库来构建应用程序。Stable 的核心机制由几个关键领域组成,旨在提供一个强大、高效且对开发者友好的平台。
#### 系统架构
Stable 构建在以下核心组件之上:
* **执行层**:EVM 兼容的智能合约执行环境
* **共识层**:快速且安全的交易确定性共识机制
* **状态管理**:高效的区块链状态存储和管理
* **网络层**:P2P 通信和数据传播
#### 费用模型
Stable 提供可预测的费用结构:
* **单组件燃气模型**:仅基础执行成本,无优先级小费
* **以 USDT0 支付费用**:稳定且可预测的交易成本
* **消除费用波动性**:一致的价格结构,改善用户体验
#### 性能和可扩展性
* **高吞吐量**:每秒能够处理数千笔交易
* **低延迟**:快速的交易确认时间
* **高效资源利用**:优化的执行环境
### 开发者核心功能
#### 开发工具兼容性
Stable 与现有以太坊开发生态系统保持完全兼容:
**支持的编程语言:**
* Solidity
**开发框架:**
* Hardhat
* Foundry
* Truffle
**客户端库:**
* ethers.js
* web3.js
* 其他 JSON-RPC 兼容库
#### JSON-RPC API
对标准以太坊 JSON-RPC 方法的支持使现有工具和基础设施能够无缝工作:
* 完全支持 `eth_*` 方法
* 与现有索引器和监控工具兼容
* 标准交易格式支持
#### 智能合约模式
* 支持标准代币规范:ERC-20、ERC-721、ERC-1155
* 代理模式和可升级合约
* 多重签名和访问控制机制
* 事件记录和状态管理
### USDT 集成
#### 原生 USDT 支持
Stable 的独特特性之一是 USDT 的原生集成:
* **USDT 作为燃气代币**:可直接使用 USDT 支付交易费用
* **跨链兼容性**:与其他链之间无缝的 USDT 移动
#### USDT 专用功能
* **保障块空间**:USDT 交易的优先处理
* **转账聚合器**:高效的批量转账处理
* **机密转账**:增强的隐私保护
### 系统模块
Stable 由以下核心系统模块组成:
#### Bank 模块
* 账户余额管理
* 代币转账和托管
* 多资产支持
#### Staking 模块
* 验证者管理
* 委托和奖励分配
* 惩罚机制
#### Distribution 模块
* 区块奖励分配
* 费用再分配
* 激励管理
### 安全性和确定性
#### 即时确定性
* 包含在区块中的交易立即确定
* 消除重组(reorg)风险
* 高度的交易确定性
#### 安全模型
* 使用经过验证的加密原语
* 多层安全架构
* 定期安全审计
### 后续步骤
要更深入地了解 Stable 的核心机制,请参考以下文档:
* [以太坊兼容性](/cn/developers/core-mechanics/ethereum-compatibility):EVM 兼容性的详细信息
* [燃气定价](/cn/developers/core-mechanics/gas-pricing):费用模型解释
* [JSON-RPC API](/cn/developers/core-mechanics/json-rpc-api):API 参考文档
* [确定性](/cn/developers/core-mechanics/finality):交易确认机制
* [EIP-7702](/cn/developers/core-mechanics/eip-7702):账户抽象支持
要开始开发,请查看[快速入门指南](/cn/developers/quick-start)。
## 银行模块
### 概述
Stable SDK 中的 `x/bank` 模块仅提供基本的代币管理功能。
每个代币都可以无限制地转移到任何账户,用户无法委托其他账户代为转移其代币到其他账户。
因此,`bank` 预编译合约在 Stable SDK 现有的 `x/bank` 模块基础上提供了额外的授权和委托功能。
### 目录
1. **[概念](#concepts)**
2. **[配置](#configuration)**
3. **[方法](#methods)**
4. **[事件](#events)**
### 概念
该预编译合约提供 ERC20 标准方法 - 如用于转账的 `transfer` 和 `balanceOf`,以及用于委托的 `transferFrom`、`approve` 和 `allowance`。这些方法可以直接调用,无需注册合约地址。
然而,`mint` 和 `burn` 方法需要合约地址被列入白名单,通过 `x/precompile` 模块注册。
```go
func (p *Precompile) mint(
ctx sdk.Context,
contract *vm.Contract,
denom string,
method *abi.Method,
stateDB vm.StateDB,
args []interface{},
) ([]byte, error) {
// ...
// mint method is only allowed for the registered caller contract
if _, err := precompilecommon.CheckPermissions(ctx, p.precompileKeeper, contract.CallerAddress, CallerPermissions); err != nil {
return nil, err
}
```
额外的验证过程可以保证调用此预编译合约的代币合约是经过授权的。
需要通过治理提案来注册代币合约地址及其denomination到 `x/precompile` 模块的白名单中。
### 配置
合约地址和gas费用已预定义。
#### 合约地址
* `0x0000000000000000000000000000000000001003` STABLE (用于治理代币)
### 方法
#### `mint`
铸造请求数量的新代币并转移到账户。
要铸造的代币数量必须大于零。
当代币成功铸造并转移到账户时,会发出 `PrecompiledBankMint` 事件。
注意:
* 禁止铸造治理代币。
* 调用铸造方法的合约必须在 x/precompile 模块中注册。
##### 输入参数
| 名称 | 类型 | 描述 |
| ------ | ------- | --------- |
| to | address | 接收铸造代币的地址 |
| amount | uint256 | 要铸造的代币数量 |
##### 输出参数
| 名称 | 类型 | 描述 |
| ------- | ---- | --------------------- |
| success | bool | 如果代币成功铸造并转移到账户,则为true |
#### `burn`
从账户中销毁请求数量的代币。
要销毁的代币数量必须大于零。
当代币成功销毁时,会发出 `PrecompiledBankBurn` 事件。
注意:
* 禁止销毁治理代币。
* 调用铸造方法的合约必须在 x/precompile 模块中注册。
##### 输入参数
| 名称 | 类型 | 描述 |
| ------ | ------- | -------- |
| from | address | 销毁代币的地址 |
| amount | uint256 | 要销毁的代币数量 |
##### 输出参数
| 名称 | 类型 | 描述 |
| ------- | ---- | --------------- |
| success | bool | 如果代币成功销毁,则为true |
#### `transfer`
将请求数量的代币从发送者转移给接收者。
代币必须设置为可发送。要转移的代币数量必须大于零。
当代币成功转移时,会发出 `PrecompiledBankTransfer` 事件。
##### 输入参数
| 名称 | 类型 | 描述 |
| ------ | ------- | -------- |
| to | address | 接收代币的地址 |
| amount | uint256 | 要转移的代币数量 |
##### 输出参数
| 名称 | 类型 | 描述 |
| ------- | ---- | --------------- |
| success | bool | 如果代币成功转移,则为true |
#### `transferFrom`
由授权的支出者在允许额度范围内将请求数量的代币从所有者转移给接收者。
代币必须设置为可发送。
要转移的代币数量必须大于零并且小于或等于当前允许额度。
当代币成功转移时,会发出 `PrecompiledBankTransfer` 事件。
##### 输入参数
| 名称 | 类型 | 描述 |
| ------ | ------- | -------- |
| from | address | 转出代币的地址 |
| to | address | 接收代币的地址 |
| amount | uint256 | 要转移的代币数量 |
##### 输出参数
| 名称 | 类型 | 描述 |
| ------- | ---- | --------------- |
| success | bool | 如果代币成功转移,则为true |
#### `multiTransfer`
将代币从单个账户转移到多个账户。
代币必须设置为可发送。
转移给每个接收者的代币数量必须大于零。
当代币成功转移时,每个接收者都会发出 `PrecompiledBankTransfer` 事件。
##### 输入参数
| 名称 | 类型 | 描述 |
| ------ | ---------- | ------------- |
| to | address\[] | 接收转移代币的地址数组 |
| amount | uint256\[] | 转移给每个接收者的代币数量 |
##### 输出参数
| 名称 | 类型 | 描述 |
| ------- | ---- | --------------------- |
| success | bool | 如果代币成功转移给每个接收者,则为true |
#### `approve`
授权支出者从所有者账户转移代币。
要授权的代币数量必须大于零。
当授权成功设置时,会发出 `PrecompiledBankApproval` 事件。
##### 输入参数
| 名称 | 类型 | 描述 |
| ------- | ------- | -------- |
| spender | address | 要授权的地址 |
| value | uint256 | 要授权的代币数量 |
##### 输出参数
| 名称 | 类型 | 描述 |
| ------- | ---- | --------------- |
| success | bool | 如果授权成功设置,则为true |
#### `revoke`
撤销支出者从所有者转移代币的授权。
当授权成功撤销时,会发出 `PrecompiledBankRevoke` 事件。
##### 输入参数
| 名称 | 类型 | 描述 |
| ------- | ------- | ------ |
| spender | address | 要撤销的地址 |
##### 输出参数
| 名称 | 类型 | 描述 |
| ------- | ---- | --------------- |
| success | bool | 如果授权成功撤销,则为true |
#### `balanceOf`
返回账户的代币余额。
##### 输入参数
| 名称 | 类型 | 描述 |
| ------- | ------- | ---------- |
| account | address | 要获取代币余额的地址 |
##### 输出参数
| 名称 | 类型 | 描述 |
| ------- | ------- | -------- |
| balance | uint256 | 账户中的代币数量 |
#### `totalSupply`
返回代币的总供应量。
##### 输入参数
无
##### 输出参数
| 名称 | 类型 | 描述 |
| ----------- | ------- | ------ |
| totalSupply | uint256 | 代币的总数量 |
#### `allowance`
返回支出者仍可从所有者提取的金额。
##### 输入参数
| 名称 | 类型 | 描述 |
| ------- | ------- | ------ |
| owner | address | 所有者的地址 |
| spender | address | 支出者的地址 |
##### 输出参数
| 名称 | 类型 | 描述 |
| ------ | ------- | ------- |
| amount | uint256 | 授权的代币数量 |
### 事件
所有从此预编译合约发出的事件都以 `PrecompiledBank` 为前缀。
为了避免歧义,调用此预编译合约的代币合约应避免使用相同前缀的事件名称。
#### PrecompiledBankMint
| 名称 | 类型 | 索引 | 描述 |
| ------ | ------- | -- | --------- |
| from | address | Y | 铸造代币的地址 |
| to | address | Y | 接收铸造代币的地址 |
| amount | uint256 | N | 铸造的代币数量 |
#### PrecompiledBankBurn
| 名称 | 类型 | 索引 | 描述 |
| ------ | ------- | -- | ------- |
| from | address | Y | 销毁代币的地址 |
| to | address | Y | 此方法中未使用 |
| amount | uint256 | N | 销毁的代币数量 |
#### PrecompiledBankTransfer
| 名称 | 类型 | 索引 | 描述 |
| ------ | ------- | -- | --------- |
| from | address | Y | 转移代币的地址 |
| to | address | Y | 接收转移代币的地址 |
| amount | uint256 | N | 转移的代币数量 |
#### PrecompiledBankApproval
| 名称 | 类型 | 索引 | 描述 |
| ------- | ------- | -- | ------- |
| owner | address | Y | 授权代币的地址 |
| spender | address | Y | 被授权的地址 |
| value | uint256 | N | 授权的代币数量 |
#### PrecompiledBankRevoke
| 名称 | 类型 | 索引 | 描述 |
| ------- | ------- | -- | --------- |
| owner | address | Y | 撤销代币授权的地址 |
| spender | address | Y | 被撤销的地址 |
| value | uint256 | N | 授权的代币数量 |
## 分配模块
### 概述
`distribution` 预编译合约作为桥梁,使 Stable SDK 的 `x/distribution` 模块功能能在 EVM 环境中使用。
### 目录
1. **[概念](#concepts)**
2. **[配置](#configuration)**
3. **[方法](#methods)**
4. **[事件](#events)**
### 概念
在 `distribution` 预编译合约中,会进行额外检查以确保委托者或存款者是调用者。
### 配置
合约地址和gas费用已预定义。
#### 合约地址
* `0x0000000000000000000000000000000000000801`
### 方法
#### `setWithdrawAddress`
设置用于接收委托者向验证者委托代币奖励的地址。
有时,当委托者是自我委托时,验证者地址被用作委托者。
当提取者地址成功设置时,会发出 `SetWithdrawAddress` 事件。
##### 输入参数
| 名称 | 类型 | 描述 |
| ----------------- | ------- | --------- |
| delegatorAddress | address | 委托者的地址 |
| withdrawerAddress | address | 接收委托奖励的地址 |
##### 输出参数
| 名称 | 类型 | 描述 |
| ------- | ---- | ------------------ |
| success | bool | 如果提取者地址成功设置,则为true |
#### `withdrawDelegatorRewards`
提取委托者从验证者那里应得的奖励。
验证者奖励给委托者的所有类型的代币都在单次交易中提取。
当奖励成功提取时,会发出 `WithdrawDelegatorRewards` 事件。
##### 输入参数
| 名称 | 类型 | 描述 |
| ---------------- | ------- | ------ |
| delegatorAddress | address | 委托者的地址 |
| validatorAddress | address | 验证者的地址 |
##### 输出参数
| 名称 | 类型 | 描述 |
| ------ | ------- | ------------- |
| amount | Coin\[] | 委托者将获得的各种代币奖励 |
`Coin` 是一个包含以下字段的结构:
| 名称 | 类型 | 描述 |
| ------ | ------- | --------------- |
| denom | string | 奖励的denomination |
| amount | uint256 | 奖励的数量 |
#### `withdrawValidatorCommission`
提取验证者的佣金。
验证者作为佣金获得的所有类型的代币都在单次交易中提取。
当佣金成功提取时,会发出 `WithdrawValidatorCommission` 事件。
##### 输入参数
| 名称 | 类型 | 描述 |
| ---------------- | ------- | ------ |
| validatorAddress | address | 验证者的地址 |
##### 输出参数
| 名称 | 类型 | 描述 |
| ------ | ------- | ------------- |
| amount | Coin\[] | 验证者将获得的各种代币佣金 |
#### `validatorDistributionInfo`
返回代表验证者将获得奖励的分配信息。验证者可以在自己的地址上向自己委托代币,这被称为自绑定。
##### 输入参数
| 名称 | 类型 | 描述 |
| ---------------- | ------- | ------ |
| validatorAddress | address | 验证者的地址 |
##### 输出参数
| 名称 | 类型 | 描述 |
| ---------------- | ------------------------- | -------- |
| distributionInfo | ValidatorDistributionInfo | 验证者的分配信息 |
`ValidatorDistributionInfo` 是一个包含以下字段的结构:
| 名称 | 类型 | 描述 |
| --------------- | ---------- | --------- |
| operatorAddress | address | 验证者操作员的地址 |
| selfBondRewards | DecCoin\[] | 验证者的自绑定金额 |
| commission | DecCoin\[] | 验证者的佣金 |
`DecCoin` 是一个包含以下字段的结构:
| 名称 | 类型 | 描述 |
| --------- | ------- | --------------- |
| denom | string | 奖励的denomination |
| amount | uint256 | 奖励的数量 |
| precision | uint8 | 奖励的精度 |
#### `validatorOutstandingRewards`
返回验证者的未结算奖励。未结算奖励表示由验证者的佣金和自绑定奖励以及委托者的总奖励组成的奖励总额。如果有验证者A,委托者B、C和D委托给A,那么验证者的未结算奖励是A的佣金和自绑定奖励 + B、C和D的奖励的总和。
##### 输入参数
| 名称 | 类型 | 描述 |
| ---------------- | ------- | ------ |
| validatorAddress | address | 验证者的地址 |
##### 输出参数
| 名称 | 类型 | 描述 |
| ------- | ---------- | --------- |
| rewards | DecCoin\[] | 验证者的未结算奖励 |
#### `validatorCommission`
返回验证者的佣金。此方法用于在调用 `withdrawValidatorCommission` 方法之前检索验证者的佣金。
##### 输入参数
| 名称 | 类型 | 描述 |
| ---------------- | ------- | ------ |
| validatorAddress | address | 验证者的地址 |
##### 输出参数
| 名称 | 类型 | 描述 |
| ---------- | ---------- | ------ |
| commission | DecCoin\[] | 验证者的佣金 |
#### `validatorSlashes`
返回验证者在起始高度和结束高度之间的削减历史。削减是当验证者恶意行为或违反网络规则(如双重签名、不当行为或不遵循链规则)时施加的罚款。
##### 输入参数
| 名称 | 类型 | 描述 |
| ---------------- | ------- | ------ |
| validatorAddress | address | 验证者的地址 |
| startingHeight | uint64 | 起始高度 |
| endingHeight | uint64 | 结束高度 |
| pageRequest | PageReq | 分页请求 |
`PageReq` 是一个包含以下字段的结构:
| 名称 | 类型 | 描述 |
| ---------- | ------ | ------- |
| key | bytes | 分页的键 |
| offset | uint64 | 分页的偏移量 |
| limit | uint64 | 分页的限制 |
| countTotal | bool | 是否计算总页数 |
| reverse | bool | 是否反转分页 |
##### 输出参数
| 名称 | 类型 | 描述 |
| ---------- | ---------------------- | ------ |
| slashes | ValidatorSlashEvent\[] | 验证者的削减 |
| pagination | PageResp | 分页响应 |
`ValidatorSlashEvent` 是一个包含以下字段的结构:
| 名称 | 类型 | 描述 |
| --------------- | ------ | ------ |
| validatorPeriod | uint64 | 验证者的期间 |
| fraction | Dec | 削减的分数 |
`Dec` 是一个包含以下字段的结构:
| 名称 | 类型 | 描述 |
| --------- | ------ | ------ |
| value | uint64 | Dec的值 |
| precision | uint8 | Dec的精度 |
`PageResp` 是一个包含以下字段的结构:
| 名称 | 类型 | 描述 |
| ------- | ------ | ------- |
| nextKey | bytes | 分页的下一个键 |
| total | uint64 | 总页数 |
#### `delegationRewards`
返回委托者从验证者那里获得的奖励。
##### 输入参数
| 名称 | 类型 | 描述 |
| ---------------- | ------- | ---------- |
| delegatorAddress | address | 委托者的十六进制地址 |
| validatorAddress | address | 验证者的地址 |
##### 输出参数
| 名称 | 类型 | 描述 |
| ------- | ---------- | -------------- |
| rewards | DecCoin\[] | 委托者从验证者那里获得的奖励 |
#### `delegationTotalRewards`
返回委托者从所有验证者那里获得的总奖励。
##### 输入参数
| 名称 | 类型 | 描述 |
| ---------------- | ------- | ---------- |
| delegatorAddress | address | 委托者的十六进制地址 |
##### 输出参数
| 名称 | 类型 | 描述 |
| ------- | ---------------------------- | ----------------- |
| rewards | DelegationDelegatorReward\[] | 委托者从所有验证者那里获得的总奖励 |
| total | DecCoin\[] | 奖励的总额 |
`DelegationDelegatorReward` 是一个包含以下字段的结构:
| 名称 | 类型 | 描述 |
| ---------------- | ---------- | -------------- |
| validatorAddress | address | 验证者的地址 |
| reward | DecCoin\[] | 委托者从验证者那里获得的奖励 |
#### `delegatorValidators`
返回委托者绑定的验证者。
##### 输入参数
| 名称 | 类型 | 描述 |
| ---------------- | ------- | ---------- |
| delegatorAddress | address | 委托者的十六进制地址 |
##### 输出参数
| 名称 | 类型 | 描述 |
| ---------- | --------- | --------- |
| validators | string\[] | 委托者绑定的验证者 |
#### `delegatorWithdrawAddress`
返回通过 `setWithdrawAddress` 方法设置的接收委托奖励的地址。
##### 输入参数
| 名称 | 类型 | 描述 |
| ---------------- | ------- | ---------- |
| delegatorAddress | address | 委托者的十六进制地址 |
##### 输出参数
| 名称 | 类型 | 描述 |
| --------------- | ------- | --------- |
| withdrawAddress | address | 接收委托奖励的地址 |
### 事件
#### SetWithdrawAddress
| 名称 | 类型 | 索引 | 描述 |
| --------------- | ------- | -- | ----------- |
| caller | address | Y | 调用者(委托者)的地址 |
| withdrawAddress | address | N | 接收委托奖励的地址 |
#### WithdrawDelegatorRewards
| 名称 | 类型 | 索引 | 描述 |
| ---------------- | ------- | -- | ------ |
| delegatorAddress | address | Y | 委托者的地址 |
| validatorAddress | address | Y | 验证者的地址 |
| amount | uint256 | N | 奖励的数量 |
#### WithdrawValidatorCommission
| 名称 | 类型 | 索引 | 描述 |
| ---------------- | ------- | -- | ------ |
| validatorAddress | address | Y | 验证者的地址 |
| commission | uint256 | N | 佣金的总数量 |
## 概览
Stable 通过**系统模块**暴露核心结算行为,以**预编译合约**的形式实现,确保gas效率和可预测的控制。
**主要模块:**
* [银行模块](./bank)
* 处理 USDT 转账、余额记账和托管流程
* [分发模块](./distribution)
* 网络参与者的费用分发和奖励逻辑
* [质押模块](./staking)
* 控制验证者参与和质押(将在主网推出)
**DApps 可以利用内置模块,而不需要重新实现代币或结算逻辑。**
## 质押模块
### 概述
`staking` 预编译合约作为桥梁,使 Stable SDK 的 `x/staking` 模块功能能在 EVM 环境中使用。
### 目录
1. **[概念](#concepts)**
2. **[配置](#configuration)**
3. **[方法](#methods)**
4. **[事件](#events)**
### 概念
在 Stable SDK 的 `x/staking` 模块中,必须在链初始化时注册绑定denomination以进行质押。
验证者和委托者只能使用绑定denomination质押代币。
在 `staking` 预编译合约中,会进行额外检查以确保验证者或委托者是调用者。
### 配置
合约地址和gas费用已预定义。
#### 合约地址
* `0x0000000000000000000000000000000000000800`
### 方法
#### `createValidator`
创建一个验证者。
验证者必须以来自操作员的初始委托创建。
对于潜在的委托者,验证者应提供他们的信息和佣金率计划。
委托者可以通过公开信息和市场机制的自然调节来选择验证者委托他们自己的代币。
当验证者成功注册时,会发出 `CreateValidator` 事件。
##### 输入参数
| 名称 | 类型 | 描述 |
| ----------------- | --------------- | ---------------- |
| description | Description | 验证者的信息 |
| commissionRates | CommissionRates | 验证者奖励质押代币的佣金率 |
| minSelfDelegation | uint256 | 验证者的最小自委托金额 |
| validatorAddress | address | 验证者的地址 |
| pubkey | string | 验证者的公钥 |
| value | uint256 | 最初自委托给验证者的质押代币数量 |
`Description` 是一个包含以下字段的结构:
| 名称 | 类型 | 描述 |
| --------------- | ------ | --------- |
| moniker | string | 验证者的名称 |
| identity | string | 验证者的身份 |
| website | string | 验证者网站的URL |
| securityContact | string | 安全联系信息 |
| details | string | 验证者的额外描述 |
`CommissionRates` 是一个包含以下字段的结构:
| 名称 | 类型 | 描述 |
| ------------- | ------- | ---------------- |
| rate | uint256 | 验证者获得的当前佣金率 |
| maxRate | uint256 | 最大佣金率(不能设置得比这更高) |
| maxChangeRate | uint256 | 验证者一天内可以更改的最大佣金率 |
`rate` 应设置为市场可接受的适当值。
* 如果验证者的佣金率较高,委托者的利润就较低。
* 如果验证者的佣金率较低,验证者的利润就较低,这使得运营变得困难。
由于高 `maxRate` 会让委托者担心验证者意外设置高佣金率,因此应小心设置 `maxRate`。`maxChangeRate` 在初始化后不可更改。
##### 输出参数
| 名称 | 类型 | 描述 |
| ------- | ---- | ---------------- |
| success | bool | 如果验证者成功注册,则为true |
#### `editValidator`
验证者更新其信息。
验证者只能更新除了 `CommissionRates` 结构中不可更改字段(如 `maxRate` 和 `maxChangeRate`)之外的信息。
当验证者成功更新时,会发出 `EditValidator` 事件。
##### 输入参数
| 名称 | 类型 | 描述 |
| ----------------- | ----------- | ------------- |
| description | Description | 验证者的信息 |
| validatorAddress | address | 验证者的地址 |
| commissionRate | int256 | 验证者奖励质押代币的佣金率 |
| minSelfDelegation | int256 | 验证者的最小自委托金额 |
##### 输出参数
| 名称 | 类型 | 描述 |
| ------- | ---- | ---------------- |
| success | bool | 如果验证者成功更新,则为true |
#### `delegate`
委托者设置要委托给验证者的代币数量。
当委托成功完成时,会发出 `Delegate` 事件。
##### 输入参数
| 名称 | 类型 | 描述 |
| ---------------- | ------- | ------------- |
| delegatorAddress | address | 委托者的地址 |
| validatorAddress | address | 验证者的地址 |
| amount | uint256 | 委托给验证者的质押代币数量 |
##### 输出参数
| 名称 | 类型 | 描述 |
| ------- | ---- | --------------- |
| success | bool | 如果委托成功完成,则为true |
##### 事件
`newShares` 表示委托者的所有权比例。
即使委托相同数量的代币,计算出的份额也可能因时间而异。
#### `undelegate`
委托者提取委托给验证者的代币数量。
当取消委托成功完成时,会发出 `Unbond` 事件。
##### 输入参数
| 名称 | 类型 | 描述 |
| ---------------- | ------- | ------------------- |
| delegatorAddress | address | 委托者的地址 |
| validatorAddress | address | 验证者的地址 |
| amount | uint256 | 愿意从验证者那里取消委托的质押代币数量 |
##### 输出参数
| 名称 | 类型 | 描述 |
| ------- | ---- | ----------------- |
| success | bool | 如果取消委托成功完成,则为true |
#### `redelegate`
委托者将委托给验证者的代币数量重新委托给另一个验证者。
当重新委托成功完成时,会发出 `Redelegate` 事件。
##### 输入参数
| 名称 | 类型 | 描述 |
| ---------------- | ------- | ----------- |
| delegatorAddress | address | 委托者的地址 |
| validatorSrc | string | 源验证者的地址 |
| validatorDst | string | 目标验证者的地址 |
| amount | uint256 | 重新委托的质押代币数量 |
##### 输出参数
| 名称 | 类型 | 描述 |
| ------- | ---- | ----------------- |
| success | bool | 如果重新委托成功完成,则为true |
#### `delegation`
返回委托者和验证者之间的委托信息。
如果未找到委托,`shares` 和 `balance` 将为 `0`。
##### 输入参数
| 名称 | 类型 | 描述 |
| ---------------- | ------- | ------ |
| delegatorAddress | address | 委托者的地址 |
| validatorAddress | address | 验证者的地址 |
##### 输出参数
| 名称 | 类型 | 描述 |
| ------- | ------- | -------------------- |
| shares | uint256 | 委托的份额 |
| balance | Coin | 委托代币的数量和denomination |
`Coin` 是一个包含以下字段的结构:
| 名称 | 类型 | 描述 |
| ------ | ------- | --------------- |
| denom | string | 奖励的denomination |
| amount | uint256 | 奖励的数量 |
#### `unbondingDelegation`
返回委托者和验证者之间的解绑委托信息。
如果未找到解绑委托,将返回空的 `UnbondingDelegationOutput`。
##### 输入参数
| 名称 | 类型 | 描述 |
| ---------------- | ------- | ------ |
| delegatorAddress | address | 委托者的地址 |
| validatorAddress | address | 验证者的地址 |
##### 输出参数
| 名称 | 类型 | 描述 |
| ------------------- | ------------------------- | ------- |
| unbondingDelegation | UnbondingDelegationOutput | 解绑委托的信息 |
`UnbondingDelegationOutput` 是一个包含以下字段的结构:
| 名称 | 类型 | 描述 |
| ---------------- | --------------------------- | ------- |
| validatorAddress | address | 验证者的地址 |
| delegatorAddress | address | 委托者的地址 |
| entries | UnbondingDelegationEntry\[] | 解绑委托的条目 |
`UnbondingDelegationEntry` 是一个包含以下字段的结构:
| 名称 | 类型 | 描述 |
| -------------- | ------ | ------- |
| creationHeight | uint64 | 条目的创建高度 |
| completionTime | uint64 | 条目的完成时间 |
| initialBalance | Coin | 条目的初始余额 |
| balance | Coin | 条目的余额 |
#### `validator`
返回验证者信息。
如果未找到验证者,将返回空的 `ValidatorOutput`。
##### 输入参数
| 名称 | 类型 | 描述 |
| ---------------- | ------- | ------ |
| validatorAddress | address | 验证者的地址 |
##### 输出参数
| 名称 | 类型 | 描述 |
| --------- | --------- | ------ |
| validator | Validator | 验证者的信息 |
`Validator` 是一个包含以下字段的结构:
| 名称 | 类型 | 描述 |
| ----------------- | ------- | ------------- |
| operatorAddress | address | 验证者的地址 |
| consensusPubkey | string | 验证者的公钥 |
| jailed | bool | 验证者是否被监禁 |
| status | int32 | 验证者的状态 |
| tokens | uint256 | 委托给验证者的质押代币数量 |
| delegatorShares | uint256 | 委托份额的数量 |
| description | string | 验证者的描述 |
| unbondingHeight | int64 | 验证者解绑的高度 |
| unbondingTime | int64 | 验证者解绑的时间 |
| commission | uint256 | 验证者奖励质押代币的佣金率 |
| minSelfDelegation | uint256 | 验证者的最小自委托金额 |
#### `validators`
返回所有与状态匹配的验证者。
如果未找到验证者,将返回空的 `ValidatorsOutput`。
状态在 `x/staking` 模块中声明,可以是以下之一:
* 0 : "BOND\_STATUS\_UNSPECIFIED", 未指定状态
* 1 : "BOND\_STATUS\_UNBONDING", 验证者正在解绑
* 2 : "BOND\_STATUS\_UNBONDED", 验证者已解绑
* 3 : "BOND\_STATUS\_BONDED", 验证者已绑定
##### 输入参数
| 名称 | 类型 | 描述 |
| ----------- | ------- | ------ |
| status | string | 验证者的状态 |
| pageRequest | PageReq | 分页请求 |
`PageReq` 是一个包含以下字段的结构:
| 名称 | 类型 | 描述 |
| ---------- | ----- | -------- |
| key | bytes | 页面的键 |
| offset | int64 | 页面的偏移量 |
| limit | int64 | 页面的限制 |
| countTotal | bool | 是否计算结果总数 |
| reverse | bool | 是否反转结果 |
##### 输出参数
| 名称 | 类型 | 描述 |
| ------------ | ------------ | ----- |
| validators | Validator\[] | 验证者数组 |
| pageResponse | PageResp | 分页响应 |
`PageResp` 是一个包含以下字段的结构:
| 名称 | 类型 | 描述 |
| ------- | ------ | ------- |
| nextKey | bytes | 页面的下一个键 |
| total | uint64 | 结果的总数 |
#### `redelegation`
返回委托者、源验证者和目标验证者的重新委托信息。
如果未找到重新委托,将返回空的 `RedelegationOutput`。
##### 输入参数
| 名称 | 类型 | 描述 |
| ------------------- | ------- | -------- |
| delegatorAddress | address | 委托者的地址 |
| srcValidatorAddress | address | 源验证者的地址 |
| dstValidatorAddress | address | 目标验证者的地址 |
##### 输出参数
| 名称 | 类型 | 描述 |
| ------------ | ------------------ | ------- |
| redelegation | RedelegationOutput | 重新委托的信息 |
`RedelegationOutput` 是一个包含以下字段的结构:
| 名称 | 类型 | 描述 |
| ------------------- | -------------------- | -------- |
| delegatorAddress | address | 委托者的地址 |
| validatorSrcAddress | address | 源验证者的地址 |
| validatorDstAddress | address | 目标验证者的地址 |
| entries | RedelegationEntry\[] | 重新委托的条目 |
`RedelegationEntry` 是一个包含以下字段的结构:
| 名称 | 类型 | 描述 |
| -------------- | ------ | ------- |
| creationHeight | uint64 | 条目的创建高度 |
| completionTime | uint64 | 条目的完成时间 |
| initialBalance | Coin | 条目的初始余额 |
| balance | Coin | 条目的余额 |
#### `redelegations`
返回委托者、源验证者和目标验证者的所有重新委托。
如果未找到重新委托,将返回空的 `RedelegationResponse` 和 `PageResp`。
##### 输入参数
| 名称 | 类型 | 描述 |
| ------------------- | ------- | -------- |
| delegatorAddress | address | 委托者的地址 |
| srcValidatorAddress | address | 源验证者的地址 |
| dstValidatorAddress | address | 目标验证者的地址 |
| pageRequest | PageReq | 分页请求 |
##### 输出参数
| 名称 | 类型 | 描述 |
| ------------ | ----------------------- | ------- |
| response | RedelegationResponse\[] | 重新委托的信息 |
| pageResponse | PageResp | 分页响应 |
### 事件
#### CreateValidator
| 名称 | 类型 | 索引 | 描述 |
| -------- | ------- | -- | ---------------- |
| valiAddr | address | Y | 验证者的地址 |
| value | uint256 | N | 最初自委托给验证者的质押代币数量 |
#### EditValidator
| 名称 | 类型 | 索引 | 描述 |
| ----------------- | ------- | -- | --------------- |
| valiAddr | address | Y | 验证者的地址 |
| commissionRate | int256 | N | 验证者奖励质押代币的更新佣金率 |
| minSelfDelegation | int256 | N | 验证者的更新最小自委托金额 |
#### Delegate
| 名称 | 类型 | 索引 | 描述 |
| ------------- | ------- | -- | ------------- |
| delegatorAddr | address | Y | 委托者的地址 |
| validatorAddr | string | Y | 验证者的地址 |
| amount | uint256 | N | 委托给验证者的质押代币数量 |
| newShares | uint256 | N | 委托后的委托份额数量 |
#### Unbond
| 名称 | 类型 | 索引 | 描述 |
| -------------- | ------- | -- | --------------- |
| delegatorAddr | address | Y | 委托者的地址 |
| validatorAddr | string | Y | 验证者的地址 |
| amount | uint256 | N | 从验证者取消委托的质押代币数量 |
| completionTime | uint256 | N | 取消委托的完成时间 |
#### Redelegate
| 名称 | 类型 | 索引 | 描述 |
| ------------------- | ------- | -- | ----------- |
| delegatorAddr | address | Y | 委托者的地址 |
| validatorSrcAddress | address | Y | 源验证者的地址 |
| validatorDstAddress | address | Y | 目标验证者的地址 |
| amount | uint256 | N | 重新委托的质押代币数量 |
| completionTime | uint256 | N | 重新委托的完成时间 |
## System Transactions
### 摘要
系统交易为 Stable 协议提供了一种为 Stable SDK 操作发出 EVM 事件的方式。当质押事件(如解绑完成)在 SDK 层发生时,协议会自动生成发出相应事件的 EVM 交易,使这些操作对 EVM 工具和应用程序完全可见。
### 动机
Stable 上的 EVM 用户和应用程序期望通过标准 EVM 接口(如 `eth_getLogs`)监控区块链事件。但关键操作发生在 Stable SDK 模块中,这些模块不会自然地发出 EVM 事件。这造成了可见性差距:EVM dapps 无法轻松跟踪用户的代币何时完成解绑。
系统交易弥合了这一差距。当质押模块完成解绑操作时,Stable 的 x/stable 模块会检测到该事件并生成一个调用 StableSystem 预编译合约(`0x0000000000000000000000000000000000009999`)的系统交易。然后,预编译合约会发出任何 dapp 都可以订阅的适当 EVM 事件。系统交易使用特殊的发送者地址(`0x8888888888888888888888888888888888888888`)运行,只有协议才能使用该地址。这可以防止任何人伪造协议事件,同时保持事件发出在链上的无需信任和可验证性。
### 规范
系统交易通过三个主要组件工作:x/stable 模块的 EndBlocker、PrepareProposal 处理程序和 StableSystem 预编译合约。
#### 架构概述
#### StableSystem 预编译合约
StableSystem 预编译合约位于 `0x0000000000000000000000000000000000009999`,处理需要发出 EVM 事件的协议级操作。目前它支持解绑完成通知。
```solidity
interface IStableSystem {
/// @notice 处理排队的解绑完成并发出 EVM 事件
/// @param blockHeight 处理完成的区块高度
/// @dev 只能由系统交易调用(from = 0x8888888888888888888888888888888888888888)
/// @dev 每次调用最多处理 100 个完成
/// @dev 自动从队列中删除已处理的完成
function notifyUnbondingCompletions(int64 blockHeight) external;
/// @notice 当解绑操作完成时发出
/// @param delegator 委托代币的地址
/// @param validator 代币委托给的验证者地址
/// @param amount 完成解绑的代币数量(以 uusdc 为单位)
event UnbondingCompleted(
address indexed delegator,
address indexed validator,
uint256 amount
);
/// @notice 调用者未授权(不是系统交易发送者)
error Unauthorized();
}
```
#### 系统交易发送者
系统交易使用 `0x8888888888888888888888888888888888888888` 作为发送者地址。该地址:
* 不需要签名验证
* 只能由 PrepareProposal 中创建的交易使用
* 用户或合约无法伪造
* 通过 SystemTxDecorator ante 处理程序跳过费用扣除
EVM 通过检查 `msg.sender == 0x8888888888888888888888888888888888888888` 来识别系统交易。预编译合约可以使用此功能来限制仅协议操作。
#### 事件驱动流程
当用户的解绑期完成时,会发生以下情况:
1. **Stable SDK 层:** 质押模块的 EndBlocker 完成解绑并发出 EventTypeCompleteUnbonding,包含委托者地址、验证者地址和金额。
2. **检测:** x/stable 模块的 EndBlocker 在质押之后运行,并扫描区块事件日志中的解绑事件。每当有代币完成解绑,该模块都将在队列中添加一条记录,包含委托者地址、验证者地址、金额和区块高度。
3. **系统交易生成**:在下一个区块的 PrepareProposal 中,应用程序查询所有排队的完成。如果存在任何完成,它会创建一个调用 StableSystem.notifyUnbondingCompletions(blockHeight) 的系统交易,使用当前区块高度。此交易放在区块前面,在任何用户交易之前。
4. **执行:** 在区块执行期间,系统交易首先运行。预编译合约查询该区块高度排队的完成状态,为每个完成发出一个 UnbondingCompleted 事件(最多 100 个),并从队列中删除它们。
5. **EVM 可见性:** 事件出现在交易收据和日志中,对 eth\_getLogs 查询、区块浏览器和任何监控 StableSystem 预编译合约的应用程序可见。
#### 批处理
为防止区块变得过大,系统每个区块最多处理 100 个解绑完成。如果队列中存在 150 条记录:
* 区块 N:创建处理完成 0-99 的系统交易
* 区块 N+1:创建处理完成 100-149 的系统交易
预编译合约直接查询状态,而不是在 calldata 中接收完成数据。这使交易大小可预测,并将数据从昂贵的 calldata 移动到更便宜的状态读取。
### 使用示例
最常见的用例是需要在解绑期完成时通知用户的质押仪表板。以下是如何设置解绑完成监听器。
```javascript
import { ethers } from 'ethers';
// StableSystem 预编译合约地址
const STABLE_SYSTEM_ADDRESS = '0x0000000000000000000000000000000000009999';
// UnbondingCompleted 事件的 ABI
const STABLE_SYSTEM_ABI = [
'event UnbondingCompleted(address indexed delegator, address indexed validator, uint256 amount)'
];
// 连接到 Stable 网络
const provider = new ethers.JsonRpcProvider('https://rpc.testnet.stable.xyz');
const stableSystem = new ethers.Contract(
STABLE_SYSTEM_ADDRESS,
STABLE_SYSTEM_ABI,
provider
);
// 订阅所有解绑完成
stableSystem.on('UnbondingCompleted', (delegator, validator, amount, event) => {
console.log('解绑完成!');
console.log('委托者:', delegator);
console.log('验证者:', validator);
console.log('金额:', ethers.formatEther(amount), '代币');
console.log('区块:', event.log.blockNumber);
console.log('交易哈希:', event.log.transactionHash);
});
```
此监听器将在任何用户的解绑完成时触发。在生产环境中部署 dApp 时需要过滤特定用户的事件。
#### 过滤特定用户的事件
要仅接收特定委托者地址的事件,请使用索引事件参数创建过滤器:
```javascript
// 仅监视特定用户的解绑
const userAddress = '0xabcd...';
const filter = stableSystem.filters.UnbondingCompleted(userAddress);
stableSystem.on(filter, (delegator, validator, amount, event) => {
// 这仅针对指定用户的解绑触发
showNotification(`您的 ${ethers.formatEther(amount)} 代币解绑完成!`);
refreshUserBalance(userAddress);
});
```
如果您正在构建特定于验证者的仪表板,您还可以按验证者过滤:
```javascript
// 监视来自特定验证者的所有解绑
const validatorAddress = '0x1234...';
const validatorFilter = stableSystem.filters.UnbondingCompleted(null, validatorAddress);
stableSystem.on(validatorFilter, (delegator, validator, amount) => {
updateValidatorStats(validator, amount);
});
```
#### 查询历史事件
如果您的 dApp 需要显示过去解绑完成的历史记录,您可以使用带有区块范围的事件过滤器查询历史事件:
```javascript
// 获取用户在最近 1000 个区块中的所有解绑
const currentBlock = await provider.getBlockNumber();
const filter = stableSystem.filters.UnbondingCompleted(userAddress);
const events = await stableSystem.queryFilter(
filter,
currentBlock - 1000,
currentBlock
);
const unbondingHistory = events.map(event => ({
delegator: event.args.delegator,
validator: event.args.validator,
amount: ethers.formatEther(event.args.amount),
blockNumber: event.blockNumber,
txHash: event.transactionHash
}));
console.log('最近的解绑:', unbondingHistory);
```
### 集成指南
#### 步骤 1:添加 Stable System 合约接口
首先,将 StableSystem 预编译合约接口添加到您的项目中。如果您使用 Foundry 或 Hardhat,请创建一个新的接口文件:
```solidity
interface IStableSystem {
event UnbondingCompleted(
address indexed delegator,
address indexed validator,
uint256 amount
);
}
```
如果您正在构建一个没有 Solidity 合约的纯前端 dApp,您只需要事件的 ABI 片段:
```javascript
const STABLE_SYSTEM_ABI = [
'event UnbondingCompleted(address indexed delegator, address indexed validator, uint256 amount)'
];
```
#### 步骤 2:设置事件监听器
初始化您的 ethers.js provider 并创建指向 StableSystem 预编译合约地址的合约实例。预编译合约始终部署在 Stable 测试网和主网的 `0x00000000000....0000009999`。
*注意:预编译合约尚未部署在 Stable 主网上,将在 v1.2.0 升级后提供。*
```javascript
const provider = new ethers.JsonRpcProvider(RPC_URL);
const stableSystem = new ethers.Contract(
'0x0000000000000000000000000000000000009999',
STABLE_SYSTEM_ABI,
provider
);
```
#### 步骤 3:在应用程序逻辑中处理事件
订阅事件并相应地更新应用程序状态。常见模式包括:
* **余额更新**:当解绑完成时,刷新用户的代币余额
* **通知系统**:在用户的解绑完成时显示 toast 通知
* **仪表板统计**:实时更新质押指标和图表
* **交易历史**:将已完成的解绑添加到用户的活动源
#### 步骤 4:处理连接问题
由于事件订阅依赖于持久的 websocket 连接,因此为生产 dApp 实现重新连接逻辑:
```javascript
let reconnectAttempts = 0;
const MAX_RECONNECT_ATTEMPTS = 5;
function setupEventListener() {
const provider = new ethers.WebSocketProvider('wss://rpc.testnet.stable.xyz');
provider.on('error', (error) => {
console.error('Provider 错误:', error);
if (reconnectAttempts < MAX_RECONNECT_ATTEMPTS) {
reconnectAttempts++;
setTimeout(() => setupEventListener(), 5000);
}
});
const stableSystem = new ethers.Contract(
'0x0000000000000000000000000000000000009999',
STABLE_SYSTEM_ABI,
provider
);
stableSystem.on('UnbondingCompleted', handleUnbonding);
}
```
### 为什么采用这种方法?
#### 与自定义索引器相比
以前,Stable SDK 要求 dApp 开发人员运行自定义索引器,监视 SDK 事件并将它们存储在数据库中。这增加了操作开销并引入了潜在的故障点。
使用系统交易,无需单独的索引器基础设施。EVM 的日志系统原生支持这类事件,每个 RPC 节点都已经索引和提供。任何标准 web3 库都可以订阅这些事件,无需额外工具。
#### 与轮询 SDK 端点相比
没有系统交易,EVM dApps 需要定期调用 Stable SDK REST 端点来检查解绑期是否已完成。这会产生几个问题:
* **延迟增加**:5-10 秒的轮询间隔意味着用户可能需要等待那么长时间才能看到更新
* **更高的负载**:每个 dApp 实例轮询端点都会增加 RPC 基础设施的负载
* **复杂性**:dApps 需要同时处理 web3 提供程序(用于 EVM 交互)和 Stable SDK REST 客户端(用于 SDK 查询)
* **无实时更新**:轮询本质上无法提供即时通知
系统交易通过 dApps 已经用于 EVM 交互的相同 websocket 连接提供实时事件通知。这简化了开发人员体验并降低了基础设施成本。
### 安全保证
#### 无需信任的事件发出
系统交易在 `PrepareProposal` ABCI 阶段创建,只有验证者才能执行。用户提交的交易无法伪造系统发送者地址(`0x8888888888888888888888888888888888888888`),因为 EVM 的状态转换逻辑强制只有到 StableSystem 预编译合约地址的交易才能跳过签名验证。
这意味着:
* 用户无法伪造解绑完成事件
* 用户无法从自己的交易中调用 `notifyUnbondingCompletions`
* 发出 `UnbondingCompleted` 事件的唯一方法是在 Stable SDK 质押模块中实际完成解绑
#### 无额外信任假设
系统交易不会引入超出区块链共识已经需要的新安全假设。如果您相信验证者正确执行区块,您就可以相信系统交易事件准确反映了 Stable SDK 状态变化。
事件发出过程是确定性的:给定 `EndBlock` 中相同的 SDK 事件,所有诚实的验证者将在 `PrepareProposal` 期间产生相同的系统交易。共识机制确保验证者就包含哪些系统交易达成一致。
#### 区块最终性
Stable 区块链通过 StableBFT 的共识机制使用快速最终性。一旦提交了一个区块,它就会立即最终化,无法重组。这意味着一旦您收到 `UnbondingCompleted` 事件,您就可以相信它是永久的。
不需要像在概率最终性链上那样等待多个确认。dApps 可以在收到事件后立即更新用户余额并显示通知。
### 性能和限制
#### 批处理大小约束
每个区块通过系统交易最多处理 100 个解绑完成。此限制存在是为了防止在解绑活动高峰期间区块大小无限制。
在实践中,假设平均区块时间为 0.7 秒,每个区块 100 个完成提供了约 9000 个完成/分钟的吞吐量。正常的质押活动很少达到此限制。在特殊情况下,完成可能会在完全处理之前排队几个区块。
#### Gas 消耗
系统交易在执行期间消耗 gas,这在区块的 gas 限制中计算。gas 成本与正在处理的完成数量成线性比例:
* 基本函数调用:约 21,000 gas
* 每个事件发出:约 3,000 gas
* 读取状态:每个完成约 2,000 gas
100 个完成的完整批次消耗大约 521,000 gas。由于 Stable 的区块 gas 限制为 100,000,000,这代表不到 0.6% 的可用区块空间。
#### 通知延迟
当解绑期在区块 N 期间完成时:
1. Stable 模块的 `EndBlock` 在区块 N 的状态中排队完成
2. 区块 N+1 的 `PrepareProposal` 创建系统交易
3. 系统交易在区块 N+1 期间执行,发出事件
这意味着解绑完成和发出 EVM 事件之间存在一个区块的延迟(大约 0.7 秒)。对于大多数用例,此延迟是可以接受的,因为解绑期本身为 7 天。
#### 高负载场景
如果解绑完成的到达速度快于每个区块 100 个,它们会在队列中累积。队列按 FIFO 顺序处理,因此最旧的完成始终首先通知。
在持续的高负载期间,队列可能会暂时增长。但是,一旦高峰消退,完成较少的后续区块将逐渐排空队列。该系统旨在处理突发而不丢失事件。
### 未来扩展
系统交易机制为将任何 Stable SDK 操作桥接到 EVM 事件空间提供了通用模式。虽然目前仅用于解绑完成,但该架构可以扩展以涵盖其他用例:
#### 质押操作
除了解绑之外,其他质押事件可以发出 EVM 通知:
* 验证者的佣金率变化
* 验证者入狱和出狱
#### 治理执行
当治理提案通过并执行时,系统交易可以发出带有提案 ID 和执行结果的事件。这将允许 dApps 对参数变化或升级做出反应,而无需轮询治理模块。
#### 通用事件桥
该模式可以推广为可配置的事件桥,其中每个模块注册哪些 SDK 事件应该镜像到 EVM。这将提供对所有 Stable SDK 操作的全面可见性,而无需每个模块的自定义逻辑。关键架构原则是系统交易仍然是协议级功能,仅由验证者在区块提案期间创建。
## 核心功能
Stable 是一条高性能区块链,专为支持 USDT 相关活动而设计。基于 **委托权益证明(dPoS)** 机制构建,Stable 实现了 **完全兼容 EVM**,并达成 **亚秒级出块时间**,确保交易快速可靠地达成最终性。作为一个 **专注于 USDT 的网络**,Stable 提供了一系列优化用户体验的 USDT 专属功能。
主要功能包括:
* **亚秒级交易最终性**:实现亚秒级出块和单轮次最终确认
* **100% EVM 兼容性**:支持所有 Ethereum 工具和智能合约
* **USDT 作为 Gas 代币**:USDT0 作为其原生 Gas 代币。USDT0 同时作为用于支付 Gas 和进行价值转移的原生资产,并作为支持 `approve`、`transfer`、`transferFrom` 和 `permit` 的 ERC20 代币。
* **USDT0 跨链转移**:支持从包括 Ethereum、Arbitrum、HyperEVM 等 EVM 区块链,以及 Tron 等其他区块链通过跨链桥转移 USDT0
* **Stable Pay 提供 Web2.5 用户体验**:通过 Stable Pay 实现无缝的链上交互体验
未来,Stable 还将推出更多功能,以进一步提升 USDT 的可用性和网络效率。其中包括 **USDT Transfer Aggregator(USDT 转账聚合器)**,可将多个 USDT 转账打包为单一交易以提升处理效率;以及 **企业专用区块空间 Enterprise Blockspace**,为机构用户提供可预测、稳定的 USDT 使用环境。
## 技术概览
从状态数据库、执行引擎、共识机制,到针对 USDT 的特定优化,Stable 的设计始终聚焦于性能、可扩展性与可靠性。技术栈中的每一层组件都经过专门优化,以支持高吞吐的工作负载和无缝的 USDT 原生操作。
### StableBFT
Stable 区块链最初采用 **StableBFT** —— 基于 CometBFT 构建的定制化 PoS 共识协议,确保网络具备高吞吐、低延迟和强健的可靠性。为了进一步优化共识性能,Stable 计划拆解数据传播与共识流程,并实现面向区块提议者的交易直接广播机制。
Stable 还计划将协议升级为基于有向无环图(DAG)的 **Autobahn** 架构。在 Autobahn 上构建的 StableBFT 将带来:
* 消除单领导瓶颈,实现提议过程的并行化;
* 通过将数据传播与排序拆解,加快最终性的达成速度;
* 借助增强的 BFT 机制提升对网络异常的鲁棒性。
### Stable EVM
**Stable EVM** 是 Stable 的以太坊智能合约的兼容执行层,支持用户通过现有的以太坊工具和钱包(如 MetaMask)与链进行交互。为打通 Stable EVM 与 StableSDK 的能力边界,同时 Stable EVM 引入一系列 预编译合约,允许 EVM 智能合约安全且原子性地调用Stable底层接口。
Stable 计划通过引入 **StableVM++** 来进一步提升 EVM 执行性能,该模块集成了如 EVMONE 等替代 EVM 实现,以及基于 Block-STM 的 **Optimistic并行执行引擎(OPE)**。
### StableDB
**状态:v1.4.0 升级时上线**
Stable 通过解决区块执行后低效的磁盘存储这一主要瓶颈,显著提升了处理速度。它将状态提交与存储操作进行拆解,使得新区块能在无需等待数据存储的情况下迅速处理。同时,结合 `MemDB` 与 `VersionDB`,并使用 `mmap`(内存映射)技术,实现近期数据驻留内存、历史数据高效存储,大幅提升整体吞吐量。
### 高性能 RPC
即使底层区块链再快,如果 RPC 反应速度缓慢,用户体验仍会大打折扣。Stable 通过彻底重构传统 RPC 架构来解决这一问题。传统的单一 RPC 模式存在资源竞争严重、扩展性差等问题,而 Stable 引入了 **路径分离架构(split-path architecture)**,根据不同功能将操作分离,部署轻量化、专业化的 RPC 节点以实现更快速响应。
未来计划包括为 EVM `view` 调用优化的专用 RPC 节点,以及原生集成索引器(indexer)以进一步加速 dApp 数据访问。
## 隐私转账(Confidential Transfer
随着区块链在企业中的应用不断加速,尤其是在稳定币领域,**对交易隐私的需求日益增长**。许多企业在处理财务操作时需要保持隐私性,以保护如付款金额等敏感信息。为满足这一需求,Stable 正在开发**隐私转账(Confidential Transfer)功能**,以在隐私保护与监管合规之间实现平衡。
Stable 利用零知识加密(Zero-Knowledge Cryptography, 简称 ZK)技术,构建了一个**隐私转账层(Confidential Transfer Layer)**,使交易双方可以在不公开链上交易金额的前提下完成代币转账。在此机制下:
* **交易金额将被加密隐藏**,而非直接记录在链上。
* **发送方和接收方地址依然公开可见**,以便于遵守金融监管和审计要求。
这种设计保证了:**交易金额仅对交易参与方和授权的监管审计方可见**,在保护用户隐私的同时,也不牺牲法律合规性。
在当前业界的实现中,Solana 的 Confidential Transfer 模型被认为是该功能的有力候选方案之一。然而,Stable 仍在积极探索其他架构,力求找到最具可行性和可扩展性的解决方案。
最终选定的方案将必须契合 Stable 的核心使命:**为企业提供安全、合规且具备企业级可靠性的区块链基础设施**。
## 保证区块空间(Guaranteed Blockspace)
### 企业需要稳定的支付基础设施
随着稳定币的持续发展,越来越多的企业将其纳入财务操作中,例如支付、资金调拨和跨境结算。这一趋势在那些获取稳定法币受限的地区尤为明显。在非洲、拉丁美洲等通货膨胀严重、货币管控严格的市场,稳定币正逐渐成为这些地区企业持续运营的关键工具。
当前,大部分稳定币交易发生在通用型公链上,例如 Ethereum、Solana 和 Tron。这些网络虽提供了高可组合性和智能合约支持,但它们并未针对**费用可预测性**或**执行确定性**进行专门设计。
* **Ethereum**:2022 年 5 月 1 日,Yuga Labs 的 “Otherside” NFT 铸造事件在 Ethereum 上燃烧了超过 2 亿美元的 Gas 费,峰值 Gas 价格超过 8,000 gwei,造成整个网络交易费用剧烈波动,缺乏可预测性。
* **其他区块链网络**:在 Solana 和 Base 等低费用网络中,由于存在 MEV 和套利机会,激励机制导致大量交易垃圾(spam)泛滥。自动化机器人频繁向链上提交交易以从中捕获价值,从而造成网络拥堵,影响真实用户的正常使用。

*来源:Flashbots 与 Robert Miller 联合发布的《MEV 与扩容的极限》报告*
若企业要大规模采用稳定币进行支付,其底层基础设施必须具备**支付可靠性**。这意味着必须在任何网络条件下都能提供可预测的交易速度与稳定的交易费用。否则,基于通用区块链的稳定币支付将难以满足企业级应用的要求。
### 保证区块空间(Guaranteed Blockspace)
为保障企业支付操作的稳定性与可靠性,Stable 将推出 **保证区块空间(Guaranteed Blockspace)** 支持。
保证区块空间(Guaranteed Blockspace) 是一种**专属的区块容量分配机制**,旨在为企业客户预留固定比例的区块空间,无论网络整体负载如何。关键性的交易(如工资发放、结算清算、供应商支付)都可在可预测的交易时间与成本下完成执行。
该机制通过以下方式实现:
* **专属内存池(Guaranteed Mempool)**:验证节点会从独立的企业交易内存池中提取优先级高的交易,避免与一般交易争夺资源。
* **验证节点级别的处理流程**:每个验证节点为企业用户预留固定比例的区块空间,确保这类交易能以高确定性地被包含进块中。
* **专属 RPC 服务**:企业级 API 会通过独立的 RPC 服务器发送交易,减少资源争抢,提升吞吐稳定性。
保证区块空间为商业用户带来以下优势:
* **专属交易通道**:通过独立的交易传输路径,确保交易享有优先访问专属区块空间的权限。
* **交易执行保障**:即使在高负载网络条件下,每个区块内都能确保企业交易的优先执行权。
* **保持网络去中心化特性**:不影响验证节点的开放性或网络参与者的操作自由。
* **关键操作的链上性能保障**:即使网络拥堵,企业的关键链上交易依旧可以保持可靠、高效运行。
## 概览
### USDT 专属功能
Stable 是一条专为 USDT 打造的 Layer 1 区块链网络。协议的每一个组件都围绕 USDT 的无摩擦转账进行优化,致力于为全球最广泛使用的稳定币提供一个高性能、简洁流畅的运行环境。
除了核心基础设施外,Stable 还提供一系列 USDT 专属功能,进一步提升整体用户体验:
* **USDT 作为 Gas Token**:USDT0 作为其原生 Gas 代币。USDT0 同时作为用于支付 Gas 和进行价值转移的原生资产,并作为支持 `approve`、`transfer`、`transferFrom` 和 `permit` 的 ERC20 代币。
* **保证区块空间(Guaranteed Blockspace)**:保证区块空间是一种专为企业客户设计的区块容量分配模型,可保证其在任何网络条件下都拥有固定份额的区块资源,实现确定性延迟与费用。
* **USDT0 转账聚合器(Transfer Aggregator)**:通过隔离并聚合 USDT0 转账交易,实现极致吞吐量的同时,确保公平性且不影响其他交易类型。
* **隐私转账(Confidential Transfer)**:Stable 计划采用零知识加密(ZK Cryptography)实现加密的 USDT 转账。交易金额将在链上隐藏,同时保留发送方与接收方地址公开,以满足合规审计需求。
## USDT as Gas
Stable 是围绕 USDT 稳定币构建的。USDT0 是 USDT 的原生跨链版本,是支撑 Stable 生态系统的核心资产。
### 摘要
Stable 是一个使用 USDT0 作为原生 Gas 代币的 EVM 兼容区块链。USDT0 同时作为 Gas 支付和价值转移的原生资产,以及支持 `approve`、`transfer`、`transferFrom` 和 `permit` 的 ERC20 代币。
这种设计让交易成本可预测并以美元计价,简化了用户体验。然而,它引入了与以太坊不同的行为差异,影响余额语义、授权安全性和某些操作码假设。
本文档指定了 Stable 的 USDT0 Gas 机制,描述了由此产生的行为差异,并定义了在 Stable 上部署的智能合约所需和推荐的开发模式。
### 版本说明
随着 Stable v1.2.0,USDT0 成为 Stable 上的原生 Gas 代币,取代了 gUSDT。作为此过渡的一部分:
* gUSDT 即将下线。
* 现有的 gUSDT 余额会自动转换为 USDT0。
* 用户和应用程序不再需要封包和解包代币来支付费用或转移价值。
在 v1.2.0 之后,USDT0 同时作为:
* 网络费用资产(gas),以及
* 具有 `approve`、`permit`、`transfer` 和 `transferFrom` 的标准 ERC20 代币。
### 网络地址
USDT0 代币合约地址:
* 测试网:[0x78cf24370174180738c5b8e352b6d14c83a6c9a9](https://testnet.stablescan.xyz/token/0x78cf24370174180738c5b8e352b6d14c83a6c9a9)
* 主网:[0x779ded0c9e1022225f8e0630b35a9b54be713736](https://stablescan.xyz/token/0x779ded0c9e1022225f8e0630b35a9b54be713736)
### 术语
* **Stable**:一个 EVM 兼容的区块链,其中 USDT0 是原生 Gas 代币。
* **USDT0**:USDT 的原生跨链版本,同时作为:
* 用于 Gas 和价值转移的原生资产,以及
* 具有授权和许可语义的 ERC20 代币。
* **原生余额**:由 `address(x).balance` 返回的余额,以 USDT0 计价。
* **Gas 费**:在 EIP-1559 式费用市场下计算的以 USDT0 支付的交易费用。
### 什么是 USDT0?
USDT0 是使用 LayerZero 的全链可替代代币 (OFT) 标准的 USDT 的原生跨链版本。USDT0 与 USDT 1:1 锚定,旨在跨多个区块链移动,而无需传统的桥接工作流程或封包表示。
在跨链转移 USDT0 时,代币在某些源链上被锁定(取决于链的原生 USDT 支持)或销毁,然后通过 LayerZero 的跨链消息在目标链上铸造。这保持了 1:1 锚定,同时将流动性整合到单个可互操作的资产中,而不是分散的链本地池。
对于用户,这可以实现更快的入门、降低的操作复杂性和改进的流动性流动性。
### USDT0 和 Stable
USDT0 是支撑 Stable 链上经济和日常使用的核心资产。由于同一资产用于支付费用和转移价值,Stable 减少了以下方面的摩擦:
* **普通用户**:更简单的入门和更少的代币概念
* **开发人员**:更简单的费用和价值流
* **企业**:简化的会计和财务运营
Stable 还可以通过允许用户通过 LayerZero 从其他网络入门 USDT0 来从第一天开始访问深度 USDT 流动性。
### 假设和先决条件
对于以下内容,读者应该理解:
* Solidity 执行语义和原生价值转移
* ERC20 授权机制和许可流程
* 标准智能合约安全模式,包括 Checks-Effects-Interactions
### 1. Gas 和费用模型
#### 1.1 概述
Stable 以 USDT0 计价所有交易费用。Gas 定价遵循 EIP-1559 式模型,具有动态调整的基础费用。
交易费用定义为:
```
fee = gasUsed × baseFee
```
交易可以使用标准 EIP-1559 参数指定 `maxFeePerGas`。
*注意:Stable 不支持优先小费。不要设置 `maxPriorityFeePerGas`,否则小费金额将丢失。*
#### 1.2 交易提交
客户端应从最近的区块获取最新的基础费用,并在计算 `maxFeePerGas` 时包含安全边际。
示例(说明性):
```javascript
const block = await provider.getBlock("latest");
const baseFee = block.baseFeePerGas;
const maxPriorityFeePerGas = 1n;
const maxFeePerGas = baseFee * 2n + maxPriorityFeePerGas;
```
#### 1.3 获取 USDT0
账户通过以下方式获取 USDT0:
* 从其他支持的链桥接 USDT0
* 从 Stable 上的其他账户接收转账
### 2. Stable 如何启用 USDT0 作为 Gas 代币
Stable 使用预扣费和退款结算模型在 USDT0 中收取 Gas 费。
#### 示例交易
Alice 向 Bob 发送 100 USDT0。
#### 2.1 Ante-handler 阶段
在 `MonoEVMAnteHandler` 中的交易验证期间:
1. 读取 Alice 的 USDT0 余额。
2. 协议验证 Alice 可以覆盖:
* 交易价值(100 USDT0),以及
* 最大可能的 Gas 费(`gasWanted × fee`)。
3. 预先转移最大 Gas 费:
* `alice → fee_collector` 以 USDT0。
#### 2.2 执行阶段
在 `ApplyTransaction` 期间:
1. EVM 执行交易。
2. 记录实际 Gas 消耗。
3. 应用价值转移:
* `alice → bob` 转移 100 USDT0。
#### 2.3 结算阶段
执行后:
1. 协议计算预扣费的未使用部分:
```
refund = (gasWanted − gasUsed) × baseFee
```
2. 退还未使用的费用:
* `fee_collector → alice` 以 USDT0。
### 3. 余额语义和行为差异
#### 3.1 原生余额可变性
在以太坊上,合约的原生余额通常仅因合约执行而改变。
在 Stable 上,合约的原生 USDT0 余额也可能由于基于 ERC20 授权的操作而改变,包括 `transferFrom` 和 `permit`。这些操作可以在不调用任何合约代码的情况下减少合约的原生余额。
因此,以下假设在 Stable 上无效:
* 合约的原生余额只能在合约被调用时减少。
### 4. 合约设计要求
#### 4.1 禁止模式:镜像余额会计
合约不得依赖内部变量来镜像原生余额。
不安全模式的示例:
```solidity
uint256 public deposited;
function deposit() external payable {
deposited += msg.value;
}
```
如果通过基于授权的转移耗尽 USDT0,此类变量可能与实际原生余额不同。
#### 4.2 必需模式:实际余额偿付能力检查
所有原生价值转移必须在转移之前立即使用 `address(this).balance` 验证偿付能力。
示例:
```solidity
require(address(this).balance >= amount, "insufficient balance");
```
提款必须遵循 Checks-Effects-Interactions 顺序:
```solidity
uint256 amount = credit[msg.sender];
credit[msg.sender] = 0;
require(address(this).balance >= amount);
payable(msg.sender).call{value: amount}("");
```
#### 4.3 状态进展必须独立于余额
依赖进展、里程碑或完成条件的协议逻辑必须使用非余额状态变量(如计数器或纪元)显式跟踪这些内容。
原生余额只能在支付时用于偿付能力验证。
#### 4.4 授权暴露
托管用户资金的合约不应向外部地址授予 USDT0 授权。
如果无法避免授权,合约应:
* 仅批准确切金额
* 使用后立即重置授权
* 将余额排空风险视为已知限制
### 5. 地址状态假设
#### 5.1 EXTCODEHASH
合约不得依赖 `EXTCODEHASH(addr) == 0x0` 来推断地址从未被使用过。
任何地址使用的概念都必须在合约状态中显式跟踪。
示例:
```solidity
mapping(address => bool) public used;
```
### 6. 零地址处理
在 Stable 上:
* 向 `address(0)` 的原生 USDT0 转移会回滚。
* 向 `address(0)` 的 ERC20 USDT0 转移也会回滚。
没有通过转移到零地址来销毁 USDT0 的支持机制。
合约必须:
* 明确拒绝 `address(0)` 作为接收者
* 重新设计任何假设零地址销毁的逻辑
* 如果需要不可逆丢失语义,请使用显式接收合约
### 7. 测试要求
Stable 部署的测试套件应包括:
* 基于授权的排空场景(`approve` + `transferFrom`)
* 使用实际原生余额的偿付能力执行
* 不依赖 `EXTCODEHASH` 的地址使用逻辑
* 零地址转移的显式失败情况
### 8. 迁移检查清单
将合约从以太坊移植到 Stable 时:
* 删除内部原生余额镜像
* 用 `address(this).balance` 替换所有偿付能力检查
* 删除所有到 `address(0)` 的原生或 ERC20 转移
* 审计所有 USDT0 批准
* 添加涵盖许可和基于授权流程的测试
### 9. 总结
Stable 使用 USDT0 作为 Gas 代币提供了可预测的费用和统一的价值会计,同时改变了关于原生余额行为的核心假设。
Stable 上的正确合约设计需要:
* 将 USDT0 视为双重角色资产
* 针对实际余额执行偿付能力
* 避免基于授权的余额排空
* 消除对以太坊特有的余额及地址假设的依赖
### 常见问题
**我们现在使用 USDT0 作为封包的原生代币。升级后,哪个代币应该被视为封包的原生代币?**
升级后,USDT0 既是原生代币又是 ERC-20 代币。您应该直接使用 USDT0,不再需要封包或解包。
**原始的 USDT0 合约地址(`0x779Ded0c9e1022225f8E0630b35a9b54bE713736`)会发生什么变化?**
没有任何变化。相同的地址仍然有效并继续代表 USDT0。
**升级后,原生代币地址是 `0x779Ded0c9e1022225f8E0630b35a9b54bE713736`(而不是 `0x0000000000000000000000000000000000001000`)吗?**
是的。升级后,原生代币标识符/地址是 `0x779Ded0c9e1022225f8E0630b35a9b54bE713736`。
**那么 `0x0000000000000000000000000000000000001000` 呢?它还会作为 gUSDT 的代币地址使用吗,我们应该保留它吗?**
不会。您可以删除它。升级后将不再使用它。
**对于 DEX calldata,协议是否会停止使用 `0x0000000000000000000000000000000000001000` 作为"原生代币"标识符,而改用 `0x779Ded0c9e1022225f8E0630b35a9b54bE713736`?**
正确。升级后,DEX 应使用 `0x779Ded0c9e1022225f8E0630b35a9b54bE713736` 作为原生代币标识符。
## USDT 转账聚合器
作为一条专为 USDT 交易优化的区块链,Stable 被设计用于处理极高频次的代币转账,同时保持系统的整体响应。为了在优化 USDT 特定性能的同时兼顾一般交易的多样性,Stable 引入了 USDT 转账聚合器机制。这是一种高效、可扩展的解决方案,可对 USDT0 转账进行高度并行化和容错处理。
### 为什么需要 USDT 转账聚合器?
支持大规模 USDT 使用的挑战在于如何同时优化吞吐量和保持不同交易处理的公平性:
* 传统的 ERC20 代币转账按顺序处理,在高交易负载下成为性能瓶颈。
* 如果仅优先考虑 USDT 的吞吐量,可能会排挤其他交易,导致整条链的性能下降。
USDT 转账聚合器通过将 USDT 转账隔离优化,避免影响执行流程中的其他部分,从而解决了这一矛盾。
### 并行聚合与验证
> *以下内容基于当前战略规划,属于前瞻性设计。随着经验积累和优先级调整,路线图可能会有所更新。*
聚合系统的核心是一个可并行化的聚合与验证管道,灵感来自 `MapReduce` 计算模型。系统不再按顺序处理每一笔转账,而是以批次为单位,聚合所有账户的输入输出后,再统一进行余额更新。
#### 关键流程
1. **账户差异聚合(Aggregate Account Diffs)**
* 每笔转账都映射到发送方与接收方。
* 为每个账户生成一个差异日志(diff journal),代表该账户的净变化:
* 发送总额为负值。
* 接收总额为正值。
2. **余额验证**
* 系统确保全局余额守恒:总输入等于总输出。
* 每个账户的净变动通过并行方式独立验证资金是否充足。
* 资金不足的账户将被标记,但不会影响该批次执行。
3. **MapReduce 并行模型**
* **Map 阶段**:根据所有收支转账计算每个账户的净变化值。
* **Reduce 阶段**:聚合这些变化以确定最终状态更新。
### 技术亮点
#### 并行计算模型
* 利用预编译合约实现余额校验与差异计算的并行处理。
* 相比传统的串行 ERC20 执行,大幅减少执行时间。
#### 依赖关系分析
* 识别转账之间的依赖关系(如多个发送来自同一账户)。
* 预先标记高风险转账(如可能余额不足),以减少级联失败。
#### 模块化故障处理
* 转账在账户级别上被隔离,只有出现问题的账户会被影响。
* 无冲突的转账将正常执行与确认,不受影响。
#### 选择性失败处理
传统的转账处理在一个区块中通常是“要么全部成功,要么全部失败”。Stable 的聚合模型引入了更精细的账户级失败隔离机制:
* 若某账户的 `当前余额 + 净变化 < 0`,系统只标记该账户的转账失败。
* 涉及其他账户的转账将正常继续执行。
* 此选择性回滚机制确保无效或恶意转账不会破坏整个批次的完整性。
### 提议者驱动或声誉排序机制
为进一步优化执行并避免状态冲突,Stable 对聚合转账引入预处理排序机制:
* **基于声誉的排序**:拥有良好交易历史或信誉的账户优先执行,降低失败率与重新排序成本。
* **提议者排序**:可信提议者节点可根据依赖关系排序交易,减少冲突并提高吞吐。
* **聚合转账优先执行**:聚合后的 USDT 转账优先于一般交易执行,减少依赖冲突,释放执行空间。
Stable 的 USDT 转账聚合器机制是一项针对性优化,能够在不影响通用交易处理性能的前提下,最大化 USDT0 转账的吞吐量。通过结合并行执行、模块化失败处理与智能排序策略,Stable 为以稳定币驱动的经济体提供了高扩展性的基础架构,使快速、频繁、无摩擦的代币转账成为常态。
## Consensus
### StableBFT 共识机制
在初始阶段,Stable 区块链采用 **StableBFT**,这是一个基于 CometBFT 定制的权益证明(PoS)共识协议,旨在确保网络具备高吞吐量、低延迟和高鲁棒性。其主要优势包括高确定的最终确定性以及强大的容错能力(即便有 1/3 验证者失效或作恶,网络仍可保持安全)。
为进一步提升共识性能,Stable 计划在不久的将来对共识相关的两层机制进行优化:
* **交易传播与共识传播拆解**:通过将交易 gossip 层与共识 gossip 层分离,防止交易层的网络拥塞影响到共识通信,提升系统稳定性。
* **交易直接广播至区块提议者**:当前模型中,交易在节点间通过点对点 gossip 传播,造成区块链网络中有大量的交易相关流量传输。Stable 计划引入直接广播机制优化这个机制,使交易可直接发送给区块提议者,从而提高交易传播效率。
### 未来规划:基于 DAG 的共识机制
为大幅提升共识效率,Stable 计划将其协议升级为基于 DAG(有向无环图)的设计,预期带来 5 倍的性能提升。
传统的基于视图的 BFT 协议(如 PBFT 和 HotStuff)在网络稳定时可实现低延迟,但在发生网络中断时性能急剧下降,恢复时间较长。
第一代 DAG 引擎如 Narwhal 和 Tusk 表明将数据传播与共识排序拆解可以消除单一提议者瓶颈,并在网络不稳定时提升鲁棒性。然而,这类架构与 CometBFT 系统不直接兼容,因为它们偏离了传统的基于区块高度的开发习惯和内存池(mempool)设计。
[Autobahn](/cn/architecture/core-optimization/appendix/autobahn) 提供了一种 PBFT-on-DAG 架构,能更好与 Stable 的共识层集成,既能在正常网络条件下实现低延迟,也能在网络故障时快速恢复。Stable 团队与 Autobahn 论文作者保持紧密合作,并将利用 Autobahn 架构提升 StableBFT 的性能。
基于 Autobahn 架构构建的 StableBFT 将带来以下能力:
* 消除单一领导者限制,实现并行处理。
* 将数据传播与最终排序分离,实现更快的最终确定性。
* 借助强大的 BFT 机制,在网络异常条件下增强系统的处理弹性。
这一先进的共识设计已通过内部原型验证,在受控环境下实现超过 **200,000 TPS(仅共识层)** 的高吞吐表现。
## 执行层
### Stable EVM
**Stable EVM** 是 Stable 区块链的以太坊虚拟机兼容执行层,使用户能够通过现有的以太坊工具和钱包(如 MetaMask)无缝与链进行交互。Stable EVM 结合了 EVM 的开发体验与 StableSDK 的模块化、高性能基础设施。
Stable 的以太坊兼容执行层,支持使用现有的以太坊工具与钱包无缝交互。同时 Stable EVM 引入一系列 预编译合约,允许 EVM 智能合约安全且原子性地调用Stable底层接口。通过这种设计,智能合约可执行包括代币转账、质押、参与治理等特权操作。
### 未来路线图一:Optimistic并行执行(OPE)
传统区块链系统依赖顺序执行机制,逐个处理交易以确保所有节点的一致状态。虽然这种方式保证了确定性,但极大限制了吞吐量和可扩展性,尤其在现代区块链需要支持每秒成千上万笔交易时更为突出。
为突破此瓶颈,Stable 将采用 **Block-STM**,一种已验证的并行执行引擎,支持 **Optimistic并行执行(Optimistic Parallel Execution,简称 OPE)**,允许在保证确定性的前提下并行处理交易,显著提升性能。
#### Block-STM 的工作原理
Block-STM 使用Optimistic并发控制机制:首先假设交易之间不会冲突并进行并行执行,随后进入验证阶段检查冲突并处理重执行。核心依赖以下五项关键技术:
**1. 多版本内存结构**
Block-STM 为每个内存键(memory key)存储多个版本:
* 每个交易读取先前交易已提交的最新版本;
* 执行过程中,读取和写入都会进行版本标记;
* 验证阶段会检查这些版本以确认是否存在冲突。
**2. 基于读取集(Read-Set)/写入集(Write-Set)的验证机制**
* 执行时,交易会记录其读取的键及其版本(Read-Set);
* 执行结束后,其写入操作记录为 Write-Set;
* 验证阶段,若任意 Read-Set 中的键在执行期间被其他交易修改,则该交易判定为冲突,程序中止然后进行重试并增加尝试编号(incarnation)。
**3. 通过 ESTIMATE 标记实现快速冲突检测**
* 失败的交易会将其 Write-Set 标记为 ESTIMATE;
* 若其他交易读取到 ESTIMATE 标记的值,会立即停止并等待该交易重试(触发 `READ_ERROR`);
* 该机制可快速识别依赖关系,减少不必要的执行负担。
**4. 预设交易顺序**
* 区块内的所有交易按照预设的确定顺序执行;
* 验证与提交阶段也遵循上述相同顺序;
* 即便并行执行,这能确保所有节点最终状态仍一致。
**5. 任务调度器(Collaborative Scheduler)**
* 任务调度器以线程安全的方式为执行和验证分配任务;
* 优先处理索引较早的交易,加速处理早期提交的任务、减少重试;
* 调度器管理已多次尝试的任务,直到成功提交。
#### Block-STM 的核心优势
* **无锁并行**:基于 MVCC(多版本并发控制),允许多个交易同时读取/写入,无需加锁。在执行后才进行冲突检查,最大限度提升吞吐量。
* **ESTIMATE 标记机制**:失败交易通过 ESTIMATE 标记提前通知依赖交易暂停,避免资源浪费。
* **高效调度与优先提交机制**:通过任务调度器优先提交索引较早的交易,提高整体吞吐并缩短执行周期。
* **确定性与共识兼容性**:即使某些交易需要重试,也将在相同顺序下提交,确保所有节点达成相同的最终一致性。
#### Stable 上的 OPE
Stablechain 将把 **Optimistic并行执行(OPE)** 作为其执行层的核心功能,并结合 **Optimistic区块处理(Optimistic Block Processing,简称 OBP)**。需要注意的是,OPE 与 OBP 是互补但本质不同的两种优化策略。
#### 关于 OBP
* OBP 并不涉及并行,而是优化执行时机;
* 在 `ProcessProposal` 阶段,Stable 会在交易 gossip 的同时预先执行区块;
* 执行结果缓存在内存中,在 `FinalizeBlock` 阶段复用,节省时间并避免重复计算。
通过结合 OPE 与 OBP,Stable 能在高交易负载下最大限度降低执行延迟与资源争用,带来卓越性能表现。
#### 性能预期
内部基准测试表明,结合 **基于 Block-STM 的 OPE** 与 **StableDB**,Stable 的交易处理吞吐量有望提升 **至少 2 倍**。
### 未来路线图二:StableVM++
虽然 OPE 与 OBP 聚焦于优化「并行执行多笔交易」,但另一个关键的提升性能手段是:「如何更高效地处理每一笔交易」。
Stable 正在探索替代的 EVM 实现方式以加速交易执行。在当前选项中,**EVMONE**(一个高性能 C++ 编写的 EVM)是最具潜力的替代现有 Go 实现的EVM。理论基准测试表明,这一更换预计将带来高达 **6 倍的 EVM 执行性能提升**。
## 高性能 RPC
在构建高性能区块链的过程中,仅仅优化共识机制或出块速度是不够的。**RPC 层** 是区块链与用户之间的接口,是实现端到端用户体验的关键组成部分。Stable 提出一种高性能 RPC 架构,旨在突破传统 RPC 的性能瓶颈。
### 为什么高性能 RPC 至关重要
#### 用户连接区块链的入口
**RPC** 是用户与区块链交互的主要方式:
* 钱包通过 RPC 广播交易;
* DApps 借助 RPC 查询链上状态来渲染界面、准备交易、进行模拟、获取事件和日志等;
* 区块浏览器、索引服务和交易机器人程序都依赖 RPC 实时获取数据。
即使底层区块链处理交易的速度极快、出块迅速,如果 RPC 响应缓慢、延迟高,用户的整体体验仍将受到影响。事实上,在现实使用中,RPC 常常成为链上体验的性能瓶颈。
因此,Stable 的高性能区块链路线图中将 **优化RPC架构** 明确作为优先任务。
### 传统 RPC 架构的弊端
#### 单一的架构设计与资源争用
传统上,RPC 节点通常是功能扩展的全节点,它们同时负责:
* 在同一时间处理区块链的同步与RPC请求;
* 若要扩展 RPC 能力,只能新增完整节点,导致必须重复执行状态同步、共识配置等繁重流程;
* 共识、执行与 RPC 服务共用同一 CPU、内存与磁盘资源。一旦某一部分高负载,**将会拖慢其他模块的性能**,例如在交易高峰期,RPC 延迟大幅上升。
此外,传统架构通常并不区分读取与写入请求的处理方式。即使读取请求(如 `eth_getBalance`)在调用量上远超写入交易,两者仍在同一逻辑结构中混合处理,造成系统整体效率低下、可扩展性差。
### Stable 的 RPC 架构
Stable 提出了 **路径分离(Split-Path)RPC 架构**,将读取与写入操作分离,并分别进行独立优化。
#### 核心原则
* 将 RPC 按功能拆分为多个轻量高效的节点;
* 使用轻量级 RPC 边缘节点进行扩展,以提升系统可扩展性;
* 根据不同功能优化路径,通过更高效的数据结构来减少请求延迟,实现更直接的链上数据访问或管理。
#### 性能提升
在读取路径下,Stable 的内部测试结果显示:
* 单节点吞吐量超 **10,000 次/秒(RPS)**;
* 同一环境下,端到端延迟 **低于 100ms**;
* 边缘节点支持线性扩展,**无需状态同步或共识负担**。
Stable 的新型 RPC 架构在高流量场景下仍可维持流畅、迅捷的用户交互体验。
### 未来工作方向
#### 优化 EVM View 查询
一个备受关注的研究方向是:**为 `eth_call` 等 EVM 只读操作提供专有支持**:
* 此类调用不涉及状态更新或交易确认;
* 可在轻量、无状态的运行环境中执行,只需当前状态快照;
* 未来可设计专门针对 `eth_call` 的 RPC 节点,进一步降低响应时间,同时减轻主节点负担。
#### 全节点原生集成 Indexer
通过将索引器(Indexer)原生集成至全节点,可以显著加快向 DApps 提供数据的速度:
* 当前架构:Node → RPC → Indexer(如 The Graph)→ 存储 → DApp;
* 提议架构:集成 Indexer 的 Node → 数据库 → DApp;
* 由于省略了额外的网络通信步骤,索引数据可被原生调用,大幅提升查询效率与实时性。
## 概览
### 全流程核心优化
一笔区块链交易从提交到最终确认,需要经历多个紧密相连的阶段。交易首先通过 **RPC** 提交,进入 **内存池(mempool)**,被打包进区块后通过 **共识机制** 验证,再由 **状态机(state machine)** 执行,最终写入 **数据库** 进行持久化。只有在完成整个流程后,用户才能收到确认结果。
仅优化某一个阶段是远远不够的。任何环节的低效都会影响系统整体性能。因此,Stable 致力于从上到下全面优化。
请查看以下页面,了解 Stable 如何从共识层、执行层、数据库层到 RPC 层,对各个架构模块进行系统性升级优化,以确保交易能稳定地以高性能处理。
## StableDB
区块链端到端性能的主要瓶颈之一是 **磁盘 I/O(Disk I/O)**。尤其是在区块执行后提交和存储状态数据的操作,是性能的关键瓶颈。Stable 通过架构创新,使用如 `MemDB`、`VersionDB` 以及文件内存映射存储(`mmap`),显著提升系统吞吐量。
### 为什么磁盘 I/O 是性能瓶颈
#### 状态转换与持久化
每当执行一批交易并产出区块时,区块链系统都会从一个状态转变为下一个状态。这个过程分为两个基本阶段:
1. **状态提交(State Commitment)**:在交易执行完成后,提交新的状态。
2. **状态存储(State Storage)**:已提交的状态被持久化到磁盘,用于长期访问和历史验证。
在传统架构中,状态存储与状态提交是**紧密耦合**的,这意味着:
* 节点在继续执行下一个区块之前,必须等待新状态完全写入磁盘。
* 状态数据被写入磁盘中随机的位置,这导致在后续交易执行中读取状态时出现高延迟。
即使共识层和执行层做了大量优化,这种对低效的串行磁盘操作的依赖仍然限制了整个系统的性能上限。
### 针对高吞吐量的数据库优化
为了解决这些限制,Stable 提出了两项核心架构优化:**解耦状态操作** 和 **引入内存映射数据库优化(mmap)**。
#### 1. 拆解状态提交与存储
第一步是将状态提交与其存储过程拆解:
* 在提交新状态后,节点可以立即执行下一个区块。
* 状态的持久化操作在后台异步进行。
这种分离让执行可以得到立即的处理,绕过磁盘写入带来的延迟,从而消除阻塞依赖,大幅提升端到端性能。
#### 2. 基于 `mmap` 的 `MemDB` 和 `VersionDB`
进一步通过 `mmap`(内存映射文件)实现双数据库模型:
* **MemDB(内存数据库)**:
* 存储近期频繁访问的活跃状态。
* 使用固定地址映射(通过 `mmap`),支持快速的数据查找。
* 适用于大多数以近期状态为目标的交易场景。
* **VersionDB(历史数据库)**:
* 存储更早期的历史状态。
* 优化用于归档和长周期查询,针对低频访问设计。
这种设计确保**热点数据通过内存驻留结构快速响应**,而冷数据则由较慢的持久化存储承担。通过结合 `mmap` 访问与状态智能分层,Stable 能够显著降低区块执行过程中的数据库读写延迟。
### 预期收益与已有实践
这种架构优化并非理论设想,已有 Sei 和 Cronos 等高性能区块链采用类似的解耦式内存映射数据库架构,实测可带来 \*\* 高达 2 倍的整体 TPS 性能提升\*\*。
Stable 也预期将获得类似的性能提升,因为该架构不再受限于存储层瓶颈,系统的共识与执行性能可以按需扩展,而不会被磁盘操作拖慢。
### 延伸阅读
如需深入了解相关技术与实现细节,请参阅:
* [ADR-065:Cosmos Store V2 架构](https://docs.cosmos.network/main/build/architecture/adr-065-store-v2)
* [MemIAVL:实用指南](https://hackmd.io/@yihuang/rkeCvy5xh)
* [Cronos MemIAVL 节点配置](https://docs.cronos.org/for-node-hosts/running-nodes/memiavl)
* [Sei 的数据库设计方案](https://4pillars.io/ko/articles/sei-db)
## Autobahn
### BFT 协议的权衡:低延迟 vs. 高鲁棒性
现代拜占庭容错(BFT)共识协议通常运行在部分同步模型下,该模型假设在某个不确定的时间点后,网络最终会变得稳定,消息传递延迟会有上限。虽然这个模型在协议设计上是实用的,但现实部署中很少能享受长时间的持续稳定。相反,系统经常经历同步阶段后出现短暂中断,如延迟激增、节点宕机或恶意攻击。这些短暂中断被称为 **“突变(blips)”**。
在这种情况下,现有的共识协议通常被迫在 **网络稳定时的低延迟** 与 **故障状态下的高鲁棒性** 之间做出取舍:
* **传统的基于视图(view-based)的 BFT 协议**(如 PBFT 和 HotStuff)在网络良好时响应迅速,但一旦发生突变,其性能会迅速恶化。这种性能衰退称为“宿醉效应(hangover)”,即使网络恢复后仍会持续,因为积压的请求会延迟后续交易处理。
* **基于 DAG 的 BFT 协议**(如 [Narwhal & Tusk](https://arxiv.org/pdf/2105.11827)/[Bullshark](https://arxiv.org/pdf/2201.05677))将数据传播(DAG)与共识(BFT)解耦,允许交易异步传播至各副本。这种设计支持高吞吐量,并可在网络中断时继续推进。然而,这些协议即使在网络良好时也会因异步排序机制的复杂性而导致高延迟。
[**Autobahn**](https://arxiv.org/pdf/2401.10369) 引入了一种全新方法,融合了这两种设计理念的优势。它结合了 DAG 协议的高吞吐与对突变的容忍性,以及传统共识协议的低延迟性能。Autobahn 的核心是一个高度并行的数据传播层,无论共识进展如何,始终以网络速度传播提案。在此之上,Autobahn 运行一个低延迟的部分同步共识协议,通过引用数据层的轻量级快照来提交提案。
Autobahn 的一个显著特点是其在突变后无性能退化的恢复能力,称为 **“无缝性(seamlessness)”**。这意味着系统在网络稳定后可立即恢复全速和低延迟运行,无需对积压交易进行代价高昂的重复处理。通过将数据可用性与排序清晰分离,并避免协议自身引起的同步延迟,Autobahn 为真实环境下的区块链共识提供了一个既有高鲁棒性又响应迅速的基础。
### Autobahn 架构概览
Autobahn 的架构围绕其两大核心层:**数据传播层** 和 **共识层**,职责分离明确。这种解耦借鉴了 Narwhal 等 DAG 系统的设计,但 Autobahn 对其进行了增强,以支持无缝性和更低延迟。
数据传播层负责以可扩展的异步方式广播客户端交易。每个副本维护一条独立的交易批处理通道,称为“车道(lane)”,这些车道可独立于共识状态进行传播和认证。即使共识过程暂停,车道仍持续增长,保证系统对客户端始终保持响应。
共识层运行一个基于 PBFT 风格的部分同步协议。但与传统共识需就每一批交易达成一致不同,Autobahn 共识协议的处理方式类似“车头快照(tip cut)”,即各条车道当前状态的精简摘要。这种设计允许 Autobahn 一次性提交任意规模的数据,减少突变带来的影响。
相较于 HotStuff(数据与共识紧耦合,领导者失败时易停滞)和 Bullshark(因 DAG 遍历和同步造成高延迟),Autobahn 提供了更平滑、更快速的共识体验。它继承了 DAG 的并行性,却规避了其延迟劣势。
### **数据传播层:车道与车辆**

*Autobahn:无缝高速 BFT*
在 Autobahn 中,每个副本在其独立推进的链中提出交易,称为一条 **车道(lane)**。每个数据提案都包含来自其他副本的确认集合,称为 **“车辆(car)”**(即可用请求认证,Certification of Available Request)。这些车辆作为数据可用性的证明(PoA),确保至少一个诚实副本持有数据,并在需要时可重新传输。
车辆通过在每个新提案中引用前一个车辆构建出链式结构。这种结构保证了只需验证车道的车头即可确认整个车道历史数据的可用性。这种可传递的可用性证明使 Autobahn 能即时引用车头快照,避免了 DAG 遍历操作或额外的同步操作。
与传统 DAG 协议不同,Autobahn 避免了强制全局可用性和防双重广播所需的高成本广播步骤。它使用尽可能少的操作,信任每个 PoA 至少有一个诚实数据副本,从而即使在负载变化或部分故障下也能实现高吞吐与低延迟。数据层独立于共识持续推进,确保在突变期间仍保持响应。
### **共识层:低延迟达成一致**

*Autobahn:无缝高速 BFT*
Autobahn 的共识层在经典 PBFT 原则基础上引入关键优化,降低延迟并支持无缝恢复。每个共识时隙的目标是提交一个 **“车头快照(tip cut)”**,该快照捕捉来自各副本车道的最新认证提案。共识领导者使用两阶段提交流程(Prepare 和 Confirm)提出该快照。
在 Prepare 阶段,副本对提议的快照进行投票。如果领导者迅速收到足够投票(完整法定数),可进入快速路径(Fast Path),仅需 3 次消息延迟即可完成提交。否则,它将进入 Confirm 阶段,收集第二轮投票后在 6 次消息延迟内完成提交。
一大创新在于将数据同步从共识投票中拆解出来。副本可仅依据认证车头进行投票,即便尚未接收完整提案数据。这是安全的,因为 PoA 保证了数据的可检索性。同步操作并行进行,并在执行阶段前完成,避免协议阻塞。如遇领导者故障或超时,系统通过超时证书触发视图变更,由新领导者继续推进。
### Autobahn 的核心特性
Autobahn 满足 BFT 协议标准的 **安全性** 与 **活性** 保证。安全性确保不会有两个正确副本在同一时隙提交不同区块;活性确保在全局稳定时间(GST)后,若最终选出正确领导者,则系统必将前进。
更重要的是,Autobahn 实现了真正的 **无缝性(seamlessness)**。其共识层可在常数时间(Constant Time)内提交任意规模的历史数据,避免因协议机制而导致的“宿醉”。即便经历突变,只要同步恢复,所有已传播的提案可立即被提交。这种能力使 Autobahn 能在间歇性故障环境中流畅运行,其恢复时间与响应速度均优于传统 BFT 协议。
此外,该协议还具备 **横向扩展性**。每个副本通过其车道为系统贡献吞吐量,随着参与者增加,快照提交容量自然增长,使 Autobahn 非常适合需要高性能与高鲁棒性的规模化部署。
### **低延迟遇上高鲁棒性**
Autobahn 在理想和故障注入的测试条件下与主流 BFT 协议(尤其是 Bullshark 和 HotStuff)进行对比测试。结果表明,Autobahn 兼具两者之长:在处理能力上匹敌 Bullshark(每秒处理超过 23 万笔交易),而延迟则降低了 50% 以上。
在网络良好条件下,Autobahn 仅需 3 至 6 次消息延迟即可提交交易,而 Bullshark 需 12 次,这使其实际提交延迟低至 280 毫秒,而 Bullshark 超过 590 毫秒。不同于 HotStuff 在突变后因积压处理而产生的长时间宿醉,Autobahn 能在网络稳定后一次性提交全部积压内容。
在领导者失效或部分网络分叉(partial network partitions)等故障场景下,Autobahn 表现出无缝恢复能力。在故障期间持续传播数据,并在共识恢复后迅速提交已积累提案。这些性能优势使 Autobahn 成为区块链平台在追求低延迟响应与高吞吐容错性方面的理想选择。
### 延伸阅读
欲了解更多技术细节,请参考:
* [Autobahn: Seamless high speed BFT](https://arxiv.org/pdf/2401.10369)